TPA-2700 - Air conditioner TecLime - Free user manual and instructions
Find the device manual for free TPA-2700 TecLime in PDF.


| Product Type | Portable Air Conditioner |
| Brand | TecLime |
| Model | TPA-2700 |
| Cooling Capacity | 9000 BTU/h |
| Room Coverage | Up to 250 sq ft |
| Dimensions (W x D x H) | 18.5 x 15.0 x 28.0 inches |
| Weight | 55 lbs |
| Power Supply | 115V / 60Hz |
| Power Consumption | 950 W (cooling) |
| Energy Efficiency Ratio (EER) | 9.5 |
| Noise Level (Low/High) | 52 / 56 dBA |
| Airflow (High) | 250 CFM |
| Modes | Cool, Fan, Dehumidify |
| Fan Speeds | 2 (Low/High) |
| Filter Type | Washable Mesh Filter |
| Water Tank Capacity | 1.5 liters (self-evaporation system) |
| Refrigerant | R-410A |
| Installation | Window kit included (slide-out or casement window) |
| Remote Control | Yes (IR) |
| Timer | 24-hour programmable |
| Self-Evaporation | Yes (reduces need to drain) |
| Auto Restart | Yes (after power outage) |
| Protection | Overheat protection, auto shut-off |
| Warranty | 1 year limited |
Frequently Asked Questions - TPA-2700 TecLime
User questions about TPA-2700 TecLime
0 question about this device. Answer the ones you know or ask your own.
Ask a new question about this device
Download the instructions for your Air conditioner in PDF format for free! Find your manual TPA-2700 - TecLime and take your electronic device back in hand. On this page are published all the documents necessary for the use of your device. TPA-2700 by TecLime.
USER MANUAL TPA-2700 TecLime
Portable Air Conditioning
SE ANVÄNDARHANDBOK
GB USER MANUAL
FeiyueGroup Europé Aps
Sundsholmen 14
DK 9440 Norresundby, Denmark
- Specification....9
- Design 9
- Installation 10
- Safety warnings....11
- Control panel and use....12
Control Panel....12
Operation....13
- Drainage 13
- Troubleshooting....14
- Maintenance....14
- Warranty Provisions.... 15
- Environmental Protection.... 15
GB The features described in this manual are published with reservation to modifications.

natural_image
Exterior view of a modern electric air conditioner unit (no visible text or symbols)Bruksanvisning (SE)

3. Installaon
Placering
natural_image
Illustration of a heating unit with cooling fan and ventilation grilles (no text or symbols)7. Felsökning
natural_image
Line drawing of a portable air conditioner unit with a handle and ventilation slots (no text or symbols)
natural_image
Illustration of a portable air purifier with a hand inserting a plug into the cover (no text or symbols visible)Efter säsongen:
Thank you for selecting this super quality air conditioner. The air-conditioner is intended for indoor household use and is not recommended for commercial usage.
Read this manual carefully before you are using the appliance and keep it for future reference.
1. Specicaon
| Model | TecLime TPA-2700 |
| Cooling capacity | 9000 Btu/h |
| Refridgerant/charge | R410A/390g |
| Voltage | 220-240 V ~, 50 Hz |
| Rated input | 1000W |
| Air low | 260m3/h |
| Noise | 52dB(A) |
| Weight | 27 kg |
| Dimensions (WxHxD) | 480x510x430 mm |
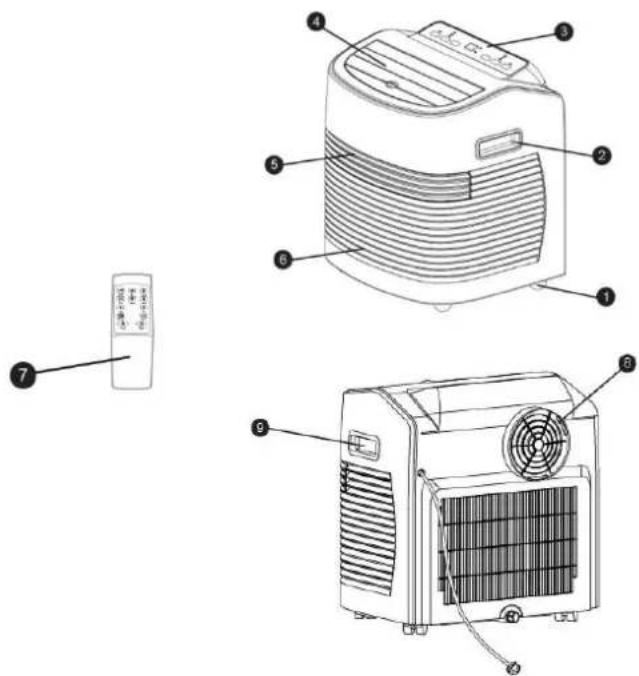
2. Design
1 Caster
2 Handle (L)
3 Control Panel
4 Wind Louver
5 Air inlet grille
6 Air inlet
7 Remote Control
8 Air outlet
9 Handle (R)
10 Exhaust pipe assembly
11 Window sealing plate assembly

3. Installaon
Select location
Place the unit on a flat stable surface and dry place. Leave at least 50cm space all around the unit.
Before you are using the unit let it be standing upright for minimum 2 hours.
Assemble the hose
- Pull out the end of the hose and fasten it to the unit by screwing it anticlockwise


natural_image
Line drawing of an air conditioner unit with cooling fan and hose (no text or symbols)Installation of window kit
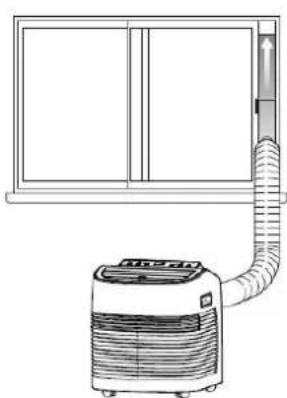
- Partially open the window and then ix the window kits to the window
- The window kits can be installed on most normal and vertical windows, and it is adjustable
- Fasten the adapter to the window kit
natural_image
Line drawing of an air conditioner unit connected to a window (no text or symbols)
natural_image
Diagram of an air conditioner unit connected to a vertical panel (no text or symbols visible)Important!
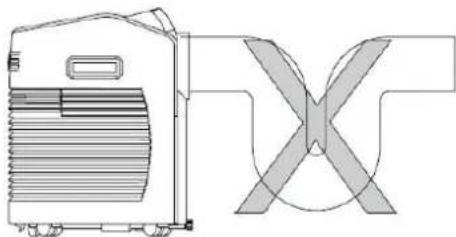
- The length of the exhaust pipe is specially designed according to the specification of this product. Do not replace or prolong it with your own private hose as this could cause malfunction.
• The hose can be shortened if needed. - Bending of the exhaust pipe is very critical. Incorrect mounting can prevent the machine from working correctly.
- Take care to prevent any sharp bows or bends of the exhaust pipe. The exhaust air must low freely
natural_image
Technical line drawing of a mechanical device with a cross-shaped component (no text or symbols)4. Safety warnings
Read them carefully before using the appliance.
- This machine is for household use only and in the manner specified in these instructions. Never use for any other purpose.
- Do not use outdoors and place it always in a dry environment.
- Check the cord regularly. Never use the appliance if the cord or plug is showing no signs of damage. Extension cord that has the same electrical specifications as the unit can be used. If in doubt consult a qualified electrician or service provider.
Never pull the cord to disconnect or move the unit.
- Keep the appliance away from heat sources and direct sunlight.
• Always switch off the machine with the power switch before unplugging.
- Always switch off and unplug the appliance before cleaning or modification of some parts of the apparatus, and when not in use.
- Clean the A/C according to the manual.
- Ensure that the voltage on the rating plate match the supply voltage. Any error in how the apparatus is connected voids your warranty.
• Children should be supervised so they do not play with the appliance.
- Never leave the appliance unattended when in use. Turn the unit off if you have to go away even for a short while.
- Do not place the unit at places where there is water or other liquids. Prevent water or liquid from entering the A/C.
- Do not insert sharp metal objects or ingers into openings or oscillating ins of the device.
- Never repair the unit yourself. Any action taken by a non-qualified person can be dangerous. Any replacement of the power cord must be performed by a qualified electrician.
- Do not use accessories not supplied by the supplier. This can be dangerous and can damage the unit.
- Suggested operation environment. Temperature: 17\~35 °C, humidity: RH 10\~80%.
- Never pull the cord to disconnect or move the unit.
Special recommendations:
• Always place the unit in a vertical position, to give the compressor good working condition.
- Install the portable air conditioner on a lat site with a lot of room, notwithstanding. Leave 50cm minimum space to the walls.
- Do not use near gas or other lammable liquids.
- Do not use aerosol spray (insecticides, paint) or other lammable products near the appliance as plastic parts can be deformed. The unit's electronics can also be damaged.
- Do not block the air outlet and inlet ventilation.
Power sources
- The plug must be properly installed and not damaged.
- Plug the power cord irst, then press the power key to operate the A/C.
The manufacturer will not assume any responsibility in case of non-adherence to these instructions.
5. Control panel and use
Control Panel

1 Power key
Press the key to turn ON/OFF the A/C
2 Mode key
Press the key to choose cooling, fan or auto-mode.
3 "DOWN" key
Press the key at cooling mode to reduce the setting temperature;
Press it at timing mode to adjust timing ON/OFF time.
Press "Up" and "Down" keys simultaneously to switch between irc C / ircF
4 Temperature/ time display window
This window displays the adjusted temperature and time
5 "UP" key
Press the key at cooling mode to increase the setting temperature;
press it at timing mode to adjust timing ON/OFF time.
6 Speed key
Press the key to choose high/ mid/ low fan speed
7 Timer key
Press the key at standby mode to set TURN-ON time.
Press this key set TURN-OFF time when the unit is on
8 Remote controller receiving window
Receiving sensor for the remote control
9 °C/°F switching key
Press the key to switch between irc C and irc F.
10 Auto-swing key
Press this key at any time after turning on the A/C to swing the wind louvers automatically

Operaon
Cooling mode
- When the A/C enters cooling mode automatically or cooling mode is selected after it's turned on, the cooling indicator lamp lights up.
- Press Up/Down key to adjust setting temperature (17°C\~30°C).
- Press Speed key to choose High/Low fan speed.
Fan mode
- When pressing mode key or choosing fan mode by pressing the remote control, the wind indicator lamp lights up, the unit will run under fan mode.
- Press Speed key to choose High/Low fan speed.
● Temperature cannot be set.
Auto-mode
- Press mode key from control panel or choose auto-mode from remote control to enter auto-mode. The indicator lamp will light up when under auto-mode.
After choosing auto mode, operation state is determined by ambient temperature: when ambient temperature is higher than 25irc C, the operation state is the same as that of cooling mode; when it is lower than 25irc C, the operation state is the same as that of fan mode.
Max cool mode (optional)
● Under cooling mode press TIMER and UP buttons at the same time to enter Max. cool mode.
- In Max. Cool mode, the A/C will cool in regardless of temperature restriction.
- In Max. Cool mode, fan speed is high, and it can't be adjusted.
Sleep mode (optional)
- Press TIMER and DOWN button at the same time under cooling to enter sleep mode.
- Under this mode, the set temperature increases by 1ircC after the unit running for 2 hours, and 2 hours later it'll increase by another 1ircC , after that it won't change any more.
● Under this mode, the fan blows at low speed and fan speed can not be adjusted.
Timer mode
- In standby state, press the key to set TURN ON time. Press Up and Down keys to set TURN ON time (0\~24H), and the timer indicator lamp lights up.
Press timer key to set TURN OFF time when the unit is on. Press Up and Down keys to set TURN OFF time (0\~24H), and the timer indicator lamp lights up.
6. Drainage
This product is equipped with an evaporation system. The condensing water is used to cool the condenser. This not only improves cooling but also saves energy for you.
- If it becomes too much condensate water in the apparatus, the display will show "FL" and the compressor will stop working.
- After power off, unscrew the water cover, pull out the water plug to drain off water, and it will become normal after being restarted.
After draining, you can turn it on and the device will work again.

natural_image
Line drawing of a portable air conditioner unit with cooling fan and ventilation grilles (no text or symbols)7. Troubleshoong
| Problem | Cause | Solution |
| The A/C does not function | No power supply. | Connect to power supply outlet and switch on. |
| “Water full” The display show “FL” | Drain water and restart | |
| Timer-off is running. | The A/C can be restarted three minutes after it has been turned off. | |
| The A/C restarts frequently | In direct sunlight. | Close curtains. |
| Windows or doors open, many people or a heat source in the room. | Close doors and windows, remove the heat source. | |
| Dirty ilter. | Clean or replace the ilter(s). | |
| Air inlet or air outlet blocked. | Remove the blockage. | |
| The unit is too noisy | Unit stands uneven. | Place on an even, solid surface (less vibration). |
| No work of compressor | Self-protect of compressor | Wait for 3 minute and restart again after the temperature decreases |
If the solutions above not solve the problem please call the service center.
Following fault codes can be shown in the display:
| FL | Too much water in the unit, drain it and restart |
| E1 | Error of the coil's temperature sensor |
| E2 | Error of the ambient temperature sensor |
| E4 | Anti-frozen protection: temperature of the coil is too low and the A/C is off. When temperature re-increases to 8°C the protection is released and previous working state is recovered. |

Cautions: Switch off the unit and unplug it immediately if anything abnormal happens. Then contact a qualified electrician.
8. Maintenance
Cleaning.
- Unplug the unit before any cleaning.
- Clean the housing with a soft moisture cloth. Do not use chemical solvent (such as benzene, alcohol, gasoline). The surface may be damaged or even the whole case may be deformed.
- Do not sprinkle water on the unit.
Cleaning of the ilters
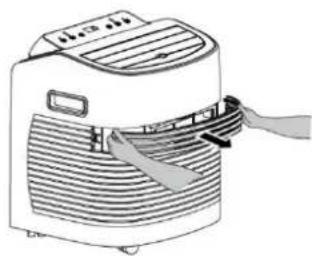
- Clean the air ilter every 2 weeks. If the air ilter is blocked with dust, the efficiency will be reduced.
- Pull out the big and small ilters as shown.
- Wash the air ilter by immersing it gently into warm (about 40°C) water with a neutral detergent, rinse it and dry it thoroughly in a shaded place.
natural_image
Line drawing of a portable air conditioner with a hand adjusting its lid (no text or symbols)
natural_image
Line drawing of a portable air conditioner unit with a hand inserting a card (no text or symbols)End of season:
- Pull out the water plug and drain the water.
- Run the A/C in Fan mode for 2 hours until the inside of the unit is dry.
- Turn off the unit and unplug it.
- Clean the air ilter and after dry it thoroughly, reinstall it.
- Remove the exhaust pipes and store them carefully.
- Wrap the unit with the plastic bag and keep it in a dry place.
9. Warranty Provisions
This product comes with a 12-month warranty starting on the date of purchase. Within this period any defects in material or workmanship will be repaired without any charge. The following provisions shall apply regarding this warranty:
- We expressly dismiss all other claims for damage, including consequential damages;
- Any repairs or replacements of components within the term of the warranty will not result in an extension of the term of the warranty;
- The warranty will no longer apply if the product has been modified, non-original parts have been used, or if it has been repaired by third parties;
- The warranty will only apply, when you present the original, dated proof of purchase, provided no changes have been made to it;
- The warranty will not apply to damage caused by actions not in compliance with the Directions for Use, neglect, vandalism;
- Transportation costs and the risk involved during the transportation of the product or its components will always be the responsibility of the purchaser.
In order to avoid unnecessary costs, we recommend that you always read the Directions for Use carefully irst. If they offer no solution, please take the product to your dealer for repair.
10. Environmental Protecon
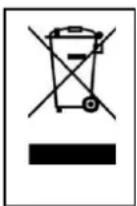
Waste electrical products should not be disposed of with household waste. Please recycle where facilities exist. Check with your Local Authority or retailer for recycling advice.
- Bruksanvisning (SE)
- Installaon
- Placering
- Felsökning
- Efter säsongen:
- Specicaon
- Design
- Select location
- Assemble the hose
- Installation of window kit
- Important!
- Safety warnings
- Special recommendations:
- Power sources
- Control panel and use
- Control Panel
- Operaon
- Cooling mode
- Fan mode
- Auto-mode
- Max cool mode (optional)
- Sleep mode (optional)
- Timer mode
- Drainage
- Troubleshoong
- Maintenance
- Cleaning.
- Cleaning of the ilters
- End of season:
- Warranty Provisions
- Environmental Protecon
Brand : TecLime
Model : TPA-2700
Category : Air conditioner