723-076 - Lawn mower Meec Tools - Free user manual and instructions
Find the device manual for free 723-076 Meec Tools in PDF.


| Product Type | Lawn Mower |
| Model | 723-076 |
| Brand | Meec Tools |
| Type of Mower | Push Reel Mower |
| Cutting Width | 40 cm (15.7 inches) |
| Cutting Height Range | 20 mm – 60 mm |
| Number of Height Adjustments | 5 |
| Grass Collection Capacity | 30 L |
| Overall Dimensions (L x W x H) | 80 x 45 x 90 cm |
| Weight | 8.2 kg |
| Power Source | Manual (Human Powered) |
| Reel Material | Steel |
| Number of Blades | 5 |
| Wheel Diameter | 20 cm (front and rear) |
| Handle Type | Foldable, Adjustable Height |
| Recommended Lawn Size | Up to 300 m² |
| Maintenance | Clean after use; oil bearings annually; sharpen blades when dull |
| Spare Parts Availability | Contact Meec Tools or authorized retailers |
| Warranty | 1 year |
| Country of Origin | China |
Frequently Asked Questions - 723-076 Meec Tools
User questions about 723-076 Meec Tools
0 question about this device. Answer the ones you know or ask your own.
Ask a new question about this device
Download the instructions for your Lawn mower in PDF format for free! Find your manual 723-076 - Meec Tools and take your electronic device back in hand. On this page are published all the documents necessary for the use of your device. 723-076 by Meec Tools.
USER MANUAL 723-076 Meec Tools
natural_image
Black-and-white photo of a manual grass meter tool with a curved handle and attached gear (no text or symbols visible)Tettere trimming....13
Trimming langs gjerde/grunnmur.... 13
Safety warnings concerning petrol....22
Extra safety instructions....23
Fitting the handlebar 23
Fitting the ejector guard 24
Fitting the trimmer head 24
Fuel 24
Mixing the fuel 24
Recommended fuel....24
Starting a cold engine 24
Starting a hot engine....24
Stopping the engine 25
Trimming 25
Trimming/cutting 25
Short trimming....25
Trimming around fences and foundations 25
Trimming around trees....25
Air filter 25
Filler cap/fuel filter 25
Adjusting the carburettor....26
Other information 26
Using the trimmer after it has been stored away 26
SÄKERHETSANVISNINGAR
natural_image
Mechanical assembly diagram showing a rotating component with shaft and housing (no text or symbols)HANDHAVANDE
Bränsle
- Drivaksel
- Sperrebryter
- Gassavtrekker
- Tenningsbryter
- Sikkerhetsbryter
- Händtak
- Selefeste
- Luftfilterdeksel
- Lokk til drivstofftank
- Drivstofftank
- Primer
- Choke
- Vern
- Kuttetråd
MONTERING
natural_image
Technical line drawing of a mechanical assembly with no visible text or symbolsBRUK
Drivstoff
natural_image
Technical line drawing of a mechanical assembly with no visible text or symbolsOBSŁUGA
Paliwo
Read the Operating Instructions carefully before use!

Study all the safety warnings and instructions carefully
Work area
- Keep the work area tidy and well lit. Dark and cluttered work areas increase the risk of accidents and injuries.
- Do not work with tools in an area where there is risk of explosion, where there are flammable liquids, gases or dust. Tools produce sparks that can ignite dust and fumes.
- Keep children and onlookers at a safe distance when working with the machine. A moment of inattention can cause you to lose control of the machine.
Personal safety
- Pay attention to what you are doing. Concentrate on what you are doing and use your common sense when working with the machine. Never use the machine if you are tired or under the influence of drugs, alcohol or medication. A moment of inattention while you are working with the machine can result in serious personal injury.
- Use safety equipment and always wear eye and ear protection. Depending on what the machine is to be used for, safety equipment such as breathing masks, non-slip safety shoes and protective helmets will reduce the risk of personal injury.
- Remove any adjusting tools or spanners before starting the machine. Spanners left in place and connected to a moving part of the machine can result in personal injury.
- Do not overreach. Always keep a good footing and balance in all situations. This will ensure better control of the power tool in unexpected situations.
- Wear appropriate clothing. Do not wear loose-fitting clothing or jewellery. Keep hair, clothing and gloves away from moving parts. Loose-fitting clothing, jewellery and long hair can get caught in moving parts.
Safety warnings concerning petrol

WARNING: Observe extra care when handling the fuel. It is flammable and the fumes are explosive. Pay attention to the following:
• Always use approved storage containers.
- Never remove the fuel tank cap or fill up with petrol when the engine is running. Allow the exhaust system on the engine to cool before filling up with fuel.
- Do not smoke.
• Never fill up with fuel indoors.
- Never store the machine or fuel tank indoors where there is a naked flame nearby, e.g. a hot water heater.
- If you spill any fuel, do not try to start the machine until you have moved it away from the place where you spilled the fuel.
• Always replace the filler cap and tighten it properly after filling up with fuel.
• If you need to empty the fuel tank, do this outside.
Extra safety instructions
WARNING! Only use the fuel recommended in this manual. Carefully follow the instructions in the section Fuel and Lubrication in the manual.
- The petrol must always be correctly mixed with 2-stroke engine oil. Otherwise the engine can become permanently damaged and the manufacturer's warranty will no longer be valid.
- Do not use any other cutting tools as accessories. Always use original spare parts and accessories. These are specially designed to ensure the best performance and maximum safety when using our products. Otherwise there is a risk of inferior performance and, at worst, personal injury. Always use the trimmer head supplied with the product. Do not use any other cutting tools as accessories. The use of other accessories can void the manufacturer's warranty and can lead to serious personal injury.
TECHNICAL DATA
Motor type Air-cooled, 2-stroke engine
Displacement 25.4 cc
Max. speed 7500 rpm
Trimming diameter 380 mm
Fuel volume 0.6 l
Guaranteed sound power level, LwA 110 dB(A)
Sound pressure level, LpA 98 dB(A), K=3 dB
Max. vibration level 7.5 m/s2, K = 1.5 m/s2
Always wear ear protection!
The declared vibration value, which has been measured by a standardised test method, can be used to compare different tools with each other and for a preliminary assessment of exposure.
WARNING! The actual vibration level when using power tools may differ from the specified maximum value, depending on how the tool is used. It is therefore necessary to determine which safety precautions are required to protect the user, based on an estimate of exposure in actual operating conditions (taking into account all stages of the work cycle, e.g. the time when the tool is switched off and when it is idling, in addition to the start-up time).
DESCRIPTION
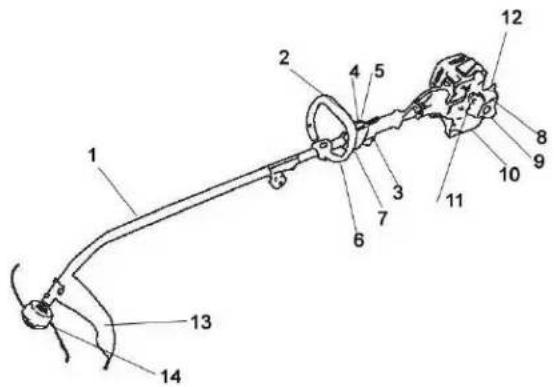
- Drive shaft unit
- Catch
- Throttle control lever
- Ignition lock
- Safety switch
- Handlebar
- Harness attachment
- Air filter cover
- Filler cap
- Fuel tank
- Primer
- Choke
- Safety guard
- Trimmer head
ASSEMBLY
Fitting the handlebar
Place the handlebar on the drive shaft unit. Tighten the retaining screws.
Fitting the ejector guard
Turn the trimmer upside down and fit the safety guard.
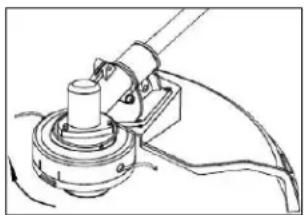
Fitting the trimmer head
- Push the rear flange on the spindle head and secure the trimmer head.
- Block the spindle head as described above.
- Tighten the trimmer head securely.
natural_image
Mechanical assembly diagram showing a rotating component with shaft and housing (no text or symbols)OPERATION
Fuel
Use standard unleaded petrol mixed with 2-stroke engine oil in the ratio of 40:1 for best results. Use the mixing ratio shown in the FUEL MIXTURE below.
WARNING!
- Never use unmixed petrol in the machine. This can cause permanent damage to the engine and void the manufacturer's warranty. Never use fuel mixtures that have been stored for more than 90 days.
• The 2-stroke oil must be top-quality oil for 2-stroke air-cooled engines and mixed in a ratio of 40:1.
Mixing the fuel
Add the oil in an approved fuel container and then pour in the petrol to ensure that the petrol and oil mix well. Shake the container to mix the oil and petrol.

WARNING! The manufacturer's warranty will become void if there is inadequate lubrication. The petrol and oil must be mixed in a ratio of 40:1.
Recommended fuel
The engine is designed to function well with any type of petrol intended for cars, including petrol with additives.
Starting a cold engine
- Set the ignition lock to RUN (I).
- Press the primer about 10 times.
- Locking the throttle control lever. Press in the throttle control lock button, set the throttle control to full throttle, press in and hold in the lock button. Release the throttle control lever. The throttle control now stays in fully pressed position (full throttle).
- Set the choke in the choke position.
- Pull the starter cord about 10 times.
- Set the choke in the middle position.
- Pull the starter cord until the engine starts.
- Give the engine time to warm up and then set the choke to "OFF".
Starting a hot engine
If the engine has not been turned off for more than 15–20 minutes.
- Set the ignition lock to RUN (I).
- Lock the throttle control lever.
- Pull the starter cord until the engine starts.
Stopping the engine
Set the ignition lock to STOP to stop the engine and turn off the trimmer.
Trimming
With a safety guard and trimmer head fitted, the machine can be used to trim grass in awkward places, such as along fences, walls, foundations and around trees. It can also be used to cut vegetation down to the ground to make it easier to plan a garden or clear a specific area.
Note: No matter how carefully you trim along foundations, walls and paths, the trimmer line will be exposed to more wear than normal. Feed out new trimming line by pressing the button underneath the trimmer head against the ground while the trimmer head is rotating.
Trimming/cutting
Move the trimmer like a scythe from one side to the other. Do not angle the trimmer head while doing this. Practise in a suitable place to determine the best cutting height. Hold the trimmer head at the same height to ensure the cutting is even.
Short trimming
Hold the trimmer straight forward at a slight angle so the base of the trimmer head is above the ground and the line is in contact at the required trimming height. Always trim away from yourself. Do not pull the trimmer towards yourself.
Trimming around fences and foundations
Move the trimmer around trees and fence poles, stone walls and foundations so that it trims close without the line touching. The line will break off or become torn if it comes into contact with stones, brick walls or foundations. If the line winds around the fence it will break off.
Trimming around trees
Trim carefully around the trunks of trees so that the line does not come into contact with the bark. Walk around the tree trimming from left to right. Approach grass and weeds with the tip of the line and angle the trimmer head slightly forward.
NOTE! Do not sweep with the trimmer
Sweeping means angling the trimmer head to sweep away debris from paths etc. The trimmer is a powerful machine and can throw small stones and other debris 15 metres or more and cause personal injury or damage to nearby property, cars, houses and windows.
MAINTENANCE
Air filter
Cleaning the air filter:
- Remove the air filter cover.
- Take the air filter out of its holder. Replace the filter if it is worn, damaged or cannot be cleaned.
- Wash the filter with soap solution and water.
- Allow the filter to dry in the air.
- Replace.
WARNING! NEVER use the trimmer without the air filter, otherwise dust and dirt will be sucked into the engine and damage it. The air filter must be kept clean. Fit a new filter if it gets damaged.
Filler cap/fuel filter
Keep the air vent on the filler cap free from debris.
-
Lift out the fuel hose and filter from the tank. Use a piece of steel wire with a hook or a paper clip.
-
Twist off the fuel filter.
-
Replace the fuel filter.
IMPORTANT! Empty the fuel from the machine and store it in an approved container before starting this procedure. Open the filler cap slowly to release any overpressure that may have built up in the fuel tank.
Adjusting the carburettor
The carburettor is set at the factory for optimum performance. Take your trimmer to an authorised service centre if any further adjustment is necessary.
Other information
• Clean the outside of the machine.
- Drain the fuel from the fuel tank.
• Start the engine after draining the fuel.
- Allow the engine to idle until it stops. This will drain the fuel out of the carburettor.
- Allow the engine to cool for about five minutes.
- Remove the spark plug with a spark plug spanner.
- Pour a teaspoon of pure 2-stroke oil into the combustion chamber. Pull the starter cord slowly a few times to lubricate the inner components. Replace the spark plug.
- Store the machine in a cool, dry place at a safe distance from sources of sparks such as oil burners and hot water heaters etc.
Using the trimmer after it has been stored away
- Remove the spark plug.
• Pull the starter cord briskly to remove excess oil from the combustion chamber. - Clean and check the electrode gap on the spark plug, or replace with a new one with the correct gap.
• Get the machine ready for use.
• Fill the petrol tank with the correct mixture of oil and petrol. See section on fuel and lubrication.
TROUBLESHOOTING
| Problem | Cause | Action |
| The machine will not start, or starts but will not run. | Incorrect starting procedure.Carburettor set for incorrect mixture.Dirty spark plug.Run out of fuel.The primer pump has not been pressed enough times. | Follow the instructions in the Operating Instructions.Have the carburettor adjusted by an authorised service centre.Clean/check electrode gap, or replace spark plug.Fill fuel tank with correct mixture of fuel.Press the primer properly and slowly 10 times. |
| The machine starts, but the engine has no power. | The fuel filter is blocked.Incorrect throttle position.Spark arrestor guard is dirty.Dirty air filter.Carburettor set for incorrect mixture. | Replace the fuel filter.Set in position RUN.Replace spark arrestor guard.Remove, clean and replace filter.Have the carburettor adjusted by an authorised service centre. |
| The engine falters. | Carburettor set for incorrect mixture.The air filter is blocked.Old fuel or incorrect mixture. | Have the carburettor adjusted by an authorised service centre.Replace or clean air filter.Empty fuel tank, fill with new fuel mixture. |
| No power under load. | Carburettor set for incorrect mixture.Old fuel or incorrect mixture.The air filter is blocked.Dirty spark plug. | Have the carburettor adjusted by an authorised service centre.Empty fuel tank (see storage)/fill with new fuel mixture.Replace or clean air filter.Replace or clean spark plug. |
| Runs unevenly. | Incorrect electrode gap on spark plug.Spark arrestor blocked.Dirty air filter. | Clean/check electrode gap, or replace spark plug.Clean or replace spark arrestor.Clean or replace air filter. |
ENGLISH
| Too much smoke in exhaust fumes. | Carburettor set for incorrect mixture.Incorrect fuel mixture. | Have the carburettor adjusted by an authorised service centre.Use correct fuel mixture (ratio 40:1). |
Subject to printing errors and design changes over which we have no control. In the event of problems, please contact our service department.
www.jula.com
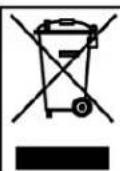
Care for the environment!
Must not be discarded with household waste! This product contains electrical or electronic components that should be recycled. Leave the product for recycling at the designated station e.g. the local authority's recycling station.
CE
EC DECLARATION OF CONFORMITY
EG FÖRSÄKRAN OM ÖVERENSSTÄMMELSE
EF SAMSVARSERKLÆRING

Machinery Directive 2006/42/EC Electromagnetic Compatibility 2004/108/EC Outdoor Noise Directive 2000/14/EC, amended by 2005/88/EC
EN ISO 11806:2008 EN ISO 14982:2009
This product was CE marked in year 2009
Name and address of the person
authorised to compile the technical file:
Erik Svedén
Box 363, SE-532 37 Skara, Sweden
Skara 2009-12-29

Stefan Rundberg
PRODUCT MANAGER
- SÄKERHETSANVISNINGAR
- HANDHAVANDE
- Bränsle
- MONTERING
- BRUK
- Drivstoff
- OBSŁUGA
- Paliwo
- Read the Operating Instructions carefully before use!
- Work area
- Personal safety
- Safety warnings concerning petrol
- Extra safety instructions
- TECHNICAL DATA
- Always wear ear protection!
- DESCRIPTION
- ASSEMBLY
- Fitting the handlebar
- Fitting the ejector guard
- Fitting the trimmer head
- OPERATION
- Fuel
- WARNING!
- Mixing the fuel
- Recommended fuel
- Starting a cold engine
- Starting a hot engine
- Stopping the engine
- Trimming
- Trimming/cutting
- Short trimming
- Trimming around fences and foundations
- Trimming around trees
- MAINTENANCE
- Air filter
- Filler cap/fuel filter
- Adjusting the carburettor
- Other information
- Using the trimmer after it has been stored away
- ENGLISH
- Care for the environment!
- CE
- EC DECLARATION OF CONFORMITY
- EG FÖRSÄKRAN OM ÖVERENSSTÄMMELSE
- EF SAMSVARSERKLÆRING
Brand : Meec Tools
Model : 723-076
Category : Lawn mower