000-913 - Lawn mower Meec Tools - Free user manual and instructions
Find the device manual for free 000-913 Meec Tools in PDF.

User questions about 000-913 Meec Tools
0 question about this device. Answer the ones you know or ask your own.
Ask a new question about this device
Download the instructions for your Lawn mower in PDF format for free! Find your manual 000-913 - Meec Tools and take your electronic device back in hand. On this page are published all the documents necessary for the use of your device. 000-913 by Meec Tools.
USER MANUAL 000-913 Meec Tools
000913
natural_image
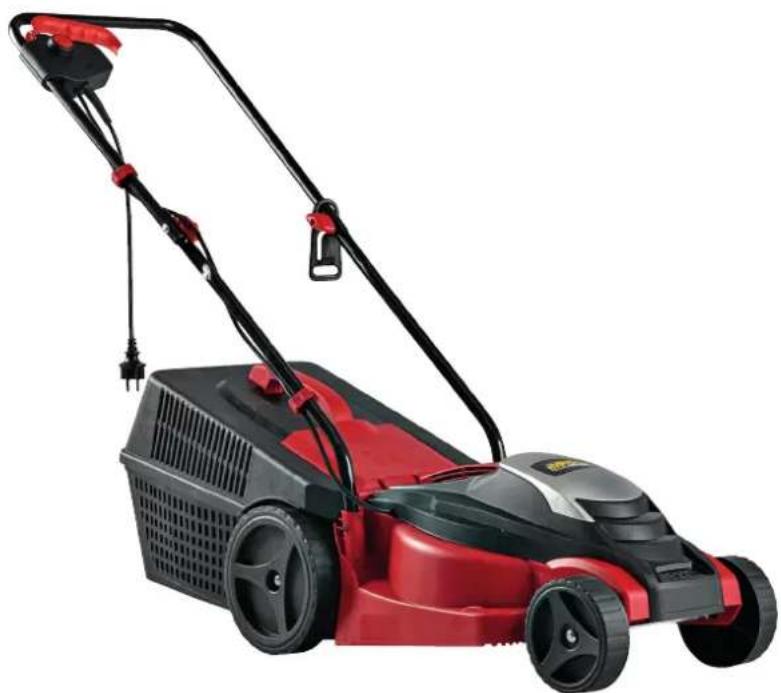
Red and black lawn mower with attached power cord, shown against white background (no text or symbols visible)
SE ELGRÄSKLIPPARE
Bruksanvisning i original
Operating instructions
(Translation of the original instructions)
Important! Read the user instructions carefully before use.
Save them for future reference.
Värna om miljön!
Care for the environment!
Must not be discarded with household waste! This product contains electrical or electronic components that should be recycled. Leave the product for recycling at the designated station e.g. the local authority's recycling station.
Jula reserves the right to make changes. In the event of problems, please contact our service department.
www.jula.com

Tillverkare/Produsent/Producenci/Manufacturer
Jula AB, Box 363, 532 24 SKARA
Distributör/Distributør/Dystrybutor/Distributor
Jula Poland Sp. z o.o., ul.
EC DECLARATION OF CONFORMITY
EG FÖRSÄKRAN OM ÖVERENSSTÄMMELSE
EF SAMSVARSERKLÆRING
DEKLARACJA ZGODNOŚCI WE

Jula AB, Box 363, SE-532 24 SKARA, SWEDEN
Machinery Directive 2006/42/EC
EN 60335-1:2012+A11, EN 60335-2-77, EN 62233:2008
Electromagnetic Compatibility Directive 2014/30/EU
EN 55014:2006+A1+A2, EN 55014-2:2015
EN 61000-3-2:2014, EN 61000-3-3:2013
Outdoor Noise Directive 2000/14/EC, amended by 2005/88/EC
RoHS Directive 2011/65/EU
EN 50518:2012
| Measured sound power level on an equipment representative for this type: Uppmätt ljudeffektnivå på en utrustning som år representativ för denna typ: Målt lydeffektnivå for utstyr som er representativt for vedkommende type: zmierzony poziom mocy akustycznej urządzenia reprezentatywnego dla danego typu: | Guaranteed sound power level: Garanterad ljudeffektnivå: Garantert lydeffektnivå: Gwarantowana moc akustyczna: | Conformity assessment procedure according to 2000/14/EC: Förfarande för bedömning av överensstämmelse enligt 2000/14/EC: Framgangsmåter for samsvarsvurdering iht. 2000/14/EC: Procedura oceny zgodności na podstawie dyrektywy 2000/14/WE: |
| 91 dB(A) 94 dB(A) | Annex VI / Bilaga VI Vedlegg VI / Załącznik VI |
Where applicable, name and address of the notified body involved:
Intertek Testing & Certification Ltd.
Davy Avenue, Knowlhill, Milton Keynes MK5 8NL
NB0359
This product was CE marked in year -16
Name and address of the person authorised to
compile the technical file:

natural_image
Line drawing of a hand holding a tool near a mechanical component (no text or symbols)
SÄKERHETSANVISNINGAR
UTBILDNING
- Read these instructions carefully and familiarise yourself with the controls and how they are used.
- Never allow children, or anyone who is unfamiliar with the appliance and these instructions, to use it. There may be local regulations for the minimum age of persons allowed to use the appliance.
- Do not use the appliance when other persons, especially children, or pets are in the vicinity.
- The user is responsible for any accidents or risks to other persons or property.
PREPARATIONS
- Always wear heavy-duty shoes and long trousers when using the appliance. Do not use the appliance if you are barefoot or wearing open shoes. Do not wear loose-fitting clothing, ties, scarves, etc., that can get caught in moving parts.
- Carefully inspect the area where the appliance is to be used and remove any objects that can be thrown out.
- Always check the appliance before use to make sure that the blade, blade screws and mower deck are not worn or damaged. Always replace the complete set of components if they are worn or damaged to avoid imbalance. Replace any stickers that have become illegible or lost.
- Check before use that the mains outlet and power cords are undamaged, and that there are no signs of fatigue. Pull out the plug immediately if the power cord gets damaged during the work. Do not touch the power cord until it has been unplugged. Do not use the appliance if the power cord is damaged or worn.
USE
- Only use the appliance in daylight, or in good artificial lighting.
- Do not use the appliance in wet grass.
• Make sure you always have a good footing on sloping ground.
• Never run with the appliance. - Mow across slopes, never up and down.
- Be very careful when changing direction on slopes.
- Do not mow very steep slopes.
- Be very careful when going backwards or pulling the appliance towards you.
- Stop the blades if the appliance has to be tilted when moving it over an ungrassed surface, or when moving to and from the area to be mowed.
- Never use the appliance if the guards or covers are dismantled or damaged. Never use the appliance without the safety devices fitted, e.g. ejector guide and/or grass catcher.
- The appliance can throw up foreign objects when in use. Wear approved safety glasses or a visor.
- Start the motor carefully according to the instructions. Keep your feet away from the blades.
- Do not tilt the appliance when starting the motor, unless this is necessary to start it. If the appliance has to be tilted, do not tilt it more than is absolutely necessary. Lift up the end furthest away from the user.
- Do not stand in front of the ejector opening when starting the motor.
- Never put your hands or feet near, or under, rotating parts. Always keep at a safe distance from the ejector opening.
- Switch off the appliance and unplug the power cord. Wait until all moving parts have completely stopped:
— Before leaving the appliance unattended.
— Before clearing blockages or cleaning the ejector.
— Before checking, cleaning or doing any other work on the appliance.
- If an object has been run over. Check the appliance and repair any damage before using it again.
- If the lawn mower starts vibrating abnormally (check immediately):
- Check the appliance to see if it is damaged.
- Replace or repair damaged parts.
- Check and tighten any loose parts.
Recommendations for class II equipment
- The appliance must be connected to the mains supply with a residual current device with a maximum tripping current of 30 mA.
SYMBOLS
Description of symbols used on the product. Familiarise yourself with them to reduce the risk of personal injury and material damage.
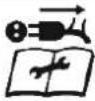
 | WARNING: Read these instructions carefully before assembly and use. Failure to follow all the instructions and safety instructions can result in personal injury and/or material damage. |
 | WARNING: Indicates danger, warning or important information. |
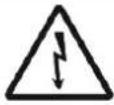 | ELECTRICAL SAFETY: Risk of personal injury and/ or material damage. |
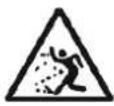 | WARNING: Do not run over objects. Objects can be thrown out and cause serious injury and/or material damage. |
 | WARNING: The blades are sharp. |
 | Keep onlookers, especially children, and pets at least 10 m from the work area. |
 | WARNING: Unplug the power cord immediately if it, or an extension cord, gets damaged during the work. |
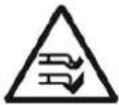
 | WARNING: Keep the power cord away from the blades. |
 | This product has a safety class II rating. That means it is fitted with enhanced or double insulation. |
 | The product complies with the relevant EU directives, and an evaluation method to verify compliance with these directives has been applied. |
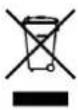 | WEEE symbol. End-of-life electrical products must not be discarded with household waste. Recycle where possible. Check with local authorities or your local store for information on recycling. |
TECHNICAL DATA
| Rated voltage 230 V ~ 50 Hz | |
| Power consumption 1000 W | |
| Blade speed 3450 /min | |
| Working width 320 mm | |
| Mowing height 20/40/60 mm | |
| Volume, collector tray 30 l | |
| Net weight 8.8 kg | |
| Safety class | |
| Protection rating | IP |
| Sound pressure level | LpA 84 dB(A), K=3 dB |
| Measured sound power level | LwA 91 dB(A), K=3 dB |
| Guaranteed sound power level | LwA 94 dB(A), K=3 dB |
| Vibration | 4.5 m/s ^2 , K=1.5 m/s ^2 |
Always wear ear protection.
DESCRIPTION
PARTS
FIG. 1
- Power switch lock
- Drive handle
- Top handle
- Bottom handle
- Rear deflector
- Grass catcher, base
- Grass catcher, top
- Cord retainer
Parts included and used when fitting the handle.
| Number | Description | Applications |
| 2 | Locking screw | Assembly of top and bottom handle. |
| 2 | Washer | |
| 2 | Thumbscrew | |
| 2 | Washer | Fitting the handles to the chassis |
| 2 | Screw |
Other parts included:
| 1 | Spanner for blade |
ASSEMBLY
HANDLE
FIG. 2
- Fit the top handle (3) on the bottom handle (4) with the thumbscrews (9), washers (10) and screws (11).
FIG. 3
- Insert both bottom handle tubes in the holes in the chassis and fasten with locking screw (12) and washer (13).
GRASS CATCHER
Assembly
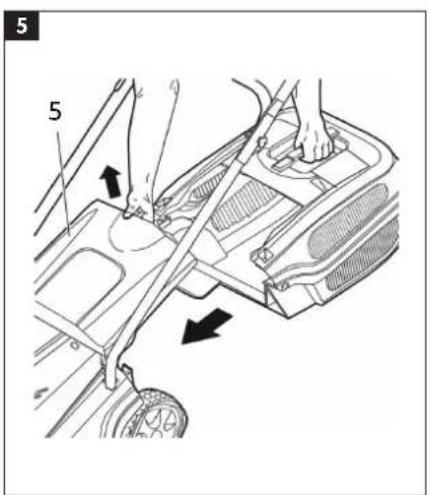
FIG. 4
- Align the back edge on the top of the grass catcher (7) to the back edge of the bottom of the grass catcher (6).
- Fit the locking tabs against each other and press together. Use pliers or other suitable tool if necessary.
- Align and press together the locking tabs on the right and left sides of the catcher.
Assembly
FIG. 5
- Check that the grass catchers is properly assembled.
- Lift up the rear deflector (5) on the mower deck.
- Insert the catcher under the handle, align the fastener hooks, and put the catcher in place.
- Fold down the rear deflector so that it rests against the catcher.
USE
NOTE:
- Check before use that the power cord is undamaged, and that there are no signs of fatigue.
- The lawn mower must be connected to the mains supply with a residual current device with a maximum tripping current of 30 mA.
- Do not use the lawn mower if the power cord or plug are damaged.
ADJUSTING THE MOWING HEIGHT
NOTE:
Switch off the motor by releasing the drive handle. Wait until all moving parts have completely stopped before adjusting the mowing height. The blade continues to rotate for a few seconds after the lawn mower has been switched off – risk of personal injury. Select a higher mowing height for long grass. The mowing height can be set to 20, 40 or 60 mm by adjusting the wheels.
FIG. 6
Pull each end of the front axle forward and move it to the required position.
FIG. 7
Pull each end of the rear wheel axle along the slot, lift the wheel and move it the required position.
NOTE:
- All the wheels should be adjusted to the same height.
- The top position gives the lowest mowing height, and the reverse.
- Only use the lowest mowing height for very smooth lawns and short grass. Medium or high mowing height is suitable in most cases.
STARTING/STOPPING
NOTE:
The blade continues to rotate for a few seconds after the lawn mower has been switched off. Do not start and stop the lawn mower too often, and wait until all moving parts have completely stopped before starting it again.
Starting
- Set the required mowing height.
- Keep the safety catch (1) pressed in.
- Press the drive handle (2) towards the handle.
Stopping
Release the drive handle (2).
LAWN MOWING
Place the lawn mower by the edge of the lawn, near the power point. Work away from the power point.
Check to make sure that the power cord is always lying on the part that has already been cut.
WARNING!
Do not overload the motor, this can damage it. If the motor is overloaded (change in the sound of the motor), switch off the lawn mower and adjust to a higher mowing height.
NOTE:
Do not mow more than 1/3 of the height of the grass at once, this can damage the grass.
Unplug the plug if the lawn mower is overloaded, or the blade gets blocked. Remove the blockage and wait a few minutes before resuming the work.
High grass
- For high grass the mowing should be done without the catcher.
- If it is necessary to collect up the grass, first mow with the highest mowing height without the catcher.
- Allow the grass cuttings to dry.
- Fit the catcher and mow the lawn again with the highest mowing height.
- Adjust to a lower mowing height and mow the lawn again. Repeat until the grass is the required height.
MAINTENANCE
WARNING!
Switch off the lawn mower, unplug the plug, and wait until all moving parts have completely stopped before inspection, maintenance and/or cleaning.
NOTE:
The inspection and repair of electrical appliances must only be carried out by an authorised electrician.
• Make sure that all the screw unions are properly tightened to keep the appliance in safe condition.
- Check the catcher for wear or damage at regular intervals.
- On appliances with multiple blades, all the blades can move when just one blade is turned – risk of personal injury.
- Be careful to make sure your fingers do not fasten between the blades and fixed parts of the appliance – risk of serious personal injury.
• Always allow the appliance to cool before cleaning.
- When working with blades, pay attention that the blades can move even when the appliance is switched off.
- Replace damaged or worn parts. Only use approved spare parts and accessories.
Blades
- The blade is very sharp – wear safety gloves.
- Avoid touching the edge – risk of cut injury.
- Be careful when lifting or turning over the appliance.
- We recommend replacing the blade every other year, or at intervals of 50 working hours (which ever comes first).
- Replace the blade immediately if it is damaged.
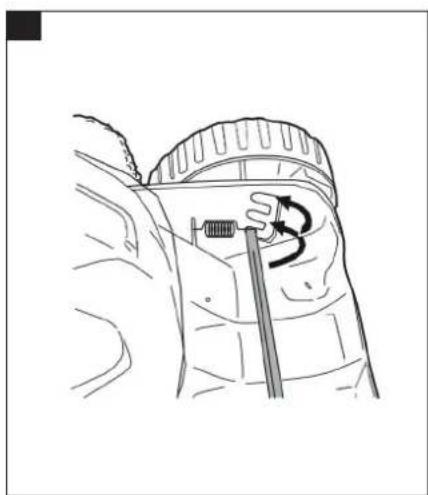
Replacing the blade
WARNING!
The lawn mower will vibrate excessively if the blade is unbalanced, which can result in a risk of personal injury.
- Switch off the appliance, unplug the power cord, and wait until all moving parts have completely stopped before removing/fitting the blade.
- Put the appliance on its side.
- Grip one end of the blade firmly. Wear safety gloves.
- Undo the retaining screw with the supplied spanner.
- Carefully remove the blade.
- Make sure to fit the new blade with the edges towards the motor.
- Place the new blade over the guide pins. The text on the blade should face outwards.
- Screw in and tighten the retaining screw.
- Put the appliance back on its wheels.
LONG-TERM STORAGE
Follow the instructions below if the appliance is not going to be used for a month or more.
- Clean all the parts of the appliance. Empty and clean grass catcher.
- Lubricate the wheels, pivot points and linkage.
- Apply oil to all unpainted metal parts to provide protection from corrosion.
- Cover over the appliance and store in a dry place.