721-440 - Lawn mower Meec Tools - Free user manual and instructions
Find the device manual for free 721-440 Meec Tools in PDF.

User questions about 721-440 Meec Tools
0 question about this device. Answer the ones you know or ask your own.
Ask a new question about this device
Download the instructions for your Lawn mower in PDF format for free! Find your manual 721-440 - Meec Tools and take your electronic device back in hand. On this page are published all the documents necessary for the use of your device. 721-440 by Meec Tools.
USER MANUAL 721-440 Meec Tools

natural_image
Red and black lawn mower with visible blades and a cylindrical tool emitting smoke (no text or symbols)SE Bruksanvisning för vertikalskärare 2 i 1
NO Bruksanvisning for vertikalskjærer 2 i 1
PL Instrukcja obsługi wertykulatora/aeratora 2 w 1
EN Operating instructions for scarifier 2-in-1
SE - Bruksanvisning i original
EN - Operating instructions (Translation of the original instructions)
Jula reserves the right to make changes. In the event of problems, please contact our service department.
www.jula.com
Tillverkare/ Produsent / Produenci/ Manufacturer
Jula AB, Box 363, 532 24 SKARA
Importör/ Importør/ Importer/ Importer
Care for the environment!
Must not be discarded with household waste! This product contains electrical or electronic components that should be recycled. Leave the product for recycling at the designated station e.g. the local authority's recycling station.
SVENSKA....6
SÄKERHETSANVISNINGAR....6
Symboler 9
TEKNISKA DATA....10
BESKRIVNING 11
MONTERING 12
HANDHAVANDE 13
Starta 13
Stoppa 13
SAFETY INSTRUCTIONS 36
Symbols 39
TECHNICAL DATA 40
DESCRIPTION 41
ASSEMBLY 42
USE 43
Starting 43
Stopping....43
Adjusting the working depth 44
Changing the rollers. 44
MAINTENANCE 45
SÄKERHETSANVISNINGAR
natural_image
Mechanical lawn mower with attached handle and wheels, shown in 3D rendering (no text or symbols visible)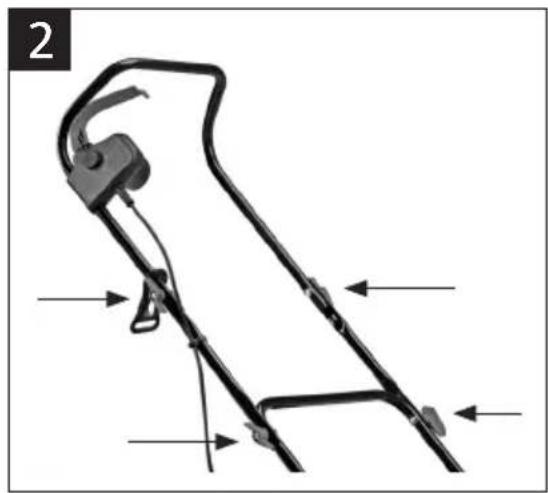
natural_image
Mechanical device diagram showing a lever mechanism with directional arrows indicating motion (no text or symbols)natural_image
Side view of a small robotic car with a black cover and arrow indicating motion (no text or symbols)HANDHAVANDE
OBS!
natural_image
Abstract circular arrow with a shaded segment, no text or symbols presentnatural_image
Close-up of a mechanical component with a labeled arrow and section lines, no readable text or symbols present.natural_image
Mechanical component diagram showing a rotating shaft and flange assembly (no text or symbols)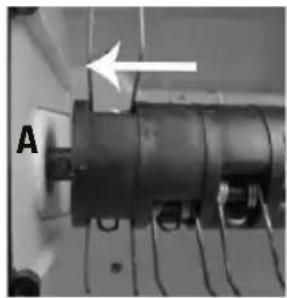
natural_image
Close-up of a mechanical component with labeled section A and an arrow pointing to a feature (no readable text or symbols)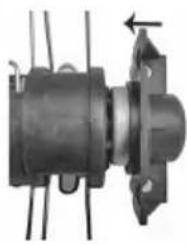
natural_image
Mechanical component with mounting flange and internal structure (no visible text or symbols)Mossrivarrullen
UNDERHÅLL
1 Motordeksel
2 Nedre håndtak
3 Kabelklemme
4 Boltskrue og vingemutter
5 Strømbryterboks
6 Strømbryterarm
7 ∅vre håndtak
8 Midthåndtak
9 Oppsamler
10 Hjul
11 Bryter for dybdeinnstilling
12 Kabelholder
13 Sekskantnøkkel
14. Moseriverrull
15. Luke

MONTERING
natural_image
Illustration of a lawn mower with labeled parts and arrows indicating motion (no text or symbols present)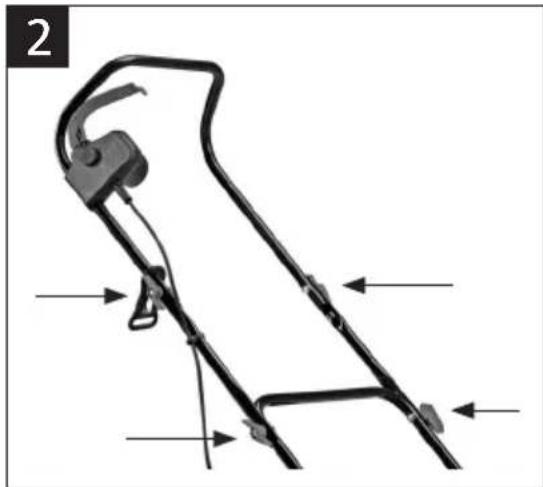
natural_image
Diagram of a mechanical device with directional arrows indicating movement or force (no text or symbols present)natural_image
Side view of a small robotic car with a black cover and arrow indicating motion (no text or symbols)BRUK
OBS!
INNSTILLING AV ARBEIDSDYBDE
natural_image
Abstract circular arrow with a shaded segment, no text or symbols presentnatural_image
Illustration of a lawn mower with labeled parts and arrows indicating motion (no text or symbols)
natural_image
Diagram of a mechanical device with directional arrows indicating movement or force (no text or symbols present)natural_image
Side view of a small robotic car with visible wheels and a downward arrow indicating motion (no text or symbols)OBSŁUGA
UWAGA!
natural_image
Circular mechanical component with bidirectional arrow indicating rotation or cycle (no text or symbols)natural_image
Mechanical component with directional arrow and label 'A' (no readable text or symbols)Rolka do aeracji
natural_image
Mechanical component diagram showing a propeller and housing assembly (no text or symbols)
natural_image
Close-up of a mechanical device with labeled component 'A' and an arrow pointing to a component (no readable text or symbols beyond label)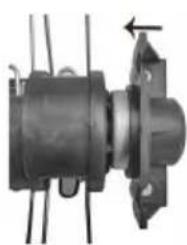
natural_image
Mechanical component with mounting flange and internal shaft (no visible text or symbols)Read the operating instructions carefully before use.
Save them for future reference.
Practice
- Read and make sure you understand all the instructions. Save these instructions. Failure to follow all the following instructions can result in electric shock, fire and/or serious injury. Read the instructions carefully to familiarise yourself with the controls and to ensure the equipment is used properly.
- Never allow children, or persons who are not familiar with these instructions, to use the machine. Local regulations can affect the permitted age of users.
- Note that the user is responsible for accidents or risks incurred by other people or property.
Preparations before use
• Always wear ear protection and safety glasses when using the machine.
- Check whether the power cord or extension cords are damaged or worn before using the machine.
- If the power cord is damaged during use it must be immediately disconnected from the power supply. DO NOT TOUCH THE POWER CORD BEFORE IT IS UNPLUGGED.
- Do not use the machine if the power cord is damaged, or worn.
- Always wear heavy-duty shoes and long trousers when using the machine. Do not use the machine barefooted or wearing sandals. Avoid loose-fitting clothing, sashes and fringes.
- Carefully inspect the area where the equipment is to be used, and remove all objects that can be thrown up by the machine. Do not use the machine on a paved or gravel surface, because ejected material can cause personal injury.
- Use the machine in the recommended position, and only on a firm and level surface.
- Before starting the machine check that all the screws, nuts, bolts and other fasteners are correctly secured and that all the guards are in place.
- Never use the scarifier if it is damaged.
- Never use the machine when people, especially children, or pets are nearby.
Electrical safety
- Do not touch the rotating rake/cutting equipment before the machine has been disconnected from the power supply and has completely stopped.
- Do not use the machine if the power cord is damaged, or worn.
- Check the power cord before using the machine. If the rubber insulation on the power cord has come loose, or its metal wires are exposed, switch off the machine and unplug it from the power supply. Do not touch the damaged power cord. Replace the power tool immediately to avoid the risk of electric shock.
- If the power cord is damaged it must be replaced by a qualified service technician to ensure safe use. It must not be less than H05VV-F, with a minimum diameter of 2 × 0.75 mm^2 .
- Do not connect a damaged power cord to the mains, and do not touch a damaged power cord until it has been unplugged. A damaged power cord can result in contact with live parts.
- Keep extension cords away from the rotating equipment. The rotating equipment can damage the cords and result in contact with live parts.
- Only connect the machine to a power supply protected by a residual current device with a breaking current that does not exceed 30 mA.
Use/handling
- Only use the machine in daylight, or in good artificial lighting.
- Avoid using the machine on wet grass.
- Make sure you always have a good footing, especially on slopes.
• Work across slopes, never up and down. - Be careful when changing direction on slopes.
- Never scarify or aerate on very steep slopes.
- Be careful when reversing the machine or pulling it to towards you.
- Stop the rotating equipment if the machine needs tilting when moving over ungrassed surfaces, and when transporting it to and from the area where it is being used.
- Never use the machine with defective safety devices, or without safety devices, for example deflectors and/or grass catcher.
- Start the motor carefully according to the instructions and with your feet well away from the rotating equipment.
-
Keep the power cord and extension cords away from the rotating equipment.
-
Do not tilt the machine when starting the motor, unless this is necessary to start it. In the latter case do not tilt the machine more than is absolutely necessary, and only tilt the part that faces away from the user.
- Always make sure that both hands are on the machine before lowering it down to the ground again.
- Do not transport the machine when the motor is running.
- Never put your hands or feet near, or under, rotating parts.
- Never obstruct the ejector opening.
-
Stop the machine and unplug the plug from the power point. Make sure all moving parts have completely stopped:
-
when leaving the machine,
– before clearing away blockages,
– before checking, cleaning or maintaining the machine, -
if you have run onto a foreign object. Check if the machine is damaged, and repair it before starting and using it again. If the machine starts to vibrate abnormally,
– immediately check if it is damaged,
– replace or repair any damaged parts,
– check and tighten any loose parts.
- Never use the machine if it is damaged.
Maintenance and storage
- Switch off the machine and unplug it from the power supply before maintenance, inspection or storage, or before replacing any accessories.
- Make sure all moving parts have completely stopped and allow the machine to cool.
- When working with the rotating equipment, note that it can rotate even when the power supply is switched off.
- Keep all nuts, bolts and screws tightened to ensure that the equipment is in good working condition.
- Check at regular intervals to make sure the collector is not worn or damaged.
- Replace worn or damaged parts to ensure safe use.
- Observe care on machines with several sets of rotating equipment, because the rotation of one can cause another to rotate.
- Be careful when adjusting the machine to make sure your fingers do not fasten between the rotating equipment and the fixed parts of the machine.
- Replace worn or damaged parts to ensure safe use. Only use original spare parts and accessories.
- Keep the machine properly maintained, and keep it clean.
- Store the machine out of the reach of children.
Recommendation
- The machine should be supplied with power via a residual current device with a breaking current that does not exceed 30 mA.
SYMBOLS
 | The machine must only be used by persons who have read and understood all the safety instructions in these operating instructions. Always take into consideration the safety of other persons in the work area. Read the instructions before use. |
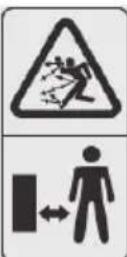 | Keep other people at a safe distance. |
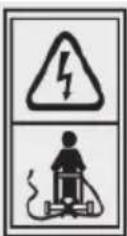
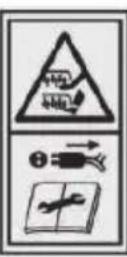 | WARNING – be careful with the sharp rotating equipment, keep fingers and toes out of the way. Pull out the plug from the power point before maintenance and cleaning, or if the power cord has become entangled or damaged. The rotating equipment continues to rotate even after the motor has been switched off. |
 | Always keep the power cord away from the rotating equipment. |
 | Do not use the machine in the rain, or leave it outside when it is raining.Wear safety glasses and ear protection. |
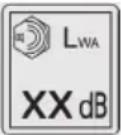 | Sound power level |
 | Double insulation for extra safety |
 | Complies with the relevant safety standards |
TECHNICAL DATA
| Catcher 30 I | |
| Weight 10 kg | |
| Voltage 230 V | |
| Output 1300 W | |
| Working depth -11 - 5 mm | |
| Working width 32 cm | |
| Protection rating IP24 | |
| Safety class II | |
| Speed no load (min-1) 4000 | |
| Working width 320 mm | |
| Working height -11 – +5 | |
| Measured sound pressure level LpA 78dB(A), k= 3 dB(A) | |
| Measured sound power level, LwA 90.3 dB(A), k= 3 dB(A)) | |
| Guaranteed sound power level 94 dB(A) | |
| Measured vibration value | 2.130 m/s2 k=1.5 m/s2 |
DESCRIPTION
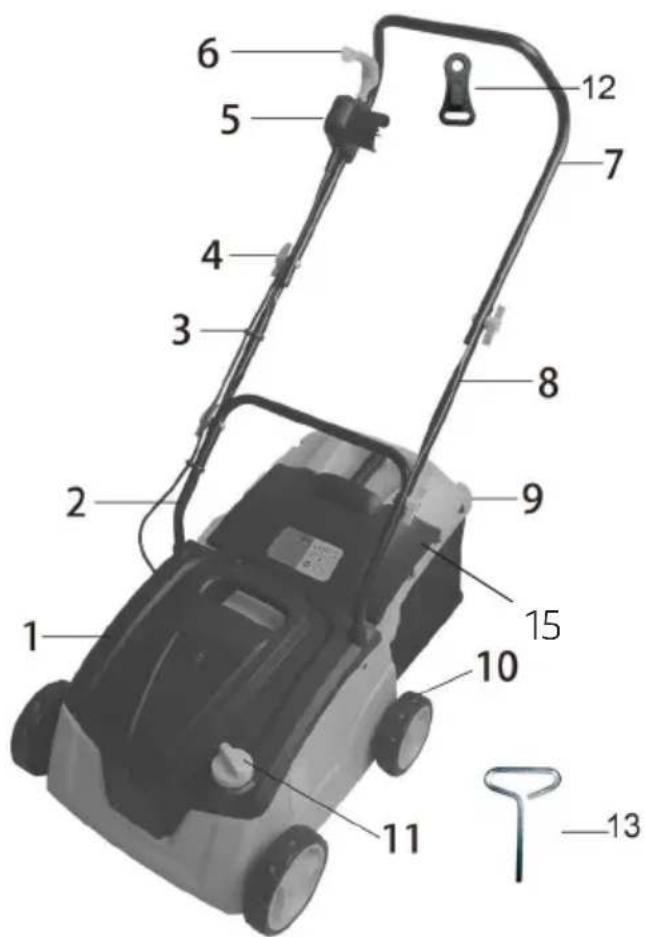
1 Motor casing
2 Bottom handle
3 Clip
4 Bolt screw and wing nut
5. Switchbox
6. Switch arm
7 Top handle
8 Middle handle
9 Catcher
10 Wheel
11 Knob for depth setting
12 Power cord holder
13 Hex key
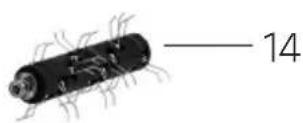
14. Lawnraker roller
15 Cover
ASSEMBLY
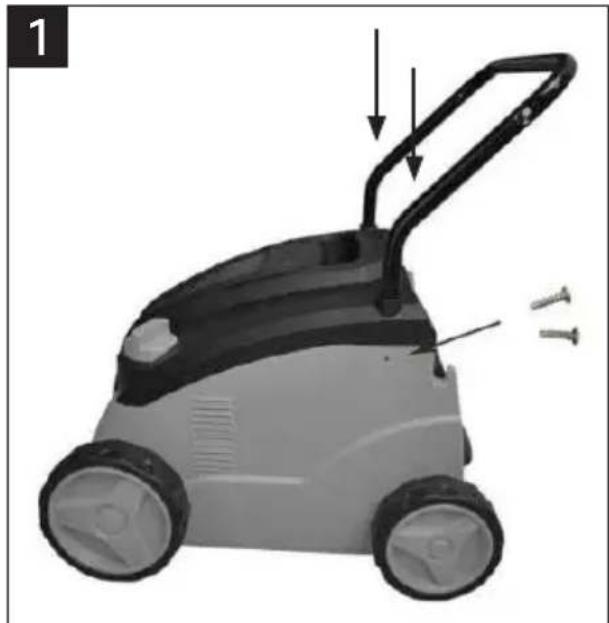
Fit the bottom handles
-
Insert the bottom handles in the holes and make sure they go all the way in (diagram 1).
-
Lock with the screws on each side.
natural_image
Illustration of a lawn mower with labeled parts and arrows indicating motion (no text or symbols present)
natural_image
Mechanical device diagram showing a lever mechanism with directional arrows indicating motion (no text or symbols)Fit the top handle, middle handle, and bottom handle.
-
Place the middle part outside the bottom handle and align the holes. Push in the two bolt screws, and put a washer on each bolt (diagram 2).
-
Screw on the wing nuts and tighten by hand.
-
Slip the power cord holder on the top handle.
-
Place the middle part outside the top part and align the holes. Push in the two bolt screws, and put a washer on each bolt.
-
Screw on the wing nuts and tighten by hand.
-
After fitting the handles, fasten the power cord in the clip.
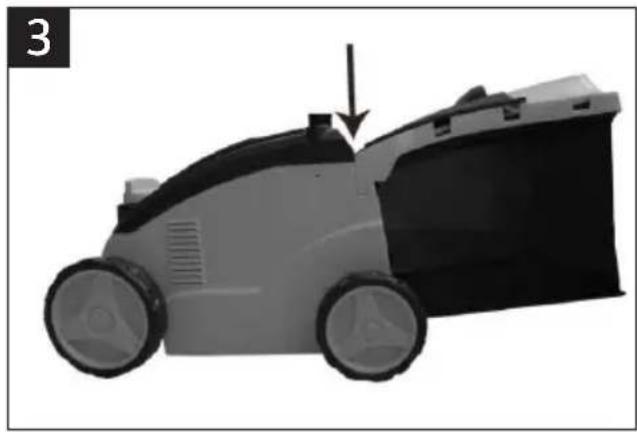
Fitting/removing the catcher
-
Lift up the cover on the scarifier (diagram 3).
-
Lift the catcher so that it fits in/comes loose from the pins on the scarifier.
natural_image
Side view of a small robotic car with a black cover and arrow indicating motion (no text or symbols)USE
NOTE:
- Use an extension cord intended for outdoor use (H05VV-F 2×0.75 mm²) and which is connected to the power supply via a residual current device.
- Connect the machine to the extension cord first, and then to the power point.
STARTING
-
Plug the plug into the power point.
-
Press and hold in the safety lock button on the switchbox.
-
Hold in the safety lock button and pull the switch arm up towards the handle, and hold it in this position. The motor will now start.
-
Release the safety lock button.

STOPPING
- Release the switch arm to stop the scarifier.
- Pull out the plug from the power point.
ADJUSTING THE WORKING DEPTH
-
Turn the knob for the depth setting to LOW to increase the working depth down to a maximum of -11 mm. The knob will then not turn any further.
-
Turn the knob for the depth setting to HIGH to reduce the working depth to a minimum depth of 5 mm. The button can still be turned, but without changing the depth.

natural_image
Abstract circular arrow with a shaded segment, no text or symbols present- Low and middle position of the lawnraker roller: - Removes moss and weeds from the lawn.
- High position of the lawnraker roller: - Removes thatch from the lawn.
- Low and middle position of the scarifier roller: - Produces deep aeration. - High position of the scarifier roller: - Produces light aeration.
WARNING: Wear safety gloves.
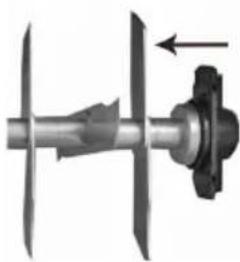
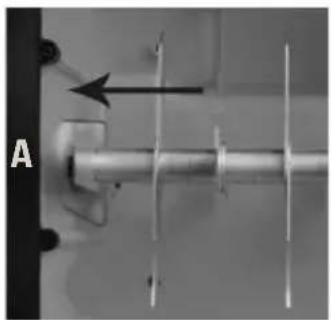
- Undo the two screws on the bearing housing (S).
- Lift up the roller from fastener B and then release it from fastener A (diagram 4).
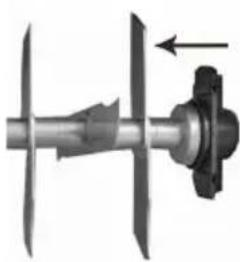
4
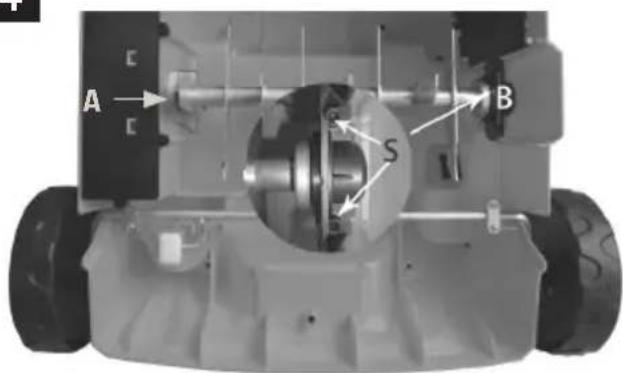
Scarifier roller
Lawnraker roller
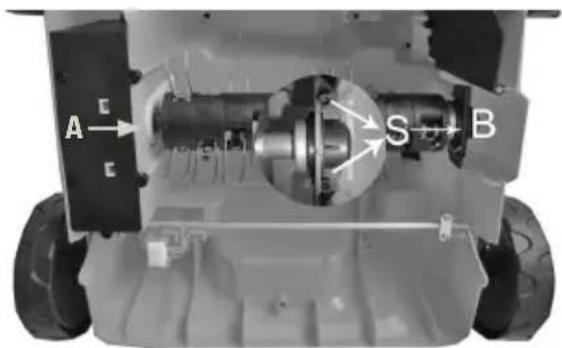
- Release the bearing housing from the roller.
- Change the roller and place the bearing housing in one end. Place the other end of the roller in fastener A. Fit the roller firmly in fastener B by screwing tight the bearing housing (diagram 5).
5
natural_image
Close-up of a metallic cylindrical component with internal channels and an arrow indicating direction (no text or symbols)Scarifier roller
natural_image
Mechanical component diagram showing a propeller with rotating shaft and housing (no text or symbols)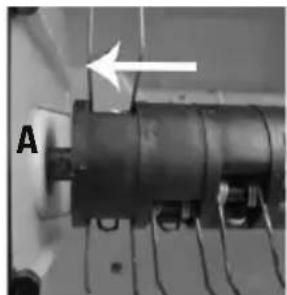
natural_image
Close-up of a mechanical device with labeled component 'A' and an arrow pointing to a component (no readable text or symbols beyond label)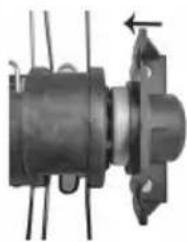
natural_image
Mechanical component with mounting flange and internal shaft (no visible text or symbols)Lawnraker roller
MAINTENANCE
NOTE: Unplug the machine from the power supply before maintenance and cleaning.
- Be careful when adjusting the machine to make sure your fingers do not fasten between the rotating blades and fixed parts of the machine.
- Never spray water on the machine.
- Clean the machine with a dry cloth after using it.
- Keep all nuts, bolts and screws tightened to ensure that the equipment is in good working condition.
- Check at regular intervals that the grass catcher is not worn or damaged. Replace worn or damaged parts to ensure safe use.
• Repairs must only be carried out by qualified service personnel. - If the carbon brushes need replacing, allow a qualified technician to do this (always replace both brushes at the same time).
- Store the machine in a dry place out of the reach of children.
CE
EC DECLARATION OF CONFORMITY
EG FÖRSÄKRAN OM ÖVERENSSTÄMMELSE
EF SAMSVARSERKLÆRING
DEKLARACJA ZGODNOŚCI WE

Jula AB, Box 363, SE-532 24 SKARA, SWEDEN
certify that the design and manufacturing of this product
Machinery Directive 2006/42/EC
EN 60335-1:2012+A11, EN 60335-2-92:2005
EN 62233:2008
Electromagnetic Compatibility Directive 2004/108/EC
EN 55014-1:2006+A1+A2, EN 55014-2:1997+A1+A2
EN 61000-3-2:2006+A1+A2, EN 61000-3-3:2013
Outdoor Noise Directive 2000/14/EC, amended by 2005/88/EC
RoHS Directive 2011/65/EU
This product was CE marked in year -15
Name and address of the person authorised to compile the technical file: