
SC2500, SC2500C - Steam cleaner KARCHER - Free user manual and instructions
Find the device manual for free SC2500, SC2500C KARCHER in PDF.
| Product type | Steam cleaner |
| Brand | KÄRCHER |
| Models | SC2500, SC2500C |
| Dimensions (L x W x H) | 350 mm x 280 mm x 270 mm |
| Weight (without accessories) | 4.1 kg |
| Power supply | 220-240 V ~ 50/60 Hz |
| Heating power | 1500 W |
| Max. operating pressure | 0.32 MPa |
| Heating time | 6 minutes |
| Continuous steam output | 40 g/min |
| Maximum steam output | 100 g/min |
| Water tank capacity | 0.8 L |
| Boiler capacity | 0.5 L |
| Protection degree | IPX4 |
| Protection class | I |
| Included accessories | Steam gun, steam hose, pencil jet nozzle, round brush, hand nozzle, microfiber cover, 2 extension tubes, floor nozzle, floor cloth |
| Safety devices | Pressure switch, boiler thermostat, safety thermostat, maintenance closure (pressure relief valve) |
| Maintenance | Rinse boiler after 10 fills; descale according to water hardness (every 50 to 100 fills) |
| Warranty | According to country conditions, material or manufacturing defects |
| Replacement parts | Use only KÄRCHER parts (ref. at end of manual) |
Frequently Asked Questions - SC2500, SC2500C KARCHER
User questions about SC2500, SC2500C KARCHER
0 question about this device. Answer the ones you know or ask your own.
Ask a new question about this device
Download the instructions for your Steam cleaner in PDF format for free! Find your manual SC2500, SC2500C - KARCHER and take your electronic device back in hand. On this page are published all the documents necessary for the use of your device. SC2500, SC2500C by KARCHER.
USER MANUAL SC2500, SC2500C KARCHER
natural_image
Line drawing of a vacuum cleaner with attached cable (no text or symbols)Deutsch 5
English 14
Français 22
Italiano 31
Nederlands 40
Español 49
Português 58
Dansk 67
Norsk 75
Svenska 83
Suomi 92
Ελληνικά 100
Türkçe 109
Русский 118
Magyar 127
Čeština 136
Slovenščina 145
Polski 153
Românește 162
Slovenčina 171
Hrvatski 180
Srpski 189
Български 198
Eesti 207
Latviešu 216
Lietuviškai 225
Українська 234
العربية 252
Register and win! www.karcher.com

natural_image
Illustration of an open book with a curved arrow indicating rotation (no text or symbols)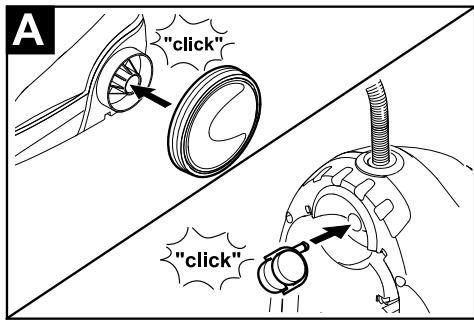
natural_image
Technical illustration of a vacuum cleaner assembly (left) and its internal components (right), both without any text or symbols.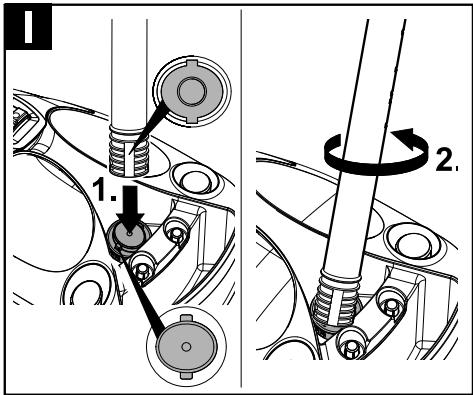
flowchart
graph TD
    A["Top Air Inlet"] --> B["Bottom Air Inlet"]
    B --> C["Recycle with Air Bag"]
    C --> D["Recycle with Air Bag"]
Inhalt
| General information | EN | 5 |
| Quick Reference | EN | 8 |
| Description of the Appliance | EN | 7 |
| Safety instructions | EN | 6 |
| Operation | EN | 8 |
| How to Use the Accessories | EN | 9 |
| Maintenance and care | EN | 10 |
| Troubleshooting | EN | 11 |
| Technical specifications | EN | 12 |
| Special accessories | EN | 12 |
General information
Dear Customer,

Please read and comply with these original instructions prior to the initial operation of your appliance and store them for later use or subsequent owners.
Proper use
Use the steam cleaner only for private households.
The appliance is intended to be used with steam and can be used with the appropriate accessories as described in these operating instructions. You will not need any detergent. Please adhere to the safety instructions.
Environmental protection

The packaging material can be recycled. Please do not place the package to the ordinary refuse for disposal, but ge for the proper recycling.

Old appliances contain valuable materials that can be recycled. Please arrange for the proper recycling of old appliances. Please dispose your old appliances using appropriate collection systems.
Notes about the ingredients (REACH)
You will find current information about the ingredients at:
www.kaercher.com/REACH
Symbols on the machine

Steam
CAUTION - Danger of scalding

CAUTION – Please read the operating instructions!
Symbols in the operating instructions
⚠️ Danger
Immediate danger that can cause severe injury or even death.
⚠ Warning
Possible hazardous situation that could lead to severe injury or even death.
Caution
Possible hazardous situation that could lead to mild injury to persons or damage to property.
Scope of delivery
The scope of delivery of your appliance is illustrated on the packaging. Check the contents of the appliance for completeness when unpacking.
In the event of missing accessories or any transport damage, please contact your dealer.
Spare parts
Use only original KÄRCHER spare parts. You will find a list of spare parts at the end of these operating instructions.
Warranty
The warranty terms published by the relevant sales company are applicable in each country. We will repair potential failures of your appliance within the warranty period free of charge, provided that such failure is caused by faulty material or defects in manufacturing. In the event of a warranty claim please contact your dealer or the nearest authorized Customer Service centre.
Please submit the proof of purchase. (See address on the reverse)
Safety instructions

Danger
■ The appliance may not be used in areas where a risk of explosion is present.
If the appliance is used in hazardous areas the corresponding safety provisions must be observed.
■ Never use the appliance in pools containing water.
■ The device should not be used to clean electrical appliances such as oven, exhaust, micro-wave, televisions, lamps, hair-dryer, electrical heating systems, etc.
- Check the faultless condition of the appliance and the accessories before using it. Otherwise, the appliance must not be used. Please check in particular the power cord, the maintenance lock, and the steam hose.
If the power cord is damaged, please arrange immediately for the exchange by an authorized customer service or a skilled electrician.
■ Please arrange for the immediate exchange of a damaged steam hose. You may only use a steam hose that is recommended by the manufacturer (see spare parts list for the order number).
■ Never touch the mains plug and the socket with wet hands.
■ Never use the appliance to clean objects containing hazardous substances (e.g. asbestos).
■ Never touch the steam jet from a short distance with your hands and never direct the steam jet to persons or animals (risk of scalds).
■ The maintenance lock must not be opened during operation.

Warning
■ The appliance may only be connected to an electrical supply which has been installed in accordance with IEC 60364.
■ The appliance may only be connected to alternating current. The voltage must correspond with the type plate on the appliance.
In wet rooms, e.g. bathrooms, connect the appliance to sockets with a series connected RCD adapter.
■ Unsuitable extension cables can be hazardous. Only use a splashproof extension cable with a minimum section of 3 × 1 mm^2 .
■ The connection between power cord and extension cable must not lie in water.
If couplings of the power cord or extension cable are replaced the splash protection and the mechanical tightness must be ensured.
■ The operator must use the appliance correctly. When working with the appliance, he must consider the local conditions and pay due care and attention to other persons, in particular children, who are nearby.
This appliance can be used by children aged from 8 years and above and persons with reduced physical, sensory or mental capabilities or lack of experience and knowledge if they have been given supervision or instruction concerning use of the appliance in a safe way and understand the hazards involved. Children shall not play with the appliance. Cleaning and user maintenance shall not be made by children without supervision.
■ Never leave the appliance unattended when it is in operation.
■ Be very careful while cleaning tiled walls with sockets.
Caution
■ Make sure that the power cable or extension cables are not damaged by running over, pinching, dragging or similar. Protect the power cable from heat, oil, and sharp edges.
■ Never fill solvents, solvent-containing liquids or undiluted acids (e.g. detergents, benzene, paint thinner, and acetone) into the water reservoir as these substances affect the materials used on the appliance.
■ The appliance must not be carried during cleaning.
■ The appliance must provide of a stable ground.
■ Use and store the unit only in accordance with the specifications in the description and/or figure.
■ The steam switch must not be locked during the operation.
■ Protect the appliance from rain. Do not store outside.
Safety Devices
Caution
Safety devices protect the user and must not be modified or bypassed.
Pressure controller
The pressure controller keeps the boiler pressure during the operation as constant as possible. The heating is turned off if the maximum operating pressure of 4 bar is reached in the boiler and is reactivated in case of a pressure drop in the boiler due to steam tapping.
Boiler thermostat
If, in case of a malfunction, there is no water in the boiler, the temperature in the boiler rises. The boiler thermostat turns off the heating. Once the boiler is filled, normal operation can continue.
Safety thermostat
The safety thermostat turns off the appliance if the boiler thermostat and the pressure controller fails and the appliance overheats in case of a malfunction. Please contact your local KÄRCHER customer service to arrange for the reset of the safety thermostat.
Maintenance lock
The maintenance lock acts as a pressure control valve at the same time. It seals the boiler against the steam pressure that builds up in the boiler.
If the pressure controller is defect and the steam pressure in the boiler rises, the pressure control valve, and steam is emitted through the maintenance lock to the outside.
Please contact your local KÄRCHER customer service before you put the appliance into operation again.
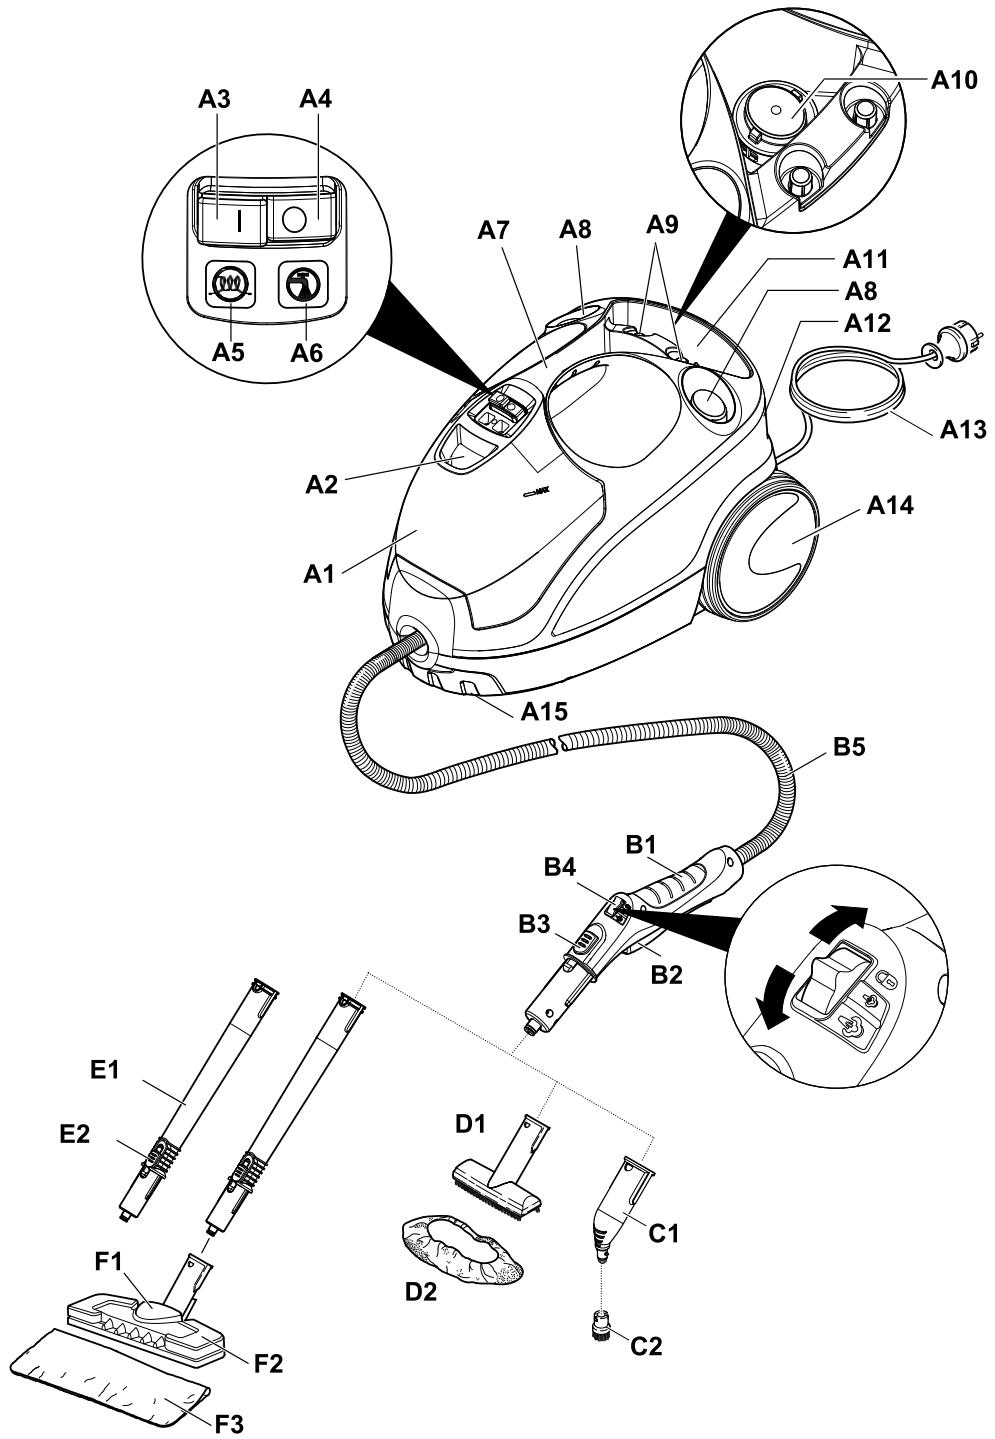
Description of the Appliance
→ Illustrations on fold-out page 4!

A1 Water reservoir
A2 Filling the Water Reservoir
A3 Switch - ON
A4 Switch - OFF
A5 Indicator lamp - heating (GREEN)
A6 Indicator lamp "water shortage" (RED)
A7 Carrying handle
A8 Holder for accessories
A9 Holder for accessories
A10 Maintenance lock
A11 Storage for mains connection cable
A12 Storage holder for floor nozzle
A13 Mains cable with mains plug
A14 Running wheels (2 ea.)
A15 Steering roller
B1 Steam gun
B2 Steam lever
B3 Unlocking button
B4 Selector switch for the steam volume (with child protection)
B5 Steam hose
C1 Detail nozzle
C2 Round brush
D1 Hand nozzle
D2 Terry cloth cover
E1 Extension tubes (two tubes)
E2 Unlocking button
F1 Floor nozzle
F2 Retaining clip
F3 Terry floor cloth
Quick Reference
→ Illustrations on Page 2
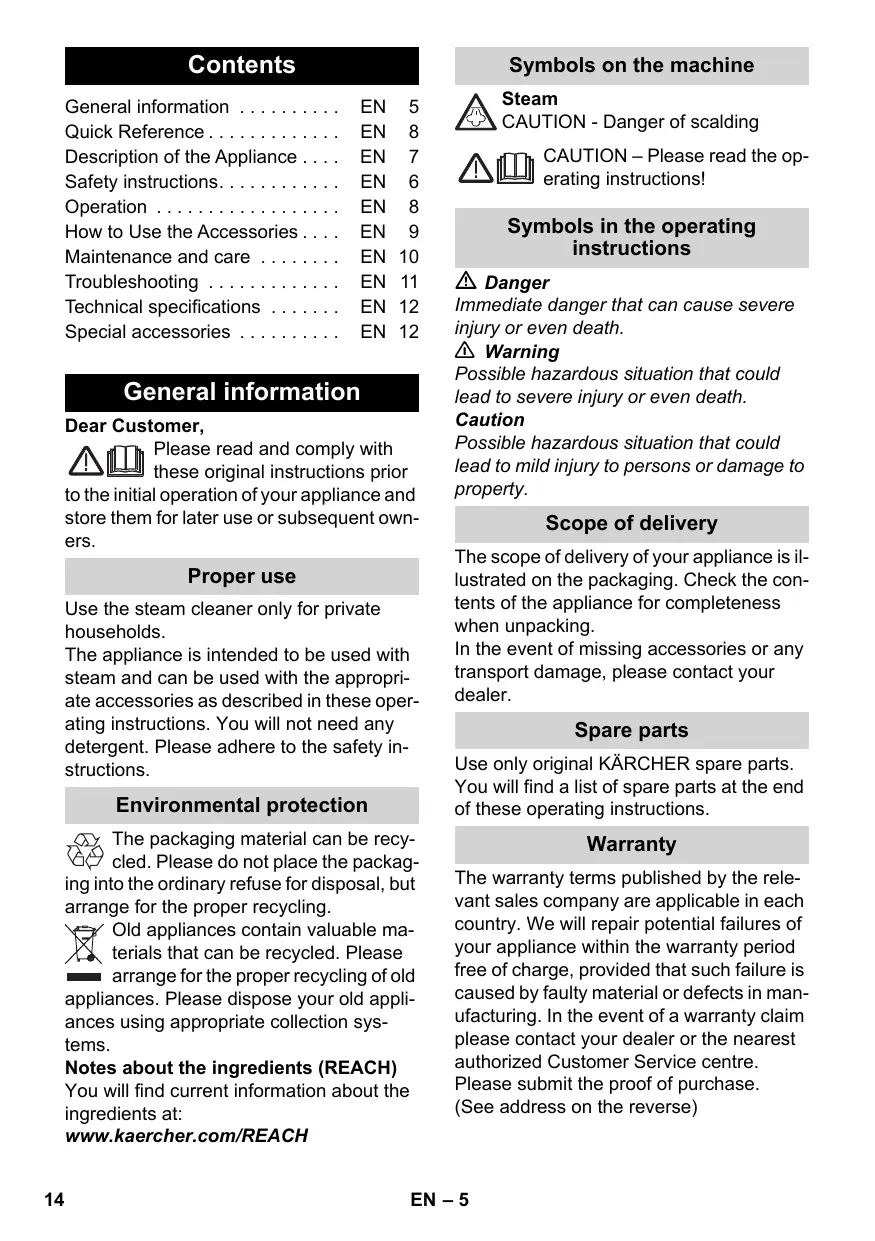
1 Fill the water reservoir up to the "MAX" marking.
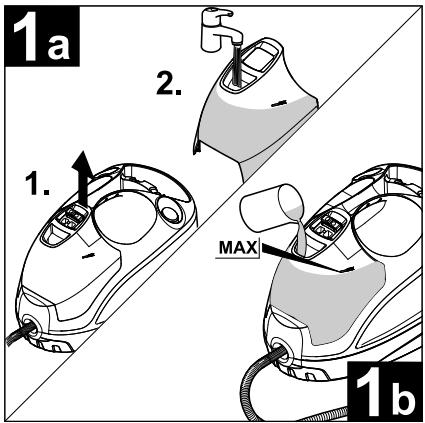
2 Plug in the main plug.
Turn on the appliance.
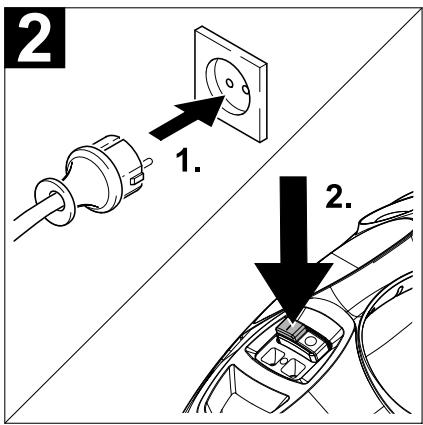
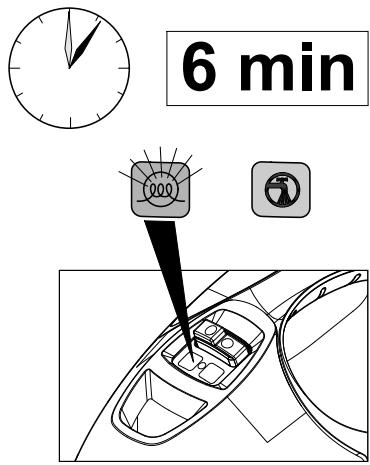
3 Indicator lamp "heating on" is blinking (green)
Wait until the indicator lamp (heater) lights up permanently.
4 Connect the accessories to the steam gun. The steam cleaner is ready to use.
Operation
→ Illustrations on fold-out page 3!

Attaching the Accessories
→ Illustration A
Insert steering roller and transport wheels and lock them.
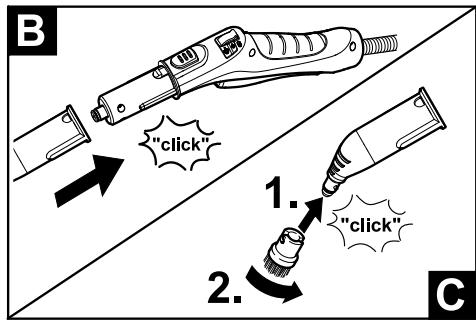
→ Illustration B + C
Connect the required accessories (see Chapter "How to use the accessories") to the steam gun. Insert the open end of the accessory on the steam gun and push onto the steam gun until the un-locking button of the steam gun locks into place.
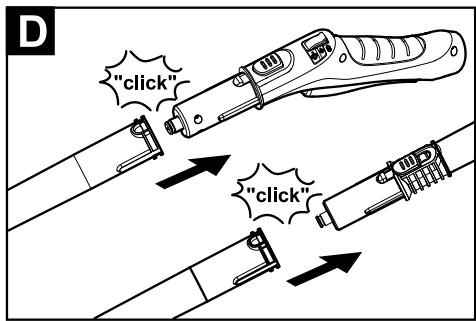
→ Illustration D
Use the extension tubes if necessary. To do so, connect one or both extension tubes to the steam gun. Insert the required accessories on the free end of the extension tube.
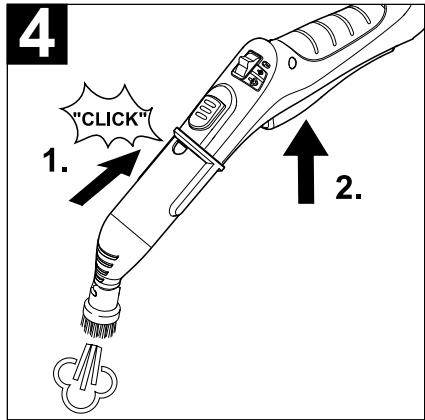
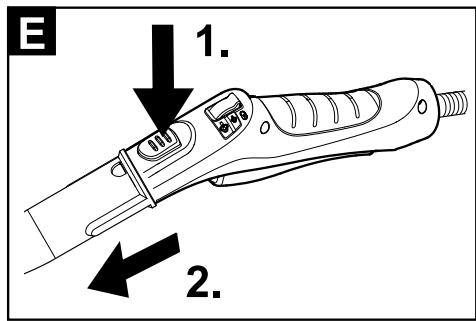
Removing the Accessories
⚠️ Danger
Hot water may drip out of the accessory parts while you are detaching them! Never detach accessory parts while steam streams out - risk of scalding!
→ Move the selector switch for the steam volume back (steam lever locked).
→ Illustration E
To detach the accessory parts, press the unlocking button and pull the items apart.
Filling the Water Reservoir
The water reservoir may be refilled at any time.
Caution
Do not use condensation water from the drier!
Do not fill with detergent or other additives (for example fragrances)!
Do not use pure distilled water! Max. 50% distilled water and 50% tap water.
Do not use collected rain water!
→ Illustration 1
You can remove the water reservoir to fill it or you can fill it directly on the appliance.
Take off water reservoir
→ Pull the water reservoir straight up.
→ Fill the water reservoir up to the "MAX" marking while positioned vertically under the water tap.
→ Insert the water reservoir and press downwards until it arrests.
Directly on the appliance
→ Pour water from a container into the funnel inlet. Fill up to the "MAX" marking.
Turning on the Appliance
→ Place the unit securely on a firm surface.
→ Insert the mains plug into a socket.
→ Press the ON switch to turn on the appliance.
Note: If there is no or not enough water in the steam boiler, the water pump starts and supplies water from the reservoir into the steam boiler. The filling process may take several minutes.
→ Wait until the indicator lamp (heater) lights up permanently.
The steam cleaner is ready to use.
Refilling Water
In case of water shortage, the indicator lamp "water shortage" glows red in the water reservoir and a signal can be heard.
→ Fill the water reservoir up to the "MAX" marking.
Note: The water pump tries to fill the steam boiler in short intervals. If the filling process is successful, the red indicator lamp goes off.
Adjusting the Steam Quantity
Use the selector switch for the steam volume to regulate the discharged steam. The selector switch has three positions:

Maximum steam volume

Reduced steam volume

No steam - child protection
Note: In this lever position, the steam lever cannot be used.
→ Set selector switch to the required steam volume.
→ While operating the steam switch, always direct the steam gun at a separate piece of cloth until the steam is emitted evenly.
Turning Off the Appliance
→ Press the OFF switch to turn off the appliance.
→ Disconnect the mains plug from the socket.
→ Empty the residual water from the water reservoir.
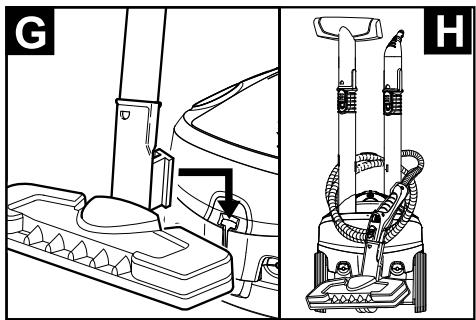
Storing the Appliance
Illustrations G - H
→ Insert the round brush into a small holder for accessories.
→ Insert the manual nozzle and detail nozzle onto each extension pipe.
→ Put the extension pipes into the large accessory compartments.
→ Hook the floor nozzle into the parking position.
→ Wrap the steam hose around the extension pipes and insert the steam pistol into the floor nozzle.
→ Stow away the mains cable in the accessory holder for the mains cable.
How to Use the Accessories
Important application instructions
Cleaning floor surfaces
It is recommended to sweep or vacuum the floor prior to using the steam cleaner. This way, the floor is already cleared of dirt/loose particles prior to the wet cleaning.
Refreshing textiles
Prior to treatment with the steam cleaner, always check the reaction of the textiles in an inconspicuous location: Steam at first, then let dry and then check for colour or shape changes.
Cleaning of Coated or Lacquered Surfaces
When cleaning painted or plastic-coated surfaces, as found on kitchen and living room furniture, doors, parquet; wax, furniture polish, plastic surfaces or paint can come loose or stains can be created. When cleaning these surfaces, briefly steam a cloth and wipe the surfaces with it.
Caution
Never direct the steam jet at glued edges as the edge band may loosen. Do not use the steam cleaner on unsealed wooden or parquet floors.
Cleaning of Glass
In case of low outside temperatures, especially in the winter, warm up the window pane by slightly steaming the entire glass surface. This will prevent tensions on the surface which might lead to glass breakage.
Then clean the window surface with the hand nozzle and attachment. Use a squee-gee to remove the water or wipe the surfaces dry.
Caution
Do not direct steam onto the sealed locations of the window frame to prevent damage.
Steam gun
You can use the steam gun without any additional accessories, e.g.:
- to remove odours and wrinkles from hanging clothes by steaming them at a distance of 10 to 20 cm.
– to remove dust from plants. Here, keep a distance of 20-40 cm. - for moist dusting, by briefly steaming the cloth and wiping the furniture with it.
Detail nozzle
The closer this nozzle is to the contaminated area, the higher the cleaning effect, as the temperature and the steam are highest at the nozzle output. Especially suited for cleaning difficult access locations, joints, fittings, drains, sinks, toilets, blinds and heaters. Heavy lime scale can be drenched in vinegar prior to steam-cleaning. Let the vinegar penetrate for about 5 minutes.
Round brush
The round brush can be installed onto the detail nozzle as an accessory. Attached brushes can therefore be used to remove heavy soiling.
Caution
Not suited for the cleaning of sensitive surfaces.
→ Illustration ©
Attach the round brush to the detail nozzle.
Hand nozzle
Pull the terry cloth cover over the hand nozzle. Especially well-suited for small washable areas, shower stalls and mirrors.
Floor nozzle
Suited for all washable walls and floor coverings, e.g. stone floors, tiles and PVC floors. Work slowly on very dirty surfaces to allow the steam to act on the dirt for a longer period of time.
Note: Detergent residue or care emulsions that are still present on the surfaces to be cleaned, can lead to smears when steam cleaned. However, these will disappear with repeated cleaning procedures.
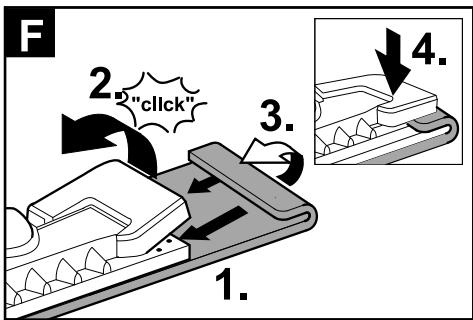
→ Illustration F
Attach the floor cloth to the floor nozzle.
1 Fold the floor cloth the long way and place the floor nozzle on top of it.
2 Open holding clamps.
3 Place the cloth ends into the openings.
4 Close the holding clamps.
Caution
Do not insert fingers between the clamps.
Parking the floor nozzle
→ Illustration G
During work breaks, hook the floor nozzle into the parking holder.
Maintenance and care
⚠️ Danger
Always disconnect the mains plug and allow the steam cleaner to cool down before performing any maintenance work.
Rinsing the steam boiler
Rinse the steam cleaner boiler at the latest after 10 boiler fillings.
→ Disconnect the mains plug from the socket.
→ Allow the steam cleaner to cool down.
→ Empty the water reservoir.
→ Remove the accessories from the accessory compartments.
Illustration 1
→ Open the maintenance lock. For this, place the open end of an extension pipe onto the maintenance lock, lock it into the guide and unscrew it.
→ Fill the boiler with water and shake it strongly. This dissolves lime scaling residing on the boiler bottom.
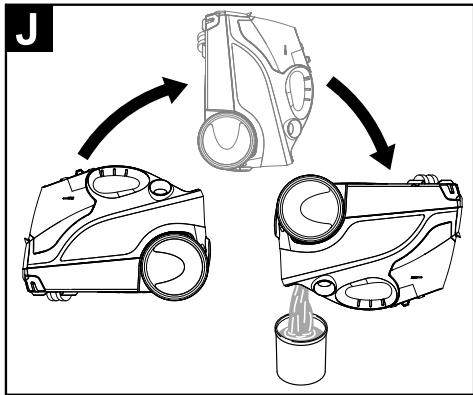
→ Completely empty the steam boiler to remove existing water (see Fig. J).
Descaling the Steam Boiler
As limes cale builds up on the boiler walls, we recommend to de scale the boiler in the following intervals (RF = reservoir fillings):
| Degree of hard-ness | ° dH | mmol/l | RF | |
| I | soft | 0-7 | 0-1,3 | 100 |
| II | medium | 7-14 | 1,3-2,5 | 90 |
| III | hard | 14-21 | 2,5-3,8 | 75 |
| IV | very hard | >21 | >3,8 | 50 |
Note: Please contact your Conservancy Board or the local water supply company to inquire about the hardness of your water.
→ Disconnect the mains plug from the socket.
→ Allow the steam cleaner to cool down.
→ Empty the water reservoir.
→ Remove the accessories from the accessory compartments.
Illustration I
→ Open the maintenance lock. For this, place the open end of an extension pipe onto the maintenance lock, lock it into the guide and unscrew it.
→ Completely empty the steam boiler to remove existing water (see Fig. J).
⚠ Warning
Only use products approved by KÄRCHER to exclude any damages of the appliance.
→ User the KÄRCHER decalcifier sticks (order no. 6.295-206) to decalcify the water. Please follow the dosing instructions on the packaging while using the decalcifying solution.
Caution
Use caution when filling and emptying the steam cleaner. The descaling solution can have an aggressive effect on delicate surfaces.
→ Pour the descaling solution into the boiler and allow it to react for approximately 8 hours.
⚠ Warning
Do not screw the maintenance lock onto the appliance during the decalcifying.
Do not use the steam cleaner as long as there is decalcifying agent in the boiler.
→ Completely empty the descaling solution after 8 hours. A small amount of the solution will remain in the boiler. Therefore, you should rinse the boiler two to three times with cold water to remove any residues of the descaler.
→ Completely empty the steam boiler to remove existing water (see Fig. J).
→ Allow the storage compartment for the mains cable to dry.
→ Screw the maintenance lock in using the extension pipe.
→ Fill water reservoir (see page 8).
→ The steam cleaner is ready to use.
Care of the Accessories
Note: The floorcloth and the terry cloth cover have been pre-washed and can be used immediately for working with the steam cleaner.
→ You can wash dirty floorcloths and terry cloth covers in the washing machine at 60^ C. Do not use a liquid softener as this would affect the ability of the cloths to pick up dirt. You may tumble dry the cloths.
Troubleshooting
Often, failures have simple causes and you can do the troubleshooting yourself using the following overview. If you are in doubt or if the failure is not listed here please contact the authorized customer service.
⚠️ Danger
Always disconnect the mains plug and allow the steam cleaner to cool down before performing any maintenance work.
Repair works may only be performed by the authorized customer service.
Long heating-up time
Steam boiler is decalcified
→ Descale the steam boiler.
No steam
Indicator lamp - "water shortage" blinks red and signal sounds
No water in the water reservoir.
→ Fill the water reservoir up to the "MAX" marking.
Indicator lamp "water shortage" glows red
No water in the steam boiler. Overheating protection of the pump was triggered.
→ Turn off the appliance.
→ Fill the water reservoir
→ Turn on the appliance.
Water reservoir has not been inserted properly or is calcified.
→ Remove the water reservoir and rinse it.
→ Insert the water reservoir and press downwards until it arrests.
Steam lever cannot be pressed anymore
Steam switch is secured with the lock / child-proof lock.
→ Move the selector switch for the steam volume to the front.
High water output
Steam boiler is decalcified
→ Descale the steam boiler.
Technical specifications
Power connection
| Voltage | 220-240 V1~50/60 Hz |
| Protection class | IPX4 |
| Protective class | I |
| Performance data | |
| Heating output | 1500 W |
| Operating pressure max. | 0,32 MPa |
| Heating time | 6 Minutes |
| Steam volume | |
| Continuous steaming | 40 g/min |
| Steam push max. | 100 g/min |
| Filling quantity | |
| Water reservoir | 0,8 l |
| Boiler capacity | 0,5 l |
| Dimensions | |
| Weight (without accessories) | 4,1 kg |
| Length | 350 mm |
| Width | 280 mm |
| Height | 270 mm |
Subject to technical modifications!
Special accessories
Order number
Microfibre cloth set, bath 2.863-171
2 soft floor cloths made of plush velour, 1 abrasive cover for the hand nozzle, 1 polishing cloth for the mirrors and fixtures
Microfibre cloth set, kitchen 2.863-172
2 soft floor cloths made of plush velour, 1 soft cover made of plush velour, 1 cloth for the streak-free cleaning of stainless steel surfaces
Microfibre cloth set, soft floor 2.863-173
2 soft floor cloths made of velvet velour Microfibre cloth set, soft cover 2.863-174 2 soft covers made of plush velour
Terry-cloth rags 6.369-357
5 floor cloths made of cotton Terry-cloth covers 6.370-990 5 covers made of cotton
Round brush kit 2.863-058
4 round brushes for the detail nozzle
Round brush kit with brass bristles 2.863-061
Removal of especially stubborn dirt ideal for insensitive surfaces.
Round brush with scraper 2.863-140
Round brush with two rows of heat-resistant bristles and a scraper. Not suitable for sensitive surfaces.
Power nozzle and extension 2.884-282
For the cleaning of difficult to access areas (such as corners) with increased cleaning power.
Turbo steam brush 2.863-159
For cleaning tasks where you would usually have to scrub.
Textile care nozzle 4.130-390
For freshening up clothes and textiles.
Wallpaper remover 2.863-062
To remove wallpaper and glue residue.
Decalcifying sticks (9 pieces) 6.295-206
Contenu
www.kaercher.com/REACH
www.kaercher.com/REACH
www.kaercher.com/REACH
Geen water in de watertank.
→ Watertank vullen tot marking "MAX".
Controlelampje - te weinig water brandt rood
Geen water in stoomketel. Beveiliging te- gen oververhitting van de pomp is in wer- king gezet.
www.kaercher.com/REACH
www.kaercher.com/REACH
www.kaercher.com/REACH
www.kaercher.com/REACH
Symboler på maskinen

Damp ADVARSEL – Forbrenningsfare

OBS – Les bruksanvisningen!
Symboler i bruksanvisningen
⚠️ Fare
For en umiddelbar truende fare som kan føre til store personskader eller til død.
Advarsel
→ Still valgbryteren for dampmengden for-over.
Stort vannutløp
Kalkavleiringer i dampkjelen
→ Avkalk dampkjelen.
Tekniske data
Strømtilkobling
| Spenning | 220-240 V1~50/60 Hz |
| Beskyttelsesklasse | IPX4 |
| Beskyttelsesklasse | I |
| Effektspesifikasjoner | |
| Varmeeffekt | 1500 W |
| Maks. driftstrykk | 0,32 MPa |
| Oppvarmingstid | 6 Minutter |
| Dampvolum | |
| Permanent damping | 40 g/min |
| Damptrinn maks. | 100 g/min |
| Fyllingsmengde | |
| Vanntank | 0,8 l |
| Dampkjele | 0,5 l |
| Mål | |
| Vekt (uten tilbehør) | 4,1 kg |
| Lengde | 350 mm |
| Bredde | 280 mm |
| Høyde | 270 mm |
Det tas forbehold om tekniske endringer!
Tilleggsutstyr
Bestillingsnummer
www.kaercher.com/REACH
Symboler på maskinen

Ånga
www.kaercher.com/REACH
www.kaercher.com/REACH
Σύμβολα στη συσκευή

Ατμός
www.kaercher.com/REACH
Cihazdaki semboller

Buhar
www.kaercher.com/REACH
www.kaercher.com/REACH
Symboly na zařízení

Pára
www.kaercher.com/REACH
Simboli na napravi

Para
POZOR - nevarnost opeklin

POZOR – Preberite navodilo za uporabo!
www.kaercher.com/REACH
Mult stimate client,

www.kaercher.com/REACH
Simboluri pe aparat

Abur
www.kaercher.com/REACH
www.kaercher.com/REACH
Simboli na aparatu

Para
www.kaercher.com/REACH
Simboli na aparatu

Para
PAŽNJA - Opasnost od opekotina

PAŽNJA - pročitajte uputstvo za rad!
Simboli u uputstvu za rad
⚠️ Opasnost
Ukazuje na neposredno preteću opasnost koja dovodi do teških telesnih povreda ili smrti.
⚠ Upozorenje
Ukazuje na eventualno opasnu situaciju koja može dovesti do teških telesnih povreda ili smrti.
Oprez
Ukazuje na eventualno opasnu situaciju koja može dovesti do lakših telesnih povreda ili izazvati materijalnu štetu.
Obim isporuke
Sadržaj isporuke Vašeg uređaja je prikazan na ambalaži. Pre vađenja uređaja iz ambalaže proverite da li je sadržaj potpun.
Ako pribor nedostaje ili je došlo do oštećenja prilikom transporta, molimo da o tome obavestite svog prodavca.
Rezervni delovi
Upotrebljavajte samo originalne rezervne delove firme KÄRCHER. Pregled rezervnih delova naći ćete na kraju ovog uputstva za rad.
Garancija
U svakoj zemlji važe garantni uslovi koje je izdala naša nadležna distributivna organizacija. Eventualne smetnje na uređaju za vreme trajanja garancije uklanjamo besplatno, ukoliko je uzrok greška u materijalu ili proizvodnji. U slučaju koji podleže garanciji obratite se sa potvrdom o kupovini Vašem prodavcu ili najbližoj ovlašćenoj servisnoj službi. (Adresu ćete naći na poleđini)
Sigurnosne napomene
⚠️ Opasnost
■ Zabranjen je rad u područjima ugroženim eksplozijom.
■ Prilikom upotrebe uređaja u opasnim područjima treba poštovati odgovarajuće sigurnosne propise.
■ Uređaj nemojte koristiti u bazenima u kojima ima vode.
■ Uređaj se ne sme koristiti za čišćenje električnih aparata i uređaja kao što su npr. klasične i mikrotalasne pećnice, aspiratori, televizori, lampe, fenovi za kosu, električne grejalice i slično.
■ Pre upotrebe proverite da li su uređaj i pribor u ispravnom stanju. Ako stanje nije besprekorno, ne sme se upotrebljavati. Posebno proverite priključni strujni kabl, zatvarač za izvođenje radova održavanja i parno crevo.
Oštećen strujni priključni kabl odmah dajte na zamenu ovlašćenoj servisnoj službi/električaru.
Oštećeno parno crevo odmah zamenite. Sme se upotrebljavati samo parno crevo kojeg je preporučio proizvođač (kataloški broj vidi u spisku rezervnih delova).
■ Mrežni utikač in utičnicu nikada ne dodirujte vlažnim rukama.
Parom ne čistite predmete koji sadrže materije štetne po zdravlje (npr. azbest).
■ Mlaz pare na maloj udaljenosti nikada ne dodirujte rukom niti usmeravajte prema ljudima ili životinjama (opasnost od opekotina).
■ Zatvarač za izvođenje radova održavanja se tokom rada ne sme otvarati.
■ Uređaj sme da se priključuje samo na električni priključak kojeg je izveo elektroinstalater u skladu sa IEC 60364.
■ Uređaj priključujte samo na izmeničnu struju. Napon se mora podudarati sa tipskom pločicom uređaja.
⚠ Upozorenje
■ U vlažnim prostorijama, kao što je npr. kupatilo, uređaj priključujte na utičnice sa predspojenom FI zaštitnom sklopkom.
■ Neodgovarajući produžni kablovi mogu biti opasni. Upotrebljavajte samo produžne kablove zaštićene od prskanja vode sa prečnikom od najmanje 3x1 mm².
■ Spoj strujnog i produžnog kabla ne sme ležati u vodi.
Kod zamene spojeva na strujnom priključnom ili produžnom kablu mora se obezbediti zaštita od prskanja i mehanička čvrstina.
Korisnik mora uređaj upotrebljavati u skladu sa njegovom namenom. Mora voditi računa o lokalnim uslovima i kod rada sa uređajem paziti na ljude u okolini.
Deca starija od 8 godina i osobe sa smanjenim fizičkim, senzornim ili mentalnim mogućnostima opažanja ili s ograničenim iskustvom i znanjem smeju koristiti ovaj uređaj samo uz nadzor ili ako su upućene u to kako sigurno koristiti uređaj kao i u eventualne povezane opasnosti. Deca ne smeju da se igraju s uređajem. Deca ne smeju obavljati poslove održavanja i čišćenja uređaja bez nadzora.
■ Uređaj za vreme rada nikada ne ostavljajte bez nadzora.
■ Opreznost pri čišćenju popločanih zidova sa utičnicama.
Oprez
www.kaercher.com/REACH
Символи на уреда

Пара
www.kaercher.com/REACH
Lisavarustuse monteerimine
→ Joonis A
www.kaercher.com/REACH
Simboli uz ierīces

Tvaiks
www.kaercher.com/REACH
www.kaercher.com/REACH
Знаки на приладі

Пара
natural_image
Icon of a gear and wrench inside a square frame (no text or symbols)- Inhalt
- General information
- Dear Customer,
- Proper use
- Environmental protection
- Notes about the ingredients (REACH)
- Symbols on the machine
- Steam
- Symbols in the operating instructions
- ⚠️ Danger
- ⚠ Warning
- Caution
- Scope of delivery
- Spare parts
- Warranty
- Safety instructions
- Danger
- Warning
- Safety Devices
- Pressure controller
- Boiler thermostat
- Safety thermostat
- Maintenance lock
- Description of the Appliance
- → Illustrations on fold-out page 4!
- Quick Reference
- → Illustrations on Page 2
- Operation
- Attaching the Accessories
- Removing the Accessories
- Filling the Water Reservoir
- Take off water reservoir
- Directly on the appliance
- Turning on the Appliance
- Refilling Water
- Adjusting the Steam Quantity
- Turning Off the Appliance
- Storing the Appliance
- Illustrations G - H
- How to Use the Accessories
- Important application instructions
- Cleaning floor surfaces
- Refreshing textiles
- Cleaning of Coated or Lacquered Surfaces
- Cleaning of Glass
- Steam gun
- Detail nozzle
- Round brush
- Hand nozzle
- Floor nozzle
- Parking the floor nozzle
- Maintenance and care
- Rinsing the steam boiler
- Descaling the Steam Boiler
- Illustration I
- Care of the Accessories
- Troubleshooting
- Long heating-up time
- Steam boiler is decalcified
- No steam
- Indicator lamp - "water shortage" blinks red and signal sounds
- Indicator lamp "water shortage" glows red
- Steam lever cannot be pressed anymore
- High water output
- Technical specifications
- Special accessories
- Microfibre cloth set, bath 2.863-171
- Microfibre cloth set, kitchen 2.863-172
- Microfibre cloth set, soft floor 2.863-173
- Terry-cloth rags 6.369-357
- Round brush kit 2.863-058
- Round brush kit with brass bristles 2.863-061
- Round brush with scraper 2.863-140
- Power nozzle and extension 2.884-282
- Turbo steam brush 2.863-159
- Textile care nozzle 4.130-390
- Wallpaper remover 2.863-062
- Decalcifying sticks (9 pieces) 6.295-206
- Contenu
- Controlelampje - te weinig water brandt rood
- Symboler på maskinen
- Symboler i bruksanvisningen
- ⚠️ Fare
- Advarsel
- Stort vannutløp
- Kalkavleiringer i dampkjelen
- Tekniske data
- Tilleggsutstyr
- Σύμβολα στη συσκευή
- Cihazdaki semboller
- Buhar
- Symboly na zařízení
- Pára
- Simboli na napravi
- Para
- Mult stimate client,
- Simboluri pe aparat
- Simboli na aparatu
- Simboli u uputstvu za rad
- ⚠️ Opasnost
- ⚠ Upozorenje
- Oprez
- Obim isporuke
- Rezervni delovi
- Garancija
- Sigurnosne napomene
- Символи на уреда
- Пара
- Lisavarustuse monteerimine
- → Joonis A
- Simboli uz ierīces
- Tvaiks
- Знаки на приладі
Brand : KARCHER
Model : SC2500, SC2500C
Category : Steam cleaner