010-089 - Orbital sander Meec Tools - Free user manual and instructions
Find the device manual for free 010-089 Meec Tools in PDF.


| Product Type | Orbital Sander |
| Brand | Meec Tools |
| Model | 010-089 |
| Rated Voltage | 230 VAC / 50 Hz |
| Power Consumption | 260 W |
| No-Load Speed | 13,000 rpm |
| Sanding Pad Size | 90 x 187 mm |
| Sandpaper Size | 90 x 229 mm |
| Weight | 1.6 kg |
| Sound Pressure Level | 82 dB(A) (K=3 dB) |
| Sound Power Level | 93 dB(A) (K=3 dB) |
| Vibration Level | 5.4 m/s² (K=1.5 m/s²) |
| Dust Collection | Included dust collector with filter |
| Lock-On Button | Yes, for continuous operation |
| Power Switch | Push button with lock-on |
| Maintenance | Clean dust collector regularly; no lubrication required |
| Safety Features | Double insulation, lock-on button, sandpaper clamps |
| Included Accessories | Dust collector, hole punch for sandpaper, operating instructions |
| Certifications | CE, Machinery Directive 2006/42/EC, EMC 2004/108/EC, RoHS 2011/65/EU |
| Manufacturer | Jula AB, Box 363, SE-532 24 SKARA, SWEDEN |
Frequently Asked Questions - 010-089 Meec Tools
User questions about 010-089 Meec Tools
0 question about this device. Answer the ones you know or ask your own.
Ask a new question about this device
Download the instructions for your Orbital sander in PDF format for free! Find your manual 010-089 - Meec Tools and take your electronic device back in hand. On this page are published all the documents necessary for the use of your device. 010-089 by Meec Tools.
USER MANUAL 010-089 Meec Tools

natural_image
Red and black electric power tool with visible wiring, no text or symbols on bodyEN - Operating instructions in original
Date of production: 2014-12-09
© Jula AB
SVENSKA....4
SÄKERHETSANVISNINGAR....4
TEKNISKA DATA....7
BESKRIVNING 8
HANDHAVANDE 8
UNDERHÅLL 11
NORSK 14
SIKKERHETSANVISNINGER 14
TEKNISKE DATA 17
BESKRIVELSE....18
HÄNDTERING 18
VEDLIKEHOLD 21
POLSKI 24
ZASADY BEZPIECZEŃSTWA .....24
DANE TECHNICZNE 27
OPIS 28
OBSŁUGA 28
KONSERWACJA 31
ENGLISH 34
SAFETY INSTRUCTIONS 34
TECHNICAL DATA....37
DESCRIPTION 38
OPERATION....38
MAINTENANCE 41
SÄKERHETSANVISNINGAR
Starta/stänga av
natural_image
Simple line drawing of a trash bin with no text or symbolsVärna om miljön!
Starte og stoppe
natural_image
Symbol of a trash bin with no visible text or labelsVerne om miljøet!
natural_image
Pure electrical circuit lines without any symbolsDBAJ O ŚRODOWISKO!
Read the operating instructions carefully before use!
Please retain for future reference.
Work area
- Keep the work area clean and well lit. Cluttered or dark areas invite accidents.
- Do not operate power tools in explosive environments, for example in the presence of flammable liquids, gases or dust. Power tools create sparks which may ignite the dust or fumes.
- Keep children and bystanders at a safe distance while operating a power tool. They may distract the user and cause them to lose control of the sander.
Electrical safety
- The sander plug must fit the power socket. Never modify the plug in any way. Never use an adapter together with earthed equipment. Unmodified plugs and matching sockets will reduce risk of electrocution.
- Avoid body contact with earthed surfaces, such as pipes, radiators, ranges and refrigerators. There is an increased risk of electrocution if the user's body is earthed.
- Do not expose power tools to rain or wet conditions. Water entering a power tool will increase the risk of electrocution.
- Take care with the power cable. Never use the cable for carrying, pulling or unplugging the sander. Keep the power cable away from heat, oil, sharp edges and moving parts. Damaged or entangled electrical cables increase the risk of electrocution.
- When operating the sander outdoors, an extension cable that is suitable for outdoor use must be used. This reduces the risk of electrocution.
- If operating the sander in a damp environment is unavoidable, use a power supply that is protected by a residual current device (RCD). Using an RCD reduces the risk of electrocution.
Personal safety
- Be careful. Always be careful and use common sense when working with power tools. Do not use a power tool while you are tired or under the influence of drugs, alcohol or medication. A moment of inattention while operating power tools may result in serious injury.
- Use personal protective equipment. Always wear eye protection. Protective equipment such as dust masks, non-skid safety shoes, hard hats and ear defenders that are tailored to the specific type and use of the tool, will reduce the risk of personal injuries.
- Avoid unintentional starting. Ensure the power switch is in the off position before connecting the sander to the mains supply. Do not pick up or carry the sander whilst it is in use. Carrying the sander with your finger on the power switch or connecting the sander to the mains when the power switch is in the on position increases the risk of accidents.
- Remove any adjusting wrench or similar before starting the sander. Any tool left attached to a rotating
part of the sander may result in personal injury.
- Do not overreach. Keep a proper footing and balance at all times. This enables better control of the sander in unexpected situations.
- Dress appropriately. Do not wear loose-fitting clothes or jewellery. Keep your hair, clothing and gloves away from moving parts. Loose clothes, jewellery or long hair can be caught in moving parts.
- If dust extraction and dust collection equipment is available, this should be connected and used correctly. This type of equipment reduces the risk of problems caused by dust.
- Use a face mask that is designed for work in dusty environments. WARNING! Dust caused by sanding, sawing, drilling and other similar operations may contain chemicals known to cause cancer, birth defects and other genetic disorders. The following chemicals may be hazardous:
– Lead from lead-based paints.
– Silicon dioxide from bricks, cement and similar products.
– Arsenic and chromium from chemically treated lumber.
- The risk of exposure depends on how often this type of work is carried out. Mitigate the risks by working in a well-ventilated area and use approved protective equipment, e.g. a face mask specifically designed to filter out microscopic particles.
Operation and care of power tools
- Do not force the sander. Use the correct tool for the planned work. The sander will work better and be safer with the load for which it is designed.
- Do not use the sander if it cannot be turned on and off using the power switch. Any power tool that cannot be controlled with the switch is dangerous and must be repaired.
- Disconnect the power cable before making any adjustments, replacing accessories or putting the sander into storage. Such preventive safety measures reduce the risk of starting the sander accidentally.
- Keep power tools that are not in use stored out of the reach of children. Never let children or persons unfamiliar with the sander or who have not read these instructions operate it. Power tools are dangerous if they are used by inexperienced people.
- Maintain the sheet sander. Check that moving parts are correctly adjusted and move freely, that no parts are incorrectly mounted or broken and that there are no other factors that can affect how it works. If the sander is damaged, it must be repaired or replaced before being used again. Many accidents are caused by poorly maintained power tools.
- Keep cutting tools sharp and clean. Properly maintained cutting tools with sharp cutting edges are less likely to bind and are easier to control.
- Use the sander, accessories, etc. in accordance with these instructions, taking into account the working conditions and the work that is to be carried out. It is dangerous to use power tools for purposes other than those for which they are intended.
- Use the insulated gripping surfaces to hold the sander when performing an operation where the tool could come into contact with live wires or its own power cable. Contact with a live cable also causes the metal parts of the sander to become live and give the user an electric shock.
Service
The sander may only be serviced by qualified personnel using identical spare parts. This ensures that the sander remains safe to use.
Special safety instructions
- WARNING! Learn about the sheet sander. Read and absorb the contents of these operating instructions before connecting the sander. Users must be aware of the areas of use and limitations of the sander, as well as the risks that the sander can pose. In this way, the risk of electrical shock, fire and serious injury can be mitigated.
- Always use protective goggles that conform to the requirements of applicable safety standards. When using power tools, there is always a danger of foreign objects flying off and hitting the eyes of the user or those standing close by and causing permanent injury.
• Always use a dust mask when sanding. - Always use ear defenders when sanding, particularly if you are going to work for long periods without interruption.
• Always disconnect the sander from the mains before changing the sanding pad and prior to cleaning. - Do not use gloves, wear ties or loose clothing.
- Secure the workpiece. Use a vice or clamps to secure the workpiece if appropriate. This is safer than holding it with your hand and allows you to operate the sander with both hands.
- A workpiece that is too small to be secured safely must not be sanded using the machine.
• Always check that the area to be sanded does not contain nails or other foreign objects. - Keep your hands away from the sanding pad. Avoid placing your hands where there is a chance that they may come into the path of the sanding pad should the sander suddenly jerk or slide uncontrollably.
- Avoid damage caused by accidental starts by always disconnecting the plug from the mains socket before fitting or removing sandpaper or the dust collector.
- Keep the extension cable away from the work area. Position the extension cable so that it cannot become entangled in the workpiece, sander or other obstacle when working with the sander.
- If an extension cable is to be used, it must be in good condition. In addition, also ensure that the extension cable has a sufficiently large capacity (cable area) for the current used by the sander. Extension cables with an inadequate cable area deliver insufficient voltage, which leads to lower output and overheating.
- The table below shows the appropriate cable area based on cable length and the current strength specified on the type plate. If in doubt: choose the biggest cable area. The lower the number, the greater the capacity of the cable.
- Make sure the extension cable is correctly connected and is in good condition. Replace damaged extension cables or get an electrician to repair them prior to use. Protect extension cables from sharp objects, excessive heat, steam and damp areas.
- Check the following prior to each use of the sander:
— The sandpaper is in good condition and has been fitted correctly to the sander.
— The workpiece has been properly secured and there are not foreign objects impeding work.
- The user has put on safety goggles or face protection.
– The user has put on ear defenders and a dust mask.
TECHNICAL DATA
| Rated voltage 230 VAC / 50 Hz |
| Power 260 W |
| Unloaded rpm 13,000 rpm |
| Sanding pad size 90 x 187 mm |
| Sanding paper size 90 x 229 mm |
| Sound pressure level, LpA 82 dB(A), K=3 dB |
| Sound power level, LwA 93 dB(A), K=3 dB |
| Vibration level 5,4 m/s ^2 , K=1,5 m/s ^2 |
| Weight 1.6 kg |
Always use ear defenders!
The declared vibration value, which has been measured in line with a standardised testing method, can be used to compare different tools with each other and for a preliminary assessment of exposure.
WARNING! The actual vibration level during the power tool's use can vary from the specified total value depending on how the tool is used. You must therefore identify the safety measures required to protect the user, based on an estimate of exposure during actual operating conditions (taking into account all parts of the work cycle as well as the time the tool is switched off and when running idle, in addition to the start-up time).
DESCRIPTION
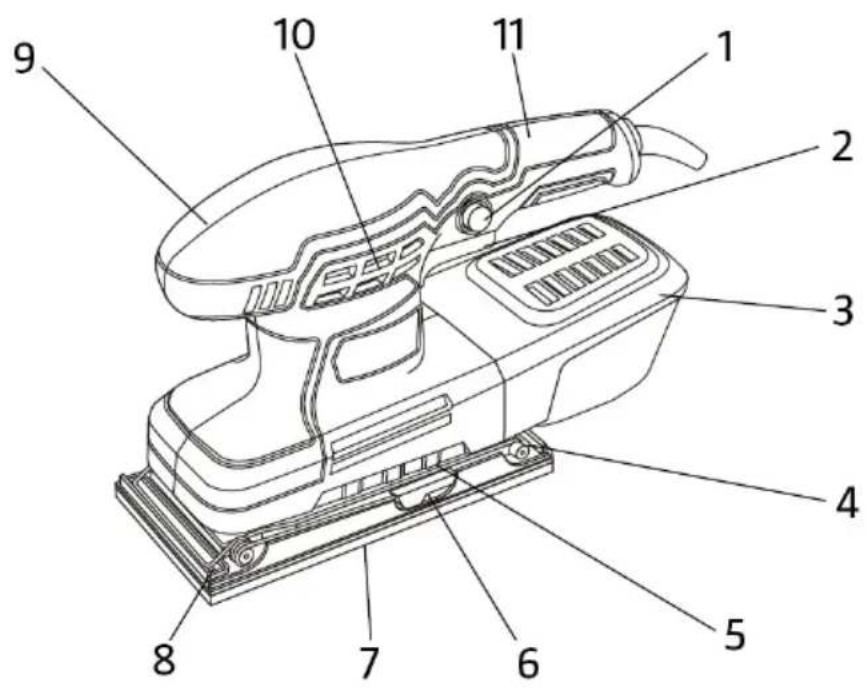
- Lock-on button
- Power switch
- Dust collector
- Rear sandpaper clamp
- Ventilation openings
-
Sandpaper clamp
-
Sanding plate
- Front sandpaper clamp
- Front handle
- Ventilation openings
- Main handle
OPERATION
Fitting sandpaper
- Lift the sandpaper clamps (6) upwards and outwards. The latches are located on either side of the lower part of the sander. This releases the front and rear sandpaper clamps (4 and 8) on the lower part of the sander.
- Place one end of the sandpaper, with the coarse side facing upwards, in the open front sandpaper clamp (8) and check that it is aligned with the sanding plate. Lift the sandpaper clamp latch upwards and inwards in order to secure the paper.
- Fold the sandpaper over the sanding plate and insert it in the open rear sandpaper clamp (4). NOTE! Make sure that the sandpaper is as tight as possible to the sanding plate in order to achieve the best possible sanding function.
- Lift the sandpaper clamp latch upwards and inwards in order to secure the paper.
Making holes in the sandpaper
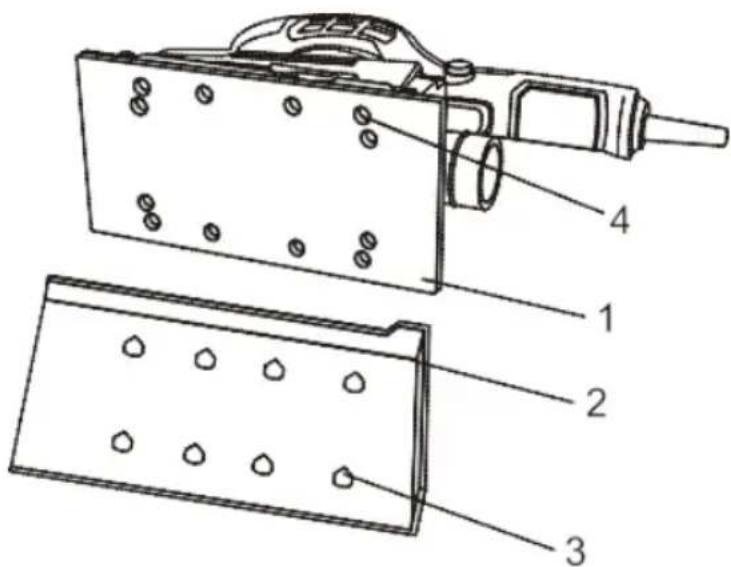
If a sandpaper without holes has been fitted, you can make holes yourself. Place the corner of the lower part of the sander in the hole punch with the corner (1) fully inserted in the corner of the hole punch (2). Press down firmly on the lower part of the hole punch. The sharp pins (3) make holes in the sandpaper (4) so that sanding dust can be removed.
Turning on/off
- Start the sander by pressing the power switch (2).
- Switch the sander off by releasing the power switch (2).
Lock-on button
The sander has a lock function that is practical if you need to sand for longer periods of time without interruption.
-
Lock the sander by first pressing the power switch (2) and then pressing the lock-on button (1).
-
Release the power switch and release the lock-on button. The sander will now continue to run.
-
Turn off the sander by pressing and then releasing the power switch.
This will interrupt the lock-on function.
Selecting sandpaper
- In order to achieve as high a quality result as possible, it is very important to select the right coarseness and type of sandpaper. Aluminium oxide, silicon carbide and other synthetic abrasive materials are the best for machine sanding. Natural abrasive materials such as flint and granite are too soft and are no suitable for machine sanding.
- Coarse sandpaper removes a lot of material, while finer sandpaper produces a more attractive finish after sanding. Which sandpaper is most appropriate for a particular application depends on the condition of the surface that is going to be sanded. NOTE! The coarseness of sandpaper is usually indicated by digits, with a higher number indicating a finer sandpaper and a lower number indicating a coarser sandpaper.
- If the surface to be sanded is very rough: start with a coarse sandpaper and sand until the surface is evenly sanded. Then use a medium coarse paper to remove abrasions from the coarse sanding, and a fine sandpaper to create a beautiful finish. Continue sanding with each sandpaper until the surface is evenly sanded.
Sanding
Securely clamp the workpiece or secure it in another way so that it cannot move during sanding. Ideally, use a vice if possible. WARNING! If the workpiece is not securely held, it may be thrown towards the user and cause injury.
Position the sander so that the entire sanding pad surface is in contact with the workpiece. Start the sander by pressing the power switch. Move the sander slowly over the workpiece and work in parallel lines until the entire piece has been sanded. When sanding wood, it is important that the sander is moved parallel with the grain, not across it. This makes sanding more efficient and achieves a more even finish. Turn off the sander by releasing the power switch once you have completed sanding. Do not remove the sanding pad from the workpiece until the sander has come to a complete stop.
NOTE!
- Do not start the sander until the entire surface of the sanding pad is in contact with the workpiece. If the entire surface is not in contact with the workpiece, the sandpaper may loosen and result in injury.
- Hold the sander by both handles with both hands. Do not cover the ventilation openings on the motor with your hands. If the ventilation openings are not kept clear, the motor may overheat and become damaged.
Do not force the sander. Normally, the weight of the sander is sufficient to achieve adequate pressure. Let the sander and the sandpaper do the work. If the sander is subjected to additional pressure, the motor will run more slowly, sanding will take longer and sandpaper wear will increase. Excessively hard pressure may result in the motor overloading, overheating and becoming damaged. In addition, the quality of the sanded surface will be worse. If surface treatment products have been used on the wood (polish, varnish, etc.), these will soften as a result of the frictional heat produced, which can quickly impair sandpaper function. Do not sand too long in one location as it may result in an excessive amount of material being removed and the surface becoming uneven.
If sanding is done for longer periods of time without a break, the motor may overheat. If this happens: turn off the sander, wait until the sanding pad has come to a complete stop and then lift it from the workpiece. Check that the ventilation openings are free (not covered by your hands while carrying out work). Allow the motor to cool before starting sanding again.
MAINTENANCE
Cleaning the dust collector
The dust collector collects the majority of dust generated during sanding. Therefore, the collector must be emptied regularly in order to make collection as efficient as possible.
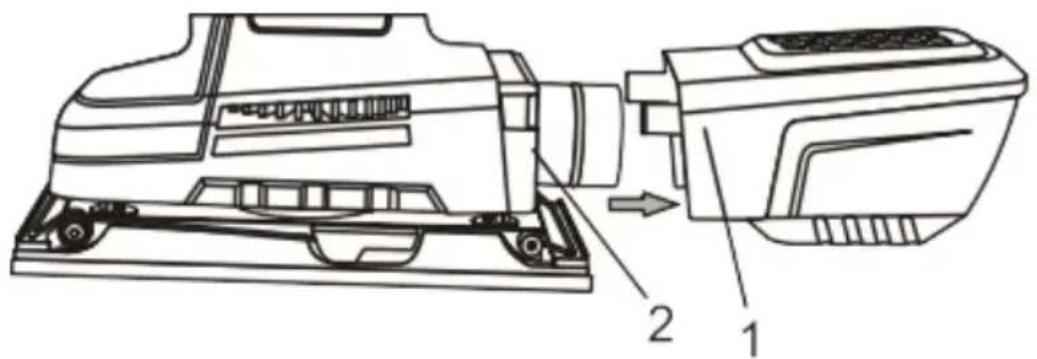
- Press in the sides of the dust collector (1) and pull it out from the rear part of the sander (2).
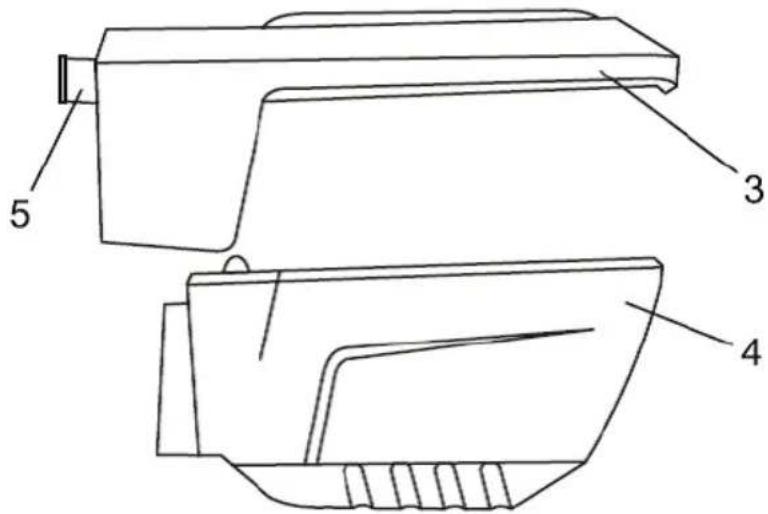
- Pull the upper part of the dust collector (3) from the lower part (4). NOTE! Open the dust collector outdoors or over a waste paper basket or bin, as the dust is immediately emptied.
-
Shake out all the dust from the dust collector.
-
Use a soft, DRY brush to remove the dust from the filter inside the upper part of the dust collector.
-
Reassemble the dust collector once it has been completely emptied. If the parts are positioned correctly, they will quickly "click" into place.
-
Refit the dust collector to the rear part of the sander.
NOTE! The lock tabs (5) snap into place once the dust collector is pressed into the rear part of the sander.
General
- Do not use solvents to clean the plastic parts. Plastic can be damaged by different types of commercially available solvent. Use a clean cloth to remove dirt, dust, oil, grease, etc.
- Power tools wear out more quickly if they are used on fibreglass components, plaster or filler. Shavings and dust from these types of material wear out the power tool parts, e.g. bearings, brushes and commutators. Therefore, it is recommended that the sander is not used for more extensive work on fibreglass material, plaster or filler. If the sander is used on any of these materials, it is very important that the sander is cleaned frequently with compressed air.
LUBRICATION
All bearings in this sander are lubricated with high grade lubricant, and this is intended to be sufficient for the entire service life of the sander under normal operating conditions. Therefore, no additional lubrication is required.
Jula reserves the right to make changes. In the event of problems, please contact our service department. www.jula.com
natural_image
Pure mechanical diagram showing a recycling bin with no text or symbolsCare for the environment!
Must not be discarded with household waste!
This product contains electrical or electronic components that should be recycled.
Leave the product for recycling at the designated station e.g. the clocal authority's recycling station.
CE
EC DECLARATION OF CONFORMITY
EG FÖRSÄKRAN OM ÖVERENSSTÄMMELSE
EF SAMSVARSERKLÆRING
DEKLARACJA ZGODNOŚCI WE

Jula AB, Box 363, SE-532 24 SKARA, SWEDEN
Machinery Directive 2006/42/EC
EN 60745-1:2009+A11, EN 60745-2-4:2009+A11
Electromagnetic Compatibility Directive 2004/108/EC
EN 55014-1:2006+A1+A2, EN 55014-2:1997+A1+A2
EN 61000-3-2:2006+A1+A2, EN 61000-3-3:2013
RoHS Directive 2011/65/EU
This product was CE marked in year -15
Name and address of the person authorised to compile the technical file:
- SVENSKA....4
- SÄKERHETSANVISNINGAR....4
- TEKNISKA DATA....7
- BESKRIVNING 8
- HANDHAVANDE 8
- UNDERHÅLL 11
- NORSK 14
- SIKKERHETSANVISNINGER 14
- TEKNISKE DATA 17
- BESKRIVELSE....18
- HÄNDTERING 18
- VEDLIKEHOLD 21
- POLSKI 24
- ZASADY BEZPIECZEŃSTWA .....24
- DANE TECHNICZNE 27
- OPIS 28
- OBSŁUGA 28
- KONSERWACJA 31
- ENGLISH 34
- SAFETY INSTRUCTIONS 34
- TECHNICAL DATA....37
- DESCRIPTION 38
- OPERATION....38
- MAINTENANCE 41
- SÄKERHETSANVISNINGAR
- Starta/stänga av
- Värna om miljön!
- Starte og stoppe
- Verne om miljøet!
- DBAJ O ŚRODOWISKO!
- Read the operating instructions carefully before use!
- Work area
- Electrical safety
- Personal safety
- Operation and care of power tools
- Service
- Special safety instructions
- TECHNICAL DATA
- Always use ear defenders!
- DESCRIPTION
- OPERATION
- Fitting sandpaper
- Making holes in the sandpaper
- Turning on/off
- Lock-on button
- Selecting sandpaper
- Sanding
- NOTE!
- MAINTENANCE
- Cleaning the dust collector
- General
- LUBRICATION
- Care for the environment!
- CE
- EC DECLARATION OF CONFORMITY
- EG FÖRSÄKRAN OM ÖVERENSSTÄMMELSE
- EF SAMSVARSERKLÆRING
- DEKLARACJA ZGODNOŚCI WE
Brand : Meec Tools
Model : 010-089
Category : Orbital sander