
TRC-1460 - Weather Station DENVER - Free user manual and instructions
Find the device manual for free TRC-1460 DENVER in PDF.


| Product Type | Indoor & wireless outdoor thermometer with real time clock and snooze alarm |
| Model | TRC-1460 |
| Brand | Denver |
| Main Unit Operating Temperature Range | 0°C to +50°C (+32°F to +122°F) |
| Remote Sensor Operating Temperature Range (with LCD) | -10°C to +50°C (14°F to +122°F) |
| Remote Sensor Operating Temperature Range (without LCD) | -20°C to +50°C (-4°F to +122°F) |
| Detachable Outdoor Probe Range | -50°C to +70°C (-58°F to +158°F) |
| Transmission Range | 100 feet (open area) |
| Number of Remote Sensors Supported | Up to 3 |
| Main Unit Power | DC 3V, 2 x AAA size batteries (alkaline recommended) |
| Remote Sensor Power | DC 3V, 2 x AAA size batteries |
| Battery Life (Main Unit) | Approximately 9 months |
| Battery Life (Remote Sensor) | Approximately 6 months |
| Alarm Duration | 1 minute |
| Snooze Duration | 5 minutes |
| Clock Format | 12 or 24 hours |
| Temperature Display | Celsius or Fahrenheit selectable |
| Functions | Real time clock, calendar, snooze alarm, max/min temperature memory, temperature alerts, auto-scroll remote channels |
| Maintenance | Clean with soft cloth; do not use abrasive or corrosive substances; do not immerse in water; avoid excessive force, shock, dust, temperature, humidity |
| Disposal | Do not dispose with household waste; recycle at designated collection points for electrical and electronic appliances |
Frequently Asked Questions - TRC-1460 DENVER
User questions about TRC-1460 DENVER
0 question about this device. Answer the ones you know or ask your own.
Ask a new question about this device
Download the instructions for your Weather Station in PDF format for free! Find your manual TRC-1460 - DENVER and take your electronic device back in hand. On this page are published all the documents necessary for the use of your device. TRC-1460 by DENVER.
USER MANUAL TRC-1460 DENVER
INDOOR & WIRELESS OUTDOOR THERMOMETER
WITH REAL TIME CLOCK & SNOOZE ALARM
MODEL: TRC-1460
INSTRUCTION MANUAL
1. INTRODUCTION
Thank you for purchasing our In/Outdoor thermometer with wireless thermometer sensor and real time clock. The main unit is designed to receive temperature signals from maximum 3 remote sensors in different locations, and it is also equipped with a snooze alarm. To ensure proper operations, please read this instruction manual carefully and save it for future reference.
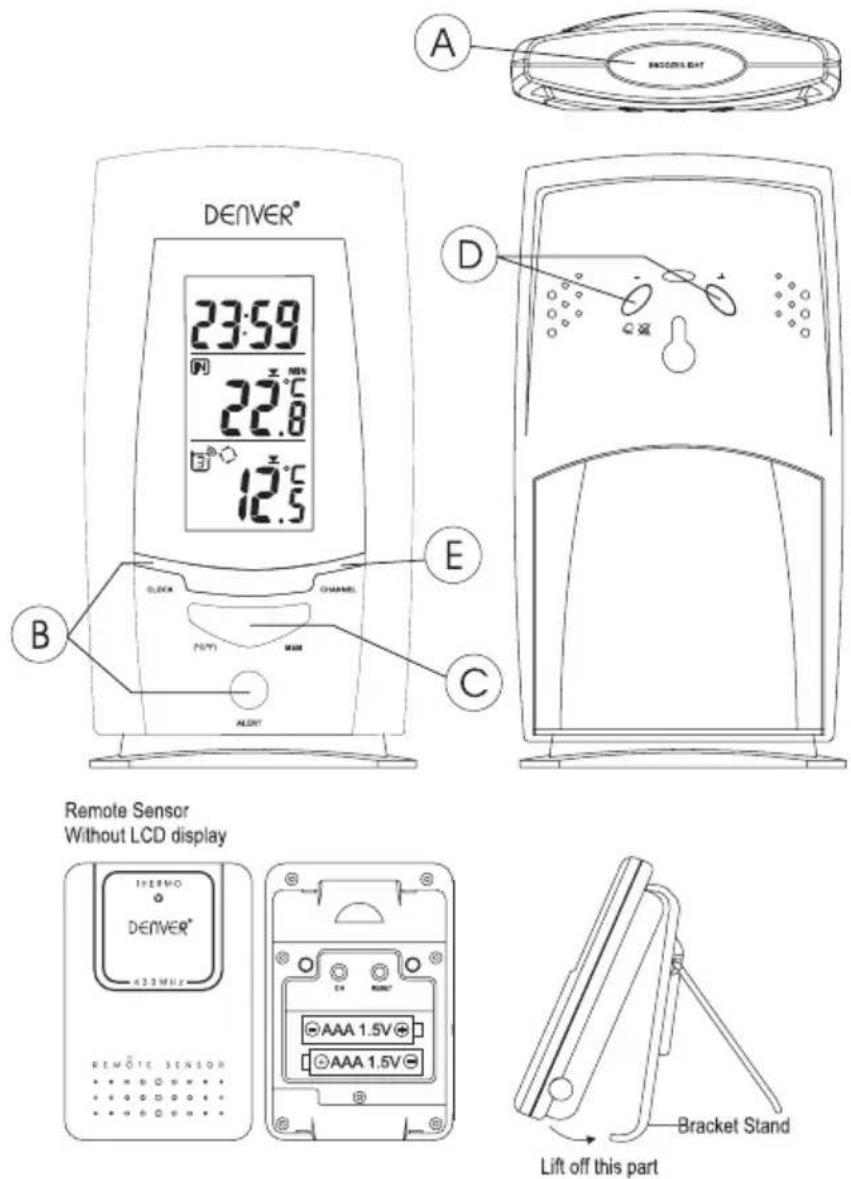
2. DESCRIPTION OF BUTTONS
Main Unit
A. [SNOOZE/ LIGHT] button
Activate the snooze function when an alarm sounds or turn on the backlight for 5 seconds.
B. [CLOCK] & [ALERT] button
Press the [CLOCK] side to display the real time clock, calendar or alarm time. When display the real time clock, press and hold the [CLOCK] side for 2 seconds to activate the clock setting mode. When display the alarm time, press and hold the [CLOCK] side for 2 seconds to enter the alarm setting mode.
Press the [ALERT] side to toggle to display high temperature alert and then low temperature alert for indoor thermometer, channel 1, 2, 3 remote thermometers respectively and then return to normal thermo display mode.
Press & hold [ALERT] side for 2 seconds at the desired alert temperature display to enter its setting mode, use [+] / [-] keys to change the settings, press [ALERT] again to confirm the setting or press no key for 10 seconds to auto-exit to normal thermo display and confirm the setting.
C. [(^/ ^) MEM] button
Press the [(°C/°F)] side to select the temperature display in Celsius (°C) or Fahrenheit (°F).
Press the [MEM] side to toggle for max or min temperature memory reading for both IN & OUT thermometers. Press
and hold 2 seconds to clear both IN/OUT temperature memory.
D. [+] & [-] button
Press the [-] side to decrease the setting when enter setting mode of clock, alarm or temperature alert.
When display the alarm time, press [-] side to turn Daily Alarm on/off.
When display the temperature alert, press [-] side to turn the corresponding temperature alert on/off.
Press the [+] side to increase the setting when enter setting mode of clock, alarm or temperature alert.
E. [CHANNÉL] button
Toggle to display remote thermo channel from channel 1, channel 2, channel 3 to Auto-scroll mode which alternately display 3 channels;
Press and hold 2 seconds to activate searching mode for remote sensor;
Remote Sensor
The remote sensor has 3 function buttons inside the battery compartment.
a. [CH] button
After the battery installation, the LED blinks slowly every 1.5 seconds and channel number shows '1' to indicate it is now under channel setting mode and is set to channel 1 by default. If the user presses no key within ten seconds, the unit will auto-exit the channel setting.
If the user press [CH] button once during the channel setting, the channel number is changed to '2' to indicate the unit is set to channel 2. If the user press [CH] button again, the channel number will be advanced to channel '3' and so on.
Note: Never set the channel to '4' & '5' which would not be applied in this model
b. [C/F] button (for sensor with LCD)
Press to toggle unit °C or °F
c. [RESET] button
Press to hardware reset the unit to factory setting
3. BATTERY INSTALLATION
NOTE: Please insert batteries for the main unit first, then the RF remote sensor.
BATTERY INSTALLATION FOR MAIN UNIT
a. Remove the battery door;
b. Insert 2 pieces AAÅ size 1.5V alkaline battery as indicate by the polarity;
c. Close the battery door.
BATTERY INSTALLATION FOR REMOTE SENSOR UNIT
a. Lift off the bracket stand of the remote sensor unit by releasing the 2 fixing snaps at the bottom;
b. Use a small Philips type screwdriver to remove the battery cover screws;
c. Insert 2 pieces of AAA size batteries according to the “+” and “-” polarity marks shown in the battery compartment and then close the battery door.
WIRELESS REMOTE SENSOR REGISTRATION PROCEDURE
a. Insert x2 AAA batteries first to the main unit. The temperature display shows ‘—.-C’ while the wave icon will keep blinking for 2 minutes indicate the main unit is in sensor searching mode.
b. In a second step, insert the x2 AAA batteries into the sensor unit. The LED on the front panel will start flashing at a rate of one time per around 2 seconds indicates channel-1 is in use.
c. While the LED is flashing, press once the [CH] key will change the sensor channel setting to 2. Keep toggle on [CH] key can change channel setting up to 3. The LED is blinking at a frequency to indicate the channel setting. i.e. continuous blinks 2 times indicate channel-2 is selected.
Note: If user does not press any key for 10 seconds, it will exit the channel setting mode and transmit the RF signal. The main unit will register the temperature reading.
4. HOW TO SET TIME AND CALENDAR
a. Make sure the 1 ^st line of the LCD displays the clock time, press & hold [CLOCK] button for 2 seconds to enter clock setting mode. Flashing 24 hours will appear.
b. Press [ + ] or [ - ] button to switch between 24 hours and 12 hours format, and then press [CLOCK] button to confirm.
c. The hour digits will flash. Use the [ + ] button to increase by one hour or [ - ] button to decrease by one hour to your desired hours. Holding down either button will change the increment rapidly. Press [CLOCK] button to confirm.
d. The minute digits will flash. Use the [ + ] button or [ - ] button to set your desired minutes. Holding down either button will change the increment rapidly. Press [CLOCK] button to confirm.
Note: Every change of minute digit will automatically reset the seconds to zero.
e. The year digit will flash and Yr icon appears. Press [ + ] or [ - ] button to set your desired year. Press [CLOCK] button to confirm.
Note: Year range is from 2000 to 2099.
f. D and M icons will flash. Press [ + ] or [ - ] to select D M (Date Month) or M D (Month Date) format. Press [CLOCK] button to confirm.
g. Month digits will flash. Press [ + ] or [ - ] button to set your desired month. Press [CLOCK] button to confirm. Do the same to set Date.
NOTE: If the main unit idles for 8 seconds during setting, it will exit the setting mode and return to normal display.
5. HOW TO SET ALARM
a. In clock time display mode, press [CLOCK] button twice to display alarm time for 10 seconds.
b. Press [-] button in alarm display mode to arm or disarm the daily alarm.
c. Press and hold [CLOCK] for 2 seconds to enter the alarm setting mode.
d. The hour digit will flash, use [+] button to increase by one hour or [-] button to decrease by one hour to your desired hours. Hold down the button will change the increment rapidly. Press [CLOCK] button to confirm.
e. The minute digits will flash. Use [+] button to increase by one minute or [-] button to decrease by one minute to your desired minutes. Hold down the button will change the increment rapidly. Press [CLOCK] button to confirm and finish the setting.
6. SNOOZE FUNCTION
The alarm will go off for one minute, press any button (except [SNOOZE] button) will stop the alarm. If [SNOOZE] button is pressed, the snooze function will be triggered and the alarm will stop for 5 minutes.
7. HOW TO DISPLAY DIFFERENT OUTDOOR TEMPERATURES
a. You can select the temperature shown in Celsius or Fahrenheit by pressing the [(^ / ^)] button.
b. The main unit is designed to receive RF signals from maximum 3 RF remote sensors. Pressing the [CHANNEL] button will change the temperature display from one sensor to another.
c. This device is equipped with an auto-scroll function. While the auto-scroll function is set, the unit will automatically cycle to display the temperature of each remote sensor for 4 seconds. To enable auto-scroll function, use CHANNEL button to toggle channel 1,2,, until auto scroll icon appears beside the channel indicator.
Note: If the channel has no registered remote sensor, the device will display ‘—.-C’ in the channel display.
8. HOW TO DISPLAY MAX/MIN TEMPERATURE
a. The main unit records the maximum and minimum value of both indoor and outdoor temperature.
b. Press the [MEM] button once to read the minimum temperature of indoor temperature, press it again for the maximum temperature of indoor temperature. Press the [MEM] button continuously to view the minimum or maximum temperature of all 3 remote sensor one by one.
c. To erase the max/min temperature record, press and hold [MEM] button for 3 seconds.
9. HOW TO SET TEMPERATURE ALERT
a. Press [ALERT] key to your desire upper/Hi or lower/Lo temperature alert for designated IN or REMOTE thermo at the desirable channel;
b. Press and hold the [ALERT] key for 2 seconds, the corresponding display digits start blinking;
c. Use the [+] & [-] keys to change for your desired setting;
d. Press [ALERT] key to confirm setting and exit the setting mode. (" ▼" or " "icon appears to indicate the Hi or Lo alert is armed)
e. Auto-exit the temperature alert display and returns to current temperature display mode after 10 seconds. (Hi-Lo temperature limit icon disappears; leaving “▼” or “■” icon to indicator alert is armed.)
f. To disarm the temperature alert – go to the desired temperature alert display mode, press [-] key once to disable the alert, the “ ” or “ ” icon disappears.
10. BATTERY INDICATORS
The main unit comes with battery level detectors, it will continuous monitor the battery level of both the main unit and the RF remote sensor(s). There are two “2” low battery level icons, when low battery level of the main unit is detected, the “2” icon will be displayed on the indoor temperature segment of the screen. If low battery level of any remote sensor is detected, the “2” icon will be displayed on the outdoor temperature segment of the corresponding remote sensor channel.
NOTE: The main unit and the RF remote sensor contains no user-serviceable parts.
11. THE HOLD SEEK FUNCTION
In order to have a quick re-registration of remote sensor, it is recommended to activate the hold seek function before replacing batteries of any remote unit.
a. Press and hold the [CHANNEL] button for 3 seconds to activate the hold seek function.
b. The main unit will temporary stop seeking signal from the corresponding remote sensor and waiting for new signal registration.
c. Once the batteries have been replaced, the remote unit will start to transmit signal to the main unit again and the main unit will automatically set the new signal back to its previous channel. With this hold seek function, there is no need to reset the main unit or proceed the whole registration procedures again when batteries of any remote unit have to be replaced.
12.RF REMOTE SENSOR WITH DETACHABLE PROBE (OPTIONAL)
a. In order to avoid freezing up of battery, when the outdoor temperature is below 20^ C, open the side cover of the RF remote sensor and insert the probe plug. Extend the 6 feet probe cord, leave the probe sensor outdoor and place the remote sensor unit indoor.
b. Besides overcomes the extreme low temperature, the detachable probe can also be used to measure the temperature of water, soil or other liquid.
13.MAINTENANCE
a. Do not clean the main unit/RF remote sensor with abrasive or corrosive substance.
b. Do not immerse the main unit/RF remote sensor in water.
c. Do not subject the main unit/RF remote sensor to excessive force, shock, dust, temperature or humidity.
d. Do not modify or temper with the internal components of the main unit/RF remote sensor. Doing so can cause a malfunction and might invalidate its warranty.
e. Do not subject the main unit/RF remote sensor to excessive exposure to direct sunlight or to heavy rain.
f. Do not mix old and new batteries, this can cause rupture or leakage, resulting in personal injury or property damage.
g. Read this instruction manual thoroughly before operating the main unit/RF remote sensor.
NOTE: In order to protect our environment, please dispose the old batteries promptly and properly. Do not burn or bury them.
14. TROUBLE SHOOTING (RECEIVING RF SENSOR SIGNAL)
If the (---) dash icon still flashes after inserting the batteries to the RF remote sensor for more than 11 minutes, that means the RF signal has been lost. Please rotate the sensor in 45° steps, and wait for 3 minutes after each position change. If the main unit still cannot receive the RF signal, move the remote sensor closer to the main unit or reposition both RF remote unit and the main unit until successful reception is observed.
NOTE: Signals from other household devices such as door bell, home security system may interfere with this product and cause temporarily reception failure. The transmission and reception will resume once the interfererecedes.
15.SPECIFICATIONS
Main Unit Operating Temperature Range :0°C to +50°C (+32°F to +122°F)
RF Remote Sensor Operating Temperature Range
Sensor with LCD Display :-10°C to +50°C (14°F to +122°F)
Sensor without LCD Display :-20°C to +50°C (-4°F to +122°F)
Detachable Outdoor Probe : -50°C to +70°C (-58°F to +158°F)
Transmission Range :100 feet, open area
Battery
Main Unit :DC 3V, 2 x AAA size
RF Remote Sensor :DC 3V, 2 x AAA size
Alarm Duration :1 minute
Snooze
Battery Life Time
Main Unit :9 months
RF Remote Sensor :6 months
:5 minutes
16. DISCLAIMER
The information in this document has been viewed and is believed to be accurate. However, neither the manufacturer nor its affiliates assume any responsibility for inaccuracies, errors or omissions that may be contained herein. In no event will the manufacturer or its affiliates be liable for direct, indirect, special, incidental or consequential damages arisen by using this product or resulting from any defect/omission in this document, even if advised of the possibility of such damages.
The manufacturer and its affiliates reserve the right to make improvements or changes to this document and the products and services described at any time, without notice or obligation.
Do not dispose of this product in the usual household garbage at the end of its lifecycle; hand it over at a collection point for the recycling of electrical and electronic appliances. The symbol on the product, the instructions for use or the packing will inform about the methods for disposal.
The materials are recyclable as mentioned in this marking. By recycling, material recycling or other forms of re-utilization of old appliances, you are making an important contribution to protect our environment.
Please inquire at the community administration for the authorized disposal location.
ALL RIGHTS RESERVED COPYRIGHT DENVER ELECTRONICS

www.denver-electronics.com
INDEN- OG UDEND∅RS TRÅDL∅S TERMOMETER
MED UR & SLUMREALARM
MODEL: TRC-1460
BRUGSANVI SNI NG
1. INDLEDNING
11.BEHOLD S∅GEFUNKTION
MANUAL DE INSTRUÇÕES
1. INTRODUÇÃO
Sensor remoto RF :DC 3V, 2 x tamanho AAA
5. CÓMO CONFIGURAR LA ALARMA
Sensore Remoto RF :DC 3V, 2 x AAA
Durata sveglia
:1 minuto
Snooze: 5 minuti
Durata batteria
- INDOOR & WIRELESS OUTDOOR THERMOMETER
- INSTRUCTION MANUAL
- INTRODUCTION
- DESCRIPTION OF BUTTONS
- Main Unit
- [+] & [-] button
- [CHANNÉL] button
- Remote Sensor
- a. [CH] button
- b. [C/F] button (for sensor with LCD)
- c. [RESET] button
- BATTERY INSTALLATION
- BATTERY INSTALLATION FOR MAIN UNIT
- BATTERY INSTALLATION FOR REMOTE SENSOR UNIT
- WIRELESS REMOTE SENSOR REGISTRATION PROCEDURE
- HOW TO SET TIME AND CALENDAR
- HOW TO SET ALARM
- SNOOZE FUNCTION
- HOW TO DISPLAY DIFFERENT OUTDOOR TEMPERATURES
- HOW TO DISPLAY MAX/MIN TEMPERATURE
- HOW TO SET TEMPERATURE ALERT
- BATTERY INDICATORS
- THE HOLD SEEK FUNCTION
- 12.RF REMOTE SENSOR WITH DETACHABLE PROBE (OPTIONAL)
- 13.MAINTENANCE
- TROUBLE SHOOTING (RECEIVING RF SENSOR SIGNAL)
- 15.SPECIFICATIONS
- DISCLAIMER
- INDEN- OG UDEND∅RS TRÅDL∅S TERMOMETER
- BRUGSANVI SNI NG
- INDLEDNING
- 11.BEHOLD S∅GEFUNKTION
- MANUAL DE INSTRUÇÕES
- INTRODUÇÃO
- CÓMO CONFIGURAR LA ALARMA
Brand : DENVER
Model : TRC-1460
Category : Weather Station