
WS650 - Weather Station DENVER - Free user manual and instructions
Find the device manual for free WS650 DENVER in PDF.

| Product Type | Wireless weather station with outdoor sensors |
| Brand and model | Denver WS650 |
| Main unit power supply | 3 AAA batteries (not included) and 5 V / 300 mA power adapter (included) |
| Temperature/humidity/wind sensor power supply | 4 AA batteries (not included) |
| Rain gauge sensor power supply | 2 AA batteries (not included) |
| Indoor temperature range | 0 °C to +50 °C |
| Outdoor temperature range | -40 °C to +60 °C |
| Temperature accuracy (20-24 °C) | ±1 °C |
| Humidity range | 25 % to 90 % RH |
| Humidity accuracy | ±5 % |
| Barometric pressure range | 850 hPa to 1050 hPa |
| Wind speed range | 0 to 127.5 km/h |
| Rainfall range | 0 to 2999 mm |
| Radio range | Up to 50 m in open field |
| Radio frequency | 433.05 – 434.79 MHz |
| Radio-controlled clock | DCF77 (automatic reception) |
| Max. number of outdoor sensors | 3 temperature/humidity/wind sensors + 1 rain gauge |
| Main functions | Weather forecast, moon phase, trends (temperature, humidity, pressure), alarms (temperature), min/max memory, backlight, snooze |
| Display | LCD with backlight (adjustable or standby) |
| Safety instructions | Do not open, avoid water/humidity, respect operating temperature, insert batteries correctly, keep out of reach of children |
| Maintenance and cleaning | Wipe with a dry cloth, do not use chemicals |
Frequently Asked Questions - WS650 DENVER
User questions about WS650 DENVER
0 question about this device. Answer the ones you know or ask your own.
Ask a new question about this device
Download the instructions for your Weather Station in PDF format for free! Find your manual WS650 - DENVER and take your electronic device back in hand. On this page are published all the documents necessary for the use of your device. WS650 by DENVER.
USER MANUAL WS650 DENVER
Please read the safety instructions carefully before using the product for the first time and keep the instructions for future reference.
- This product is not a toy. Keep it out of reach of children.
- Keep product and batteries out of the reach of children and pets to avoid chewing and swallowing.
- Never use old and new batteries or different types of batteries together. Remove the batteries when you are not using the system for a longer period of time. Check the polarity (+/-) of the batteries when inserting them in the product. Wrong positioning can cause an explosion.
- Product operating temperature: Main unit: 0^ +50^ / Sensor: -40^ +70^ and storage temperature is from -10^ +60^ Celsius. Under and over this temperature might affect the function.
- Never open the product. Touching the inside electrics can cause electric shock. Repairs or service should only be performed by qualified personnel.
- Do not expose to heat, water, moisture, direct sunlight!
- The unit is not waterproof. If water or foreign objects enter the unit, it may result in fire or electric shock. If water or a foreign object enters the unit, stop use immediately.
- Do not use non original accessories together with the product as this can make the product functionality abnormal.
Overview
Weather Station
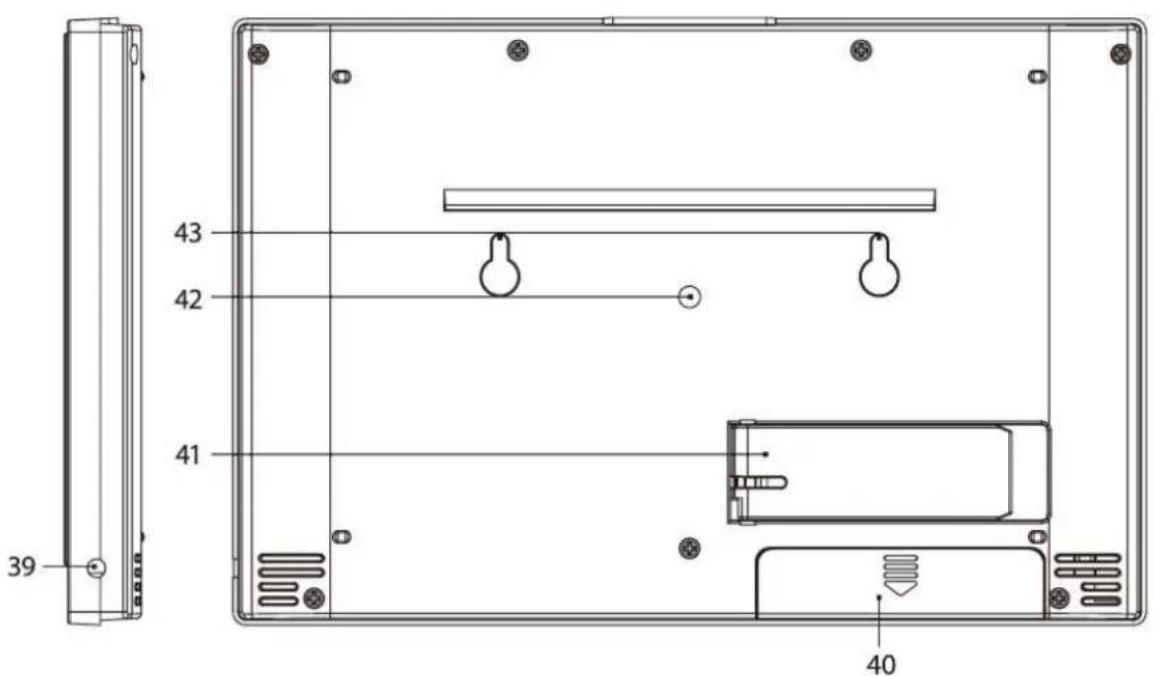
[Skriv her]
Temperature/humidity/Wind sensor

Main unit
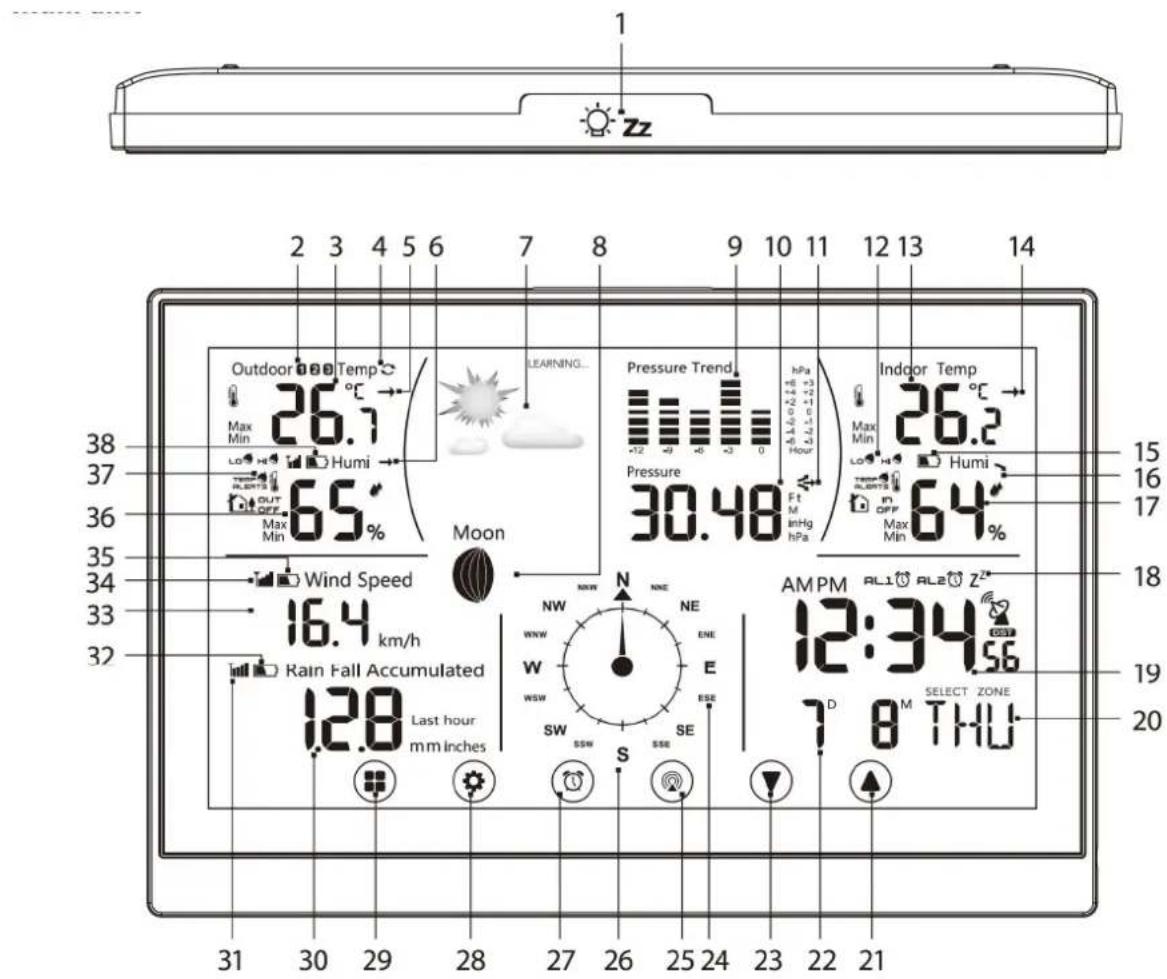
- Snooze/light button
- Number of temperature/humidity / Wind sensor 1/2/3
- Outdoor temperature
- Cycling through data from connected sensors
- Outdoor humidity trend
- Outdoor humidity trend
- Weather forecast
- Moon phase
- Pressure history
- Pressure value
- Pressured trend
- Indoor temperature alert
- Indoor temperature
- Indoor temperature trend
-
Station batteries low
-
MODUS button: switch display mode
- Data from precipitation sensor
- Signal from precipitation sensor
- Low batteries in precipitation sensor
- Wind speed
- Signal from temperature/humidity/wind sensor
- Low batteries in temperature/ humidity/wind sensor
- Outdoor humidity
- Outdoor temperature alert
- Low batteries in temperature/ Humidity/wind sensor
- Power adaptor socket
- Battery compartment
- Stand
-
Alarm speaker
-
Indoor humidity trend
- Indoor humidity
- Alarm no.1/no.2
- Time DCF signal reception, daylight savings time (DST)
- Day of the week
- UP button: go forward in settings. Memory of Max/min temperature and humidity.
- Date.
- Down button: go back in settings
- Wind direction indicator
- Channel button: search for sensor signal or Switch through information from connected sensors
- Wind direction: S- south. W-west, N-north E-east
- ALARM Button: alarm activation/deactivation
-
SET button: switch between ^ C / ^ F , function settings
-
Mounting holes
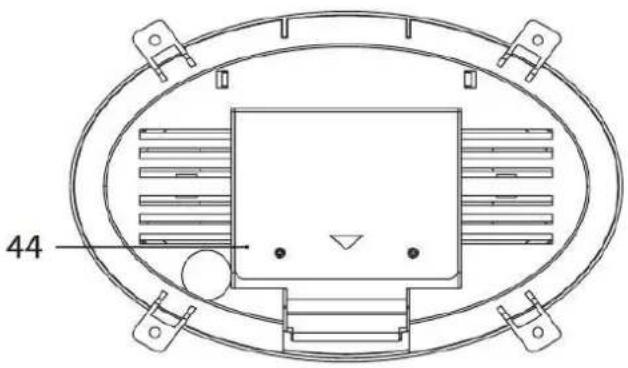
Rain gauge sensor
- Rain gauge battery sensor
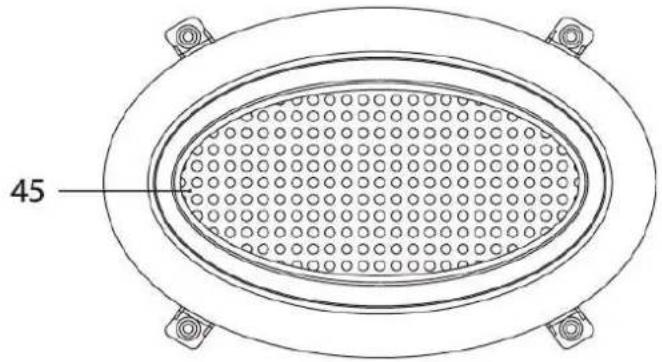
- Rain gauge sensor grille
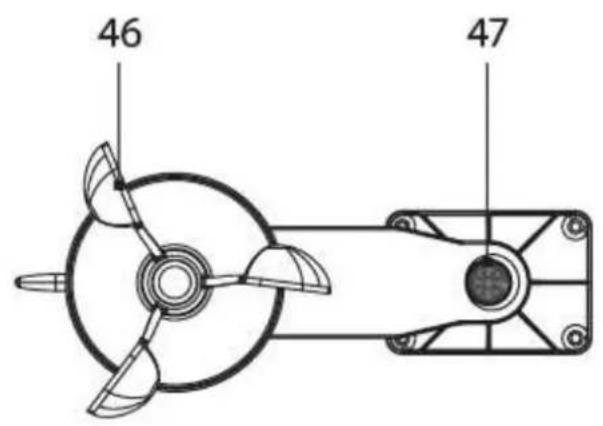
Temperature/humidity/Wind sensor
- Wind sensor cups
- Compass
- Wind direction paddle
- Temperature/humidity/wind sensor battery
Compartment. Buttons: TX: semd Signal from Sensor to Station 1/2/3: switch sensor channel number.
WAVE: manually activate/deactivate DCF - Singal reception
- Wind sensor cups
- Mounting rod (26 mm Diameter)
- Mounting base
| Specifications Clock control: DCF77-radio signal | ||||
| Time format: 12/24 h | ||||
| Indoor temperature: 0 °C to +50 °C, 0,1 °C resolution | ||||
| Outdoor temperature: -40 °C to +60 °C, 0,1 °C resolution | ||||
| Temperature measurement accuracy: ±1 °C for range 20 °C to 24 °C | ||||
| ±2 °C for range 0 °C to 20 °C and 24 °C to 40 °C | ||||
| ±3 °C for range -20 °C to 0 °C and 40 °C to 50 °C | ||||
| Indoor and outdoor humidity: 25 - 90 % RH, 1 % resolution | ||||
| Humidity measurement accuracy: 5 % | ||||
| Barometric pressure measurement range: 850 hPa to 1050 hPa | ||||
| Wind sensor measurement range: 0 to 127,5 km/h | ||||
| Rain gauge sensor measurement range: 0 to 2.999 mm | ||||
| Radio signal range: | Up to 50 m im free sight | |||
| Connected sensors: | Max. 3 temperature/humidity /Wind sensors | |||
| Max. 1 rain gauge sensor | ||||
| Power supply | ||||
| Main unit | 3 x AAA-Batterien ( not included) and AC 230 V/DC 5 V, 300 Ma adapter (included) | |||
| Rain gauge sensor | 2 x AA batteries (not included) | |||
| Temperature/humidity/Wind sensor | 4 x AA batteries (not included) | |||
| The buttons | ||||
| Mode button | Set button | Clock button | Channel Button | Up/down buttons |
Installation
Power and Batteries
Plug the power adaptor into the main unit and insert batteries (3 x1.5V AAA). Continue with inserting batteries into the wireless temperature/humidity /wind sensor(4 x1.5V AA) and the wireless rain gauge
Sensor (2 x1.5V AA). The battery compartment of the rain gauge sensor is protected by screws, so you need a suitable screwdriver. Low battery levels will be indicated on the display (see 15,32 and 38).
Backlight
The weather station display is backlit. When you press the Sleep/Light button (1), the display lights up for five seconds. When the weather station is powered by the power supply, the backlight is always on. You can reduce the brightness of the display in two stages by pressing the snooze/light button. A third press puts the display into standby mode.
Connecting the units
Place all units next to each other. The main unit will automatically detect the signals from the sensors usually within 3 minutes. If the main unit does not detect the signals press and hold the channel button on the main
[Skriv her]
unit's display
To repeat the search, or press and hold the TX button(49) on the temperature/humidity/ wind sensor. You find the TX button under the battery cover.
Placement of sensors
To ensure correct measurements, the temperature/humidity /wind sensor and the rain gauge sensor must be placed at least 1.5m above the ground on a horizontal surface without buildings and structures nearby.
Mounting
Both sensors must be firmly attached to prevent them from falling and being damaged. Do not place the sensors onto metal objects as this will reduce their transmission range.
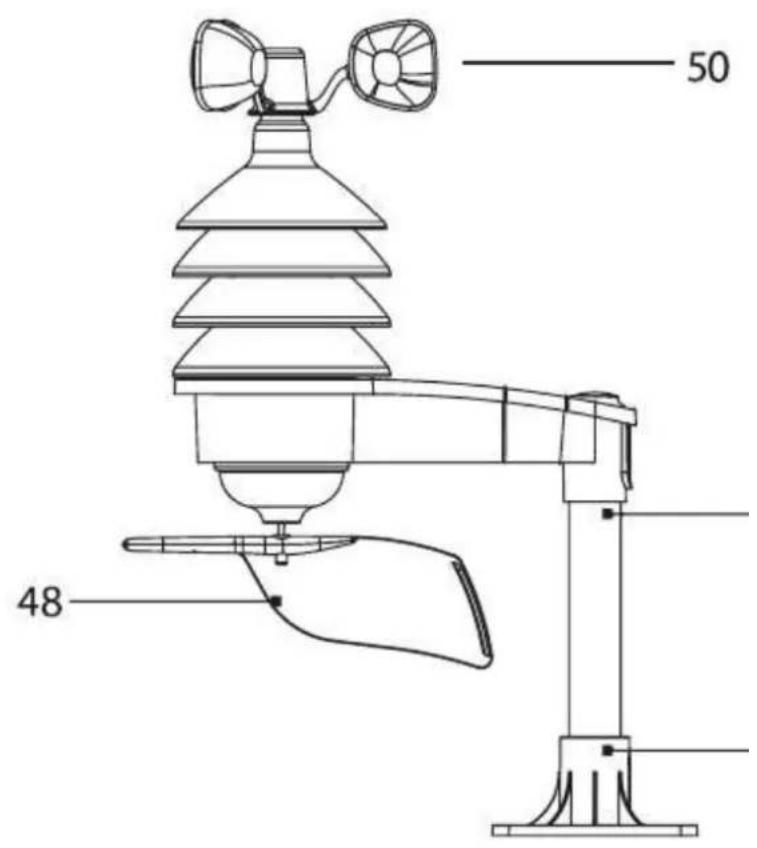
To assemble and mount the temperature/humidity/wind sensor, begin with screwing the mounting base (51) onto a level surface. Place the mounting rod(50) in the base and fasten it with two screws. Put the temperature/humidity/wind
Sensor on top of the rod. Before fastening it, make sure that the wind can flow freely around the wind sensor from all sides. Check that the wind cups and wind paddle(48)for measuring wind speed and directino can rotate freely.
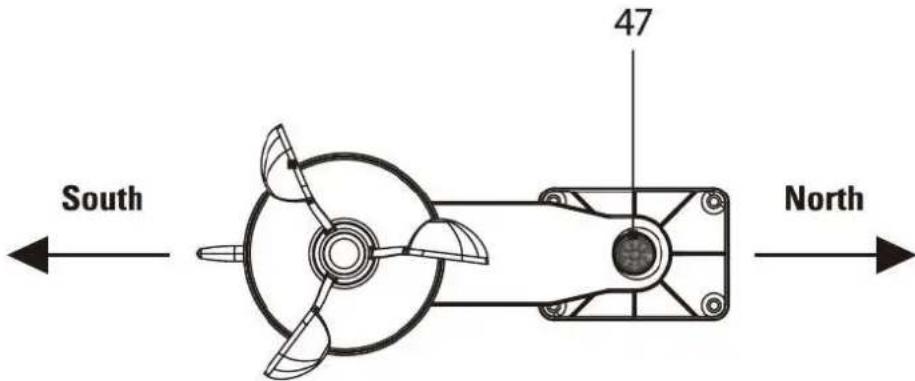
Important. To make sure that the wind direction is measured correctly, it is important that you install the temperature/ humidity/wind sensor in north-south direction using the built-in compass(47). The part with the wind cups and wind
Cups and wind direction paddle should face south. See picture.
When you have aligned the temperature/ humidity wind sensor in north-south direction, fasten the sensor to the mounting rod with two screws. Lastly, mount the rain gauge sensor by screwing it onto a suitable surface and place the grille (45) in the sensor.
Weather forecasts
The weather station will start a 14- day learning process once turned on and set up. This learning process is necessary for the weather station to be able to make weather forecasts. The display will show "LEARNING..." at The top of the display during this time.
Changing channel and connecting additional sensors
- Press the channel button on the main unit's display repeatedly to select the desired channel 1.2 or 3 for the sensor. Then press and hold the channel button until the icon starts to flash.
- Remove the battery cover of the temperature/humidity/wind sensor and set the sensor switch to the corresponding channel you just selected.Data from the sensor will be loaded within 3 minutes.
If you press the channel button until the cycling symbol shows, data from all three sensors will be shown automatically, sensor by sensor
- If the sensor signal is not found, remove the batteries and proceed again, or press the TX button(49) to reset.
Radio controlled clock (DCF77)
When turned on the first time, the base station automatically starts to search for a DCF signal for the time setting. If no signal is found, the search stops and you need to set the time manually. It may take some Time for the station to receive the signal. The mian unit will update the DCF signal every night at 1,2 and 3 o'clock. Note! The main unit only recieve the DCF77 signal on channel 1. Therefore, make sure that there is at least one sensor on channel 1.
You can also activate a search for the DCF signal manually. Press and hold the wave button located in the battery compartment of the temperature/humidity/wind sensor to initiate a search. To end the search Longpress the wave button again.
Time, date and forecast settings
Press the mode button on the display, then hold the set button for 3 seconds to enter the time setting mode. The current value starts to blink. The values are changed in this order: time zone>language>year>month /day order>month> dat>12/24 hr>hour>minute> second>exit. Change the values with the up/down buttons and confirm and move to the next value with the set button.
Alarm settings and features
Press the clock button on the display to select one of the two alarms, on the display indicated with AL 1 or AL
- Both alarms can be active at the same time. To set the alarms, press the mode button twice and then hold the set button for 3 seconds until the hour value starts to blink. Change the values with the up/down buttons and confirm with the set button.
When the alarm goes off, the display lights up will and the alarm sounds for three minutes before it is turned off. Press the snooze /light button on top of the base unit to snooze the alarm for 5 minutes.
Press any other button to turn off the alarm for the day.
Settings for altitude and atmospheric pressure
The weather station shows atmospheric pressure in hPa or in Hg and keeps a history of pressure readings for the last 12 hours. To achieve more accurate calculations of pressure values you should manually
Set the altitude for the place where the weather station is being used:
- Press the mode button on the display 3 times.
- Press the set button or 3 seconds and use the arrows to set altitude between -90 m to +1990 m (10m increments).
- Press the mode button to switch between M/pha and Ft/inHg units.
- Press the set button to quit settings.
Setting the unit for precipitation
- Press the mode button 5 times, then press the set button for 3 seconds.
- Use the up and down arrows to set mm or inches as units
- Press the set button to quit settings
Setting the unit for wind speed.
- Press the mode button 6 times, then press the set button for 3 seconds.
- Use the up and down arrows to set km/h or mph as units.
- Press the set button to quit settings
Temperatur alert
The weather staiton can alert you of temperature changes indoors and outdoors. To change alarm settings, press the mode button on the dispay 4 times, then hold the set button for 3 seconds You change the settings with the set button in the following order: outdoor low temp> outdoor low alarm on/off> outdoor temp high> outdoor high alarm on /off> indoor low temp> indoor low alarm on /off > indoor high temp> Indoor temp alarm on/off . Change the values with the up/down buttons.
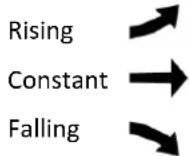
Temperature, humidity und pressure trends
Moon phases
| 1 | 2 | 3 | 4 | 5 | 6 | 7 | 8 |
- New moon
- Waxing crescent
- First quarter
- Waxing gibbous
- Full moon
- Waning gibbous
- Last quarter
- Waning crescent
Note: In the period between 18:00 and 06:00 , the moon icon will be surrounded by stars
Min./Max.-Temperature memory
The base station saves the min/mas temperature and humidity setting s for each day and deletes the values at midngith, Prdss the up button once to display the maximum values and press it again the dispay the minimum values .A third press takes you back to the standard dispay.
Displaying and deleting measured values from the rain gauge sensor
Pressing the down button repeatedly shows measured precipitation values in various time periods in the following steps:
Accumulated
Today
Last hour
Yesterday
This week
Note: To delete the value being displayed, you press and should the down button.
| EN | |
| Manufacturer's name or trade mark, commercial registration number and address | Xiamen Innore Chongyuan Electronics Co., Ltd No. 943, Tonglong Second Road, Tong'an District, Xiamen,Fujian, 91350200568403208H |
| Model identifier YT60160 | |
| Input voltage 100-240VAC | |
| Input AC frequency 50/60HZ | |
| Output voltage 5VDC | |
| Output current 300mA | |
| Output power 1.5W | |
| Average active efficiency | ≥70% |
| Efficiency at low load (10%) | ≥65% |
| No-load power consumption | ≤ 0.1 W |
Please notice - All products are subject to change without any notice. We take reservations for errors and omissions in the manual.
ALL RIGHTS RESERVED, COPYRIGHT DENVER A/S

denver.eu


Hereby, Denver A/S declares that the radio equipment type WS-650 is in compliance with Directive 2014/53/EU. The full text of the EU declaration of conformity is available at the following internet address: denver.eu and then click the search ICON on topline of website. Write model number: WS-650. Now enter product page, and RED directive is found under downloads/other downloads.
Operating Frequency Range: 433.05 MHz- 434,79MHz
Max Output Power: 3,21dBm
DENVER A/S
Omega 5A, Soeften
DK-8382 Hinnerup
Denmark
www.facebook.com/denver.eu


- Overview
- Main unit
- Rain gauge sensor
- Temperature/humidity/Wind sensor
- Installation
- Power and Batteries
- Backlight
- Connecting the units
- Placement of sensors
- Mounting
- Weather forecasts
- Changing channel and connecting additional sensors
- Radio controlled clock (DCF77)
- Time, date and forecast settings
- Alarm settings and features
- Settings for altitude and atmospheric pressure
- Setting the unit for precipitation
- Setting the unit for wind speed.
- Temperatur alert
- Temperature, humidity und pressure trends
- Moon phases
- Min./Max.-Temperature memory
- Displaying and deleting measured values from the rain gauge sensor
Brand : DENVER
Model : WS650
Category : Weather Station