Ozone - Stroller Emmaljunga - Free user manual and instructions
Find the device manual for free Ozone Emmaljunga in PDF.


| Product Type | Stroller |
| Brand | Emmaljunga |
| Model | Ozone City |
| Suitable Age | 6 months to 3 years |
| Maximum Child Weight | 15 kg (seat unit) |
| Carrycot Maximum Weight | 9 kg |
| Carrycot Dimensions (Outer) | 795 mm (length) x 430 mm (width) |
| Harness Type | 5-point harness with crotch strap |
| Wheel Size | 300 mm rear wheels, swivel front wheels (300 mm?) |
| Brake Type | Parking brake on rear wheels |
| Canopy/Hood | Adjustable with integrated mosquito net |
| Raincover | Included |
| Seat Recline Positions | 4 positions (lowest for folding) |
| Handle Height Adjustment | Yes, adjustable |
| Footrest Adjustment | Multiple positions, auto horizontal for folding |
| Front Wheel Mode | Fixed or 360° swivel |
| Shopping Tray Capacity | 5 kg max |
| Footrest Max Load | 3 kg |
| Hood Pocket Max Load | 250 g |
| Care Instructions | Hand wash seat fabrics in lukewarm water; drip dry; do not wash harness straps |
| Wheel Maintenance | Lubricate axles every 3 months; clean brake mechanism regularly |
| Service Intervals | Every 6, 12, 24, 36 months at authorised retailer |
| Compliance | EN 1888:2003+A1:2005+A2:2005+A3:2005, EN 1466:2008 |
Frequently Asked Questions - Ozone Emmaljunga
User questions about Ozone Emmaljunga
0 question about this device. Answer the ones you know or ask your own.
Ask a new question about this device
Download the instructions for your Stroller in PDF format for free! Find your manual Ozone - Emmaljunga and take your electronic device back in hand. On this page are published all the documents necessary for the use of your device. Ozone by Emmaljunga.
USER MANUAL Ozone Emmaljunga
UK IMPORTANT! KEEP FOR FUTURE REFERENCE. FOR THE PROPER USE OF THIS VEHICLE, BE SURE TO READ THIS USER'S MANUAL CAREFULLY. This product complies with DIN EN 1888:2003 + A 1:2005 + A 2:2005 + A 3:2005, EN 1466:2008
This product is suitable for one (1) child from 6 months - 3 years with a maximum weight of 15 kg.
WARNING! The seat-unit is not suitable for children under 6 months. Don't use the seat-unit until your child can sit unaided.
WARNING! The product is not suitable for running or skating. The outer length and width of the City Carry Cot is 795 mm/430 mm. The outer length and width of the Quadrolift is 800 mm / 400 mm. The outer length and width of the Babylift is 800 mm / 330 mm.
WARNING! This carrycot is suitable only for a child who cannot sit up unaided, roll over and cannot push itself up on its hands and knees. Maximum weight of the child: 9 kg.
WARNING! Never use this carrycot on a stand.
WARNING! Please visit www.emmaljunga.co.uk for the latest version of this information before using the product.
FI TÄRKEÄÄ TIETOA – SÄILYTÄ TULEVAA KÄYTTÖÄ VARTEN. LUE NÄMÄ KÄYTTÖOHJEET HUOLELLISESTI ENNEN KUIN
natural_image
Close-up of a bicycle frame with labeled parts (1, 2) and a black tag (no readable text or symbols beyond labels)2
3
natural_image
Close-up of a black fabric garment with a numbered label '7' and an arrow pointing to a seam or seam (no text or symbols on the garment itself)Manual Ozone City v. 1.5
natural_image
Close-up of a person's hand adjusting a cable or cable device on a dark bag (no visible text or symbols)natural_image
Person in winter gear adjusting equipment, no visible text or symbolsMontera suffletten
natural_image
Top-down view of a person wearing a dark suit with a headband and directional arrows indicating motion or movement (no text or symbols)natural_image
Close-up of hands using a tool to adjust or install a component, with two circular annotations highlighting specific parts (no text or symbols present)Montera frambågen
natural_image
Close-up of a person in a stroller holding a device, with two circular arrows highlighting the interior area (no text or symbols visible)natural_image
Close-up of hands adjusting a zipper with a magnified inset showing a detail (no text or symbols visible)natural_image
Top-down view of a gray car seat with two circular cutouts on the backrest (no text or symbols)WARNING
natural_image
Close-up of a person adjusting a mechanical device with numbered parts (17 and 18), no visible text or symbols beyond labels.16
natural_image
Close-up of a person adjusting a bicycle seatbelt with a hand adjusting the seat (no visible text or symbols)17
natural_image
Mechanical assembly diagram showing a wheel and shaft with a 20-degree angle标注 (no text or symbols beyond the number)18
19
natural_image
Close-up of a person adjusting a black athletic jacket with a hand holding the belt (no text or symbols visible)10
natural_image
Mechanical linkage component with numbered parts (1, 2, 3) and connecting arrows, no visible text or symbols23
natural_image
Close-up of a hand holding a black mechanical component with a curved handle, showing a 30-degree angle indicator (no text or symbols on the object itself)24
Manual Ozone City v. 1.5
Justera fotstödet
natural_image
Silhouette of a baby stroller with a dotted arrow indicating motion (no text or symbols)natural_image
Black stroller with a curved arrow indicating 34° rotation (no text or symbols on the device itself)natural_image
Black and white photo of a two-wheeled stroller with a matching seat (no text or symbols visible)VIKTIGT
natural_image
Black and white photo of a baby stroller with a red X symbol crossed, standing beside a person (no text or symbols on the device itself)WARNING
natural_image
Line drawing of a hand holding a mechanical clamp or bracket, with arrows indicating force direction (no text or symbols)33
34
Manual Ozone City v. 1.5
natural_image
Diagram of a mechanical assembly with arrows indicating rotation or movement (no text or symbols)Justera suffletten
natural_image
Close-up of a robotic arm handling a metallic cylindrical component with a tool, against a plain background (no text or symbols visible)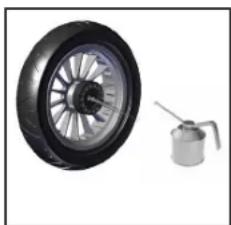
natural_image
Two automotive components: a black and silver wheel with a hose and a gas cylinder (no text or symbols visible)Manual Ozone City v. 1.5
natural_image
Close-up of a bicycle frame with labeled parts (1, 2) and a black handle (no text or symbols beyond labels)2
3
natural_image
Close-up of a dark fabric garment with a numbered label '7' pointing to a seam or seam (no text or symbols on the garment itself)natural_image
Close-up of a hand adjusting a backpack cover with a cable, no visible text or symbolsnatural_image
Person in a suit adjusting equipment with a tool, no visible text or symbolsnatural_image
Top-down view of a baby stroller with visible seat, legs, and decorative band (no text or symbols)natural_image
Close-up of hands using a tool to adjust or install a component, with two circular annotations highlighting specific parts (no text or symbols present)Monter frontbøjle
natural_image
Close-up of a person using a bicycle seatbelt device, showing hand positioning and motion arrows (no text or symbols visible)natural_image
Close-up of hands adjusting a zipper with a magnified inset showing a detail (no text or symbols visible)natural_image
Top-down view of a gray car seat with two circular cutouts and a central circle (no text or symbols)ADVARSEL
natural_image
Close-up of a person adjusting a mechanical device with numbered parts (17 and 18), no visible text or symbols beyond labels.16
natural_image
Close-up of a person adjusting a bicycle seatbelt with a hand adjusting the seatbelt (no visible text or symbols)17
natural_image
Mechanical assembly diagram showing a wheel and shaft with a 20-degree angle标注 (no text or symbols beyond the number)18
19
natural_image
Person adjusting a black athletic jacket with a hand pointing to the pocket (no text or symbols visible)Manual Ozone City v. 1.5
natural_image
Close-up of a mechanical clamp or bracket with numbered annotations (1, 2, 3) indicating rotational movement or assembly steps (no text beyond labels)23
natural_image
Close-up of a hand holding a black mechanical component with a curved handle, showing a 30-degree angle indicator (no text or symbols on the object itself)24
30
natural_image
Silhouette of a baby stroller with a dotted arrow indicating motion (no text or symbols)natural_image
Black stroller with curved arrow indicating 34° rotation (no text or symbols on the device itself)natural_image
Black and white photo of a two-wheeled stroller with a silver seat and black body (no text or symbols visible)natural_image
Black and white photo of a baby stroller with a red X symbol crossed, standing beside a person (no text or symbols visible)ADVARSEL
natural_image
Line drawing of a hand holding a mechanical clamp or bracket, with arrows indicating force direction (no text or symbols)33
34
32
Montering af barnevogns overdel
natural_image
Diagram of a mechanical component with directional arrows indicating rotation or movement (no text or symbols)Justere kalechen
natural_image
Close-up of a robotic arm handling a metallic cylindrical component with a tool, against a plain white background (no text or symbols visible)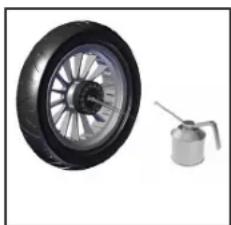
natural_image
Two automotive components: a black and silver wheel with a hose and a gas cylinder (no text or symbols visible)natural_image
Close-up of a bicycle frame with labeled parts (1, 2) and a black tag (no readable text or symbols beyond labels)2
3
natural_image
Close-up of a dark fabric garment with a numbered label '7' pointing to a seam or seam (no text or symbols on the garment itself)Manual Ozone City v. 1.5
natural_image
Close-up of a hand adjusting a backpack with straps and straps (no visible text or symbols)natural_image
Person in winter gear adjusting equipment, no visible text or symbolsMonter kalesjen
natural_image
Top-down view of a person wearing a dark outfit with a head cover and mechanical arms (no visible text or symbols)natural_image
Close-up of a robotic gripper with mechanical components and circular annotations highlighting specific parts (no text or symbols present)natural_image
Close-up of a person using a backpack and chairbelt, with arrows indicating movement or change (no text or symbols visible)natural_image
Close-up of hands adjusting a zipper with a magnified inset showing a detail (no text or symbols visible)natural_image
Top-down view of a car seat with two circular cutouts and a central oval (no text or symbols)ADVARSEL
- Bruk alltid 5-punktsselen så fort barnet kan sitte selv.
- Kjøreposen har hull for 5-punktsselen.
Bruk av vognen
15
natural_image
Close-up of a person adjusting a mechanical device with numbered parts (17 and 18), no visible text or symbols beyond labels.16
natural_image
Close-up of a person adjusting a bicycle seatbelt with a hand adjusting the seatbelt (no visible text or symbols)17
natural_image
Mechanical assembly diagram showing a wheel and shaft with a 20-degree angle标注 (no text or symbols beyond the number)18
19
natural_image
Close-up of a person adjusting a black athletic jacket with a hand pointing to the pocket (no text or symbols visible)natural_image
Mechanical component with numbered parts (1, 2, 3) showing rotational motion, no text or symbols present23
natural_image
Close-up of a hand holding a black mechanical component with a curved handle, showing a 30-degree angle indicator (no text or symbols on the object itself)24
Manual Ozone City v. 1.5
natural_image
Silhouette of a baby stroller with a dotted arrow indicating motion (no text or symbols)26
natural_image
Black stroller with curved arrow indicating 34° rotation (no text or symbols on the device itself)27
28
natural_image
Black and white photo of a stroller with wheels and seat (no visible text or symbols)29
natural_image
Black and white photo of a baby stroller with a red X symbol, standing beside a person (no text or symbols visible)50
natural_image
Line drawing of a mechanical clamp or bracket assembly with arrows indicating force direction (no text or symbols)natural_image
Diagram of a vehicle's seat assembly with directional arrows indicating rotation (no text or labels)natural_image
Close-up of a robotic arm handling a metallic cylindrical device with a spool, against a plain white background (no text or symbols visible)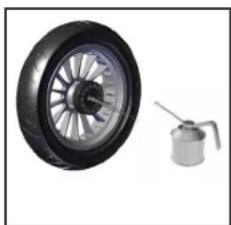
natural_image
Two automotive components: a black wheel with metallic rim and a gas cylinder (no text or symbols visible)Manual Ozone City v. 1.5
- Bagdel (City Bag):
natural_image
Close-up of a bicycle frame with labeled parts (1, 2) and a black handle (no text or symbols beyond labels)2
3
natural_image
Close-up of a dark fabric garment with a numbered label pointing to a seam or seam (no text or symbols on the garment itself)natural_image
Close-up of a hand adjusting a backpack cover with attached straps and a curved cable (no text or symbols visible)natural_image
Person in a wheelchair wearing a suit jacket, with hands adjusting the seat (no visible text or symbols)natural_image
Top-down view of a person wearing a dark suit with a head cover and directional arrows indicating movement or focus (no text or symbols present)natural_image
Close-up of hands using a tool to adjust or install a component, with two circular annotations highlighting specific parts (no text or symbols present)natural_image
Close-up of a person using a bicycle seatbelt device, showing hand positioning and motion arrows (no text or symbols visible)natural_image
Close-up of hands adjusting a zipper with a magnified inset showing a detail (no text or symbols visible)natural_image
Top-down view of a gray car seat with two circular cutouts and a small circular base (no text or symbols)WARNUNG
natural_image
Close-up of a person adjusting a mechanical device with numbered parts (17 and 18), no visible text or symbols beyond labels.16
natural_image
Close-up of a person adjusting a bicycle seatbelt with a hand adjusting the seatbelt (no visible text or symbols)17
natural_image
Mechanical assembly diagram showing a wheel and shaft with a 20-degree angle标注 (no text or symbols beyond the number)18
19
natural_image
Close-up of a person adjusting a black athletic jacket with a hand pointing to the pocket (no text or symbols visible)Manual Ozone City v. 1.5
natural_image
Close-up of a mechanical clamp or bracket with numbered annotations (1, 2, 3) indicating rotational movement or assembly steps (no text beyond labels)23
natural_image
Close-up of a hand holding a black mechanical component with a curved handle, showing a 30-degree angle indicator (no text or symbols on the object itself)24
natural_image
Silhouette of a baby stroller with a dotted arrow indicating motion (no text or symbols)26
natural_image
Black stroller with curved arrow indicating 34° angle (no text or symbols on the device itself)27
28
natural_image
Black and white photo of a stroller with wheels and seat (no visible text or symbols)29
natural_image
Black and white photo of a stroller with a red X symbol, standing beside a person (no text or symbols visible)Manual Ozone City v. 1.5
natural_image
Line drawing of a hand holding a mechanical clamp or bracket, with arrows indicating force direction (no text or symbols)33
34
70
natural_image
Technical line drawing of a mechanical component with directional arrows indicating rotation (no text or symbols)36
37
natural_image
Close-up of a robotic arm handling a metallic cylindrical device with a spool, against a plain white background (no text or symbols visible)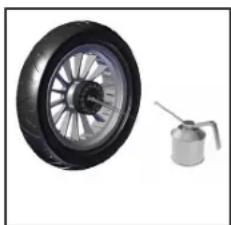
natural_image
Two automotive components: a black and silver wheel with a hose and a gas cylinder (no text or symbols visible)Subject...... The section applies to the following products:
Contents of the box 78 Ozone City & City Carrycot
Emmaljunga's original accessories 78 Ozone City & City Carrycot
Important safety information 79-82 Ozone City & City Carrycot
Assembly of the chassis 83 Ozone City & City Carrycot
Assembly of the seat-unit 83-85 Ozone City & City Carrycot
Usage of the pram 86-88 Ozone City & City Carrycot
Assembly and usage of the City Carrycot 89-90 City Carrycot
Care and maintenance 91-92 Ozone City & City Carrycot
Service Documentation.... 93 Ozone City
Delivery Check.... 94 Ozone City
Service Protocol.... 95 Ozone City
IMPORTANT
In the manual the terminology City Carrycot is used for the City Carrycot/Bassinet
Contents of the box:
Ozone City
1 pc seat unit incl 5-point harness
1 set shoulder harness pads
1 pc folded chassis with tray
2 pc wheel 300 mm
2 pcs Swivel front wheels
1 pc Raincover
1 pc Instruction manual
1 pc hood
1 pc seat-unit fabrics
1 pc bumper bar cover
City Carrycot (Accessory)
1 pc City Carrycot
1 pc Hood
1 pc Mattress
1 pc Instruction manual
1 pc Apron
Emmaljunga's original accessories
Please use Emmaljunga's original accessories for maximum safety and comfort. Information about co-ordinating accessories can be found in our brochure or at any of our authorised retailers.
Important Safety Information
Read these instructions carefully before use and keep them for future reference. Your child's safety may be affected if you don't follow these instructions.
Important keep these instructions for future reference.
WARNING Never leave your child unattended.
WARNING Ensure that all the locking devices are engaged before use.
WARNING To avoid injury ensure that your child is kept away when unfolding and folding this product.
WARNING Do not let your child play with this product.
WARNING Use a harness as soon as your child can sit unaided.
WARNING This seat unit is not suitable for children under 6 months.
WARNING Always use the restraint system.
WARNING Check that the pram body or seat unit or car seat attachment devices are correctly engaged before use.
WARNING This product is not suitable for running or skating.
WARNING Accessories or spare parts that the manufacturer has not approved must not be used.
Warning sentences according to prEN1888:2010
WARNING It may be dangerous to leave your child unattended.
WARNING Do not add a mattress thicker than 45mm.
WARNING Any load attached to the handle affects the stability of the pram/pushchair.
WARNING Always use the crotch strap in combinations with the waist belt.
Warning sentences according to EN1888:2003+A1:2005+A2:2005+A3:2005
WARNING A child's safety is your responsibility. Children should be harnessed in at all times and should never be left unattended. The child should be clear of moving parts while making adjustments. This vehicle requires regular maintenance by the user. Overloading, incorrect folding and the use of non-approved accessories may damage or break this vehicle. Read the instructions.
Warning sentences according to BS 7409:1996
Important Safety Information
WARNING Follow the manufacturer's instructions.
WARNING Put on all the brakes whenever you park the stroller.
WARNING Do not leave children unattended.
WARNING Do not carry extra children or bags on this stroller.
WARNING Make sure children are clear of any moving parts if you adjust the stroller, otherwise they may be injured.
WARNING Not recommended for a child under 6 months old.
Mandatory warning sentences Australia
To avoid injury or death:
WARNING Always apply the brakes whenever the pram/stroller is stationary.
WARNING Do not leave children unattended.
WARNING Secure the child in the harness at all times.
WARNING Do not carry extra children or bags on this pram/stroller.
WARNING Make sure children are clear of any moving parts if you adjust the pram/stroller.
WARNING When not in use disconnect shoulder straps from the waist strap and/or buckle.
WARNING Do not use this bassinet once the child can sit up unaided.
WARNING Do not use or park the vehicle close to open fires or other sources of heat such as radiators for example.
WARNING Avoid steps, stairs and escalators whenever possible. Always stand below the stroller if used on an escalator.
Warning sentences according to AS/NZS 2088:2009
WARNING Do not let other children play unattended near the carrycot.
WARNING Do not use the carrycot if any part is broken, torn or missing.
WARNING Use only replacement parts supplied or approved by the manufacturer.
WARNING Be aware of the risk of open fire and other source of strong heat, such as electric bar fires, gas fires, etc., in the near vicinity of carry cot.
Important Safety Information
WARNING The handles and the bottom of the carrycot should be inspected regularly for signs of damage and wear.
WARNING Never use the carrycot on a stand.
WARNING Do not leave your child unattended.
WARNING Use only the carrycot on a firm, horizontal level and dry surface.
Warning sentences according to EN 1466:2004+A1:2007
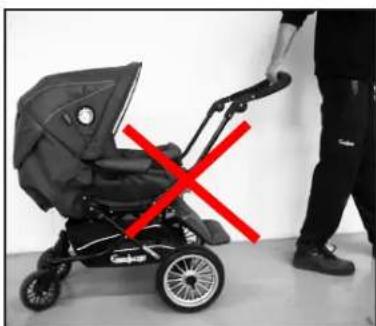
WARNING Never pull a pram with swivel front wheels behind you, if the front wheels are not locked.
The pram might self turn which can lead to a safety risk if you are not cautious and attentive.
- Your child's safety is your responsibility.
- This product is intended for one (1) child from the age of 6 months up to a maximum weight of 15kg . Only use the pram for the number of children it is intended for.
- With a lift (original accessory) the pram can be used from birth
- The carrycot can only be used for the transportation of one child from 0 to 6 months up to a maximum weight of 9kg . The product is not suitable for a child that can sit unaided, roll around or support themselves on hands and knees.
- Ozone ^City chassis should only be used together with an City carrycot or a Type A Seat Unit Oz seat unit.
- Follow the care and maintenance instructions.
- The safety instructions and directions in this manual cannot cover all possible conditions and unforeseeable situations which may occur. It must be understood that common sense, caution and care are factors that cannot be built into a product. These factors are the responsibility of the person(s) caring for and operating the pram.
- It is important that these instructions are understood and followed by everyone that uses the pram and accessories. Always inform and instruct each person using the pram and accessories how they should be used, even if the person(s) in question will only use them for a short time.
- The maximum weight for one child using the Toddler Roller accessory on the pram is 20 kg.
- Use a maximum of one accessory on the pram at any one time e.g. Toddler Roller, Toddler Seat or car seat adaptor.
- Do not place objects on the hood. Never use the pram without the hood. The pocket in the hood is intended for the storage of light objects only and must not be loaded with a weight exceeding 250 g.
- If any part of this manual is unclear or requires further explanation, please contact an authorised Emmaljunga retailer who will be able to assist you.
- The pram is intended for transportation only. Never use the pram as a bed for your child.
- Never leave the pram with a child in it without engaging the brake.
- The brake should always be engaged when you lift your child in and out of the pram.
- Never park the pram on a hill or an uneven surface.
Important Safety Information
- Do not stand or sit on the footrest. The footrest must only be used as a support for one (1) child's legs and feet. Any other usage may lead to serious personal injury. The maximum load for the footrest is 3 kg.
- Never use the product if a part is faulty or damaged.
- Check that all zips and poppers are securely fastened before use.
• Always remove the child before you fold the pram. - Do not place any additional mattresses in the carrycot and only use the mattress that is included with the pram or another mattress recommended by Emmaljunga.
• Overloading, incorrect folding and the use of non-approved accessories may cause injury to your child/children and/or damage the pram. - When using a lift accessory, attach the product to the d-rings on the pram. Check that the carrycot's/lift's carrying straps are fastened securely. The Babylift's carrying straps should be placed inside the product's mini hood.
- Any load that is placed on the pram (e.g. on the handle, backrest or on the sides of the pram) will affect the stability of the pram. Do not use non-approved accessories.
- The shopping tray has a maximum weight limit of 5 kg. Always place heavier objects in the centre of the tray. The pram may become unstable if the weight in the tray is une venly distributed.
- Only use original replacement parts supplied by Emmaljunga.
- Never use the carrycot on a stand.
- Items in the shopping tray should not protrude over the sides as items could get caught in the wheel spokes.
- The seat unit or carrycot must not be used as a car seat.
- Never leave the carrycot carrying straps loose on the outside of the carrycot sides when the pram is in use.
- Never leave the carrycot carrying straps loose on the outside of the carrycot sides when the pram is in use.
- The outer length and width of the City Carrycot is 795 mm/430 mm.
- The outer length and width of the Quadrolift is 800 mm / 400 mm.
- The outer length and width of the Babylift is 800 mm / 330 mm.
BS 7409:1996 WARNING!
A CHILD'S SAFETY IS YOUR RESPONSIBILITY.
Children should be harnessed in at all times and should never be left unattended. The child should be clear of moving parts while making adjustments. This vehicle requires regular maintenance by the user. Overloading, incorrect folding and the use of non-approved accessories may damage or break this vehicle.
Assembly of the chassis
1
natural_image
Close-up of a bicycle frame with labeled parts (1, 2), no visible text or symbols beyond labels2
3
Make sure that children are kept away from moving parts when assembling the pram, otherwise they might be at risk of injury.
Unfolding the chassis
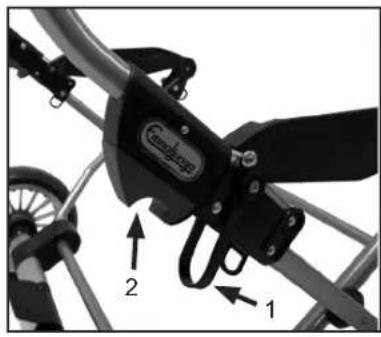
- Apply the brake on the pram. To unfold the chassis, pull the handle upwards, whilst holding down the side of the chassis.
- The safety catch (1) is activated to prevent unintentional folding if the chassis lock (2) is not locked into position.
WARNING
• The chassis locks need to click into the locked position.
- Please make sure, before you use the pram that the chassis lock (2) is in the locked position otherwise the pram will be dangerous to use.
Attaching the wheels
- Remove the plastic protection from the axles. Save them for future use.
- Release the brake by pushing the brake bar upwards using minimum force with your foot.
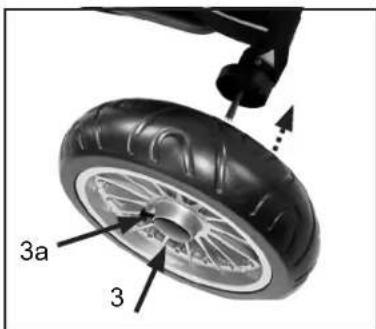
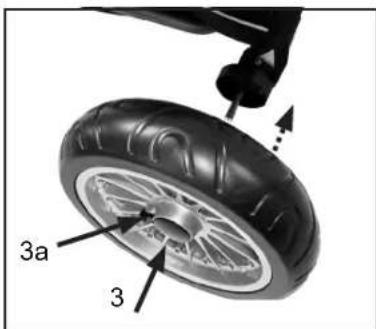
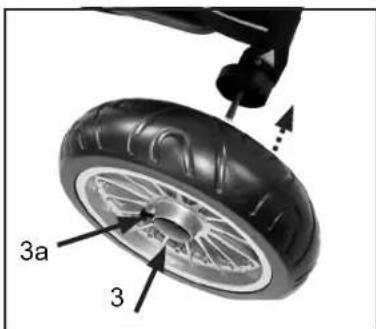
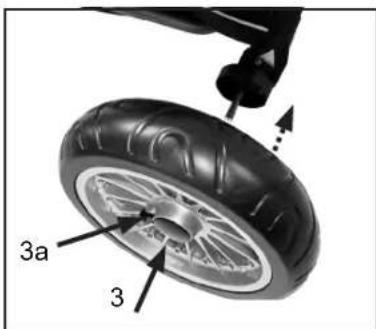
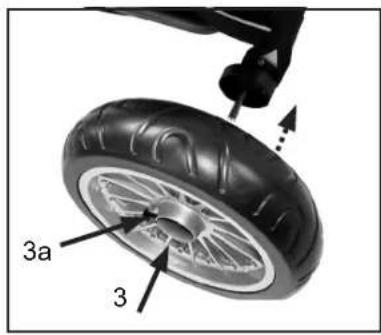
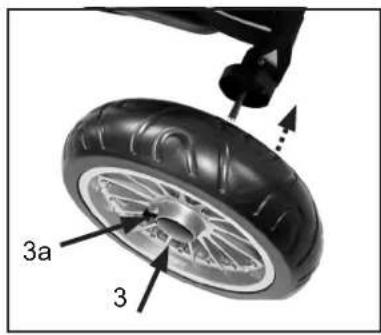
- Press in the hub cap's release button (3 or 3a), push the wheel onto the axle as far as it can go. Release the button and pull the wheel towards you, until you hear a definite click. Repeat the same procedure for both rear wheels. Make sure that the wheels are attached properly and cannot be pulled off the axle.
IMPORTANT
- The wheels are greased and can leave marks on textiles. Please use wheel protection indoors to protect your floors.
-
Risk of suffocation. Don't let your child play with or in some other way handle the plastic protectors.
-
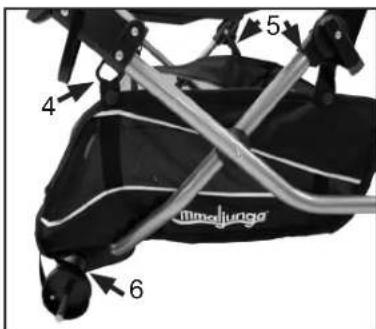
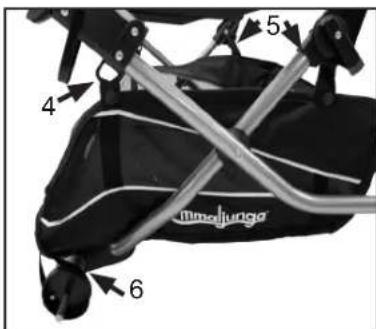
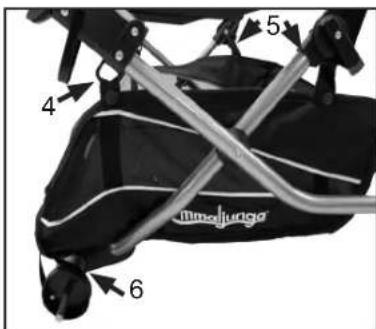
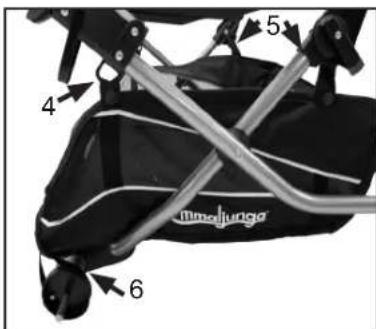
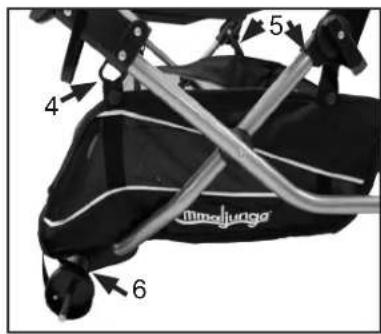
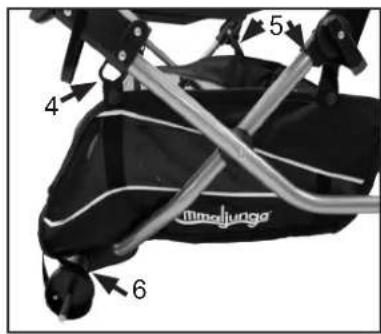
Attach the tray to the rings on the chassis (4 and 5).
- Fasten the tray around the brake axle (6).
Assembly of the seat-unit
4
natural_image
Close-up of a dark fabric garment with a numbered label '7' pointing to a seam or seam (no other text or symbols visible)Manual Ozone City v. 1.5
Removing and assembling the seat-fabrics
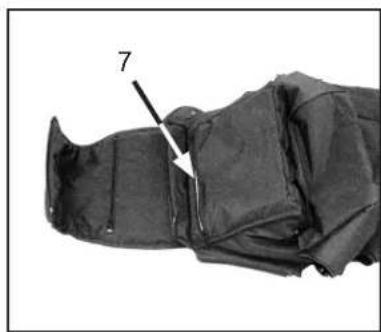
- The fabrics of the pram are assembled at delivery, but can be removed to be washed.
- Before washing, remove the wooden seat plate which you will find within the seat unit fabrics. Open with the aid of the zipper (7).
IMPORTANT
- Follow the washing instructions in this instruction manual's section for care and maintenance.
Assembly of the seat-unit
5
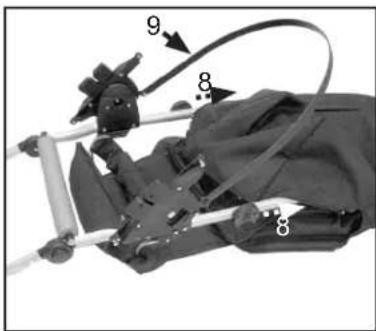
- To assemble the seat unit fabrics, open all of the zippers on the seat-fabrics. Insert the wooden seat plate (see picture 4). Insert the seat unit's aluminium frame into the fabric as shown in the picture (8).
- The black plastic strap on the seat unit frame (9) should be placed on the outside of the fabric.
6
natural_image
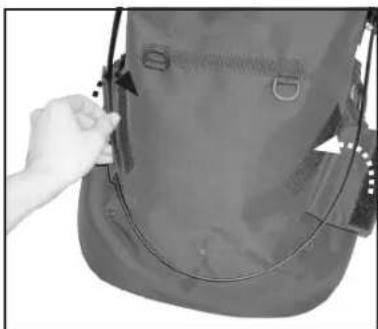
Close-up of a hand adjusting a backpack with straps and straps (no visible text or symbols)- Secure the black plastic strap to the seat fabric with the aid of the two Velcro straps in the fabrics.
7
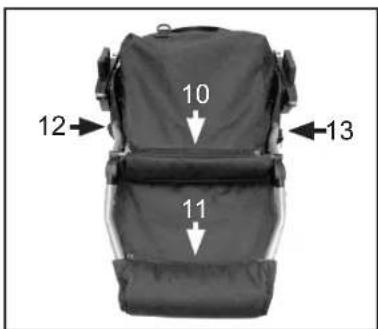
- Check that all zips are attached, (five in total):
- For the wooden plate (picture 4)
- 1 pc under the seat (10)
- 1 pc under the footrest (11)
- 1 on each side of the seat along the black plastic Easy fix attachment points (12 and 13).
WARNING
- Before you use the pram, make sure that the seat fabrics are correctly attached and that all zips are correctly fastened.
8
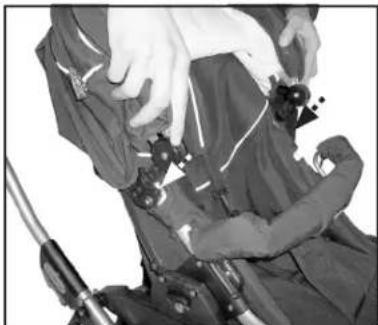
natural_image
Person in a suit adjusting equipment with gloves, no visible text or symbolsAssembly of the hood
- Press the two plastic legs of the hood into the plastic receivers on the seat-unit (one on each side).
WARNING
• The hood should be assembled when the pram is in use.
9
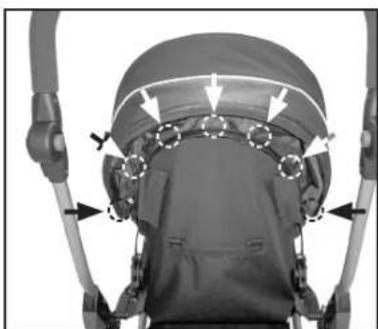
natural_image
Top-down view of a person wearing a dark outfit with a head cover and mechanical arms (no visible text or symbols)- The hood should be attached with the poppers (7 pcs in total) as shown on the picture.
WARNING
• Always make sure that the backrest of the unit is in a safe position before it is used. This step is very IMPORTANT.
Assembly of the seat-unit
10
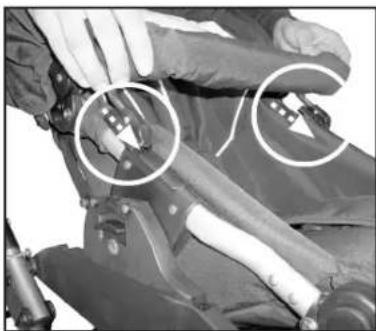
natural_image
Close-up of a robotic gripper with mechanical components and circular annotations (no readable text or symbols)Assembly of the bumper bar
- Slot both attachments pieces located at each end of the bumper bar, on to the plastic pieces on the seat-unit until they are fully located.
- The crutch strap is assembled around the bumper bar with the aid of the poppers.
WARNING
- Make sure that the bumper bar is attached when the child is placed in the pram.
11
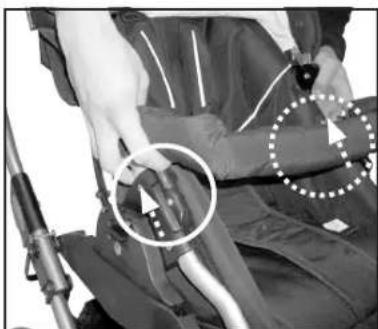
natural_image
Close-up of a person using a bicycle seatbelt device, showing hand positioning and motion arrows (no text or symbols visible)- The bumper bar is removed by pulling the two attachments in the opposite direction to that used to attach it.
12
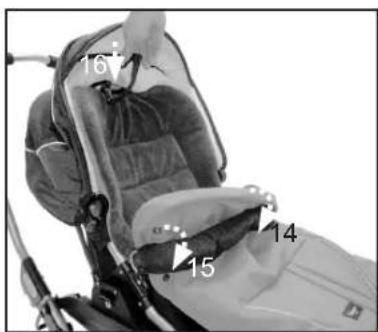
Assembly of the Footmuff (Accessory)
- Place the footmuff in the seat unit and secure it around the bumper bar using the four poppers(14 and 15).
- Position the straps on the footmuff between the hood and the rear of the seat unit (16).
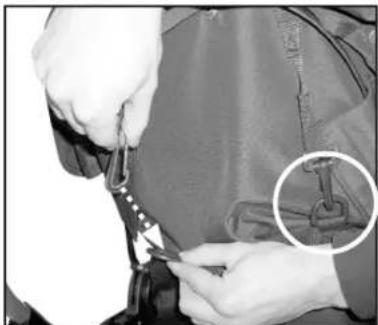
13
natural_image
Close-up of hands adjusting a zipper with a magnified inset showing a small object (no text or symbols visible)- Attach the plastic clips on the footmuff's straps to the plastic hooks on the rear of the seat unit.
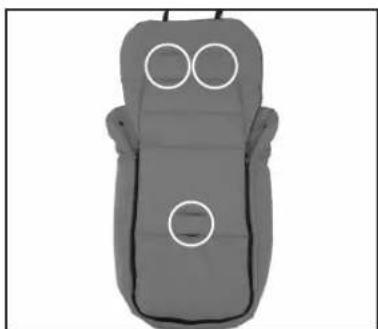
14
natural_image
Top-down view of a gray car seat with two circular cutouts and a central hole (no text or symbols)WARNING
- Always use the 5-point harness as soon as the child can sit unaided.
- The footmuff has holes to accommodate the 5-point harness.
Usage of the pram
15
natural_image
Close-up of a person adjusting a mechanical device with numbered parts (17 and 18), no visible text or symbols beyond labels.16
natural_image
Close-up of a person adjusting a bicycle seatbelt with a hand adjusting the seatbelt (no visible text or symbols)17
natural_image
Mechanical assembly diagram showing a wheel and shaft with a 20-degree angle标注 (no text or symbols beyond the number)18
19
natural_image
Close-up of a person adjusting a black athletic jacket with a hand pointing to the pocket (no text or symbols visible)Attaching and releasing the seat-unit.
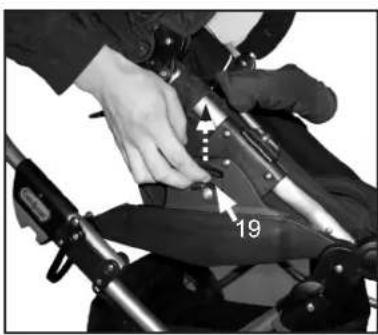
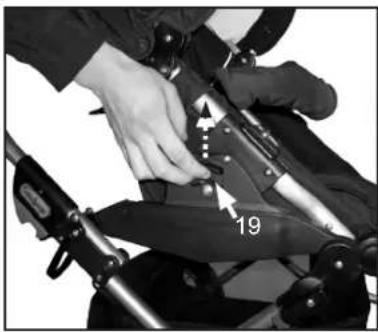
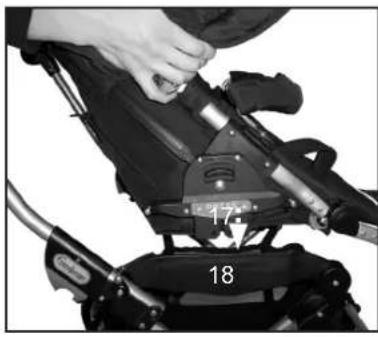
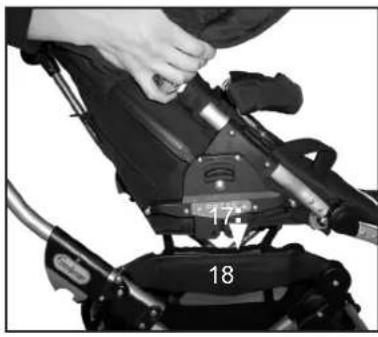
- Attaching the seat-unit: Engage the parking device: Lift the seat unit and push the Easy Fix pieces (17) into the receivers on both sides of the chassis (18) until it locks into position with an audible "click".
• The seat-unit can be attached in both driving directions.
WARNING
- Make sure that the seat-unit is correctly assembled on the chassis before usage.
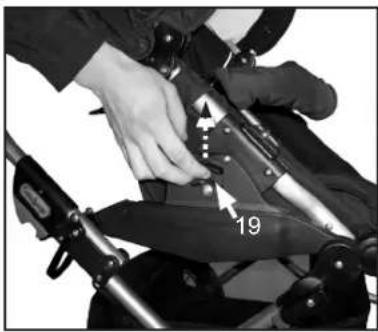
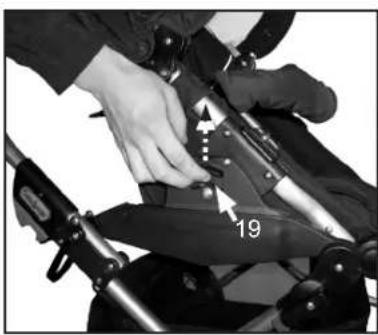
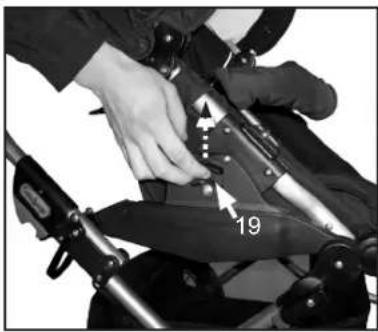
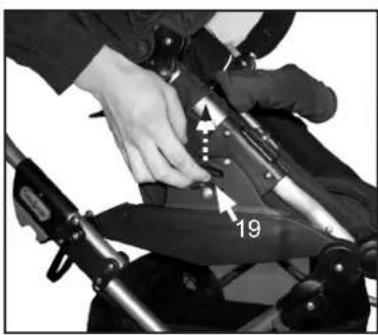
- To release the seat-unit: Start by engaging the parking device. Press the handles (19) on both sides at the same time and then lift the seat-unit straight up.
WARNING
- Don't allow any child to be placed in the vehicle when it is being folded/unfolded.
- Hold the handles steadily until the seat unit is in place.
IMPORTANT
- Make sure that the seat-unit is in place, before you start to use the vehicle.
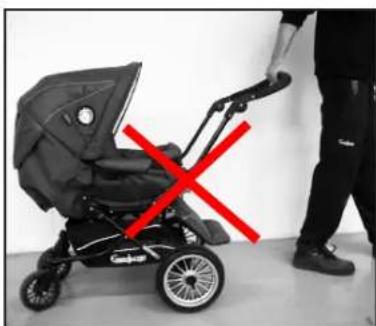
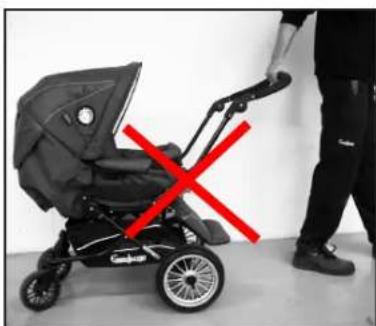
- Never lift the top part when it is assembled onto the chassis.
Engaging the parking device
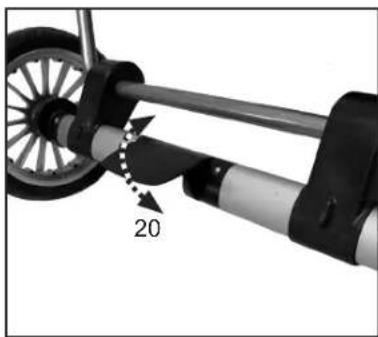
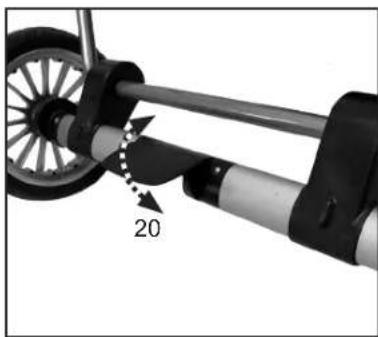
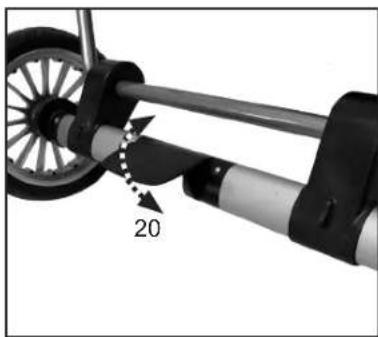
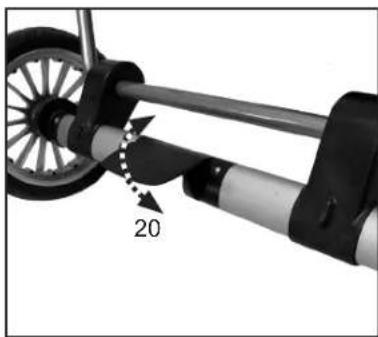
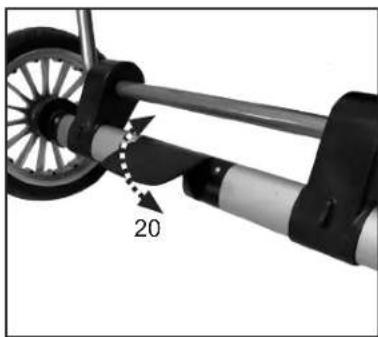
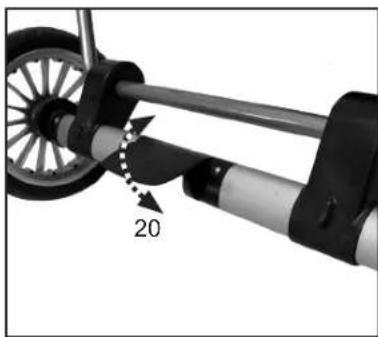
- Engage the parking device by pushing the brake pedal (20) all the way down with your foot.
• Disengage the parking device by lifting the pedal up with your foot.
WARNING
- Never leave the vehicle without first engaging the parking device.
- The brake should always be engaged when you lift your child in and out of the stroller/pram.
- Avoid uphill or downhill parking.
- Make sure that the cogs are attached properly on both back wheels.
- Make sure that the brake pin engages into the cogs when the vehicle is parked.
How to adjust the height of the handle
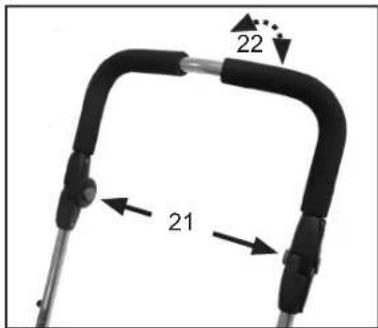
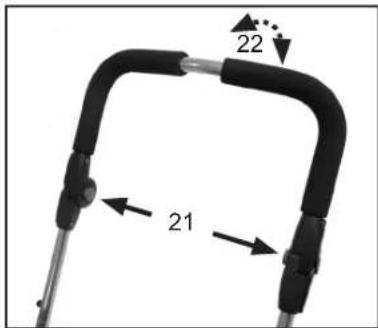
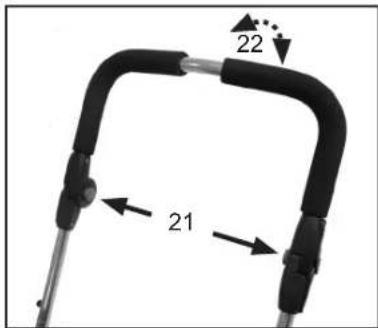
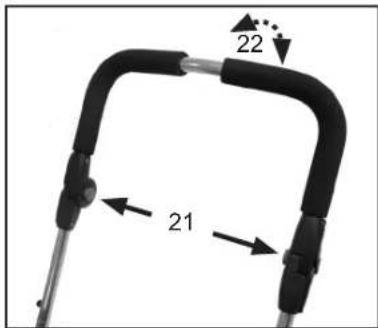
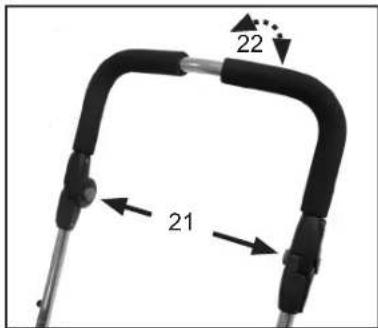
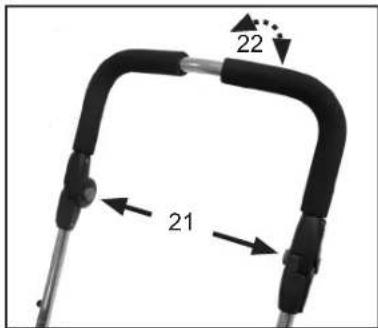
- Adjust the height by pressing the grey buttons on the inside of the handle (21). Keep the buttons pressed in while you adjust the handle to the required position (22).
Adjusting the hood
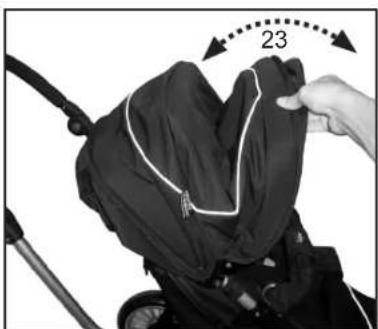
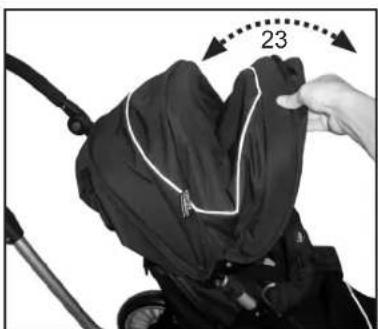
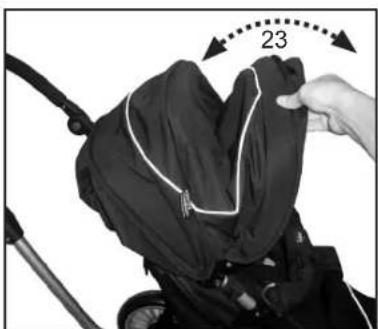
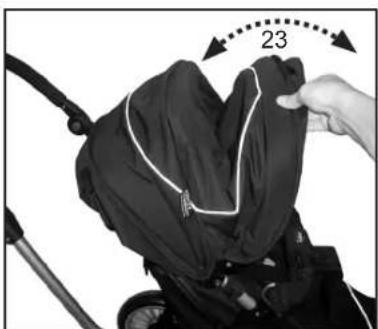
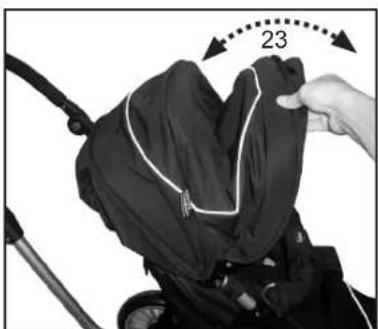
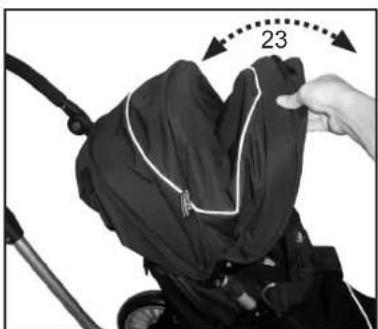
- Adjust the hood by gently pulling the front backwards/forwards (23) until it reaches the desired position.
- The pram is equipped with a sewn in mosquito net in the hood. The mosquito net can be pulled over the footrest and attached with the plastic hooks.
IMPORTANT!
- Never lift the stroller by holding on to the hood.
- Never lift the top part when it is assembled on the chassis.
Usage of the pram
20
21
22
natural_image
Close-up of a mechanical clamp or bracket with numbered annotations (1, 2, 3) indicating rotational movement or adjustment points.23
natural_image
Close-up of a hand holding a black mechanical component with a curved handle, showing a 30-degree angle indicator (no text or symbols on the object itself)24
Manual Ozone City v. 1.5
Adjusting the footrest
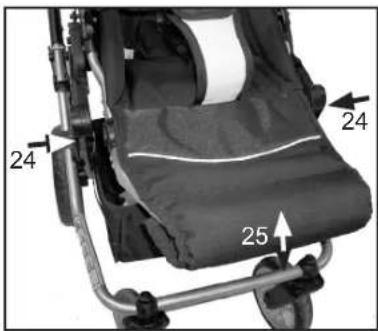
- The footrest can be adjusted into different positions. Adjust the footrest to the down position by pushing in the release buttons (24) on each side. Keep the release buttons pushed in and adjust (25) into the desired position.
• To adjust into the horizontal position lift the footrest upwards. - The stroller features an automatic adjustment of the footrest into the horizontal position which is required for folding.
WARNING
- Do not let the child/children stand on the footrest.
Adjust the 5-point harness
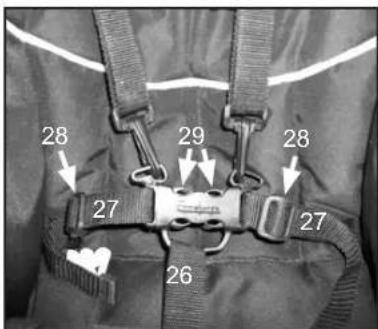
- Bring crutch strap (26) forward between the child's legs and up toward the front of the waist. Insert the waist straps (27) into the harness buckle until they "click" into place. Make sure waist straps are fastened.
- Adjust all straps, using the sliders (28).
- To release the shoulder and waist straps, press the buttons (29) in the centre of the harness buckle.
Attachment points are provided at the ends of each waist strap for a separate harness complying with BS 6684.
WARNING
- Always fasten the child with the harness when they are placed in the pram. Make sure that all attachment points are correctly fastened and that the harness is assembled in the pram.
Adjust the angle of the seat unit.
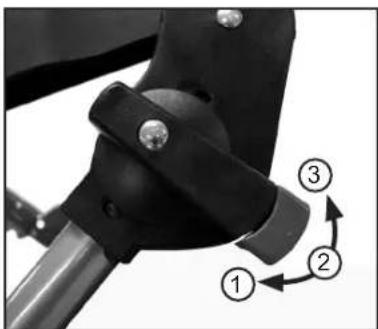
- Adjust the angle by pulling the grey tab outwards and twist the knob until the grey button locks into the desired position: 1, 2 or 3. Repeat on the other side of the chassis - make sure the knobs are in the same positions on both sides of the chassis.
- Remove your child from the pram before adjusting the angle.
WARNING
- Adjust the angle when the chassis is folded to avoid unnecessary wearing of the mechanism.
- The mechanism must be in the same position on both sides of the chassis to avoid uneven strain and possible damage to the chassis.
- Make sure the grey button has locked into position in order for the mechanism to function properly.
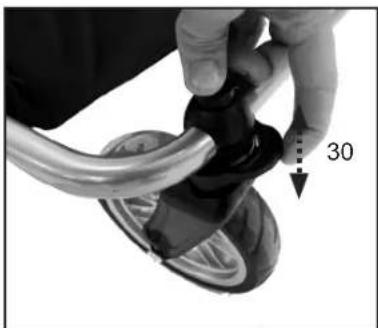
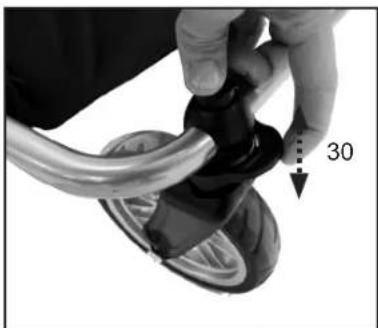
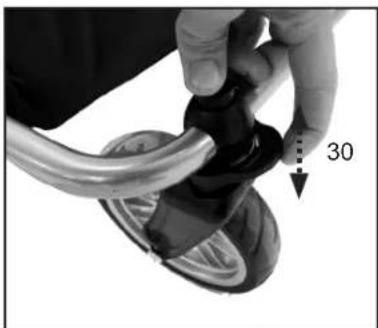
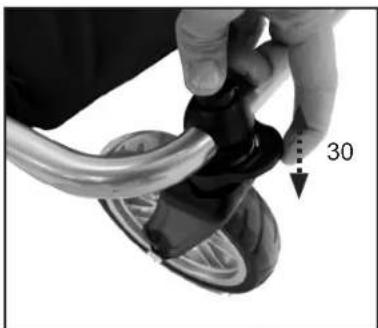
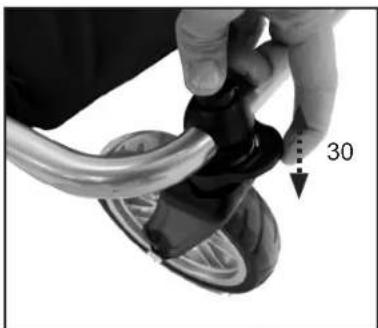
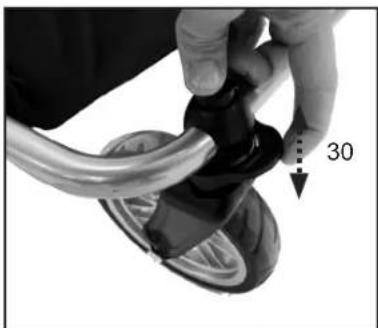
The front wheel can be fixed or swivel 360 degrees.
- The wheels are fixed by pressing the locking ring (30) down when the wheels are positioned straight forward.
- The wheels can rotate freely 360 degrees by pulling the locking ring up.
Adjusting the backrest/seat unit
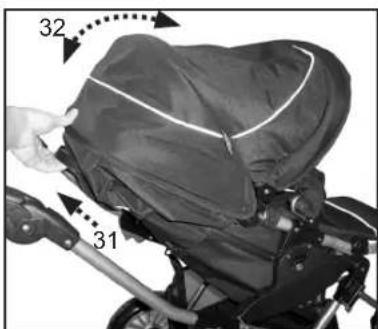
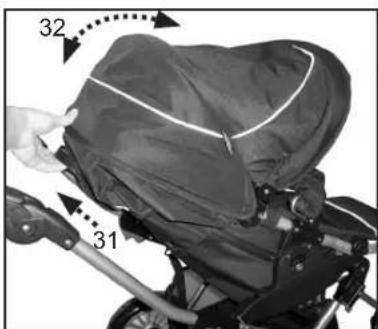
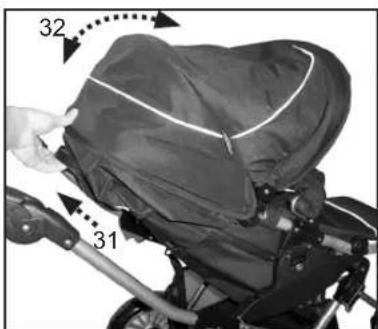
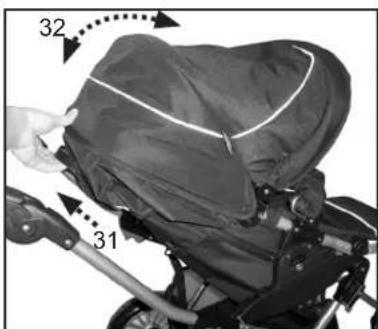
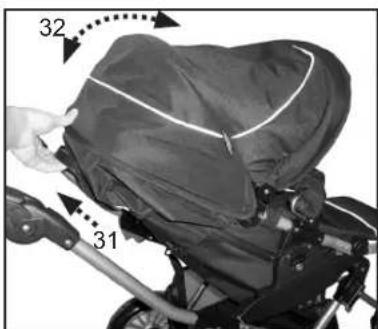
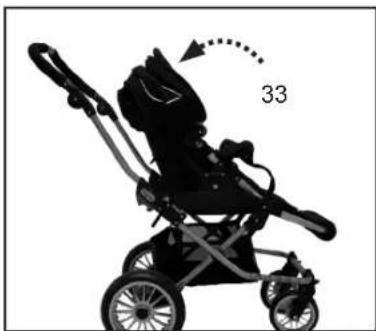
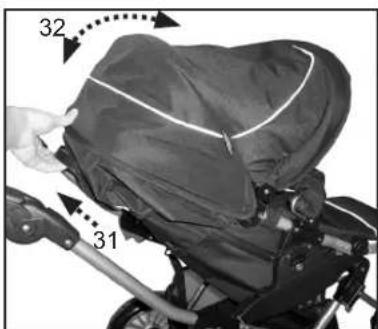
- Pull the backrest lever (plastic strap) (31) and lower/ raise the backrest/seat unit into the desired position (32).
WARNING
- Make sure that the backrest/seat unit is locked into one of its 4 positions by pushing the backrest/seat unit backwards until it locks in one of its positions. Please note! The lowest recline position should only be used when folding the stroller.
Usage of the pram
25
natural_image
Silhouette of a baby stroller with a dotted arrow indicating motion (no text or symbols)26
natural_image
Black stroller with a curved arrow and dotted measurement line indicating 34 units (no text or symbols on the device itself)27
28
natural_image
Black and white photo of a stroller with wheels and seat (no visible text or symbols)29
natural_image
Black and white photo of a baby stroller with a red X symbol, standing beside a person (no text or symbols visible)Make sure children are clear of any moving parts if you adjust the stroller, otherwise they may be injured.
Unfolding of the chassis
- Apply the brake on the pram. Push back the hood towards the backrest.
WARNING
- Make sure that no children are nearby when the pram is being folded/unfolded.
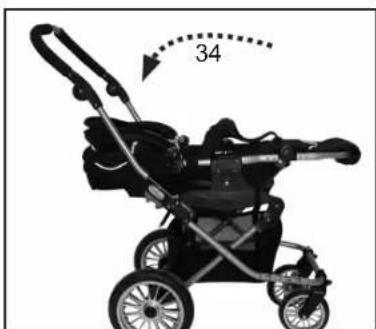
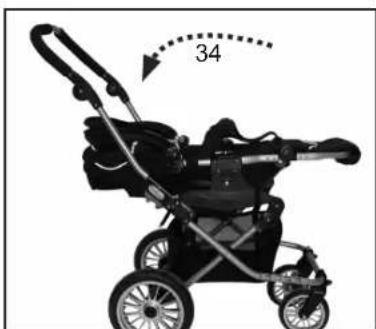
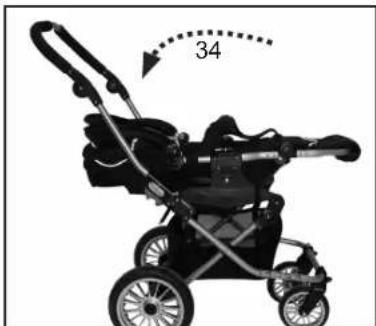
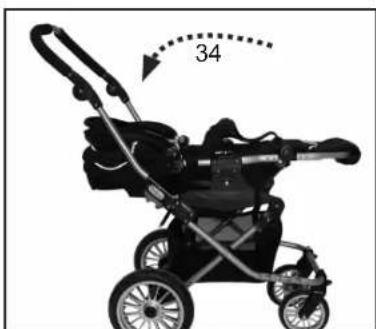
- Lower the backrest/seat unit into its lowest position by pulling the backrest lever (picture 24) and lowering the seat unit down to it's lowest position before it is folded (34).
IMPORTANT!
- The backrest/seat unit should always be in its lowest position (fully reclined) before the pram is folded. Please note! The lowest recline position should only be used when folding the stroller.
Make sure children are clear of any moving parts if you adjust the stroller, otherwise they may be injured.
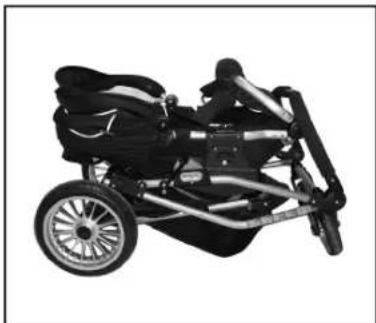
Folding of the pram
- Start by making sure that the backrest/seat unit is in its lowest position (picture 26) and make sure that the brake is engaged (picture 17)
- Let the front wheels rotate freely by pulling up the locking rings (see picture 23)
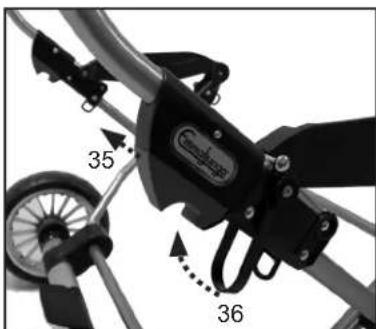
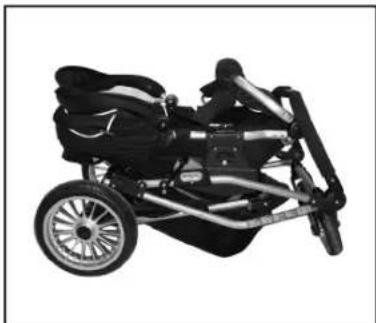
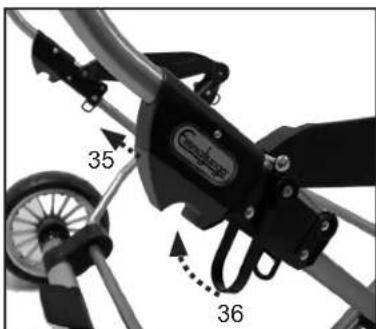
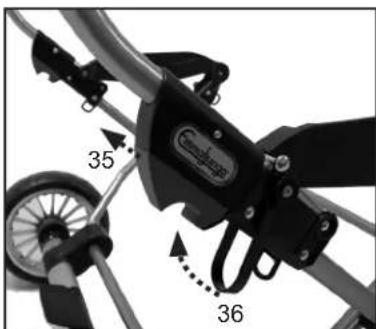
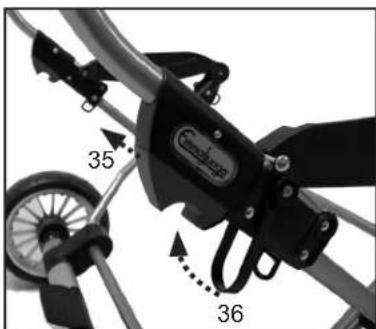
- Fold the chassis by pulling the two chassis locks (35) (one on each side) upwards.
- Lift the safety catch (36) and push the handle forward.
IMPORTANT
- Make sure that the fabrics don't get caught between the handle and the seat-unit.
- If you need more space you can remove the rear wheels by pushing in the hub caps release buttons and pulling of the wheels.
- Wipe off dirt from the axles before attaching the wheels again.
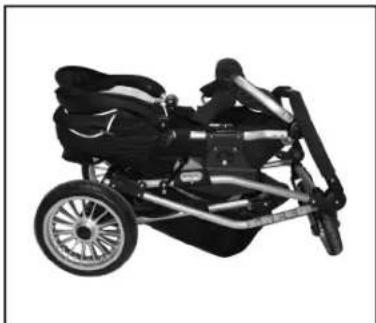
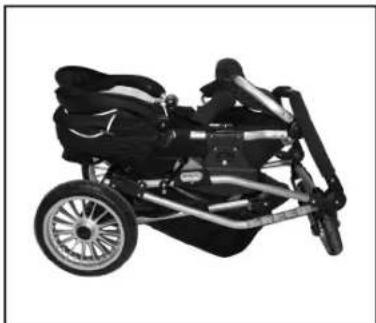
- Push down the handle and let the chassis fold slowly.
Use of the raincover
- The raincover is assembled by placing the small opening over the handle. Then pull the raincover over the hood and seat-unit. Close the opening by the handle with the Velcro strap. Please note that there is an opening in the raincover near the hood opening.
• Use the raincover that is supplied with the pram. - Always use the raincover when it's raining or snowing. If the pram is damp before the raincover is attached, wipe off the fabrics first if possible.
- Make sure the raincover is completely dry before it is placed back into its bag.
WARNING
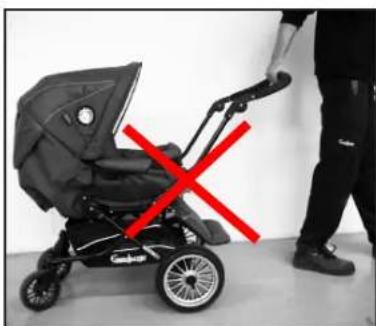
- Never pull a pram with swivel front wheels behind you, if the front wheels are not locked. The pram might self turn which can lead to a safety risk if you are not cautious and attentive.
Assembly and usage of the
This section applies to the following products:
City Carrycot
City carrycot (accessory to Ozone City)
30
31
32
natural_image
Line drawing of a hand holding a mechanical clamp or bracket, with arrows indicating force direction (no text or symbols)33
34
Manual Ozone City v. 1.5
Assembly of the carrycot
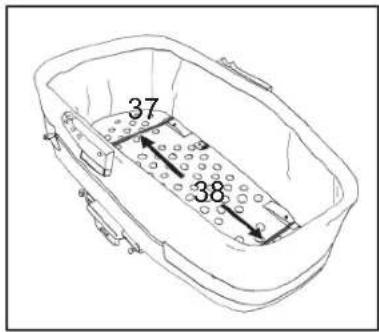
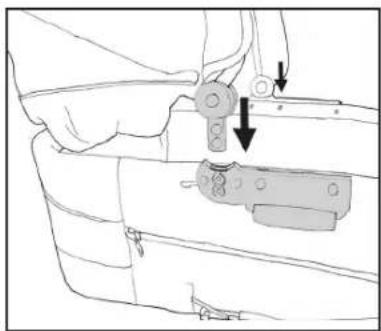
- Remove the mattress and seat fabrics from the plastic packaging. Slide the two metal support brackets (38) into position on the base of the carrycot (37).
• The Base is made out of wood.
WARNING
- Risk of suffocation. Do not let your children play with the plastic packaging.
- Make sure that the metal support bars are attached so that the pram stability and safety will not be jeopardized.
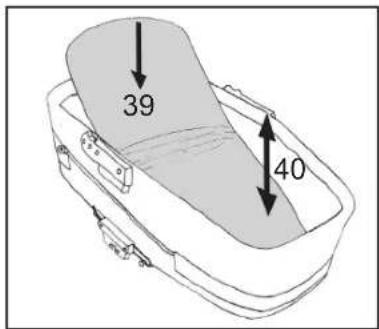
- Insert the mattress (39).
WARNING
- The depth from the top of the mattress together with other bed accessories to the carrycot upper part (40) must be at least 150 mm.
- The exclusive mattress consists of a combination of fibre filling and polyeter filling. Make sure that you place the mattress with the firmer polyeter filling facing downwards in the carrycot.
- Do not add a mattress thicker than 45mm.
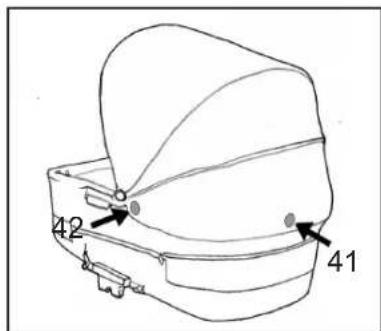
- Attach the carrycot hood by pushing the plastic legs of the hood into the plastic receivers on the carrycot. Make sure they are securely in place.
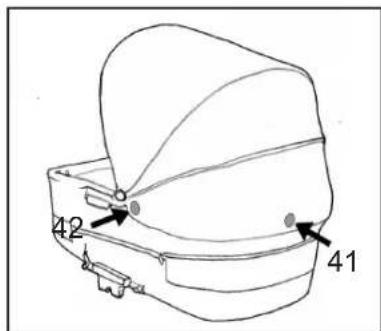
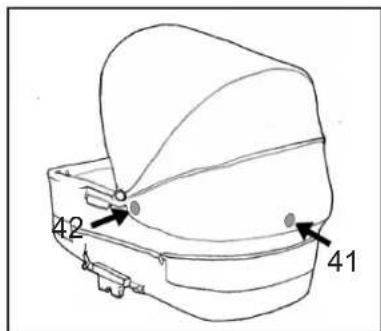
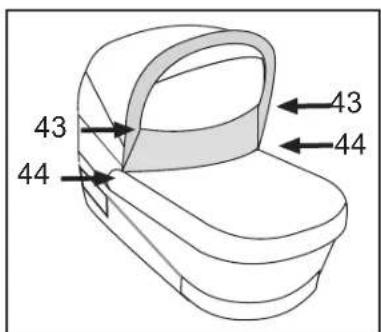
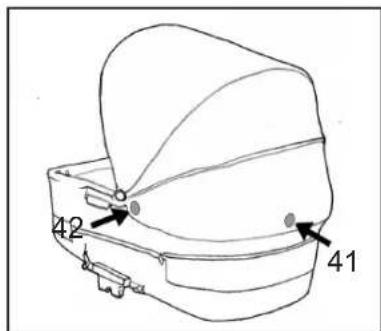
- Press the hood fabric onto the plastic receivers (42) on each side of the carrycot. Press the Velcro (41) onto the carrycot.
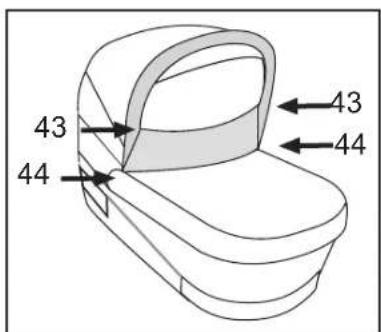
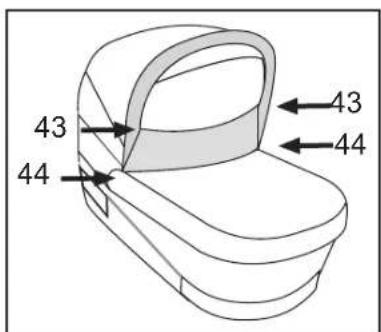
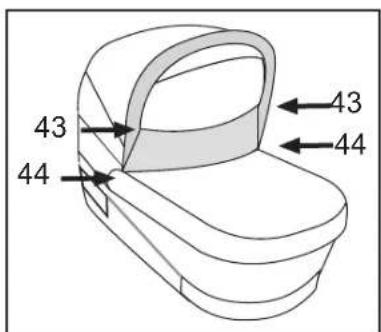
- Press the apron onto the hood (43) and onto the plastic receivers (44) on each side of the carrycot.
IMPORTANT
- The hood cannot be pushed back when the apron is attached to the hood without first releasing the poppers (43).
Assembly and usage of the City Carrycot (Accessory to Ozone City)
This section applies to the following products: City Carrycot
35
natural_image
Technical line drawing of a mechanical component with directional arrows indicating motion (no text or symbols)Adjusting the hood
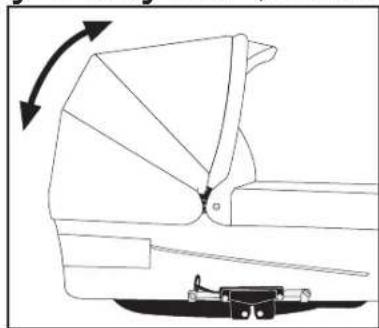
- Adjust the hood by gently pulling the hood forwards/backwards into the desired position.
- Do not adjust the hood while the apron is attached.
IMPORTANT
• Never carry the carrycot by the hood.
- Never lift the carrycot when it is assembled onto the chassis.
36
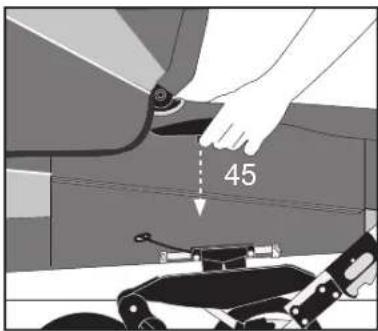
Attachment of the carrycot
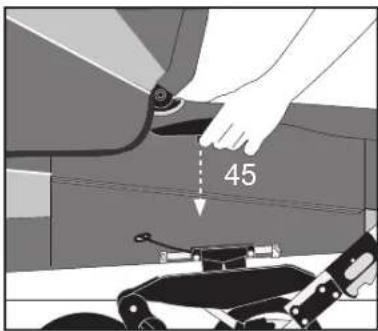
- Engage the parking device: Lift the carrycot by the handles and push the Easy Fix pieces into the receivers (45) on both sides of the chassis until it locks into position.
WARNING
• Make sure that the carrycot is locked in position on both sides.
37
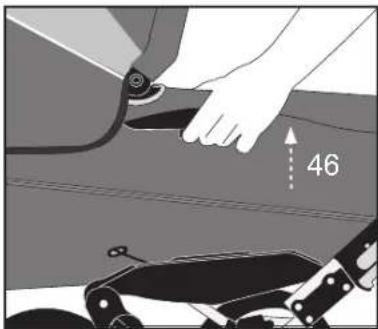
To release the carrycot
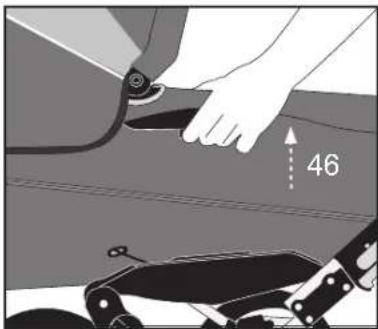
- Start by engaging the parking device. Press the Easy Fix handles and then lift the carrycot straight up (46). When the Easy-Fix cannot be pressed any further, the carrycot can then be removed.
Use of the rain cover
- The raincover is attached by placing the raincover over the carrycot and seat-unit. Please note that there is an opening in the raincover near the hood opening. Use the raincover that is supplied with the pram.
- Always use the raincover when it's raining or snowing. If the pram is damp before the rain cover is attached, wipe off the fabrics first if possible.
- Make sure the raincover is completely dry before it is placed back into its bag.
- Make sure the raincover is removed from the pram/stroller after use in order to avoid condensation forming in between the raincover and the pram/stroller.
Care and maintenance
General care advice
- Never expose your vehicle to excessive sunlight for long periods of time.
• Always use a raincover when it is snowing or raining. - Never store your vehicle in cold and/or damp places. In order to avoid mould it is important that you make sure that it is completely dried in room temperature after use.
- Should the chassis become wet, dry it off promptly. Make sure the vehicle is completely dry before storing.
- Rinse and dry off the pram, if you have used the pram close to the sea or on salted roads or pavements.
- Take care when transporting or storing the chassis. The chassis surface is delicate. Scratches to the chassis surface, that arise after purchase are not cause for a valid complaint.
Routine Inspection
- Regularly clean the chassis and metal parts of the vehicle -dry off and lubricate all joints of the chassis. When the pram is used during the winter time, cleaning of the pram should be done at least once a week. Lack of maintenance could cause corrosion. Should corrosion on the surface occur, which is a possibility, you are required to remove this with a corrosion cleaning agent in order to avoid rust. (never use a corrosion cleaning agent on the wheels)
- It is recommended to lubricate the wheel axles and suspension system every three months (clean axles with a cloth prior to lubrication). Axles may be lubricated with petroleum jelly or automobile oil.
Check regularly that:
- all chassis locking devices are functioning properly.
- all rivets, nuts and bolts are firmly tightened and not broken or damaged.
- all plastic parts are not cracked or broken.
• the wheel bushings are in a good condition. - both velcros are securely fastened around the plastic strap on the backrest/seat unit
- all elastic straps are in a good condition.
- the secondary locking mechanism is intact and can move freely.
• the brake works and the brake cogs are intact - check the handle regularly and the bottom of the carry-cot/lift for damage or wear and tear.
PLEASE OBSERVE
- When in need of servicing with original parts and other technical issues that require a professional decision, always get in touch with your retailer where your Emmaljunga product was purchased.
- The product that you have chosen follows the guarantee regulations valid from the 1st of July 2002 (SFS 2002:587) You have a right to demand this information when you purchase your pram at your retailer.
WARNING
- Tyres can when in contact with PVC-floor or other plastic materials cause discoloration. Always use wheel protection if the pram/stroller is stored on delicate surfaces.
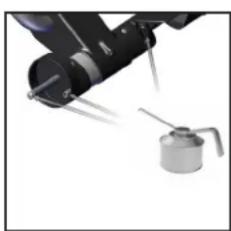
natural_image
Close-up of a robotic arm handling a cylindrical tool with a spool, against a plain white background (no text or symbols visible)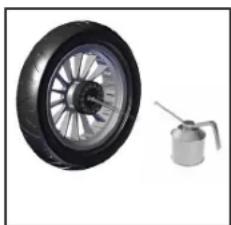
natural_image
Two automotive components: a black wheel with metallic rim and a gas cylinder (no text or symbols visible)Manual Ozone City v. 1.5
- The parking brake consists of moving parts and requires regular maintenance for correct function.
- To ensure effective functioning always make sure that the parking brake is well lubricated. Immediately remove sand, snow, ice and dirt from any moving part of the braking system.
- Use a silicon or oil based lubricant to lubricate the brake pedal, wheel axle and brake pins on both sides of the parking brake at least once a month. Also lubricate the release mechanism on the wheels on a similarly regular basis.
- If you use your Emmaljunga pram/stroller on sandy beaches or under other dirty and wet conditions make sure to take extra care of the parking brake and maintain the braking system and wheels as detailed above whenever needed.
Care and maintenance
Washing instructions
- Hood:
Take off and extend the hood. Shower the hood from the inside (interior fabric) with lukewarm water. Use mild liquid soap as detergent. Cleanse it thoroughly. Drip dry the fully extended hood.
- Seat fabric and 5-point harness:
Remove the seat fabric from the chassis and remove the wooden seat board from the seat unit fabrics. Hand wash seat fabrics in lukewarm water. Use mild liquid soap as detergent. Cleanse thoroughly. Drip dry the seat fabric. Only wipe the nylon straps and plastic parts clean with a damp cloth. Do not hand wash. Make sure the harness is dry before reassembly.
- Bumper bar padding:
Remove the bumper bar fabric from the bumper bar. Handwash in lukewarm water. Use mild liquid soap as detergent on the surface of the exterior fabric. Handle non-woven interior material with care. Drip-dry.
- Mattress:
The exclusive mattress consists of a combination of fibre filling and polyeter filling. We recommend that you hand wash this product. The mattress can be machine washed at 40 degrees, but the fibre filling must be flattened back into shape after washing. Please note that the polyeter mattress does not contain bleach and will therefore naturally become yellow.
- Carrycot (City Carrycot)
Wipe the outer fabric and the inner lining with a damp cloth. Do not handwash. Use mild liquid soap. Cleanse thoroughly. Drip-dry. Wipe the carrycot when fully extended. Make sure that the bottom wooden base does not become wet.
General Information
- Ironing:
If any fabric part needs to be ironed, always use a 100 % cotton cloth in-between the iron and the fabric to protect the fabric surface. Iron the exterior fabrics (100 %) polyester and the interior fabrics (65% cotton and 35% polyester) on gentle heat (110°C on the iron).
- Make sure all parts are completely dry before reassembly. Check the trimmings and the seam on the seat fabric underneath the backrest-pocket.
- You may apply a material protector on the exterior fabric after washing. Always apply before reassembly.
WARNING
- Do not place your child/children in the stroller for at least 24 hours after applying a material protector.
Reassembly after washing
WARNING
• Make sure all parts are assembled correctly according to the instructions in this manual.
- Make sure the seat base board is correctly positioned before reassembly and use.
IMPORTANT
Washing advice for leatherette fabrics
- Fabrics made of leatherette must not be washed according to the above instructions. Leatherette fabrics must only be cleaned with a drop of uncoloured washing up detergent and wiped down with a damp cloth, dry at room temperature.
Emmaljunga
Service Documentation
Your pushchair requires regular care and maintenance. We recommend that you have your product serviced regularly, following the suggested service intervals in order for you to take full advantage of and maintain the quality of the product and to minimize the effects of wear and tear.
Always take your product to an authorised Emmaljunga retailer to carry out the service. After every service you will receive a report covering what has been inspected and checked together with a note stating the date on which the service has been carried out.
Before the pram is sent from the factory it has undergone regular checks and testing. Another check is completed before the product is given to you to ensure that it fulfills all safety and quality requirements.
In addition to the regular service by your authorised retailer it is very important that you also check and maintain the product. You can find out more about this under the care and maintenance section in the product manual.
Chassis number
Delivery control
0
Date, stamp, customer name, signature
6 month service
6
Date, stamp, customer name, signature
12 month service
12
Date, stamp, customer name, signature
24 month service
24
Date, stamp, customer name, signature
36 month service
36
Date, stamp, customer name, signature
Emmaljunga
Delivery Check
1. Check that the following items are present in the correct numbers:
☐ 1 pc seat unit incl 5-point harness
□ 1 set shoulder harness pads
□ 1 pc folded chassis with tray
□ 2 pc wheel 300 mm
□ 2 pcs Swivel front wheels
□ 1 pc Raincover
□ 1 pc Instruction manual
□ 1 pc hood
□ 1 pc seat-unit fabrics
□ 1 pc bumper bar cover
2. Check the functions of the chassis.
Unfold the chassis.
□ Check that the chassis locks function on both sides.
☐ Check that the safety catch/safety buttons function correctly by folding the pram and checking that the safety catch/safety buttons are activated to prevent accidental folding.
☐ Check that the seat unit/carrycot clicks securely on to the chassis and that it locks on both sides.
□ Check the harness function on the seat unit by locking and unlocking the harness.
☐ Check the handle height adjustment function by adjusting the handle up and down. The handle should lock securely into each position.
□ Check the carrycot/seat unit's angle adjustment's 3 positions on both sides of the chassis.
☐ Check that the backrest can be adjusted and locks securely into each of its four positions.
☐ Check that the footrest can be adjusted and locks securely into each of its two positions.
3. Wheel and brakes
□ Lubricate the ends of the axles.
☐ Attach the wheels and make sure that the wheels lock into position.
☐ Check that the parking device locks both rear wheels when engaged.
4. Overall inspection of the product
☐ Check that all rivets, screws and nuts are securely fastened.
☐ Check that all poppers and zips on the seat fabrics and the tray are correctly and securely attached.
☐ Make sure that there are no other visible differences on the chassis, seat fabrics, tray and wheels.
Emmaljunga
Service Protocol
Service
Chassis/seat unit/carry cot function
Check the chassis locks function on both sides.
Check the safety catch/safety buttons function by folding the pram and checking that the safety catch/safety buttons are activated to prevent accidental folding.
Check that the seat unit/carrycot clicks securely on to the chassis and that it locks on both sides.
Check the safety catch/safety buttons function by folding the pram and checking that the safety catch/safety buttons are activated to prevent accidental folding.
Check the handle height adjustment function by adjusting the handle up and down. The handle should lock securely into each position.
Check the carrycot/seat unit's angle adjustment's 3 positions on both sides of the chassis.
Check that the backrest can be adjusted and locks securely into each of its four positions.
Check that the footrest can be adjusted and locks securely into each of its two positions.
□ □ □ □
□ □ □ □
□ □ □ □
□ □ □ □
□ □ □ □
□ □ □ □
□ □ □ □
□ □ □ □
Wheels and brakes
Check that the wheels are removable and that they lock onto the axles
Check that the brakes lock both rear wheels
Visual overview
Check that all rivets and screws are tightened correctly
Check that all buttons and zippers are intact and correctly fastened
Check for any other visible deviations on the chassis, fabrics, tray and wheels
Lubrication
Clean and lubricate the wheels, axles, chassis locks, footrest and the safety catch
□ □ □ □
□ □ □ □
□ □ □ □
□ □ □ □
□ □ □ □
□ □ □ □
Other notes (further adjustments or changed details)
Sisällysluettelo
natural_image
Close-up of a bicycle support structure with labeled parts (no readable text or symbols)2
3
natural_image
Close-up of a dark fabric garment with a numbered label '7' pointing to a seam or seam (no other text or symbols visible)natural_image
Close-up of a hand adjusting a backpack cover with a cable, no visible text or symbolsnatural_image
Person in winter gear adjusting a camera, no visible text or symbolsnatural_image
Top-down view of a baby stroller with attached straps and a dome-shaped head (no text or symbols visible)natural_image
Close-up of hands using a tool to adjust or install a component, with two circular annotations highlighting specific parts (no text or symbols present)natural_image
Close-up of a person using a bicycle seatbelt device, showing hand positioning and motion arrows (no text or symbols visible)natural_image
Close-up of hands adjusting a zipper with a magnified inset showing a detail (no text or symbols visible)natural_image
Top-down view of a gray car seat with two circular cutouts and a small circular base (no text or symbols)VAROITUS
natural_image
Close-up of a person adjusting a mechanical device with numbered parts (17 and 18), no visible text or symbols beyond labels.16
natural_image
Close-up of a person adjusting a bicycle seatbelt with a hand adjusting the seatbelt (no visible text or symbols)17
natural_image
Mechanical assembly diagram showing a wheel and shaft with a 20-degree angle标注 (no text or symbols beyond the number)18
19
natural_image
Person adjusting a black athletic jacket with a hand pointing to the pocket (no text or symbols visible)Manual Ozone City v. 1.5
natural_image
Close-up of a mechanical clamp or bracket with numbered annotations (1, 2, 3) indicating rotational movement or adjustment points.23
natural_image
Close-up of a hand holding a black mechanical component with a curved handle, showing a 30-degree angle indicator (no text or symbols on the object itself)24
106
natural_image
Silhouette of a baby stroller with a dotted arrow indicating motion (no text or symbols)26
natural_image
Black stroller with curved arm and 34-degree rotation indicator (no text or symbols on the device itself)27
28
natural_image
Black and white photo of a stroller with visible seat, wheels, and frame (no text or symbols)29
natural_image
Black and white photo of a stroller with a red X symbol, standing beside a person (no text or symbols visible)Manual Ozone City v. 1.5
natural_image
Line drawing of a hand holding a mechanical clamp or bracket, with arrows indicating force direction (no text or symbols)natural_image
Diagram of a mechanical component with arrows indicating rotation or movement (no text or symbols)Kuomun säätäminen
natural_image
Close-up of a robotic arm handling a small cylindrical device with a tool, against a plain white background (no text or symbols visible)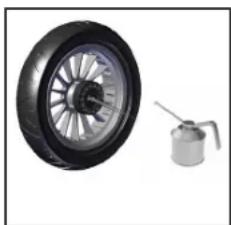
natural_image
Two automotive components: a black wheel with metallic rim and a gas cylinder (no text or symbols visible)Instruction manual for Ozone City © 2011 Emmaljunga Barnvagnsfabrik AB All rights reserved
- Montera suffletten
- Montera frambågen
- WARNING
- Justera fotstödet
- VIKTIGT
- Justera suffletten
- Monter frontbøjle
- ADVARSEL
- Montering af barnevogns overdel
- Justere kalechen
- Monter kalesjen
- Bruk av vognen
- - Bagdel (City Bag):
- WARNUNG
- Contents of the box:
- Ozone City
- City Carrycot (Accessory)
- Emmaljunga's original accessories
- Important Safety Information
- WARNING The handles and the bottom of the carrycot should be inspected regularly for signs of damage and wear.
- WARNING Never pull a pram with swivel front wheels behind you, if the front wheels are not locked.
- Assembly of the chassis
- Unfolding the chassis
- Attaching the wheels
- IMPORTANT
- Assembly of the seat-unit
- Removing and assembling the seat-fabrics
- Assembly of the hood
- Assembly of the bumper bar
- Assembly of the Footmuff (Accessory)
- Usage of the pram
- Attaching and releasing the seat-unit.
- Engaging the parking device
- How to adjust the height of the handle
- Adjusting the hood
- IMPORTANT!
- Adjusting the footrest
- Adjust the 5-point harness
- Adjust the angle of the seat unit.
- The front wheel can be fixed or swivel 360 degrees.
- Adjusting the backrest/seat unit
- Unfolding of the chassis
- Folding of the pram
- Use of the raincover
- Assembly and usage of the
- City carrycot (accessory to Ozone City)
- Assembly of the carrycot
- Assembly and usage of the City Carrycot (Accessory to Ozone City)
- Attachment of the carrycot
- To release the carrycot
- Use of the rain cover
- Care and maintenance
- General care advice
- Routine Inspection
- Check regularly that:
- PLEASE OBSERVE
- Washing instructions
- - Hood:
- - Seat fabric and 5-point harness:
- - Bumper bar padding:
- - Mattress:
- - Carrycot (City Carrycot)
- General Information
- - Ironing:
- Reassembly after washing
- Washing advice for leatherette fabrics
- Emmaljunga
- Service Documentation
- Delivery Check
- Check that the following items are present in the correct numbers:
- Check the functions of the chassis.
- Wheel and brakes
- Overall inspection of the product
- Service Protocol
- Service
- Chassis/seat unit/carry cot function
- Wheels and brakes
- Visual overview
- Lubrication
- Other notes (further adjustments or changed details)
- Sisällysluettelo
- VAROITUS
- Kuomun säätäminen
Brand : Emmaljunga
Model : Ozone
Category : Stroller