
SPT 7500 - Loudspeaker SENCOR - Free user manual and instructions
Find the device manual for free SPT 7500 SENCOR in PDF.


| Product Type | Portable Audio System with CD, DAB+, FM, Bluetooth, USB, AUX |
| Brand | Sencor |
| Model | SPT 7500 |
| Power Supply | AC 100–240 V ~50/60 Hz (adapter: 5.9 V/1 A) or 4× LR14 (C) 1.5 V batteries |
| Power Consumption | Max 14 W; standby < 1 W |
| Dimensions (W x H x D) | 319 × 161 × 75 mm |
| Weight | 1180 g |
| Radio Bands | DAB+ (174.928–239.200 MHz), FM (87.5–108 MHz) |
| Output Power (CD mode) | 2 × 1 W RMS |
| Output Power (USB/Tuner/Aux/BT) | 2 × 2 W RMS |
| CD Playback | CD, CD-R, CD-RW, MP3-CD, WMA-CD |
| Bluetooth | V5.3+EDR, A2DP profile, 2402–2480 MHz, max. transmit power < 20 dBm |
| USB Input | FAT32, max. 128 GB, for MP3 playback |
| AUX Input | 3.5 mm stereo jack |
| Headphone Output | 3.5 mm stereo jack |
| Presets | Up to 40 presets for DAB+ and FM |
| Alarm | Dual alarms with snooze, wake-up sources: buzzer, DAB, FM, CD, USB |
| Sleep Timer | Off, 15, 30, 45, 60, 90 minutes |
| Equalizer | Bass and Treble adjustment |
| Display | LCD with station info, time, date, signal strength |
| Antenna | Telescopic |
| Languages | English, German, Polish, Czech, Slovak, Hungarian |
| Included Accessories | AC adapter, user manual |
Frequently Asked Questions - SPT 7500 SENCOR
User questions about SPT 7500 SENCOR
0 question about this device. Answer the ones you know or ask your own.
Ask a new question about this device
Download the instructions for your Loudspeaker in PDF format for free! Find your manual SPT 7500 - SENCOR and take your electronic device back in hand. On this page are published all the documents necessary for the use of your device. SPT 7500 by SENCOR.
USER MANUAL SPT 7500 SENCOR
EN User Manual DAB radio with CD
SAFETY INSTRUCTIONS AND WARNINGS
- Please take the time to carefully follow the instructions in this user manual.
It will help you set up and operate your system correctly and take advantage of all its advanced features.
-
Please save this user manual for future reference
-
Observe all warnings on the product and in the instructions for use.
-
For your safety, please read and follow these instructions carefully to ensure proper use of the product and to avoid any danger or physical damage.
-
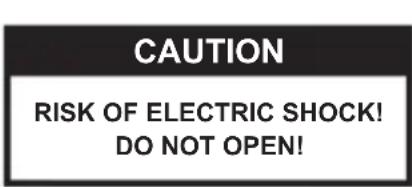
ATTENTION: TO REDUCE THE RISK OF ELECTRIC SHOCK, DO NOT REMOVE ANY COVER. THERE ARE NO PARTS INSIDE THAT THE USER CAN REPAIR, REFER ANY SERVICING TO QUALIFIED SERVICE PERSONNEL.
-
Observe all warnings – on the product and in the user manual.
-
Do not use this appliance near water or moisture.
-
Do not use this product near a bathtub, sink, kitchen sink and laundry tub, in a damp basement, near a swimming pool or anywhere else where water or moisture is present.
-
Use only the attachments/accessories specified by the manufacturer.
-
During a storm or prolonged periods of non-use, unplug this device from the power outlet to prevent damage to this product.
-
Have all repairs carried out by qualified service personnel.
-
To avoid the risk of fire or electric shock, do not overload electrical sockets, extension cables or integrated sockets.
-
Place the unit on a flat surface and ventilate. Ventilation should not be impeded by covering the vents with objects such as newspapers, tablecloths, curtains, etc. to prevent overheating and malfunction.
-
No sources of open flame, such as lit candles, should be placed on the equipment.
-
Protect the appliance from rain and moisture. Do not place the unit in a damp or humid environment that could lead to malfunction.
-
When the unit is suddenly moved from a cold environment to a warm environment, it may not function properly if moisture builds up inside. To solve this problem, wait about one hour for the moisture to evaporate.
-
Do not expose the unit to direct sunlight or nearby objects that emit heat to avoid damaging the unit.
-
The equipment should be used in temperate climates.
-
If a mains plug or connection device is used as a disconnection device, the disconnection device must remain easily accessible.
-
Do not pull the power cord, but the plug to disconnect the appliance from the mains.
-
The On/Off switch does not completely isolate the product from the power source. To disconnect the product from the mains power supply, you must disconnect the power adapter from the mains.
-
Ensure a minimum distance of 0.1 metres around the device for adequate ventilation.
-
The device must not be exposed to dripping or splashing water, do not place any objects filled with liquid such as vases on top of it.
-
Servicing – Do not attempt to service this product yourself, as opening or removing the covers may expose you to dangerous voltage or radiation. Have all repairs carried out by qualified service personnel.
-
Damage requiring service – Unplug this product and have it repaired by qualified service personnel under the following conditions:
A. When the power cord or power plug is damaged.
B. If liquid has entered the product or objects have fallen into the product, if the product has been exposed to rain or water.
C. If the product does not operate normally according to the operating instructions. Adjust only those controls that are described in the operating instructions, as incorrect adjustments can cause damage and will often require extensive work by a qualified technician to restore the product to normal operation.
-
Use appropriate power sources – Plug the product into an appropriate power source as described in the operating instructions or as marked on the product.
-
The batteries must not be exposed to excessive heat, such as direct sun light, fire, etc.
ATTENTION:
Before making any electrical connections, make sure that:
- You have completed all other connections.
- The socket must be in reach during installation.
- The appliance must be connected to a 100–240 V 50/60 Hz AC power source via a two-prong socket.
- Danger of electric shock! When unplugging the mains plug, always pull the plug out of the socket. Never pull on the power cord.
- To completely disconnect the device from the mains, switch off the power socket and pull out the mains adapter completely. The marking information is located on the back of the device.
SYMBOLS

This mark is used to indicate equipment that complies with European standards for safety and electromagnetic compatibility.

This symbol indicates that this unit is double insulated. Grounding is not required.
This device contains the following markings:



LASER SAFETY
This unit uses a laser, repair should only be attempted by qualified service personnel.
BATTERY INSTALLATION
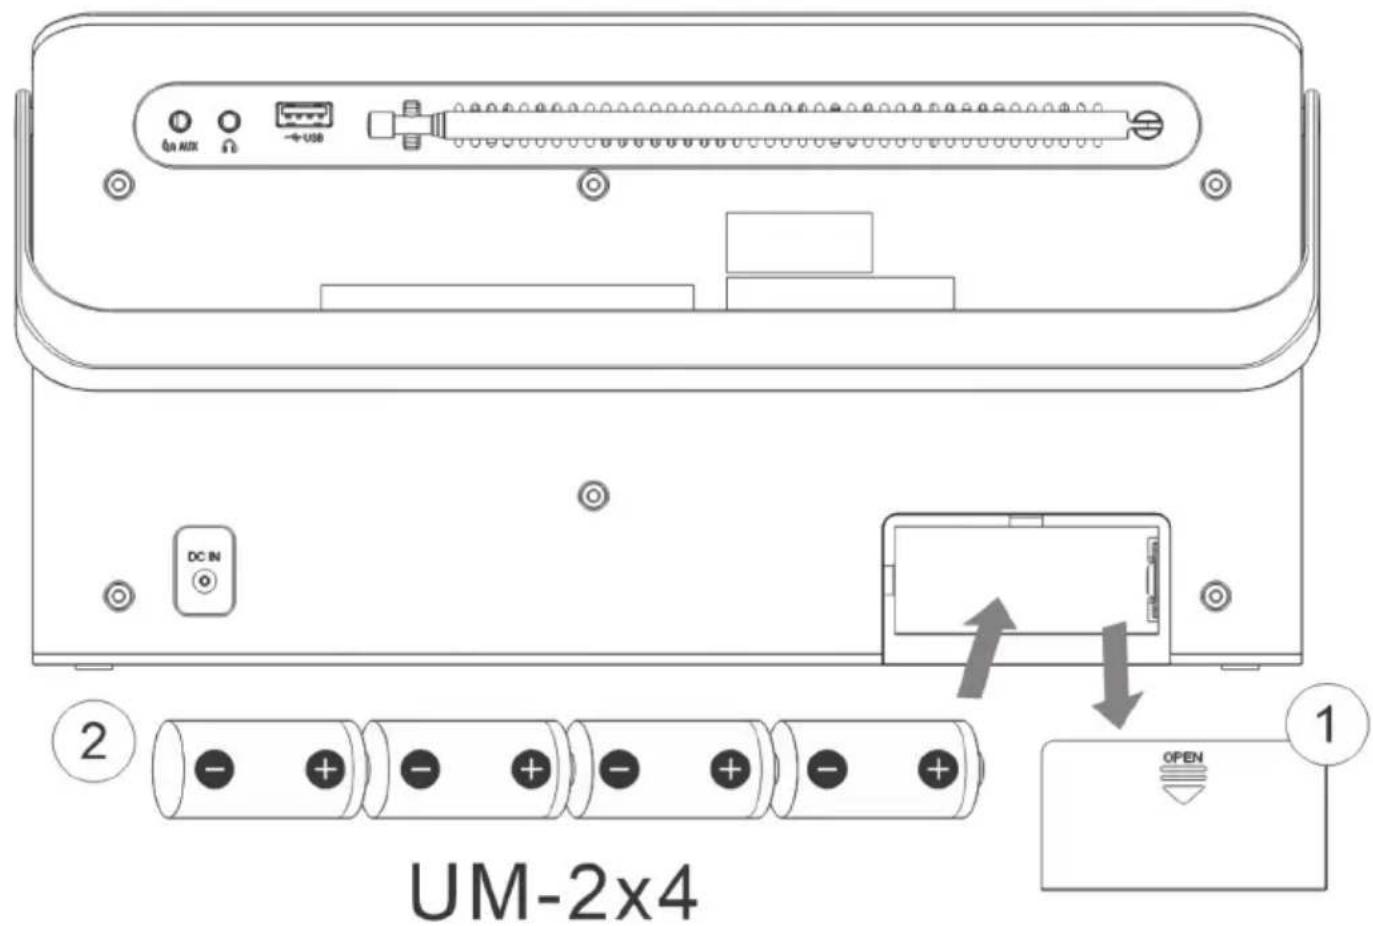
Caution:
Disconnect the power adapter connector and leave it disconnected for the entire battery operation.
- Carefully remove the battery compartment cover.
- Insert 4 batteries of size "C" (UM-2 or equivalent) with the correct polarity.
Caution:
The polarity is marked inside the battery compartment.
- Close the battery compartment cover.
Caution:
Only adults should handle batteries.
Check the batteries regularly and prevent them from draining. Spilled electrolyte can damage the electronics and the instrument case. As a precautionary measure, remove the batteries from the device if you will not be using it for an extended period of time.
CONTROLS
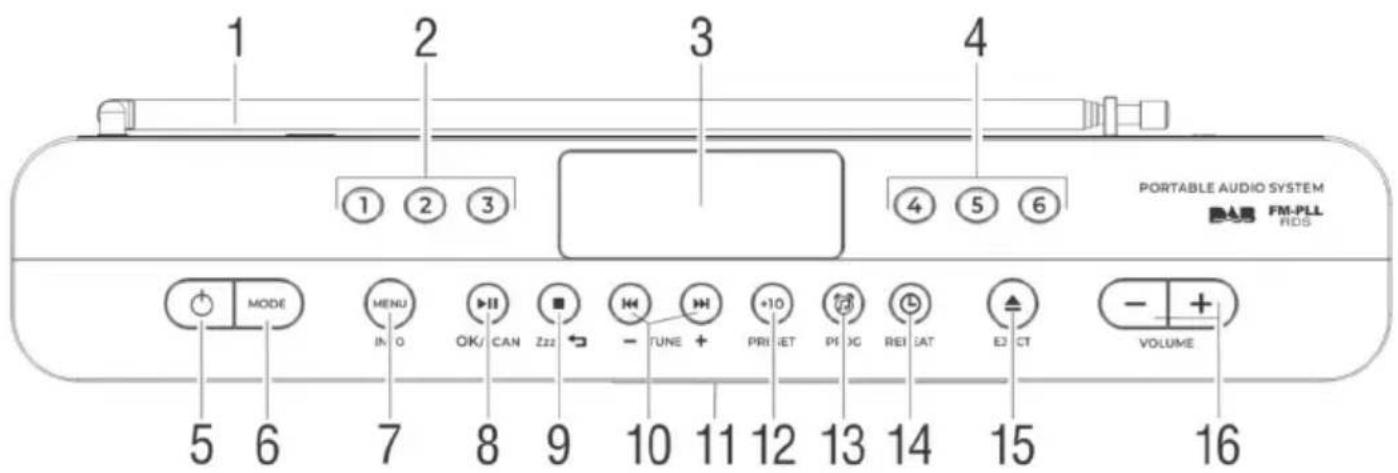
- Antenna
- Presets 1–3
- Display
- Presets 4–6
- STANDBY
- MODE
- MENU/ INFO
- OK/SCAN// ▶II
- SNOOZE (ZBACK
- /, TUNI -/+
- CD DOOR
- +10/ Presets
- ALARM/PROG
- ⏱ SET TIME/ REPEAT
- VOLUME +/-
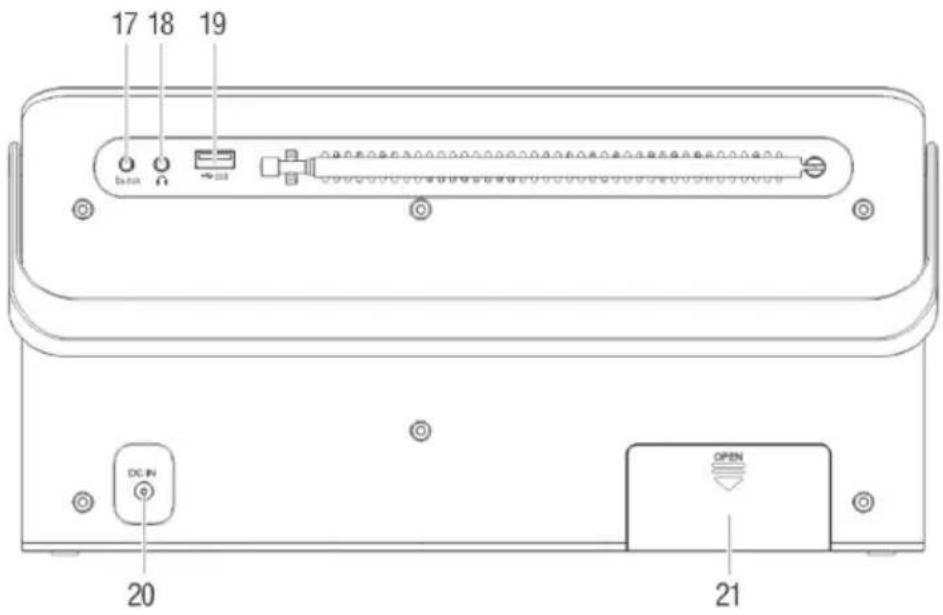
- USB port
- DC JACK power supply
-
Battery compartment
-
CD DOOR EJECT (Opening the disc door)
-
3.5mm AUX-IN JACK input
-
3.5mm HEADPHONE JACK output
Power Supply Connection
- Check the label information on the supplied adapter to make sure it matches your mains.
- Plug the adapter into the mains.
- Plug the adapter connector into the power input on the back of the device and turn it on.
Note: Use the adapter power supply without batteries inserted.
CONTROL OF THE DEVICE
Turning On and Off
- Press the STANDBY button to switch the device to standby mode.
- To turn the device on, press the ⏻ STANDBY button. The device switches to the last used mode • AUTO STANDBY – the device complies with energy saving standards.
If the device is in CD/USB/AUX mode and not playing, it will enter energy saving mode after 15–20 minutes of inactivity. Press the ⬇STANDBY button to switch on again.
Caution:
Standby mode varies depending on the power supply. When powered by batteries the display is completely off, when powered by an adapter the time and date remain displayed. If you want to turn off the device completely, for example for a long absence, disconnect the power connector from the adapter and remove the batteries from the device. For your safety, remove the adapter from the power outlet.
Selecting a Mode
After switching on, press the MODE button repeatedly before selecting the desired mode of operation as follows: DAB, FM, Bluetooth, CD, USB, AUX.
Note: You can choose from multiple languages for the device to communicate with you. However, some hardware-based functions (especially CD, USB, BT modes) have fixed messages in English.
The instrument provides a lot of information, varying according to the mode you have just selected. You can cycle through the information by briefly pressing the MENU (INFO) button.
Device Settings
The device has a wealth of settings in the device menu.
The work in Settings is the same for all inputs/modes, the setting items vary by input/mode.
To enter the settings, (long) press the MENU (INFO) button for 2 seconds. In the menu you can select between items by pressing I/O, pressing (OK) to enter the submenu of the item and pressing
■ (STOP) to return to the higher menu. You can move between the values of the items by pressing ◀◀/▶▶lagain, pressing ▶II (OK) to confirm the selected value and pressing ■ (STOP) to return to the higher menu.
If you don't make any changes or movements in the menu for a few tens of seconds, the menu will close itself.
Sound Settings [Volume /Equalizer]
- VOLUME +/- - adjusts the volume of the sound
- Bass/Treble – enter the device menu and select Equalizer, then Bass or Treble. Set the desired value and confirm it.
Note: High volume or bass may cause skipping of CD playback or sound distortion. We recommend using them judiciously.
Setting the Clock
-
In Standby mode, press and hold the ⏻ button for 2 s or enter MENU and select System>Time.
-
In this menu you can:
Set Time/Date: set the current time and date.
Auto update: detect time from DAB or FM broadcasts or disable time update.
Set time mode 12/24 hours
Set date format: DD-MM-YYYY/MM-DD-YYYY
Setting the Alarm
The time must be set before the alarm can be used. There are two independent alarms.
- Enter the MENU and select System> Alarm. Or press the 📄 button for 2 seconds in Standby.
- In the alarm menu, select between Alarm 1 and Alarm 2.
- Next, set the
• On time: wake-up time
• Duration: 15, 30, 45, 60, 90
• Source: Buzzer, DAB, FM, CD, USB
• Frequency: Daily/Once/Weekends/Weekdays
- Date: MM-DD-YYYY (only for "once")
Volume
- Alarm: On/Off
- Save the values by pressing OK.
- Press STOP or MENU to exit the alarm settings.
- Press the 🎧 button repeatedly to switch alarms 1 and 2 on or off.
The status is shown by an icon on the display. You can also use this in STANDBYmode.
Once the alarm is triggered, you can turn it off by pressing ⏻ or ⚫ And by pressing the Snooze button Zzz, you activate a delayed (repeated) wake-up in 9 minutes. It will appear on the display. When you switch on the device, this delayed wake-up is cancelled.
If CD or USB is selected as the wake-up sound source and you do not insert a data medium, the wake-up will use the buzzer sound itself. If you select FM or DAB as the source, tune to the desired station in advance.
Sleep Timer
The device can automatically switch off to STANDBY after a set time.
With the device switched on, enter MENU and select System/Sleep. Select from: Off, 15, 30, 45, 60, 90 minutes and confirm with OK. Exit the settings.
FM RADIO
Note: To listen to the radio, always pull out the telescopic antenna and pull down it when you are finished and put it back in place.
You can find and receive FM radio stations in several ways.
Quickly find and listen to a strong station – in FM mode, press TUNE +/- for 2 seconds, the search will be displayed in that direction and will stop when a strong station is found. If the station does not suit you, repeat this procedure to find the next station.
In some difficult conditions, poor reception can be improved by rotating the antenna, bringing the receiver out from behind a building or natural screen, and also by briefly pressing TUNE +/- , which changes the received frequency by 0.05 MHz.
Scan the entire band – you can search and save up to 40 stations by pressing the OK/SCANbutton. The found stations are saved in the pre-sets and the first one starts playing after the search is finished.
Manually save a specific station – if you want to keep the station you're listening to easily accessible in the future, save it to the pre-set as follows:
For pre-sets 1–6 (buttons on the main panel) – press the number button for 2 seconds
For all pre-sets – press the PRESET button for 2 seconds, then use the ◀◀◀▶▶▶ buttons to select the desired number and confirm with OK.
Note: If you save a station to an existing pre-set, the original station will be deleted and replaced with the new one.
Listening to a Saved Station
For pre-sets 1–6 (buttons on the main panel) – briefly press the number button
For all pre-sets – briefly press PRESET, then use the ◀◀◀▶▶▶ buttons to select the station and confirm with OK.
Display of FM Information
Press INFO repeatedly to display information (if available):
Radio text/ Programme type (PTY)/ Station name/ Mono-Stereo/ Time/ Date
FM Settings
Enter MENU and select settings:
Scan setting – select between All stations or only Strong stations
Audio setting – select between Stereo Enabled or Mono Only
Save the settings by pressing OK or exit without saving by pressing STOP or MENU.
DAB+ RADIO
Note: To listen to the radio, always pull out the telescopic antenna and pull down it when you are finished and put it back in place.
You can store up to 40 DAB+ (DABplus) stations. For information on stations that can be received in your area, go to www.WorldDAB.org or contact your salesperson.
First Use of DAB
After the first selection of DAB mode, a search for available stations is performed. If none are found, the DAB menu will be displayed. Later, you can start the search manually by pressing the SCAN button for 2 seconds. After the search, the first saved station will start playing. You can select other stations using the ▶/▶buttons.
Manually save a specific station – if you want to keep the station you're listening to easily accessible in the future, save it to the pre-set as follows:
For pre-sets 1–6 (buttons on the main panel) – press the number button for 2 seconds
For all pre-sets – press the PRESET button for 2 seconds, then use the ◀◀/▶▶I buttons to select the desired number and confirm with OK.
Note: If you save a station to an existing pre-set, the original station will be deleted and replaced with the new one.
Listening to a Saved Station
For pre-sets 1–6 (buttons on the main panel) – press the number button briefly.
For all pre-sets – briefly press PRESET, then use the ◀◀/▶▶I buttons to select the station and confirm with OK.
Display of DAB Information
The basic display shows the station name on the first line and the service information provided by the station on the second line. Press INFO repeatedly to view more information: Dynamic label segment (DLS), Signal strength, Program type (PTY), Ensemble name, Channel/Frequency, Error rate, Codec, Time, Date.
Note: Try to keep the error rate low, e.g. by selecting the station, reception location, antenna routing. A certain number of errors can be corrected by DAB demodulation without audible effect on the sound, while a higher number of errors may be reflected by audio drop-outs or embedded artefacts.
DAB Settings
Enter MENU and select settings:
Scan setting – select between All stations or only Strong stations
Audio setting – select between Stereo Enabled or Mono Only
Save the settings by pressing OK or exit without saving by pressing STOP or MENU.
Full scan – searches all DAB stations
Manual tune – you can search for a particular DAB channel by going into the MENU and using the
/▶▶I buttons to select the channel number you have previously found from public sources. Press OK to scan the channel for the presence of a signal with DAB stations
DRC (Dynamic Range Compression) – set Off/High/Low
Prune – No/Yes deletes invalid stations
Announcement – On/No TA/Only TA/Off
System
Save the settings by pressing OK or exit without saving by pressing STOP or MENU.
Using Bluetooth
The device is equipped with a Bluetooth input for wireless connection of external audio sources such as a mobile phone.
- Press MODE repeatedly until BT is selected.
- Select pairing on your device and pair with "Sencor DAB radio".
If your source supports receiving external control commands, you can control these commands (e.g. Play, Pause, Skip Forward and Backward, Volume) from this device. This device supports automatic reconnection without the need for a new pairing.
USING A CD
Inserting a CD disc
- Press the EJECT button to open the door covering the CD drive.
- Insert the CD disc with the print facing you on the centre mandrel until it audibly clicks.
- Close the door.
CD Playback
- When you select CD mode and the CD door is closed with a disc inserted, the disc is loaded and the track count is displayed.
- The disc will start playing automatically.
-
You can control playback with the buttons (Play/Pause), Skip Forward/Backward / , skip 10 by pressing +10, ■(Stop).
-
The first press of (Stop) activates the RESUME function, and after pressing (Play/Pause), playback starts where you left off. A second press clears this memory and any playback will start from the beginning of the disc. Opening the door also erases the RESUME memory.
Repeat Playback
During playback, press the button repeatedly to select the repeat method: REP-1 (Repeat 1), REP-ALL (Repeat All), SHUFFLE (Random), Off.
Program CD Playback (MEM)
- When playback is stopped, press PROG
- Use the 1 buttons to select the first track, press PROG to save it to the program.
- Repeat step 2 to store additional tracks in the program. (max. 20 steps for CD and 99 steps for MP3).
- Pressing ▶II will start playback according to this program.
- Press the ■ button once to stop the program (MEM is still lit), press it a second time or open the door to clear the program (MEM goes off on the display).
Using a USB
Using a USB memory is very similar to using a CD.
For playback, choose a USB flash memory of maximum 128 GB, with one FAT32 formatted partition. Use branded memory, without protection or lock. The USB memory must be plugged directly into the device. Do not use a USB extension cable to avoid data transmission failure or interference.
AUX Input
You can connect an external audio source (MP3 player, phone, etc.) with your own cable to the 3.5mm stereo jack. Set the appropriate volume on the external source (e.g. 70%) and this device.
GENERAL SETTINGS
During Standby, press MENU for 2 seconds to adjust the following general settings:
- Alarm
- Time
• Backlight: Low, Medium, High
• Language: English, German, Polish, Czech, Slovak, Hungarian - Factory Reset – you can return all settings to their original values and clear the memories
- Software upgrade – software can be upgraded from USB
- SW version – displays the software version: Check the version of software.
Note about the update:
Use only software approved and supplied by the manufacturer for software updates. Use of other software may cause irreversible damage to the device that is not covered by the warranty.
Using Headphones
You can use your own wired headphones in the 3.5mm jack. Plugging them in disconnects the device's speakers. Before plugging in, turn the volume down to minimum and gradually increase it after plugging in the headphones.
Caution:
protect your hearing and do not listen at high volumes for long periods of time.
TROUBLESHOOTING
| Problem Possible Cause | |
| Not working Check power supply, | mains and battery status |
| No audio Check the function of the sound source and adjust the volume.Check the headphone connection. | |
| No sound from the AUX inputSound is distorted | Adjust the volume of the power supply and this device correctlyReduce the volume of the source |
| Distorted sound / CD skips Reduce volume and bassCD is scratched | |
| CD cannot be played Use only 12cm round disc CD-DA, CD-MP3Scratched or dirty disc | |
| Bad radio sound (noise,distortion, drop-outs,interference) | Pull out the antenna fully, move the device, choose another station.Distance the receiver from other electronics (PC, etc.) and kitchen appliances (microwave, etc.) |
| The device turned itself off The device switches off after 15–20 minutes of inactivity. Switch it on again for further use. | |
TECHNICAL SPECIFICATIONS
| Output power CD mode: 2×1W RMS | |
| USB/Tuner/Aux/BT: 2×2W RMS | |
| Supported discs CD, CD-R, CD-RW, MP3-CD, | wma-CD. |
| BT frequency V5.3+EDR, A2DP profile | 2402–2480 MHzMax. transmits power: < 20dBm |
| DAB+ frequency 174.928–239.200 MHz | |
| FM frequency 87.5–108 MHz | |
| AC adapter SHENZHEN GUIJIN TECHNOLOGY CO., LTD | |
| AC adapter, typeInput voltage / frequencyOutput voltage / frequencyAverage operating efficiency at low loadNo-load consumption | AK06WG-0590100VWAC 100-240V~50/60Hz, 0.2ADC 5.9V/ 1A/ 5.9W74.88%68.76%<0.1W |
| Battery 6V | --- 4× LR14/C (1.5V) |
| USB output | 5V --- 500 mA (does not support power supply) |
| USB format | MP3, FAT32, max. 128 GB |
| Operating time (max.) | 14 W |
| Standby consumption | < 1W |
| Dimensions (w×h×d) | 319 × 161 × 75 mm |
| Weight – Main Unit | 1180 g |
INSTRUCTIONS AND INFORMATION ON THE DISPOSAL OF PACKAGING MATERIALS
Take the packaging material to a collection centre for recycling.
DISPOSAL OF DISCARDED ELECTRICAL AND ELECTRONIC EQUIPMENT
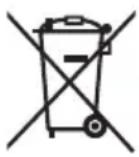

This symbol on the product, accessory or packaging indicates that the product must not be treated as ordinary household waste. Please dispose of this product in a collection centre designated for the recycling of electrical and electronic equipment. In some EU states or other European countries, you can return your old product to the retailer when purchasing an equivalent new product. Proper disposal of this product helps to conserve valuable natural resources and prevent potential negative impacts on the environment and human health that could result from improper disposal. Further details can be obtained from local authorities or the nearest collection centre. Failure to dispose of this type of waste properly may result in legal penalties.
For Companies in European Union Countries
If you want to dispose of electrical or electronic equipment, request necessary information from your retailer or supplier.
Disposal in Countries Outside the European Union
Request information regarding the proper disposal of this product from local authorities or your retailer.

This product meets the EU requirements.
FAST ČR, a. s. hereby declares that the radio equipment type SPT 7500 complies with Directive 2014/53/EU. For the full version of the EU Declaration of Conformity, please visit: www.sencor.cz
Text, design and technical data are subject to change without notice; we reserve the right to make such changes.
The original version is in Czech.
Manufacturer: FAST ČR, a. s., U Sanitasu 1621, Říčany 251 01, Czech Republic
Authorised service centres: For detailed information on authorised service centres, please visit www.sencor.com.
SENCOR®
EN Warranty conditions
Warranty card is not a part of the device packaging.
This product is warranted for the period of 24 months from the date of purchase to the end-user. Warranty is limited to the following conditions. Warranty is referred only to the customer goods using for common domestic use. The claim for service can be applied either at dealer's shop where the product was bought, or at below mentioned authorized service shops. The end-user is obligated to set up a claim immediately when the defects appeared but only till the end of warranty period. The end user is obligated to cooperate to certify the claiming defects. Only completed and clean (according to hygienic standards) product will be accepted. In case of eligible warranty claim the warranty period will be prolonged by the period from the date of claim application till the date of taking over the product by end-user, or the date the end-user is obligated to take it over. To obtain the service under this warranty, end-user is obligated to certify his claim with duly completed following documents: receipt, certificate of warranty, certificate of installation.
This warranty is void especially if apply as follows:
■ Defects which were put on sale.
■ Wear-out or damage caused by common use.
The product was damaged by unprofessional or wrong installation, used in contrary to the applicable instruction manual, used in contrary to legal enactment and common process of use or used for another purpose which has been designed for.
■ The product was damaged by uncared-for or insufficient maintenance.
The product was damaged by dirt, accident of force majeure (natural disaster, fire, and flood).
■ Defects on functionality caused by low duality of signal, electromagnetic field interference etc.
■ The product was mechanically damaged (e.g. broken button, fall).
■ Damage caused by use of unsuitable media, fillings, expendable supplies (batteries) or by unsuitable working conditions (e.g. high temperatures, high humidity, quakes).
■ Repair, modification or other failure action to the product by unauthorized person.
■ End-user did not prove enough his right to claim (time and place of purchase).
■ Data on presented documents differs from data on products.
- Cases when the claiming product cannot be identified according to the presented documents (e.g. the serial number or the warranty seal has been damaged).
Manufacturer:
FAST ČR, a.s., U Sanitasu 1621, Říčany 251 01, Czech Republic
Visit www.sencor.com for detailed information about authorized service centers.
The original version of the instructions is in the Czech language, other language versions are made by the appropriate translation.
BEZPEČNOSTNÍ POKYNY A UPOZORNĚNÍ


LASEROVÁ BEZPEČNOST
Upozornění:
• Budík (Alarm): Zap/Vyp (On/Off)


LASEROVÁ BEZPEČNOSŤ
Upozornenie:
Odpojte konektor napájacieho adaptéra a ponechajte ho odpojený celý čas prevádzky na batérie.
- Anténa
- Predvol'by 1-3
- Displej
- Predvol'by 4-6
- STANDBY
- MODE (Režim)
- MENU/ INFO
- OK/SCAN/ ▶II
- SNOOZE (ZBACK
- I/ TUNI -/+
- Dvierka CD DOOR
- +10/ Predvol'by
- ALARM/PROG
- Hlasitost' VOLUME +/-
- Vstup 3,5mm AUX-IN
- USB port
- Napájanie DC
-
Batériový priestor
-
⏻ SET TIME/ REPEAT (Nastavenie času/Opakovania)
-
CD DOOR EJECT (Otvorenie dvierok disku)
-
Slúchadlový výstup 3,5mm
Pripojenie napájania

natural_image
Warning symbol of a lightning bolt inside a triangle (no text or numbers)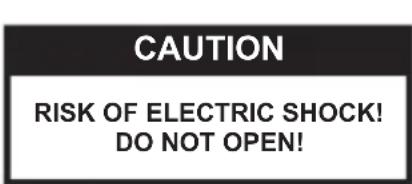


LÉZERBIZTONSÁG
Figyelmeztetés:



BEZPIECZEŃSTWO LASERA
Ostrzeżenie:
• Czas trwania (Duration): 15, 30, 45, 60, 90


- SAFETY INSTRUCTIONS AND WARNINGS
- ATTENTION:
- Before making any electrical connections, make sure that:
- SYMBOLS
- BATTERY INSTALLATION
- Caution:
- Power Supply Connection
- CONTROL OF THE DEVICE
- Turning On and Off
- Selecting a Mode
- Device Settings
- Sound Settings [Volume /Equalizer]
- Setting the Clock
- Setting the Alarm
- Sleep Timer
- FM RADIO
- Listening to a Saved Station
- Display of FM Information
- FM Settings
- DAB+ RADIO
- First Use of DAB
- Display of DAB Information
- DAB Settings
- Using Bluetooth
- USING A CD
- Inserting a CD disc
- CD Playback
- Repeat Playback
- Program CD Playback (MEM)
- Using a USB
- AUX Input
- GENERAL SETTINGS
- Note about the update:
- Using Headphones
- TROUBLESHOOTING
- TECHNICAL SPECIFICATIONS
- INSTRUCTIONS AND INFORMATION ON THE DISPOSAL OF PACKAGING MATERIALS
- DISPOSAL OF DISCARDED ELECTRICAL AND ELECTRONIC EQUIPMENT
- For Companies in European Union Countries
- Disposal in Countries Outside the European Union
- SENCOR®
- EN Warranty conditions
- Warranty card is not a part of the device packaging.
- This warranty is void especially if apply as follows:
- Manufacturer:
- BEZPEČNOSTNÍ POKYNY A UPOZORNĚNÍ
- Upozornění:
- Upozornenie:
- Pripojenie napájania
- Figyelmeztetés:
- BEZPIECZEŃSTWO LASERA
- Ostrzeżenie:
Brand : SENCOR
Model : SPT 7500
Category : Loudspeaker