
EasyPhone XR - Mobile Phone Evolveo - Free user manual and instructions
Find the device manual for free EasyPhone XR Evolveo in PDF.


| Product Type | Mobile Phone |
| Model | EasyPhone XR |
| Dimensions | 130 x 55 x 10 mm |
| Weight | 100 g |
| Battery Type | Li-Ion 1000 mAh, removable |
| Display | 2.4 inch TFT, 240x320 pixels |
| Network | GSM 850/900/1800/1900 MHz |
| SIM Card | Dual SIM (Mini-SIM) |
| Camera | 0.3 MP rear, no flash |
| Memory | 64 MB RAM, 128 MB ROM, microSD up to 32 GB |
| Connectivity | Bluetooth 3.0, micro USB 2.0, 3.5 mm jack |
| Radio | FM radio with external antenna |
| Torch | LED flashlight |
| Power Adapter | DC 5V, 500 mA |
| Maintenance | Wipe with a soft, dry cloth; do not use harsh chemicals |
| Safety | Keep away from water and extreme temperatures; use only approved charger |
| Spare Parts | Battery, charger, USB cable, earphones available |
| Repairability | Easy: removable battery and SIM tray |
Frequently Asked Questions - EasyPhone XR Evolveo
User questions about EasyPhone XR Evolveo
0 question about this device. Answer the ones you know or ask your own.
Ask a new question about this device
Download the instructions for your Mobile Phone in PDF format for free! Find your manual EasyPhone XR - Evolveo and take your electronic device back in hand. On this page are published all the documents necessary for the use of your device. EasyPhone XR by Evolveo.
USER MANUAL EasyPhone XR Evolveo
Planá 2, 370 01, Czech Republic
Made in China
Thank you for choosing an EVOLVEO mobile phone.
IMPORTANT NOTICE
EN
- Use a headset with a microphone to make calls while driving. Only pull your car over to the side of the road to make a phone call in an emergency.
- Switch your phone off when you board the aircraft and do not switch it on on board.
- Use extra caution when using the phone near pacemakers, hearing aids or other electronic medical devices that may interfere with the phone.
- Never attempt to disassemble the phone yourself. If you have problems with your phone, contact your dealer or service.
- Do not connect your phone to the charger unless the battery is inserted.
- Use only the original charging adapter and charging stand for charging.
- Protect your phone from magnetic fields. Keep her out of reach
- items with magnetic elements, such as credit cards.
-
Protect your phone from liquids. If moisture penetrates or corrodes, remove the battery immediately and contact your dealer.
-
Do not use your phone in areas that are too cold or too hot. Never leave it in direct sunlight, in dusty environments or where there is high humidity.
- Do not use liquids or wet substances with strong solvents to clean your phone.
PHONE DESCRIPTION
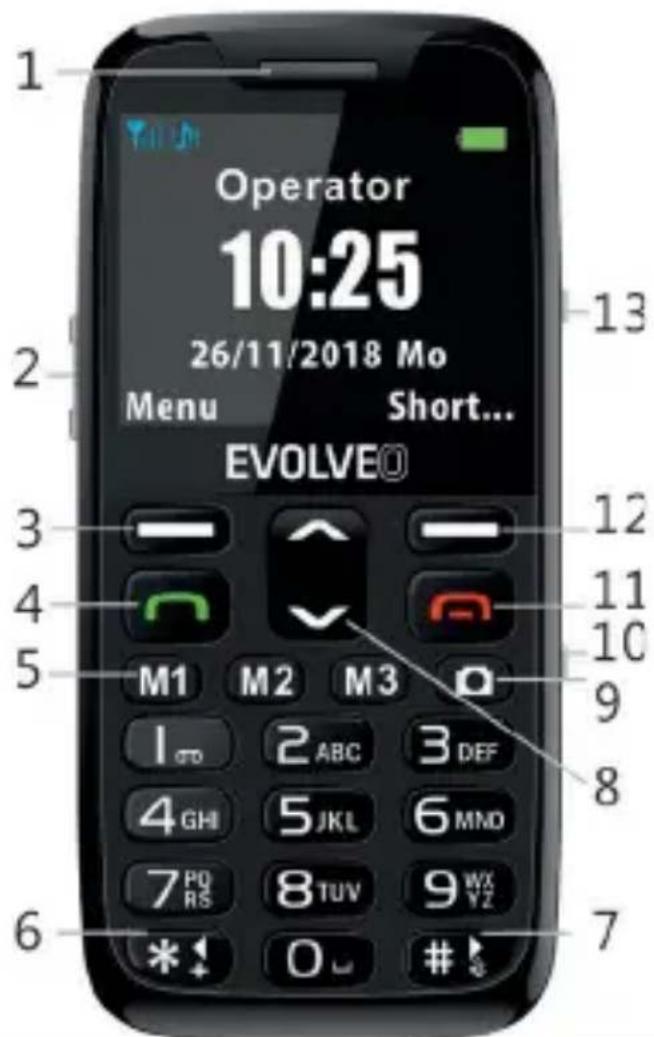
1) Earpiece
2) Volume
3) Left functional
4) Call, Call Answer, Call History
5) Favourites
6) Special symbols
7) Text input method, Mute sound
8) UP-DOWN in the menu or menu items
9) Camera
10) Lock - Unlock the keyboard
11) Switch on - Switch off the phone, End call
12) Right function button
13) Flashlight
INTRODUCTION
1) Place your phone face down and remove the back cover, facing up.
2) Locate the space for the MiniSIM-sized SIM card and insert it with the metal contacts facing down.
3) If you want, you can also insert a microSDHC card with a maximum supported capacity of 32GB. Secure it by pulling the metal locking cap to the LOCK position.
4) Insert the battery into your phone. Close the phone with the back cover.
BATTERY CHARGING
1) Make sure you have the battery inserted in your phone.
2) You can charge your phone when it is switched on or off.
3) The charging port is located at the bottom of the phone.
4) The phone can be charged directly using the included 230V charger with USB-C connector or by placing the phone in the stand and connecting it to the charger. After charging the battery, disconnect the charger from the mains.
SWITCHING ON AND OFF
To switch on the phone, hold down the red handset
button (11) until the phone switches on.
Enter the SIM card PIN, if required. To switch the phone off, hold down the red handset button (11) until the phone switches off.
Enter the SIM card PIN, if required.
CHANGE THE LANGUAGE ON YOUR PHONE:
Select Menu > 3x up arrow > Settings
OK > Phone settings > OK > Language > OK > select language > OK
To switch the phone off, hold down the red handset button (9) until the phone switches off.
KEYPAD LOCK
To lock the keypad, move the lock switch on the side of the phone upwards. Move it back down to unlock the keyboard. The phone lock password is used if you do not want others to use your phone. This password is usually provided by the phone manufacturer and can be changed afterwards.
The factory password for this device is 1122.
If your phone is locked, you will not be able to access it without entering the appropriate password. If you change the factory password, make a careful note
of it!
LIGHTHOUSE
To switch on or off, slide the switch on the side of the phone.
PHONE MENU
Press the UP arrow to enter the phone menu, press the UP or DOWN arrows to move through the items.
You can confirm the selected menu option by pressing the button (3). To return to the previous menu or to cancel a selection, usually press the button (12).
CALLING
Enter the phone number on the phone keypad and press the green button to call
(4). If there is an error in entering the number, press the right button (12), "Delete" and the last digit will be deleted.
To answer an incoming call, press the green button (4).
To reject the call, press the red button (11).
To adjust the volume during a call, press (2).
To listen loudly (hands-free), press the button (12) during a call.
CONTACTS
Dial a number from the phone book
Press the DOWN button to enter the "Phonebook" menu. Find the number you want Press the button on the phone keypad containing the first letter of the name you want and use the Up/Down directional buttons to find the specific name.
Press the button (4) with the green handset to make a call.
TO STORE YOUR PHONE NUMBER IN YOUR PHONE'S MEMORY OR ON A SIM CARD
Write the number you want to save on the display, press (3) Options > Save to phonebook > To SIM or To phone. Enter the name under which the number will be saved > press the button (3) Options > Save.
SETTINGS
Preferred memory: selecting the memory to store the contact
Speed dial: after switching on, the keypad buttons can be assigned to 2 to 9 contacts.
To call these stored numbers, simply press the
assigned button for more than 2 seconds.
Memory status: shows the SIM and Phone capacity usage
OPERATIONS
You can copy or move contacts between the SIM and the phone by selecting the menu option.
SETTING OF QUICK SELECTION M1, M2, M3
Menu > Phonebook > select Contact
Options > Add to specific key > select M1, M2 or M3 > Save
NOTIFICATION LED
Permanently lit: Bluetooth is on
Flashing: missed phone call or SMS message
SMS NEWS
In standby mode, press the UP directional button and confirm with OK.
WRITE A REPORT
First, write the content of the message.
TEXT WRITING
Press the # button repeatedly to switch between the input modes (ABC, abc, 123). When setting the abc/ABC options, you can press the 2-9 buttons to
type letters.
Press the selected button repeatedly to enter any of the characters on it. One press of the first letter, two presses of the second letter and so on. To move the cursor left/right, press the UP/DOWN directional buttons.
INSERTION OF SYMBOLS, SPACES, DIGITS
Press the * button to open the menu of the available symbols and use the UP/DOWN arrow keys to select a symbol, confirm with the button (2).
Press the O button to insert a space. This option does not work in 123 number entry mode.
When "123" mode is selected, you can press buttons to directly insert single digits. To send a typed message, press (2) Options > Send > Insert number > Add from list and use the UP/DOWN arrow to select the recipient of the message and confirm OK > Send.
In the Messages menu you can also find Inboxes, Sent SMS messages, Drafts (broken down messages), Unsent or SMS Settings (option to set up SMS center, send Inbox) etc.
MMS NEWS
CHECKING DATA ACCOUNT SETTINGS
To send an MMS message, the Data Account must be set up correctly.
Check the Data Account settings, from the main screen, select Menu > Settings > Data Accounts. If no data account is created, select Options > Add GPRS account. Enter the APN, proxy values according to your mobile operator's settings (APN, proxy and other settings can be found on your operator's website).
WRITE AN MMS MESSAGE AND SEND
From the main screen, select Menu > Messaging > Write an MMS message. First type the text of the MMS message, then add a picture to send "Add picture". Then select "Send to" > select the recipient from the list or enter the recipient's phone number. Select Options > Send.
MULTIMEDIA
FILE MANAGER
Allows you to work with files stored on the memory card (if it's in your phone).
Camera: you need to insert a microSD card and then you can change the settings
Picture viewer: allows you to view pictures stored on the memory card (if it is inserted in your phone).
MUSIC PLAYER
Audio files must be saved on the microSD card in the "My music" folder.
RECORDER
Insert the microSD card and set additional recording options in the Options menu.
FM RADIO
To exit the FM radio menu, press the button with the red phone.
If you are in the FM radio menu, you can press 3 (Options) to call up this local menu: Channel list: If you have already tuned in each channel with stations, you can
choose any one of them and start listening to it.
Manual input: you enter the radio frequency manually.
Automatic tuning: after confirming the dialog "Automatically search and save channels?" debugging is started.
Settings - Background playback: Activate background playback mode, even after leaving the FM radio menu.
SETTINGS
PROFILES
Allows storage of up to 4 profiles: Main, Silent, Meeting, Outside with the possibility of adjusting the type of signaling, ringing, volume, etc. You can customise the profiles and save your changes.
PHONE
TIME AND DATE
Setting the date, time and daylight saving time on/off
LANGUAGE
Change the language on your phone: Select Menu > 3x up arrow > Settings > OK > Phone settings > OK > Language > OK > select language > OK
PREFERRED METHOD OF INSERTION
Choosing how to enter text
AIRPLANE MODE
When this mode is activated, the SIM card is disconnected and you cannot receive calls or make calls from your phone.
LCD BACKLIGHT
Change the brightness of the display using the button (8). Reducing the brightness of the display will extend battery life.
ILLUMINATED BUTTONS
To turn the button backlight on or off
DATA ACCOUNTS
Option to add a data account for MMS messages
SECURITY
Allows you to set the PIN code for the SIM card, phone and set the automatic keypad lock.
You will be asked to enter your PIN every time you switch on your phone.
PIN/PIN2 CODE
The PIN/PIN2 code (4 to 8 digits) is used to protect the SIM card from unwanted use by others. The PIN code is usually provided by your phone operator and comes with your SIM card. If you activate SIM card protection with PIN/PIN2, you will need to enter this PIN/PIN2 every time you switch on your phone. If you enter the PIN code incorrectly three times, the SIM card will automatically lock and you will not be able to enter the PIN/PIN2 code again.
Warning: If you enter the wrong PIN/PIN2 code three times, the SIM card will automatically lock and remain locked until you enter the PUK code. You can usually get a PUK code with your SIM card from your phone provider.
SOS SETUP
To enable SOS calling/sending SMS, go to Settings> SOS functions> Status: Off or On.
Pressing the SOS button on the back of the phone will trigger an audible alarm and automatically dial the numbers stored in the SOS number list. The phone will also send an SOS message, the text of this SMS message can be changed in the Settings >SOS message menu.
If the emergency call is answered, the phone automatically switches to hands-free speakerphone mode. If you want to exit this mode after activating the SOS function, press the button with the red handset (11).
RESTORE DEFAULT
Return your phone to factory settings (code 1122).EXTRA
BUDDY
You can set it in Extra > Alarm > Edit Use the buttons (6) and (7) to switch it on/off.
Set the time and type of repetition, melody and type To save everything, press the button (3).
BLUETOOTH
If you turn on Bluetooth and enable Visibility, you can use the My Devices menu to find other Bluetooth devices near your phone and pair your phone. Turning on Bluetooth increases power consumption and reduces battery life.
CALLER
The phone includes a calculator with basic operations. Enter the numbers (insert the decimal point by pressing the "#" button), use the up or down arrow to insert the individual number commands (+), (-), (x) or (/) and press the (3) button to confirm the operation.
STATEMENT OF TALKS
Press the green button (3) on the main screen to call up the list of recent calls. For a full list of all calls, please refer to the "Call listing" menu.
PROBLEM SOLVING
The phone cannot be switched on
Is the battery at least partially charged?
Is the battery inserted correctly?
The battery cannot be charged
Check that the charger is properly connected.
Is the battery working? Battery functionality decreases in proportion to the length of use and may not be functional after more than a year.
Is the battery fully discharged? In this case, the phone and battery must be connected to the charger for a longer period of time before charging can start. It could be tens of minutes.
Unable to log in to the operator's network
Signal is too weak or may be interfered with. Check the signal strength by the icon on the phone display to see if there are vertical lines next to the antenna.
Is the SIM card inserted correctly? He's not making bad contact? If the SIM card is damaged, ask your operator to replace it.
Cannot make phone calls
Is your phone logged into your network?
No call blocking active?
Do you have enough credit?
Cannot receive calls
Is your phone logged into your network?
Do you have enough credit?
Not active call forwarding?
No call blocking active?
Your phone is locked with a PIN
Enter the PUK code you received from your operator with your SIM card to unlock the PIN or contact your operator.
SIM card error
SIM card has dirty contacts. Clean them up.
SIM card is damaged. Replace it with another one.
The phone is not behaving normally
Select Settings >Reset default for returning the phone to the original condition it was in out of production. Enter the factory password 1122 if you have not changed it yourself before.
Do you still need advice after reading this guide?
First read the "FAQ" at https://eshop.evolveo.com/ or contact EVOLVEO Technical Support
TECHNICAL SUPPORT
The warranty is NOT valid for:
• using your mobile phone for other purposes
- mechanical damage caused by improper use
- damage caused by natural elements such as fire, water, static electricity, surges, etc.
- damage caused by unauthorised repair
- damage to the warranty seal or illegible serial number of the device
- the battery if it does not maintain its original capacity after more than 6 months of use (the battery capacity warranty is 6 months)

LIKVIDATION
The crossed-out container symbol on the product, in literature or on the packaging means that in the EU all electrical and electronic equipment, batteries and accumulators must be placed in the separate waste stream at the end of their useful life. Do not dispose of these products in unsorted municipal waste.

DECLARATION OF
CONFORMITY
Abacus Electric s.r.o. hereby declares that the EVOLVEO EasyPhone XR complies with the requirements of the standards and regulations applicable to this type of device.
The full text of the Declaration of Conformity can be found at http://ftp.evolveo.com/ce
Copyright© Abacus Electric s.r.o. www.evolveo.com www.facebook.com/EvolveoCZ
Importer / Manufacturer Abacus Electric, s.r.o. Planá 2, 370 01, Czech Republic Made in China All rights reserved.
Design and specifications are subject to change without notice.
Kedves Ügyfél,

- IMPORTANT NOTICE
- EN
- PHONE DESCRIPTION
- INTRODUCTION
- BATTERY CHARGING
- SWITCHING ON AND OFF
- CHANGE THE LANGUAGE ON YOUR PHONE:
- KEYPAD LOCK
- The factory password for this device is 1122.
- LIGHTHOUSE
- PHONE MENU
- CALLING
- CONTACTS
- Dial a number from the phone book
- TO STORE YOUR PHONE NUMBER IN YOUR PHONE'S MEMORY OR ON A SIM CARD
- SETTINGS
- Memory status: shows the SIM and Phone capacity usage
- OPERATIONS
- SETTING OF QUICK SELECTION M1, M2, M3
- NOTIFICATION LED
- SMS NEWS
- WRITE A REPORT
- TEXT WRITING
- INSERTION OF SYMBOLS, SPACES, DIGITS
- MMS NEWS
- CHECKING DATA ACCOUNT SETTINGS
- WRITE AN MMS MESSAGE AND SEND
- MULTIMEDIA
- FILE MANAGER
- MUSIC PLAYER
- RECORDER
- FM RADIO
- PROFILES
- PHONE
- TIME AND DATE
- LANGUAGE
- PREFERRED METHOD OF INSERTION
- AIRPLANE MODE
- LCD BACKLIGHT
- ILLUMINATED BUTTONS
- DATA ACCOUNTS
- SECURITY
- PIN/PIN2 CODE
- SOS SETUP
- RESTORE DEFAULT
- BUDDY
- BLUETOOTH
- CALLER
- STATEMENT OF TALKS
- PROBLEM SOLVING
- The phone cannot be switched on
- The battery cannot be charged
- Unable to log in to the operator's network
- Cannot make phone calls
- Cannot receive calls
- Your phone is locked with a PIN
- SIM card error
- The phone is not behaving normally
- Do you still need advice after reading this guide?
- TECHNICAL SUPPORT
- The warranty is NOT valid for:
- LIKVIDATION
- DECLARATION OF
- CONFORMITY
Brand : Evolveo
Model : EasyPhone XR
Category : Mobile Phone