
WS 2331 - Weather Station HYUNDAI - Free user manual and instructions
Find the device manual for free WS 2331 HYUNDAI in PDF.

| Product Type | Weather Station with Wireless Outdoor Sensor |
| Model | WS 2331 |
| Brand | Hyundai |
| Power Supply (Main Unit) | 3 x AA batteries (not included) |
| Power Supply (Outdoor Sensor) | 2 x AAA batteries (not included) |
| Battery Life (Typical) | Approximately 12 months (depending on usage) |
| Indoor Temperature Range | 0 °C to 50 °C (32 °F to 122 °F) |
| Outdoor Temperature Range | -20 °C to 50 °C (-4 °F to 122 °F) |
| Temperature Unit | °C or °F selectable |
| Weather Forecast | 5 animations: Sunny, Slightly Cloudy, Cloudy, Rainy, Snow/Freezing |
| Barometric Trend Indicator | Rising, Steady, Falling |
| Clock Type | Radio Controlled (DCF77, 77.5 kHz) |
| Time Format | 12 or 24 hour selectable |
| Alarm Functions | 4 daily alarms with snooze (5 minutes, up to 7 times) |
| Calendar | Perpetual up to year 2099, day of week in 8 languages |
| Wireless Sensor Frequency | 433.9 MHz, E.i.r.p. 0.06 mW |
| Transmission Range | Up to 30 m (98 ft) in open area |
| Outdoor Sensor Alerts | Upper and lower temperature limit alert |
| Low Battery Indication | Icon displayed for outdoor sensor |
| Mounting Options | Wall mount (main unit), table stand (both units) |
| Dimensions (Main Unit, Approx.) | 156 x 110 x 30 mm |
| Dimensions (Outdoor Sensor, Approx.) | 100 x 60 x 20 mm |
| Weight (Main Unit, Approx.) | 150 g (without batteries) |
| Weight (Outdoor Sensor, Approx.) | 80 g (without batteries) |
| Cleaning and Maintenance | Wipe with soft dry cloth. Do not use abrasive cleaners. Remove batteries if not used for long periods. |
| Safety Warnings | Keep plastic bag away from children. Dispose of batteries properly. Do not expose to extreme temperatures or water. |
| Spare Parts & Repairability | No user-serviceable parts. Contact customer support for repairs. Spare outdoor sensors may be available separately. |
| Conformity | Compliant with EU Directive 2014/53/EU. Full declaration at http://www.hyundai-electronics.cz/declaration_of_conformity |
Frequently Asked Questions - WS 2331 HYUNDAI
User questions about WS 2331 HYUNDAI
0 question about this device. Answer the ones you know or ask your own.
Ask a new question about this device
Download the instructions for your Weather Station in PDF format for free! Find your manual WS 2331 - HYUNDAI and take your electronic device back in hand. On this page are published all the documents necessary for the use of your device. WS 2331 by HYUNDAI.
USER MANUAL WS 2331 HYUNDAI
3. VENKOVNÍ TEPLOTNÍ SENZOR
B5: Przycisk “+/AL1-2ON/OFF
B6: Przycisk "RESET"
B7: Przycisk " /-/ AL3-4 ON/OFF"
B8: Przycisk "ALARM"
7.1 Radio Controlled Clock:
IMPORTANT: Please read before using and retain for future reference.
IMPORTANT NOTES
INTRODUCTION
• Thank you for buying our product.
- Please read through these operating instructions, so you will know how to operate your equipment properly. After you finished reading the instructions manual, put it away in a safe place for future reference.
PRECAUTIONS
• Use a pin to press the reset button (B5) if the Unit does not work properly.
• All setting modes will automatically exit in 15 seconds without any adjustment.
• The clock loses its time information when the battery is removed.
- Avoid placing the clock near interference sources/metal frames such as computer or TV sets.
• Do not expose it to direct sunlight, heavy heat, cold, high humidity or wet areas.
- The outdoor sensor must not be set up and installed under water. Set it up in away direct sunlight and Rain.
- Never clean the device using abrasive or corrosive materials or products.
Abrasive cleaning agents may scratch plastic parts and corrode electronic circuits.
- If there is any inconsistency of weather forecast between Local Weather Station and this unit, the Local Weather Station's forecast should prevail. The manufacturer will not take responsible for incorrect forecasting from this unit.
1. FEATURES
1.1 Weather Forecast
– Sunny, Slightly Cloudy, Cloudy, Rainy and Snow animation
1.2 Time – Radio Controlled Time DCF77, 77,5 kHz
– 12/24 hour user selectable
– Four Daily Snooze Alarm function
– Perpetual Calendar Up to Year 2099
– Day of week in 8 languages user selectable
1.3 Temperature
- Indoor measurable range: 0 \~ 50 °C [+32 \~ +122 °F]
- Measures °C / °F user selectable
- Outdoor measurable range: -20 \~ 50 °C [-4 \~ +122 °F]
– Outdoor temperature alert function
1.4 Wireless Outdoor Sensor – Low-battery indicator for outdoor thermo sensor
- Wall Mount or Table Stand
– One Wireless Thermo Sensor Included
- 433,9 MHz RF transmitting frequency, E.i.r.p. 0,06 mW
- 30 meter [98 feet] transmission range in an open area
2. MAIN UNIT APPEARANCE
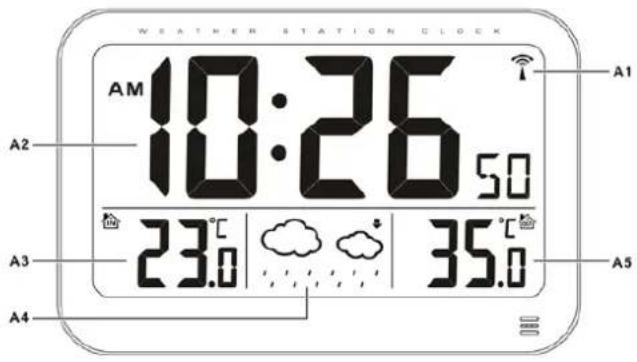
2.1 Part A-LCD
A1: Radio Control Icon A4: Weather Forecast
A2: Time A5: Outdoor Temperature
A3: Indoor Temperature
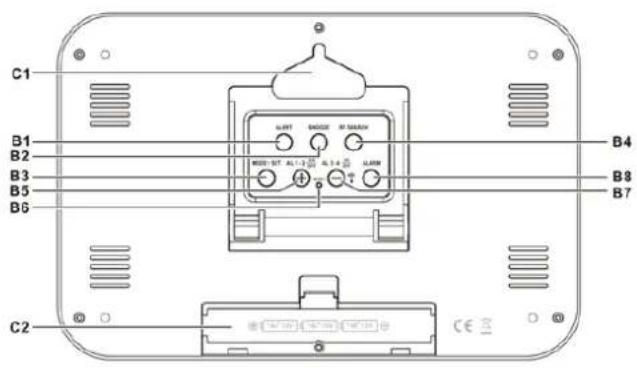
2.2 Part B- Buttons
B1: "ALERT" button B5: "+/AL1-2ON/OFF button
B2: "SNOOZE" button B6: "RESET" button
B3: "MODE/SET" button B7: "/-/AL3-4 ON/OFF" button
B4: "RF SEARCH" button B8: "ALARM" button
2.3 Part C- Structure
C1: Hanging hole C2: Stand
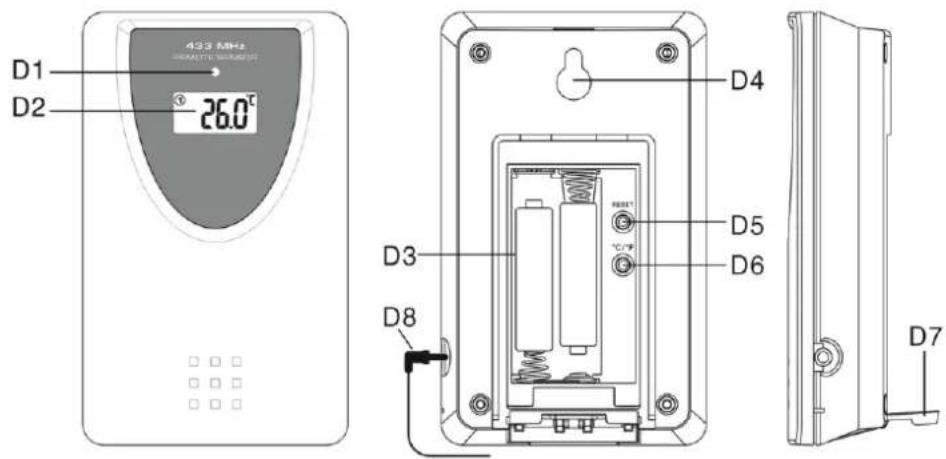
3. OUTDOOR THERMO SENSOR
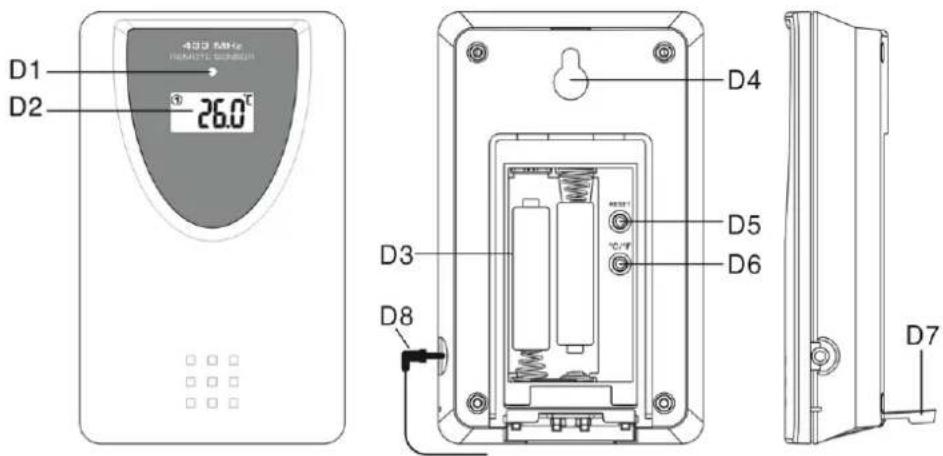
D1: Transmission Indication LED D5: "RESET" button
D2: LCD Display D6: "C/F" Button
D3: Battery Compartment D7: Stand
D4: Wall Mount Hole D8: Temperature Probe Plug
4. GETTING STARTED
4.1 Main Unit:
- Open main unit battery compartment cover.
- Insert 3 x AA batteries observing polarity ["+" and" -" marks].
- Replace main unit battery compartment cover.
- Use a pin to press the RESET [B6] button on the rear of the main unit, the main unit is now ready for use.
4.2 Outdoor Thermo Sensor
• Batteries compartment (D3) of thermo sensor is locating behind the back cover,
- Insert 2 x AAA batteries observing polarity [ “+” and “−” marks]
5. INSTALLATION
5.1 Main Unit
• Wall mounted by the hanging hole, or place the unit onto flat surface.
5.2 Outdoor Thermo sensor
The remote sensor should be securely mounted onto a horizontal surface.
Note: Transmissions between receiver and transmitter can reach up to 30m in open area. Open Area: there are no interfering obstacles such as buildings, trees, vehicles, high voltage lines, etc.
6. WEATHER FORECAST FUNCTION
6.1 Operation
- After Batteries inserted, weather icon flash (A4) on the LCD. Enter the current weather pressing “+” (B5) or “-” (B7) button. Press “MODE” (B3) button to confirm the setting. The weather forecast may not be accurate if the current weather entered is not correct.
- The current weather status should be entered again if the altitude of the main unit is changed. (Barometric pressure is lower at higher altitude location. Therefore, altitude change will affect the weather forecast). The weather station will start the first forecast at 6 hours later after the current weather status is entered.
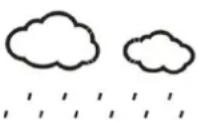
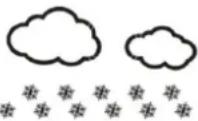
6.2 Weather Conditions
There are totally 5 different weather status animations in the weather forecast.
| Sunny | SlightlyCloudy | Cloudy | Rain | Freezing or Snow |
 |  |  |  |  |
Note:
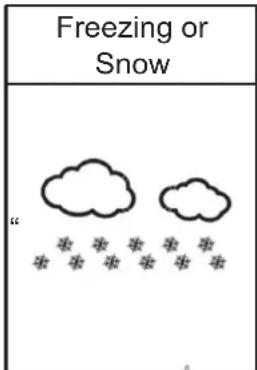
“ is shown if the weather forecast is Rainy and outdoor temperature (any channel) under 0 °C.
- Frost Alert: “” is shown if the outdoor temperature (any channel) is between -2 °C \~ +3 °C.
- If there is any inconsistency of weather forecast between Local Weather Station and this unit, the Local Weather Station's forecast should prevail. The manufacture will not hold responsible for any trouble that may come up due to wrong forecasting from this unit.
6.1 Barometric Trend Pointer
The trend pointer displayed on the LCD (A6) indicates the trend of the Barometric pressure.
 |  |  |
| Indicating the barometric pressure trend is rising | Indicating the barometric pressure trend is steady | Indicating the barometric pressure trend is falling |
7. TRANSMISSION PROCEDURE:
7.1 Radio Controlled Clock:
- The main unit automatically starts receiving transmission from outdoor thermo sensor for outdoor temperature after weather condition setting.
- The thermo sensor unit will automatically transmit temperature signal to the main unit after batteries inserted.
- If main unit failed to receive transmission from outdoor thermo sensor in first 3 minutes after the batteries inserted (“- - . -” display on the LCD), hold “RF SEARCH” button (B4) for 3 seconds to receive transmission manually.
8. TIME AND ALARM SETTING
8.1 Radio Controlled Clock:
- After batteries inserted and main unit finishes receiving the transmissions from outdoor thermo sensor, the clock automatically starts to scan the DCF time signal. Radio Control Icon " (A1) flashes on the LCD.
 (A1) flashes, (A1) turns on, (A1) flashes, (A1) turns on,  1) disappear,Indicating now is receiving DCF signal 1) disappear,Indicating now is receiving DCF signal | Indicating signal received successfully |  Indicating signal reception failed Indicating signal reception failed |
- The clock automatically scans the time signal at 3.00 a.m. every day to maintain accurate timing. If reception fail, scanning stops ("on LCD disappear")
- The clock can be set to scan the time signal manually by holding “▲” button (B7). Each reception takes about few minutes. Stop scanning by holding “▼” button (B7).
• "DST" shown on the LCD if it is in Daylight Saving Time Mode
8.2 Manual Time Setting:
- Press "MODE" button select to view
| Time | → | Weekday | → | Date | → | Year |
- Hold "MODE" button (B3) for 2 seconds to enter Clock/Calendar setting mode.
- Press "+" (B5) or "-" (B7) button to adjust the setting and press "MODE" button (B3) to confirm each setting.
- The setting sequence is shown as follow: 12/24Hour, RCC ON/OFF, Time Zone, Hour, Minute, Second, Year, Month, Day, Day-of-week language, Temperature Unit, Weather Forecast.
- 8 languages can be selected in Day-of-week, they are: German, French, Spanish, Italian, Dutch, Denmark, Russian, and English.
- The languages and their selected abbreviations for each day of the week are shown in the following table.
| Language Sunday Monday Tuesday Wednesday Thursday Friday Saturday | |||||||
| German, GE SO MO DI MI DO FR SA English, EN SU MO TU WE TH FR SA Russian, RU BC PH BT CP 4T PT CB Denmark, DA SO MA TI ON TO FR LO Dutch, NE ZO MA DI WO DO VR ZA Italian, IT DO LU MA ME GI VE SA Spanish, ES DO LU MA MI JU VI SA French, FR DI LU MA ME JE VE SA | |||||||
- The Time zone is used for the countries where can receive the DCF time signal but the time zone is different from the German time.
- When the country time is faster than the German time for 1 hour, the zone should be set to +1. Then the clock will automatically set 1 hour faster from the signal time received.
Note:
(1) Second adjusted to zero only.
(2) The Time Setting Mode will automatically exit in 15 seconds without any adjustment.
8.3 Daily Snooze Alarm Function:
- Press "AL1-2 ON/OFF" (B5) button or "AL3-4 ON/OFF" (B7) button select to activate or deactivate alarm function. When alarm function is activated, the corresponding alarm icon display. (Alarm 1 icon " 🔍" or Alarm 2 icon " 🔍" or Alarm 3 icon " 🔍" or Alarm 4 icon " 🔍")
- Press "ALARM" button (B8) select to view different alarm time, the corresponded alarm icon and alarm time display.
- When viewing the alarm time, hold "ALARM" button (B8) to enter alarm time setting. Press "+" (B5) or "-" (B7) button to adjust the alarm time. Press "ALARM" button (B8) to confirm the setting.
- When alarm alerting, alarm icon flashes. Press “SNOOZE” button (B2) to activate the snooze alarm, the alarm will snooze for 5 minutes, then it alarms again. “ z^z ” flashes on the LCD during the snooze time. This process can be repeated 7 times.
- Except "SNOOZE" button, press any buttons to stop snooze alarm. Otherwise, the alarm signal sounds for about 2 minutes, then stops automatically.
9. THERMOMETER
9.1 Temperature display
- If the temperature is out of the measurable range, LL.L (beyond the minimum temperature) or HH.H (beyond the maximum temperature) will be shown on the LCD.
9.2 Temperature Alert function
- Press "ALERT" button (B1) select to activate or deactivate the alert function, when alert function is activated, and corresponding alert icon (or on) would be displayed on LCD.
- Hold "ALERT" button for 3 seconds to enter outdoor upper temperature alert setting. Icon "▲beside Temperature's digits flash. Press "+" (B5) or "-" (B7) to adjust setting for alert value, press "ALERT" button (B1) to confirm the setting, and move to the lower limit temperature alert setting. Press "+" (B5) or "-" (B7) button to adjust the alert value, press "ALERT" button to confirm and quit the setting.
- When it's alert, the alert icon would flash on the LCD. Press any buttons to stop the alert sound, otherwise, it will sound for around two minutes, and stop automatically.
Remark:
(1) Icon:
▲: upper limit of outdoor temperature alert function
▼: lower limit of outdoor temperature alert function
▲: upper and lower limit of outdoor temperature alert function
(2) The alert icon would stop flashing once the temperature reading is out of the setting range of alert value.
10. LOW BATTERY INDICATION:
The low battery icon “ ^8 ” will appear at particular channel indicating that thermo sensor is in low battery status. The batteries should be replaced.
We reserve the right to change technical specifications.
TO AVOID DANGER OF SUFFOCATION, KEEP THE PLASTIC BAG AWAY FROM BABIES AND CHILDREN. DO NOT USE THIS BAG IN CRIBS, BEDS, CARRIAGES OR PLAYPENS. THIS BAG IS NOT A TOY
Disposal of old Electrical & Electronic Equipment (Applicable in the European Union and other European countries with separate collection systems)

This symbol on the product or on its packaging indicates that this product shall not be treated as household waste. Instead it shall be handed over to the applicable collection point for the recycling of electrical and electronic equipment. By ensuring this product is disposed of correctly, you will help prevent potential negative consequences for the environment and human health, which could otherwise be caused by inappropriate waste handling of this product. The recycling of materials will help to conserve natural resources. For more detailed information about recycling of this product, please contact your local Civic Office, your household waste disposal service or the shop where you purchased the product.
Hereby, ETA a.s. declares that the radio equipment type WS2331 is in compliance with Directive 2014/53/EU. The full text of the EU declaration of conformity is available at the following internet address: http://www.hyundai-electronics.cz/declaration_of_conformity
B1: "ALERT" gomb B5: "+/AL1-2ON/OFF gomb
B2: "SNOOZE" gomb B6: "RESET" gomb
B3: "MODE/SET" gomb B7: "/-/AL3-4 ON/OFF" gomb
B4: "RF SEARCH" gomb B8: "ALARM" gomb