
RA-E313B-DAB - Radio JVC - Free user manual and instructions
Find the device manual for free RA-E313B-DAB JVC in PDF.

| Product Type | DAB+/FM Digital Radio with Bluetooth |
| Brand | JVC |
| Model | RA-E313B-DAB |
| Dimensions | 160 x 98 x 59 mm |
| Weight | Approx. 345 g |
| Power Supply | DC 5V / 1.4A via USB-C |
| Battery Type | Lithium-ion (3.7 V / 2200 mAh) |
| Battery Charging Time | Approx. 2 hours |
| Battery Playback Time | 17 hours at 50% volume |
| Radio Bands | DAB+ (174.928 – 239.2 MHz) and FM (87.5 – 108 MHz) |
| Presets | 40 DAB+ and 40 FM |
| Bluetooth | Version 5.0, range approx. 8 meters |
| Audio Output | 1 x 1.5 Watts |
| Display | LCD with backlight |
| Headphone Output | Yes, 3.5mm jack |
| USB-C Port | For charging only |
| Alarm | Two wake-up alarms with sleep timer |
| Equalizer | Built-in equalizer settings |
| Languages | Czech, Slovak, Polish, English, German |
| Operating Temperature | +5°C to +35°C |
| Package Contents | Radio, USB-C charging cable, User manual |
| Maintenance | Clean with dry soft cloth; unplug before cleaning |
| Safety | Do not expose to water or moisture; keep away from heat sources |
| Repairability | No user-serviceable parts; refer to qualified service |
Frequently Asked Questions - RA-E313B-DAB JVC
User questions about RA-E313B-DAB JVC
0 question about this device. Answer the ones you know or ask your own.
Ask a new question about this device
Download the instructions for your Radio in PDF format for free! Find your manual RA-E313B-DAB - JVC and take your electronic device back in hand. On this page are published all the documents necessary for the use of your device. RA-E313B-DAB by JVC.
USER MANUAL RA-E313B-DAB JVC
- Thank you for buying our product.
- Please read through these operating instructions, so you will know how to operate your equipment properly. After you finished reading the instructions manual, put it away in a safe place for future reference.
SAFETY INSTRUCTIONS
General
- Heed all warnings - on the product and in the user guide.
- The device should be used in moderate climate.
- Do not use this device near a bathtub, washbowl, kitchen sink, and laundry tub, in a wet basement, near a swimming pool, or anywhere else where water or moisture is present.
- The device shall not be exposed to dripping or splashing, no objects filled with liquids, such as vases, shall be placed on the apparatus.
- Keep the device away from rain and any moisture. Do not place the device in moist and humid conditions, which could lead to malfunction.
- When the device is suddenly moved from a cold environment to a warm one, it may not operate properly if moisture forms inside it. To correct this problem, wait about one hour for the moisture to evaporate.
- Do not expose the device under direct sunlight or nearby objects that radiate heat to avoid damaging the unit.
- No naked flame sources, such as lighted candles, should be placed on the device.
- The ventilation should not be impeded by covering the ventilation openings with items, such as newspapers, table-cloths, curtains, etc. Ensure a minimum distance of 0,1 meters around the device for sufficient ventilations.
- Only use attachments/accessories specified by the manufacturer.
- Unplug this device during lightning storms or when unused for long periods of time to prevent damage to this device.
- To prevent risk of fire or electric shock, avoid overloading wall outlets, extension cords or integral convenience receptacles.
• Refer all servicing to qualified service personnel.
Charging
- NEVER expose the device to water while charging, as doing so may result in damage to the device or the power source.
- NEVER operate this device with a damaged cable or after it has malfunctioned or has been damaged in any manner.
- NEVER leave the device unattended while charging. If the device becomes hot, smokes, or gives off an odor during charging, terminate charging immediately.
Risks associated with high volumes

Connect headphones with volume set low and increase it if required. Prolonged listening through some headphones at high volume settings can result in hearing damage. To prevent possible hearing damage, do not listen at high volume levels for long periods.
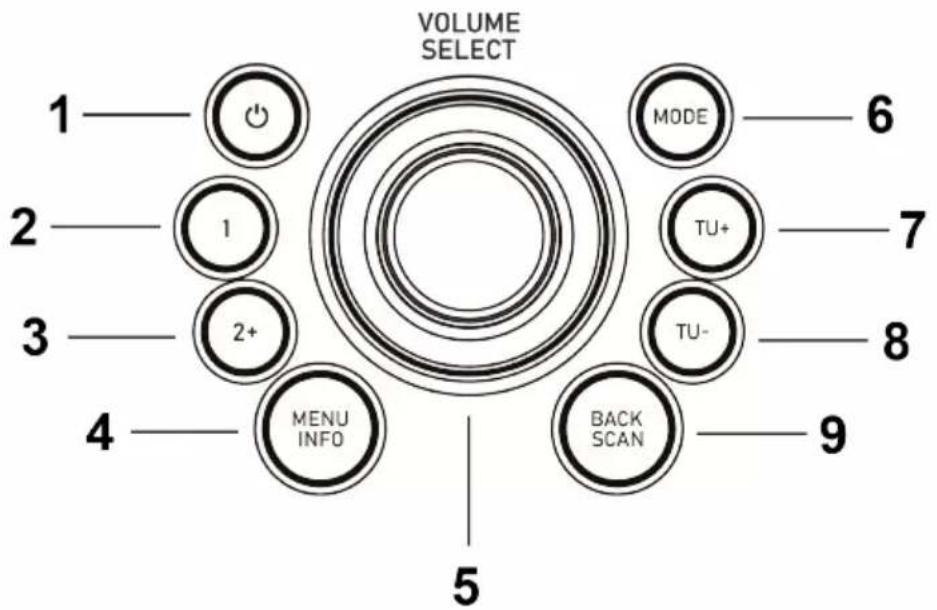
- STANDBY button
- PRESET 1 button
- PRESET 2+ button
- MENU/INFO button
- VOLUME/SELECT knob
- MODE button
- TU+ button
-
TU-button
-
BACK/SCAN button
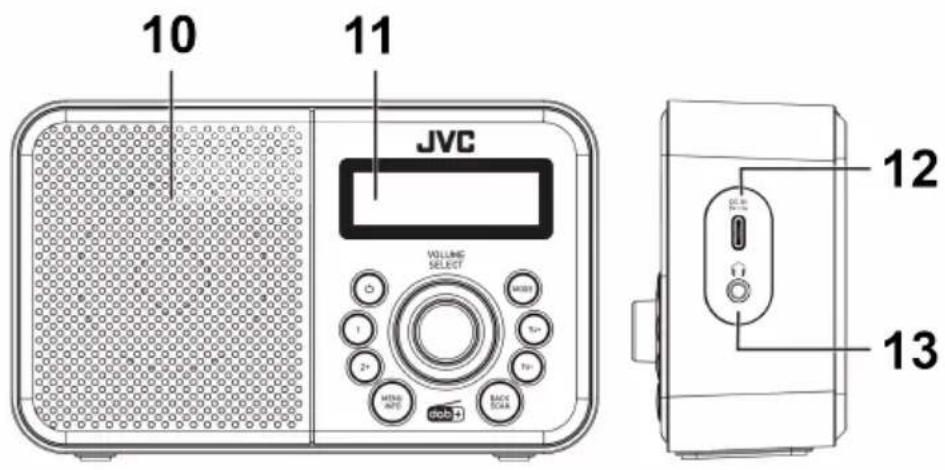
- Speaker
- Display
- USB-C ^TM charging port
- Headphone output
USB Type- C^TM and USB- C^TM are trademarks of USB Implementers Forum.
GETTING STARTED
CHARGING
Before first-time use, fully charge the built-in battery. The charger is not included in the package, please charge the speaker via a standard 5 V / 1,4 A charger or via a PC. The battery icon on the display indicates the charging status.
NOTE: The display will show
IMPORTANT: Please make a complete charge every three months to avoid shortening the battery lifespan.
BASIC OPERATION
Powering ON/OFF
- Press the ⓊSTANDBY button to switch on the unit.
- Press and hold the ⏻ STANDBY button to switch the unit back to Standby mode.
Mode selection
Press the MODE button repeatedly to switch between DAB, FM, and Bluetooth modes.
Settings menus
- Press and hold the MENU/INFO button to enter the menu.
- Turn the VOLUME/SELECT knob or press the TU+/TU- buttons to move through the menus.
- Press the VOLUME/SELECT knob to confirm the setting.
- Press the BACK/SCAN button to return to the previous menu or exit the menu.
Language selection
To change the language, press and hold the MENU/INFO button, and then select
NOTE: The default language is Czech. Available languages are Slovak, Polish, English, and German.
Volume
Turn the VOLUME/SELECT knob to adjust the volume.
PRESETS
You can store up to 40 of your favorite DAB or FM stations to the memory. This will enable you to access your favorite stations quickly and easily. To store a preset, you must first be listening to the station that you would like to save.
Storing to Presets 1
- Press and hold the PRESET 1 button until the display shows
Storing to Presets 1 \~ 40
- Press and hold the PRESET 2+ button.
- Turn the VOLUME/SELECT knob or press the TU+/TU- buttons to select your desired preset station number, then press the knob to confirm.
- The station will be stored in a few seconds, the display will show
.
Recalling Presets 1
Press the PRESET 1 button.
Recalling Presets 1 \~ 40
- Press the PRESET 2+ button.
- Turn the VOLUME/SELECT knob or press the TU+/TU- buttons to select your desired preset station number, then press the knob to confirm.
NOTE: If you choose a preset station number that has not been allocated a station, the display will show <# Empty>.
DAB OPERATION
NOTE: Extend the telescopic antenna to its full length to get the best reception, or place the unit in an open location.
If the unit is connected to the mains power and then switched on for the first time, the unit will automatically enter into the DAB mode and perform auto scan function. During the scan the display will show
To explore and listen to the found stations press the TU+/TU- buttons to select, then press the VOLUME/SELECT knob to confirm.
Full Scan
The Full Scan will search for the entire DAB+ Band III channels.
- To activate Full Scan, press the BACK/SCAN button or press and hold the MENU/INFO button, and then select
. - Once a full scan is complete, the radio returns to play the previously selected station or first station on the station list.
Manual tuning
This can help you align your antenna or add stations that are missing after a full scan.
- Press and hold the MENU/INFO button to enter the menu, and then select
. - Turn the VOLUME/SELECT knob or press the TU+/TU- buttons to select your desired DAB channel, then press the knob to confirm.
NOTE: DAB channels are numbered from 5A to 13F. You will not see any new radio stations or hear anything during manual tuning.
DAB Display (Info.)
To view further information about the station you are listening to press the MENU/INFO button, the display will show the following information:
- Signal Strength as slide bar to indicate the signal strength
- Program Type
- Name of the multiplex
- Frequency
- Signal Error
- Bitrate
- Time / Date
- DLS / Dynamic label segment is a scrolling message that the broadcaster may include with their transmissions. The message usually includes information, such as program details, etc.
Prune Invalid
You may remove all unavailable stations from the list.
- Press and hold the MENU/INFO button to enter the menu, and then select
. - Turn the VOLUME/SELECT knob or press the TU+/TU- buttons to select
to confirm the removal, or select to cancel, then press the knob to confirm.
FM OPERATION
NOTE: Extend the telescopic antenna to its full length to get the best reception, or place the unit in an open location.
Auto Scan
- To activate Full Scan, press and hold the BACK/SCAN button.
- Once a full scan is complete, all found stations are stored in presets. To explore stations stored in presets, press the PRESET 2+ button.
NOTE: The search may not stop at a station with a very weak signal. - Press and hold the TU+/TU- button to search for the next/previous station.
Manual Scan
- To search for stations manually, press the TU+/TU- buttons repeatedly until your desired frequency is reached.
NOTE: Each press will increase/decrease the frequency by 0,05 MHz. If reception is poor, adjust the position of the aerial or try moving the radio to another location.
FM Display (Info.)
To view further information about the station you are listening to press the MENU/INFO button, the display will show the following information:
- Radio Text
- Program Type
- Name of the Station
- Audio Type
- Time / Date
Scan Setting
This is a scan setting to search all stations, or just search stations with a strong signal.
- Press and hold the MENU/INFO button to enter the menu, and then select
. - Turn the VOLUME/SELECT knob or press the TU+/TU- buttons to select or
, then press the knob to confirm.
Audio settings
This unit will automatically switch between stereo and mono mode, but you can override this and toggle this function manually. This can be helpful when receiving poor signal reception.
- Press and hold the MENU/INFO button to enter the menu, and then select
- Turn the VOLUME/SELECT knob or press the TU+/TU- buttons to select
or , then press the knob to confirm.
BLUETOOTH
- In Bluetooth mode,
will flash on the display. This means the unit is not paired with any Bluetooth device. - Activate Bluetooth of mobile phone and search for device name RA-E313B-DAB then connect it. If the pairing is successful,
appears on the display.
Playback
- Adjust the volume to your desired level.
- Press the VOLUME/SELECT knob to play/pause the playback.
- Press the TU+/TU- button to skip to the next/previous track.
NOTE: The operational range between the unit and the device is approximately 8 meters. If the signal strength is weak, your Bluetooth receiver may disconnect, but it will re-enter pairing mode automatically. For better signal reception, remove any obstacles between the unit and the Bluetooth device. Compatibility with all devices and media types is not guaranteed. Some mobile phones with Bluetooth functions may connect and disconnect as you make and end calls. This is not an indication of a problem with the unit.
SYSTEM SETTINGS
- Press and hold the MENU/INFO button to enter the menu, and then select
Sleep timer
To set the sleep timer, select
- Turn the VOLUME/SELECT knob or press the TU+/TU- buttons to set the timer
NOTE: When the sleep timer is set,
Alarm
There are two wake-up alarms. To set the alarms, select
- Turn the VOLUME/SELECT knob or press the TU+/TU- buttons to select
or , then press the knob to confirm. - Set all parameters of the alarm. To activate the alarm, set in the last setup step
.
NOTE: When the alarm is activated, the alarm icon will appear on the display.
Time/Date
To set the time/date, select
- Set the time, date, 12/24 time format, and date format.
- Time and date can be updated from DAB and/or FM automatically. Select
for settings.
Backlight
To set the display backlight, select
- To set the desired time, after which the display backlight level will decrease, select
. - To adjust the display backlight level, select
.
Equalizer
To set the equalizer, select
Language
To set the language, select
Factory Reset
Reset all user settings to default values, so time, date, and preferences will be lost. To perform factory reset, select
Software Version
To view the software version, select
MAINTENANCE / CLEANING
- Ensure the unit is fully unplugged from the mains socket before cleaning.
- Never use any harsh or strong solvents to clean the device since these may damage the surface of the device. Dry, soft cloth is appropriate, however, if the device is extremely dirty, it may be wiped off with a slightly moist cloth. Make sure the device is dried off after cleaning.
When you are necessary to ship the device, store it in its original package. Save the package for this purpose.
SPECIFICATIONS
GENERAL
DC input voltage/current 5V / 1,4 A
Battery type Lithium-ion (3,7 V / 2200 mAh)
Battery Charging Time approx. 2 hours
Battery Playback Time 17 hours (50 % Volume)
Weight Approx. 345 g
Dimensions 160 x 98 x 59 mm
Operation temperature +5°C \~ +35°C
RADIO SECTION
FM Frequency Range 87,5 – 108 MHz
DAB+ Frequency Range 174,928 – 239,2 MHz
Presets DAB+ 40 / FM 40
BLUETOOTH SECTION
Bluetooth V 5.0
BT Frequency Range 2402 – 2480 MHz
EIRP 4 dBm
AUDIO SECTION
Power output 1 x 1,5 Watts
WE RESERVE THE RIGHT TO CHANGE TECHNICAL SPECIFICATIONS.
PACKAGE CONTENTS
DAB+/FM Digital Radio, USB-C charging cable, User manual
WARRANTY
The capacity of the product battery decreases over time. Decreasing of battery capacity occurs during normal use of the appliance and is considered usual wear and tear of the appliance.
Decreasing battery capacity is not a defect of the appliance.
WARNING: DO NOT USE THIS PRODUCT NEAR WATER, IN WET AREAS TO AVOID FIRE OR INJURY OF ELECTRIC CURRENT. ALWAYS TURN OFF THE PRODUCT WHEN YOU DON'T USE IT OR BEFORE A REVISION. THERE
AREN'T ANY PARTS IN THIS APPLIANCE WHICH ARE REPARABLE BY CONSUMER. ALWAYS APPEAL TO A QUALIFIED AUTHORIZED SERVICE. THE PRODUCT IS UNDER A DANGEROUS TENTION.


TO AVOID DANGER OF SUFFOCATION, KEEP THE PLASTIC BAG AWAY FROM BABIES AND CHILDREN. DO NOT USE THIS BAG IN CRIBS, BEDS, CARRIAGES OR PLAYPENS. THIS BAG IS NOT A TOY.
Disposal of old Electrical & Electronic Equipment
(Applicable in the European Union and other European countries with separate collection systems)
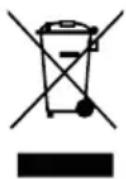
This symbol on the product or on its packaging indicates that this product shall not be treated as household waste. Instead it shall be handed over to the applicable collection point for the recycling of electrical and electronic equipment. By ensuring this product is disposed of correctly, you will help prevent potential negative consequences for the environment and human health, which could otherwise be caused by inappropriate waste handling of this product. The recycling of materials will help to conserve natural resources. For more detailed information about recycling of this product, please contact your local Civic Office, your household waste disposal service or the shop where you purchased the product.

Bluetooth®
The Bluetooth ^® word mark and logos are registered trademarks owned by Bluetooth SIG, Inc. and any use of such marks by JENMART INDUSTRIAL (HK) CO., LIMITED is under license. Other trademarks and trade names are those of their respective owners.
Hereby, ETA a.s. declares that the radio equipment type RA-E313B-DAB is in compliance with Directive 2014/53/EU. The full text of the EU declaration of conformity is available at the following internet address: www.JVCAUDIO.cz/doc
ÚVOD
STACJE ZAPISANE W PAMIĘCI
PENTRU A EVITA INCENDIUL, VĂTĂMAREA CORPORALĂ SAU
ELECTROCUTAREA. OPRIȚI ÎNTOTDEAUNA PRODUSUL CÂND NU ÎL UTILIZAȚI
SAU ÎNAINTE DE O REVIZIE. ÎN ACEST APARAT NU EXISTĂ PIESE CARE SĂ POATĂ FI REPARATE DE CĂTRE CLIENT. APELAȚI ÎNTOTDEAUNA LA UN SERVICE CALIFICAT AUTORIZAT. PRODUSUL SE AFLĂ SUB O TENSIUNE PERICULOASĂ.


PENTRU A EVITA PERICOLUL DE SUFOCARE, NU LĂSAȚI PUNGA DIN PLASTIC LA ÎNDEMÂNA BEBELUŞILOR ŞI A COPIILOR. NU UTILIZATI ACEASTĂ PUNGĂ ÎN PATURI OBIŞNUITE, PATURI PENTRU COPII, CĂRUCIOARE PENTRU COPII SAU TARCURI PENTRU COPII. ACEASTĂ PUNGĂ NU ESTE O JUCĂRIE.
This product is manufactured and distributed exclusively by ETA a.s., serviced and warranted by its designated partner.
“JVC” is the trademark of JVCKENWOOD Corporation, used by such company under license.

- SAFETY INSTRUCTIONS
- General
- Charging
- Risks associated with high volumes
- GETTING STARTED
- BASIC OPERATION
- Powering ON/OFF
- Mode selection
- Settings menus
- Language selection
- Volume
- PRESETS
- Storing to Presets 1
- Storing to Presets 1 \~ 40
- Recalling Presets 1
- Recalling Presets 1 \~ 40
- DAB OPERATION
- Full Scan
- Manual tuning
- DAB Display (Info.)
- Prune Invalid
- FM OPERATION
- Auto Scan
- Manual Scan
- FM Display (Info.)
- Scan Setting
- Audio settings
- BLUETOOTH
- Playback
- SYSTEM SETTINGS
- Sleep timer
- Alarm
- Time/Date
- Backlight
- Equalizer
- Language
- Factory Reset
- Software Version
- MAINTENANCE / CLEANING
- SPECIFICATIONS
- RADIO SECTION
- BLUETOOTH SECTION
- AUDIO SECTION
- WE RESERVE THE RIGHT TO CHANGE TECHNICAL SPECIFICATIONS.
- PACKAGE CONTENTS
- WARRANTY
- Disposal of old Electrical & Electronic Equipment
- (Applicable in the European Union and other European countries with separate collection systems)
- Bluetooth®
- ÚVOD
- STACJE ZAPISANE W PAMIĘCI
Brand : JVC
Model : RA-E313B-DAB
Category : Radio