
M2005 - Home trainer HMS Premium - Free user manual and instructions
Find the device manual for free M2005 HMS Premium in PDF.


| Type | Magnetic resistance home trainer |
| Brand | HMS Premium |
| Model | M2005 |
| Dimensions (L x W x H) | 105 x 54.5 x 133 cm |
| Net weight | 25 kg |
| Gross weight | 28.5 kg |
| Maximum user weight | 120 kg |
| Flywheel weight | 6 kg |
| Resistance system | Magnetic, manually adjustable via tension knob |
| Console display functions | Time, Speed, Distance, Calories, Pulse, Scan |
| Heart rate monitoring | Hand pulse sensors on handlebars |
| Pedals | Adjustable pedal straps included |
| Seat adjustment | Vertical via quick release knob |
| Handlebar adjustment | Fixed position |
| Transport wheels | Yes, on front stabilizer |
| Leveling feet | Yes, on rear stabilizer |
| Safety class | EN ISO 20957-1 Class H (home use) |
| Power supply | 2x AAA batteries (not included) for console |
| Assembly required | Yes, tools included (Allen wrench, universal wrench) |
| Warranty | 24 months (battery and charger not covered) |
| Intended use | Home fitness, not for therapeutic or rehabilitation |
Frequently Asked Questions - M2005 HMS Premium
User questions about M2005 HMS Premium
0 question about this device. Answer the ones you know or ask your own.
Ask a new question about this device
Download the instructions for your Home trainer in PDF format for free! Find your manual M2005 - HMS Premium and take your electronic device back in hand. On this page are published all the documents necessary for the use of your device. M2005 by HMS Premium.
USER MANUAL M2005 HMS Premium
natural_image
Line drawing of a stationary exercise bike with adjustable arms and legs (no text or symbols)ROWER MAGNETYCZNY – MAGNETIC BIKE MAGNETICKÝ ROTOPED – MAGNETISCHER HEIMTRAINER
INSTRUKCJA UŻYTKOWANIA – MANUAL INSTRUCTION NÁVOD K O BSLUZE – BEDIENUNGSANLEITUNG
natural_image
Four technical drawings of mechanical parts with circular and rectangular features, no text or symbols present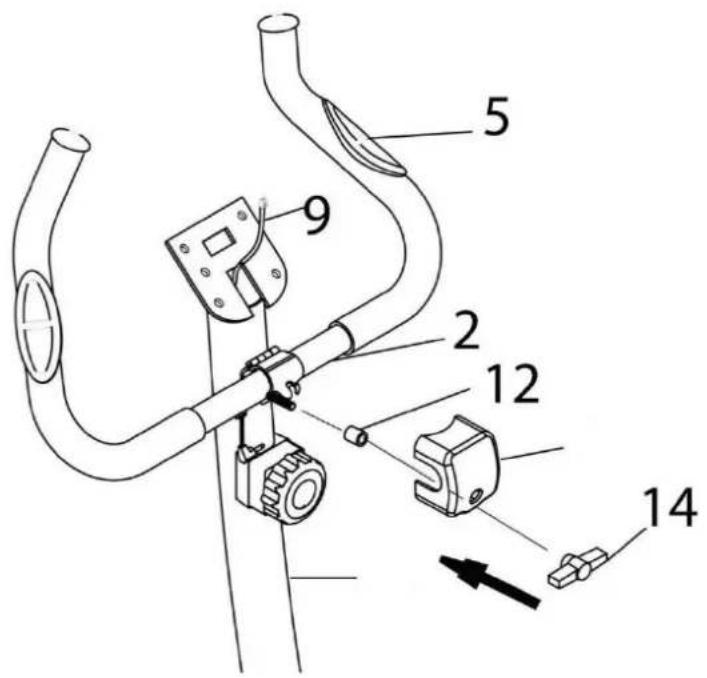
- Read this manual carefully before first using and retain it for future reference.
- Observe all warnings and precautions including assembly steps. Use it only for intended purpose.
- Assemble and use it only according to this manual to assure your safety. Inform all other users about safe usage.
- Keep it away from children and pets. Don't let children unattended near this device. Only an adult person may assemble and use it.
- Ask your physician for advice before starting any exercise program. It is especially necessary if your suffer from some health problems or if you take some medication that could affect your heart rate, blood pressure or cholesterol level.
- Observe body signals. If you feel some problems (pain, tightness in chest, irregular heartbeat, breathing shortness, dizziness or nausea), stop immediately, improper exercising can result in serious health problems or in an injury.
- Put it only on a flat, dry and clean surface and keep a safety safety clearance of at least 0.6 m from other objects for higher safety. Use a protective cover to protect carpet or floor.
- Wear adequate sports clothes and sports shoes. Avoid too loose clothes.
- Don't use it outdoors.
- Check this device for damage or wearing before each using. Regularly check all bolts and nuts. They should be well tightened, Re-tighten, if necessary. Never use damaged or worn device to assure your safety.
- If some sharp edges occur, stop using.
- If you hear some unusual noises coming from this device, stop using.
- No adjustable part should protrude and obstruct user movements. Only one person may use it at time.
- Braking is independent of the speed.
- It is not intended for therapeutic purpose.
- Pay attention while lifting or transporting it to avoid back injury. Use only proper lifting techniques or ask some other person for help.
- Don't do any improper modification of this product. If necessary, contact authorized service.
- Max user weight: 120 kgs
- Category: The equipment has been tasted and certified according EN ISO 20957-1 under class H. It is not suite for therapeutic use.
WARNING! The heart rate frequency monitoring may not be completely accurate. Overexertion during training can lead to a serious injury or even death. If you start to feel faint, stop the exercise immediately.
Parts list
| PART | DESCRIPTION | Q'TY | PART | DESCRIPTION | Q'TY |
| 1 | Plug | 2 | 37 | pedal strap (R&L) | 1set |
| 2 | Handle bar | 1 | 38 | Pedal (R&L) | 1set |
| 3 | Foam grip | 2 | 39 | Side cover R&L | 1set |
| 4 | Screw M 4*15mm | 2 | 40 | Chain cover (R&L) | 1set |
| 5 | Hand pulse | 2 | 41 | Screw for chain cover | 4 |
| 6 | Hand pulse wire | 1 | 42 | Screw M5*35mm | 4 |
| 7 | Meter | 1 | 43 | Belt adjustable (3 in 1) | 2 set |
| 8 | Crank bearing retainer | 2 set | 44 | Nut 3/8*7 mm | 2 |
| 9 | Middle section sensor wire | 1 | 45 | Flywheel | 1 |
| 10 | Post tube | 1 | 46 | Spring | 1 |
| 11 | Tension control with cable wire | 1 | 47 | Bearing | 1 |
| 12 | Spacer | 1 | 48 | Nylon nut M 8*6mm | 1 |
| 13 | Clamp cover | 1 | 49 | Press wheel | 1 |
| 14 | T-knob | 1 | 50 | Sleeve | 1 |
| 15 | Screw for tension control | 1 | 51 | Bracket | 1 |
| 16 | Cup for front post tube | 1 | 52 | Flat washer 19*8.5 mm | 1 |
| 17 | Sensor with wire | 1 | 53 | Allen head bolt M8*15mm | 1 |
| 18 | Tension cable | 1 | 54 | Allen head bolt M10*35 mm | 1 |
| 19 | Bolt M8x15mm | 4 | 55 | Screw | 1 |
| 20 | Spring washer M 8 | 8 | 56 | Magnet | 1 |
| 21 | Curve washer M 8 | 8 | 57 | Pulley | 1 |
| 22 | Front stabilizer | 1 | 58 | Big keyed washer | 1 |
| 23 | Carriage bolt M8X75mm | 2 | 59 | Belt | 1 |
| 24 | Nut M8 | 2 | 60 | Cross head phillip screw | 4 |
| 25 | Rear end cap R&L | 1set | 61 | M5X20 round head bolt | 2 |
| 26 | Front end cap R&L | 1set | 62 | Plug | 1 |
| 27 | Main frame | 1 | 63 | 3/8"x26Wx4H bolt | 1 |
| 28 | Sleeve for seat post | 1 | 64 | 3/8"x26Wx11L bolt | 2 |
| 29 | Cup for seat tube | 1 | 65 | Allen head bolt | 2 |
| 30 | Quick release knob | 1 | 67 | Split bearing | 4 |
| 31 | Seat post | 1 | 70 | Small keyed washer | 2 |
| 32 | Wave washer | 1 | 71 | Allen wrench | 1 |
| 33 | Seat | 1 | 72 | Universal wrench | 1 |
| 34 | Nylon nut | 3 | 73 | Phone bracket | 1 |
| 35 | Flat washer | 3 | 74 | Crank | 1 |
| 36 | Rear stabilizer | 1 | 75 | M5x15 countersunk head bolt | 2 |
Pre-assembly check list
| Part no. | Description | Q'Ty | Part no. | Description | Q'Ty |
| 27/40R,L | Main frame/chain cover | 1 | 37R,L | Pedal strap R&L | 1 |
| 36/25 | Rear stabilizer w/2 adjustable end cap | 1 | 7 | Meter w/sensor wire | 1 |
| 22/26 | Front stabilizer W /2 transport wheels | 1 | 16 | Front post decoration cover | 1 |
| 1/2/3/5/6 | Handlebar | 1 | 10/11/12/13 /14 | Front post w/tension control | 1 |
| 33/34/35 | Seat/flat washer/nut | 1 | 31 | Seat post | 1 |
| 38R,L | Pedal R&L | 1 |
Hardware packing list
| Part no. | Description | Q'Ty | Sketch | |
| 24 | Cap nut M8 | 2 |  |  |
| 21 | Curved washer φ8mm | 4 | ||
| 20 | Spring washer φ8mm | 4 | 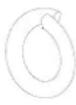 | 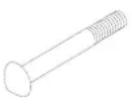 |
| 23 | Carriage bolt M8X75 | 2 | ||
| 71 | Allen wrench | 1 | 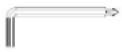 |  |
| 72 | Universal wrench | 1 | ||
| 65 | Allen head bolt M8X75 | 2 | 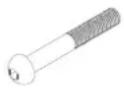 | |
Assembly
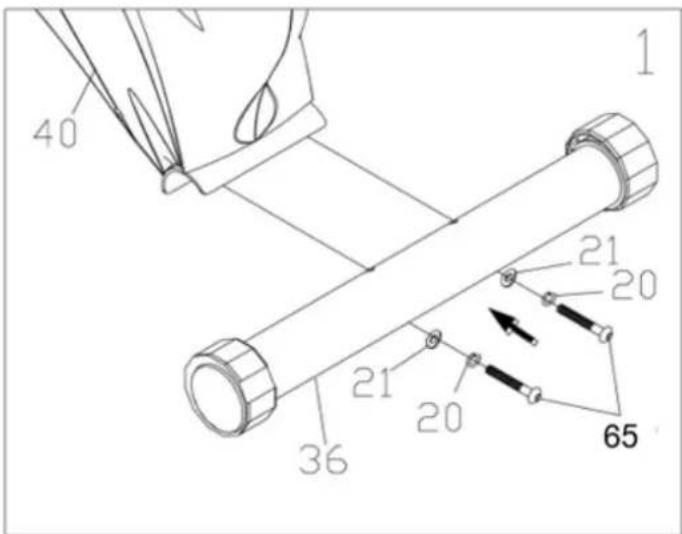
Step 1 Attach rear stabilizer (36) with 2 leveling caps (25) to the welded cross bar bracket of main frame (27) and fasten with 2 curvedwashers (21), 2 spring washers (20) and allen head bolts (65).
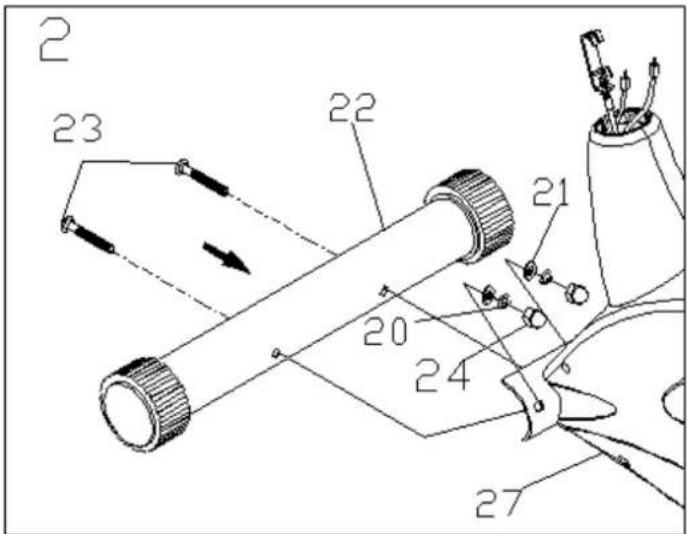
Step 2 Attach front stabilizer (22) with 2 transportation wheels (26) to the welded cross bar bracket of main frame (27) and fastenwith 2 curved washers (21), 2 spring washers (20), 2 carriage bolts (23) and 2 cap nuts (24).
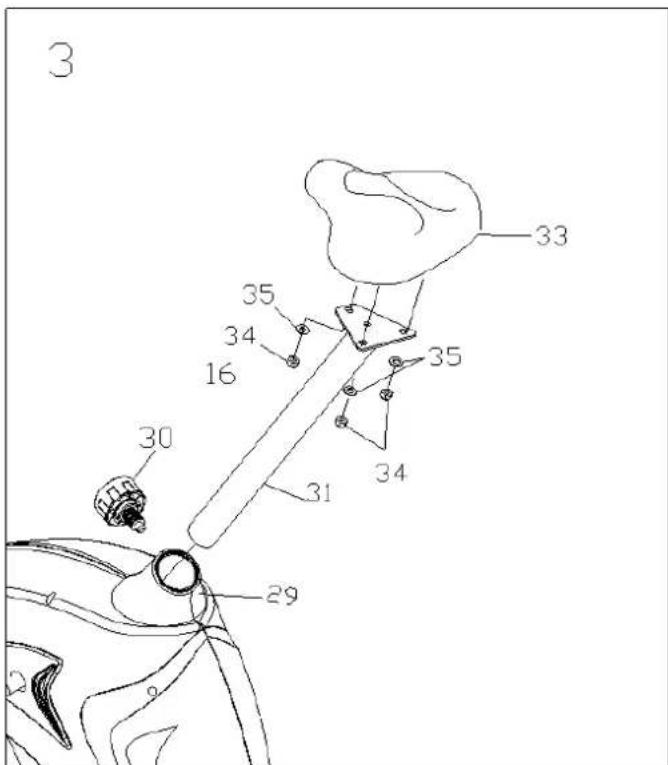
Step 3 Remove the pre-assembled 3 nylon nuts (34) and flat washers (35) from back of the serat (33). Fix the seat (33) to the top bracket of seat post (31) and fasten with nylon nuts (34) and flat washers (35).
Attach seat post (32) into the seat post bottom tube of main frame (27) and secure in right position with the seat triangle screw pin knob (30). Adjust the right height of seat post (31) by choosing the hole of seat post (31).
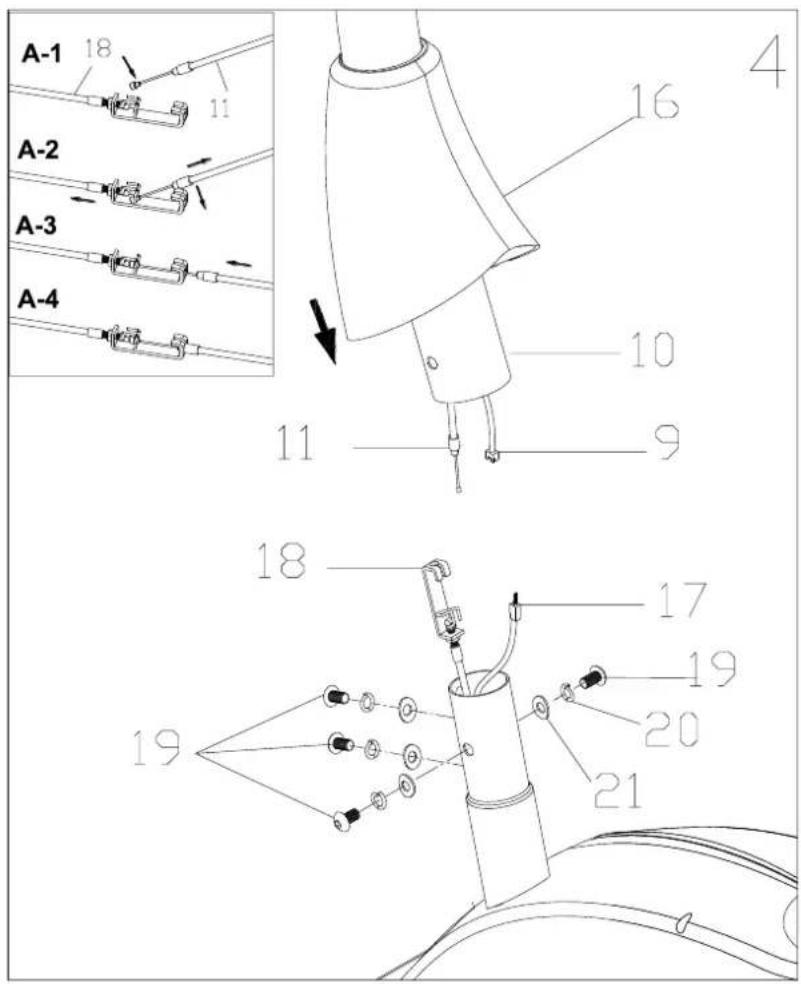
Step 4 Sonnect the middle section sensor wire (9) of the front post with the lower section sensor wire (17) securely. Connect the middle section tension cable (11) to the bracket of lower section tension cable (18).
Remove th epre-assembled 4 allend head bolts (19), 4 curve washers (21) and 4 sring washers (20) form the main frame (27).
Put the front post (10) with the decoration cover (16) into the bottom tube of main frame (27) and fasten with 4 allen head bolts (19), 4 spring washers (20) and 4 curve washers (21). Please note don't tighten allen head bolts (19) too much at the beginning. When all parts are fixed already, and then fasten each one piece tightly.
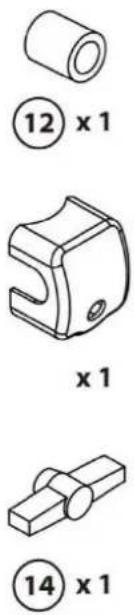
Step 5 Put handlebar (2) with 2 hand pulse sensor plates (5), 2 foam grip (3) to the top 2pc clamp bracket sets of the front post (10) and the fasten 2pcs clamp bracket sets with spacer 12), clamp cover (13) and T-knob (14).
natural_image
Four technical drawings of mechanical parts with cross-sectional views (no text or symbols)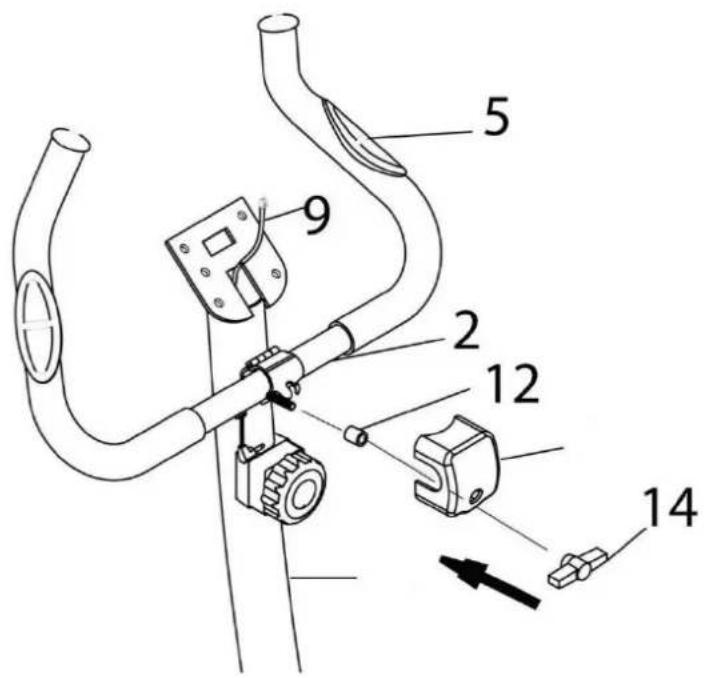
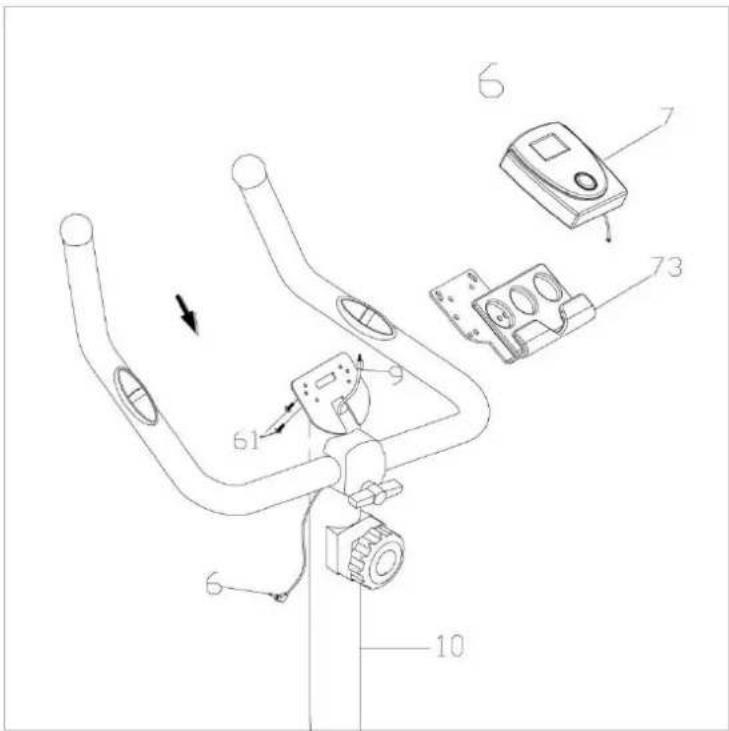
Step 6 Put meter (7) to the phone bracket (73) and tighten with 2 pcs M5x15 countersunk head bolt (75).
Connect the plug of middle section sensor wire (9).
Attach the meter (7) w/phone bracket (73) set to the top meter bracket of front post (10) and tighten with 2pcs M5x20 round head bolt (61).
Insert the plug of hand pulse sensor wire (6) to the pulse socket of console back (7).
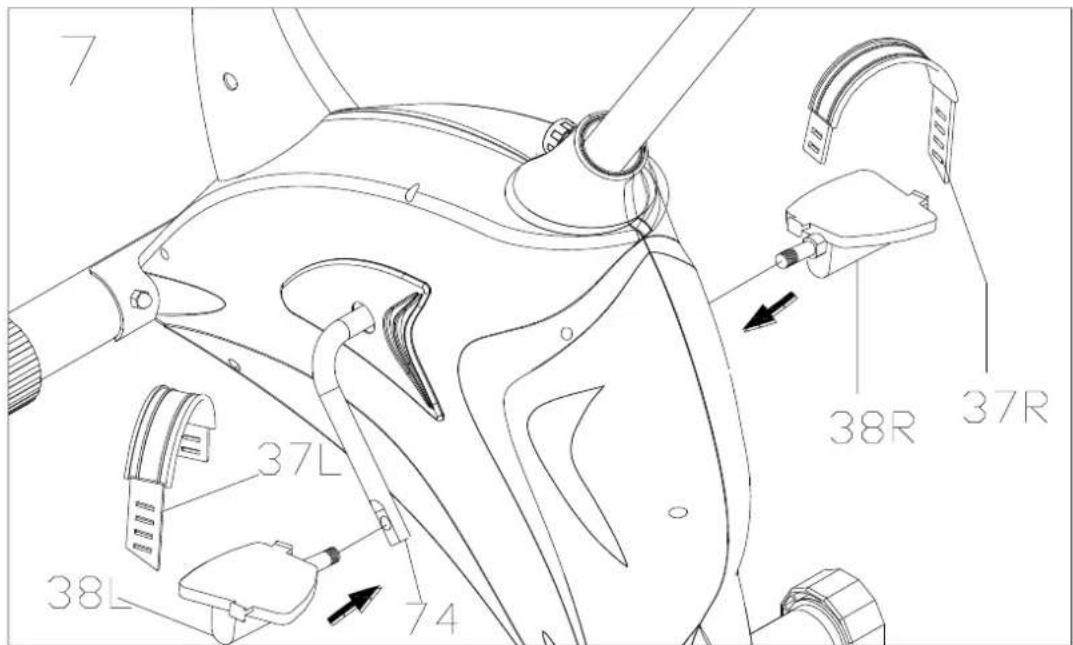
Step 7 Assemble each pedal (38R i 38L) to the crank (74). Pedal „R” assemble with crank right side, pedal „L” assemble with crank left side..
Note: the right pedal should be threaded on clockwise. The left pedal should be threaded on counter-clockwise.
Attach the pedal straps (38) to the pedals.
Computer
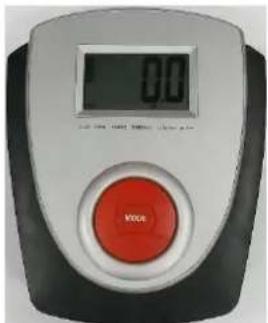
Pedal movement or push the MODE button. Automatic shut off after four minutes of inactivity.
Press to select display functions SCAN/ DYSTANS/ SPEED/ KALORIE/ PULS
Functions
Scan: Automatically scans each function every 4 seconds. To active, press and release MODE button until SCAN appears on the display.
Time: display the time for one second up to 0-99:59
Speed: Sidplay the current speed from 0-999,9 km/h
Distance: Display the distance from 0-99,99 km
Calories: display the calories consumption from 0-999,9 kcal
Puls: Display your heart rate in beats per minute. To display heart rate, select HEART RATE mode and grasp the pulse sensor on the habdlebars, one each hand. The heart symbol will Begin flashing when the meter senses your heart rate. Your heart rate will be displayed approximately 5 seconds afetr the heart icon is displayed. If you don't place your hands correctly and 60 seconds passes without a heart rate reading, the meter will turn off the heart raet circuit. If this occurs, press the MODE button to restart, pleace your hands back on the pulse sensor correctly, and the heart rate readout will appear.
Maintenance
Proper maintenance is very important to ensure a faultless and operational condition of the treadmill. Improper maintenance can cause damage to the treadmill or shorten the life of the product.
All parts of the must be checked and tightened regularly. Worn out parts must be replaced immediately.
Technical data
Max user's weight: 120 kg
Flywheel: 6 kg
Net weight: 25 kg
Gross weight: 28,5 kg
Dimensions: 105 x 54,5 x 133 cm
Box size: 83 x 59 x 25,5 cm
Warm up
I. WARM-UP PHASE
This phase should help improving blood circulation and make your muscles working properly while reducing a cramp risk or injury. It is advisable to do a few stretching exercises as shown below. Each stretching exercise should be taken for approx. 30 seconds. Don't overstretch and don't jerk your muscles. If you feel pain, stop immediately.
II. EXERCISE PHASE
It is a phase, during which you should put in your effort. After regular workout, your leg muscles should get more flexible. Keep steady tempo throughout your exercising. The workout intensity should be sufficient to raise your heartbeat into the target zone as shown below.
NOTE: This stage should last for at least 12 mins. Thus, most people start at approx. 15-20 mins.
III. COOL-DOWN PHASE
In this stage, your cardio-vascular system and muscles should get calm. Repeat the warm-up exercises, reduce your tempo and continue for approx. 5 mins. Repeat the stretching exercises, but don't overstretch or jerk your muscles. As you get fitter, you can exercise longer and harder. It is advisable to train at least three times a week and, if possible, to space your workouts evenly throughout a week.
Bezpečnostní pokyny
natural_image
Four technical drawings of mechanical parts with cross-sectional views (no text or symbols)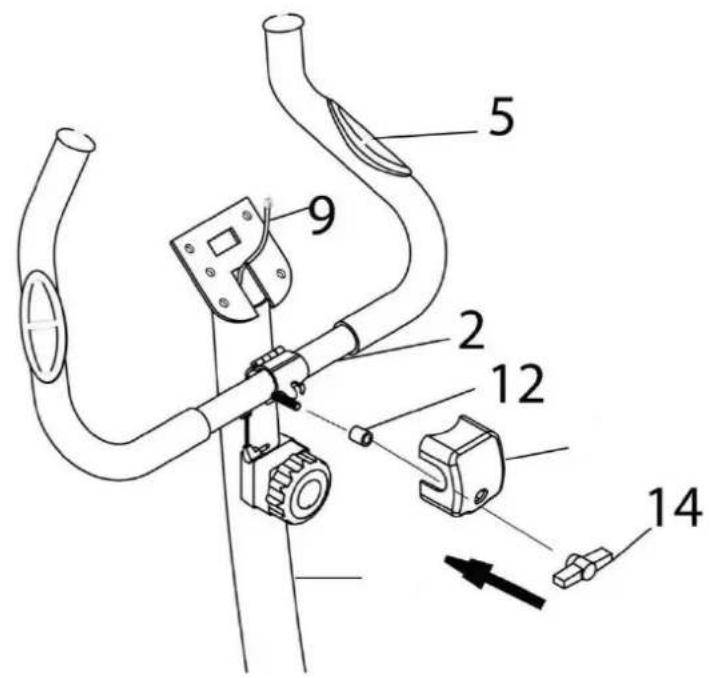
EN: Marking the equipment with a symbol of a crossed-out waste container informs about prohibition of placing used electrical and electronic equipment with other household waste. According to the WEEE Directive on used electrical and electronic waste management, separate disposal methods must be applied for this type of equipment. A user, who intends to dispose this product, is required to deliver it to a collection point for used electrical and electronic equipment in order to contribute to reuse, recycling, or recovery and consequently, to protect the environment. To do this, contact the point where the device was purchased or local government officials. Hazardous components contained in the electronic equipment can cause long-lasting adverse changes in the environment, as well as have a harmful effect on human health.
-
The Seller provides guarantee on behalf of the Guarantor within the territory of the Republic of Poland for the period of 24 months from the date of sale: electric power assisted booster 24 months, charger 6 months.
-
The Guarantee will be recognised by the shop or service centre after the client provides:
- clearly and correctly filled-in guarantee card with the sale stamp and the seller's signature
- valid purchase confirmation for the equipment including the date of sale / bill, complained product.
-
Possible defects and damages revealed during the guarantee period shall be remedied free of charge within not more than 21 days from the delivery of the product to the shop or service.
-
Should it be necessary to import some components, the guarantee term can be extended by the period required to import such part, however such period shall not be longer than 90 days.
-
The guarantee does not cover:
- mechanical damages and subsequent defects,
- damages and defects resulting from incorrect storage and usage of the equipment against its purpose,
- incorrect assembly and maintenance,
- damages and consumption of such elements as: cables, straps, rubber parts, pedals, sponge grips, wheels, bearings, etc.
- The guarantee expires in the event of:
- expiry of the validity term,
- self-repairs,
- failure to follow the rules of correct operation.
-
The product handed over for repair should be complete and clean. If some parts are missing, the service is entitled to refuse to accept the product for repair. The service may refuse to accept a dirty product or clean in on the client's expense after the client's written permit.
-
The guarantee does not cover activities related to assembly, maintenance, which, according to the instruction, the user is obliged to perform themselves.
-
The Guarantor also informs that they offer post-guarantee service.
-
The product should be provided in its original packaging and should be secured for shipment.
-
To exercise the guarantee follow the procedure posted on the website: https://serwis.abisal.pl/
In case of non-conformity of the sold thing with the contract, the buyer is entitled by law to legal remedies from and at the expense of the seller. The guarantee does not affect such remedies.
THE EQUIPMENT IS NOT INTENDED FOR REHABILITATION AND THERAPY
NOTES ON THE COURSE OF REPAIRS
| Item | Date of notificacion | Date of provision | Course of repairs | Signature of the recipient (shop, owner) |
GARANTIEKARTE
Artikelname:
EAN-Code:
HMS-FITNESS.COM

IMPORTER: ABISAL SP. Z O.O., ul. Pyskowicka 17, 41-807 Zabrze, Polska
DISTRIBUTOR: ABISTORE SPORT S.R.O, U Cihelny 230/3, 74801 Hlučín, Česká Republika
abisal@abisal.pl www.abisal.pl


Brand : HMS Premium
Model : M2005
Category : Home trainer