EPR 40-25 - Drill Narex - Free user manual and instructions
Find the device manual for free EPR 40-25 Narex in PDF.


| Type | Electric chainsaw |
| Model | EPR 40-25 |
| Power input | 2500 W |
| Rated voltage | 230 V |
| Rated frequency | 50 Hz |
| Current | 11.8 A |
| Guide bar length | 400 mm |
| Chain type | Oregon 91-PX 057 |
| Chain speed | 12.5 m/s |
| Chain brake | Mechanical |
| Runout brake | Mechanical |
| Chain lubrication | Automatic |
| Oil tank capacity | 200 ml |
| Weight | 4.5 kg |
| Protection class | II (double insulation) |
| Noise level (L_pA) | 90 dB(A) |
| Vibration (a_h,D) | 5.0 m/s² |
| Cable type | H07 RN-F, min. 1.5 mm² |
| Safety features | Chain brake, runout brake, chain catcher, cable strain relief, smooth start, overload protection |
| Maintenance | Clean filter, check chain tension, sharpen chain, flush oil system before storage |
Frequently Asked Questions - EPR 40-25 Narex
User questions about EPR 40-25 Narex
0 question about this device. Answer the ones you know or ask your own.
Ask a new question about this device
Download the instructions for your Drill in PDF format for free! Find your manual EPR 40-25 - Narex and take your electronic device back in hand. On this page are published all the documents necessary for the use of your device. EPR 40-25 by Narex.
USER MANUAL EPR 40-25 Narex
Original operating manual
natural_image
Three Narex chain-link robotic devices with visible blade and head profiles (no text or symbols on the devices themselves)Original operating manual (EN) 20
Symbols used in the manual and on the machine
Figure and description of pictograms
1 Use protective aids of eyes, head and ears!
2 Notice!
3 To minimize the risk of injury, do read the Manual carefully!
4 Protect this device from rain
5 If the lead-in cable is damaged, disconnect it from the power supply immediately
6 Attention, kick-back!
7 Hold by both hands!
8 Does not belong among municipal waste!
9 Double insulation
CS
1 Oil inspection glass
2 Front handle
3 Oil tank cover
4 Front guard of the hand (chain brake activation)
5 Guide bar
6 Saw chain
7 Hand tightening nut
8 Chain wheel guard
9 Switch
10 Rear guard of the hand
11 Rear handle
12 Power cable with plug
13 Protective bar guard
14 Arched handle
15 Lock switch (button)
16 Grooved wheel for chain tensioning
17 Chain catcher
18 Cable strain relief
18a Cable holder
18b Hole for cable
19 Drive sprocket
20 Chain tensioning pin
21 Vent holes
22 Filter
23 Filter cover
DE
natural_image
Line drawing of a manual oil pump with a funnel and bottle pouring liquid from a bottle (no text or symbols)
Narex s.r.o.
natural_image
Line drawing of a manual oil pump with funnel and spout pouring liquid into it (no text or symbols)
Narex s.r.o.
Electric chainsaw EPR 35-25; EPR 40-25; EPR 45-25 Original operating manual (EN)
Table of contents
| Preface to the Operating Manual | 20 |
| Technical parameters | 20 |
| General Power Tool Safety Warnings | 20 |
| Safety instructions for chainsaws | 21 |
| Causes of kickbacks and how to avoid them: | 21 |
| Information about noise level and vibrations | 21 |
| Use | 22 |
| Double insulation | 22 |
| Putting into operation | 22 |
| Safety devices on your electric chainsaw | 23 |
| Instructions for professional work with the electric chainsawu | 23 |
| Maintenance and service | 25 |
| Technical problems | 25 |
| Storage | 25 |
| Environmental protection | 25 |
| Warranty | 25 |
| EC Certificate of Conformity | 26 |
Preface to the Operating Manual
This Operating Manual shall facilitate familiarization with the device and with its correct applications. The Operating Manual contains important instructions how to handle the device safely, professionally and economically, thus avoiding risks, minimizing repairs and outage time and increasing its reliability and service life. The Operating Manual must be available continuously on the place where the device is used. The Operating Manual must be read and observed by all persons authorized to work with the machine, e.g. to operate, maintain or transport it. Besides the Operating Manual and the mandatory regulations how to avoid injury, valid in the country where the device is used, it is also necessary to observe the generally accepted technical rules for safe and professional work as well as the injury prevention rules of relevant professional associations.
Technical parameters
The devices are manufactured in accordance with EN 50144-2-13 and conform fully to the wording of the act on safety of devices and products.
Type EPR 35-25 EPR 40-25 EPR 45-25
| Rated voltage 230 V 230 V 230 V | |||
| Rated frequency 50 Hz 50 Hz 50 Hz | |||
| Current 11.8 A 11.8 A 11.8 A | |||
| Power input 2 500 W 2 500 W 2 500 W | |||
| Guide bar-length 350 mm 400 mm 450 mm | |||
| Chain Oregon 91-PX 052 | Oregon 91-PX 057 | Oregon 91-PX 062 | |
| Chain speed | ca 12.5 m.s ^-1 | ca 12.5 m.s ^-1 | ca 12.5 m.s ^-1 |
| Chain brake | mechanic | mechanic | mechanic |
| Runout brake | mechanic | mechanic | mechanic |
| Chain lubrication | automatic | automatic | automatic |
| Weight | 4.5 kg 4.5 kg | 4.5 kg | |
| Class of protection | II/回 | II/回 | II/回 |
General Power Tool Safety Warnings

WARNING! Read all safety warnings and all instructions. Failure to follow the warnings and instructions may result in electric shock, fire and/or serious injury.
Save all warnings and instructions for future reference!
The term "power tool" in the warnings refers to your mains-operated (corded) power tool or battery-operated (cordless) power tool.
1) Work area safety
a) Keep work area clean and well lit. Cluttered or dark areas invite accidents.
b) Do not operate power tools in explosive atmospheres, such as in the presence of flammable liquids, gases or dust. Power tools create sparks which may ignite the dust or fumes.
c) Keep children and bystanders away while operating a power tool. Distractions can cause you to lose control.
2) Electrical safety
a) Power tool plugs must match the outlet. Never modify the plug in any way. Do not use any adapter plugs with earthed (grounded) power tools. Unmodified plugs and matching outlets will reduce risk of electric shock.
b) Avoid body contact with earthed or grounded surfaces, such as pipes, radiators, ranges and refrigerators. There is an increased risk of electric shock if your body is earthed or grounded.
c) Do not expose power tools to rain or wet conditions. Water entering a power tool will increase the risk of electric shock.
d) Do not abuse the cord. Never use the cord for carrying, pulling or unplugging the power tool. Keep cord away from heat, oil, sharp edges or moving parts. Damaged or entangled cords increase the risk of electric shock.
e) When operating a power tool outdoors, use an extension cord suitable for outdoor use. Use of a cord suitable for outdoor use reduces the risk of electric shock.
f) If operating a power tool in a damp location is unavoidable, use a residual current device (RCD) protected supply. Use of an RCD reduces the risk of electric shock.
3) Personal safety
a) Stay alert, watch what you are doing and use common sense when operating a power tool. Do not use a power tool while you are tired or under the influence of drugs, alcohol or medication. A moment of inattention while operating power tools may result in serious personal injury.
b) Use personal protective equipment. Always wear eye protection. Protective equipment such as dust mask, non-skid safety shoes, hard hat, or hearing protection used for appropriate conditions will reduce personal injuries.
c) Prevent unintentional starting. Ensure the switch is in the off-position before connecting to power source and/or battery pack, picking up or carrying the tool. Carrying power tools with your finger on the switch or energising power tools that have the switch on invites accidents.
d) Remove any adjusting key or wrench before turning the power tool on. A wrench or a key left attached to a rotating part of the power tool may result in personal injury.
e) Do not overreach. Keep proper footing and balance at all times. This enables better control of the power tool in unexpected situations.
f) Dress properly. Do not wear loose clothing or jewellery. Keep your hair, clothing and gloves away from moving parts. Loose clothes, jewellery or long hair can be caught in moving parts.
g) If devices are provided for the connection of dust extraction and collection facilities, ensure these are connected and properly used. Use of dust collection can reduce dust-related hazards.
4) Power tool use and care
a) Do not force the power tool. Use the correct power tool for your application. The correct power tool will do the job better and safer at the rate for which it was designed.
b) Do not use the power tool if the switch does not turn it on and off. Any power tool that cannot be controlled with the switch is dangerous and must be repaired.
c) Disconnect the plug from the power source and/or the battery pack from the power tool before making any adjustments, changing accessories, or storing power tools. Such preventive safety measures reduce the risk of starting the power tool accidentally.
d) Store idle power tools out of the reach of children and do not allow persons unfamiliar with the power tool or these instructions to operate the power tool. Power tools are dangerous in the hands of untrained users.
e) Maintain power tools. Check for misalignment or binding of moving parts, breakage of parts and any other condition that may affect the power tool's operation. If damaged, have the power tool repaired before use. Many accidents are caused by poorly maintained power tools.
f) Keep cutting tools sharp and clean. Properly maintained cutting tools with sharp cutting edges are less likely to bind and are easier to control..
g) Use the power tool, accessories and tool bits etc. in accordance with these instructions, taking into account the working conditions and the work to be performed. Use of the power tool for operations different from those intended could result in a hazardous situation.
5) Service
a) Have your power tool serviced by a qualified repair person using only identical replacement parts. This will ensure that the safety of the power tool is maintained.
Safety instructions for chainsaws
- Keep all parts of your body clear of the chain while the saw is running. Before starting the saw, make sure that the chain does not touch any objects. When working with a chainsaw, even a short moment of inattentiveness may result in clothes or parts of the body being caught by the chain.
- Always hold the chainsaw with your right hand at the rear handle and your left hand at the front handle. Holding the chainsaw differently (left hand – rear handle / right hand – front handle) during operation will increase the risk of injury and is not permitted.
- Hold the electric equipment by its insulated handle surfaces, as the chainsaw can come into contact with its own mains power cable. If the chainsaw comes into contact with a live cable, it can energise metal parts of the equipment and cause an electric shock.
- Wear eye and hearing protection. Other personal protection equipment for the head, hands, legs and feet is recommended. Proper protective clothing and protection equipment reduce the risk of injury caused by thrown-about wood chips and accidental contact with the chain.
- Do not operate the chainsaw on trees. Operating a chainsaw while situated on a tree involves a high risk of injury.
- Make sure to have a safe stand at any time, and only use the chainsaw when standing on solid, safe and level ground. A slippery ground or instable surfaces as the steps of a ladder may lead to loosing balance or the control over the chainsaw.
- When cutting a branch that is under tension take into account that it will spring back. When the tension of the wood fibres is released the tensioned branch may hit the operator and/or the chainsaw resulting in a loss of control.
-
Apply particular caution when cutting brush and young trees. The thin material may get caught in the chain and hit you or throw you off balance.
-
Carry the switched-off chainsaw using the front handle with the chain pointing away from your body. A lways put on the protection cover when transporting or storing the chainsaw. The careful handling of the chainsaw reduces the risk of accidentally touching the sharp cutting chain.
- Follow the instructions for lubrication, chain tension and changing accessories. An improperly tensioned or lubricated chain may either break or considerably increase the risk of a kick-back.
- Keep the handles dry, clean and free from oil and grease. Fatty, oily handles are slippery and may lead to a loss of control.
- Use the chainsaw for cutting wood only! Do not use the chainsaw for works it is not designed for. – Example: Do not use the chainsaw for cutting plastics, brickwork or other construction materials that are not made of wood. The use of the chainsaw for applications, for which it is not designed, may result in dangerous situations.
Causes of kickbacks and how to avoid them:
A kickback can occur if the tip of the guide bar touches an object or the wood to be cut pinches the bar inside the cut.
In some cases, touching an object with the tip of the bar may lead to an unexpected, sudden backward movement, in the course of which the guide bar is 'kicked' upwards and in the direction of the operator.
The pinching of the chain at the upper edge of the guide bar may fiercely throw the bar back in the direction of the operator.
In both cases, you may lose the control over the saw and get seriously hurt. Do not exclusively rely on the chainsaw's built-in safety features.
As a user of a chainsaw you should take several precautions to continuously work without having accidents or suffering injuries.
A kickback is the result of a wrong or improper use of the power tool. It may be avoided by taking the following proper precautions:
- Hold the saw with both hands with the thumbs and fingers firmly embracing the handles of the chainsaw. Position your body and arms such that you can withstand the power of a kickback. When proper precautions are taken the operator will be able to control the power of a kickback. Never let go of the chainsaw!
- Avoid unusual postures and do not cut above shoulder height. This avoids accidentally touching objects with the tip of the bar and allows for a better control of the chainsaw in unexpected situations.
- Only use the replacement bars and chains prescribed by the manufacturer. The use of wrong replacement bars and chains may lead to chain breaks or kickbacks.
- Adhere to the manufacturer's instructions to sharpen and maintain the chain. Depth limiters that are too low increase the risk of a kickback.
Information about noise level and vibrations
Values were measured in conformity with EN 60745:
Acoustic pressure level L_pA = 90 dB (A)
Measurement uncertainty K = 3 dB (A)

ATTENTION! Noise is generated during work!
Use ear protection!
Value of vibrations a_h (sum of vectors in three directions) and uncertainty K established in conformity with EN 60745:
Value of vibrations a_h,D = 5,0 m/s^2
Measurement uncertainty K = 1,1 m/s ^2
The emission values specified (vibration, noise) were measured in accordance with the test conditions stipulated in EN 60745 and are intended for machine comparisons. They are also used for making preliminary estimates regarding vibration and noise loads during operation.
The emission values specified refer to the main applications for which the power tool is used. If the electric power tool is used for other applications, with other tools or is not maintained sufficiently prior to operation, however, the vibration and noise load may be higher when the tool is used.
Take into account any machine idling times and downtimes to estimate these values more accurately for a specified time period. This may significantly reduce the load during the machine operating period.
Use
To ensure maximum safety of the user, our tools are designed and built to satisfy applicable European standards (EN standards). Tools with double insulation are marked by the international symbol of a double square. These tools must not be grounded and a two-wire cable is sufficient to supply them with power. Tools are shielded in accordance with EN 50114.
Putting into operation
Check whether the data on the rating plate conform to the real voltage of the power supply source. Check whether the plug type conforms to the socket. The device intended for 240 V can be also connected to 220 / 240 V.
1. Oil tank filling
The chainsaw may never work without the oil, because lack of oil can lead to damage of the chain, bar and engine. Damage as the consequence of work without oil is not covered by the warranty.

natural_image
Line drawing of a manual oil pump with a funnel and bottle pouring liquid from a container (no text or symbols)
Attention! Be so kind and use only the oil suitable for the saw chains, on the biological basis and 100% degradable.
The bio-oil is available in all specialized shops. Use the fresh oil only. The dirty (used) oil may damage your chainsaw and result in loss of your warranty.
☐ When filling the oil tank, disconnect the power cable plug.
☐ Open the screw cover (3). The cover is equipped by a plastic wire from inside preventing loss of the cover.
☐ Pour ca 200 ml of oil into the tank through a funnel and screw the cover firmly to the stop.
☐ Oil level can be seen through the oil inspection glass (1). If the device is not used for a longer time period, empty the oil tank!
☐ Before transportation or dispatch, empty the oil tank of the chain-saw!
☐ Prior to start work, check correct function of the chain lubrication unit. Mount the cutting assembly, start the chainsaw and hold it well away from your body above a clear surface. Attention, to not touch it! If an oil stain appears, the lubrication unit works correctly.
☐ After the end of work place the chain saw horizontally on an absorbent mat, because the oil spread on the bar, chain and drive may drop for a while.
2. Mounting of bar and chain

Attention! Risk of injury. Use protective gloves when inserting the chain.
No tools are needed for mounting the bar and chain on this chain-saw type model!
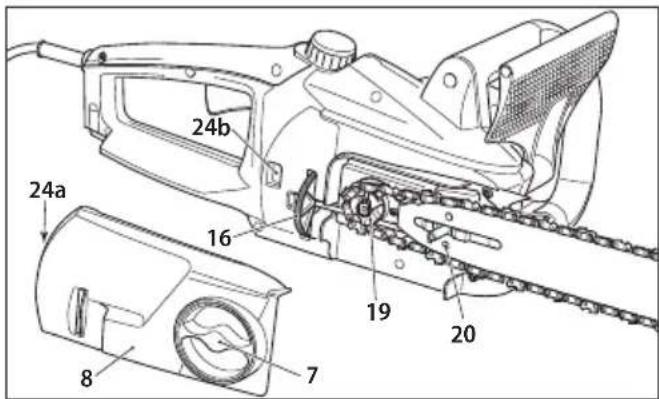
Place the electric chainsaw on a stable /solid surface.
☐ Loosen the hand tightening nut (7) counterclockwise.
☐ Remove the sprocket (chain wheel) guard (8).
Place the chain on the bar, observing correct orientation (in the direction of chain movement). Teeth on the top guide bar side must face forwards (see the Fig).

Place the free saw chain end on the drive sprocket (19).
Place the bar so that the longitudinal hole in the bar may be aligned precisely with the seating surface guide.
☐ Pay attention to the chain tensioning pin (20) which must be seated precisely inside the bar hole. It must be seen clearly through the hole. If necessary, by rotating the grooved wheel of the chain tensioning unit (16) the pin can be moved forwards or backwards until the chain tensioning pin is seated precisely in the bar hole.
☐ Check whether all chain links are seated precisely in the bar groove and whether the saw chain is guided precisely round the drive sprocket (19).
☐ Place the sprocket wheel (8) guard with latch (24a) on the hole (24b) and press it firmly.
☐ Tighten the hand tightening nut (7) moderately clockwise.
☐ Tension the chain. For this purpose rotate the grooved wheel (16) up (arrow direction +). The chain should be tensioned so that it may be lifted in the central bar zone by ca 3 mm (see Fig.). To lose the chain, rotate the grooved wheel down (arrow direction -).
☐ Tighten the hand tightening nut (7) firmly!

Attention! Chain tensioning affects service life of the cutting unit materially and therefore it has to be checked regularly. When heated to the operating temperature, the
chain is stretched and tightening must be renewed.
A new saw chain must be tensioned more frequently.

Attention! During the period of running-in the chain must be tensioned more frequently. If the chain vibrates or leaves the groove, it must be tensioned immediately!
When tensioning the chain, loosen the hand tightening nut moderately (7). Rotate the grooved wheel up (arrow direction +). The chain should be tensioned so that it may be lifted in the central bar zone by ca 3 mm (see Fig). Tighten the hand tightening nut (7).
3. Connection of the electric chainsaw
We recommend to operate the chainsaw with the residual current device with the max. breaking current 30 mA.
This device is intended for operation in el. network with the system impedance Z_max in the supply terminal (house service line) max. 0.4 . The user must ensure work of the device only in the el. network conforming to these requirements. Impedance of the system can be established from the local distribution plant, if necessary.

Use only the lead-in cables approved for use outdoors which are not thinner than the rubber cable H07 RN-F pursuant to DIN/VDE 0282, min. cross section 1.5 mm ^4 . They are protected from splashing water.

The damaged power cable with the plug (12) may be replaced only and exclusively by the service centre appointed by the manufacturer, because special tools are needed to operation. Mobile devices used outdoors should be continued through the residual current device.
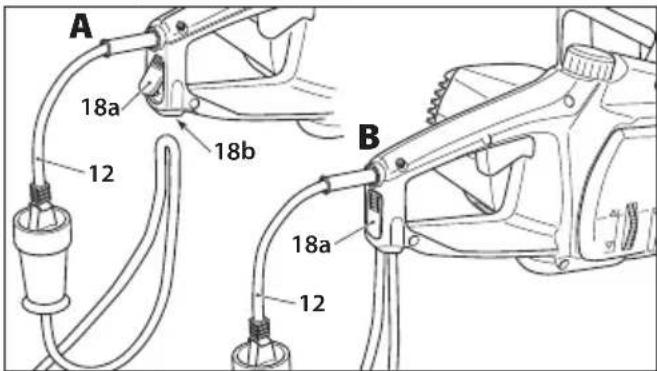
To protect the lead-in cable, this electric chainsaw is equipped by the cable strain relief (18). At first connect the power cable plug of the device (12) with the lead-in cable. Make a loop on the lead-in cable, press the cable holder button, thus extending the cable holder (18a) to the position A, insert the cable loop from below into the hole for the cable (18b). Release the cable holder button. The holder will be returned to the initial position B and the cable will be fixed. To loosen the cable, press the cable holder button (18a) again and take the cable out.
4. Switching on
☐ The front guard of the hand (4) must be in the unlocked position, i.e. must be pushed towards the front handle (2).
☐ Press the lock button (15) on the left side of the front handle (11) by the thumb and then the switch (9).

Attention! The electric chainsaw will be started immediately at a high speed.
☐ The lock button (15) serves for locking of unwanted start and after the switch is pressed, this button does not need to be held any more.
☐ For switching off, release the switch (9).

When switching the chainsaw off, the chain may never come in contact with stones or metal things!
5. Electronic system
Smooth start
To avoid the current peaks after start of the chainsaw, the device is equipped by the smooth / slow electronic start.
Heat protection from overload
If the chainsaw is overloaded, the heat protection switches the device off automatically. When cooled down (after ca 15 minutes), the device is again ready for operation. During this time period the switch may not be activated!
Safety devices on your electric chainsaw

1. Chain brake
This chainsaw is equipped by the mechanical chain brake. When the chainsaw is catapulted as the consequence of contact of the end bar piece with wood or a solid thing, the saw chain drive is stopped immediately by reaction of the hand guard (4). The brake effect is initiated as follows: back of the hand on the front handle (2) pushes the hand guard (4) forwards (position B). Function of the chain brake should be checked before each use of the chain saw!

Attention! When releasing the chain brake, pull the hand guard (4) backwards in the direction of the handle and fix it here (position A). The switch (9) may not be activated!
Make sure that before putting the chain saw into operation the hand guard (4) is fixed in the working position.
2. Runout brake
In accordance with relevant regulations this chainsaw is equipped by the runout brake. it is connected with the chain brake and brakes the running chain after the chainsaw was switched off. It is activated after release of the switch (9). This runout brake eliminates the risk of injury by the running chain.
3. Chain catcher
This chainsaw is equipped by the chain catcher (17). If the chain is broken during work, the catcher catches quickly the moving chain end thus preventing injury of the user's hand.
Instructions for professional work with the electric chainsawu
1. Tree felling
If two or more persons cut down the tree(s) at the same time, the distance between the persons should be at least twice the height of the cut tree. During tree felling other persons may not be endangered, el. distributing lines affected and material/property damaged. Contact of the falling thee with el. distribution line must be notified immediately to the relevant distribution company.
When cutting on a slope, the chainsaw operator shall stay above the cut tree, because the fallen tree will most probably slide or roll down the slope.
a) Escape route

Prior to start cutting, the escape route should be planned and cleared, if necessary. The escape route should lead obliquely from the expected falling tree track, as can be seen in the Figure.
Prior to start cutting, it is necessary to consider the natural tree leaning,
English
position of larger branches and wind direction so that the direction of tree fall may be established. Impurities, stones, free bark, bolts and wires have to be removed from the tree at first.
b) Creation of a notch

Cut a notch at the right angle to the tree as deep as 1/3 of tree diameter. To make the notch, the horizontal cut shall be done at first to avoid jamming (seizing) of the chainsaw or the guide bar when starting the second oblique cut of the notch.
c) Felling cut
Start the felling cut 50 mm above the horizontal cut of the notch, see the Figure. Make the felling cut in parallel with the notch and so deep that the trunk residue may remain preserved as a "suspension". The trunk residue prevents tree swivelling and its fall in the incorrect direction. Do not cross-cut the tree residue.
When the felling cut approaches the notch (undercut), the tree should start to fall. If it appears that the tree will most probably not fall in the desired direction or will be leaned back and will close the chainsaw, stop cutting and use wooden, plastic or aluminium wedges for opening the felling cut and for correct directing the tree.
When the tree starts to fall, take the chainsaw out of the cut, switch it off and leave the risk zone using the escape route. Pay attention to the falling branches not to stumble!
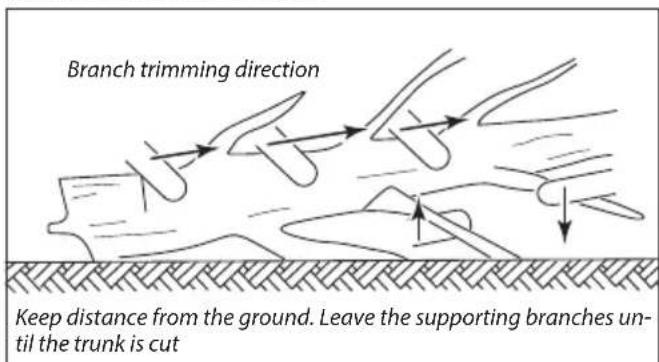
d) Branch trimming
Branch trimming is understood separation of branches from the fallen tree. When trimming, leave at first the larger branches supporting the trunk. Trim smaller branches by a single cut. The sprung branches should be cut from bottom to top to avoid chainsaw jamming.
e) Tree trunk cross-cutting
Cross-cutting is understood trunk separation into shorter parts. Do not forget to be steady and to distribute body weight onto both legs. The trunk should be supported by branches, beams or wedges, if possible. Observe simple instructions for easy cutting.
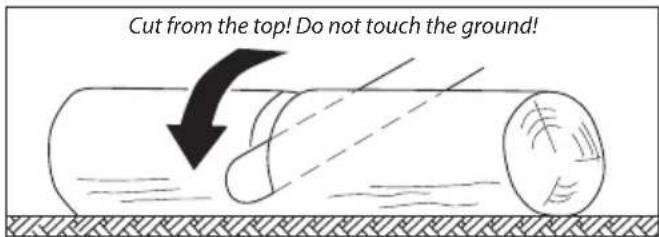
If the whole trunk length is supported uniformly, see the Figure, cut from the top.
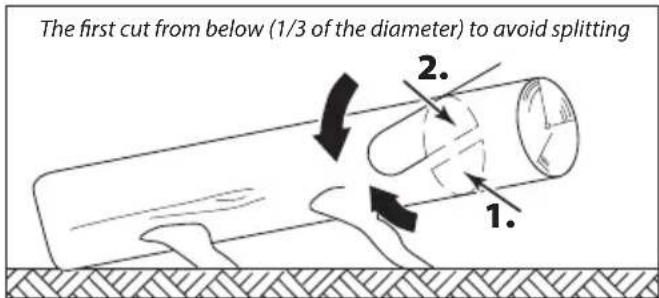
If the trunk lies on the ground by its one end, see Figure, cut at first 1/3 of trunk diameter from the bottom side and then the remaining part from the top as deep as the bottom cut.
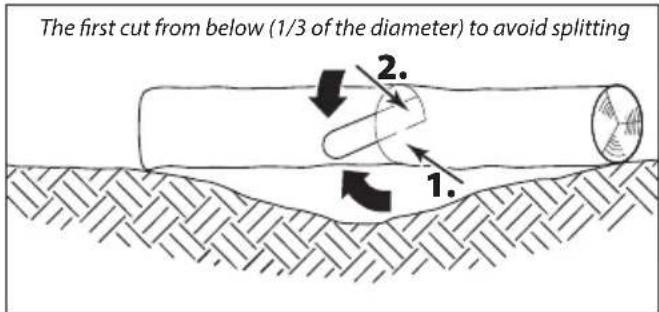
If the trunk lies above a field depression supported on its ends, see Figure, cut at first 1/3 of trunk diameter from the bottom side and then the remaining part from the top as deep as the bottom cut.

When cutting on the slope, stay as shown in the Figure. To have a full control over the chainsaw at the moment of full cross-cut, reduce the pressure in the final cut phase, still holding chainsaw handles firmly in your hands. Attention, the chain may not touch the ground! When the cut is complete, wait until the chain is stopped and only then take out the chainsaw.

Attention! Never move from one tree to another with the switched on chainsaw.
Maintenance and service

Attention! Prior to start any work connected with maintenance and cleaning, always disconnect the power cable plug from the power supply source.

☐ After each use clean the chainsaw from sawdust and oil. To protect the chainsaw internals from impurities, the vent holes (21) serving for engine cooling are equipped by a filter (22). The filter is designed so that its cleaning by a simple brush may be enough under normal conditions. In case of high pollution by sawdust the filter can be dismantled and cleaned out of the device, e.g. by blowing the sawdust away. For this purpose release the filter cover (23) by screwdriver from the holders (see Fig.), remove the filter and clean it. Place the clean filter back on the vent holes (21) and press the filter cover (23) back by your hand.
☐ If the chain is polluted heavily, e.g. by resin, it has to be dismantled and cleaned. Place the chain for several hours into a vessel filled with saw chain cleaner. Flush the chain by water afterwards. If the chain is not used immediately, treat it by a service spray or by a standard anticorrosion spray.
☐ Only when the biological oil for chains is used: As certain kinds of biological oil can be sensitive to creation of peels after a certain time period, before a long chainsaw storage the oil system should be flushed. Fill the empty oil tank by the saw chain cleaner - as high as one half of the tank (ca 100 ml) - and close the tank. Start the chainsaw without the installed bar and chain so long until the whole liquid is drained out of the chainsaw hole. Before reuse of the chainsaw do not forget to fill its tank by oil!
☐ Do not store the chainsaw in the open air or in wet rooms.
☐ Check all chainsaw assemblies before each use for their wear, in particular chain, bar and chain sprocket.
☐ Take care of correct chain setting. Too much tensioned chain may spring out during the work and cause injury. Damaged chain must be replaced immediately. The minimum length of the cutting teeth should be 4 mm.
☐ Check motor housing and lead-in cable before use for possible damage. If any signs of damage are established, the chainsaw must be repaired by a specialized workshop and/or service centre.
☐ Check chain sharpening before each use of the chainsaw. Dull chain results in engine overheating.
☐ As professional knowledge is needed for chain sharpening, this operation should be made by a specialized workshop.

Attention! With respect to protection from el. shock and preservation of the class of protection, all maintenance and service operations requesting jig saw case removal be performed by the authorized service centre only!
The current list of authorized service centres can be found at our website www.narex.cz, section "Service Centres".
Technical problems
☐ Engine is not started: Check the power supply source (socket). Check the lead-in cable for possible damage. If remedy is not reached, handover the chainsaw to the specialized workshop or to the manufacturer's service centre.
☐ Chain is not started: Check position of the hand guard (4). The chain is started at the released brake only.
□ Heavy engine sparkling: Damaged engine or carbon brush. Handover the chainsaw to the specialized workshop or to the manufacturer's service centre.
Oil is not distributed: Check oil level. Clean holes in the bar for smooth oil flow (see also corresponding instruction in the part "Maintenance and cleaning"). If remedy is not reached, handover the chainsaw to the specialized workshop or to the manufacturer's service centre.

Attention! The maintenance and repair works other than those contained in this Operating Manual may be performed by authorized staff or by the manufacturer's serntre only.

Attention! Damaged lead-in cable of the chainsaw may be replaced only by the specialized workshop authorized by the manufacturer or by the manufacturer's service centre, the special tools are necessary for this operation.
Storage
Packed appliance may be stored in dry, unheated storage place with temperature not lower than -5 °C.
Unpacked appliance should be stored only in dry storage place with temperature not lower than +5 °C with exclusion of all sudden temperature changes.
Environmental protection
Power tools, accessories and packaging should be sorted for environmental-friendly recy.
Only for EU countries:
Do not dispose of power tools into household waste!
According to the European Directive 2002/96/EC on waste electrical and electronic equipment and its incorporation into national law, power tools that are no longer suitable for must be separately collected and sent for recovery in an environmental-friendly manner.
Warranty
Our equipment is under warranty for at least 12 months with regard to material or production faults in accordance with national legislation. In the EU countries, the warranty period for exclusively private use is 24 months (an invoice or delivery note is required as proof of purchase).
Damage resulting from, in particular, normal wear and tear, overloading, improper handling, or caused by the user or other damage caused by not following the operating instructions, or any fault acknowledged at the time of purchase, is not covered by the warranty.
Complaints will only be acknowledged if the equipment has not been dismantled before being sent back to the suppliers or to an authorised NAREX customer support workshop. Store the operating instructions, safety notes, spare parts list and proof of purchase in a safe place. In addition, the manufacturer's current warranty conditions apply.
Note
Due to continuous research and development work, we reserve the right to make changes to the technical content of this documentation.
EC Certifi cate of Conformity
We declare that this device meets requirements of the following standards and regulations.
Safety:
EN 60745-1; EN 60745-2-13
Directive 2006/42/EC; Directive 2000/14/EC
Electromagnetic compatibility:
EN 55014-1; EN 55014-2; EN 61000-3-2; EN 61000-3-3
Directive 2004/108/EC
RoHS:
Directive 2011/65/EU
Method of assessment of conformity:
Annex No. VI. to the Directive 2000/14/EC.
Type (verification) certifi cate: 1044 MSR, VDE Off enbach
Measured acoustic power value L_w : 104 dB(A)
Guaranteed acoustic power valueu L: 106 dB(A)
Place of storage of the technical documentation:
Narex s.r.o.
470 01 Česká Lípa CEO of the company
September 1, 2016
natural_image
Line drawing of a manual electric shaver with a funnel pouring liquid from a bottle onto a motor (no text or symbols)natural_image
Diagram of a cylindrical object with internal lines and a downward arrow indicating flow or movement (no text or symbols)natural_image
Line drawing of a person using a camera on a tree-lined path, surrounded by trees (no text or symbols)Narex s.r.o.
natural_image
Line drawing of a manual oil pump with a funnel pouring liquid from a bottle onto a motor (no text or symbols)Narex s.r.o.
natural_image
Line drawing of a manual oil pump with a funnel pouring liquid into a bottle (no text or symbols)
natural_image
Diagram of a cylindrical object with internal lines and a downward arrow indicating compression or dislocation (no text or symbols)natural_image
Line drawing of a person using a power tool on a tree-lined path (no text or symbols)Narex s.r.o.
natural_image
Line drawing of a mechanical device with a funnel pouring liquid into a bottle (no text or symbols)Narex s.r.o.
natural_image
Line drawing of a manual electric shaver with a funnel pouring liquid from a bottle onto a motor (no text or symbols)
Narex s.r.o.
The current list of authorized service centres can be found at our website www.narex.cz, section "Service Centres".
- Symbols used in the manual and on the machine
- Figure and description of pictograms
- CS
- DE
- Electric chainsaw EPR 35-25; EPR 40-25; EPR 45-25 Original operating manual (EN)
- Preface to the Operating Manual
- Technical parameters
- General Power Tool Safety Warnings
- Save all warnings and instructions for future reference!
- Safety instructions for chainsaws
- Causes of kickbacks and how to avoid them:
- Information about noise level and vibrations
- ATTENTION! Noise is generated during work!
- Use ear protection!
- Use
- Putting into operation
- Oil tank filling
- Mounting of bar and chain
- Connection of the electric chainsaw
- Switching on
- Electronic system
- Smooth start
- Heat protection from overload
- Chain brake
- Runout brake
- Chain catcher
- Instructions for professional work with the electric chainsawu
- Tree felling
- English
- c) Felling cut
- d) Branch trimming
- e) Tree trunk cross-cutting
- Maintenance and service
- Technical problems
- Storage
- Environmental protection
- Only for EU countries:
- Warranty
- Note
- EC Certifi cate of Conformity
- Safety:
- Electromagnetic compatibility:
- RoHS:
- Method of assessment of conformity:
Brand : Narex
Model : EPR 40-25
Category : Drill