
FZP 5216-B - Saw Fieldmann - Free user manual and instructions
Find the device manual for free FZP 5216-B Fieldmann in PDF.


| Product Type | Circular Saw |
| Model | FZP 5216-B |
| Brand | Fieldmann |
| Power Supply | 230 V ~ 50 Hz |
| Power Consumption | 1600 W |
| No-Load Speed | 4800 min⁻¹ |
| Blade Diameter | 165 mm |
| Cutting Depth at 90° | 55 mm |
| Cutting Depth at 45° | 40 mm |
| Bevel Capacity | 0° - 45° |
| Weight | 4.2 kg |
| Dimensions (L x W x H) | 300 x 240 x 200 mm |
| Cable Length | 2.5 m |
| Safety Features | Blade guard, safety switch, spindle lock |
| Maintenance | Regular cleaning of ventilation slots, carbon brush replacement |
| Spare Parts Available | Carbon brushes, blades, guide rails |
| Repairability | User replaceable carbon brushes and blade |
| Included Accessories | Rip fence, blade wrench, dust bag |
| Warranty | 2 years |
| Certification | CE |
Frequently Asked Questions - FZP 5216-B Fieldmann
User questions about FZP 5216-B Fieldmann
0 question about this device. Answer the ones you know or ask your own.
Ask a new question about this device
Download the instructions for your Saw in PDF format for free! Find your manual FZP 5216-B - Fieldmann and take your electronic device back in hand. On this page are published all the documents necessary for the use of your device. FZP 5216-B by Fieldmann.
USER MANUAL FZP 5216-B Fieldmann
natural_image
Abstract black and white geometric spiral pattern with no text or symbolsFIELDMANN®
Home & Garden Performance

natural_image
Fieldmann industrial chain-linking machine with green handle and black frame (no visible text or symbols on the device itself)FZP 5216 B
English 3-28
Čeština....29-54
Slovenčina 55-80
Magyarul 81-106
Polski 107-132
Slovenščina 133-160
Chain saw
USER'S MANUAL
Thank you for purchasing this chain saw. Before you start using it, please, carefully read this user's manual and save it for possible future use.
CONTENTS
- GENERAL SAFETY INSTRUCTIONS .... 5
Important safety information....5
Packaging 5
User's Manual 5
-
EXPLANATION OF INSTRUCTION LABELS ON THE MACHINE 6
-
SAFETY INSTRUCTIONS....7
Before using the power tool 7
Safety of the operator, work equipment and clothing 7
Instructions for handling fuel....9
- DESCRIPTION OF THE POWER TOOL AND INCLUDED CONTENTS....10
Description of the power tool (see Fig. 1)....10
- INSTALLING THE BUMPER SPIKES, GUIDE BAR AND CHAIN 11
Installing the bumper spikes 11
Installing the guide bar and chain....11
- FUEL AND CHAIN LUBRICATING OIL....12
Filling the oil tank....12
Mixing the fuel mix 12
Storing fuel 13
- PREPARING FOR OPERATION....13
Chain brake (Fig. 1, point 9)....14
Checking the working order of the brake....14
- TURNING THE CHAIN SAW ON AND OFF 14
Starting a cold engine....14
Starting a warm engine....15
Speed control system 15
Stopping the engine 15
Checking chain lubrication....15
-
ADJUSTING THE CHAIN TENSION....16
-
CUTTING....16
Safety brake (protection against kickback) 16
Felling trees....17
Cutting logs....17
Log lying on the ground....17
Log above the ground....18
Lopping a fallen tree 18
- CLEANING AND MAINTENANCE....18
Maintenance after every use 18
Cleaning the body of the chain saw....19
Maintaining the guide bar....19
Normal maintenance of the guide bar 19 - SHARPENING THE SAW CHAIN 20
Equipment necessary for sharpening a saw chain....20
Sharpening the teeth on the chain 20
Filing the depth gauge....21 - REPLACING THE SAW CHAIN....22
- MAINTENANCE TABLE 23
- TROUBLESHOOTING....24
- TECHNICAL SPECIFICATIONS....25
- DISPOSAL....26
- DECLARATION OF CONFORMITY 27
1. GENERAL SAFETY INSTRUCTIONS
Important safety notice
Carefully unpack the product and take care not to throw away any part of the packaging before you find all the parts of the product.
Store the product in a dry place out of reach of children.
Read all warnings and instructions. Not following warnings or instructions may lead to injury by electrical shock, a fire and/or serious injuries.
Packaging
The product is packed in a package that prevents damage during transport. This package is a resource and so can be handed over for recycling.
User's manual
Before you start working with the machine, read the following safety and usage instructions. Acquaint yourself with the operating elements and the correct use of the machine. Keep the user's manual in a safe place where it can be easily retrieved for future use. Save the original packaging, including the internal packing material, warranty card and proof of purchase receipt at least for the duration of the warranty.
If you need to ship this machine, pack it in the original cardboard box to ensure maximum protection during shipping or transport (e.g. when moving or when you need to send this product for repair).

NOTE: If you hand over the power tool to somebody else, do so together with this user's manual.
Following the instructions in the included user's manual is a prerequisite for the proper use of the power tool. The user's manual also contains operating, maintenance and repair instructions.
The manufacturer takes no responsibility for accidents or damages resulting from not following the instructions in this manual.
2. EXPLANATION OF INSTRUCTION LABELS ON THE MACHINE

Before using the power tool, carefully read the user's manual.

When operating the power tool, wear protective aids such as safety glasses, earmuffs, etc.
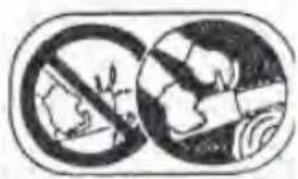
Always use two hands when operating the chain saw.

While working use protective gloves.

Use solid insulating work footwear.
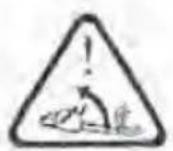
Attention! Danger of kickback

Warning! Attention!
3. SAFETY INSTRUCTIONS
ATTENTION! The safety instructions in this user's manual are marked with the symbol containing critical points, which one needs to pay attention to when operating the power tool to prevent serious or fatal injuries. Please carefully study the instructions and adhere to them.
ATTENTION! This symbol indicates instructions that must be adhered to in order to prevent accidents that could result in serious or fatal injuries.
NOTE: This symbol indicates a tip or instructions useful when operating the power tool.
Before using the power tool
Before using the power tool, carefully read the user's manual.
Do not use the power tool if your are under the influence of alcohol or narcotics, if you are tired or exhausted. Do not use the power tool if your are taking medication, which could affect or limit your decision-making abilities for safe operation of the power tool.
Do not use the power tool indoors, the emitted gases contain damaging carbon monoxide.
Never use the power tool under the conditions listed below:
- If the work surface is slippery or if weather conditions do not permit you to maintain a stable stance while operating the power tool.
- If it is dark, heavy fog or under poor weather conditions, which limit visibility of the work area.
- During rain, during a storm or in strong winds or under conditions that could be dangerous when operating the power tool.
If you are using the chain saw for the first time, please consult with an experienced user before starting work.
* Tiredness or physical exhaustion may lead to inattentiveness, which may result in serious injury
- Limit the operating time of the power tool to approx. 10 minutes per single use and try to rest for approximately 10-20 minutes between work sessions. Limit the total amount of work per day to approximately 2 hours.
Make sure that you have the user's manual at hand in case you need to use it.
If you sell, loan or handover the power tool, make sure that you include the user's manual.
* Never allow children or other persons that are insufficiently acquainted with the user's manual to use this power tool.
Safety of the operator, work equipment and clothing
When operating a chain saw, you should wear the following work clothing and protective aids:
- Helmet
– Safety glasses or protective face shield - Work gloves
- Anti-slip work boots
- Earmuffs
Furthermore, you should also have
- The included tools
– Sufficient supply of fuel and chain lubricating oil - Accessories for designating the work area (rope, warning signs)
- Whistle (to call for help)
- Hand saw or axe (to remove potential obstacles)
When working, never wear loose clothing, jewellery, that could become caught by the chain saw. Do not wear sandals when working, do not work barefoot.
* Check the work area, the item being cut and the cutting direction. Remove obstacles.
Never commence work if the work area is not cleared, if you do not have a stable stance and if you do not have a planned escape route in the event of a falling tree.
Pay increased attention and keep passers-by and pets away from the work area at a distance of at least 2.5 times the length of the item being cut.
* Check for damaged, worn out or missing parts of the power tool. Never use the power tool if it is damaged, incorrectly adjusted or incomplete. Check that the chain stops turning when the throttle trigger is released.
- Keep the handles dry, clean and free of oil and fuel stains.
Do not touch the muffler, spark plugs or other metal parts of the engine when the power tool is running or immediately after it is turned off - there is a risk of burns or injury by electrical shock.
Pay exceptional attention when cutting thin branches or trunks because fragile material may become caught in the chain and flung towards the operator and may thus cause a loss of balance.
When cutting tensioned branches keep in mind that they will fl ing out when the wood fi bres are cut and the tension is released.
* Check for and remove dry branches that could come loose from the falling tree.
Make sure that the power tool is turned off when you put it down.

CAUTION danger of kickback! Kickback may occur when the nose of the guide bar comes into contact with an item or if the material being cut clamps the chain in the cut. During contact with the item, the chain saw may be flung with the guide bar moving up and back towards the operator. A clamped chain may result in a fast backward movement of the guide bar towards the operator. Both these reactions may lead to a loss of control over the chain saw and subsequent serious injuries. Do not rely only on the chain saw's safety features. As the operator of the chain saw, you must constantly adhere to multiple rules to avoid injuries or damages.
If you are acquainted with the kickback principle, you can reduce or eliminate the moment of surprise. Unexpected reactions result in accidents.
If the engine is running, hold the chain saw with both hands with the right hand on the rear handle and the left hand on the front handle. Firmly grasp the handle with the thumb going around towards the fingers.
A firm grip helps limit kickback and to keep the chain saw under control.
There must be no obstacles in the work area. When working with the chain saw, the loose end of the guide bar must not touch a branch, trunk or another obstacle.
* Cut with the engine running at high speed.
A stable stance must be maintained at all times when cutting, do not cut above shoulder height.
Adhere to the instructions of the manufacturer for lubricating and sharpening the chain.
Only use spare chains and guide bars specified by the manufacturer or their equivalents.
Instructions for handling fuel
The engine of the power tool is designed to use a highly fl ammable fuel mix. Never store fuel containers or refi ll fuel in the vicinity of an open flame, wood stove, electrical lines, welding work or other sources of heat or flame, which could lead to ignition.
* Smoking is forbidden when operating the power tool and when refi lling fuel.
When refi lling fuel, make sure that the power tool is off and that there is no open flame in the vicinity.
If the power tool is sprayed with fuel, use a dry cloth to wipe away the stains.
After refi lling fuel, screw on the fuel tank cap and take the power tool at least 3 m away from the place where it was refi lled and then start it up.
4. MACHINE DESCRIPTION AND INCLUDED CONTENTS
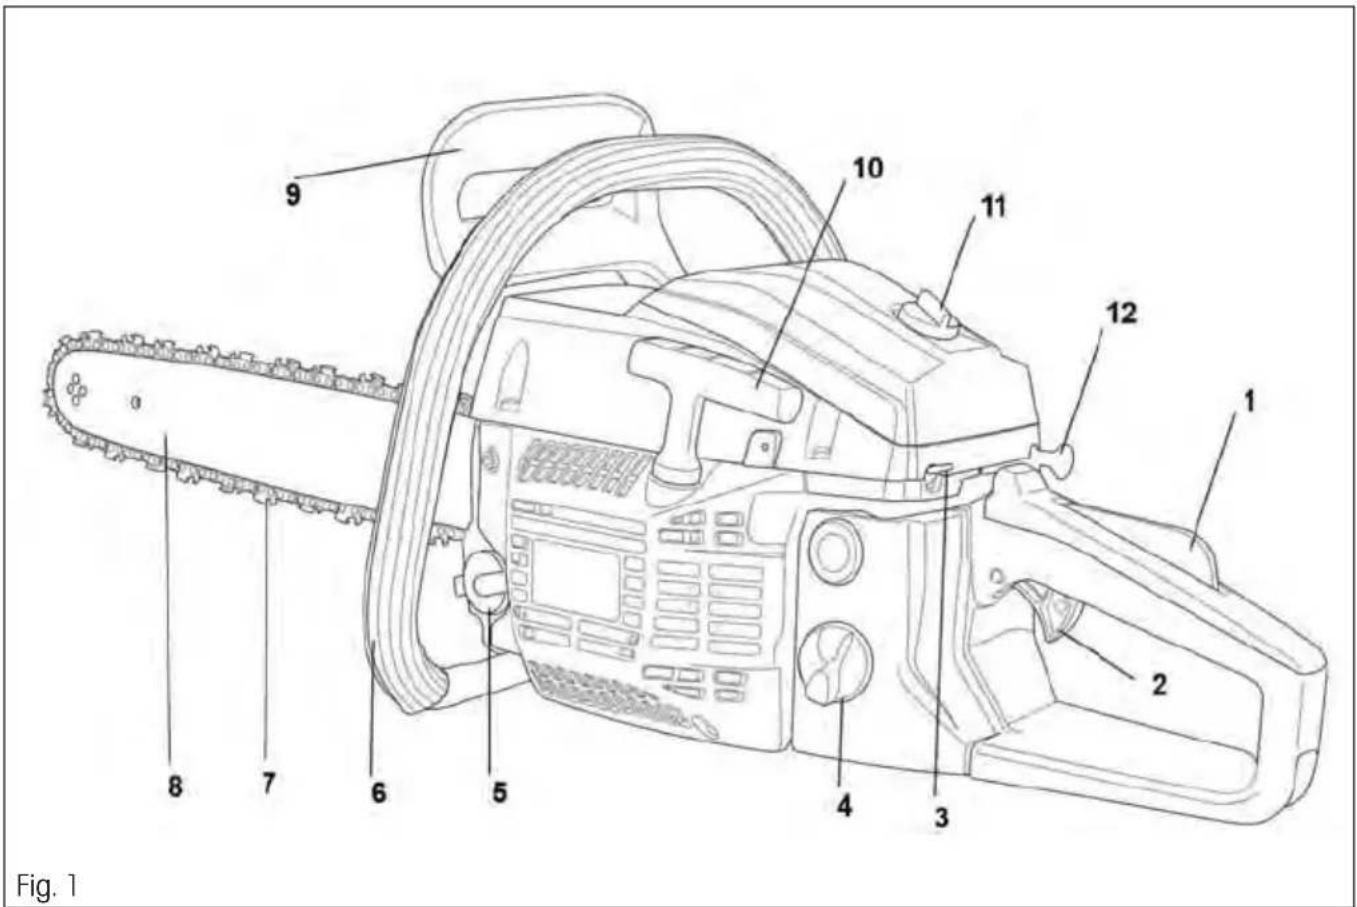
Description of the power tool (see Fig. 1)
- Throttle safety switch
- Throttle trigger
- Main power switch
- Fuel tank cap
- Oil tank cap
-
Front handle
-
Chain
- Guide bar
- Safety brake
- Starting handle
- Air filter cover screw
- Choke lever
Included contents: Petrol chain saw, 405 mm guide bar, chain, plastic guide bar cover, calibrated fuel mixing container, tool set with file.
5. INSTALLING THE BUMPER SPIKES, GUIDE BAR AND CHAIN

ATTENTION! Always wear protective gloves when installing and inspecting the chain to prevent injury from the sharp cutting edges on the chain.
Installing the bumper spikes
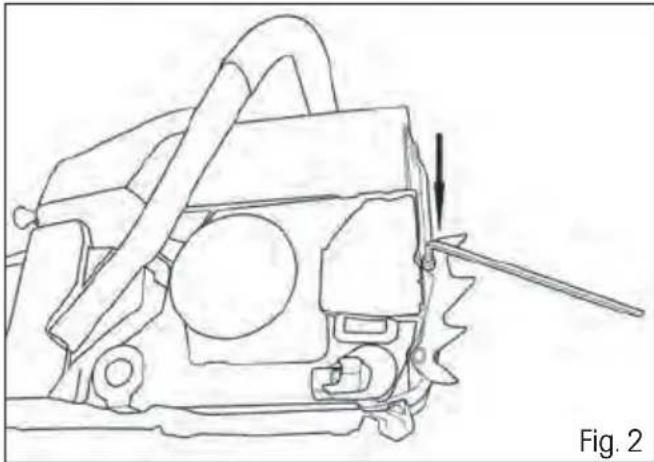
* Using the included hex key and screws, attach the bumper spikes, see picture (Fig. 2).
Installing the guide bar and chain
The safety brake lever (Fig. 1 point 9) must be disengaged (pull it towards the top handle)
* Loosen two nuts and take off the sprocket cover (Fig. 3, point 2).
Seat the chain on to the guide bar and then thread on to the sprocket (pinion). At the same time, hold the chain on the guide bar.

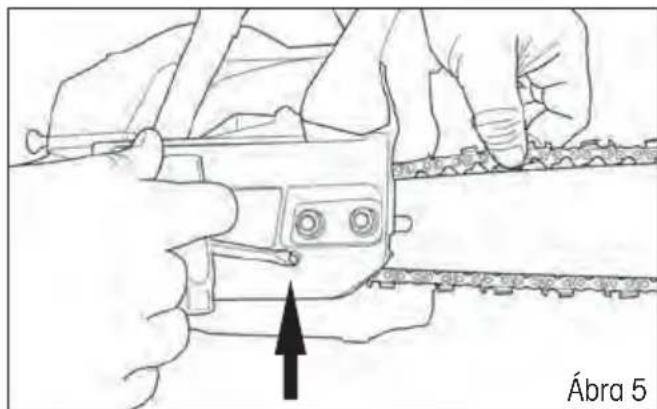
ATTENTION! The chain tensioning pin (Fig. 3, point 3) must fit into the hole in the guide bar (Fig. 3, point 4). The position of this pin can be adjusted using the chain tensioning screw (Fig. 5)

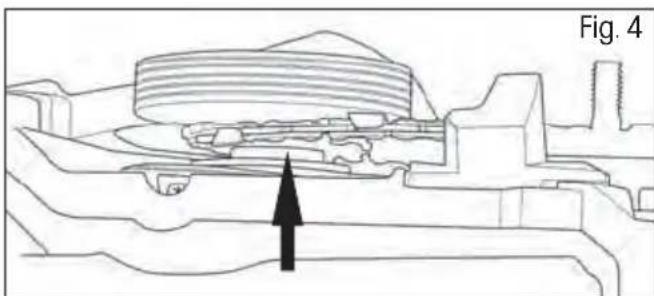
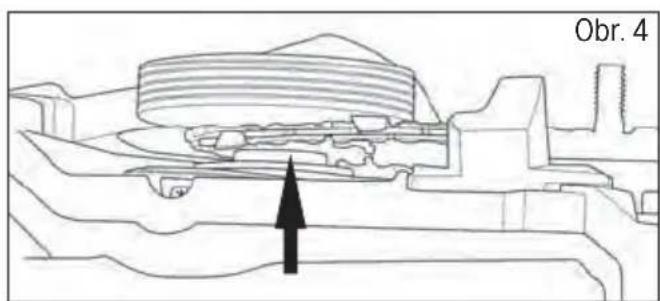
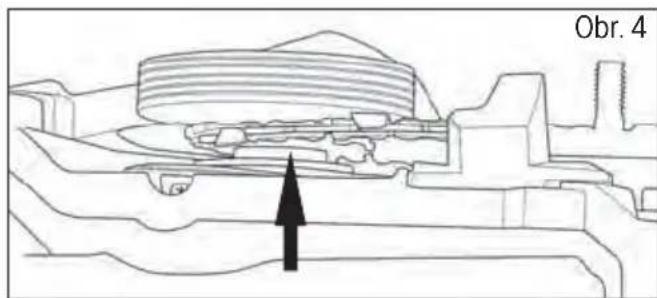
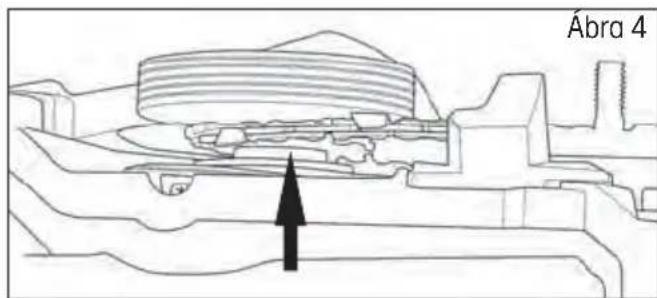
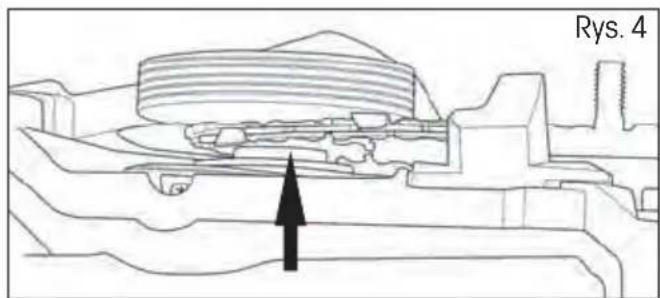
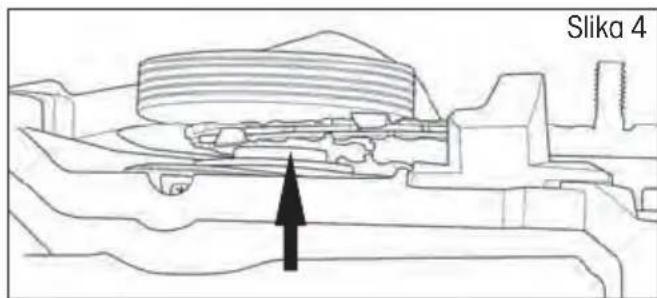
ATTENTION! Ensure that the chain is always correctly fitted in the sprocket ring (Fig. 4). If this is not the case, the chain saw may be damaged.
Put the sprocket cover back. Do not fully tighten the screws, tighten by hand only, to make it possible to tension the chain.
* Tension the chain using the tensioning screw (Fig. 5) and then tighten the sprocket cover nuts using the included tubular wrench

ATTENTION! The chain is correctly tensioned if it is possible to lift chain off the guide bar and its height in the horizontal position in the middle of the guide bar is 3 to 4 mm.
natural_image
Line drawing of a mechanical device with a tool inserted, labeled 'Fig. 2' (no text or symbols on the diagram itself)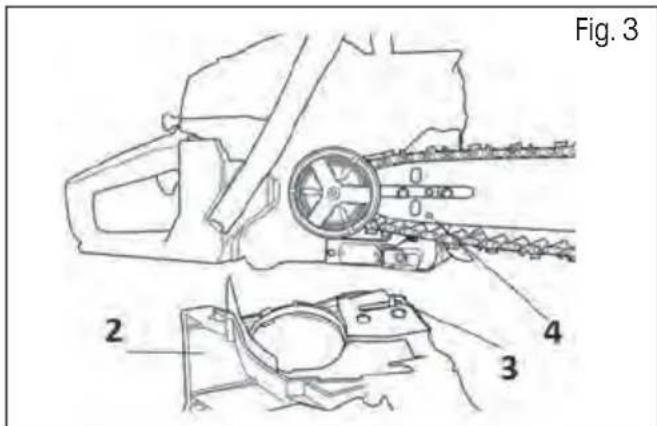
natural_image
Technical line drawing of a mechanical assembly with an arrow indicating direction (no text or symbols)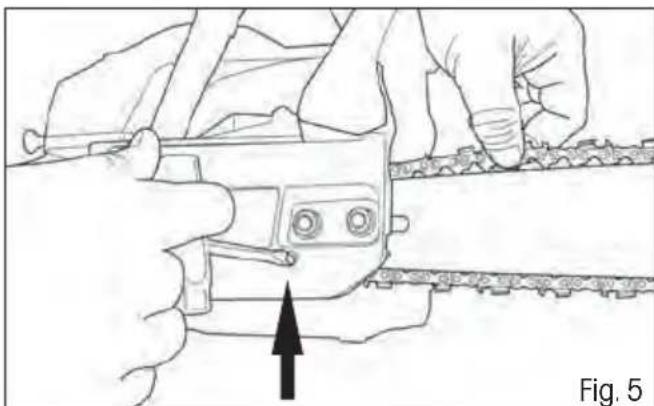
natural_image
Line drawing of hands operating a mechanical device with a tool, showing a black arrow pointing to the component (no text or symbols present)6. FUEL AND CHAIN LUBRICATING OIL
Filling the oil tank
ATTENTION! A new chain requires a certain running-in period, which is usually 5 minutes. The lubrication of the chain is very important during this phase. After this running-in period, check the chain tension and readjust if necessary.
The oil tank on the supplied chain saw is empty. Fill this oil tank with oil prior to first use of this chain saw.
* Only use oil specifi ed for total-loss lubrication
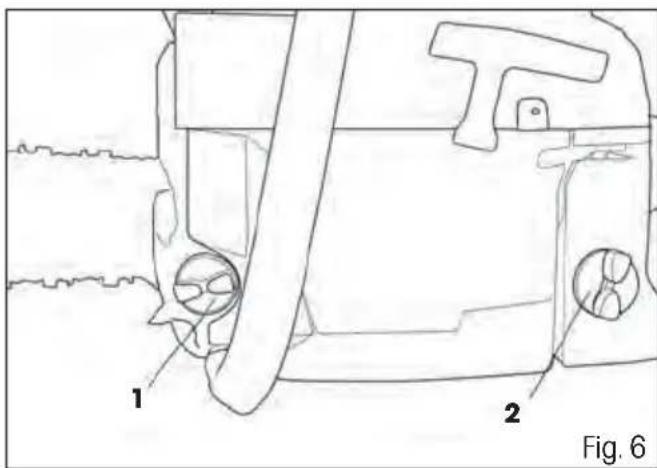
* Screw off the oil tank cap (Fig. 6, point 1).
Pour the oil into the tank (take care to prevent the oil from becoming dirty while filling the tank).
Screw on the oil tank cap.
Before using the chain saw, the oil tank should never be completely empty, this could damage the guide bar and chain.
The oil level can be visually checked after screwing off the cap.
ATTENTION! Do not use oil that has already been used or processed because this could damage the oil pump.
Mixing the fuel mix
ATTENTION! Never pour fuel into the fuel tank in a closed and unventilated location.
ATTENTION! Do not pour fuel in the vicinity of an open flame or a source of sparks.
⚠️ ATTENTION! Do not overfill the petrol tank. Before starting the engine, make sure that all spilt fuel is wiped away.
ATTENTION! If the engine is hot, DO NOT POUR IN FUEL.
For this type of two-stroke engine a mixture of lead-free petrol and two-stroke engine oil is used. This type of two-stroke engine uses a mix of unleaded petrol with two-stroke engine oil in a ratio of 25:1.
ATTENTION! A fuel mix that is mixed at a ratio other may damage the engine. Make sure that this fuel mix is mixed correctly.
When mixing petrol with two-stroke engine oil, use only petrol containing NO ETHANOL or METHANOL (types of alcohols).
Use quality petrol with an octane number of 95 or higher. This will help prevent possible damage to the fuel system and other parts of the engine.
We recommend the use of the calibrated container supplied with the chain saw for mixing the fuel mix. DO NOT MIX THE PETROL AND OIL DIRECTLY IN THE FUEL TANK.
Screw off the fuel tank cap (Fig. 6, point 2) and pour in the fuel. Then screw the cap back on.
Storing fuel
Only store fuel in a clean, safe and approved canister. Inform yourself about and adhere to local directives related to the type and storage of canisters filled with fuel.

ATTENTION! Fuel for two-stroke engines may separate. Prior to every use, thoroughly shake the canister with fuel.

ATTENTION! Stored fuel ages. Do not mix more fuel than you expect to consume within one month.
7. PREPARING FOR OPERATION

IMPORTANT: Follow instructions for preparing the fuel mix! Not following these instruction may damage the engine! Do not use fuel that has been stored for longer than two months. A fuel mix stored for longer than two months will cause problems at start up and lower engine performance. If the fuel mix is stored for longer than two months, it should be removed and new fuel must be used.

ATTENTION! The use of petrol-powered chain saws may be regulated by local codes.
* Check for damaged, worn out or missing parts of the power tool. Never use the power tool if it is damaged, incorrectly adjusted or incomplete.
* Check whether any screws, nuts and installation elements are loose. Tighten any loose screws.
Check whether the air filter is dirty. Prior to starting work, remove all dirt from the air filter.
* Check that the chain is tensioned. You can lift a correctly tensioned chain in the middle of the guide bar in the horizontal position by 3 to 4 mm
Keep the handles dry, clean and free of oil and fuel stains.
* Check the fuel tank for leaks.
* Check the work area, the item being cut and the cutting direction. Remove obstacles
Never commence work if the work area is not cleared, if you do not have a stable stance and if you do not have a planned escape route in the event of a falling tree.
Pay increased attention and keep passers-by and pets away from the work area at a distance of at least 2.5 times the length of the item being cut.

ATTENTION! The recommended guide bar and chain combination is based on the technical parameters provided in chapter 14. Do not use the chain saw with a guide bar longer than 18" (45 cm). Using a longer guide bar may significantly reduce power output.
Chain brake (Fig. 1, point 9)
This chain saw is equipped with an automatic brake that stops the chain in the event of kickback. The brake is engaged automatically by inertia acting on the ballast located under the rear cover. This brake can be operated manually by tilting down the front protective frame towards the guide bar.
The brake is disengaged by pulling the front protective frame back towards the chain saw handle.
ATTENTION! Before every use, check that the chain brake is in working order in the following manner.
Checking the working order of the brake
Place the running chain saw on to the ground and for 1 to 2 seconds leave it at full speed.
* Push the brake lever (Fig. 1, point 9) forward. The chain should stop immediately.
ATTENTION! If the chain stops slowly or does not stop at all, do not use the chain saw and contact an authorised service centre.
If you wish to disengage the brake, pull the brake lever towards the top handle so that you hear the typical click.
ATTENTION! Check that the chain brake is in order. A correctly functioning chain brake will protect you against potential injury, which could result from kickback. If the brake is not working properly, have it adjusted or repaired at an authorised service centre.
8. TURNING THE CHAIN SAW ON AND OFF
WARNING
* Prior to starting the engine, make sure that the chain moves freely along the guide bar and is not touching any foreign objects.
When the engine is idling, the saw chain must not be turning. Otherwise, contact an authorised service centre to perform an inspection and remedy the problem.
Prior to starting the engine, make sure that the throttle trigger moves freely.
ATTENTION: Exposure to vibrations may damage the health of persons that suffer from circulatory or nerve system problems. If any physical problems become evident, such as desensitisation, loss of sensitivity, loss of usual strength or changes in skin colour, please contact a doctor. These systems usually manifest themselves on fingers, hands or wrists.
Starting a cold engine
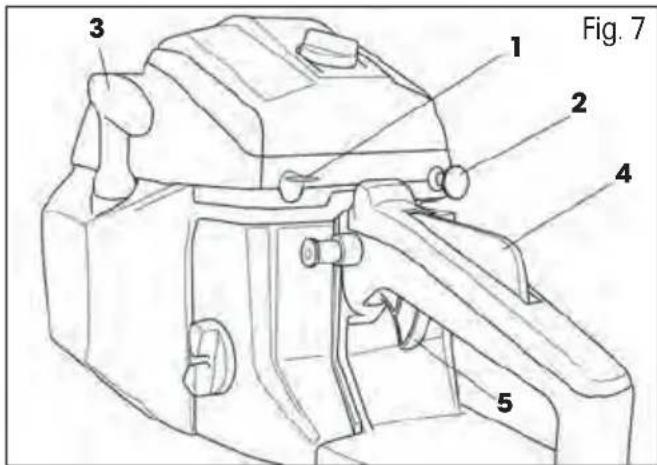
- Set the main power switch to the top position (see Fig. 7, point 1)
- Pull out the choke lever (Fig. 7, point 2) but do not touch the throttle trigger.
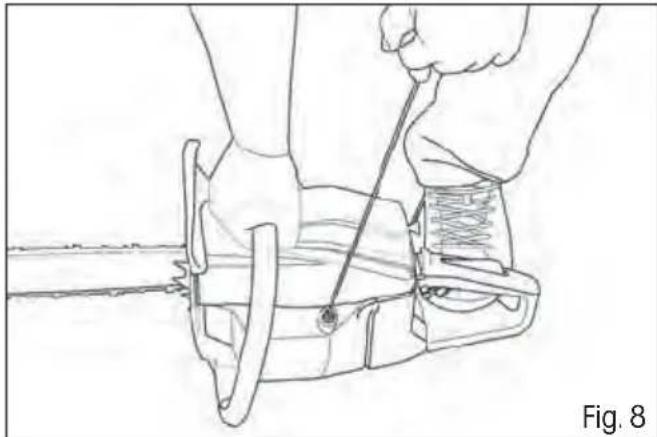
- Place the chain saw flat on the ground so that it is stable and pull on the handle of the starting cord until the engine rotates (the engine will show signs of attempting to start) (Fig. 8).
- At this point, push the choke lever back in (Fig. 7, point 2) and start the engine by repeatedly pulling on the starting cord.
ATTENTION! Spinning the engine for too long with the choke lever pulled out will result in flooding of the engine and problems with starting it up.
- Prior to starting work, leave the engine to warm up for a few minutes to get up to operating temperature.
Starting a warm engine
-
Set the main power switch to the top position (see Fig. 7, point 1)
-
Pull on the handle of the starting cord until the engine starts up (Fig. 8) DO NOT USE THE CHOKE!
ATTENTION! In the event that the fuel in the fuel tank was completely used up, after pouring in fuel, repeat the steps for STARTING A COLD ENGINE.
Speed control
To increase speed, first use the palm of your hand to push down the throttle safety switch (Fig. 7, point 4) and then use your finger to pull on the throttle trigger (Fig. 7, point 5)
To lower the speed, release the throttle trigger
natural_image
Line drawing of a person using a tool to cut a chain or cable, labeled 'Fig. 8' (no text or symbols on the diagram itself)Stopping the engine
Release the throttle trigger (Fig. 7, point 5) and switch the main power switch to the "Stop" position (Fig. 1, point 1).
WARNING
The engine exhaust fumes contain chemical substances that are damaging to health. Never inhale these fumes. Always start the chain saw outdoors.
Checking chain lubrication
ATTENTION! Adhere to safety provisions and prevent the guide bar from coming into contact with the surface of the terrain. Use this power tool safely and maintain a minimum distance of 20 cm from the ground.
Before starting work, check the chain lubrication and the amount of oil in the oil tank. Start the chain saw and hold it above the ground. If you see
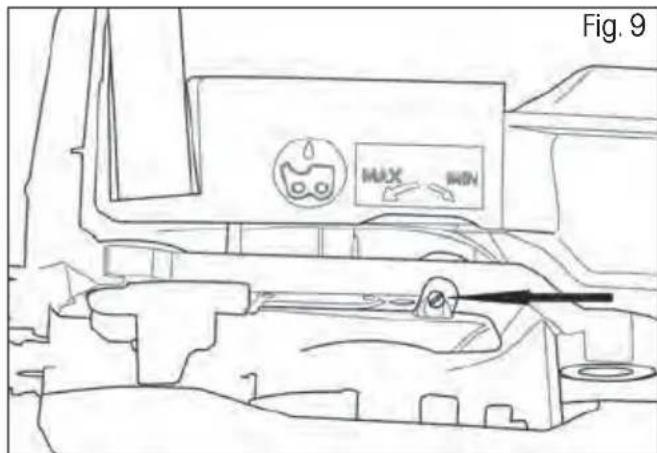
a growing oil stain then chain lubrication is working properly. If there are no oil stains on the ground, adjust the lubrication strength on the underside of the chain saw (Fig. 9)
If even then, the chain is not sufficiently lubricated, clean out the oil outlet (under the sprocket cover), the top chain tensioning hole and the oil lines, or contact an authorised service centre if necessary.
9. ADJUSTING THE CHAIN TENSION
ATTENTION! Due to the effect of higher temperatures, during operation the saw chain has a tendency to lengthen. A longer chain becomes loose and could slide off the guide bar.
* Loosen the sprocket cover fastening nuts.
Make sure that the chain is seated in the guiding groove of the guide bar.
Use a screwdriver to turn the chain tensioning screw (Fig. 5). Turn the tensioning screw until the required tension is achieved (you should lift the chain in the middle of the guide bar in the horizontal position to a height of 3 to 4 mm).
* Firmly tighten the guide bar fastening nuts.
ATTENTION! Do not tension the chain excessively. Excessive tension of a warm chain may result in excessively tension when it cools down.
10. CUTTING
ATTENTION! Before proceeding, please read the chapter "Safety instructions". We recommend that you gain experience by cutting smaller logs. In this way you will also get to know the chain saw.
* Always adhere to safety instructions. The chain saw may only be used for cutting wood.
It is forbidden to cut any other materials. Vibrations and kickback differ for various materials. Do not use the chain saw as a lever for lifting, moving or splitting material. It is forbidden to attach any parts or jigs other than those specified in the technical documentation.
It is not necessary to push the chain saw into the cut. When the engine is running at full speed, push the chain saw down lightly.
If the chain jams in the cut, do not attempt to free it by pulling, rather stretch open the cut using a wedge or crowbar.
Safety brake (protection against kickback)
This chain saw is equipped with an automatic chain brake that, if it works correctly, immediately stops the chain in the event of kickback. It is necessary to check the working order of the chain brake before every use of the chain saw. Run the chainsaw at full speed for 1 - 2 seconds and then tilt the front protective cover. The chain must stop immediately even when the engine is running at high speed. If the chain stops slowly or does not stop at all, please contact an authorised service centre.
It is extremely important to check the working order of the chain brake and the sharpness of the chain before every use to ensure that the necessary level of safety in the event of a kickback is maintained. Removing safety accessories, incorrect maintenance or when using unsuitable guide bars or chains may, in the event of kickback, result in serious injuries.
Felling trees
* Decide about the direction in which the tree will fall, respecting the wind direction, incline angle of the tree and location of the branches, and consider all other factors before cutting.
The area around the tree must be clear, without obstacles, and must enable a stable stance. The escape route must be passable.
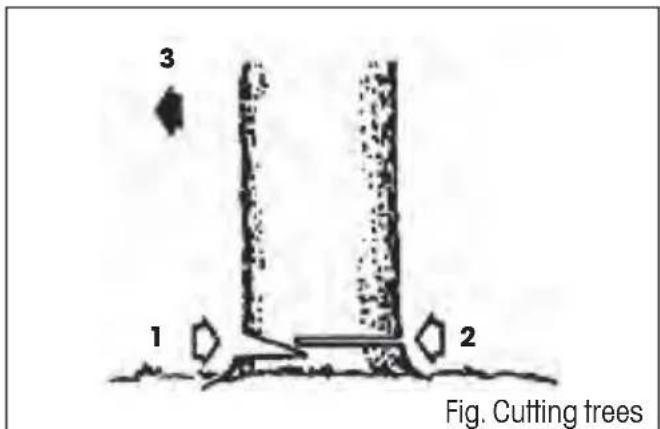
* Cut a wedge into one third of the tree's diameter on the side to which the tree should fall. (see Fig. Felling, point 1)
* From the opposite direction perform a separation cut at a level above the wedge cut. (see Fig. Felling, point 2)
The tree will fall in the direction towards the wedge cut. (see Fig. Felling, point 3)
ATTENTION! When felling trees, inform other people in the area about the potential danger. Felling trees requires experience and we do not recommend performing this task without the necessary experience.
Cutting logs
ATTENTION! Always maintain a stable stance. Do not step on logs.
ATTENTION! Before starting work, check that all components are in their place and that all nuts and bolts are tightened.
The log being cut may roll away. Especially when cutting on a slope, always stand above the log being cut.
* Prevent kickback of the saw by following the instructions in chapter "Safety instructions".
Before starting work, assess the direction of the force causing the cut trunk to bend. The final cut needs to always be done from the opposite side of where the bending force is acting to prevent the guide bar from being clamped inside the cut.
Only carry the chain saw with the engine turned off and the guide bar protected by the protective cover.
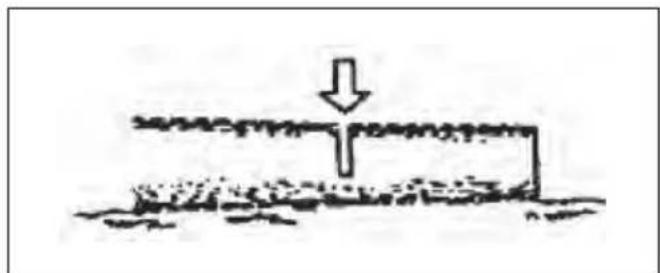
Log lying on the ground
* Cut it halfway through, then roll it over and complete the cut from the other side.
natural_image
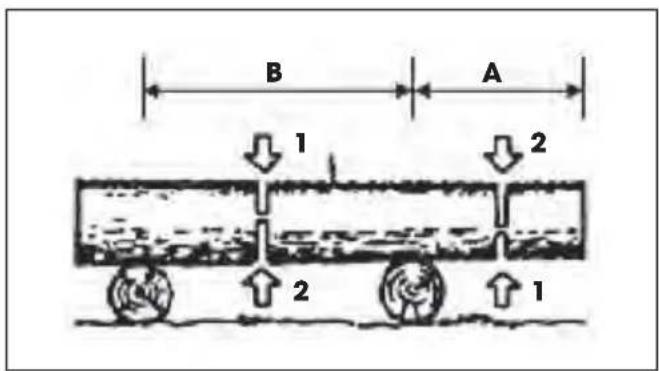
Simple line drawing of a pipe or channel with a downward arrow indicating flow or direction (no text or symbols)Log above the ground
In part "A" make a cut from below to a third of the log and then complete the cut from above. In part "B" make a cut from above to a third of the log and then complete the cut from below.
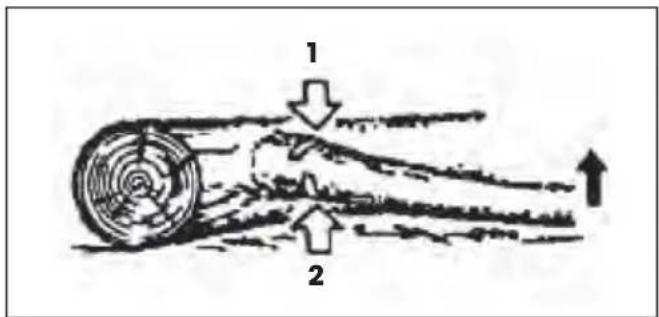
Removing a fallen tree
First find out to which side the branch is bent. Then make the initial cut from the side of the bend and then complete the cut from the opposite side.
ATTENTION! A bent branch may spring up.
11. CLEANING AND MAINTENANCE
ATTENTION! Prior to cleaning, inspecting or repairing the chain saw, its engine must be turned off and cold and the spark plug must be removed to prevent accidentally starting the engine.
Maintenance after every use
Remove the guide bar and use a brush to clean away accumulated sawdust from the entire chain saw. Use a spatula or screwdriver to remove stubborn dirt.
Air fi Iter:
Loosen the screw (Fig 1, point 11) and remove the air filter cover. Take out the filter insert and use a brush to remove the dust. If the filter insert is clogged with dust, dismantle into 2 parts and wash it out in petrol. If you are using compressed air, blow from the inside out.
Lubricating hole:
Take off the guide bar and check the passage of the lubricating hole.
Guide bar:
After taking off the guide bar, remove dust from the grooves and the lubricating hole.
* Other parts:
Check for any oil leaks, loose mounts and damaged main parts, particularly in the location where the handles and the guide bar are mounted. Any identified defects must be repaired before the chain saw is used again.
Cleaning the body of the chain saw
Keep the body of the chain saw clean. When cleaning, use a soft cloth dipped in a soap solution. Use this cloth to meticulously clean the body of the chain saw.
Maintaining the guide bar
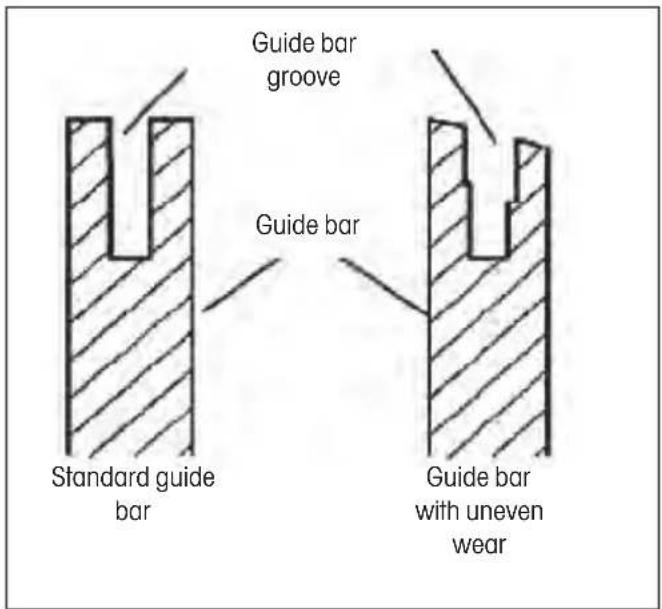
Most problems with the guide bar arise due to uneven wear. Uneven wear occurs mainly as a result of an incorrectly sharpened chain or an incorrectly set depth gauge. When the guide bar is worn out unevenly, the guiding groove is widened (see Picture). The result is a rattling chain and rivets falling off. The chain saw cannot be used for straight cuts. In such a case, replace the guide bar for a new one.
* Always check the condition of the guide bar before sharpening the chain. Using a worn out or damaged guide bar is very dangerous. Using a worn out or damaged guide bar will result in damage to the chain. Cutting with such a power tool will also be much more difficult and demanding.
Normal maintenance of the guide bar
Remove the guide bar from the body of the chain saw.
* Regularly remove sawdust from the guide bar groove. For cleaning use a spatula or a wire.
* Clean oily grooves at the end of every work day.
Replace the guide bar if:
- it is bent or cracked
- its groove is very damaged or worn out

NOTE: To replace the guide bar, follow the instruction contained in this user's manual. You will find the correct guide bar type in the technical specifications.
12. SHARPENING THE SAW CHAIN
Keep the saw chain sharp. Cutting will be signifi cantly faster and most importantly safer. A blunt saw chain increases wear on the sprocket, guide bar, chain and engine. If you need to push on the saw and only sawdust with a few splinters are produced then this means that the chain is blunt.
For this task, we recommend that you contact an authorised service centre
Equipment necessary for sharpening a saw chain
Round fi le as per technical specifi cations
Depth gauge
File guide
Vice
Medium-size fl at fi le
Sharpening the teeth on the chain
Use the file guide set at an angle of 30^
(mark A, see figure).
Set the saw chain tension to the correct level.
* Fasten the guide bar in a vice so that you have the chain in a stable position.

NOTE: Do not fasten the chain itself.
Push the round fi le, inserted in the fi le guide, into the groove between the top plate and the depth gauge on the chain. The chain should be touching both the top plate as well as the depth gauge (see fi gure)

NOTE: File in the middle of the guide bar.
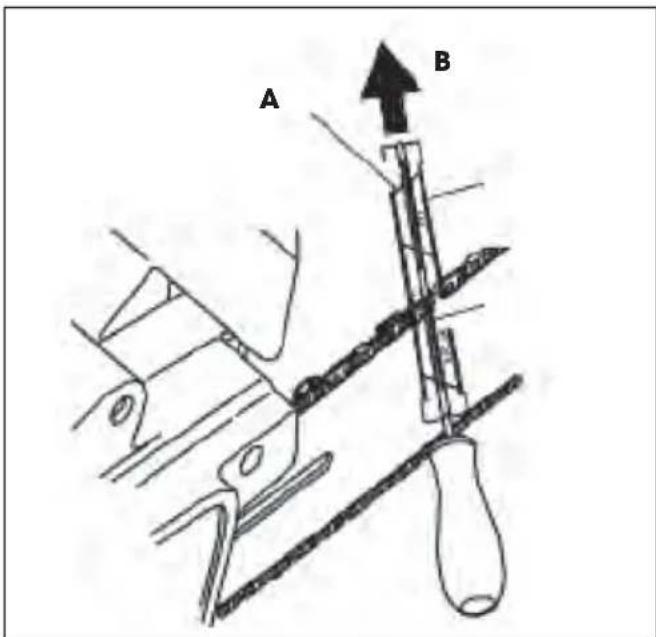

NOTE: In the figure you can see the position of the file guide and the direction for filing the teeth on the left side of the chain.
Place the fi le guide at the required angle (mark A, see fi gure). Check that the mark is at 30° on the fi le guide aligned with the centre of the guide bar. This will ensure that you will fi le at an angle of 30°.
File the tooth in the direction from inside out (in direction B, see figure) until it is sharp. File only in this direction.

NOTE: Two to three passes of the file should be sufficient to sharpen the tooth.
Filing the depth gauge
As a result of sharpening the teeth on the chain, the depth gauge tolerance is reduced. After every second or third sharpening, it is necessary to adjust the depth gauge setting.
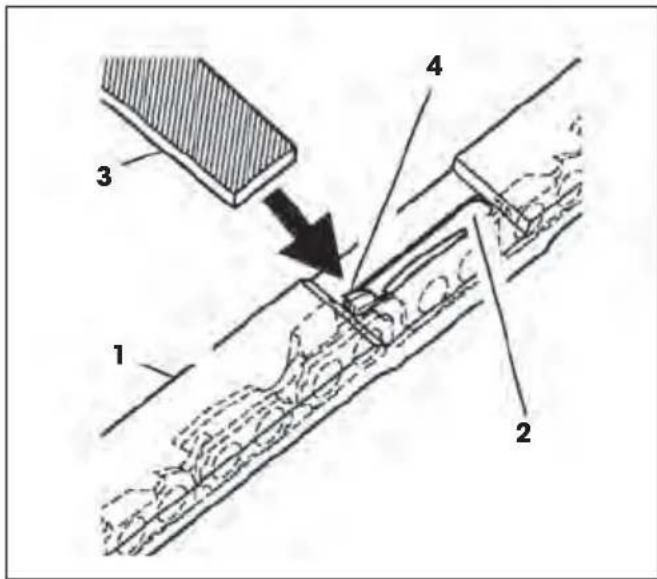
* Place the depth gauge adjustment jig (see fi g., point 1) firmly on the top edge of two teeth. Make sure that the groove of the jig is in the groove of the depth gauge (see fi g., point 2.)
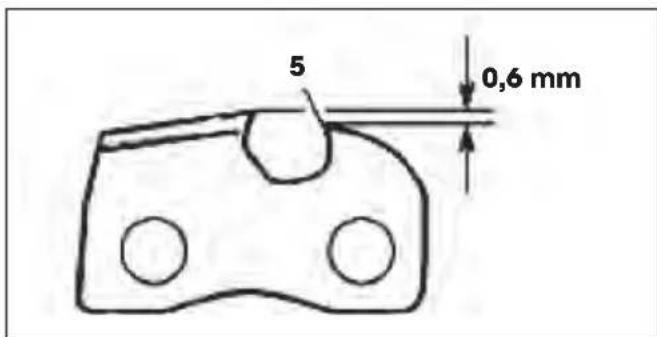
Use a medium-sized fl at fi le (see fi g., point 3). File the depth gauge (see fi g., point 4) to the level of the depth gauge adjustment jig.
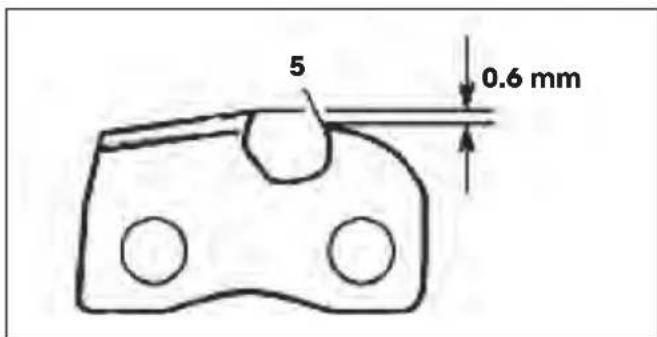
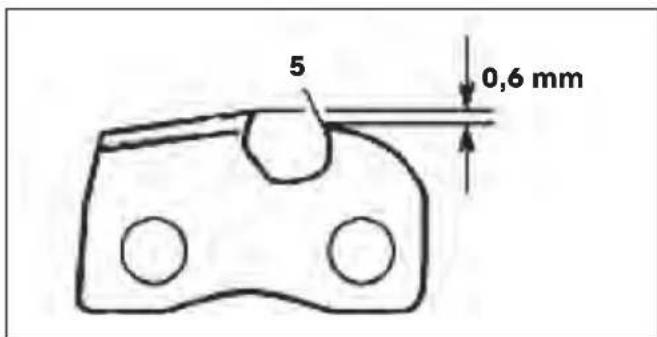
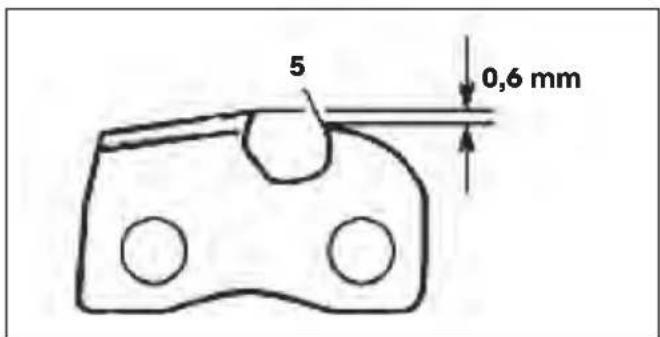
Remove the depth gauge adjustment jig. Using a fl at fi le, round the front edge of the depth gauge (see fi gure). When fi ling, adhere to the prescribed values (see fi g., point 5).

NOTE: After the chain has been sharpened by hand several times, have the saw chain sharpened at an authorised service centre or sharpen it on a special sharpening machine.
This will renew the even sharpness of all teeth.
13. REPLACING THE SAW CHAIN
ATTENTION! When replacing the saw chain, do not clamp the chain saw or the guide bar in a vice.
Always replace the chain if the teeth are excessively worn out and they cannot be sharpened or if the chain snaps. Use only an original spare chain according to the specifications in this user's manual. When replacing the saw chain, always also replace the cogged wheel of the sprocket. This will ensure the correct position of the chain during movement. (Note: You will find the specifications of the correct chain type and the cogged wheel in the technical specifications.)
Loosen and remove the bar guide bolt.
Remove the sprocket cover.
Remove the saw chain.
Wind the new chain around the cogged wheel, then along the top groove of the guide bar and around the guide bar nose.
ATTENTION! Check that the saw teeth are facing in the correct direction. Put on the chain so that the teeth on the top side of the guide bar are facing towards the guide bar nose (see figure).
Before placing the sprocket cover into position, check that the chain tensioning pin is inserted into the adjustment hole on the guide bar.
Put the sprocket cover back on to the body of the chain saw.
Fasten the sprocket cover using the guide bar bolt.
ATTENTION! Only tighten the bolt by hand.
Adjust the tension of the saw chain.
* Tighten the guide bar bolt.
ATTENTION! Check that you have not placed the saw chain on the guide bar in the opposite direction. Otherwise, the chain saw will exhibit excessive vibrations and will not cut.

- MAINTENANCE TABLE
| Please understand that the following maintenance intervals apply only to standard work conditions. In the event that your daily work is more demanding than normal, the maintenance intervals must be shortened correspondingly. | Before every use | After every pause for adding fuel | Every week | When damage of defect arises | As required | |
| The entire machine Check for: leaks, cracks and wear X X | ||||||
| Check: trigger switch, starter, throttle lever and throttle lock lever | Check working order | X | X | |||
| Chain brake Check working order X X | ||||||
| Check performed by an authorised repair centre | X | |||||
| Fuel tank and oil tank Check for: leaks, cracks and wear X X | ||||||
| Fuel filter Inspection and cleaning X | ||||||
| Replacement of filtration element | X | Every 6 months | ||||
| Chain lubrication Check the power output X X | ||||||
| Chain Check for: damage, sharpness and wear | X | X | ||||
| X X | ||||||
| Sharpening: check the fl ing depth | X | |||||
| Guide bar | Check for: damage and wear | X X | ||||
| Cleaning of grooves and oil lines | X | |||||
| Rotation, lubrication of drive wheel and removal of flashes | X | |||||
| Replace | X | |||||
| Sprocket Check for: damage and wear | X | Replacement with every new chain | ||||
| Connecting piece | Check for: damage and wear | X | ||||
| Replace | X | |||||
| Chain retainer | Check for: damage and wear | X X | ||||
| Replace | X | |||||
| All accessible nuts and bolts (excluding bolts on the carburettor) | Check and tighten | X | ||||
| Air filter | Clean | X | ||||
| Replace | X | Every 6 months | ||||
| Ribs of the cylinder and slits in the starter cover | Clean | X | ||||
| Pull cord Check for: damage and wear | X | |||||
| Replace | X | |||||
| Carburettor | Check idling speed (the chain must not turn at idling speed) | X | X | |||
| Spark plug | Check the distance of the electrodes | X | ||||
| Replace | X | Every 6 months | ||||
| Anti-vibration system | Check for: damage and wear | X | ||||
15. TROUBLESHOOTING
| CAUTION: always turn off the unit and disconnect the spark plug before carrying out the checks recommended in the table, except for the cases where the unit needs to be running. | ||
| When all possible causes have been checked and the problem remains unsolved, please contact an authorised service centre. When you identify a problem that is not included in the table, please contact an authorised service centre. | ||
| PROBLEM POSSIBLE CAUSES SOLUTION | ||
| The motor cannot be started or stops several seconds after starting.(Make sure that the switch is in position „I”) | 1. The spark plug is not fi ring2. The motor is fl ooded | 1. Check that the spark plug is fi ring. If the spark plug is not fi ring, repeat the test with a new spark plug (WXL7T).2. Take out the spark plug and pull the starting cord several times. Then reinsert the cleaned spark plug and start without using the choke. |
| The motor starts but does not properly increase its speed or does not run properly at high speeds. | The carburettor must be adjusted. | Contact an authorised service centre to have the carburettor adjusted |
| The motor does not reach full speed and/or emits too much smoke. | 1. Check the petrol - oil mixture.2. Dirty air fi lter.3. The carburettor must be adjusted. | 1. Only use fresh petrol and oil suitable for two-stroke engines.2. Clean it; see instructions in chapter 11.3. Contact an authorised service centre to have the carburettor adjusted |
| The engine starts, works and accelerates, but does not maintain idling speed. | The carburettor must be adjusted. | Contact an authorised service centre to have the carburettor adjusted. |
| The guide bar and chain heat up and smoke while running | 1. Empty chain oil tank2. Chain is overly tensioned3. Lubrication system not working properly | 1. The oil tank must be fi lled up every time when the fuel tank is fi lled.2. Tensioning the chain; see instructions in chapter 5.3. Allow it to run at maximum speed for 15-30 seconds. Stop and check whether oil is dripping from the tip of the guide bar. If there is oil there, the faulty operation may be caused by a loose chain or damaged guide bar. If there is no oil there, contact an authorised service centre |
| The motor starts but the chain is not running.CAUTION: when the motor is running, never touch the chain | 1. Chain brake engaged2. Chain is overly tensioned3. Guide bar and chain installation4. Damaged chain and/or guide bar5. Damaged clutch and/or pinion | 1. Disengage the chain brake; see chapter 7.2. Tensioning the chain; see instructions in chapter 9.3. See instructions in chapter 5.4. See instructions in chapter 11. and 13.5. If necessary, replace it; contact an authorised service centre |
16. TECHNICAL PARAMETERS
Type....FZP 5216 B
Engine 52 cm ^3
Maximum engine power.... 1.9 kW / 8500 rpm
Maximum engine speed with cutting tool 10000 rpm
Maximum engine speed when idling....3.000 rpm
Guide bar length....405 mm
Cutting length 345 mm
Chain pitch 0.325 inch
Guiding groove width 1.5 mm
Number of drive chain links....64
File diameter 4 mm
Weight (without the guide bar and chain) 5.20 kg
Fuel mix (petrol : oil)....25:1
Fuel tank capacity 550 ml
Oil tank capacity....240 ml
Chain lubricating oil ....total-loss lubrication oil
Chain lubrication system....adjustable automatic pump
Sound pressure level.....LpA: 101.9 dB(A)
Guaranteed emission level of sound power ....LwA: 113 dB(A)
Vibration* – front handle 4.795 m/s2
Vibration* – rear handle....5.247m/s2
* If you find that the vibrations being transferred to the handle have become noticeably worse compared to the condition when the chain saw was new, check the wear on the silentblocks (rubber coated mounting elements) and if necessary contact an authorised service centre to have them replaced.
⚠️ ATTENTION! Working with a chain saw with an incorrectly working vibration shock absorption system may lead to health problems.
17. DISPOSAL
INSTRUCTIONS AND INFORMATION REGARDING THE DISPOSAL OF USED PACKAGING MATERIALS
Dispose of used packaging material at a site designated for waste in your municipality.
The machine and its accessories are manufactured from various materials, e.g. metal and plastic.
Take damaged parts to a recycling centre. Inquire at the relevant government department.

This product meets all the basic requirements of EU directives that apply to it.
Changes in the text, design and technical specifications may be made without prior notice and we reserve the right to make these changes.
User s manual in the original language.
18. DECLARATION OF CONFORMITY
Manufacturer:
Fast ČR, a.s.,
Černokostelecká 2111, 100 00 Praha 10, Czech Republic
VAT no: CZ26726548
Product / brand: PETROL CHAIN SAW / FIELDMANN
Type / model: FZP 5216 B
1.9kW, ^3 52cm
The product is inline with directives and regulations listed below:
Electromagnetic Compatibility 2014/30/EU
machinery for forestry EN ISO 11681-1:2011
safety of machinery 2006/42/EC
RoHS 2011/65/EU
CE
Place of issuance: Prague Name: Ing. Zdeněk Pech
Chairman of the Board
Date of issuance: 1.5.2018 Signature:

Řetězová pila
NÁVOD K OBSLUZE
natural_image
Technical line drawing of a mechanical device with no visible text or symbols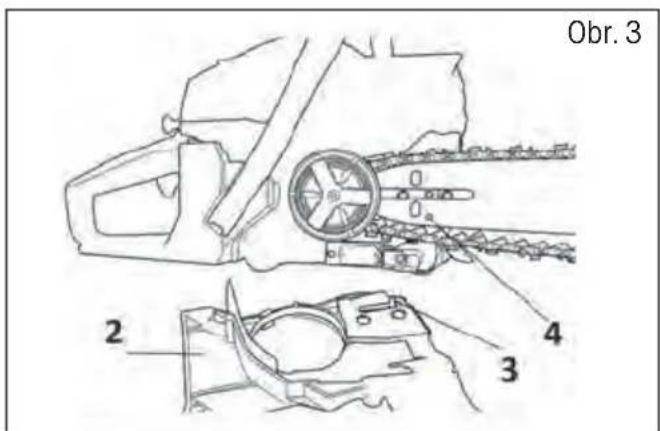
natural_image
Architectural line drawing of a building complex with an arrow indicating upward motion (no text or symbols)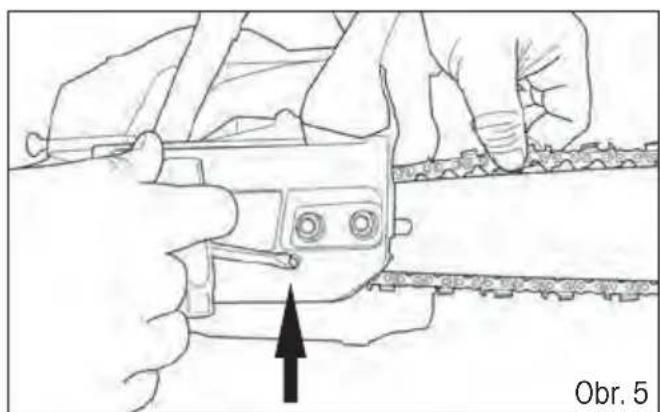
natural_image
Illustration of hands using a tool to adjust or install a mechanical component, with an arrow indicating the process (no text or symbols present)6. PALIVO A OLEJ PRO MAZÁNÍ ŘETĚZU
7. PŘÍPRAVA NA POUŽITÍ

natural_image
Line drawing of a person using a tool to cut a chain (no text or symbols)Zastavení motoru
natural_image
Simple line drawing of a pipe or channel with an arrow indicating downward flow (no text or symbols)Poleno nad zemí
13. VÝMĚNA PILOVÉHO ŘETĚZU
Brzda refaze (Obr. 1, bod 9)....66
natural_image
Technical line drawing of a mechanical component with no visible text or symbols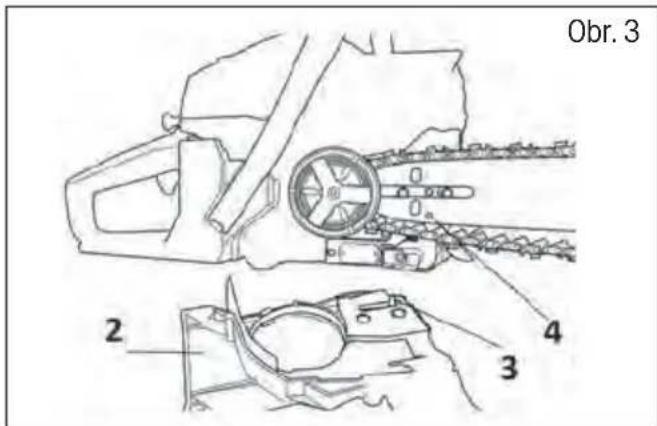
natural_image
Architectural line drawing of a building complex with an arrow indicating direction (no text or symbols)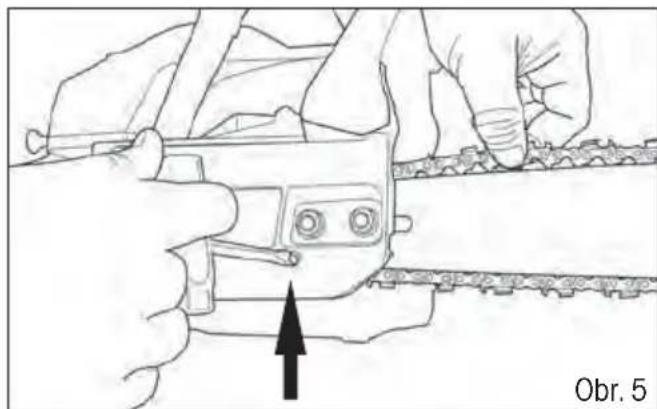
natural_image
Illustration of hands using a tool to adjust or install a mechanical component, with an arrow indicating the process (no text or symbols present)6. PALIVO A OLEJ NA MAZANIE REŠAZE
7. PRÍPRAVA NA POUŽITIE

Brzda ref'aze (Obr. 1, bod 9)
natural_image
Line drawing of a person using a tool to cut a chain (no text or symbols)Zastavenie motora
Uvoľnite páčku ovládania plynu (Obr. 7, bod 5) a prepníte hlavný vypínač do polohy „Stop“ (Obr. 1, bod 1).
VAROVANIE
natural_image
Simple line drawing of a pipe or channel with an arrow indicating downward flow (no text or symbols)Poleno nad zemou
V časti „A“ urobte rez zdola do tretiny polena a potom rez dokončite zhora. V časti „B“ urobte rez zhora do tretiny a potom rez dokončite zdola.
13. VÝMENA PÍLOVEJ REŤAZE
natural_image
Line drawing of a mechanical device with a tool inserted, labeled 'Ábra 2' (no other text or symbols)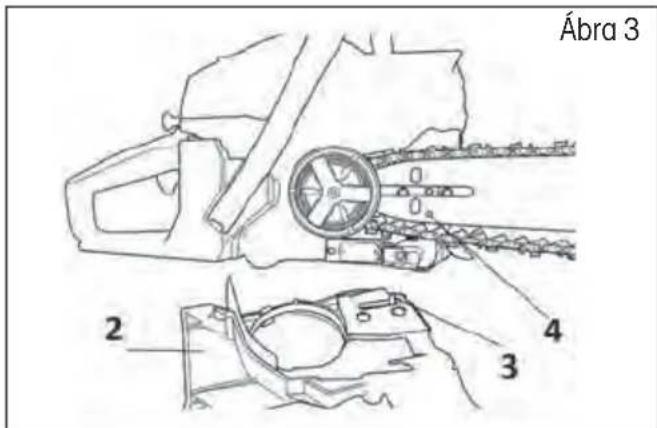
6. ÜZEMANYAG ÉS LÁNCKENŐ OLAJ
natural_image
Line drawing of hands using a tool to adjust or install a mechanical component, labeled 'Ábra 8' (no text or symbols on the diagram itself)A motor megállítása
natural_image
Simple line drawing of a pipe or channel with a downward arrow indicating flow or direction (no text or symbols)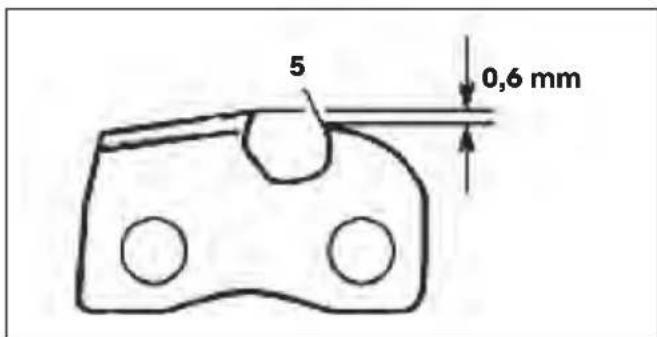
13. A FÜRÉSZLÁNC CSERÉJE
natural_image
Line drawing of a mechanical device with a tool and gear assembly (no text or symbols)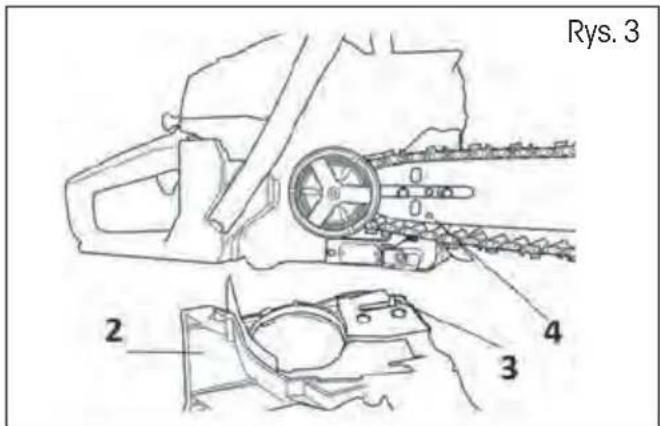
natural_image
Architectural cross-section diagram showing structural layers and a highlighted feature (no text or symbols)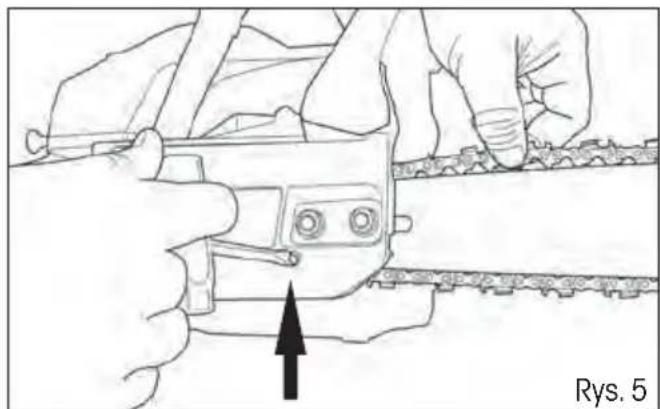
natural_image
Illustration of hands using a tool to adjust or install a mechanical component, with an arrow indicating the process (no text or symbols present)6. PALIWO I OLEJ DO SMAROWANIA ŁAŃCUCHA
natural_image
Line drawing of a person using a tool to cut a chain (no text or symbols)natural_image
Simple line drawing of a pipe or channel with a downward arrow indicating flow or direction (no text or symbols)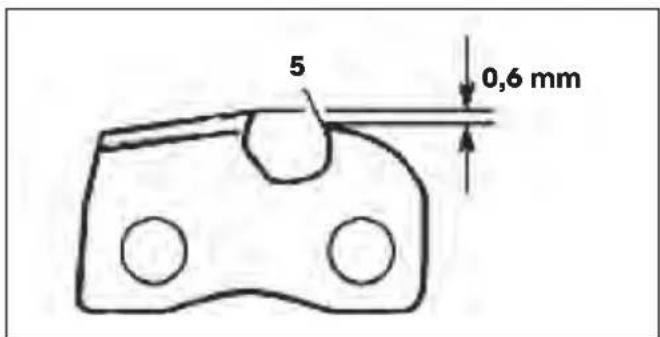

Verižno žago med delom vedno držite z obema rokama.

natural_image
Line drawing of a mechanical device with a tool inserted, labeled 'Slika 2' (no other text or symbols)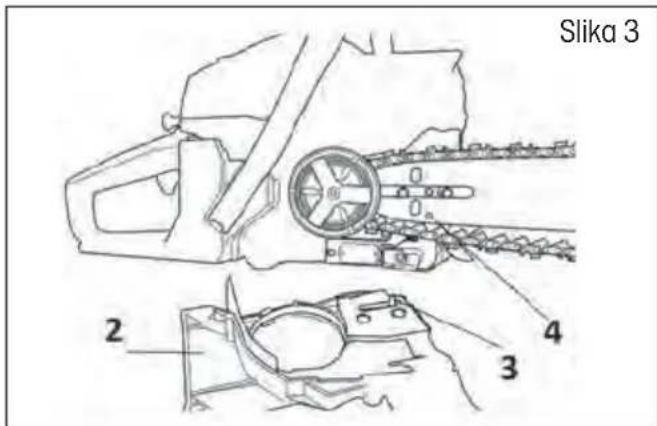
natural_image
Architectural line drawing of a building complex with an arrow indicating direction (no text or symbols)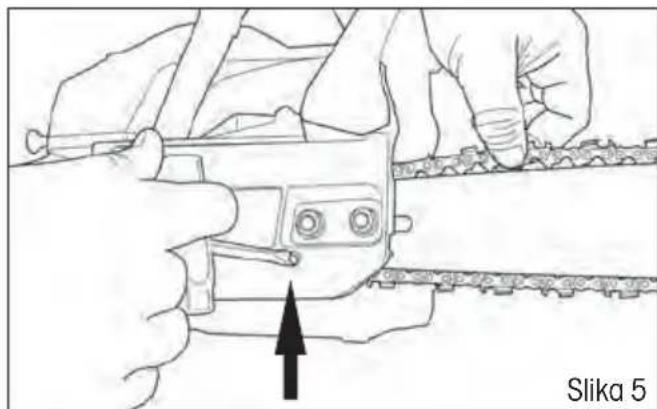
natural_image
Illustration of hands using a tool to adjust or install a mechanical component, with an arrow indicating the process (no text or symbols present)6. GORIVO IN OLJE ZA MAZANJE VERIGE
Točenje olja v posodo za olje
⚠️ POZOR! Novo verigo morate približno 5 minut utekati. V tej fazi je zelo pomembno, da je zagotovljeno zadostno mazanje. Po utekanju preverite napetost verige in jo po potrebi prilagodite.
natural_image
Line drawing of a person using a tool to cut a chain or cable (no text or symbols present)Zaustavitev motorja
Sprostite ročico plina (Slika 7, točka 5) in preklopite stikalo za vklop v položaj "Stop" (Slika 1, točka 1).

OPOZORILO
natural_image
Simple line drawing of a pipe or channel with a downward arrow indicating flow or direction (no text or symbols)Deblo, ki je nad tlemi
13. MENJAVA VERIGE
⚠️ POZOR! Pri menjavi verige nikoli ne vpenjajte verižne žage ali meča v primež.
Home & Garden Performance
Model /Modell /Modelis:
Conditions of guarantee
This product is warranted for the period of 24 months from the date of purchase to the end-user. Warranty is limited to the following conditions. Warranty is referred only to the customer goods using for common domestic use. The claim for service can be applied either at dealer's shop where the product was bought, or at below mentioned authorized service shops. The end-user is obligated to set up a claim immediately when the defects appeared but only till the end of warranty period. The end-user is obligated to cooperate to certify the claiming defects. Only completed and clean (according to hygienic standards) product will be accepted. In case of eligible warranty claim the warranty period will be prolonged by the period from the date of claim application till the date of taking overthe product by end-user, or the date the end-user is obligated to take it over. To obtain the service under this warranty, end-user is obligated to certify his claim with duly completed following documents: receipt, certificate of warranty, certificate of installation... This warranty is void especially if apply as follows: ■ Defects which were put on sale. ■ Wear-out or damage caused by common use. ■ The product was damaged by unprofessional or wrong installation, used in contrary to the applicable instruction manual, used in contrary to legal enactment and common process of use or used for another purpose which has been designed for. ■ The product was damaged by uncared-for or insufficient maintenance. ■ The product was damaged by dirt, accident of force majeure (natural disaster, fire, flood, ...). ■ Defects on functionality caused by low duality of signal, electromagnetic field interference etc. ■ The product was mechanically damaged (e.g. broken button, fall...). ■ Damage caused by use of unsuitable media, fillings, expendable supplies (batteries) or by unsuitable working conditions (e.g. high temperatures, high humidity, quakes,...). ■ Repair, modification or other failure action to the product by unauthorized person. ■ End-user did not prove enough his right to claim (time and place of purchase). ■ Data on presented documents differs from data on products. ■ Cases when the claiming product can not be identified according to the presented documents (e.g. the serial number or the warranty seal has been damaged).
servis.brno@fastcr.cz
www.fastcr.cz
Fast Plus, a. s.
Na Pántoch 18
SK 831 06 Bratislava
Slovenská republika
Tel.: +421/ 249 105 811
Fax: +421/ 249 105 810
fastplus@fastplus.sk
www.fastplus.sk
Jótállási jegy
natural_image
Green Fieldmann chain saw with black handle and brand logo (no text or symbols on the instrument itself)
FIELDMANN®
Home & Garden Performance

- FIELDMANN®
- Chain saw
- USER'S MANUAL
- CONTENTS
- GENERAL SAFETY INSTRUCTIONS
- Important safety notice
- Packaging
- EXPLANATION OF INSTRUCTION LABELS ON THE MACHINE
- SAFETY INSTRUCTIONS
- Before using the power tool
- Safety of the operator, work equipment and clothing
- Instructions for handling fuel
- MACHINE DESCRIPTION AND INCLUDED CONTENTS
- Description of the power tool (see Fig. 1)
- INSTALLING THE BUMPER SPIKES, GUIDE BAR AND CHAIN
- Installing the bumper spikes
- Installing the guide bar and chain
- FUEL AND CHAIN LUBRICATING OIL
- Filling the oil tank
- Mixing the fuel mix
- Storing fuel
- PREPARING FOR OPERATION
- Chain brake (Fig. 1, point 9)
- Checking the working order of the brake
- TURNING THE CHAIN SAW ON AND OFF
- WARNING
- Starting a cold engine
- Starting a warm engine
- Speed control
- Stopping the engine
- Checking chain lubrication
- ADJUSTING THE CHAIN TENSION
- CUTTING
- Safety brake (protection against kickback)
- Felling trees
- Cutting logs
- Log above the ground
- Removing a fallen tree
- CLEANING AND MAINTENANCE
- Maintenance after every use
- Cleaning the body of the chain saw
- Maintaining the guide bar
- Normal maintenance of the guide bar
- SHARPENING THE SAW CHAIN
- Equipment necessary for sharpening a saw chain
- Sharpening the teeth on the chain
- Filing the depth gauge
- REPLACING THE SAW CHAIN
- TROUBLESHOOTING
- TECHNICAL PARAMETERS
- DISPOSAL
- INSTRUCTIONS AND INFORMATION REGARDING THE DISPOSAL OF USED PACKAGING MATERIALS
- DECLARATION OF CONFORMITY
- Manufacturer:
- Řetězová pila
- NÁVOD K OBSLUZE
- PALIVO A OLEJ PRO MAZÁNÍ ŘETĚZU
- PŘÍPRAVA NA POUŽITÍ
- Zastavení motoru
- Poleno nad zemí
- VÝMĚNA PILOVÉHO ŘETĚZU
- PALIVO A OLEJ NA MAZANIE REŠAZE
- PRÍPRAVA NA POUŽITIE
- Brzda ref'aze (Obr. 1, bod 9)
- Zastavenie motora
- VAROVANIE
- Poleno nad zemou
- VÝMENA PÍLOVEJ REŤAZE
- ÜZEMANYAG ÉS LÁNCKENŐ OLAJ
- A motor megállítása
- A FÜRÉSZLÁNC CSERÉJE
- PALIWO I OLEJ DO SMAROWANIA ŁAŃCUCHA
- GORIVO IN OLJE ZA MAZANJE VERIGE
- Točenje olja v posodo za olje
- Zaustavitev motorja
- OPOZORILO
- Deblo, ki je nad tlemi
- MENJAVA VERIGE
- ⚠️ POZOR! Pri menjavi verige nikoli ne vpenjajte verižne žage ali meča v primež.
- Model /Modell /Modelis:
- Conditions of guarantee
- Jótállási jegy
Brand : Fieldmann
Model : FZP 5216-B
Category : Saw