
XENON C 133 USB - Hi-Fi ECG - Free user manual and instructions
Find the device manual for free XENON C 133 USB ECG in PDF.


| Product Type | Hi-Fi Mini System |
| Brand | ECG |
| Model | XENON C 133 USB |
| Dimensions (W x H x D) | 300 x 150 x 250 mm (approx.) |
| Weight | 3.5 kg (approx.) |
| Power Supply | AC 230V, 50Hz |
| Power Consumption | 30 W (max) |
| Disc Playback | CD, CD-R/RW, MP3 CD |
| USB Playback | MP3, WMA files via USB-A port |
| Radio Tuner | FM (87.5 - 108 MHz) |
| Preset Stations | 20 FM presets |
| Audio Output | 2 x 15 W RMS (stereo) |
| Remote Control | Yes, included (battery CR2025) |
| Additional Inputs | Auxiliary (3.5 mm), Headphone (3.5 mm) |
| Display | LCD with backlight |
| Cleaning | Wipe with a soft, dry cloth |
| Safety | Do not expose to moisture or liquids; do not open the device |
| Repairability | Contact authorized service center for repairs |
| Included Accessories | Remote control, instruction manual, FM antenna |
Frequently Asked Questions - XENON C 133 USB ECG
User questions about XENON C 133 USB ECG
0 question about this device. Answer the ones you know or ask your own.
Ask a new question about this device
Download the instructions for your Hi-Fi in PDF format for free! Find your manual XENON C 133 USB - ECG and take your electronic device back in hand. On this page are published all the documents necessary for the use of your device. XENON C 133 USB by ECG.
USER MANUAL XENON C 133 USB ECG
natural_image
Three black audio/video speakers with speaker holes and a digital display (no visible text or symbols)XENON C 133 USB
CD MIKROSYSTÉM
NÁVOD K OBSLUZE
CD MIKROSYSTÉM
NÁVOD NA OBSLUHU
MINIWIEŻA CD
INSTRUKCJA OBSŁUGI
CD MIKRO HIFI RENDSZER
HASZNÁLATI ÚTMUTATÓ
CD-MIKROSYSTEM
BEDIENUNGSANLEITUNG
CD MICROSYSTEM
INSTRUCTION MANUAL
CZ
SK
PL
HU
DE
EN
OBSAH
BEZPEČNOSTNÍ UPOZORNĚNÍ 3
POPIS PŘÍSTROJE....4
POPIS DÁLKOVÉHO OVLADAČE....5
ZAPOJENÍ......6
POUŽÍVÁNÍ PŘÍSTROJE....6
PÉČE A ÚDRŽBA 8
ŘEŠENÍ POTÍŽÍ......9
TECHNICKÉ ÚDAJE 10
BEZPEČNOSTNÍ UPOZORNĚNÍ

Poslech se sluchátky
Levý reproduktor Pravý reproduktor
SK

HU

SAFETY INFORMATION......48
DESCRIPTION 49
REMOTE CONTROLLER....50
INSTALLATION 51
USING THE SYSTEM 51
CARE AND MAINTENANCE....53
TROUBLESHOOTING 54
TECHNICAL SPECIFICATIONS....55
SAFETY INFORMATION
Read carefully and keep for future use!
- Read this manual thoroughly before connecting and using the device. Keep this manual for future reference.
- Do not open the device box. There are no elements inside that can be configured by the user. Have a qualified service technician perform repairs on the device.
- Turn the equipment off when you are not using it. If you do not plan on using the device for a longer period of time, turn it off, unplug the device and remove the disc. (The plug enabling the complete disconnection from the power network should be easy to access for everyday use.)
- Not using the system for a longer period of time can result in a defect or impaired functionality. We recommend starting the system from time to time.
- Do not place the system in areas exposed to heat sources or direct sunlight.
- Do not install the system in areas exposed to moisture or rain or in a dusty area.
- The device should not be exposed to dripping or splashing water and objects containing liquids should not be placed upon it, for example vases.
- Place the device on a horizontal, flat and solid surface with good ventilation. Do not cover the air vents. Doing so may damage the device by overheating.
- The position of the power cord should not permit walking over the cord or being damaged, for example, by placing heavy objects on the cord.
- Refer to a qualified repair shop for replacing a damaged power cord.
- Do not expose batteries to excessive temperatures, e.g. direct sunlight, fire etc.
- Batteries shall only be replaced with ones of the same type. Otherwise there is a risk the system may explode.
- The sides of the system become warm after operating for a longer period of time. This is not a defect.
- Use a soft and clean towel to clean the outer surface. Do not use chemicals or cleaning detergents.
- Use only accessories recommended by the manufacturer.

The lightning symbol warns the user about dangerous voltage inside the device box, which could cause injury by shock upon coming into contact with the internal elements of the device.
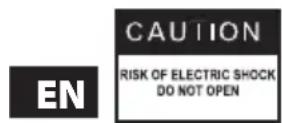
To reduce the risk of fi re or electric shock, do not remove the cover of the device. Have a qualified service technician perform repairs on the device.
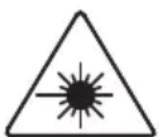
This symbol represents that the device is classified under the class 1 laser equipment group. Harmful radiation may result in the laser ray coming into direct contact with the human body.
DESCRIPTION
VIEW FROM ABOVE: FRONT PANEL:
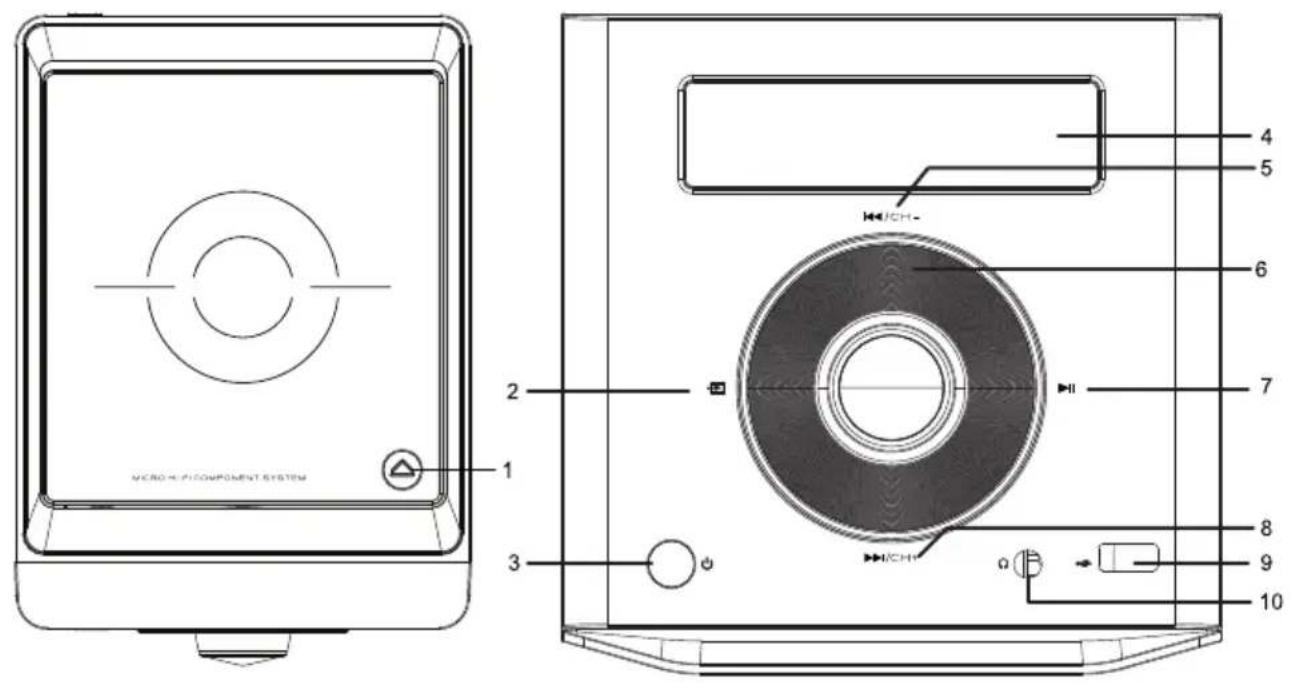
- Opening the disc compartment
- Signal source selection
- On/Off switch
- Display
- Back / Channel -
- Volume control
- Play/pause
- Forward / Channel +
- USB port
- Headphones jack
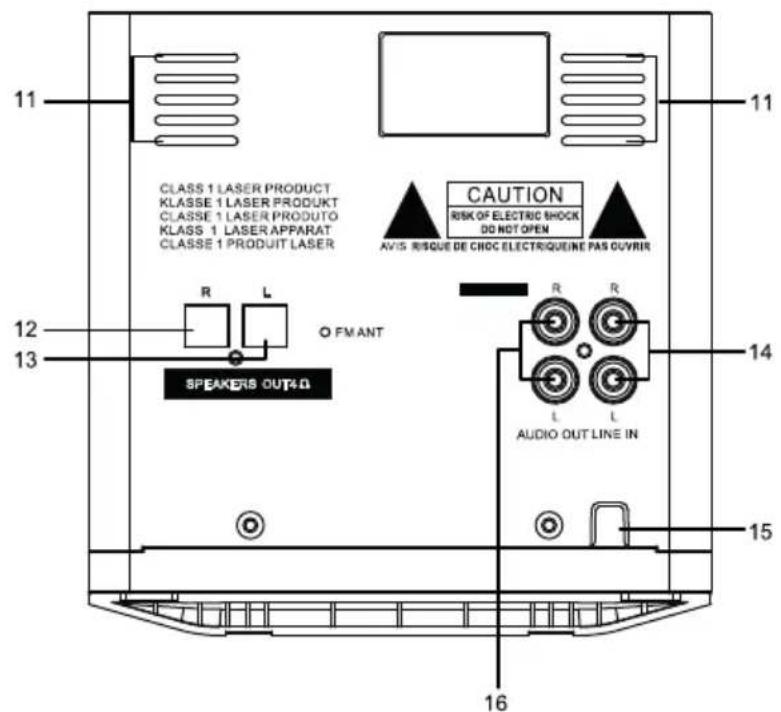
- Air vents
- Right speaker out
- Left speaker out
- Line in (CINCH)
- Power cord
- Line out (CINCH)
BACK PANEL:

Listening with headphones
Reduce the volume before connecting headphones to the headphone jack and then increase the volume as necessary. No sound comes from the speakers when headphones are connected.
WARNING: Excessive acoustical pressure from headphones can cause hearing damage.
EN
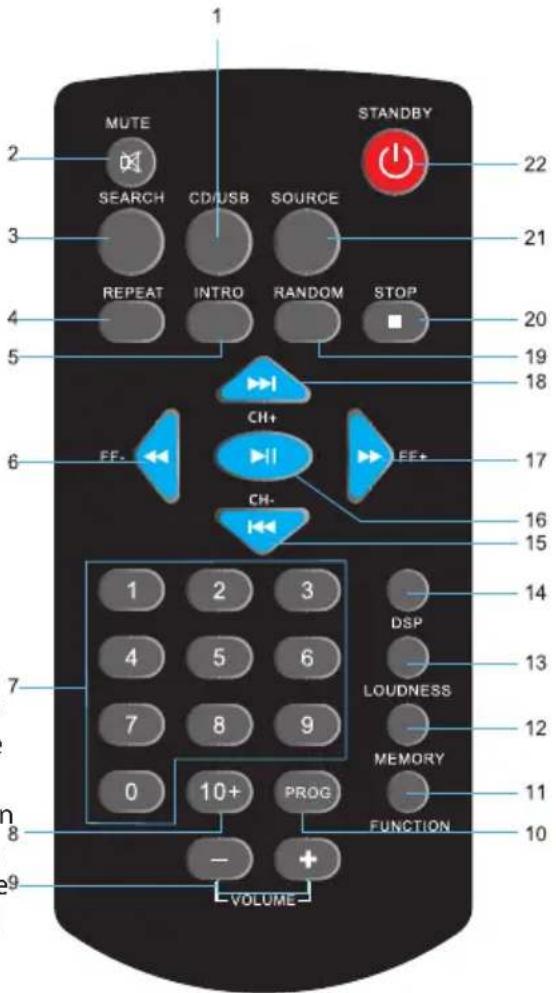
REMOTE CONTROLLER
- CD/USB: Press to select CD or USB.
- MUTE: Sound On/Off.
- SEARCH: Pressing the button once automatically searches for radio stations.
- REPEAT: Pressing the button once enables the track repeat feature. Pressing the button again cancels the repeat action and returns to normal playback.
- INTRO: Pressing the button plays the first 15 seconds of each track. Pressing the button again cancels the INTRO feature.
-
REV: Rewinds the track back in 1 second intervals.
-
0-9 (Numerical buttons): In CD/USB mode, use these buttons to select the track you wish to play.
-
+10 (Numerical buttons): In CD/USB mode, use this button to select the tracks with a number higher than 10 (example: for track 12, press +10 and then 2).
-
-/+: You can use these buttons on the remote controller or the VOLUME control on the system to adjust the volume.
-
PROG: You can program up to 42 tracks that will play in the sequence you choose. With no media being played, press the PROG button so that "P01" appears on the display. Use the numerical buttons to enter the track number you wish to program as track "P01", and press PROG to confirm. When "P02" appears, select the next track and press PROG to confirm. Select all tracks of the playlist this way. When the program is complete, start program playback by pressing ▶. Press ■TOP to stop playback.
-
FUNCTION: Press the button and choose whether to adjust bass, treble or volume, and set the desired level with the +/- buttons.
-
MEMORY: Press MEMORY to save an FM radio station, found via manual search, to the list of favourite stations.
-
LOUDNESS: Press this button to achieve a louder sound, press again to return to standard volume.
-
DSP: This button allows the user to toggle between sound options Jazz, Rock, Pop, Class and OFF (no effect).
-
☐: Jump back to previous fi le (multimedia mode).
-
Playing or pausing playback.
-
FWD: Fast forward.
-
📄H+: Jump to next file.
-
RANDOM: Random sequence playback.
-
☐OP: Stops playback.
-
SOURCE: Press to select the source – CD/USB/Radio.
-
⏻ STANDBY: Press this button to switch the system to standby mode, press again to awake.
INSTALLATION
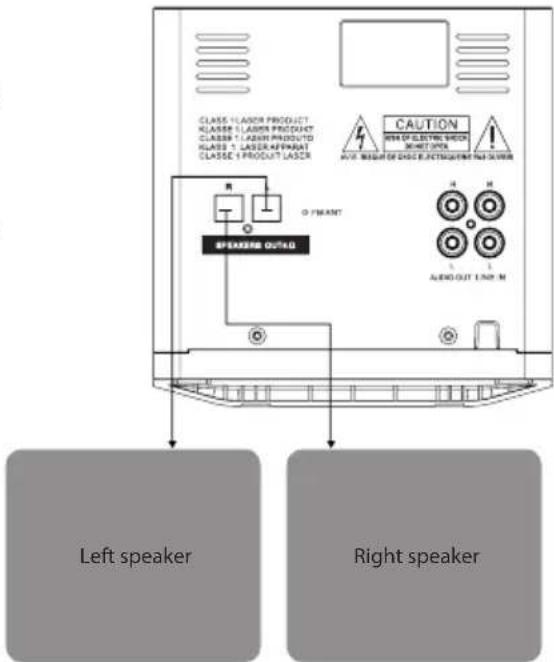
Connecting the speakers
Connect the speaker cables to the speaker terminals on the back panel of the system, as shown in the illustration.
Start
Before starting the system, check that all connections are properly made.
Then plug in the power cord into the socket.
Press ☐ on the front panel to start the system.
USING THE SYSTEM
Playing CDs
To play a CD, open the disc compartment by pressing 合. Insert a CD and close the compartment. The CD will load and playback starts automatically.
Press to switch the system into standby mode after the CD playback finishes.
CD playback features
Seek within the track:
- During playback, press ◀/▶ on the remote controller. Press ▶ once you reach the point from where you wish to resume listening.
- Press ◀◀▶to increase the seek speed (three speeds available).
Jumping to the next track/fi le:
- Press ▶CH+ / ◀CH- on the system or remote controller to search for the desired tracks.
Repeated playback
Repeating a track:
- Press REPEAT once on the remote controller during playback. will begin to flash on the display.
Repeat disc playback: - Press REPEAT twice on the remote controller during playback. will light up on the display.
End repeated playback: - Press REPEAT again during playback. The symbol will disappear and normal playback will resume.
Random playback
- Press RANDOM on the remote controller during playback. RAN will appear on the display and the tracks will play in random order.
- Press RANDOM again to stop random playback. Track playback in normal order will resume.
Note:
The following restrictions apply to playing MP3/WMA discs:
- File names should not have special characters, for example / : * ? <> etc.
- If the disc contains more than 1000 fi les, only the fi rst 999 fi les will be shown.
Creating a custom playlist
You can create a playlist containing up to 99 tracks.
- Insert the CD and wait for it to load.
- With no media being played, press the PROG button on the remote controller, so that "P01" appears on the display.
-
Use the numerical buttons or the ◀◀/▶◀ buttons on the remote controller to enter the number of the track you wish to program as the first track, and press PROG to confirm.
-
When "P02" appears, enter the next track for your playlist and press PROG to confirm.
- Repeat steps 2 through 4 to program the remaining tracks on the playlist.
- When your playlist is complete, press PLAY to play your custom playlist.
- To repeat the program, press the REPEAT button during playback.
- Press STOP to stop the playback.
Note: The program will be deleted once the playlist finishes or is stopped.
Listening to the radio
An integrated FM antenna is found on the back panel of the system. For best reception, remember to unwind the antenna.
- Press SOURCE on the remote controller or ➤ on the front panel while the system is ON. The system will switch to FM tuner mode.
Radio station auto-search
Via remote controller:
- Press SEARCH on the remote controller. The system automatically searches and saved available FM stations.
Via the front panel:
- Press ▶ on the front panel. The system automatically searches and saved available FM stations.
Radio station manual search
Via remote controller:
- Hold ◀◀/▶ on the remote controller until you find the station of your choice. Press MEMORY and via the numerical buttons, select the pre-set number under which the station should be saved, and press MEMORY again to confirm.
Via the front panel:
- Press ▶▶CH+ / ◀◀CH- to select the next/previous saved station.
Exiting FM tuner mode
- Press SOURCE on the remote controller or ➕ on the front panel to exit FM tuner mode. Pressing the button again toggles between CD playback and radio.
Notes:
- Adjust the antenna to the position with the best reception.
• After adjusting the antenna to the best position, you can search for more radio stations. - The station frequency cannot be entered directly using the numerical buttons.
- You can store up to 40 radio stations into the system memory.
Listening to tracks from a USB device
You can play media files saved to a USB device by connecting a USB memory device to the USB port of the system.
- Plug the USB memory device to the USB port on the front panel of the system.
- Press CD/USB on the remote controller to select the USB function.
- Playback will start once the contents are loaded from the USB device.
Note: Depending on the capacity of the memory device, the loading process can take longer than a minute. Loading large memory devices can take even longer.
- Select the track to play via ◀/▶ on the remote controller or ◀/▶ on the system.
- You can also use the numerical buttons on the remote controller to select the track of your choice.
- The selected track will automatically begin to play.
- Press STOP to stop playback.
Notes:
- Do not remove the USB device while the system is ON.
-
Back up your data on a USB memory device to prevent losing your data.
-
This device does not support the NTFS fi le system. Make sure the memory device uses the FAT or FAT32 fi le system.
- Memory cards with a maximum number of 999 saved files are supported.
- This device is not capable of reading data directly from your mobile phone.
- The memory device may not be recognized if a USB extension cable or hub is used.
- The device does not support external hard drives and encrypted devices.
Listening to an MP3 player connected via LINE IN
- Use the included cable. Plug the 3.5 mm jack into your MP3 player and plug the CINCH connectors on the other end of the cable into the respective (red and white) LINE IN connectors on the back side of the system.
- Press SOURCE on the remote controller or → on the front panel while the system is ON to select LINE IN.
- Use the controls of your MP3 player to control the playback.
Note: Make sure the volume is adjusted accordingly on both devices.
Amplifi er connection
- Connect the LINE OUT connectors (red and white) on the back panel of the system to the LINE IN connectors (red and white) on your amplifier. Use a CINCH cable with connectors (not included).
CARE AND MAINTENANCE
Cleaning and maintenance
- Unplug the system before cleaning. Do not use liquid cleaners or spray products for cleaning.
- There are no elements inside the system that the user could repair himself. By removing the cover, you expose yourself to dangerous voltage or other risks. Have all service operations carried out by a qualified repair shop.
Moisture condensation
- Condensation can affect the proper functionality of the system in the following cases:
- When suddenly moving the system from a cool area to a warm area and vice versa.
- When the system is used in a room, where heating was just activated, or when cold air from the air conditioning unit is directed towards the system.
- When you move the system from an air conditioned room to a moist and warm environment.
- In a moist room.
- If moisture condensation affects proper system functionality, remove the disc, plug in the system, start and leave to get used to the environment for 2 to 3 hours. Afterwards, the system is warmed up and the moisture will vaporize. Leaving the system plugged in limits problems with moisture condensation to a minimum.
Disc care
- Do not touch the media side of the disc.
- Do not put labels or stickers on discs.
- Do not use solvents, anti-static sprays or benzene-based cleaners to clean discs.
- Do not store discs in areas exposed to heat sources and in dusty or moist areas.
- Place the discs vertically in their original cases. Stacking discs on top of one another can damage the discs.
EN
TROUBLESHOOTING
Before bringing the device to the repair centre, please check the following table.
| Problem Possible cause Solution | ||
| No power The power | supply is not properly connected to the socket | Check the proper connection of the power supply. |
| The remote controller does not work | The batteries are dead Replace the batteries with a new set. | |
| The remote controller is outside of its operating range | Control the system from a maximum distance of 7 metres. | |
| The controller is not directed at the system, obstacle between the controller and system | Aim the remote controller at the system, remove any obstacles in the path of the ray. | |
| No sound No function | selected Press SOURCE to select FM, CD or LINE | |
| The speakers are not connected properly Make sure all connections are made properly. | ||
| The volume is set to min. Increase the volume. | ||
| CD does not play Disc | compartment not closed properly Make sure the disc compartment is properly closed. | |
| No disc Insert a disc. | ||
| The disc is inserted upside down Make sure the disk is inserted with the label facing upward. | ||
| Distorted or interrupted sound | The disc is contaminated Clean the disc. | |
| Scratched or deformed disc Replace the damaged disc with another. | ||
| Cannot tune a radio station | Incorrectly connected or directed antenna | Change the antenna direction. |
EN
TECHNICAL SPECIFICATIONS
ECG XENON C 133 USB
Specifications
Power AC \~100–240 V, 50/60 Hz
Power input 20 W
Standby power input <0.5 W
LINE IN 2 × CINCH
AUDIO OUT 2 × CINCH
Headphones IN front 3.5mm jack
USB
USB IN front type A
Maximum flash memory capacity 32 GB
Supported USB fi les WMA,MP3
CD
Frequency characteristic 20 Hz – 20 kHz (+/-3 dB) 20 Hz – 20 kHz (+/-3 dB)
Signal-to-noise ratio ≥ 80 dB
Audio out 1.0 V (+/-0.2 V)
Supported CD fi les WMA, MP3
FM tuner
FM band range 87.5–108 MHz,
Memory 40 pre-sets
Amplifi er
Power output (max.) 5 W + 5 W
Bass correction -10 dB \~ + 10 dB
Treble correction -10 dB \~ + 10 dB
Frequency characteristic 20 Hz – 20 kHz (+/-3 dB)
Signal-to-noise ratio ≥80 dB
Speakers
System 2 × 4 , 5 W
Dimensions
Main unit (w × h × d) 150 × 154 × 201 mm
Speaker 2 × (w × h × d) 145 × 154 × 162 mm
EN
USE AND DISPOSAL OF WASTE
Wrapping paper and corrugated paperboard – deliver to scrapyard. Packing foil, PE bags, plastic elements – throw into plastic recycling containers.
DISPOSAL OF PRODUCTS AT THE END OF LIFETIME
Disposal of electric and electronic equipment (valid in EU member countries and other European countries with an implemented recycling system)
The represented symbol on the product or package means the product shall not be treated as domestic waste. Hand over the product to the specified location for recycling electric and electronic equipment. Prevent negative impacts on human health and the environment by properly recycling your product.
Recycling contributes to preserving natural resources. For more information on the recycling of this product, refer to your local authority, domestic waste processing organization or store, where you purchased the product.
This product complies with EU directive requirements on electromagnetic compatibility and electrical safety.
08/05

The instruction manual is available at website www.ecg.cz. Changes in text and technical parameters reserved.
EN
www.ecg.cz


- XENON C 133 USB
- CD MIKROSYSTÉM
- MINIWIEŻA CD
- CD MIKRO HIFI RENDSZER
- CD-MIKROSYSTEM
- CD MICROSYSTEM
- OBSAH
- BEZPEČNOSTNÍ UPOZORNĚNÍ
- Poslech se sluchátky
- SAFETY INFORMATION
- Read carefully and keep for future use!
- DESCRIPTION
- Listening with headphones
- REMOTE CONTROLLER
- INSTALLATION
- Connecting the speakers
- Start
- USING THE SYSTEM
- Playing CDs
- CD playback features
- Repeated playback
- Random playback
- Note:
- Creating a custom playlist
- Listening to the radio
- Radio station auto-search
- Radio station manual search
- Exiting FM tuner mode
- Notes:
- Listening to tracks from a USB device
- Listening to an MP3 player connected via LINE IN
- Amplifi er connection
- CARE AND MAINTENANCE
- Cleaning and maintenance
- Moisture condensation
- Disc care
- TROUBLESHOOTING
- TECHNICAL SPECIFICATIONS
- ECG XENON C 133 USB
- Specifications
- USB
- CD
- FM tuner
- Amplifi er
- Speakers
- Dimensions
- USE AND DISPOSAL OF WASTE
- DISPOSAL OF PRODUCTS AT THE END OF LIFETIME
- www.ecg.cz
Brand : ECG
Model : XENON C 133 USB
Category : Hi-Fi