
XENON D 1010 HD - Hi-Fi ECG - Free user manual and instructions
Find the device manual for free XENON D 1010 HD ECG in PDF.


| Product Type | Hi-Fi Stereo Receiver |
| Brand | ECG |
| Model | XENON D 1010 HD |
| Category | Hi-Fi |
| Power Output | 2 x 100W RMS (8 ohms) |
| Frequency Response | 20 Hz - 20 kHz (+/- 0.5 dB) |
| Signal-to-Noise Ratio | > 90 dB |
| Input Sensitivity (Line) | 200 mV |
| Dimensions (W x H x D) | 430 x 145 x 320 mm |
| Weight | 8.5 kg |
| Power Supply | AC 230V, 50/60 Hz |
| Remote Control | Included (IR) |
| Headphone Jack | 6.3 mm (1/4") |
| Speaker Impedance | 4 - 16 ohms |
| Protection Circuit | Overload, short circuit, thermal |
| Material | Aluminum front panel, steel chassis |
| Color | Black |
| Standby Power Consumption | < 0.5 W |
| Inputs | 4x RCA, 1x Phono (MM), 1x Optical, 1x Coaxial |
| Outputs | Speaker (binding posts), Pre-out, Subwoofer |
| Cleaning | Wipe with dry cloth; avoid solvents |
| Safety | Do not expose to water; ensure ventilation |
Frequently Asked Questions - XENON D 1010 HD ECG
User questions about XENON D 1010 HD ECG
0 question about this device. Answer the ones you know or ask your own.
Ask a new question about this device
Download the instructions for your Hi-Fi in PDF format for free! Find your manual XENON D 1010 HD - ECG and take your electronic device back in hand. On this page are published all the documents necessary for the use of your device. XENON D 1010 HD by ECG.
USER MANUAL XENON D 1010 HD ECG
natural_image
Black ECG audio recording device with front panel and control buttons (no visible text or symbols on body)XENON D 1010 HD
MIKROSYSTÉM S DVD
NÁVOD K OBSLUZE
CZ
MIKROSYSTÉM S DVD
NÁVOD NA OBSLUHU
SK
DVD MICRO SYSTEM
INSTRUCTION MANUAL
EN
natural_image
Diagram of a mechanical component with an arrow indicating direction (no text or symbols)natural_image
Diagram of a door handle with an arrow indicating direction (no text or symbols)Poznámka:
| CD RIP | |||
| OPTIONS | TRACK | ||
| speed Ngrmal | √ track01 | 04:36 | |
| √ track02 | 03:34 | ||
| bitrate 128kbps | track03 | 05:01 | |
| track04 | 03:26 | ||
| Create ID3 Yes | track05 | 04:46 | |
| device USB SLOT1 | track06 | 03:32 | |
| track07 | 04:00 | ||
| track08 | 03:08 | ||
| at SUMMARY | |||
| selected track 2 selected time 08:10 | |||
| start | exit | select all select none | |
CZ
| CD RIP | ||
| ripping | selected | track |
| track progress | track01 | 04:36 |
| track02 | 03:34 | |
| total progress | ||
| SUMMARY | ||
| The file has existedReplace it or not?OKCANCEL | ||
ŘEŠENÍ POTÍŽÍ
natural_image
Diagram of a mechanical component with an arrow indicating direction (no text or symbols)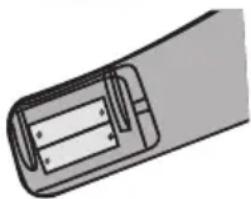
natural_image
Diagram of a cylindrical battery with internal components (no text or symbols)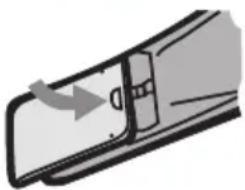
natural_image
Diagram of a door handle with an arrow indicating direction (no text or symbols)Poznámka:
| CD RIP | ||
| ripping | selected | track |
| track progress | track01 | 50% |
| track02 | 03:34 | |
| total progress | ||
| CANCEL | ||
| SUMMARY | ||
| now ripping track 01/02 | ||
| CD RIP | ||
| ripping | selected | track |
| track progress | track01 | 04:36 |
| track02 | 03:34 | |
| total progress | ||
| SUMMARY | ||
| The file has existedReplace it or not?OKCANCEL | ||
Read carefully and save for future use!
- Read the manual carefully before starting to use this device. Keep this manual for future reference.
- Do not open the unit. There are no elements inside, which could be set by the user. Leave servicing to qualified service personnel only.
- Turn the equipment off when you are not using it. If you do not plan on using the device for a longer period of time, turn it off and unplug the device. The electrical outlet, which serves to unplug the device from power completely, has to be easily accessible.
- Do not install the unit in place exposed to sources of heat or direct sunlight.
- Do not install the unit in place exposed to moisture or rain.
- The device should not be exposed to dripping or splashing water and objects containing liquids should not be placed upon it, for example vases.
- Install the unit on a horizontal, even and firm surface with good ventilation. Never cover the ventilation openings, the unit may fail due to overheating.
- Use soft, clean cloth for cleaning the external surface. Never use chemicals or detergents for cleaning.
- This document is only a guide for using the device and is not considered an authoritative criterion for configuration.
- Use only accessories recommended by the manufacturer.
- If the plug serves as a disconnection device, the electrical outlet has to remain easily accessible.
WARNING: Do not expose the batteries to excessive heat, e. g. direct sunlight.
ATTENTION: Incorrect battery replacement may cause an explosion. Replace the battery only with the same or equivalent type.

The lightning symbol alerts the user to dangerous voltage inside the unit, which can cause injury by electrical shock when touching internal elements of the device.
The exclamation mark alerts the user to important operational instructions in the manual.
To reduce the risk of fi re and electrical shock, do not remove the covers of the device. Leave servicing to qualified service personnel only.
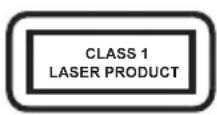
This symbol represents that the device is classified under the class 1 laser equipment group. A laser beam may present radiation danger in contact with the human body.
FEATURES
Thank you for purchasing this product. Read the manual carefully before starting to use this device. Keep this manual for future reference.
This DVD player is a new generation home video player, which provides high quality picture and Hi-Fi quality sound. Its performance exceeds all previous home video equipment. It will provide you with the best experience!
• Built-in support of audio decoders Dolby Digital, MPEG, LPCM, PCM etc.
• Digital sound processor of Hi-Fi quality 96 kHz/24 bit.
• Intelligent software upgrade.
• Coaxial digital audio output.
- It supports DVD, DVD-R, DVD+R, DVD-RW, DVD+RW, VCD, DVCD, CD, CD-R, MP3, MPEG4, DIVX, KODAK PICTURE CD etc. formats.
• USB port and slot for memory cards.
- Integrated servo system, using single chip decoding technology. It is highly reliable, stable and provides excellent error correction.
• Fully functional remote control.
• FM STEREO radio.
• High quality amplifi er.
- CD ripping function.
ACCESSORIES
Package contents
Operating manual
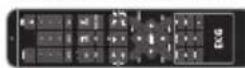
Remote controller A/V cable FM antenna Battery
playable discs and media types:
| Types of discs Symbol Contents | ||
| DVD Audio + Video |  | |
| MP3 |  | Audio |
| Video-CD (VCD) |   | Audio + Video |
| CD-DA Audio |  | |
| Picture CD |  | CD with pictures in JPEG format |
| Kodak Picture CD |  | Digital photography |
| MPEG-4 |  | Audio + Video |
DESCRIPTION
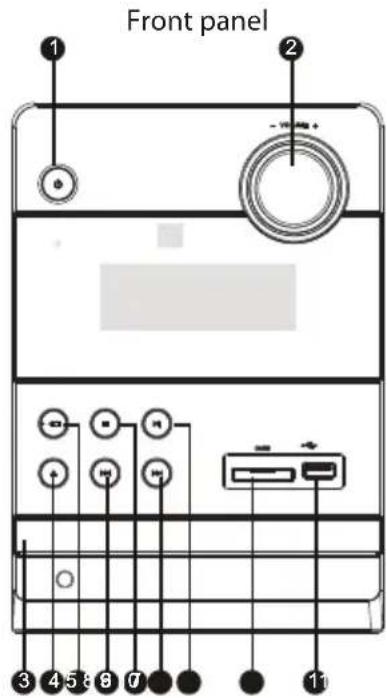
Front panel
- Standby mode
- Volume control
- Disc tray
- Open/Close
- Source switching
-
Previous
-
Stop
- Next
- Play/Pause
- Memory card slot
- USB port
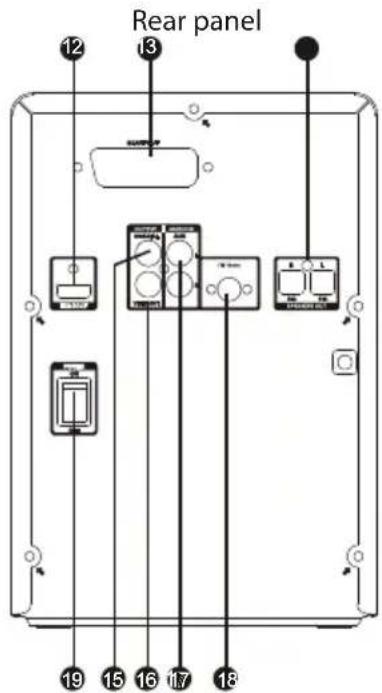
Rear panel
- HDMI output
- SCART output
- Speakers output
-
Coaxial digital audio output
-
Composite video output
- L/R audio input
- FM antenna connector
- On/Off switch
CONNECTIONS
Connection of video system
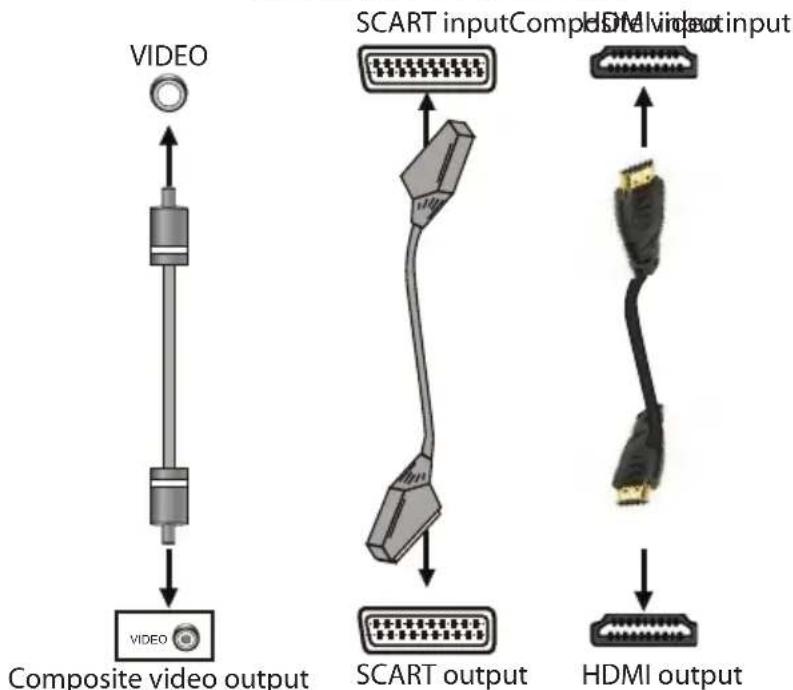
The device provides the following video outputs:
Video input of TV/monitor
flowchart
graph TD
    A["VIDEO"] --> B["Composite video output"]
    C["SCART input"] --> D["Composite video output"]
    E["HDMI output"] --> F["Composite video output"]
    G["SCART output"] --> H["Composite video output"]
Video output of the DVD player

Composite video
Using the AV cable with yellow connectors connect the composite video output of this device to the video input of the tv set or monitor.
SCART
Using 21 pole SCART cable connect SCART output of this device to SCART input of the tv set or monitor.
HDMI
Using HDMI you can transmit audio and video signals via a single cable. HDMI output provides the highest possible resolution and image quality. If your tv set is equipped with HDMI input, use it. Using HDMI cable connect HDMI output of this device to HDMI input of your tv set or monitor.
NOTE:
- Of the above noted video outputs, the HDMI offers the highest quality, followed by SCART output and finally by composite video, offering standard quality. Use the best available video connection.
- Do not execute all the above mentioned connections at once, it could have an adverse effect on the resulting picture.
- The device will provide the required video output only if the video settings correspond to the actual connection of the video system. (see Video settings in the System setup).
Connecting the audio system
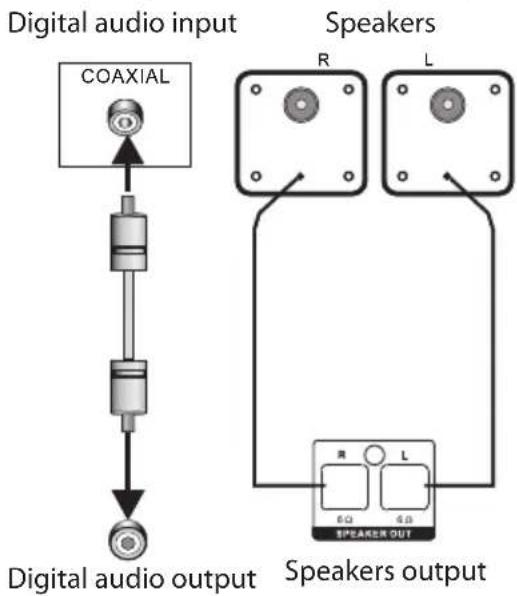
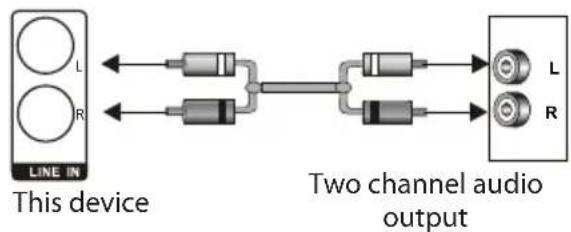
There are two types of audio outputs. These are analogue audio output and digital audio output.
The analog audio output system is a two channel stereo output. The digital audio output system is a coaxial output.
Audio input of TV/monitor/amplifi er
flowchart
graph TD
    A["Digital audio input"] --> B["COAXIAL"]
    B --> C["Resistors"]
    C --> D["Speaker output"]
    E["Speakers"] --> F["R"]
    E --> G["L"]
    F --> H["Speaker OUT"]
    G --> H
    style A fill:#f9f,stroke:#333
    style E fill:#ccf,stroke:#333
DVD Audio output
flowchart
graph LR
    A["This device"] --> B["Two channel audio output"]
    B --> C["L"]
    B --> D["R"]
Digital coaxial audio output
Using the coaxial cable, connect the coaxial output of the device with the coaxial input on the power amplifier.
Speakers' output
Connect the speakers to the appropriate terminals using included cables (white+, black -).
Input AUX IN
The device has several inputs for connecting other devices, for example input AUX IN. Using these inputs, you may connect an external source of analog stereo signal to the device, for example MP3, VCD and CD players or videorecorders.
After correctly connecting the external device, switch to AUX IN input, using the SOURCE / SOURCE SELECT button and enjoy the sound from the external device.
SYSTEM SETUP
Control menu
- Press SETUP in the DVD mode on the remote control to show the setup menu.
- Using ◀/▶ select the required item. A submenu of the selected item will appear.
- Press ▲/▼ to select the required item from the submenu, press ENTER/▶ to confirm. Using ▲/▼ choose the required selection and press ENTER to confirm, press ◀ to cancel.
- You can continue to set items in the menu by pressing ▲/▼.
- Press ◀ to return to the higher menu.
- Press again SETUP to exit the settings menu.
1 GENERAL SETUP page
1.1 TV DISPLAY (aspect ratio)
If the device is connected to a standard TV set, you should select 4:3 PANSCAN or 4:3 LETTERBOX. The picture with aspect ratio 4:3 will be displayed in full format in its native aspect ratio.
4:3 PAN SCAN: The TV displays widescreen image in its original aspect ratio, part of the picture will be cut on the left and right sides.
4:3 LETTERBOX: The TV displays widescreen image in its original aspect ratio with black bars on the top and bottom of the screen.
If the device is connected to a widescreen TV, you should select 16:9.
16: 9: The screen displays full widescreen image in its original aspect ratio. Picture 4:3 will be stretched horizontally to fill the screen.
1.2 ANGLE MARK
Set this item to ON. When playing a disc where the scenes are recorded using multiple camera angles, the angle mark appears on the screen. In this case, press ANGLE on the remote control to switch to an alternative scene with a different angle.
Set the item to OFF to deactivate this function.
NOTE: This function can be used only with discs, where scenes are recorded from various angles.
1.3 OSD LANGUAGE
Set the language of the menus of this device with this option.
1.4 CLOSED CAPTIONS
Set this item to ON. When playing a disc with close captioning, the subtitles will be displayed. Set the item to OFF to hide the subtitles.
As well, you can hide or display the captions by pressing SUBTITLE button on the remote control.
NOTE: This function can only be used with discs with recorded captions.
1.5 SCREEN SAVER
ON: In case of fixed picture on the screen, for example during a playback pause, the screen saver appears. Press any button except STANDBY to wake up the device.
OFF: The screen saver function is deactivated.
1.6 HDCD (High Definition Compatible Digital)
HDCD (High Definition Compatible Digital) is a patented process of coding/decoding bringing you full richness and details of sound from CD discs encoded in HDCD. You can set digital filter 2x, 1x or off.
1.7 LAST MEMORY
ON: Anytime when you turn off the device during playback or pause or when you open the disc tray, the device remembers the point where you interrupted the playback. Later, when you switch the device on and start playback of the same disc, the device starts playback from that remembered point.
OFF: The last position memory function is deactivated.
2 AUDIO SETUP page
2.1 ANALOG AUDIO SETUP (audio output setup)
2.1.1 DOWNMIX MODE SETUP
LT/RT: 5.1-channel audio is mixed in the left and right channel and it is reproduced via left front or left right speaker.
STEREO: 5.1-channel audio is mixed into stereo signal and is played through the front left and front right speakers.
NOTE: This function is applied only to 5.1 channel discs with audio encoded in Dolby AC-3.
2.2 DIGITAL AUDIO SETUP
2.2.1 DIGITAL OUTPUT
SPDIF/OFF (off): No digital audio signal output. (Coaxial output is off)
SPDIF/RAW (on): The digital audio signal is brought to the output in an unedited format. This mode usually uses DTS a Dolby Digital 5.1 for audio signals.
SPDIF/PCM: The digital audio signal is brought to the output in PCM format. This mode is usually used for an audio signal from CD.
2.2.2 LPCM OUTPUT
This option will be available, if DIGITAL OUTPUT is set to SPDIF/PCM.
Select the sampling frequency for the digital audio output. There are two options available, 48 kHz and 96 kHz.
NOTE: Some amplifiers do not support sampling frequency 96 KHz, which affects the coaxial output.
3 DOLBY DIGITAL SETUP page
3.1 DUAL MONO
STEREO: The device plays the audio of the left channel and the audio of the right channel through the left front speaker or the right front speaker.
L-MONO: The device plays only the audio of the left channel through the left front and right front speakers.
R- MONO: The device plays only the audio of the right channel through the left front and the right front speakers.
MIX-MONO: The unit plays mixed audio from the left and right channels through the left and right front speakers.
NOTE: This function applies only to two-channel audio discs encoded in Dolby AC-3.
3.2 DYNAMIC
When you watch movies with a wide dynamic range at low volume, e. g. at night, you can set the value of the dynamics in a way that you do not lose the audio details due to low volume.
4 VIDEO SETUP page
4.1 VIDEO OUTPUT
CVBS: Sets the video output to composite video if the connection is made using the composite video input.
RGB: It sets the video output to RGB format, if SCART output is used.
NOTE: If the video output setting differs from physical video connection, the TV screen may display poor picture. By pressing repeatedly button V-MODE on the remote control you can switch it to corresponding video output mode.
4.2 RESOLUTION
Set resolution using this item.
4.3 COLOR SETTING (detailed setting)
4.3.1 SHARPNESS
There are three options available for this item – HIGH, MEDIUM and LOW.
4.2.3 BRIGHTNESS, CONTRAST, HUE, SATURATION
Using the arrow buttons, enter individual items ◀/▶ to set their value and confirm by pressing ENTER.
4.3.3 GAMMA
There are four selections available to correct a Gamma item – HIGH, MEDIUM, LOW and NONE.
4.3.4 LUMA DELAY
Two options are available for this item - 0T and 1T.
4.4 HDMI SETUP
About HDMI
HDMI (High-Definition Multimedia Interface) is the newest interface for audio visual devices, like high definition tv sets and home theater systems. With 19 wires in a single USB-like cable, the HDMI interface can transmit signals with 5 Gbps (gigabites per second) bandwidth. That is more than twice the bandwidth needed to transmit multichannel audio and video, therefore the HDMI standard is a guarantee of sufficient capacity for the future. Thanks to that and many other factors, the HDMI interface is much more suitable than its predecessors – component video, S-video and composite video.
HDMI transmits uncompressed, entirely digital signal, while all the above mentioned interfaces are entirely analog. In the case of analog interface, the clean digital source is transformed into less precise analog, sent to tv set and there transformed back into digital signal displayed on the screen. The digital signal loses part of its integrity with each transformation and the result is worse picture quality. The HDMI keeps the source signal in the original form and because there is no conversion to an analog signal, it provides a picture of the highest quality and sharpness.
Although the standard HDMI (or "Type A") consists of 19 wires, "Type B" will have 29 wires. The latter named format is focused on the film industry and other professional applications. It is the "Intelligent HDMI" in both cases, which allow the components equipped with the HDMI interface to communicate with each other. These informations can ensure remote control from a single controller and other mutually interactive functions, which previous technologies could not offer.
HDMI supports standard video formats, advanced video formats and high resolution HD formats. It is also back-compatible with the DVI (Digital Video Interface). You can connect modern graphic cards provided with DVI port to the HDMI interface using the DVI/HDMI cable. It is simply a cable with a DVI connector at one end and HDMI connector at the other end. As a rule, the HDMI cables should not be longer than 5 meters to prevent degradation in the quality of the signal.
4.4.1 HDMI
Setting ON or OFF enable/ disable HDMI connection.
4.5 FONT SIZE
You can choose the size of the letters using this option.
4.6 FONT COLOR
You can choose the most suitable color of the subtitles using this option.
4.7 FONT POSITION
You can choose the most suitable position for the subtitles using this option.
5 PREFERENCE page
This item is available if there is no disc in the disc tray, if the cover is open or the disc stops.
5.1 TV TYPE
This device supports both TV broadcasting systems, NTSC (National Television System Committee) and PAL (Phase Alternating Line).
PAL: If the connected TV set is compatible with the PAL system, used in China, Hong Kong and Europe, select this mode. The NTSC video signal of the disc will be fed to the output in the PAL format.
AUTO: If the connected TV set supports more formats, select this mode. The output video signal will correspond with the video signal on the disc.
NTSC: If the connected TV set is compatible with NTSC system, used in Taiwan, USA, Canada and other countries, select this mode. The PAL video signal of the disc will be fed to the output in the NTSC format.
NOTE: In case that the selected signal should be wrong, the TV picture will be very poor. In that case, we recommend to change the setting of this item.
5.2 AUDIO, SUBTITLE and DISC MENU
Using these options, select the preferred audio language, the language of the subtitles and the language of the disc menu.
You can use the AUDIO button to select an audio track and using the SUBTITLE button on the remote control you can select the language of the subtitles.
NOTE: If the selected language is not available on the played disc, the language used for the audio track, subtitles and menu will be the default language of this disc.
5.3 PARENTAL
This option lets you set the maximum rating of the disc, which may be watched. Movies with rating higher than the set rating will not be possible to watch without entering a correct password. The change in setting of rating requires entering of password as well. The default password is 136900.
NOTE: This function is available only with discs, which have parental control.
5.4 PASSWORD
Using this option, you can reset the password. When you enter this menu a dialog box appears. Enter the old password and then enter the new password. Finally, enter the new password once again to confirm. When you are finished, change the password by pressing ENTER:
NOTE: The default password (136900) is always active, even when you change password.
5.5 DEFAULT
It will renew all the original settings except for PASSWORD MODE and PARENTAL.
REMOTE CONTROL
Using the remote control
Insert batteries into the remote control. Point the remote control at the remote control sensor on the front panel. The remote control range is about 8 meters and at an angle of 30 degrees horizontally.
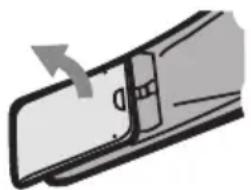
Inserting batteries
-
Remove the cover of the battery space on the back of the remote control.
-
Insert two AAA/1,5 V batteries into the battery compartment. Observe the correct polarity of the batteries, marked inside the battery compartment by the + and - symbols.
-
Replace the cover.
natural_image
Diagram of a mechanical component with an arrow indicating direction (no text or symbols)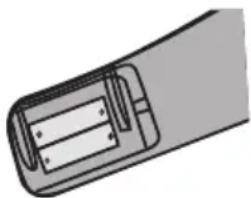
natural_image
Diagram of a cylindrical device with internal components, no text or symbols present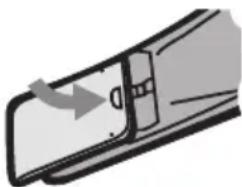
natural_image
Diagram of a door handle with an arrow indicating direction (no text or symbols)Note:
- If you do not plan to use the remote control for a longer period of time, take the batteries out.
- Do not combine old and new batteries or different types of batteries.
• Empty batteries may leak and seriously damage the remote control. - Do not expose the batteries to high temperatures, for example to direct sunlight, fire or other sources of heat.
- Be considerate to the environment and dispose of the old batteries in accordance with local regulations.
Description
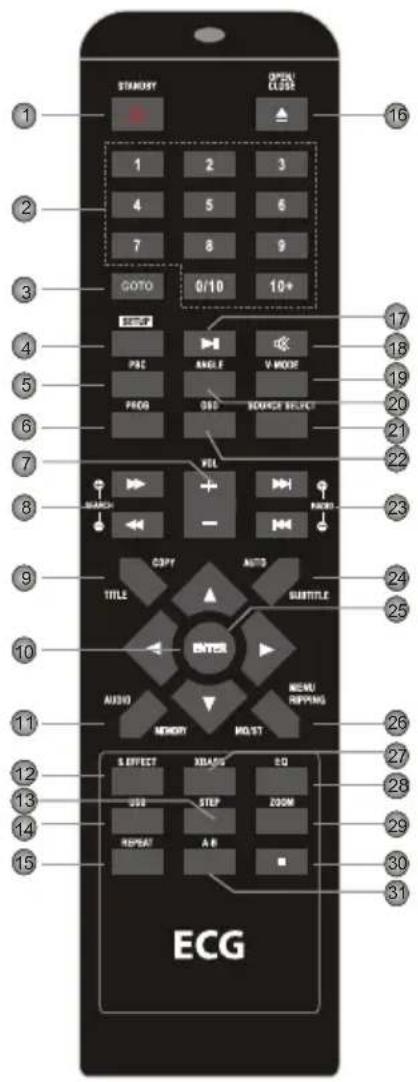
- STANDBY 16. OPEN/CLOSE
- Numerical buttons 17. Play/Pause
- GOTO 18. MUTE
- SETUP 19.V-MODE
- PBC 20. ANGLE
- PROGRAM 21. SOURCE SELECT
- VOLUME +/- 22. OSD
- FAST FORWARD/REWIND 23. NEXT/PREVIOUS
- TITLE/COPY 24. SUBTITLE
- Arrow buttons 25. ENTER
( ◀▶ ▲▼) - AUDIO 27. X-BASS
- SOUND EFFECT 28. EQ
- STEP 29. ZOOM
- USB 30. STOP
- REPEAT 31. A-B REPEAT
Radio control:
-
SEARCH +/- 23. RADIO +/-
-
MEMORY 24. AUTO
-
MO/ST
PLAY
DVD Control
STANDBY

Switches device on. /It switches the device to standby mode.
Note: Standby mode consumes small amount of electricity, but it ensures the optimal functioning of all components of the device immediately after startup.
SOURCE SELECT

Press repeatedly to switch the source of the signal between DVD, TUNER and AUX IN modes.
USB

Press repeatedly to switch to various signal sources, USB drive, memory card or back to DVD mode.
OPEN/CLOSE

Press to open/close the disc tray.
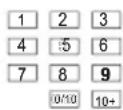
The number pad may be used to enter numbers or select a song, chapter, etc.

Press it to enter a menu option or confirm a selection.

The arrows may be used to move the highlighted item or to set value in the menu.
SETUP

Press to open/exit the setup menu.
GOTO

Press during playback to enter menu GOTO. Select in the menu using arrows ▲/▼ the setup item and press ENTER enter the status of the adjustment and using the number pad, a track, time position on the disc or in the track, chapter, title, time position in the chapter or track where you will go directly. Press again GOTO to exit the menu.
PROGRAM

Press this button to activate or exit the program menu, where you can play the content of a disc in order selected by you.
Create a list of programs in the program menu using the arrow keys, the number pad and ENTER then move the highlight to START and press ENTER to start program playback.
When you press this button during playback you can enter the program menu, highlight the item STOP and press ENTER to cancel the program playback.

Press to pause playback. Press the button again to resume playback.
By pressing this button you will continue regular playback as well, after fast forward or after a picture slideshow, etc.

Press again to pause playback, then press ▶II to continue playback. Press twice to stop playing. The disc will return to the beginning.

Press repeatedly to select different speeds for playing forward.

Repeat pressing to select different speed of rewind.

Press to skip to previous chapter/song.

Press to skip to next chapter/track.
STEP

Press repeatedly to play video frame by frame. Press ▶II to continue normal playback. Valid for discs (DVD, VCD, MPEG4 etc.)
Press to pause audio. Press again to switch the sound on again.
Press the VOLUME +/- buttons to set volume.
You can switch between repeat play modes by single pressing.
(Note: In case of VCD2.0 discs, this function is invalid if the PBC function is activated)
You can repeat certain part of the disc using this button.
If a disc is played (DVD, VCD, CD, MP3 or MPEG4), you can mark the initial point (A) using this button and then the end point (B). The device will play the marked part over and over. Pressing the button third time will cancel the A - B repeat and regular play will resume.
Note: A and B points must be in the same title/song.
Press to turn on/off the surround sound effect and the bass enhancement.
Press repeatedly to toggle between various sound effects or to turn the effects off.
Note: When playing a disc with the Dolby 5.1 sound, we recommend that you turn off the sound effects to achieve the original 5,1 channel sound.
Press repeatedly to select the equalizer mode: FLAT, ROCK, CLASSIC, POPS, VOCAL, JAZZ.
Press to enter the menu of the played disc.
Press to enter the main menu.
When playing a disc with PBC (Play Back Control), you can press this button to turn the PBC function on/off.
(Note: VCD2.0 discs have PBC function, while DVD discs, VCD1.1, CD-DA and MP3 do not.)
Press repeatedly to switch on/off subtitles.
(Note: This function is active only on discs with recorded subtitles.)
Press repeatedly to switch on or hide disc information.
Press repeatedly to select sound track from available languages off ered by the disc.
Press repeatedly to toggle the available audio channels (LEFT MONO, RIGHT MONO, MIX-MONO and STEREO) off ered by the disc (valid for VCD).
Press to switch between camera angles.
(Note: This function works only with discs with recorded scenes from various camera angles.)
Press repeatedly between video output modes.
Press button to zoom in/out of the image. In the zoom in mode, you can use the arrow buttons to move the center of the enlarged area. (Note: Valid for DVD, VCD, MPEG4 etc. discs.)
Press button to enter or exit the ripping menu. For details about CD ripping see the chapter "CD ripping".
Press to copy from a multi format disc to a USB. For details see the chapter "Playback from USB and memory card".
Radio control
Following buttons are used in the radio mode. Press SOURCE SELECT to select radio mode.

Press to switch between Mono and Stereo FM broadcast reception.

To tune in a new frequency, press MEMORY and using the number pad assign a preset number to it.


Press to start automatic search of radio stations.

During the automatic station search, press this button to stop the process.
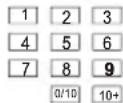
You can use the number pad to tune in preset stations in the radio mode.
Press e. g. 0 and 2 to select preset 2; press 1 and 5 to select preset 15.
Press gently to fine tune frequency.

Press to switch to following/previous preset station.
NOTE: The buttons VOLUME+/-, MUTE and S.EFFECT are available in the radio mode.
Play discs Kodak picture CD
-
Insert the Kodak picture CD into the CD slot, the device will set the disc automatically.
-
Press [■] to enter the preview mode, where you can preview the thumbnails of images.
Use the arrow buttons in the preview mode to select an image, then press ENTER to start playback from the selected image.
You can use the arrows and ENTER in the preview mode to select any of the options on the bottom of the screen Slide Show, Menu, Prev or Next (slide show, menu, prev, next).
Slide Show: Starts slide show.
Menu: Opens menu of instructions for remote control function buttons. Press ENTER in the menu to go to the next page of the menu and once more to start the instruction menu.
Prev/Next: Go to previous/next page.
Remote control functions:
■: Enter the preview mode, allowing to view image thumbnails.
ZOOM: During playback, press ZOOM repeatedly to zoom in/out the picture. When the image is zoomed in, the direction keys can be used to move the picture. Press ZOOM again to exit the picture-zooming mode.
◀◀/▶◀: Press during playback to skip to previous/next picture.
▶II: Press to pause playback. Press the button again to resume playback.
◀/▶: Press during playback to rotate the picture counterclockwise or clockwise.
▲/▼: Press for vertical/horizontal image flip.
Playing MP3/MPEG4
Insert MP3/MPEG4 disc in the player. The content menu will appear on the screen.
MENU CONTROL:
Using arrow buttons ▲/▼ select a file or a folder and press ENTER to confirm selection or to play a file. You can use also the number pad to select a folder or a file for playback.
Press ◀ in the content menu to return to higher menu. Press ◀◀/▶▶I to go to previous/next menu page.
PROG: Press repeatedly to switch between folder replay mode (FOLDER) and list replay mode (FILELIST).
MENU: During MPEG4 disc play, press to return to the content menu.
NOTE: These buttons function normally during playback◀, ▶▶, ▶II, ■ (press to stop playback), REPEAT, A-B, VOLUME+/-, MUTE, X-BASS, EQ etc. For details, see functions of remote control in this chapter.
Playback from USB and memory card
Insert USB disc to USB port and then press USB to enter the connected USB disc and to play supported format files contained on the disc. Press again USB to switch to DVD mode.
Insert the memory card SD, MS or MMC in the memory card slot and then press USB to enter the inserted memory card and play the supported format files contained on the card. Press again USB to switch to DVD mode.
NOTE:
- In the event that the player stops working after connecting the USB disc or the memory card, turn the player off, unplug it from the power outlet in the wall and remove the USB disc or the memory card. Afterwards, restart the appliance. Normal functioning of the player will resume.
- For controlling playback, see "Playing MP3/MPEG4 discs" in this chapter.
- If a USB disc and a memory card are connected to the device in the same time, press USB once to select the USB disc and press twice to select the memory card. Press third time to return to the DVD mode.
- Copying: Connect USB disc to the device, insert a multi format disc in the player, press COPY and using the arrows and the ENTER button, select a file. Using the arrows, move the highlighting to COPY and press the ENTER button once to change to USB mode; press again to select NEXT, when you press the third time, to start copying. Press USB to display the USB disc fi les.
• Using the options ALL SELECT and ALL UNSELECT you can select all files or cancel selection of all files contained on the multi format disc. - EXIT: move highlighting to this option and press ENTER or COPY to exit the copying menu.
CD Ripping
CD ripping is a process of copying audio from CD/HDCD disc and saving the audio content into compressed digital audio format MP3.
You can copy music from CD/HDCD disc to the connected USB drive using this function. Insert CD or HDCD disc in the device and connect the USB drive. Press RIPPING on the remote control to display the disc ripping menu. Use the arrows to move the cursor among the menu items.
The tracks window (TRACK) contains the list of all tracks on the CD and their length. Highlight the track which you want to copy and press ENTER to confirm the selection. If you want to cancel the selection, highlight the track again and press ENTER again. If you want to select all the tracks on the disc, highlight Select All and press ENTER. If you want to cancel the selection of all tracks, highlight Select None and press ENTER.
| CD RIP | |||
| OPTIONS | TRACK | ||
| speed Normal | √ track01 | 04:36 | |
| bitrate 128kbps | √ track02 | 03:34 | |
| track03 | 05:01 | ||
| Create ID3 Yes | track04 | 03:26 | |
| track05 | 04:46 | ||
| device USB SLOT1 | track06 | 03:32 | |
| track07 | 04:00 | ||
| SUMMARY | track08 | 03:08 | |
| selected track 2 selected time 08:10 | |||
| start | exit | select all select none | |
In the SUMMARY window you can check the number of selected tracks and the total length of the selected tracks.
In the Options window set the required ripping speed, ripping bitrate and if you want to save also ID3 information with the copied track (if available), set Create ID3 to YES, otherwise set to NO. You can set individual options by highlighting the required setting of the appropriate item and press ENTER.
When you finish setting, move the highlight to START and press ENTER to start the ripping procedure. If you want to cancel the operation, move the highlight to EXIT and then press ENTER, or simply exit the procedure by pressing RIPPING on the remote control.
After you start ripping, the system moves to another page of the menu.
The ripping window displays indicators showing the progress of the current ripped track and the general progress.
The item CANCEL is highlighted during ripping, which means that if you want to interrupt ripping just press the ENTER button.
The tracks copied from the CD or HDCD will be saved to the connected USB drive in an automatically created folder. If there is a track in the folder with the same name as the track, which you want to copy, a dialog window appears indicating this fact. Press ENTER, if you want to continue and overwrite the existing track with the new track. To cancel the action select the option CANCEL. You can now create a new folder on the connected USB drive to copy the track there.
| CD RIP | ||
| ripping | selected | track |
| track progress | track01 | 50% |
| track02 | 03:34 | |
| total progress | ||
| CANCEL | ||
| SUMMARY | ||
| now ripping | ||
| track 01/02 | ||
| CD RIP | ||
| ripping | selected | track |
| track progress | track01 | 04:36 |
| track02 | 03:34 | |
| total progress | ||
| SUMMARY | ||
| The file has existedReplace it or not? | ||
| OKCANCEL | ||
Create a new folder for ripping
EN
If you want to create another folder on the connected USB drive
for the copied tracks, you have to open the disc tray and then close it. The tracks copied after this operation will be saved in the newly created folder.
TROUBLESHOOTING
Before bringing the unit for repair, please, check the following table first.
| Symptom Cause Correction | ||
| No power. • AC power cord is not properly plugged in the outlet. | • Check, if the power cord is properly plugged in. | |
| PictureNone or distorted picture. | • Video cable is not properly connected.• The output video mode of the unit is not set properly.• The video input mode of the connected tv set is incorrectly set. | • Connect the video cable properly.• Press repeatedly V-MODE, until a normal picture appears again.• Set the corresponding input video mode on the TV set. |
| AudioNone, or distorted audio. | • The audio cables are not connected properly.• The volume is set to minimum.• Audio is off .• The disc is in fast forward/rewind mode. | • Connect the audio cables properly.• Increase volume.• Press MUTE on the remote control to switch on audio.• Press PLAY/PAUSE. |
| Cannot play disc. • The disc is incorrectly inserted into the disc tray.• The level of the parental control encoded on the disc is higher than the level of parental control set for the device.• The disc is not compatible with the device.• The disc is dirty. | • Make sure that the disc is inserted in the disc tray with label facing up.• Change the parental control setting.· -• Clean the disc. | |
| The device stops working when you insert a USB drive or a memory card. | · The connected USB disc or the memory card is probably not the certifi ed type. | · The player cannot play non certifi ed USB discs and memory cards.In the event that the player stops working, turn it off and unplug from power supply, disconnect the USB disc/card and turn on again. Normal functioning of the player will resume. |
| The buttons on the unit do not work. | · Static electricity interferes with the functions of the player. | · Turn the device off and unplug it from the power supply.Then plug it in again and switch it on. |
| The remote control does not work. | · There are no batteries in the remote control.· The batteries are empty.· The remote control is not pointed to the remote control sensor.· The remote control is out of working range.· The device is off . | · Insert two 1.5 V (AAA) batteries.· Replace old batteries with new ones.· Make sure that the remote control is pointed to the remote control sensor.· Make sure that the remote control is close enough to the device.· Switch the device off and unplug it from AC power. Afterwards, restart the appliance. |
TECHNICAL SPECIFICATIONS
| Model ECG XENON D 1010 HD | ||
| Power AC ~230 V, 50 Hz | ||
| Input power 75 W | ||
| Power consumption in the standby mode < 0.5 W | ||
| Operating conditions | Temperature -10 – +35°C | |
| Relative humidity 5% – 90% | ||
| Disc output | TV norm | PAL/NTSC |
| Frequency range | 20 Hz – 20 kHz | |
| S/N ratio (fi Iter A) | >80 dB (1 kHz) | |
| Dynamic range | ≥70 dB (1 kHz) | |
| Distortion and noise THD+NOISE | ≤-60 dB (1 kHz) | |
| Fluctuation WOW FLUTTER | Below measurable level | |
| Tuner | FM band range | 87.5 MHz – 108 MHz |
| Output power (max.) | 25 W ×2 | |
| Frequency range | ±1,5 dB (20 Hz – 20 kHz) | |
USE AND DISPOSAL OF WASTE
Wrapping paper and corrugated paperboard – deliver to scrapyard. Packing foil, PE bags, plastic elements – throw into plastic recycling containers.
DISPOSAL OF PRODUCTS AT THE END OF LIFETIME
Disposal of electric and electronic equipment (valid in EU member countries and other European countries with an implemented recycling system)
The represented symbol on the product or package means the product shall not be treated as domestic waste. Hand over the product to the specified location for recycling electric and electronic equipment. Prevent negative impacts on human health and the environment by properly recycling your product.
Recycling contributes to preserving natural resources. For more information on the recycling of this product, refer to your local authority, domestic waste processing organization or store, where you purchased the product.
This product complies with EU directive requirements on electromagnetic compatibility and electrical safety.
Changes in text and technical parameters reserved.
08/05
EN
K+B Progres
K+B Progres, a.s. (dále jen K+B), IČO: 61860123


- XENON D 1010 HD
- MIKROSYSTÉM S DVD
- DVD MICRO SYSTEM
- Poznámka:
- CZ
- ŘEŠENÍ POTÍŽÍ
- Read carefully and save for future use!
- FEATURES
- ACCESSORIES
- Package contents
- DESCRIPTION
- Front panel
- Rear panel
- CONNECTIONS
- Connection of video system
- Composite video
- SCART
- HDMI
- NOTE:
- Connecting the audio system
- Digital coaxial audio output
- Speakers' output
- Input AUX IN
- SYSTEM SETUP
- Control menu
- GENERAL SETUP page
- TV DISPLAY (aspect ratio)
- ANGLE MARK
- OSD LANGUAGE
- CLOSED CAPTIONS
- SCREEN SAVER
- HDCD (High Definition Compatible Digital)
- LAST MEMORY
- AUDIO SETUP page
- ANALOG AUDIO SETUP (audio output setup)
- DOWNMIX MODE SETUP
- DIGITAL AUDIO SETUP
- DIGITAL OUTPUT
- LPCM OUTPUT
- DOLBY DIGITAL SETUP page
- DUAL MONO
- DYNAMIC
- VIDEO SETUP page
- VIDEO OUTPUT
- RESOLUTION
- COLOR SETTING (detailed setting)
- SHARPNESS
- BRIGHTNESS, CONTRAST, HUE, SATURATION
- GAMMA
- LUMA DELAY
- HDMI SETUP
- About HDMI
- HDMI
- FONT SIZE
- FONT COLOR
- FONT POSITION
- PREFERENCE page
- TV TYPE
- AUDIO, SUBTITLE and DISC MENU
- PARENTAL
- PASSWORD
- DEFAULT
- REMOTE CONTROL
- Using the remote control
- Inserting batteries
- Radio control:
- PLAY
- DVD Control
- Radio control
- Play discs Kodak picture CD
- Remote control functions:
- Playing MP3/MPEG4
- MENU CONTROL:
- Playback from USB and memory card
- CD Ripping
- Create a new folder for ripping
- EN
- TROUBLESHOOTING
- USE AND DISPOSAL OF WASTE
- DISPOSAL OF PRODUCTS AT THE END OF LIFETIME
- K+B Progres
Brand : ECG
Model : XENON D 1010 HD
Category : Hi-Fi