
BTR 1000 - Radio ECG - Free user manual and instructions
Find the device manual for free BTR 1000 ECG in PDF.


| Product Type | Portable Radio |
| Brand | ECG |
| Model | BTR 1000 |
| Dimensions (approx.) | 25 x 15 x 8 cm |
| Weight (approx.) | 0.6 kg |
| Power Source | 4 x AA batteries (not included) or AC adapter (5V, 1A) |
| Tuning Bands | FM (87.5-108 MHz), AM (520-1710 kHz) |
| Speaker | Built-in 3W mono speaker |
| Headphone Jack | 3.5 mm stereo output |
| Antenna | Telescopic antenna for FM |
| Display | LCD screen with frequency and time display |
| Preset Stations | 20 FM and 10 AM presets |
| Controls | Volume, tuning, band selector, power |
| Sleep Timer | Yes, up to 90 minutes |
| Alarm Clock | Wake-up alarm with buzzer or radio |
| Additional Features | Auto scan, stereo/mono switch, LED indicator |
| Care and Cleaning | Wipe with a soft, dry cloth. Do not use liquids. |
| Safety | Keep away from water and heat sources. Do not disassemble. |
| Repairability | Battery compartment accessible. For other repairs, consult a professional. |
| Spare Parts | Replacement batteries, AC adapter (optional) |
| Manual Availability | Free PDF download at notice-facile.com |
Frequently Asked Questions - BTR 1000 ECG
User questions about BTR 1000 ECG
0 question about this device. Answer the ones you know or ask your own.
Ask a new question about this device
Download the instructions for your Radio in PDF format for free! Find your manual BTR 1000 - ECG and take your electronic device back in hand. On this page are published all the documents necessary for the use of your device. BTR 1000 by ECG.
USER MANUAL BTR 1000 ECG
natural_image
Two ECG portable electronic devices with dual speakers and a digital display showing 96.5V (no visible text or symbols on devices)BTR 1000
PŘENOSNÉ RÁDIO S BLUETOOTH/USB/SD/FM
NÁVOD K OBSLUZE
PRENOSNÉ RÁDIO S BLUETOOTH/USB/SD/FM
NÁVOD NA OBSLUHU
PRIJENOSNI RADIO UREĐAJ S BLUETOOTH/USB/SD/FM
UPUTE ZA UPORABU
HORDOZHATÓ RÁDIÓ BLUETOOTH/USB/SD/FM
HASZNÁLATI ÚTMUTATÓ
MOBILES RADIO MIT BLUETOOTH/USB/SD/FM
BEDIENUNGSANLEITUNG
PORTABLE RADIO WITH BLUETOOTH/USB/SD/FM
INSTRUCTION MANUAL
CZ
SK
HR
HU
DE
GB
BEZPEČNOSTNÍ UPOZORNĚNÍ
POKYNY K UŽÍVÁNÍ PŘÍSTROJE
Nabíjení
Read carefully and save for future use!
- Read the manual carefully before starting to use this device. Keep this manual for future reference.
- A label with basic information about the device's power supply can be found on the back of the device.
- Do not open the device box. There are no elements inside that can be configured by the user. Leave servicing to qualified service personnel only.
- Turn the equipment off when you are not using it.
- Do not place the device in locations exposed to heat sources or direct sunlight.
- Do not place the device in locations exposed to humidity and rain or in places with high dust levels.
- Place the device on a horizontal, flat and firm surface with good ventilation. Never cover the ventilation openings as this may cause a malfunction due to overheating.
- Do not expose batteries to excessive temperatures, e.g. direct sunlight, fire etc.
- Replace batteries only with batteries of the same type and with correct polarity. Otherwise there is a risk the system may explode.
- The sides of the system become warm after operating for a longer period of time. This is not a defect.
- Use soft, clean cloth for cleaning the external surface. Do not use chemicals or cleaning detergents.
- Use only accessories recommended by the manufacturer.

The lightning symbol alerts the user to dangerous voltage inside the unit, which can cause injury by electrical shock when touching internal elements of the device.
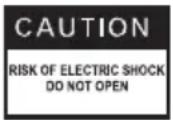
CAUTION
To reduce the risk of fire or electric shock, do not remove the cover of the device. Leave servicing to qualified service personnel only.

WARNING
The exclamation mark alerts the user to important operational instructions in the manual.

WARNING
The device, including accessories. should not be exposed to dripping or splashing water and objects, containing liquids should not be placed on it, e.g. vases. You will reduce the risk of electric shock or damage to the device.
Electrostatic discharge:
In case of electrostatic discharge on the surface of the device or close to any of its part or button, USB port, SD card slot, the unit may stop working or may suddenly shut down. This is a normal reaction, protecting the device and its internal components from damage.
In this case, reset the device (turn off and disconnect from the power supply) to resume normal operation.
DESCRIPTION
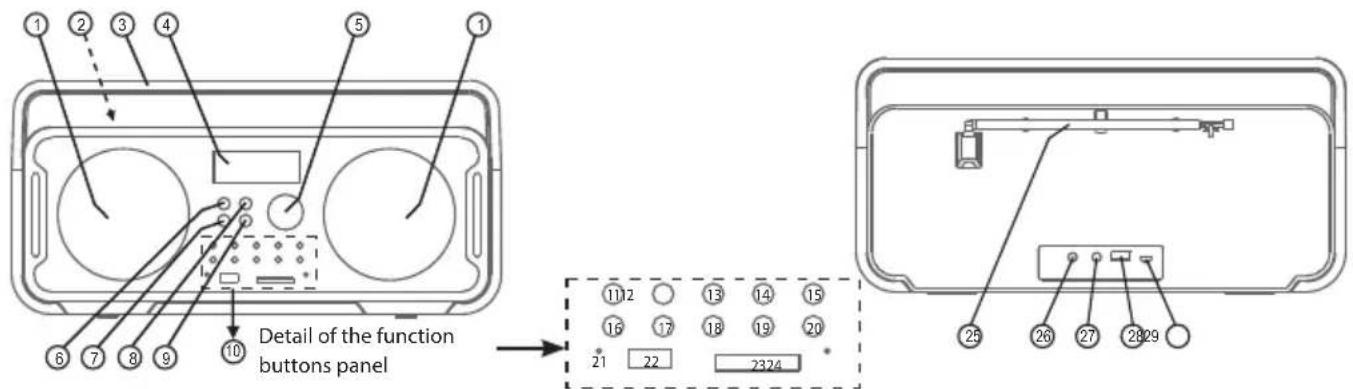
- Main speaker
- Slot for inserting smartphone/tablet
- Handle
- LCD display
- Volume control
- Bass boost button
- Bass attenuation button
- Treble boost button
- Treble attenuation button
- Function buttons panel
- On/Off switch
- Back / Tuning -
- Play / Pause / Pairing
- Forward / Tuning +
- Function buttons
- Move +10 tracks (MP3)
- P-mode / FM mode
- Stop / Program
- Memory - / Folder -
- Memory + / Folder +
- LED charging indicator
- USB port (mp3)
- SD card slot
- LED pairing indicator
- Telescopic antenna
- Headphones jack
- External input AUX
- USB charging port
- DC power input (micro USB)
INSTRUCTIONS HOW TO USE THE DEVICE
Charging
- This device is powered by an internal Li-ion battery.
- It can be charged via any standard USB port (e.g. USB port on the PC).
- It can also be charged using the included AC power adapter with micro-USB connector.
• Make sure that the voltage of the local power supply has the same voltage range as the AC adapter. - Insert the micro-USB connector of the AC adapter into the micro-USB port on the rear panel of the device and plug the AC adapter into the wall outlet.
- Turn the device on by pressing the switch ("On/Standby").
- The device is charged when the LED indicator light is on.
- Once the device is fully charged, you can simply unplug it and take it with you everywhere.
- Operating time per charge is about 5–6 hours.
• We recommend to leave the device connected to the charger when not in use.
Attention
- In order that you achieve the best possible functioning, we recommend that you charge the device before each use. If the battery is completely empty, please, let it charge for several hours before use.
Control
Sound control:
- Adjust the volume using the volume control on the device and you can also use the volume control of the connected device (when connected via Bluetooth or external input AUX).
- Using the device controls, you can also adjust the basses and trebles.
Note: If you do not hear any sound, make sure that device or any connected device does not have the volume set to "0".
- To improve sound quality, this unit is equipped with two equalizer functions. At any time during playback, you can use the bass and treble buttons (Bass + / - Treble + / -) to boost the low or high frequencies.
- The display shows the levels you have set for the bass and treble.
Function buttons
You can switch between various input signal sources by pressing repeatedly the F button. Switching functions proceeds as follows:

flowchart
graph LR
    BT["BT"] --> FM["FM"]
    FM --> USB["USB"]
    USB --> SD["SD"]
    SD --> AUX["AUX"]
    Bluetooth["Bluetooth"] --> FM
    Radio["Radio"] --> FM
    MP3["MP3"] --> USB
    MP3 --> SD
    Ext. input["Ext. input"] --> SD
Wireless Bluetooth® playback (profi le A2DP Audio Streaming)
- This device allows wireless audio playback from a device equipped with Bluetooth® function A2DP.
- Wireless range is about 10 meters.
- Simply pair your device (e.g. smart phone) with this unit and enjoy wireless music playback.
Pairing of devices with this unit:
- Make sure that the paired device (smartphone / tablet) has enabled Bluetooth.
- Switch this device on (portable radio) and press repeatedly , until the display shows "BT".
- When the LED pairing indicator starts flashing, this device (portable radio) appears on the list of paired devices on Bluetooth (of tablet or smartphone).
- Make connection in the device (tablet or smartphone) (e.g. select the "Connect" item).
- If you are prompted for password, enter "0000".
Notes
- It is necessary to perform this procedure for a given device only once. If you want to pair the portable radio with another device, please repeat the above described steps. The device remembers up to 4 different devices. You do not have to repeat this operation for those 4 devices, even after you switch off the radio.
- If the portable radio finds the last paired device after it is switched on, an automatic pairing with this device occurs and the radio switches into Bluetooth® mode.
- Keep in mind that this unit remembers up to 4 devices, but can be paired with only one device at a time.
- LED pairing indicator shows the status of the pairing Bluetooth connection of this device:
| STATUS | LED INDICATOR |
| Search | Slow fl ashing |
| Pairing | Faster fl ashing |
| Connected | Steady light |
Listening to FM radio
-
Press repeatedly the function F, until the display shows "FM".
-
You can improve the reception of the FM station by change of location or orientation of the device. For better reception quality pull out the telescopic antenna located on the rear panel of the device.
-
After tuning in the desired station, you can click "FM MODE" button to switch between stereo and mono reception.
-
In the case of lower quality reception (e.g. of remote station), we recommend to improve the reception quality by switching to "MONO".

Manual frequency tuning
-
Press briefly and repeatedly the "Tuning+" or "Tuning-" buttons to tune in the desired frequency.
-
After tuning in the desired station, the station can be stored in the memory of the device (see "Saving presets" below).
Automatic frequency tuning
- Press and hold "Tuning+" or "Tuning-" to start search of the following or previous radio station.
- After tuning in the desired station, the station can be stored in the memory of the device (see "Saving presets" below).
Saving presets
- You can save the tuned in station under one of the 20 memory positions.
- Press briefly "Program" to enter the presets mode. The display shows a flashing "P-01".
- Press briefly "Memory+" or "Memory-" to select a memory position, where you want the station saved (P-01 to P-20).
- Press briefly "Program" to confirm selection. The writing on the display stops flashing.
Tuning the saved preset
- Press briefly "Memory+" or "Memory-" to find the desired saved station.
- To delete a saved radio station, simply save to the appropriate memory position a new station.
Playback of MP3 songs from the USB device or SD card
The following table describes using the USB/SD mode:
| Button Functions in USB and SD mode | |
| Function button Press repeatedly to display “USB” or “SD” | |
| +10 During playback of MP3 songs from USB or SD card skip 10 tracks | |
| Folder+/Folder-Folder selection on USB / SD (not available in the random playback mode) | |
| Back/Forward Skipping to previous/next song | |
| Play/Pause Start or pause playback | |
| P-mode | Normal playback -> Repeat 1 -> Repeat folder -> Repeat all -> Random |
| Stop | Stopping playback |
Note:
- Loading the contents of the USB mass storage device or SD card can take longer time. Loading the memory medium with a large number of files may take longer than 1 minute.
ATTENTION: Removal of USB device or an SD card:
- Never remove an SD card or a USB device during playback. Before removing the USB or SD card, be sure to stop playback and press the function key to switch to another mode (FM/BT/AUX) to avoid damage to the tracks or files on the memory device.
Using external audio input AUX
- The device is equipped with a connector for external audio input (AUX), allowing connection of an audio player using a cable.
- External audio player is connected to this unit using a standard stereo cable with a 3.5 mm headphone connector.
- Press repeatedly the function button F to show "AUX" on the display.
- Turn on the external player and start playback.
- Set the volume controls on this unit and the external player to the desired level.
- The playback can only be controlled by the external player controls.
- When you finish the playback from the external player, do not forget to switch off also this device.
Charging USB port
The device is equipped with USB port on the rear panel with DC 5V power, enabling the charging of external devices. If you want to use this function, simply connect to this port, using suitable USB cable, the device you want to charge (phone or tablet). This function is active only if the radio is supplied with power using the AC adapter. The external devices will be charged after connecting automatically, even during playback.
Do not use the USB charging port if the radio is completely depleted. When the internal battery of the device is completely depleted, the charging port will not be functional, because charging the internal battery of this unit will take priority.
TECHNICAL DATA
Power: Li-Ion battery 3,7 V / 2100 mAh, built-in. AC adapter (micro-USB)
Charging power: USB 5V (500 mA or higher)
USE AND DISPOSAL OF WASTE
Wrapping paper and corrugated paperboard – deliver to scrapyard. Packing foil, PE bags, plastic elements – throw into plastic recycling containers.
DISPOSAL OF PRODUCTS AT THE END OF LIFETIME
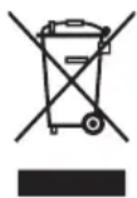
Disposal of electric and electronic equipment (valid in EU member countries and other European countries with an implemented recycling system)
The represented symbol on the product or package means the product shall not be treated as domestic waste. Hand over the product to the specified location for recycling electric and electronic equipment. Prevent negative impacts on human health and the environment by properly recycling your product.
Recycling contributes to preserving natural resources. For more information on the recycling of this product, refer to your local authority, domestic waste processing organization or store, where you purchased the product.
This product complies with EU directive requirements on electromagnetic compatibility and electrical safety.
08/05

The instruction manual is available at website www.ecg.cz.
Changes in text and technical parameters reserved.
www.ecg.cz

- BTR 1000
- PŘENOSNÉ RÁDIO S BLUETOOTH/USB/SD/FM
- PRENOSNÉ RÁDIO S BLUETOOTH/USB/SD/FM
- PRIJENOSNI RADIO UREĐAJ S BLUETOOTH/USB/SD/FM
- HORDOZHATÓ RÁDIÓ BLUETOOTH/USB/SD/FM
- MOBILES RADIO MIT BLUETOOTH/USB/SD/FM
- PORTABLE RADIO WITH BLUETOOTH/USB/SD/FM
- BEZPEČNOSTNÍ UPOZORNĚNÍ
- POKYNY K UŽÍVÁNÍ PŘÍSTROJE
- Nabíjení
- Read carefully and save for future use!
- CAUTION
- WARNING
- Electrostatic discharge:
- DESCRIPTION
- INSTRUCTIONS HOW TO USE THE DEVICE
- Charging
- Attention
- Control
- Sound control:
- Function buttons
- Wireless Bluetooth® playback (profi le A2DP Audio Streaming)
- Pairing of devices with this unit:
- Notes
- Listening to FM radio
- Manual frequency tuning
- Automatic frequency tuning
- Saving presets
- Tuning the saved preset
- Playback of MP3 songs from the USB device or SD card
- Note:
- ATTENTION: Removal of USB device or an SD card:
- Using external audio input AUX
- Charging USB port
- TECHNICAL DATA
- USE AND DISPOSAL OF WASTE
- DISPOSAL OF PRODUCTS AT THE END OF LIFETIME
- www.ecg.cz
Brand : ECG
Model : BTR 1000
Category : Radio