
TVP 7920 - TV ECG - Free user manual and instructions
Find the device manual for free TVP 7920 ECG in PDF.


| Product Type | LED TV |
| Screen Size | 32 inches (81 cm) |
| Resolution | 1366 x 768 (HD Ready) |
| Refresh Rate | 60 Hz |
| Dimensions (with stand) | 73.5 x 47.0 x 18.5 cm |
| Dimensions (without stand) | 73.5 x 43.0 x 8.0 cm |
| Weight (with stand) | 5.2 kg |
| Power Consumption (max) | 50 W |
| Power Supply | AC 100-240 V, 50/60 Hz |
| Standby Power Consumption | < 0.5 W |
| Connectivity | 2 x HDMI, 1 x USB, 1 x VGA, 1 x Composite AV, 1 x RF, 1 x Optical Audio Out |
| Smart TV | No |
| Remote Control | Included (batteries not included) |
| Wall Mount | VESA 200 x 200 mm |
| Built-in Speakers | 2 x 8 W |
| Supported Video Formats | MPEG-2, MPEG-4, H.264, H.265, VP9 |
| Supported Audio Formats | MP3, AAC, AC3, EAC3 |
| Cleaning Instructions | Use a soft, dry cloth. Do not use abrasive cleaners or liquids directly on screen. |
| Safety Notices | Place on a stable surface. Do not expose to rain or moisture. Unplug during thunderstorms. |
| Spare Parts Availability | Contact ECG customer service for remote control, power cord, and stand. |
| Repairability Index | 7.0 / 10 (based on user rating) |
Frequently Asked Questions - TVP 7920 ECG
User questions about TVP 7920 ECG
0 question about this device. Answer the ones you know or ask your own.
Ask a new question about this device
Download the instructions for your TV in PDF format for free! Find your manual TVP 7920 - ECG and take your electronic device back in hand. On this page are published all the documents necessary for the use of your device. TVP 7920 by ECG.
USER MANUAL TVP 7920 ECG
natural_image
Digital ECG tablet displaying a smiling girl holding an apple, with green window and window frame in background (no text or symbols on device body)TVP 7920 DVB-T
PŘEHRÁVAČ S DVB-T
NÁVOD K OBSLUZE
CZ
PREHRÁVAČ S DVB-T
NÁVOD NA OBSLUHU
SK
ODTWARZACZ Z TUNEREM DVB-T
INSTRUKCJA OBSŁUGI
PL
LEJÁTSZÓ DVB-T VEVŐVEL
HASZNÁLATI ÚTMUTATÓ
HU
PLAYER MIT DVB-T
BEDIENUNGSANLEITUNG
DE
PLAYER WITH DVB-T TUNER
INSTRUCTION MANUAL
EN
BEZPEČNOSTNÍ UPOZORNĚNÍ
2) Software-Upgrade:
Read carefully and save for future use!
Warning: The safety measures and instructions, contained in this manual, do not include all conditions and situations possible. The user must understand that common sense, caution and care are factors that cannot be integrated into any product. Therefore, these factors shall be ensured by the user/s using and operating this appliance. We are not liable for damages caused during shipping, by incorrect use, voltage fluctuation or the modification or adjustment of any part of the appliance.
To protect against a risk of fire or electric shock, basic precautions shall be taken while using electrical appliances, including the following:
-
Read and follow the instructions – all instructions with reference to safety and operation shall be read before using the product.
-
Keep these instructions – safety and operating instructions shall be kept for future reference.
-
Pay attention to all warnings – all warnings on the device and in the manual must be remembered.
-
Proceed according to the instructions – follow all instructions for use and operation.
-
Do not expose the device to water that drips or is sprayed or to moistness – and no objects containing liquids (e.g. vases) shall be placed on or near the device.
-
Clean only with dry towel – always unplug the power cord before cleaning. Do not use liquid or aerosol cleaning agents. Clean only with dry cloth.
-
Do not cover ventilation openings. Install according to the manufacturer's recommendations – Openings on the device cover serve as air vents and ensures proper operation and prevents overheating, these vents must not be covered or otherwise closed. The holes should never be covered by placing the device on a blanket, sofa, carpet or similar surface. This product should not be placed in built-in installations, such as libraries or shelves, if there is not proper ventilation provided or the manufacturer's instructions are not respected.
-
Do not install close to any heat sources, such as radiators, heat exchangers, heaters and other appliances (including amplifiers), which produce heat.
-
Do not bypass the safety function of a grounded outlet. The ground prong is for your safety. If you cannot insert the plug into your outlet, ask an electrician to change the obsolete outlet.
-
Power cords should be lead in such manner to avoid stepping on them or being squeezed by objects lying on them or pushed up against them. This especially applies to cords by plugs, sockets, and in places, where they exit the device.
-
Use only accessories recommended by the manufacturer. Unapproved accessories can be dangerous.
- Unplug the device from the outlet and antenna during a storm or if you do not plan to use for a longer period of time. This way you can avoid damaging the device by lightning or excess voltage in the electrical network.
- All servicing should be done by a qualified service staff. The device requires servicing if damaged any way, for example, the power cord becomes damaged, liquid or a foreign object penetrated the device, the device was exposed to rain or moistness, the device operation is not normal, or the device has fallen.
- Only use the voltage specified on the label. If you are not sure about the type of power source inside your household, refer to the product vendor or your local power company.
- The exterior antenna system should not be in the vicinity of an electric main, or other power circuits and in places, where a similar electric main or circuit may fall. When installing the exterior antenna, you must be very cautious not to come into contact or near an electric main or circuits, for this kind of contact could be fatal.
- Do not overload electric outlets or extension cords. Risk of fire or electric shock.
- Prevent liquid or foreign objects penetrating the device. This could lead to a short circuit, electric shock or fire.
- Do not attempt to repair the machine on your own; by opening or removing the cover, you can expose yourself to dangerous voltage or other dangers. All servicing should be done by a qualified service staff.
Safety measures
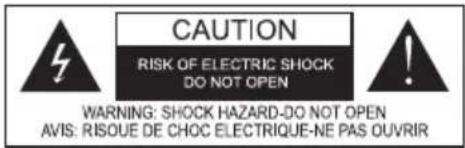

The lightning bolt symbol inside an equilateral triangle warns the user of the presence of non-insulated "dangerous" voltage inside the product, which is high enough to cause injury.

The exclamation point inside an equilateral triangle warns the user of the presence of important instructions for the control and maintenance (service) in the accompanying documentation supplied with the device.
WARNING: Do not expose the product to rain or humidity, there is danger of fire or electric shock. Dangerous voltage inside cover. Do not open the cover.
ATTENTION: Plug the cord correctly and completely into the outlet.
High volume
WARNING:
Excessive acoustical pressure from headphones can cause hearing damage. To prevent damage to your hearing, avoid listening at high volumes for longer periods of time.
CONTENTS
SAFETY INFORMATION....73
CONTROLS....75
CONNECTION 76
USING THE DEVICE AND SYSTEM MENU ....78
TROUBLESHOOTING....85
TECHNICAL SPECIFICATIONS....85
EN
CONTROLS
Remote controller
1. SOURCE
Switch between DVB and AV mode
2. Numerical buttons
Direct channel number or menu entry
3. RED button
4. GREEN button
5. FAV
Favourite mode on/off
6. ENTER
Activate highlighted items
7. RIGHT/LEFT
Move cursor in menu left/right
8. UP/DOWN
Switching Channels. Move cursor in menu up/down
9. SETUP
Display menu on screen
10. REPEAT
Replay file on USB or memory card.
11. TV/RADIO
Switching between TV And radio
12. EXIT
Return to previous screen
13. DISPLAY
Display information about the current channel
14. MUTE
Toggle audio on/off
15. SCAN
Activates the tuning menu
16. SUBTITLE (YELLOW)
Displays the menu for selecting subtitles
17. AUDIO (BLUE)
Audio source selection
18. STOP
Stops playback from USB or memory card
19. Button ▶II
Pause and resume playback
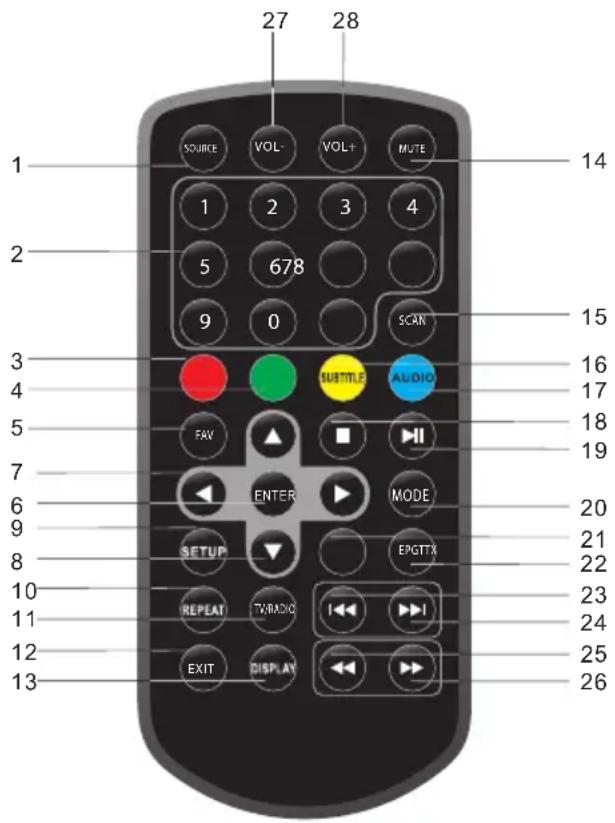
20. MODE
TFT display parameter settings (including brightness, contrast and tone)
21. TTX
Displays teletext (if available)
22. EPG
Displays the programme guide (if available)
23. Button
Skips to previous fi le
24. Button ▶▶
Skips to next fi le
25. Button ◀◀
Rewind
26. Button ▶▶
Fast forward
27./28. VOL+/VOL-
Volume control
EN
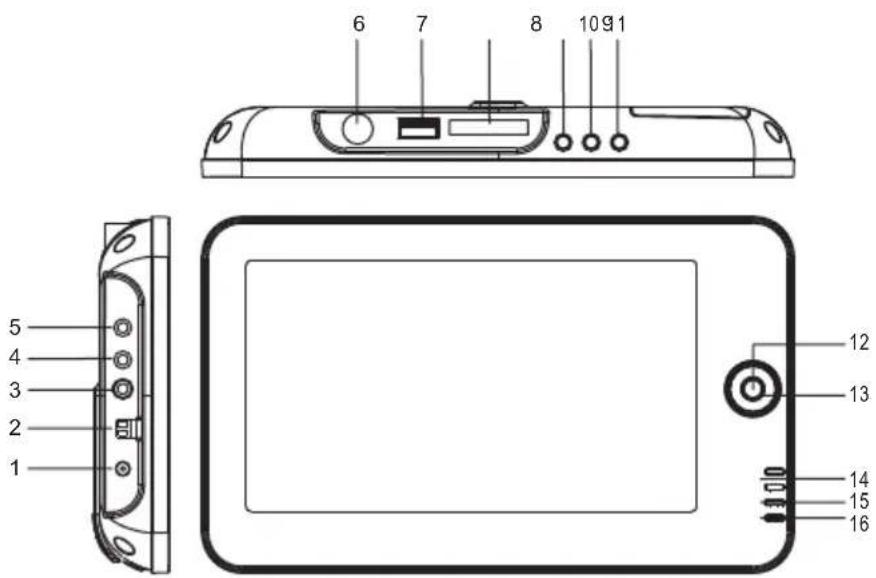
Device
- Power DC IN 9-12 V
- On/Off switch
- Headphones jack
- AV input connector
- AV output connector
- Antenna connector
- USB connector
- SD/MMC card slot
- SETUP: Enter setup menu
- EXIT: Return to previous screen
- SOURCE: Switch between DVB and AV mode
- ENTER: Activate highlighted items
- Direction buttons
- IR remote controller receiver
-
POWER indicator: Red: on
-
CHARGE indicator: Red: charging Green: Charged
CONNECTION
Power supply connection
Plugging into outlet
Attention:
- Do not plug the power cord into an outlet with a voltage other than specified.
- Do not handle the power cord with wet hands. Risk of electric shock.
• Do not use a power supply other than the one specified, otherwise the device can be damaged.
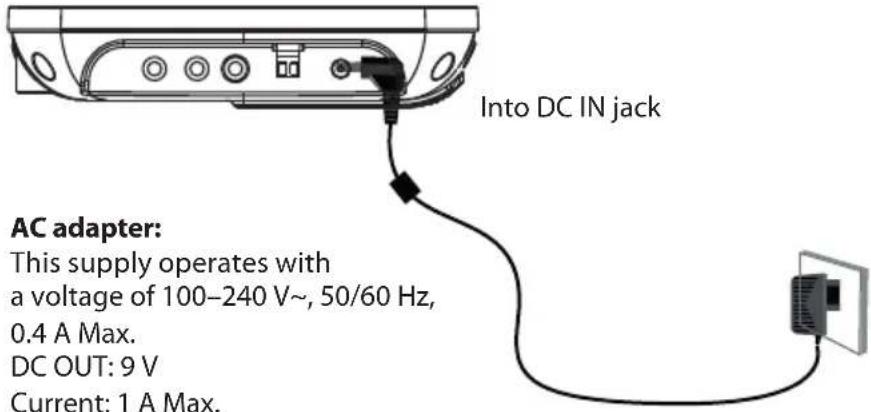
EN
Using a car adapter
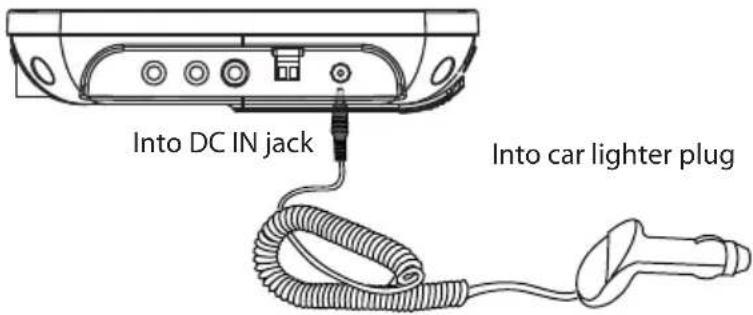
If you are not using the device, unplug the adapter from the car lighter plug.
Antenna connection
- Attach the included antenna to the antenna terminal on the side of the device.
- Place the antenna on a fl at surface.
If the signal is weak, move the antenna or direct it towards a different direction to achieve better reception.
Embedded battery
The device is equipped with an embedded battery. Before using the device for the first time, charge the battery.
Notes:
- Use a designated charger.
- Do not throw into fires or heat up.
- Do not use at high temperatures or near sources of heat.
- Do not open the cover.
• Servicing should be done by a qualified service staff.
• To ensure maximum service life for your battery, charge at room temperature.
Headphones connection
Before connecting headphones, make sure the device volume is set to the minimum level. Continue by gradually increasing the volume to an adequate level.
ATTENTION: Physicians warn against using headphones at high volumes for a longer period of time. Listening at high volumes for longer periods of time can cause hearing damage. If you hear a ringing noise in your ears or observe hearing loss, stop using the headphones and seek medical attention.
Connecting a USB stick or memory card
The loading of data lasts a certain period of time. If you would like to unplug the device, turn it off first and then unplug.
AV signal output
To transfer the AV signal of the device (in AV mode) to an external display system, connect the output AV connector with the AV input of the external device.
NOTE: 1. Follow the instructions in the manual of the connected device.
- Before making the connection, switch off and unplug both devices.
Preparing the remote controller
Direct the remote controller towards the remote control sensor on the device. The controller does not necessarily have to work properly if the sensor is covered, there is an obstacle between the sensor and controller, or the sensor is exposed to sunlight or a strong source of light. In this case, change the location of the device or source of light.
USING THE DEVICE AND SYSTEM MENU
Settings via the MODE button
PICTURE
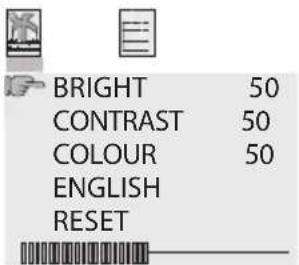
BRIGHT: Brightness settings CONTRAST: Contrast settings COLOUR: Colour settings ENGLISH: OSD settings RESET: Reset to default value
FUNCTION
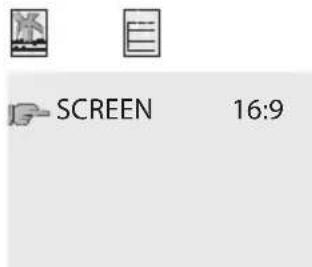
SCREEN: Brightness settings
Main menu
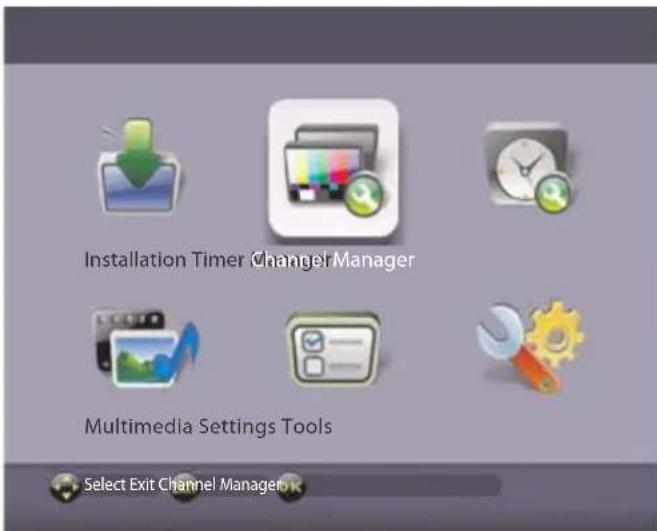
Pressing SETUP displays the main menu, which contains several menus for device configuration and control. Each menu is described in the following paragraphs.
EN
1. Installation
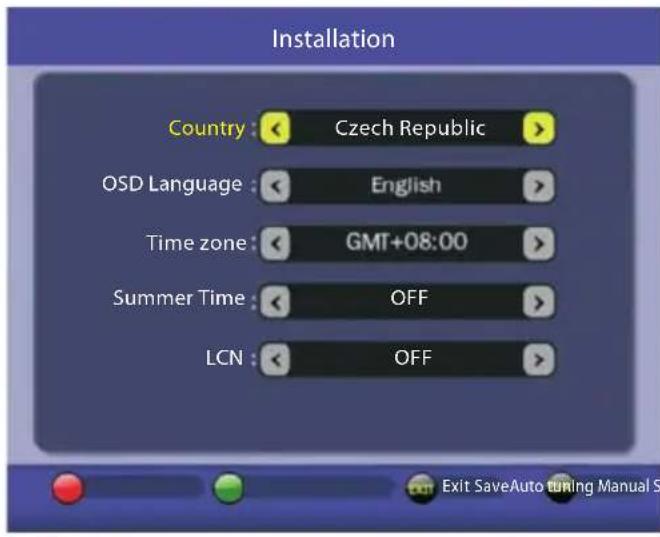
Country: Select a country using the
Menu language: Select an OSD menu language using the
Time zone: Select a time zone using the
Daylight savings time: Select daylight savings time settings using the
LCN: Select LCN settings using the
- Press the red button to run automatic channel tuning.
- Press the green button to run manual channel tuning.
- Press EXIT to return to the main menu.
- Press OK to save the settings and return to the main menu.
Manual tuning
Press the green button in the "Installation" menu to start manual tuning.
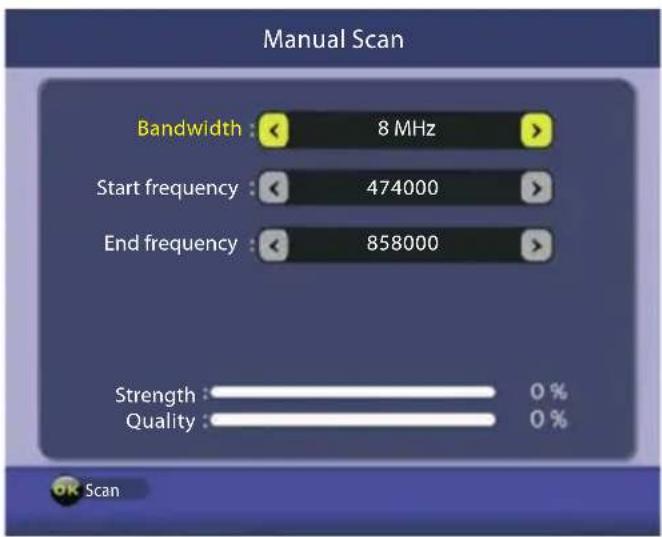
Bandwidth: Change the bandwidth using the
Start frequency: Change the start frequency in your country using the
End frequency: Change the end frequency in your country using the
- Select an item with the
/ arrow.
• Edit the value with the/ arrow. - Press OK to run manual tuning.
Auto-tuning
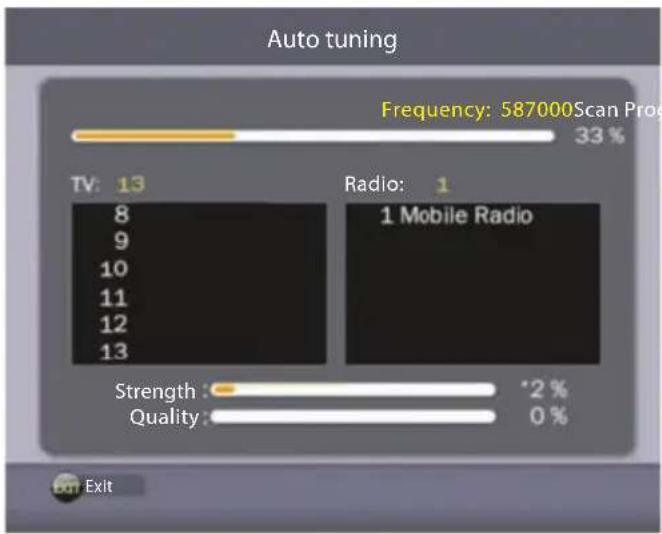
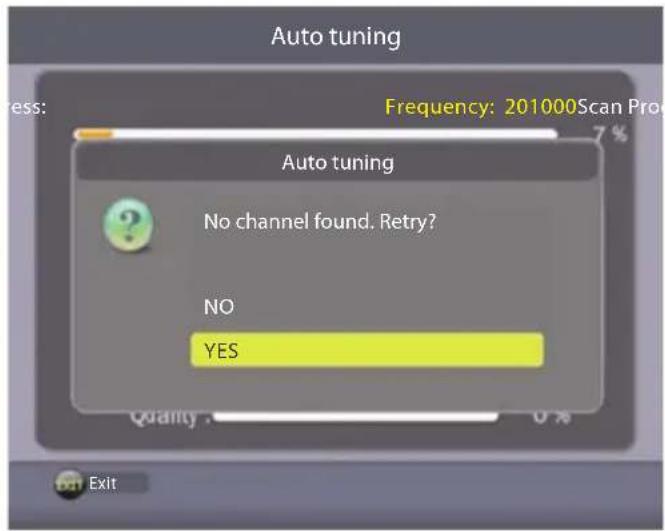
Press the red button in the "Installation" menu to start auto-tuning channels. After channels are found, you may begin watching the TV channels. If no channels are found, you can restart the auto-tuning session by selecting YES, or select NO to return to the "Installation" menu.
EN
2. Channel Manager
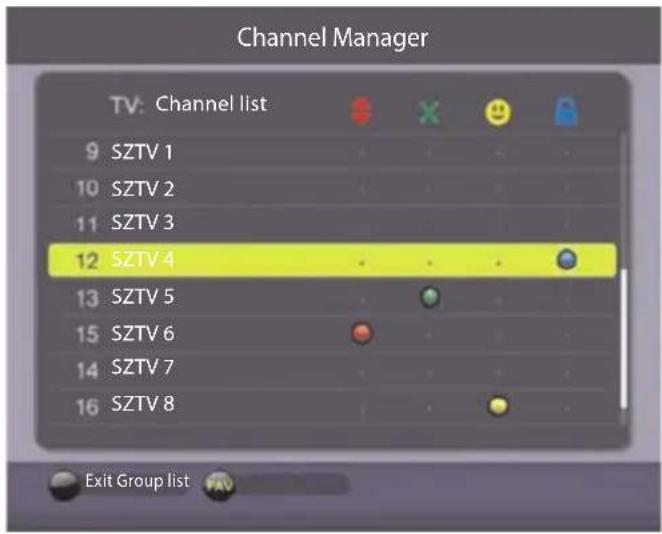
The channel guide enables changing the order of channels, removing unnecessary channels, lock channels or set favourite channels.
- To change the order of channels, press
on the desired channel and move the channel to the correct position with the / arrows. Press the again to confirm the new order of channels. - Press the
to discard the channel from the list. - Press the
to set the channel as a favourite channel. - Press the
to activate the channel lock.
Buttons functions:
Button Functions
Up/Down Select or move channel
Left/Right Empty
Red Move channel
Green Delete channel
Yellow Favourite channel settings
Blue Channel lock settings
EXIT Return to main menu
3. Timer Manager
Timer settings enable modifying various timer configuration, such as scheduling programmes, auto-shutdown or the auto-tuning interval.
![Timer Manager Programme timer [Back] EnterSelect Back](/content/2026/05/844662/images/7a25f29114faffaa41d0e972db9703774b105fca8384ba91df4127e21df24b8d.jpg)
Programme timer
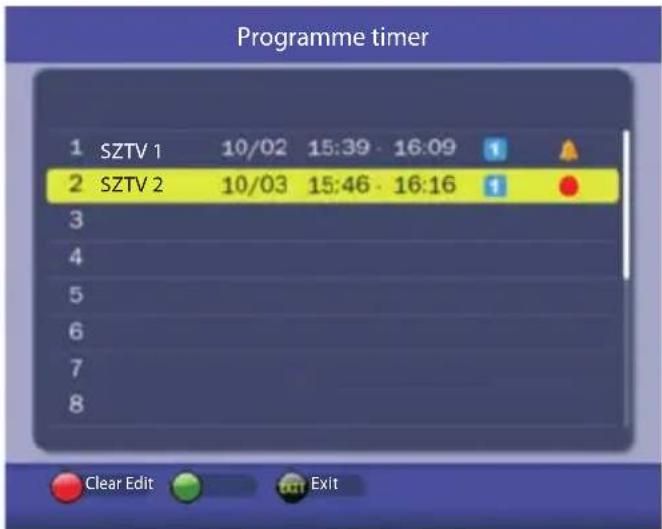
With the programme timer, the device can be switched on or off at a defined time, or you can schedule recording times in advance.
The scheduled device ON function automatically switches the device ON from standby mode and runs the reproduction of the programme from the Programme timer. If the device is already switched ON, the display will show a warning message saying the device will switch channels to the channel broadcasting the specified programme.
Button Functions
Up/Down Time selection
Left/Right Empty
Red Delete timer
Green Add new timer or edit existing timer
EXIT Return to "Timer manager" menu
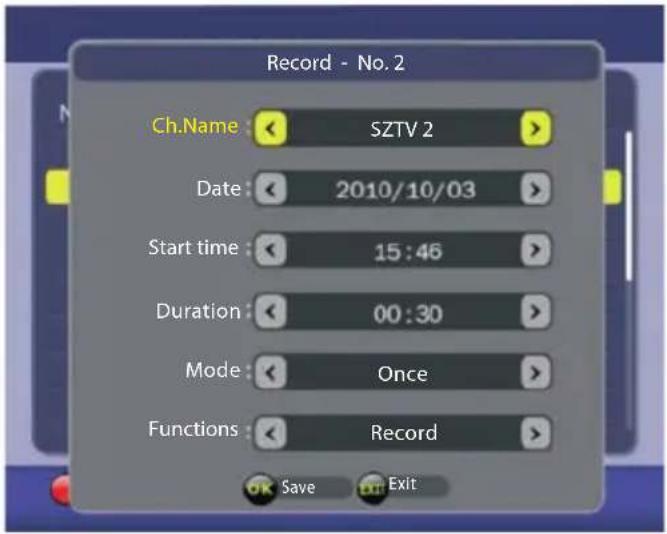
Timer configuration:
Defi ne buttons
Button Functions
Up/Down Press to select desired item
Left/Right Press to set value
OK Press to save current settings
EXIT Return to "Timer manager" menu
Item Description
Channel name Select desired channel
Date Setting the play date
Start time Setting the play start time
Duration Setting the duration (default: 30 minutes)
Mode Once, daily, weekly
Functions Set whether the timer should operate as an alarm.
4. Multimedia
This device offers a series of multimedia functions, such as playing music, films, displaying photos, or digital PVR recording. Multimedia content can be stored to a memory card or USB memory device.
![Multimedia Music Photo Movie PVR [Back] Select Back Enter](/content/2026/05/844662/images/9bc050cddc24e5fa45e0e0374f1bd9e1b02e41e0fdc21d1c4f0f584a33d0bc3e.jpg)
EN
1) Music: After opening the directory with music files (supported formats: MP3 and WMA) the track list will be displayed. Use the
2) Photo: The photograph viewer (supported formats: JPG and BMP) has three operating modes: Thumbnail, viewing and slide mode.
3) Film: The video player allows watching films stored to a memory card or USB memory device. The following is a list of supported formats (only in standard resolution):
MPEG1 dat, avi
MPEG2 mpg, vob
MPEG4 divx, xvid, mp4, avi
4) PVR: This function can be used for playing videos obtained through instant recording or scheduled recording. From the main menu select Multimedia and then PVR. Wait 2 to 3 seconds, until the screen with previews appears, and press
5. Settings
This menu contains all TV settings, such as language, picture, recording and parent lock.
![Settings Language Preference Display Preference Parental Control [Back] EnterSelect Back](/content/2026/05/844662/images/df63b23f250611ed89611d7dec3ec445ab69a4ca24c03f5157ea3213a5478204.jpg)
1) Language Preference: Here you can set the programme guide language (EPG), audio track language and subtitle language.
2) System settings
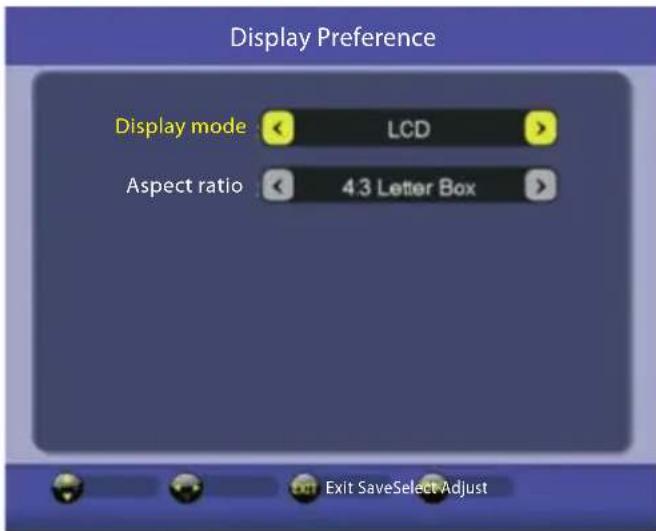
Display mode:
Display device selection.
Aspect ratio:
4:3 Letter Box, 4:3 Pan & Scan, 16:9 Pillar Box, 16:9 Full Screen

3) Parental Control
(Default password: 1234)
This function helps protect children against unsuitable content. Critical parameters can be modified here. The password (PIN) must be entered to watch channels with a classification equal or higher than the value configured for the parent lock, and also to change these parameters. You can also change you access password (PIN) in this menu.
Menu lock Activate or deactivate the menu lock
Channel Lock Activate or deactivate the channel lock
Maturity Lock: Setting the parent lock classification level (Off, 4 – 18 years)
PIN code Password change (PIN code)
6. Tools
With this menu, you can manage memory devices, update firmware, perform a factory reset and determine information about the firmware version.
![Tools Storage Manager Software update Factory reset Software information [Back] EnterSelect Back](/content/2026/05/844662/images/6d62403d254d6dd17c8fec8f92904574ea0c8cccff4ca619ed1489c9432cb088.jpg)
1) Storage Manager:
It provides information about memory devices currently connected to the device.
2) Firmware update:
Select the memory device that contains the new firmware using the
3) Factory reset:
Resets to factory default settings.
4) Software Information
TROUBLESHOOTING
If any issues come up with the device, check this list of resolutions first.
| Problem Cause Solution | ||
| No image The power supply is | not connected. | Connect the power supply. |
| The on/off switch is not on. Turn on | the on/off switch. | |
| The display shows “No signal” | The DVB-T antenna cable is not connected. | Connect the DVB-T antenna cable. |
| Incorrect settings. Reset the settings. | ||
| No sound is coming from the speaker | The audio cable is not connected properly. | Connect the audio cable properly. |
| The audio is played at a low volume. | Activate the sound by pressing. | |
| Incorrect audio track. Try another audio track. | ||
| Only audio can be heard, no image | This is a radio programme. Pressto switch to TV mode. | |
| The remote controller does not work | The batteries are dead. Replace the batteries | |
| The remote controller is too far or is not directed at the sensor. | Direct the controller at the remote control sensor and move closer to the device. | |
| The image keeps freezing up or forms a mosaic image. | The signal is weak. Increase the signal strength. |
TECHNICAL SPECIFICATIONS
| Tuner Input frequency 170~230 MHz | 470~860 MHz | |
| Video | Decoder | MPEG2 MP@ML.HL |
| Output format | PAL/NTSC | |
| Output connector CVBS | ||
| Audio | Decoder | MPEG-1 (layer 1&2) |
| Power | Voltage | 100–240 V~50/60 Hz |
| Power input | Max 8 W | |
| Power adapter | 9 V DC / max. 0.6 A | |
| USB2.0 | Photo | JPEG, BMP |
| Audio | MP3, WMA | |
| Video | MPEG1, MPEG2, MPEG4, AVi | |
USE AND DISPOSAL OF WASTE
Wrapping paper and corrugated paperboard – deliver to scrapyard. Packing foil, PE bags, plastic elements – throw into plastic recycling containers.
DISPOSAL OF PRODUCTS AT THE END OF LIFETIME
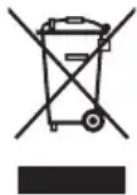
Disposal of electric and electronic equipment (valid in EU member countries and other European countries with an implemented recycling system)
The represented symbol on the product or package means the product shall not be treated as domestic waste. Hand over the product to the specified location for recycling electric and electronic equipment. Prevent negative impacts on human health and the environment by properly recycling your product.
Recycling contributes to preserving natural resources. For more information on the recycling of this product, refer to your local authority, domestic waste processing organization or store, where you purchased the product.
This product complies with EU directive requirements on electromagnetic compatibility and electrical safety.
Changes in text and technical parameters reserved.
08/05

EN
K+B Progres, a.s. (dále jen K+B), IČO: 61860123
- TVP 7920 DVB-T
- PŘEHRÁVAČ S DVB-T
- PREHRÁVAČ S DVB-T
- ODTWARZACZ Z TUNEREM DVB-T
- LEJÁTSZÓ DVB-T VEVŐVEL
- PLAYER MIT DVB-T
- PLAYER WITH DVB-T TUNER
- BEZPEČNOSTNÍ UPOZORNĚNÍ
- 2) Software-Upgrade:
- Read carefully and save for future use!
- Safety measures
- High volume
- WARNING:
- CONTENTS
- CONTROLS
- Remote controller
- SOURCE
- Numerical buttons
- RED button
- GREEN button
- FAV
- ENTER
- RIGHT/LEFT
- UP/DOWN
- SETUP
- REPEAT
- TV/RADIO
- EXIT
- DISPLAY
- MUTE
- SCAN
- SUBTITLE (YELLOW)
- AUDIO (BLUE)
- STOP
- Button ▶II
- MODE
- TTX
- EPG
- Button
- Button ▶▶
- Button ◀◀
- Button ▶▶
- 27./28. VOL+/VOL-
- Device
- CONNECTION
- Power supply connection
- Plugging into outlet
- Attention:
- Using a car adapter
- Antenna connection
- Embedded battery
- Notes:
- Headphones connection
- Connecting a USB stick or memory card
- AV signal output
- Preparing the remote controller
- USING THE DEVICE AND SYSTEM MENU
- Settings via the MODE button
- Main menu
- Installation
- Manual tuning
- Auto-tuning
- Channel Manager
- Button Functions
- Timer Manager
- Programme timer
- Item Description
- Multimedia
- EN
- Settings
- 3) Parental Control
- Tools
- 1) Storage Manager:
- 2) Firmware update:
- 3) Factory reset:
- 4) Software Information
- TROUBLESHOOTING
- USE AND DISPOSAL OF WASTE
- DISPOSAL OF PRODUCTS AT THE END OF LIFETIME
- Disposal of electric and electronic equipment (valid in EU member countries and other European countries with an implemented recycling system)
Brand : ECG
Model : TVP 7920
Category : TV