C3040 ZOOM - Digital Camera OLYMPUS - Free user manual and instructions
Find the device manual for free C3040 ZOOM OLYMPUS in PDF.

| Product type | Digital camera |
| Brand | OLYMPUS |
| Model | C3040 ZOOM |
| Dimensions (W x H x D) | 109.5 x 76.4 x 69.6 mm (without accessories) |
| Weight | 307 g (without batteries and SmartMedia card) |
| Power supply | 2 CR-V3 lithium batteries or 4 AA NiMH/Ni-Cd/alkaline/lithium batteries; AC adapter optional |
| Sensor | CCD 1/1.8 inch, 3.34 million pixels (total) |
| Maximum resolution | 2048 x 1536 pixels (TIFF, SHQ, HQ) |
| Lens | Olympus 7.1–21.3 mm (35–105 mm equiv.), f/1.8–f/2.6, 10 elements in 7 groups |
| Optical zoom | 3x |
| Digital zoom | Up to 5x (adjustable in menu) |
| Viewfinder | Real-image optical viewfinder with autofocus target |
| LCD screen | 1.8-inch color TFT LCD, approx. 114,000 pixels |
| Exposure modes | Program Auto, Aperture Priority, Shutter Priority, Manual |
| Shutter speed | Program: 1–1/800 s; Priority: 4–1/800 s; Manual: 16–1/800 s |
| Aperture | Wide-angle: f/1.8–f/10; Telephoto: f/2.6–f/10 |
| Built-in flash | Modes: auto, red-eye reduction, forced, off; range approx. 0.8–5.6 m (W) |
| Storage media | 3V SmartMedia cards (3.3 V): 4, 8, 16, 32 or 64 MB |
| Connectivity | USB, RS-232C serial, A/V output (PAL), DC input, external flash sync terminal |
| Video recording | QuickTime Motion-JPEG, up to 300 s (32 MB card) in SQ quality |
| Special functions | DPOF, protect, erase, self-timer (12 s), optional remote control, exposure compensation |
| Maintenance and cleaning | Clean with a soft, dry cloth; do not use solvents; avoid moisture |
| Safety | Do not open the casing; remove batteries if not used for extended periods; use only Olympus accessories |
| Spare parts / repairability | SmartMedia cards, batteries, AC adapter, cables, case, optional FL-40 external flash; repair by authorized service centers |
Frequently Asked Questions - C3040 ZOOM OLYMPUS
User questions about C3040 ZOOM OLYMPUS
0 question about this device. Answer the ones you know or ask your own.
Ask a new question about this device
Download the instructions for your Digital Camera in PDF format for free! Find your manual C3040 ZOOM - OLYMPUS and take your electronic device back in hand. On this page are published all the documents necessary for the use of your device. C3040 ZOOM by OLYMPUS.
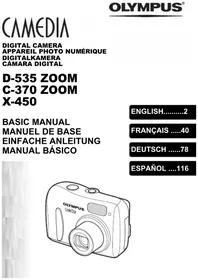
USER MANUAL C3040 ZOOM OLYMPUS
Thank you for purchasing an Olympus digital camera. Before you start to use your new camera, please read these instructions carefully to enjoy optimum performance and a longer service life. Keep this manual in a safe place for future reference.
- IBM is a registered trademark of International Business Machines Corporation.
Microsoft and Windows are registered trademarks of Microsoft Corporation.
Macintosh is a trademark of Apple Computer Inc. - All other company and product names are registered trademarks and/or trademarks of their respective owners.
- The standards for camera file systems referred to in this manual are the "Design Rule for Camera File System/DCF" standards stipulated by the Japan Electronics Industry Development Association (JEIDA).
CONTENTS/TABLE DES MATIÉ/INHALT/CONTENIDO
PRECAUTIONS (in English only) 3
ENGLISH 5
FRANCAIS 41
DEUTsCH 77
ESPANOL 113
IMPORTANTNOTICES
Disclaimer of Warranty
Olympus makes no representations or warranties, either expressed or implied, by or concerning any content of these written materials or software, and in no event shall be liable for any implied warranty of merchantability or fitness for any particular purpose or for any consequential, incidental or indirect damages (including but not limited to damages for loss of business profits, business interruption and loss of business information) arising from the use or inability to use these written materials or software. Some countries do not allow the exclusion or limitation of liability for consequential or incidental damages, so the above limitations may not apply to you.
Copyright Notice
All rights reserved. No part of these written materials or software may be reproduced or used in any form or by any means, electronic or mechanical, including photocopying and recording and the use of any kind of information storage and retrieval system, without prior permission in writing from Olympus. No liability is assumed with respect to the use of the information contained in these written materials or software, or for damages resulting from the use of the information contained in these written materials or of the software. Olympus reserves the right to alter the features and contents of this publication or software without obligation or advance notice.
WARNING
Unauthorised photographing or use of copyrighted material may violate applicable copyright laws. Olympus assumes no responsibility for unauthorised photographing, use or other acts that infringe upon the rights of copyright owners.

CAUTION
Caution concerning the flash
- Be careful when taking pictures at close range.
- Do not take pictures of people's faces (babies in particular) at close range. If the flash goes off too close to someone's eyes it may cause a loss of vision. In particular, when taking pictures of babies, be sure that the distance is at least 1m .
Be careful when handling the unit
- Do not use in an unstable position. If you lose your balance, you might get hurt.
- Be careful that no foreign substance (dirt, rain, sand) can enter the unit, particularly when the battery cover or lens barrier is open, as it may cause damage.
- To prevent damage, do not drop the camera or subject it to severe shock or vibration.
- This camera is not water-resistant. Do not put it in water, and be careful to protect it from rain, sea water, etc.
- Do not use the camera outside during a storm or when there is lightning.
- When replacing the batteries, make sure the power is OFF. If it is left ON, it may damage the internal circuits.
Storage environment
To avoid damage or mis-operation of the camera, only store it where the temperature is -20 60^ and the humidity 10 90% .
- Do not store in humid places, as condensation may form and cause damage.
- To prevent injuries or accidents, keep the camera out of the reach of children.
Usage environment
- Do not use where there may be a large concentration of flammable or explosive gases, as it may cause a fire or explosion.
- To avoid damage or mis-operation of the camera, use it only if the temperature is 0 40^ and the humidity 30 90% .
- Do not move the camera suddenly from a hot to cold place, or vice versa. It may cause the formation of condensation inside the unit that may damage it. To prevent the formation of condensation, put the camera in a plastic bag, etc. to protect it and wait until the camera has reached the ambient temperature before taking it out.
- If used in low temperatures, the batteries will have a shorter life span than normal.
Precautions when handling the batteries
To prevent leakage, fire, or damage, please read the instructions carefully and observe the following points:
- Do not heat or throw the batteries into a fire.
- Do not disassemble, modify or solder.
- Do not install with inverted polarity (+, -).
- Do not let metal objects touch the contacts. Do not store or carry loosely with necklaces or hairpins.
- Do not use old batteries together with new ones, and do not use different types of batteries at the same time.
- Do not store them in humid places as they may corrode.
- Do not use if something seems to be wrong.
- Do not use if there is leaking, swelling, a rise in temperature, or any other abnormal condition.
- When using them for the first time, if there are signs of corrosion or if they are warm, please take them back to where they were bought.
- Never use any battery whose body is not fully covered by the insulating sheet or the sheet is torn as it may cause leak, fire or injury. Some commercially available batteries are also partially covered, or not covered at all by the insulating sheet. Never use these batteries.
PRECAUTIONS (Cont.)

CAUTION
If there is a leak
- If the liquid gets into your eyes, do not rub them. Rinse with clean water, then seek medical attention immediately.
If the liquid gets in contact with your skin or clothing, rinse with clean water. - If the liquid has leaked inside the battery compartment, clean it carefully with a wet rag before inserting new batteries.
When the batteries are dead, take them out of the camera
- If old batteries are left inside the camera, they may leak. If the camera is going into storage or if you intend not to use the camera for a long period of time, remove the batteries.
Do not use in an airtight device
It may cause the batteries to leak and/or the camera to be damaged.
Do not recharge alkaline or lithium batteries
- Do not attempt to recharge Lithium batteries as this could result in serious injury.
Keep out of the reach of children
- Make sure children do not take the batteries out when using the camera. If a child is going to use the camera, be sure to teach the child proper usage according to this manual.
- When disposing of old batteries, be sure to do so in accordance with all applicable regulations in your area.
Precautions on using accessories
- Be sure to use only the supplied accessories, or accessories recommended by the manufacturer, otherwise fire, electric shock or damage may result. For more information, please consult the dealer where the unit was purchased.
- Do not keep the AC adaptor connected when not using the camera, otherwise fire, electric shock or damage may result.
- To prevent electric shock and damage, do not plug, connect or handle the AC adaptor with wet hands.
- Do not modify, bend forcibly, pull strongly, scratch, etc., or otherwise alter the AC adaptor power cord. Also, do not put heavy objects on the power cord, or place it close to a heat source as it may result in a fire or electric shock.
Points to verify before using the camera
- If taking particularly important pictures or if you have not used the camera for a long period, first confirm that it functions properly, or consult an Authorized Service Centre.
We decline all responsibility concerning the loss of data, down time, loss of revenue or any other direct or indirect damage or claims caused by this camera.
Do not use or store in a hot place (e.g. inside a closed car on a hot and sunny day)
It may shorten their service life. Store in a dry cool place protected from direct sunlight.
Notes on display and backlight
- The Control panel and the fluorescent lamps used in the LCD monitor have a limited service life. If they begin to darken or flicker, contact your nearest service center.
- In cold conditions, the display backlight may be slow to come on or may change color suddenly. To avoid this, keep the camera warm when using in cold temperatures. Backlight performance will return to normal under normal temperature conditions.
- When the color LCD monitor shows different pictures, some pixels may not change color and remain on or off. This phenomenon may be due to a lag in some circuits, but is considered to be within the normal operating tolerances of the LCD monitor. In addition, the brightness of the color LCD monitor may vary between pictures.
CONTENTS
GETTING STARTED 6
BASIC FUNCTIONS 16
RECORDING FUNCTIONS 22
PLAYBACK FUNCTIONS 24
PRINTINGPICTURES 32
DOWNSLOADING IMAGES TO YOUR COMPUTER 33
ERROR CODES 35
SPECIFICATIONS 37
GETTING STARTED
PACKAGE CONTENTS

Camera
Lens cap

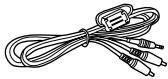
A/V cable
Strap
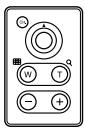
Remote control
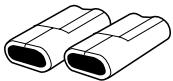
CR-V3 Lithium Battery Pack (2)
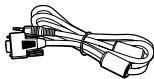
RS-232C PC serial cable
Warranty
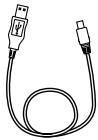
USB cable

Remote Control Instructions
Instructions

(Basic Manual/Quick start Guide)


Lens cap cord

Software CDs (including Windows 98 USB driver Installer Software/Reference Manual)
SmartMedia card (1)

Static-free SmartMedia case
SmartMedia labels (2)

SmartMedia Instruction
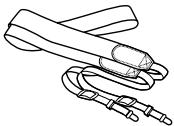
ATTACHING THE STRAP
Thread the strap through loop and fastener as indicated by the arrows in the figure. Then check that the strap does not loosen or come undone when pulled.

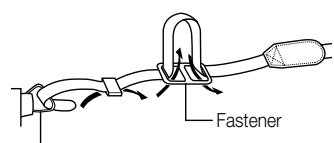
Strap eyelet
NAME OF PARTS
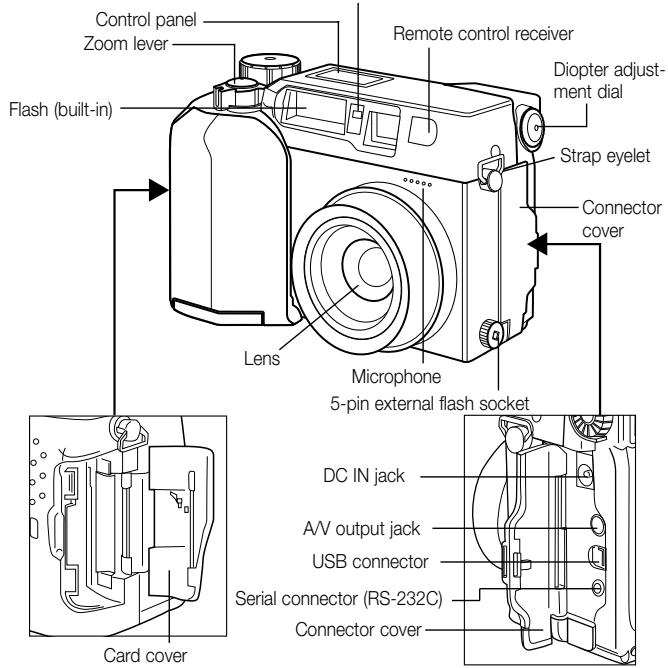
Camera
Camera
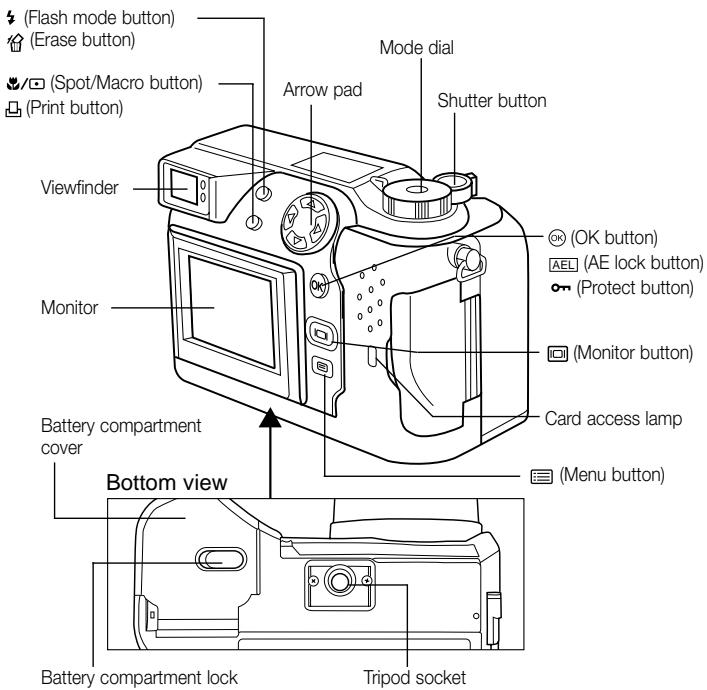
Viewfinder
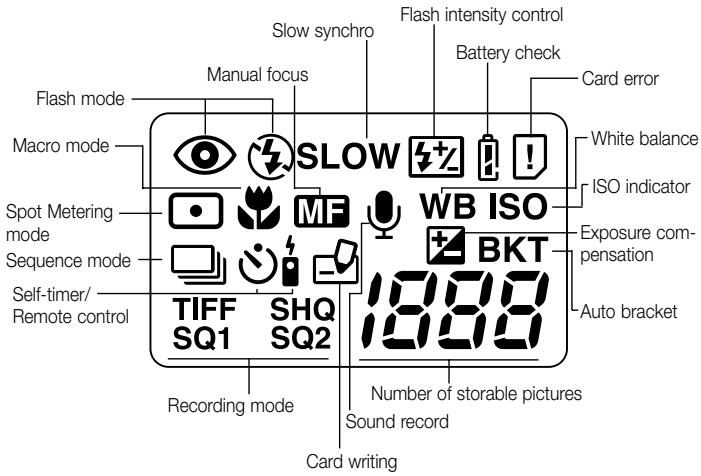
Control panel display
Monitor display
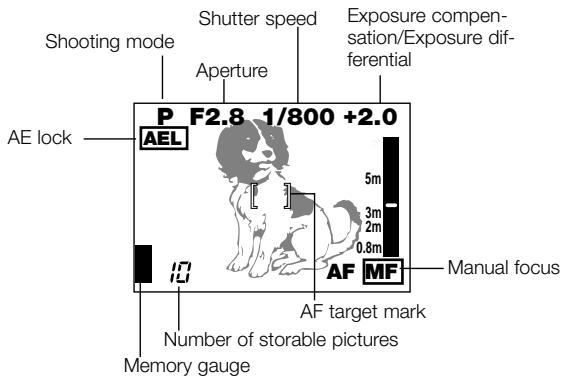
(During Shooting)
(During Playback)
DISPLAYING IMAGE INFORMATION
Displaying image information for pictures
When you set image information display to "ON", the following information appears on the LCD monitor.
Displaying image information for movies
During movie playback
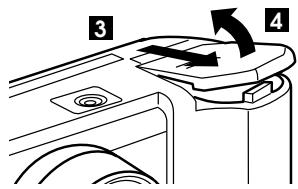
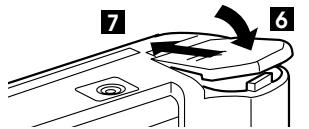
LOADING THE BATTERIES
Check that the camera is off and load the batteries as shown in the illustrations below. Note that CR-V3 lithium battery packs cannot be charged.

5 When using AA-size batteries
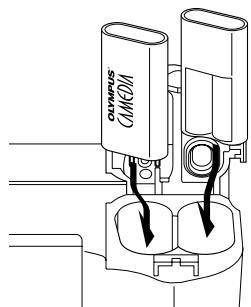
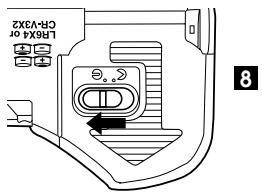
5 If you are using lithium battery packs
Life of the lithium battery pack
| Photography/Display | Conditions | Battery Life |
| Number of shots | ① | Approx. 400 |
| Playback time | ② | Approx. 360 minutes |
- The figures in the table are for reference purposes only. Actual results may differ.
① Two continuous shots repeated at 10-minute intervals at normal temperature (25^) . Flash used for 50% of the shots, the lens zoomed in and out once for each shot, and full-time AF and digital zoom both switched off. (No images displayed and no communication with a PC.)
② Continuous display in Automatic Playback mode, repeatedly switching the camera back on immediately after it automatically powers off and then restarting automatic playback.
Using a domestic AC wall outlet
To connect your camera to an ordinary domestic AC wall outlet, you need the optional AC adapter.
Consult your nearest Olympus dealer or Service center for details.
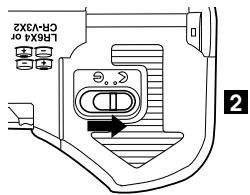
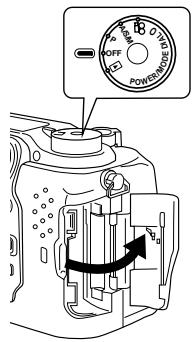
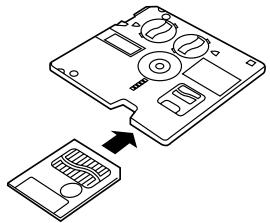
INSERTING AND REMOVING SMARTMEDIA CARDS
Use an Olympus SmartMedia card or a 3-volt (3.3V) card commercially available. Non-Olympus brand SmartMedia Cards or cards that have been formatted on a PC or other device, should first be formatted on the camera.
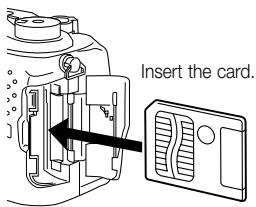
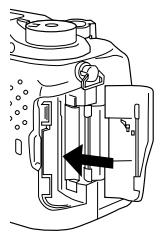
Push the card in to remove it.
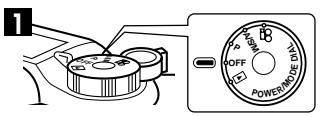
USING THE MODE DIAL
You can change modes by turning the mode dial on the top righthand side of the camera. Always remove the lens cap before you switch the camera on.
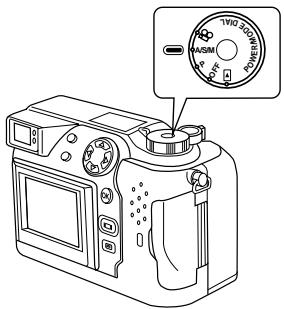
Camera Modes
"P" and "A/S/M" (Still Picture Shooting Mode)
Setting the Mode dial to "P" or "A/S/M" switches the camera on in Still Picture Shooting mode.
In "P" (Program mode), the camera automatically selects the optimal aperture and shutter speed, allowing you to take properly exposed photographs simply by pressing the shutter button.
"A/S/M" (Still Shooting mode) allows you select "Aperture Priority mode", "Shutter Priority mode" or "Manual mode" from the Still Picture Shooting menu. You can then select your own photography settings to achieve the desired effect.
" 空 ^ (Movie record mode)
Setting the Mode dial to "B" switches the camera on in Movie record mode. This mode allows you to shoot movies.
"OFF" (Camera off)
Setting the Mode dial to "OFF" switches the camera off.
"▶" (Playback mode)
Setting the Mode dial to "▶" switches the camera on in Playback mode and allows you to view pictures recorded on a SmartMedia card.
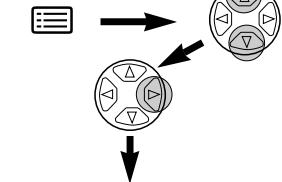
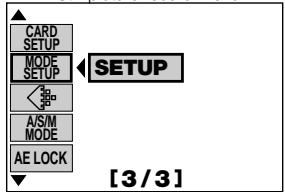
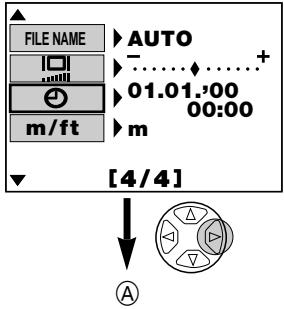
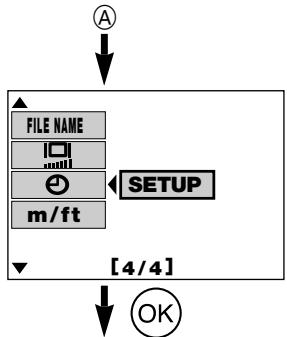
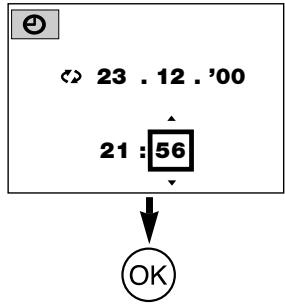
SETTING THE DATE AND TIME
Press the (Menu) button to display the menu. Press or on the Arrow pad to select MODE SETUP, press and then press the [OK] button. See the illustrations shown below. If the card contains no recorded images when
the Mode dial is set to ▷, the menu screen does not appear when you press the ⓷ (Menu) button. Always remove the lens cap before you switch the cam-
era on.
Still picture record menu

Mode setting screen
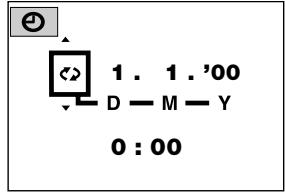
Date and time screen
:Changes the setting.
:Moves to other settings
The year 2000 is displayed as '00.
BASIC FUNCTIONS SWITCHING THE CAMERA ON AND OFF
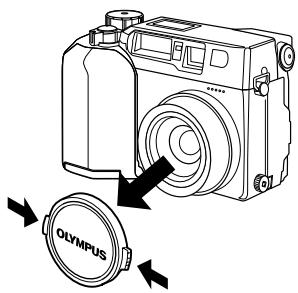
To switch the camera on, remove the lens cap and set the Mode dial to any setting other than OFF.
To switch the camera off, set the Mode dial to OFF.
Always replace the lens cap when the camera is not in use.
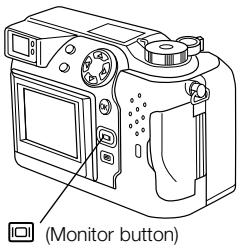
TAKING PICTURES USING THE MONITOR
Press the (Monitor) button to switch the monitor on.Compose the picture by looking at the image on the monitor and then take the picture using the same procedure as the viewfinder.
CHECKING THE DISPLAY
Checking the remaining battery charge
When you switch the camera on, the level of remaining battery charge is displayed on the control panel. When the remaining battery charge is low, load new batteries. If you are using NiMH or Ni-Cd batteries, recharge the batteries.

Control panel
lights (and turns off automatically).
The batteries have ample charge and you can take pictures.
blinks and the other icons on the control panel are displayed normally.
The battery charge is low and the batteries should be replaced. You can still take pictures, but the battery power may run out in mid shot.
blinks (and disappears after 12 seconds) and the other icons on the control panel disappear.
The batteries are fully depleted and should be replaced immediately.
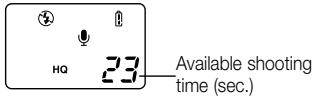
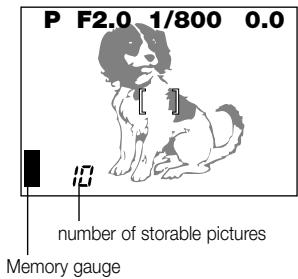
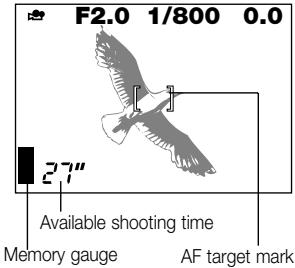
Checking the available shots/time
When you switch the camera on with the Mode dial set to "P" or "A/S/M", the number of storable pictures is displayed on the control panel. (When you switch the camera on with the Mode dial set to 品 , the available shooting time (in seconds) is displayed.)

Still Shooting mode
Movie mode
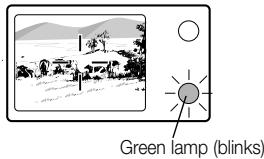
When the number of storable pictures reaches 0, the camera emits a warning beep, the green lamp beside the viewfinder blinks and the "CARD FULL" message appears on the monitor. The same thing occurs the next time you switch the camera on.
When this happens, load a new card or one that is not full. Alternatively, erase some unwanted images on the card to create some free space.

Control panel
Viewfinder

Green lamp
Number of Available Still Shots
| Recording mode | Number of pixels | File | Memory capacity (pictures without sound/pictures with sound) | ||||
| 8MB | 16MB | 32MB | 64MB | ||||
| TIFF | 2048x1536 | TIFF | 0/0 | 1/1 | 3/3 | 6/6 | |
| 1600x1200 | 1/1 | 2/2 | 5/5 | 11/11 | |||
| 1280x960 | 2/2 | 4/4 | 8/8 | 17/17 | |||
| 1024x768 | 3/3 | 6/6 | 13/13 | 27/26 | |||
| 640x480 | 8/8 | 16/16 | 33/32 | 67/65 | |||
| SHQ | 2048x1536 | JPEG | 3/3 | 6/6 | 13/13 | 27/27 | |
| HQ | 2048x1536 | 10/9 | 20/19 | 40/39 | 81/78 | ||
| SQ1 | HIGH (quality) | 1600x1200 | 5/5 | 11/11 | 22/22 | 45/44 | |
| NORMAL | 16/15 | 31/30 | 64/60 | 128/120 | |||
| HIGH (quality) | 1280x960 | 8/8 | 17/16 | 34/33 | 69/67 | ||
| NORMAL | 24/22 | 49/45 | 99/90 | 199/181 | |||
| SQ2 | HIGH (quality) | 1024x768 | 13/12 | 26/25 | 53/51 | 107/102 | |
| NORMAL | 38/32 | 76/66 | 153/132 | 306/265 | |||
| HIGH (quality) | 640x480 | 32/29 | 66/58 | 132/117 | 265/234 | ||
| NORMAL | 82/61 | 165/123 | 331/248 | 664/498 | |||
*When Recording (image quality) mode is set to TIFF, sound cannot be recorded in the photography modes. However, sound can be postrecorded in Playback mode.
Available shooting time (seconds)
| Recording mode | Number of pixels | Memory capacity | |||
| 4MB | 8MB | 16MB | Over 32MB | ||
| HQ | 320 x 240 | 13 | 27 | 55 | 75 |
| SQ | 160 x 120 | 53 | 109 | 218 | 300 |
- This table shows the maximum times for movies shot by pressing the shutter button down fully once and shooting continuously. The available shooting time shown on the control panel and monitor is the remaining time for which you can record data on the current card.
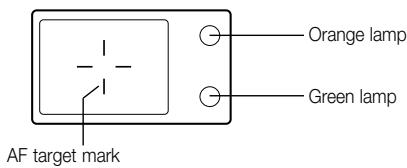
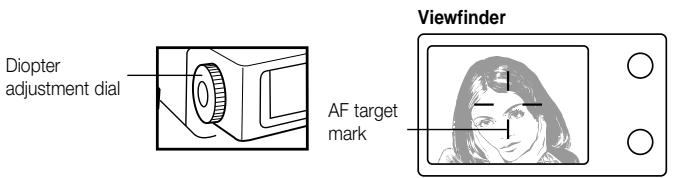
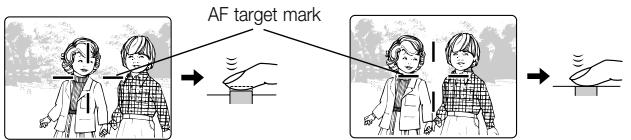
ADJUSTING THE VIEWFINDER
Turn the diopter adjustment dial until you can see the AF target mark clearly.
TAKING PICTURES
The shutter button has a 2-step operation. Practice using the shutter button before you take pictures.
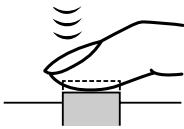
1 Press the shutter button lightly (press halfway down).
The focus and image brightness (exposure) are locked.
The green lamp beside the viewfinder lights.
To focus on a subject that is not inside the AF target mark, use Focus Lock.
2 Press the shutter button the rest of the way down (press fully).
The camera takes the picture and emits a short double-beep.
The card access lamp blinks while the picture is being recorded onto the card.
Shutter button

Viewfinder
When taking a still picture
The camera emits a short doublebeep when it has finished taking the picture.
To check the picture you're just taken, you can view it on the display.
- Continuous shooting is possible if the memory gauge shows there is space on the card.
- When the buffer memory is full, the top of the memory gauge will light up and no more pictures can be taken.

No shots taken

1 shot taken

2 or more shots taken

No photography possible
- Never open the card cover, eject the card, remove the batteries, or unplug the AC adapter while the card access lamp is blinking. This could not only prevent the recording of your current picture, but could also destroy the images recorded on the card.
Recording movies
To begin shooting, press the shutter button down fully. To stop shooting, press the shutter button again.
If the green lamp blinks, the focus and exposure are not locked. To focus on a subject that is not in the center of the shot, use Focus Lock.
Displaying pictures
Press the (Monitor) button twice in quick succession to switch the monitor on and display the most recent picture. You can also view shots by selecting on the Mode dial. (Single-frame display)
: Displays the next picture. : Displays the previous picture.
: Jumps back 10 pictures. : Jumps forward 10 pictures.
Playback movies
Use the Arrow pad to select an image with the icon and then press the (Menu) button. Select "MOVIE PLAY", press to select "START" and then press the [OK] button. The card access lamp blinks and movie playback begins. To pause playback, press the [OK] button. Press it again to resume the playback. Use the Arrow pad to display the previous/next frame once playback has finished or while the movie is paused. Press the (Menu) button to exit Movie Playback mode and return to the menu screen.
One-frame erase
Set the Mode dial to l and use the Arrow pad to display the picture you want to erase. Press the (Erase) button. A message asking whether you want to erase the picture appears. Make sure that "YES" is selected, then press [OK] button.
Protection
Use the Arrow pad to select the picture you want to protect and press the [OK] button to protect the picture. The picture is protected and appears on the monitor.
All-frame erase
Set the Mode dial to 口 . Press the 三 (Menu) button. Select "CARD SETUP", then 四 . Press the [OK] button. Make sure that "OK" is selected and press the [OK] button.
RECORDING FUNCTIONS
Focus lock
When your main subject is not within the AF target marks, follow the procedure below.
Position your main subject inside the AF target marks, and press the shutter button down halfway.
Recompose the picture while holding the shutter button down halfway. Press the shutter button down fully to take the picture.
Zoom
You can use the camera's 3x zoom for telephoto or wide-angle shots. If "DIGITAL ZOOM" is set to "ON" in the shooting menu, you can zoom in to even higher magnifications.
Auto flash
When flash is needed, the orange lamp beside the viewfinder lights when you press the shutter button down halfway.
- When the orange lamp beside the viewfinder lights, this indicates that the flash is ready to fire.
- A flashing orange lamp indicates that the flash is charging. Wait until the lamp stops flashing before you press the shutter button.
| Flash mode | Function and Purpose |
| Auto-Flash nothing displayed | Automatically fires in low-light and backlit conditions. |
| Red-Eye Reduction Flash | Reduces the "red-eye" effect (subject's eyes appearing red). |
| Forced Flash | Fires for every shot. |
| Flash Off | Never fires. |
Exposure compensation
The camera automatically sets the correct exposure for your shots, but you can also adjust the exposure by plus or minus 2 steps in increments of 1/3 of a step. Select a positive compensation value to show white objects more brightly or a negative value to show black objects more intensely black.
Sequence mode
Sequential Shooting ( 🚤): Allows you to take up to five frames in a sequence of sequential shots. Focus, brightness (exposure), and white balance are locked at the first frame.
AF Sequential Shooting (AF): Allows you to take a sequence of sequential shots. Focus, brightness (exposure), and white balance are measured and updated for each frame.
Self-timer/remote-control (): Allows you to take pictures with the self-timer/remote-control.
Auto bracket (BKT): Allows you to record multiple images with different brightness settings from a single shot. Focus and white balance are set for the first shot and remain fixed during continuous shooting.
AE Lock AEL
You can use this feature when you want to set the exposure for one scene and then recompose the shot and use the same exposure settings for the new scene.
Spot Metering mode
In Spot Metering mode, the camera measures the brightness of the subject. Spot metering, because it only measures the light levels at the center of the image, allows you to obtain the correct exposure for backlit subjects since the exposure is not affected by the background light. The light metering mode changes in the cycle shown below each time you press the l (Spot/Macro) button.
| Setting | Function and Purpose |
| Normal | Digital ESP metering. Used for normal autofocus photography. |
| Spot metering mode | Measures light only at the center of the shot. |
| Macro mode | Used for close-up shots. |
| Macro + Spot metering mode | Used for spot metering in close-up shots. |
PLAYBACK FUNCTIONS
Close-up display
Each time you turn the zoom lever towards "T", the image magnification increases one step to 1.5x, 2x, 2.5x and then 3x. Press the Arrow pad ( , , and ) scrolls around the enlarged image and direction arrows ( , , and ) appear on each edge of the screen.
Index display
By turning the zoom lever towards "W", you can view multiple pictures on one screen. Use the Arrow pad to select a picture to view separately and then turn the zoom lever towards "T". You can use the menu to select the number of pictures to be displayed simultaneously
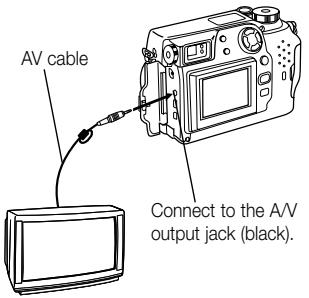
Viewing images on a TV
You can play back the pictures and sounds you have recorded on a TV using the AV cable supplied with the camera.
Plug one end of the AV cable into the AV output jack (black) on the camera. Then plug the other end into the VIDEO IN (yellow) terminal and AUDIO IN (white) terminal on the TV.
Rotating and Checking Vertically Oriented Pictures
If the camera is connected to a TV, a function is provided that rotates pictures so that images shot when the camera was on its side are easier to see. Each time you press the [OK] button, the image changes one step in the following sequence: "Rotated 90^ right", "Rotated 90^ left", "Not rotated".

Video images cannot be rotated.
USING MENUS FOR DETAILED ADJUSTMENTS
Press the (Menu) button and then use the Arrow pad to select a desired menu option. Press to view the settings for the selected option and then use or to select the setting. When you have finished selecting the setting, press the [OK] button or to return to the previous option. Press the [OK] button again.
Menu screen display
Indicates that there is a preceding screen.
Indicates that there is a subsequent screen.
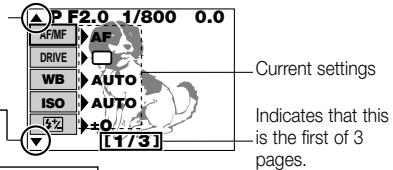
(Example): Selecting "400" as the ISO setting
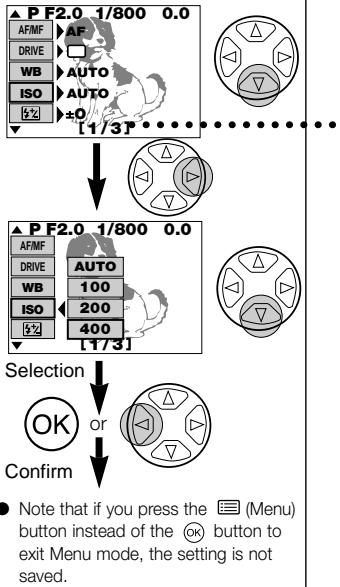
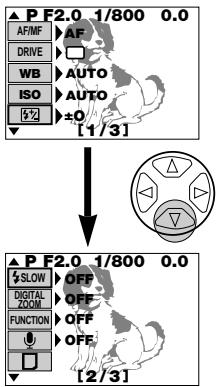
(Example) : Moving to the second and subsequent menu pages
- You can move from page 1/3 to page 3/3 by pressing on the Arrow pad.
SHOOTING MENU OPTIONS
Change the camera to your desired setting. For more details, refer to the software CD's instructions on CD-ROM.
Still picture shooting menu
These options are displayed in the still picture shooting modes (P or A/S/M).
| Menu page | Display | Function | Default setting |
| 1/3 | AF/MF MF | •AF MF •Selects Autofocus or Manual Focus. | AF |
| DRIVE ☐ ☐ | •☐ ☐ AF ☐ BKT •Select this option to use continu-ous shooting, the self-timer or Auto Bracket. | Single picture shooting | |
| WB | •AUTO PRE-SET ☐ •▲▲▲▲▲▲ •Sets the white balance for a light source. | AUTO | |
| ISO | •AUTO 100 200 400 •Sets the ISO setting. | AUTO | |
| S2 | •Setting the intensity of the flash. | ±0 | |
| 2/3 | SLOW | •OFF SLOW 1 SLOW 2 •Sets the flash timing to get the best results in shots of night scenes. | OFF |
| DIGITAL ZOOM | •OFF ON •Allows you to zoom digitally up to 5x. | OFF | |
| FUNCTION | •OFF BLACK & WHITE SEPIA WHITE BOARD BLACK BOARD •Allows special photography modes. | OFF | |
| •OFF ON •Allows you to record voice comments on pictures you have shot. | OFF | ||
| •PLAY •Select this setting when you want to use Function SmartMedia cards for tasks such as panorama-image creation. | - | ||
| 3/3 | CARD SETUP | •初始化 (format) the card. | - |
| MODE SETUP | •SETUP •Sets the camera mode to suit the type of photography. | - | |
| 4 | •TIFF SHQ HQ SQ1 SQ2 •Sets the record mode. | HQ | |
| A/S/M MODE | •AS M •Sets the functions available when the Mode dial is set to A/S/M. | A | |
| AE LOCK | •OFF SINGLE MULTI •Allows AE lock or multi-metering to be used. | OFF |
Movie record menu
These menu options are displayed in Movie record mode (8).
| Menu page | Display | Function | Default setting |
| 1/2 | AF/MF | •AF MF •Selects Autofocus or Manual Focus. | AF |
| •OFF ON •Select this option to take pic-tures using the self-timer. | OFF | ||
| WB | •AUTO PRE-SET ☐ •▲ ▼ 崇 •Sets the white balance for a light source. | AUTO | |
| ISO | •AUTO 100 200 400 •Sets the ISO setting. | AUTO | |
| FUNCTION | •OFF BLACK & WHITE SEPIA •Allows black and white or sepia photography. | OFF | |
| 2/2 | •OFF ON •Allows you to select whether to record sound when you are shooting a movie. | ON | |
| CARD SETUP | •图 •Initializes (Formats) the card. | - | |
| MODE SETUP | •SETUP •Sets the camera mode to suit the type of photography. | - | |
| HQ SQ | •HQ SQ •Sets the image quality mode. | HQ |
Still picture playback menu
These menu options are displayed when still image frames are being displayed.
| Menu page | Display | Function | Default setting |
| 1/2 | •PLAY •Automatically displays successive frames. | - | |
| INFO | •ON OFF •Allows you to view photography details for each image. | OFF | |
| •START •Adds recorded voice comments to pictures you have shot. | - | ||
| FUNCTION | •□ •Allows you to use special function SmartMedia cards to create composite images. This option can only be selected when you are using a special function SmartMedia card. | - | |
| 2/2 | CARD SETUP | •曾田 •Erases all the frames on a card or initializes (format) the card. | - |
| MODE SETUP | •SETUP •Sets the camera mode to suit the type of photography. | - |
Movie playback menu
These menu options are displayed when you are playing back a movie.
| Menu page | Display | Function | Default setting |
| 1/1 | MOVIE PLAY | •START •Play back movie pictures. | - |
| INFO | •OFF ON •Allows you to view photography details for the movie (date and time, file name, etc.). | OFF | |
| FUNCTION | •MOVIE INDEX MOVE EDIT •Allows you to edit a movie or create an index listing the movie details. | - | |
| CARD SETUP | • 曲图 •Erases all the frames on a card or initializes (Formats) the card. | - | |
| MODE SETUP | •SETUP •Sets the camera mode to suit the type of photography. | - |
LIST OF MODE SETTING
Change the camera to your desired setting. For more details, refer to the instructions on the software CDs supplied with the camera.
| Displayedmode* | Setting | Function | Default setting | ||
| P | O | O | ALL RESET | Determines the camera sta-tus when you switch the camera on. | ON |
| O | O | WB-z | Makes fine adjustments to the white balance. | RED···BLUE | |
| O | O | SHARPNESS | Sets the image clarity. | NORMAL | |
| O | O | CONTRAST | Sets the image contrast. | NORMAL | |
| O | TIFF | Sets the quality for the TIFF quality mode. | 2048 x 1536 | ||
| O | SQ1 | Sets the quality for the SQ1 quality mode. | 1280 x 960 NORMAL | ||
| O | SQ2 | Sets the quality for the SQ2 quality mode. | 640 x 480 NORMAL | ||
| O | FLASH | Sets the flash firing settings when an external flash is mounted on the camera. | IN+ - | ||
| O | O | O | ■) | Sets the volume of the tones emitted during camera oper-ation. | LOW |
| O | AF MODE | Sets the system used for focusing in Autofocus mode. | NORMAL | ||
| O | FULL-TIME AF | Allows you to specify that the camera repeatedly focuses without the shutter button being pressed down halfway. | OFF | ||
- P (A/S/M is as same as "P") denotes Still Picture Shooting mode, denotes Movie record mode, and denotes Picture playback mode or Movie playback mode. "O" indicates that the setting is displayed in that mode.
| Displayedmode* | Setting | Function | Default setting | ||
| P | O | O | |||
| O | O | REC VIEW | Specifies whether the record-ed image is displayed after the picture is taken and whether the screen for saving or dis-carding the image appears. | ON | |
| O | O | FILE NAME | Sets the recording method used for file names recorded on the SmartMedia card. | RESET | |
| O | O | O | #I | Sets the monitor brightness. | -···◆···+ |
| O | O | O | ∅ | Sets the date and time. | - |
| O | O | m/ft | Specifies the unit of length used for setting the focal distance. | m | |
| O | # | Sets the number of frames per screen in Index Display mode. | 9 | ||
- "P" (A/S/M is as same as "P") denotes Still Picture Shooting mode, "B" denotes Movie record mode, and "□" denotes Picture playback mode or Movie playback mode. "O" indicates that the setting is displayed in that mode.
PRINTING PICTURES
The DPOF system allows you to record information specifying which images are to be printed and how many copies of each. This information is recorded on the card used to store the pictures and allows the specified pictures to be automatically printed by a printer or photo lab that supports the DPOF system. Note that print orders cannot be set for images marked with the icon.
■ Single print order
Use the Arrow pad and display any still picture. Press the . Use or on the Arrow pad to select and then press the [OK] button. Use the Arrow pad to display the image for which you want to set the print order. Press the [OK] button. Press or to select . Press or to set the number of copies. Press or to select . Press or to select "DATE" or "TIME" or "NO". Press or to select . Press or to select "YES" or "NO". When you have completed the settings, press the [OK] button. Press the Print button to return to Display mode.
All-print order
Allows you to store print data for all the pictures on the card, as well as allowing you to choose how many prints you want.
■ Trimmed print order
This function allows you to enlarge and print a portion of a picture.
Resetting print reserve
This resets all the print reserve settings for images saved in a card. Press . The print order setting screen is displayed. If there are no pictures on the card, this screen is not displayed.
Press to select "RESET", then press the [OK] button. To keep the print order select "KEEP" and press the [OK] button.
Note:
- You cannot connect the camera directly to printers that support direct printing, such as the Olympus P-300E digital printer, to print images.
- You cannot use this camera to change DPOF order details specified using another device. Use the original device to modify the orders. If a card contains files with DPOF orders set on another device, using this camera to specify new orders may erase the previous orders.
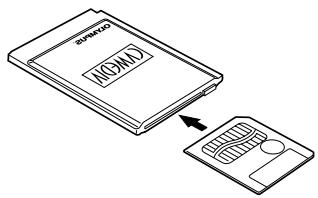
DOWNSLOADING IMAGES TO YOUR COMPUTER Downloading pictures directly from a card
Card adapters enable you to capture images on your personal computer without using any special software.
For the latest information on a available adapters consult our Customer Support Center.
| Computer type | Required device |
| Equipped with a 3.5-inch floppy disk drive | Floppy Disk Adapter (optional) |
| Equipped with a PC card slot | PC Card Adapter (optional) |
| Equipped with a USB interface | SmartMedia Reader/Writer (optional) |
Note:
- Depending on factors such as your personal computer hardware and software configuration and the storage capacity, you may not be able to use the devices listed here. Check beforehand for compatibility issues.
- Images downloaded to your computer can be viewed using the enclosed CAMEDIA Master software. You can also view the images using any graphics software that supports JPEG images (Paint Shop Pro, Photoshop, etc.) or web browser software (Netscape Communicator, Microsoft Internet Explorer, etc.). Refer to the manual for the respective software application for details.
For more details, refer to the software CD's Reference Manual on CD-ROM
Cable connection
The special cables and the CAMEDIA Master software are provided in the convenient Connection Kit enclosed with the camera.
If you are using an IBM PC-compatible computer running Windows 98 or Windows 98 Second Edition, the USB driver must be installed on your computer beforehand. Refer to the USB driver installation guide (or the CAMEDIA Master installation guide if you are using CAMEDIA Master) for information on installing the driver.
If you are using an Apple Macintosh computer running Mac OS 8.6, check that you are running version 1.3.5 of the USB MASS Storage Support software.
To connect the CAMEDIA to a personal computer via a serial cable, you need the optional special serial cable and CAMEDIA Master 2.5.
Refer to the CAMEDIA Master online manual for details.
For more details, refer to the software CD's Reference Manual on CD-ROM.
| PC hardware/software | Connection | Connection requirements | |
| Connection cable | Communications software | ||
| Windows 2000 Professional or Windows Me, Mac OS 8.6 (*1) or 9 | USB | USB cable | None required |
| Serial (RS-232C) port | Serial cable (*2) | CAMEDIA Master | |
| Windows 98 or Windows 98 Second Edition | USB | USB cable | USB driver (*1) |
| Serial (RS-232C) port | Serial cable | CAMEDIA Master | |
| Windows 95 or Windows NT 4.0 SP3 or later, Mac OS 7.6.1 or later | Serial (RS-232C) port | Serial cable (*2) | CAMEDIA Master |
*1: The USB driver is included on the CAMEDIA Master 2.5 CD-ROM. The latest version USB driver can also be downloaded from the Olympus web site.
- To use the communications functions with Mac OS 8.6, USB MASS Storage Support 1.3.5 is required. Contact Apple Computer, Inc. for information on obtaining USB MASS Storage Support 1.3.5.
- When a USB connection is used, file management software such as Windows Explorer can be used to download and delete image data.
- CAMEDIA Master can also communicate via a USB connections and provides easy-to-use image processing functions.
*2: The optional Macintosh conversion cable is required for Apple Macintosh computer.
ERROR CODES
Error codes appear when there is a problem with the camera. Error codes displayed on the control panel will flash.
| Control panel display | Monitor display | Meaning | Response |
| - - | CARD COVER OPEN | The card cover is open. | Insert a card and close the cover. |
| - - - | NO CARD | No card is insert-ed, or the camera cannot recognize the card. | Insert a card or insert the card again. |
| - - - | CARD FULL | The number of storable pictures is 0 so no more pictures can be taken. | Replace the card or erase unwanted pictures. |
| - - - | WRITE PROTECT | Writing to the card is prohibited. | To take pictures, remove the write-protect sticker. |
| - - - | CARD ERROR | You cannot record, display or erase images on the card. | If the card is dirty, wipe it with a clean tissue and insert the card again. Alternatively, format the card. If this still does not correct the problem, the card cannot be used. |
| (No display) | PICTURE ERROR | The recorded images cannot be displayed on this camera. | Use the image processing software on your computer to display the images. If this is not successful, some of the image files are damaged. |
| -F- | ( Formatting screen) | The card is not formatted. | Format the card. |
| NO PICTURE | There are no pictures on the card, so there is nothing to display. | Insert a card that contains images. | |
| CARD FULL | There is no free space on the card, so you cannot record print data or sound data. | Replace the card or erase unwanted pictures. |
Optional items
- Photo Printers For Olympus Digital Cameras
- AC Adapter
Leather Camera Case - Leather SmartMedia Case
Standard SmartMedia Cards (8/16/32/64 MB) - Special Function SmartMedia Cards
-
Template Card
-
FL-40 external flash
- Flash bracket
- Bracket cable
- Floppy Disk Adapter
PC Card Adapter
NiMH Batteries
NiMH Battery Charger - USB SmartMedia Reader/Writer
Macintosh conversion cable
Visit the Olympus home page (http://www.olympus-europa.com) for the latest information on optional items.
as of October 2000
SPECIFICATIONS
| Product type: | Digital camera (for shooting and displaying) |
| Recording System | |
| Still images: | Digital recording, JPEG (DCF-compliant), TIFF (uncompressed), DPOF-compliant |
| Still images with sound: | WAV format |
| Movies: | QuickTime Motion-JPEG-compliant |
| Recording media: | 3 V (3.3 V); 4, 8, 16, 32, or 64 MB SmartMedia card |
| No. of available shots (using a | 16 MB card): |
| Approx. 1 frame (TIFF: 2048 x 1536) | |
| Approx. 6 frames (SHQ) | |
| Approx. 20 frames (HQ) | |
| Approx. 49 frames (SQ1: 1280 x 960. NORMAL) | |
| Approx. 165 frames (SQ2: 640 x 480 NORMAL) | |
| Erase: | One-Frame erase, All-Frames erase |
| Image pickup element: | 1/1.8 inch CCD solid-state image pickup |
| 3,340,000 pixels (total) | |
| Resolutions: | 2048 x 1536 pixels (TIFF/SHQ/HQ) |
| 1600 x 1200 pixels (TIFF/SQ1) | |
| 1280 x 960 pixels (TIFF/SQ1) | |
| 1024 x 768 pixels (TIFF/SQ2) | |
| 640 x 480 pixels (TIFF/SQ2) | |
| White balance: | Full Auto TTL (iESP Auto), Quick Reference, Preset (Daylight, Overcast, Tungsten Light, Fluorescent) |
| Lens: | Olympus lens 7.1 to 21.3 mm, F/1.8 to F/2.6, 10 elements in 7 groups (equivalent to 35-105 mm on a 35 mm camera) |
| Light metering: | Spot metering or Digital ESP metering using the image pickup element |
| Exposure control (photography modes): | |
| Program Auto, Aperture Priority, Shutter Priority and Manual | |
| Aperture: | W: F/1.8 to F/10.0 |
| T: F/2.6 to F/10.0 | |
| Shutter speeds: | Coupled with mechanical shutter |
| Still images: | Program Auto: 1-1/800 sec. |
| Aperture Priority, Shutter Priority: 4-1/800 sec. | |
| Manual: 16-1/800 sec. | |
| Movie: | 1/30-1/10000 sec. |
| Effective range: | 0.8 m to ∞ (normal photography) |
| 0.2 m to 0.8 m (Macro mode) | |
| Viewfinder: | Optical real image viewfinder (AF Target), Monitor |
| Monitor: | 1.8-inch TFT color LCD display |
| Monitor resolution: | Approx. 114,000 pixels |
| On-screen display: | Date/Time, Frame number, Protect, Record mode, Battery check, Image information, Print ordering, Menu settings, etc. |
| Flash charging time: | Approx. 6 sec. (at normal temperature with new batteries) |
| Effective flash range: | W: Approx. 0.8 m to 5.6 m |
| T: Approx. 0.2 m to 3.8 m | |
| Flash modes: | Auto-Flash (flash fires automatically in low light and backlighting), Red-eye Reduction, Forced Flash, Flash Off |
| Control panel display: | Record mode, Number of storable pictures, Card error, Flash mode, Flash intensity control, Battery check, Continuous shooting, Exposure compensation, Spot Metering mode, White balance, ISO, Self-timer/Remote control, Macro mode, Slow synchro, Auto bracket, Card writing, Manual focus, Sound record |
| Autofocus: | TTL-type AF, Spot AF, Contrast-detection system |
| Focusing adjustment range : 0.2 m to ∞ | |
| Self-timer: | 12-sec. delay |
| External connectors: | DC IN jack, serial connector (RS-232C), A/V OUT jack (PAL), USB connector (USB 1.0-compliant), 5pin external Fash socket |
| Date/time: | Recorded simultaneously with picture data |
| Automatic calendar function: | Self-correcting to 2030 |
| Calendar battery: | Uses main camera battery (with internal capacitor for backup) |
Operating environment
Temperature:
Humidity:
Power supply:
0-40 ^ C (operating), -20 to 60^ storage
30-90% (operating), 10-90% (storage)
For batteries, use 2 CR-V3 lithium battery packs or 4 AA-size NiMH, Ni-Cd, alkaline or lithium batteries.
Do not use Zinc-carbon batteries.
AC adapter (optional)
Dimensions (W× H× D)
109.5 x 76.4 x 69.6 mm (excluding attachments)
Weight:
307 g (excluding batteries and SmartMedia card)
Specifications are subject to change without any notice or obligation on the part of the manufacturer.

TABLE DES MATIÉ
PREPARATIFS 42
FUNCTIONS DE BASE 52
FUNCTION D'ENREGISTREMENT 58
FUNCTIONS ECRAN 60
IMPRESSION DES IMAGES 68
TELECHARGEMENT DES IMAGES VERS VOTRE ORDINATEUR 69
CODES D'ERREUR 71
FICHE TECHNIQUE 73
PREPARATIFS CONTENU

Apparel photo

Bouchon d'objectif
"▶" (Mode Affichage)
PRISE DE PHOTOS AVEC I'ECRAN ACL
San-Ei Building, 22-2, Nishi Shinjuku 1-chome, Shinjuku-ku, Tokyo, Japan.
(Customer support) Tel. 0426-42-7499 Tokyo
http://www.olympus.co.jp
OLYMPUS AMERICA INC.
Two Corporate Center Drive, Melville, NY 11747-3157, U.S.A. Tel. 631-844-5000
(Customer support) Tel. 1-888-553-4448
http://www.olympus.com
OLYMPUS OPTICAL CO. (EUROPA) GMBH.
(Premises/Goods delivery) Wendenstraße 14-18 D-20097 Hamburg, Germany. Tel. 040-237730
(Letters) Postfach 10 49 08, 20034 Hamburg, Germany.
http://www.olympus-europa.com
Hotline Numbers
Tel.01805-67 10 83
for Germany
Tel.00800-67 10 83 00
for Austria, Belgium, Denmark, France, Netherlands, Norway, Sweden, Switzerland, United Kingdom
Tel.+49 180 5-67 10 83
for Finland, Italy, Luxemburg, Portugal, Spain, Czech Republic
Tel.+49 40-237 73 899
for Greece, Croatia, Hungary and the Rest of Europe
Our Hotline is available from 9 a.m. to 6 p.m. (Monday to Friday)
(E-Mail) di/support@olympus-europa.com

- "CE" mark indicates that this product complies with the European requirements for safety, health, environment and customer protection.
- La marque "CE" indique que ce produit est conforme avec les exigences européennes en matière de sécurité, santé, environnement et protection du consommateur.
- Das CE-Zeichen bestägt, daß这意味着 Produkt mit den europäischen Bestimmungen für Sicherheit, Gesundheit, Umweltschutz und Personenschutz übereinstimmt.
- Lamarca“CE”indica que este producto está en conformidad con losrequiremientos europeos de segundad, salud, medio ambiente y proteccion al usuario.