
C-990 ZOOM - Digital Camera OLYMPUS - Free user manual and instructions
Find the device manual for free C-990 ZOOM OLYMPUS in PDF.

User questions about C-990 ZOOM OLYMPUS
0 question about this device. Answer the ones you know or ask your own.
Ask a new question about this device
Download the instructions for your Digital Camera in PDF format for free! Find your manual C-990 ZOOM - OLYMPUS and take your electronic device back in hand. On this page are published all the documents necessary for the use of your device. C-990 ZOOM by OLYMPUS.
USER MANUAL C-990 ZOOM OLYMPUS
Operating Instructions
- Before you use this camera, read this manual and then store it in a safe location where you can find it for future use.
- We recommend that you spend some time taking test shots and experimenting with all of the features before you take important pictures.
Mode d'emploi
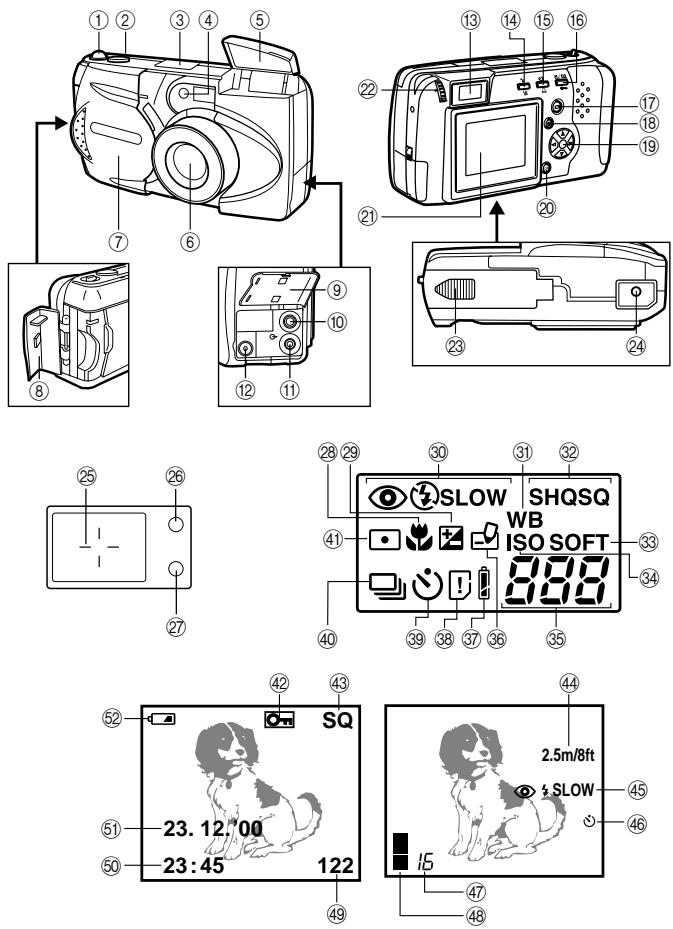
① Zoom lever
② Shutter release button
③ Control panel
④ Self-timer signal lamp
⑤ Flash
⑥ Lens
⑦ Lens barrier
⑧ Card compartment cover
⑨ Connector cover
⑩ Video output connector
⑪ Computer connector
⑫ AC adapter connector
⑬ Viewfinder
⑭ Flash mode button/Erase button
⑮ Self-timer/Print button
⑯ Macro•Digital telephoto button/Write-protect button
⑰ Monitor button
⑱ Menu button
⑲ Arrow pad
⑳ OK button
②1 Monitor
② Diopter adjustment dial
②3 Battery compartment cover (bottom)
⑳ Tripod socket (bottom)
Viewfinder
⑲ Autofocus mark/Backlighting correction mark
②6 Orange lamp
⑳ Green lamp
Control Panel
⑳ Macro mode mark
⑲ Exposure compensation mark
③0 Flash mode
③1 White balance mark
③2 Record mode
③3 Sharpness
③4 ISO mark
③5 Remaining picture count
③6 Write mark
③7 Battery check
③8 Card error/Card function
⑲ Self-timer
④0 Sequential shooting
④1 Spot metering mark
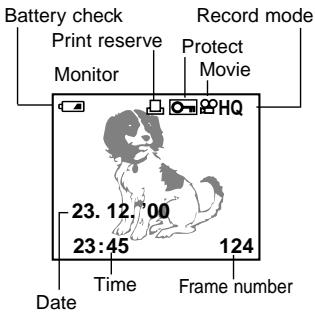
Monitor
④2 Protect mark
④3 Record mode
④4 Quick focus
④5 Flash
④6 Self-timer
④7 Remaining picture count
④8 Memory gauge
④9 Frame number
⑤0 Time
⑤1 Date
⑤2 Battery check
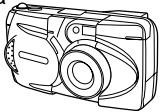
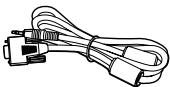
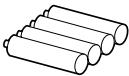
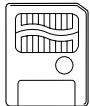
Checking the Contents
Camera
natural_image
Line drawing of a digital camera with no text or symbolsStrap

natural_image
Simple line drawing of a pair of ropes or rods (no text or symbols)Video cable

natural_image
Line drawing of a coiled cable with two connectors (no text or symbols)Standard RS-232C interface D-SUB 9-pin connector
natural_image
Line drawing of a USB cable with connector port (no text or symbols)R6 (AA) alkaline batteries (4 pieces)
natural_image
Simple line drawing of three cylindrical batteries (no text or symbols)Software CD's (including instructions on CD-ROM)

SmartMedia (8MB)
Static-free case

natural_image
Simple line drawing of a rectangular container with a curved indentation on top (no text or symbols)SmartMedia instructions

natural_image
Simple line drawing of a document with horizontal lines, no text or symbols presentWrite-protect adhesive seals (4 pieces)

Index lables (2 pieces)

Instructions
(concise version)/
Warranty
agreement

natural_image
Two overlapping rectangular books with blank pages, no text or symbols visibleOptional Items
• Photo Printers For Olympus Digital Cameras
- AC Adapter
• Leather Camera Case
• Standard SmartMedia Card (8/16/32/64MB)
• Leather SmartMedia Case
- FlashPath Floppy Disk Adapter
- PC Card Adapter
- NiMH Batteries
- NiMH Battery Charger
- USB SmartMedia Reader/Writer
(As of June 2000)
Attaching the Strap
Attach the strap to the camera.
CAUTION
- Attach the strap exactly as shown in the diagram. If the strap is attached incorrectly the camera may come loose and fall off. In this case, Olympus will not be responsible for any damage.
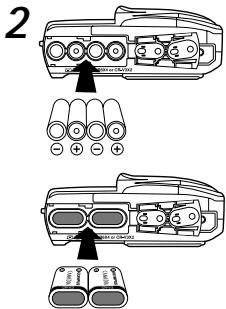
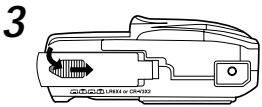
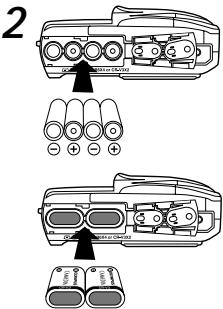
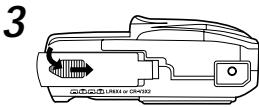
Inserting the Batteries
Make sure the power is off. Then slide the battery compartment cover to the side and lift up to open. Insert the batteries as shown. Close the battery compartment cover, then press the tab ◀ and slide it into the locked position.
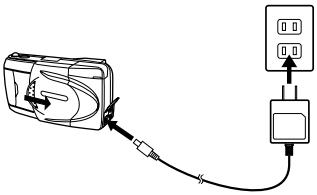
Using the AC Adapter
(sold separately)
natural_image
Pure electrical circuit lines without any symbols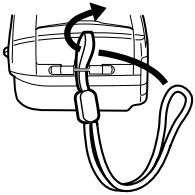
natural_image
Diagram of a car interior showing a rope knot and a curved arm, with no text or symbols present.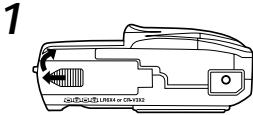


The camera may be operated on ordinary household current from a wall outlet by using the optional AC adapter (sold separately).
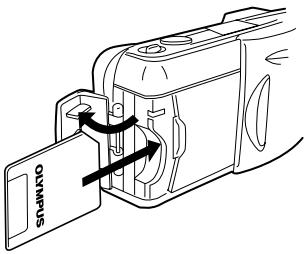
Inserting the SmartMedia Card
Make sure the power is off, then open the card cover. Insert the SmartMedia Card (or the Special Function SmartMedia Card) as shown. Close the cover and make sure it clicks into place.
CAUTION
- Never open the card cover, eject the card, remove the batteries, or disconnect the AC adapter while the camera power is turned on. Doing so may destroy the image data on the card. Destroyed images cannot be recovered.
- The card is a precision instrument. Do not subject to it excessive force or shock.
- Do not touch the gold portion of the card.
Setting the Date and Time
Make sure the lens barrier is closed and the SmartMedia card is inserted. Press the monitor button, then the menu button. Press the arrow pad △ or ▽ to move the on-screen arrow to date setting, then press ▷. Press the arrow pad △ or ▽ to select how you want the date displayed, then press ▷ to view the date setting. Repeat the process until the date and time is set correctly. Turn the counter to 00 and press the OK button twice to save the settings.
Adjusting the Viewfinder
Slide the lens barrier open until it clicks. While looking through the viewfinder, gently turn the diopter adjustment dial until the autofocus mark is clearly visible. You are now ready to shoot some pictures.
Learning the Basics
Turning the Power On
Slide the lens barrier open until it clicks. This turns on the power and extends the lens. The battery check level goes off automatically after a few seconds.
Checking the Control Panel
Is the SmartMedia card inserted?
If you forget to insert the card, or if there is any other problem with the card, the monitor will automatically light up and display a message.
Read the message and correct the problem.
When the "NO CARD" error message is displayed:
- The card may not be inserted properly.
- Turn the power off. Then remove and re-insert the card.
For other error messages:
- Follow the directions on the monitor. For details, see "Error Codes".
When the card setup screen is displayed:
- You have inserted a card which needs to be formatted.
Monitor

Checking the Batteries
When the power is turned on with the camera in shooting mode on (with the lens barrier open), the approximate remaining battery power is displayed on the control panel.

lights and turns off automatically.
Batteries are OK. You can shoot.

blinks and other indicators on the control panel are displayed normally.
Battery power is low and batteries should be replaced.

blinks and goes off after about 10 seconds, and other indicators on the control panel go out.
Batteries are dead and should be replaced immediately.
NOTE
- Keep spare batteries on hand when using the camera for long periods of time, when traveling, in cold weather or for important occasions.
- NiMH batteries have a shorter life than lithium batteries.
- When using NiMH batteries, the low battery warning appears early.
CAUTION
- When the camera power is on, the camera may beep continuously immediately after the power has been turned on or after taking a picture. The frame number on the control panel may blink. This indicates that battery power is low. The camera will not work properly and the batteries should be replaced.
Does the Card Have Enough Room for More Pictures?
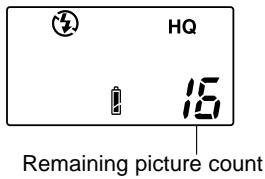
When the power is turned on with the camera in shooting mode (with the lens barrier open), the control panel displays a remaining picture count.
- If the count drops to 0, the camera beeps, the green lamp blinks and the monitor displays the message "CARD FULL".
This will repeat every time the power is turned on.
- The number of storable pictures varies depending on the record mode.
Control panel
Approximate storable still pictures
| SmartMedia capacity\Record mode | SQ | HQ | SHQ | ||
| 640×480 | 1600×1200 | ||||
| SQ | SQ-HIGH (High quality) | HQ | SHQ | SHQ-TIFF | |
| 2MB | 20 | 7 | 3 | 1 | 0 |
| 4MB | 40 | 16 | 7 | 2 | 0 |
| 8MB | 82 | 32 | 16 | 5 | 1 |
| 16MB | 165 | 66 | 31 | 11 | 2 |
| 32MB | 331 | 132 | 64 | 22 | 5 |
| 64MB | 665 | 266 | 128 | 45 | 11 |
Approximate maximum movie lengths, in seconds
| Record mode | Resolution | SmartMedia capacity | |||||
| 2MB | 4MB | 8MB | 16MB | 32MB | 64MB | ||
| HQ | 320×240 | 5(6) | 11(14) | 23(28) | 48(57) | 96(115) | 193(232) |
| SQ | 160×120 | 25(30) | 51(61) | 104(125) | 211(253) | 424(509) | 851(1021) |
* A limited number of seconds can be shot at one time.
**The number in parentheses displays the time in seconds you can take movie pictures when the video cable is connected to the video output connector.
Shooting Technique Depends on Distance to the Subject
Deciding whether to use the viewfinder or the monitor display to set up a shot depends on the distance between you and your subject. Determine the approximate distance before taking the picture.
For snapshots and long-range photography (from approx. 1.5m to ):
We recommend using the viewfinder.
For close-ups (from 0.8m to approx. 1.5m):
Although you can use the viewfinder to take pictures, in some cases it is better to use the monitor. See below for details.
For extreme close-ups (0.2m \~ 0.8m):
We recommend using the macro mode for taking pictures extremely close-up. Although it is possible to take such shots without using the macro mode, determining proper exposure and focus is much more difficult.
Characteristics of the viewfinder and the monitor
You can use either the monitor or the viewfinder to determine the proper shooting range. Consider the following when deciding whether to use the viewfinder or the monitor for a particular shot:
Viewfinder
Advantage: You can check the proper subject composition with less camera movement. Disadvantage: Close-up photography causes inconsistencies between the picture frame as seen in the viewfinder and the actual edge of the picture.
Monitor
Advantage: You can check the subject composition more accurately. Disadvantage: It is more difficult to hold the camera steady, and battery life is decreased.
Taking Still Pictures
After composing the shot in the viewfinder, half-press the shutter release button until the green lamp next to the viewfinder lights up. If the lamp flashes the shot is out of focus and must be refocused. Full-press the shutter release button to take the shot. To shoot another picture, compose the shot and full-press the shutter release button.
Taking Pictures Using the Monitor
Turn on the monitor by pressing the monitor button, then use it to compose the shot. The procedure for taking pictures is the same as when using the viewfinder.
Enlarging Your Shots (Optical Zoom)
Push the zoom level toward W (wide angle) to capture a wide area in the shot. Pull the zoom lever toward T (telephoto) to zoom in and make subjects appear larger.
Taking Pictures Using the Flash
In low light situations, open the flash before taking pictures by placing your finger on the edge of the flash housing and pulling it up. If the orange lamp next to the viewfinder lights up when the shutter release button is half-pressed, the flash will fire when the button is full-pressed.
Checking Your Still Pictures
When the camera on in shooting mode, quickly press the monitor button twice to switch to playback mode. The most recent image will be displayed on the monitor. Pressing ◀ on the arrow pad displays the previous image, ▷ the next image, △ the 10th image back, ∇ the 10th image ahead. Press the monitor button to return to shooting mode. To take a picture while checking previous images, look through the viewfinder and full-press the shutter release button.
Turning the Power Off
If the flash is open, close it. Close the lens barrier halfway (just until it touches the lens). Wait until the lens fully retracts, then close the lens barrier the rest of the way.
Getting Started
Turning the Power On in the Playback Mode
- Make sure the lens barrier is closed.
- Press the monitor button.
Standby mode
If the camera is left untouched for three minutes when using the batteries, it automatically turns off. It is strongly recommended, however, that you switch power off promptly when you are finished using the camera.
When using new batteries, it may take longer for the camera to shut down automatically depending on the type of batteries being used.
Turning the Power Off in Playback Mode
Press the monitor button.
Displaying Images Frame by Frame
Press the monitor button with the lens barrier closed to turn on power in playback mode and display the last image taken. Images will be displayed on the monitor, along with the information in the right diagram.
Pressing ▷ on the arrow pad displays the previous image, ▷ the next image, △ the 10th image back, ▽ the 10th image ahead.
Displaying All Frames (Index-Display Setting)
Press the monitor button with the lens barrier closed to turn on power in playback mode and display the last image taken. Push the zoom lever to W to display the last several frames taken. In the index-display setting, press △ on the arrow pad to display the previous set of frames from the upper left corner, or press ▽ to display the next set from the lower right corner. Press ◀ to select a frame to the left on the display, or ▷ to select a frame to the right. Pull the zoom lever toward T to display a full-sized version of the selected image.
Checking the Focus by Enlarging a Selected Picture (Displaying Close-ups)
Press the monitor button with the lens barrier closed to turn on power in playback mode and display the last image taken. Select the image you want to display with the arrow pad, then pull the zoom lever toward T (telephoto). The selected image enlarges 1.5x and will continue to enlarge 0.5x (up to 3x) each time you pull the zoom lever to T. Press the arrow pad in one of the four directions to select the area you want to enlarge. Push the zoom lever toward W to return the image to its original size.
Connecting to a TV Set

First make sure the camera and television power are off and the camera lens barrier is closed. Connect one end of the video cable into the camera's video output connector and the other into the TV's input terminal. Turn on the TV, set it to "video output," then press the camera's monitor button. Select the image you want to display using the arrow pad.
To Avoid Accidentally Erasing Pictures You Want to Keep (Image Protection)
Press the monitor button with the lens barrier closed to turn on power in playback mode and display the last image taken. Use the arrow pad to select the image you want to protect, then press the protect button. To cancel image protection, press the protect button again.
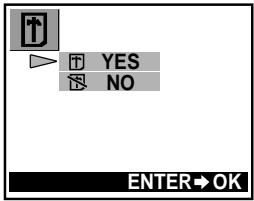
One-Frame Erase
Press the monitor button with the lens barrier closed to turn on power in playback mode and display the last image taken. Use the arrow pad to select the image you want to erase, then press the erase button. When the confirmation screen appears, select "Yes" on the arrow pad, then press the OK button. The camera beeps once and erases the picture.
Taking Better Pictures
Points to Remember
- Depending on the distance from the subject to camera, the final picture may not match the image in the viewfinder, and zooming in can make the discrepancy even greater. Use the monitor for close-ups.
- Subjects may be difficult to focus if they (1) have little contrast, (2) appear excessively bright in the center, (3) have no vertical lines, (4) are at varying distances, or (5) are moving quickly.
To correct the situation either:
- Focus the camera at something the same distance as your subject, allow it to focus, then aim it back at the subject and shoot.
- Set the focus at either 2.5m or .
For subjects with no vertical lines, hold the camera vertically to focus, then move it back to the horizontal position to take the shot.
1) Subjects with low contrast
2) Subjects that appear excessively bright in the center
3) Subjects with no vertical lines
4) Subjects of varying distances
5) Fast-moving subjects
natural_image
Line drawing of a classic sports car (no text or symbols)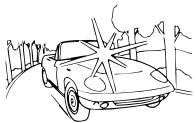
natural_image
Line drawing of a car driving on a road with trees in the background (no text or symbols)
natural_image
Illustration of a plant with leaves next to parallel horizontal lines (no text or symbols)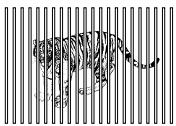

natural_image
Line drawing of a motorcyclist riding on a scooter (no text or symbols)When Not Able to Focus on a Subject While Shooting
Focus on the Subject in Advance (Focus Lock)
If your main subject is not centered inside the autofocus mark, use the focus lock feature explained below:
- Open the lens barrier.
- Look through the viewfinder and position your subject(s) inside the autofocus mark.
- Half-press the shutter release button so the green lamp next to the viewfinder lights up.
- Keep the shutter release button half-pressed while you reposition your subject(s) within the picture frame. Then full-press the shutter release button.
Using Fixed Focus (Quick Focus)
Use the quick focus when you are not able to get the desired results with autofocus. This feature disables autofocusing and lets you set the focus to either “Close” (2.5m) or “Distant” ( ).
- Open the lens barrier.
- Half-press the shutter release button while pressing the arrow pad as described below.
• Full press the shutter release button.
Using the Flash
To use the flash feature, push up the flash housing.
Switching Between Flash Modes
Each time you press the flash mode switching button, the flash mode settings are displayed in order.
| Flash mode | Function/purpose: |
| Auto-flash↓(no Mark) | Automatically fires in lowlight and backlit conditions. |
| Red-eye reduction↓ | Significantly reduces the red-eye phenomenon (i.e. when the flash causes a subject's eyes to appear red in the picture). |
| Fill-in flash↓ | Fires regardless of available light. |
| Slow sync↓ | Taking photographs of night views. |
| Red-eye reduction + Slow sync | Taking photographs of people at night. |
Auto-Flash
In auto-flash mode, the flash will automatically fire in lowlight and backlit conditions.
To fire the flash in a backlit shot, position the subject inside the backlighting correction mark.
Red-eye Reduction ( Ⓞ )
When shooting people, eyes may appear red. Use the red-eye reduction flash mode to compensate for this phenomenon.
In the red-eye reduction flash mode, the camera will emit a series of rapid pre-flashes before the actual flash fires. This makes the subject's pupils contract, significantly reducing the red-eye effect. Be sure to hold the camera firmly until the shutter releases, which takes approximately one second.
Fill-in Flash ( ↓ )
Forces the flash to fire on every shot.
Using the fill-in flash mode, the flash fires regardless of available light. This feature can be used to light up a subject's face, when shaded by a tree for example, or to correct uneven lighting conditions caused by backlighting, fluorescent lighting, etc. This mode may not have the desired effect in excessively bright light.
Slow Sync ( ↳ SLOW )
For taking pictures at night, especially night views.
In this mode, the flash will fire automatically when the picture is taken. The shutter will stay open for 1/2 second. This setting is most appropriate for night view photography. The use of a tripod is recommended to prevent blurriness caused by camera movement.
Red-eye Reduction + Slow Sync ( ◎ ↘ SLOW )
The combination of these two modes works best for taking pictures of people at night.
The red-eye reduction flash and slow sync flash both operate at the same time.
The shutter speed automatically slows down to 1/2 second in low-light conditions. The use of a tripod is recommended to prevent blurriness caused by camera movement.
Off (Flash Override) ( ④ )
When you do not want the flash to fire even in the dark, close the flash. Use this mode in situations where flash photography is prohibited, such as art museums and live stage performances, or when taking pictures in twilight or of night scenes.
The shutter speed automatically slows down to 1/2 second in low-light situations. The use of a tripod is recommended to prevent blurriness caused by camera movement.
Taking Close-up Pictures (Macro Mode)
Open the lens barrier and press the macro/digital telephoto button. Compose your shot and full-press the shutter release button. To cancel macro mode, turn camera power off or switch to digital telephoto mode. Minimum distance: 0.2m (approx.) Telephoto will enlarge image even further, while wide-angle will shrink it further.
Enlarging the Subject (Digital Telephoto Mode)
Open the lens barrier and press the macro/digital telephoto button twice. Press △ or ▽ on the arrow pad to select desired magnification size. Compose your shot (preferably using a tripod) and full-press the shutter release button. Turn on the monitor and press the macro/digital telephoto button again to cancel this mode.
Self-Timer
Secure the camera on a tripod, open the lens barrier and press the self-timer button. Set up your shot, then full-press the shutter release button. The self-timer lamp lights up for ten seconds, then blinks for two seconds before taking the picture. To cancel this feature, press the self-time button again.
Printing
Printing the Date and Time on Your Images
Press the monitor button with the lens barrier closed to turn on power in playback mode. Press the print button and the Date Print Screen appears on the monitor. Use the arrow pad to select the date/time information you want printed on the image. Press the OK button.
Selecting an Image to Be Printed (Print reserve)
Press the monitor button with the lens barrier closed to turn on power in playback mode and display the last image taken. Press the print reserve button twice to display the print reserve screen. Select reserve single frames by pressing the arrow pad, then the OK button. ☐ selects certain images to be printed, while ☐ selects all images and ☐ deletes all previous print reservations. You may also display the index by pushing the zoom lever.
Press the arrow pad to reserve images for printing, then press the OK button. Pressing ◀ on the arrow pad displays the previous image, ▷ the next image, △ the 10th image back, ▽ the 10th image ahead.
To cancel a print reservation, select the image with the arrow pad, then press the print button. Previously set commands, except for the selected shot, will still be saved. Because print reserve commands remain on the card even after printing, make sure to cancel old commands before making new ones.
Printing with the Olympus Photo Printer for Digital Cameras
The Olympus Photo Printer for Digital Cameras, the P-330NE/P-330E (sold separately), is a DPOF-compatible printer. Print your pictures by inserting a card set with print reserve commands into the Olympus Photo Printer.
See the Olympus P-330NE/P-330E Photo Printer for Digital cameras instruction manual for further information.
Main features of P-330NE/P-330E
Print Single frames / Multi-print (4, 9, 16 splits) / Print reserve / Camera reservation (Card Reserve) / Print cropping (1.5x, 2x) / Date print Reverse print (left/right inversion) / Special Function Smart Card compatible (Supports the composite template function)
Processing Photo Images with a Computer
Installing Provided Software
To take advantage of a wide range of functions, including downloading, display, storage and panorama assembly, install the CAMEDIA Master software application from the included CD-ROM.
Transferring Picture Data to a Computer
Picture data stored on a SmartMedia card can be transferred to a computer in the following ways:
However, before you can play back movie pictures on a computer, you must install Quick Time which is included with the CAMEDIA Master CD ROM.
Transferring Picture Data with a Computer SmartMedia Card Adapter
You can transfer picture data from a SmartMedia card directly to a computer equipped with a PC card slot or an external PC card reader/writer using the PC Card Adapter. See the computer card adapter instruction manual for further information.
Loading with a Floppy Disk Adapter
The picture data on a SmartMedia card can be transferred directly to a computer equipped with a 3.5" floppy disk drive using the FlashPath floppy disk adapter.
See the FlashPath instruction manual for further information.
Transferring Data with a SmartMedia Reader/Writer
You can transfer picture data from the card directly into a computer equipped with a USB port by using a SmartMedia reader/writer. The SmartMedia Reader/Writer can only be used on computers with Windows 98/2000 professional or Mac OS 8.6 (or later versions) and that have a USB port.
See the SmartMedia reader/writer instruction manual for details.
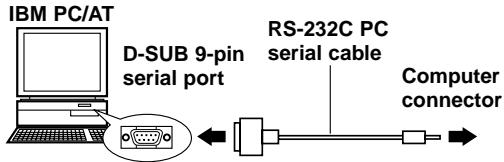
Connecting your Camera to a Computer with
a Computer Cable
Computer Operating Environment
IBM PC/AT compatibles (As of June 2000)
OS : Windows 98SE/98/95/NT 4.0/2000 professional
CPU : Pentium or better
Available hard disk space : at least 30MB
Memory : at least 32MB
Serial port : Standard RS-232C interface
Type : D-SUB 9-pin
Monitor : 256 color or better, at least 800 × 600 dots.
Using a 32000 color monitor or better is recommended.
Apple Macintosh (As of June 2000)
OS : Mac OS 7.6.1 \~ 9.0.4
CPU : PowerPC or later
Available hard disk space : at least 30MB
Memory : at least 32MB
*Serial port : Printer port or modem port
Monitor : 256 color or better, at least 800 × 600 dots.
Using a 32000 color monitor or better is recommended.
*Not available for models with USB ports such as iMac and iBook.
For an iMac or other computer equipped with only USB port, use a SmartMedia reader/writer software application.
Connecting your Camera to a Computer
Use the appropriate connector to your computer.
1 Preinstall CAMEDIA Master 2.0 on your computer.
- For installation details, see the CAMEDIA Master online instructions.
2 Make sure the power on both the computer and the camera is turned off before connecting.
3 Attach the provided RS-232C PC serial cable to the serial port (COM1 or COM2) on your computer.
4 Open the connector cover on the camera and connect the computer cable to the computer connector on the camera.
5 Turn on your computer.
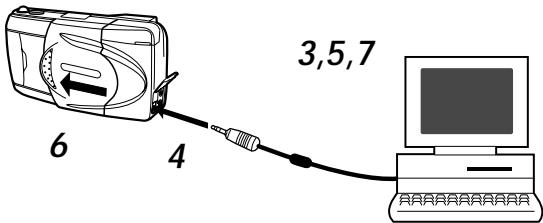
6 Open the lens barrier of the camera.
7 Start up CAMEDIA Master 2.0.
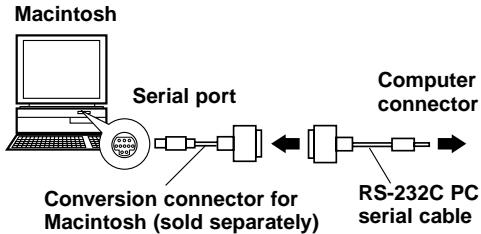
Computers Requiring a Conversion Connector
The following computers need a conversion connector (sold separately) to connect the RS-232-PC serial cable.
Apple Macintosh
First plug the IBM-compatible connector cable into the conversion connector for Macintosh.
Next, connect the conversion connector for Macintosh to the computer's printer port or modem port.
flowchart
graph LR
    A["Macintosh"] --> B["Serial port"]
    B --> C["Conversion connector for Macintosh (sold separately)"]
    C --> D["Computer connector"]
    D --> E["RS-232C PC serial cable"]
Other Functions of CAMEDIA Master 2.0
Communication between Computer and Camera
You can download both still pictures and moving images from the camera to a computer using the serial port. All camera settings, such as write protect, unprotect, data erase, date setting, and other variable settings are also supported.
Image Viewer
With this function you can display images from your camera on the computer screen either singly or index style. Images can also be stored in folders and subfolders, and can moved with a simple drag and drop operation.
Automatic moving picture file playback and still picture playback functions are also available.
Image Processing
Images can be processed in a variety of ways.
- Rotation (90 degrees right and left, 180 degrees and at angles)
- Color variation
• Enlargement and reduction - Text insertion
- Various filtering processes (brightness, contrast, color balance, sharpness, etc.)
Multi-processing
You can use the index display window to process multiple images at a time. This is useful for functions such as image rotation, format conversion and file name conversion.
Camera sequence functions
Panorama: You can assemble composite images taken in the standard card panorama mode into a panorama screen.
Template composition:
You can make your own templates and store them on the template card (sold separately). Template images can also be combined with images taken by a camera.
Printing
There are various ways to print images:
- Single frame printing
- Single frame printing with date
- Multiple copy index printing
• Automatic layout printing of 3, 4 or 6 images
Appendix
Answers to Frequently Asked Questions
How long will the camera batteries last?
You should be able to take as many as 100 frames when the flash is used in about half the shots, but this is only a rough estimate. Battery life is affected by many variables, such as how often you use the monitor, how often you use the flash, the type of batteries used and environmental conditions. Using the monitor frequently will drain battery power quickly, so keep it turned off to save power. Use of the optional AC adaptor is recommended.
How can I set the clock in the camera for recording the date on image data?
Date setting is not made when the camera is shipped. You must set the date before shooting. The date can be set either from the camera or using the CAMEDIA Master 2.0. The set date will be cancelled approximately 1 hour after the batteries are removed from the camera.
Can I use a filter or a hood with this camera?
Such accessories cannot be connected to the camera.
Can I use an extension flash with this camera?
This camera was not designed for use with extension flash units. Also, a slave unit may not function with this camera.
Why do the subject's eyes sometimes appear red in the pictures?
This red-eye phenomenon occurs with all cameras when shooting people using a flash. This is caused by the light from the flash reflecting off the back of the eye. Red-eye varies depending on the individual, as well as shooting conditions such as ambient lighting.
Use of the Red-eye Reduction Flash Mode significantly reduces this phenomenon.
How should I store the camera?
Cameras can be damaged by dust, moisture and salt. Wipe the camera with a slightly damp cloth and dry thoroughly before storing. Do not store with mothballs. Remove the batteries if you do not plan to use the camera for a long period of time.
PRECAUTIONS
This camera is not recommended for commercial use or for use under severe conditions. This camera is a precision instrument. Use caution when handling the unit. Do not apply strong vibration or pressure to the camera or lens, as this may cause damage to the finely tuned internal parts.
General Precautions
If you have any questions about this product, please consult your nearest Olympus dealer in the provided Authorised Distributors List. (Refer to the Technical Hotline Numbers for technical support, and the Authorised Distributors for repair service, etc.)
If you experience problems
- Do not use the camera if it seems not to function correctly. Take the batteries out or disconnect the AC adapter immediately, and consult your dealer or an Olympus Authorised Service Centre.
Never disassemble or modify
- To prevent damage to the camera, never disassemble it. For internal repairs, consult your dealer or an Olympus Authorised Service Centre. Always protect the camera from humidity and dust.
- Do not store in dusty places, as using the camera afterwards may result in a fire or an electric shock.
- If the unit has been dropped, or if liquid or a foreign object has entered the camera, discontinue use and consult your dealer or an Olympus Authorised Service Centre.
- To avoid severe electrical shock, never touch internal parts. The camera interior contains high voltage points.
Protect from high temperatures
- To avoid internal damage to the camera from high temperature, never leave the camera in a closed car, etc. in direct sun light.
Cleaning
- Before servicing or cleaning the unit, always disconnect the AC adapter.
- The camera can be cleaned by wiping with a soft cloth. To remove stains, wipe with a soft cloth moistened with a mild detergent solution and wrung dry, and then wipe with a dry soft cloth.
- To avoid corrosion of the camera casing, never use benzene, thinner, acetone, alcohol, or any other organic chemical product to clean the camera.
Precautions When Using the Camera
Using the flash
• Always use caution when taking flash pictures at close range.
- When you fire the flash, you must be at least 1 meter away from the faces of your subjects, especially when taking pictures of infants and small children. Firing the flash too close to the subject's eyes could cause a momentary loss of vision.
Handle the camera carefully
- To avoid personal injury, always use the camera from a stable position to prevent losing your balance.
- Use the camera with care to prevent any foreign substances, especially dirt, dust, rain, and sand, from entering the camera when the battery compartment cover or lens barrier is open.
- To prevent damage, never drop the camera or subject it to severe shock or vibration.
- This camera is not water-resistant. Always protect it from water, especially rain and salt water.
- Do not use the camera outside during a rain or lightning storm.
- To avoid damaging the internal circuits of the camera, always switch the camera OFF before you replace the batteries.
Storage environment
- To avoid damage to or malfunction of the camera, store it within the following ranges of temperature and humidity:
$$ - 2 0 ^ {\circ} \mathrm{C} \sim 6 0 ^ {\circ} \mathrm{C} $$
$$ 10\sim 90\% \text{RH (with no condensation)} $$
- To prevent damage from condensation, never use the camera in high humidity.
- When the camera is not in use, always store it in a safe location out of the reach of small children.
Usage environment
•To prevent the hazards of fire, explosion, and serious personal injury, never use the camera in a factory, laboratory, etc. near large concentrations of flammable or explosive gases.
- To avoid damage or malfunction of the camera, use it within the following ranges of temperature and humidity:
$$ 0 ^ {\circ} \mathrm{C} \sim 4 0 ^ {\circ} \mathrm{C} $$
$$ 30\sim 90\% \text{RH (with no condensation)} $$
- Avoid subjecting the camera from sudden, extreme changes in temperature (bringing it into a warm room on a cold day, or vice versa). To avoid the formation of condensation inside the camera which could damage it, place the camera in a plastic bag and then remove it after it has reached ambient temperature.
- Please remember that batteries have a shorter service life at low temperature.
Using accessories
- To prevent the hazards of fire, electrical shock, and damage to the camera, use only the supplied accessories, or accessories recommended by Olympus. For details, please consult the dealer where the unit was purchased or contact an Olympus authorised service centre.
- To prevent fire or electrical shock, always disconnect the AC adapter when the camera is not being use.
- To prevent serious injury from electrical shock, never handle or connect the AC adapter with wet hands.
- The power supply cord should be routed so it will not be walked on. Never place a heavy object on the power cord and never wrap the power cord around the leg of a table or chair. Keep the areas around the power cord connection points, at the power outlet and at the product connection, free of all obstacles. Never place the power cord near a heat source.
Before using the camera
- Before taking particularly important picture, or if the camera has been not used for a long period, make sure that it is operating correctly. If you experience any problem, consult an Olympus authorised service centre.
- We can take no responsibility concerning the loss of data, down time, loss of revenue or any other direct or indirect damage or claims caused by this camera
Important:
- A "Note" indicates information you should be aware of.
- Your camera may differ slightly from that shown in illustrations.
BATTERY HANDLING PRECAUTIONS
To prevent damage or fire caused by battery leakage, please read these instructions carefully and always observe the following guidelines when handling or installing batteries:
- Never heat or throw the batteries into a fire.
- Never disassemble, modify or solder batteries.
- Never install batteries with their polarities (+, -) reversed.
- Take precautions when carrying or storing batteries to prevent them from coming into contact with any metal objects like jewellery, pins, fasteners, etc.
- Never use old batteries together with new ones, and never use different types of batteries together.
- To prevent corrosion, never store batteries in high humidity.
- Never use a battery if it appears damaged in any way.
- Never use a battery if it is leaking, warped, swollen, warm to the touch, or shows any other abnormal condition.
- If you notice any abnormality in new batteries, return them to the dealer where you purchased them.
- To prevent the hazards or fire and serious injury, never use a battery without its protective insulation cover.
- If the liquid gets into your eyes, do not rub them. Rinse with clean water, then seek medical attention immediately.
- If the liquid gets in contact with your skin or clothing, rinse with clean water.
- If the liquid has leaked inside the battery compartment, clean it carefully with a wet rag before inserting new batteries.
- If old batteries are left inside the camera they may leak. If the camera is going into storage, or if you intend not to use the camera for a long period of time, always remove the batteries.
- To prevent battery leakage, never store the camera and/or batteries in an air tight container.
- To prevent leakage which could damage the camera, never attempt to recharge Ni-Cd or Lithium batteries.
- Store batteries in a cool, dry location protected for direct sunlight. Storing batteries in a hot, enclosed location (e.g., inside a vehicle on a hot day) could shorten their service life.
- Always store batteries in a safe location out of the reach of small children.
- If children are going to use the camera, teach them how to use it safely and correctly according to the instructions in the manual. Make sure that children never remove the batteries from the camera.
- When you dispose of dead batteries always observe the local laws and regulations regarding the disposable of such items.
The monitor displays error codes and indicators on the control panel blink to alert you to various problems.
| WarningMonitor Display | Error | Remedy |
| NO CARD | There is no card in the camera, or the card is not inserted correctly. | Insert or remove and reinsert the card. |
| The card is not being recognized. | ||
| CARD FULL | The card is full. | Replace the card, erase unwanted pictures, or transfer the data to a computer and erase all the data to free up space on the card. |
| Number of storable pictures is 0. | ||
| WRITE PROTECT | The camera cannot enter picture, erase or card-format mode. | Remove the write-protect seal before taking any pictures. |
| A write protect seal has been placed on the card and cannot be written to. | ||
| CARD ERROR | You are unable to shoot, playback, or erase pictures with this card. | Wipe the terminal area of the card with lens paper and insert the card again. A card that cannot be formatted cannot be used. |
| This card cannot be used. |
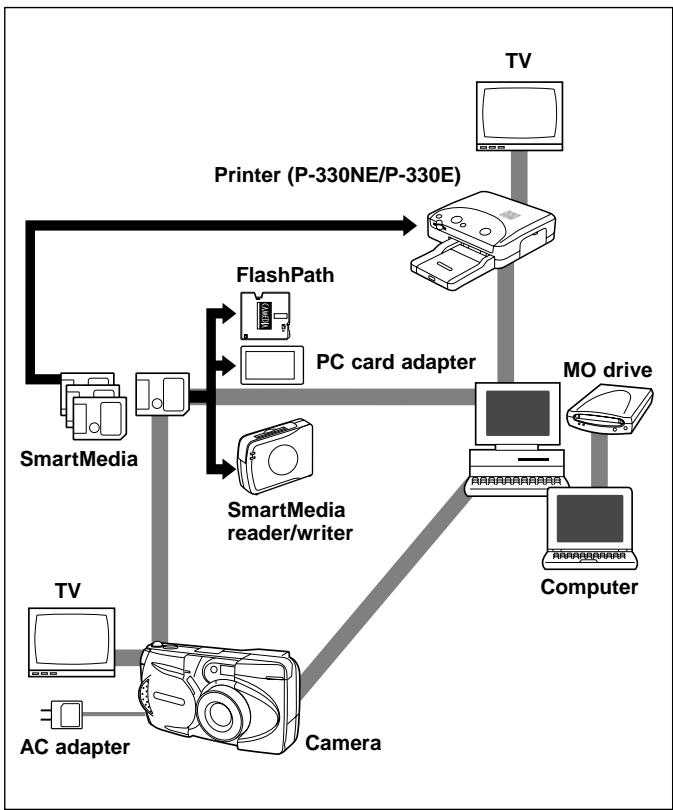
Using the Camera with Optional Equipment
This camera can be used with the following optional equipment:
flowchart
graph TD
    A["SmartMedia"] --> B["PC card adapter"]
    B --> C["TV"]
    C --> D["MO drive"]
    D --> E["Computer"]
    F["AC adapter"] --> G["Camera"]
    H["FlashPath"] --> B
    I["SmartMedia reader/writer"] --> B
    J["TV"] --> K["Computer"]
    L["Printer (P-330NE/P-330E)"] --> C
As of June 2000
IMPORTANT NOTICES
Disclaimer of Warranty
Olympus makes no representations or warranties, either expressed or implied, by or concerning any content of these written materials or software, and in no event shall be liable for any implied warranty of merchantability or fitness for any particular purpose or for any consequential, incidental or indirect damages (including but not limited to damages for loss of business profits, business interruption and loss of business information) arising from the use or inability to use these written materials or software. Some countries do not allow the exclusion or limitation of liability for consequential or incidental damages, so the above limitations may not apply to you.
Copyright Notice
All rights reserved. No part of these written materials or software may be reproduced or used in any form or by any means, electronic or mechanical, including photocopying and recording and the use of any kind of information storage and retrieval system, without prior permission in writing from Olympus. No liability is assumed with respect to the use of the information contained in these written materials or software, or for damages resulting from the use of the information contained in these written materials or of the software. Olympus reserves the right to alter the features and contents of this publication or software without obligation or advance notice.
WARNING
Unauthorised photographing or use of copyrighted material may violate applicable copyright laws. Olympus assumes no responsibility for unauthorised photographing, use or other acts that infringe upon the rights of copyright owners.
- IBM is a registered trademark of International Business Machines Corporation.
- Microsoft and Windows are registered trademarks of Microsoft Corporation.
• Macintosh is a trademark of Apple Computer Inc. - All other company and product names are registered trademarks and/or trademarks of their respective owners.
Notes on Display and Backlight
- The control panel and the fluorescent lamps used in the monitor have a limited service life. If they begin to darken or flicker, contact your nearest service center.
- In cold conditions, the display backlight may be slow to come on or may change color suddenly. To avoid this, keep the camera warm when using in cold temperatures. Backlight performance will return to normal under normal temperature conditions.
- When the color monitor shows different pictures, some pixels may not change color and remain on or off. This phenomenon may be due to a lag in some circuits, but is considered to be within the normal operating tolerances of the monitor. In addition, the brightness of the color monitor may vary between pictures.
About Image File Compatibility
- The following limitations apply when using this camera to play back images shot with another Olympus digital camera, or when using another Olympus digital camera to play back images shot with this camera:
Using the monitor of another camera to play back images shot with this camera
| Compatibility | Camera type |
| Playback | C-3030ZOOM, C-3000ZOOM, C-2020ZOOM |
| Playback of still pictures only | C-2500L, C-2000ZOOM, C-960ZOOM, C-920ZOOM, C-860L, C-21 |
| Incompatible | C-1400XL, C-1400L, C-1000L, C-900ZOOM, C-840L, C-830L, C-820L, C-420L |
Using the monitor of this camera to play back images shot with another camera
| Compatibility | Camera type |
| Playback | C-2020ZOOM, C-2000ZOOM, C-1400XL,C-1400L, C-1000L, C-960ZOOM, C-920ZOOM,C-900ZOOM, C-860L, C-840L, C-830L, C-820L,C-420L, C-21 |
| Still picture limitations* | C-3030ZOOM, C-3000ZOOM, C-2500L |
* A still picture larger than 1600×1200 dots cannot be played back.
Specifications
| Product type: | Digital Camera Image Recording System for shooting and playing back photo images. |
| Still pictures: | Digital recording, JPEG, TIFF non-compression DCF compliant/DPOF compliant |
| Movie pictures: | QuickTime Motion JPEG compliant |
| Recording medium: | 3V (3.3V) SmartMedia card2MB, 4MB, 8MB, 16MB, 32MB, 64MB |
No. of storable still pictures:
| Approx. 1 shot (SHQ-TIFF Mode/8MB card) | |
| Approx. 5 shots (SHQ Mode/8MB card) | |
| Approx. 16 shots (HQ Mode/8MB card) | |
| Approx. 32 shots (SQ-HIGH Mode/8MB card) | |
| Approx. 82 shots (SQ Mode/8MB card) | |
| Erase: | One-Frame Erase, Erase All Frames |
| Image pickup element: | 1/2.7 inch CCD solid-state image pickup |
| 2,110,000 pixels (gross) | |
| Recording image: | 1600 x 1200 pixels(SHQ-TIFF/SHQ/HQ Mode) |
| 640 x 480 pixels (SQ/SQ-HIGH Mode) | |
| White balance: | Full auto TTL, Preset (daylight, overcast, tungsten light, fluorescent light) |
| Lens: | Olympus lens 5.4 ~ 16.2mm,F2.8 ~ 4.4, 8 elements in 6 groups (equivalent to 35 ~ 105mm lens on a 35mm camera) |
| Photometric system: | Digital ESP metering system, Spot metering system |
| Exposure control: | Program auto exposure |
| Aperture*: | W: F2.8, F5.6T: F4.4, F8.6 |
| Shutter*: | 1/2 ~ 1/1000 sec.(used with mechanical shutter)*Manual setting of shutter speed is not supported |
| Shooting range: | 0.8m ~∞ (in standard mode)0.2m ~ 0.8m (in macro mode) |
| Viewfinder: | Optical real image viewfinder (with autofocus mark and backlighting correction mark), monitor |
| Monitor: | 1.8 inch TFT color LCD |
| No. of pixels: | Approx. 61,000 |
| On-screen display: | Date/time, frame number, write-protect, picture mode, battery check, file number display, print reserve, menu, etc. |
| Battery charging time for flash: | Approx. 8 sec or less (at room temperature with new batteries) |
| Flash working range: | W: Approx. 0.2m ~ 4mT: Approx. 0.2 ~ 2.6m |
| Flash modes: | Auto-Flash (automatic flash activation in low light and backlight), Red-eye Reduction Flash, Off (no flash), Fill-In Flash, Slow Shutter Sync Flash, Red-eye Reduction Flash + Slow Shutter Sync Flash |
| Autofocus: | TTL system autofocus |
| Exposure compensation: | Exposure compensation system |
| Focusing range: | 0.2m ~ |
| Self-timer: | 12 sec. delay |
| External connectors: | AC adapterComputer connector (RS- 232C),Video output connector |
| Date and time: | Recorded in picture data |
| Automatic calendar system: | Up to year 2030 |
| Usage environment: | Temperature: 0 ~ 40°C (in use) / -20°C ~ 60°C (in storage) |
| Humidity: | 30 ~ 90% (in use) / 10 ~ 90% (in storage) |
| Power supply: | This camera uses either four R6 (AA) alkaline, NiMH lithium or NiCd batteries. Two-battery CR-V3 lithium battery packs (Olympus model LB- 01) are also available. Do not use Zinc-carbon batteries in this camera.Exclusive AC adapter (optional) |
| Dimensions (excluding the raised portion): | 127mm (W) x 66.5mm (H) x 53mm (D) |
| Weight: | 270g (excluding batteries/SmartMedia card) |
Specifications are subject to change without any notice or obligation on the part of the manufacturer.
Préparations
Nomenclature
Appareil photo
natural_image
Line drawing of a digital camera module (no text or symbols)Dragonne

natural_image
Simple line drawing of a pair of scissors or pliers (no text or symbols)Câble vidéo

natural_image
Line drawing of a coiled cable with two connectors (no text or symbols)natural_image
Line drawing of a USB cable with connector port (no text or symbols)Quatre piles alcalines R6 (AA)

natural_image
Simple line drawing of three cylindrical batteries (no text or symbols)natural_image
Simple line drawing of a rectangular container with a curved indentation on top (no text or symbols)
natural_image
Simple line drawing of a document with three horizontal lines, no text or symbols present.natural_image
Two overlapping rectangular books with blank pages, no text or symbols visibleArticles optionnels
natural_image
Pure electrical circuit lines without any symbols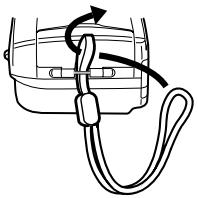
natural_image
Diagram of a mechanical clamp or rope being inserted into a housing (no text or symbols)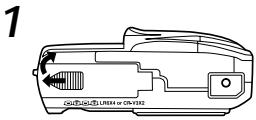
natural_image
Diagram showing a device connected to a TV, with an inset close-up of its front panel (no text or symbols present)natural_image
Line drawing of a classic sports car (no text or symbols)
natural_image
Line drawing of a car driving on a road with trees in the background (no text or symbols)
natural_image
Illustration of a bamboo plant beside a horizontal striped panel (no text or symbols)
natural_image
Line drawing of a motorcyclist riding on a speed motorcycle (no text or symbols)natural_image
Line drawing of a digital camera with no text or symbolsHandschlaufe

natural_image
Simple line drawing of a pair of ropes or rods (no text or symbols)Videokabel
natural_image
Line drawing of a coiled cable with two connectors (no text or symbols)natural_image
Line drawing of a USB cable with connector port (no text or symbols)R6/AA
Alkalibatterien (4 Stück)

natural_image
Simple line drawing of three cylindrical batteries (no text or symbols)natural_image
Simple line drawing of a rectangular container with a curved indentation on top (no text or symbols)
natural_image
Two overlapping rectangular books with blank cover, no text or symbols visibleSonderzubehör
natural_image
Diagram of a mechanical clamp or rope system with rotational arrow indicating motion (no text or symbols)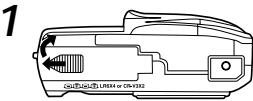

natural_image
Diagram showing a device connected to a screen, with an inset close-up of its internal components (no text or symbols present)natural_image
Line drawing of a classic sports car (no text or symbols)
natural_image
Line drawing of a car on a road with a starburst effect (no text or symbols)
natural_image
Illustration of a bamboo plant beside a striped bamboo mat (no text or symbols)
natural_image
Illustration of a tiger in profile with vertical bars (no text or symbols)
natural_image
Line drawing of a motorcyclist riding a scooter with motion blur (no text or symbols)OS : Windows 98SE/98/95/NT 4.0/2000 professional
natural_image
Line drawing of a digital camera with no text or symbolsCorrea

natural_image
Simple line drawing of a pair of ropes or rods (no text or symbols)Cable de video

natural_image
Line drawing of a coiled cable with two connectors (no text or symbols)natural_image
Line drawing of a USB cable with connector port (no text or symbols)Pilas R6 (AA) alcalinas (4 unidades)

natural_image
Simple line drawing of three cylindrical batteries (no text or symbols)natural_image
Simple line drawing of a rectangular container with a curved indentation on top (no text or symbols)natural_image
Two overlapping rectangular books with blank covers, no visible text or symbols on pages or covers.Items Opcionales
natural_image
Pure electrical circuit lines without any symbols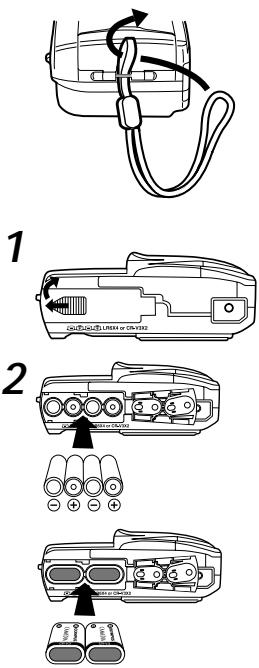
natural_image
Line drawing of a device connected to a monitor, showing internal components and wiring (no text or symbols)natural_image
Line drawing of a classic sports car (no text or symbols)natural_image
Line drawing of a car on a road with abstract background elements (no text or symbols)natural_image
Illustration of a bamboo plant beside parallel grooves (no text or symbols)natural_image
Line drawing of a motorcyclist riding on a motorcycle with motion blur (no text or symbols)Two Corporate Center Drive, Melville, NY 11747-3157, U.S.A. Tel. 631-844-5000
(Customer support) Tel. 1-888-553-4448
www.olympusamerica.com
distec@olympus.com
OLYMPUS OPTICAL CO. (EUROPA) GMBH.
(Premises/Goods delivery) Wendenstrase 14-16, 20097 Hamburg, Germany. Tel. 040-237730
(Letters) Postfach 10 49 08, 20034 Hamburg, Germany.
www.olympus-europa.com
OLYMPUS OPTICAL CO. (U.K.) LTD.
2-8 Honduras Street, London EC1Y 0TX, United Kingdom. Tel. 0171-253-2772

- “CE” mark indicates that this product complies with the European requirements for safety, health, environment and customer protection.
- La marque “CE” indique que ce produit est conforme avec les exigences européennes en matière de sécurité, santé, environnement et protection du consommateur.
- Das CE-Zeichen bestätigt, daß dieses Produkt mit den europäischen Bestimmungen für Sicherheit, Gesundheit, Umweltschutz und Personenschutz übereinstimmt.
- Operating Instructions
- Mode d'emploi
- Viewfinder
- Control Panel
- Monitor
- Checking the Contents
- Optional Items
- Attaching the Strap
- CAUTION
- Inserting the Batteries
- Inserting the SmartMedia Card
- Setting the Date and Time
- Adjusting the Viewfinder
- Learning the Basics
- Turning the Power On
- Checking the Control Panel
- Is the SmartMedia card inserted?
- When the "NO CARD" error message is displayed:
- For other error messages:
- When the card setup screen is displayed:
- Checking the Batteries
- NOTE
- Does the Card Have Enough Room for More Pictures?
- Shooting Technique Depends on Distance to the Subject
- For snapshots and long-range photography (from approx. 1.5m to ):
- For close-ups (from 0.8m to approx. 1.5m):
- For extreme close-ups (0.2m \~ 0.8m):
- Characteristics of the viewfinder and the monitor
- Taking Still Pictures
- Taking Pictures Using the Monitor
- Enlarging Your Shots (Optical Zoom)
- Taking Pictures Using the Flash
- Checking Your Still Pictures
- Turning the Power Off
- Getting Started
- Turning the Power On in the Playback Mode
- Standby mode
- Turning the Power Off in Playback Mode
- Displaying Images Frame by Frame
- Displaying All Frames (Index-Display Setting)
- Checking the Focus by Enlarging a Selected Picture (Displaying Close-ups)
- Connecting to a TV Set
- To Avoid Accidentally Erasing Pictures You Want to Keep (Image Protection)
- One-Frame Erase
- Taking Better Pictures
- Points to Remember
- When Not Able to Focus on a Subject While Shooting
- Focus on the Subject in Advance (Focus Lock)
- Using Fixed Focus (Quick Focus)
- Using the Flash
- Switching Between Flash Modes
- Auto-Flash
- Red-eye Reduction ( Ⓞ )
- Fill-in Flash ( ↓ )
- Slow Sync ( ↳ SLOW )
- Red-eye Reduction + Slow Sync ( ◎ ↘ SLOW )
- Off (Flash Override) ( ④ )
- Taking Close-up Pictures (Macro Mode)
- Enlarging the Subject (Digital Telephoto Mode)
- Self-Timer
- Printing
- Printing the Date and Time on Your Images
- Selecting an Image to Be Printed (Print reserve)
- Printing with the Olympus Photo Printer for Digital Cameras
- Main features of P-330NE/P-330E
- Processing Photo Images with a Computer
- Installing Provided Software
- Transferring Picture Data to a Computer
- Transferring Picture Data with a Computer SmartMedia Card Adapter
- Loading with a Floppy Disk Adapter
- Transferring Data with a SmartMedia Reader/Writer
- Connecting your Camera to a Computer with
- a Computer Cable
- Computer Operating Environment
- Connecting your Camera to a Computer
- Computers Requiring a Conversion Connector
- Other Functions of CAMEDIA Master 2.0
- Communication between Computer and Camera
- Image Viewer
- Image Processing
- Multi-processing
- Camera sequence functions
- Appendix
- Answers to Frequently Asked Questions
- How long will the camera batteries last?
- How can I set the clock in the camera for recording the date on image data?
- Can I use a filter or a hood with this camera?
- Can I use an extension flash with this camera?
- Why do the subject's eyes sometimes appear red in the pictures?
- How should I store the camera?
- PRECAUTIONS
- General Precautions
- If you experience problems
- Never disassemble or modify
- Protect from high temperatures
- Cleaning
- Precautions When Using the Camera
- Handle the camera carefully
- Storage environment
- Usage environment
- Using accessories
- Before using the camera
- Important:
- BATTERY HANDLING PRECAUTIONS
- Using the Camera with Optional Equipment
- IMPORTANT NOTICES
- Disclaimer of Warranty
- Copyright Notice
- WARNING
- Notes on Display and Backlight
- About Image File Compatibility
- Préparations
- Nomenclature
- Appareil photo
- Articles optionnels
- Sonderzubehör
- Items Opcionales
Brand : OLYMPUS
Model : C-990 ZOOM
Category : Digital Camera