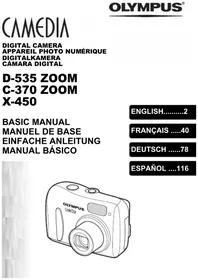
C-200 ZOOM - Digital Camera OLYMPUS - Free user manual and instructions
Find the device manual for free C-200 ZOOM OLYMPUS in PDF.

| Product type | Digital camera |
| Brand | OLYMPUS |
| Model | C-200 ZOOM |
| Sensor | CCD 1/2.7 inch, 2,110,000 pixels (gross) |
| Maximum resolution | 1600 x 1200 pixels (SHQ mode) |
| Lens | Olympus 5.4–16.2 mm (35–105 mm equiv.), F2.8–4.4 |
| Optical zoom | 3x |
| Digital zoom | Up to 3x (max. 9x combined) |
| LCD screen | 1.8 inch TFT, 61,000 pixels |
| Viewfinder | Optical real-image |
| Storage media | SmartMedia 3V (3.3 V) card, 4 to 128 MB |
| Image formats | JPEG, TIFF, DCF, DPOF |
| Flash modes | Auto, red-eye reduction, fill-in, off, night scene, combination |
| Power source | 4 AA batteries (alkaline, lithium, NiMH, NiCd) or 2 CR-V3 batteries; optional AC adapter |
| Weight (without batteries or card) | 240 g |
| Operating temperature | 0 to 40 °C |
| Connections | USB, video output, DC input |
| Focus | TTL auto, macro from 20 cm |
| Shutter speed | 1/2 to 1/1000 sec |
| Self-timer | 12 seconds |
| Maintenance | Clean with a soft dry cloth; avoid moisture |
| Safety | Do not expose to water or disassemble the camera |
| Spare parts and repairability | SmartMedia cards, AC adapter, USB/video cables, wrist strap; contact Olympus customer service |
Frequently Asked Questions - C-200 ZOOM OLYMPUS
User questions about C-200 ZOOM OLYMPUS
0 question about this device. Answer the ones you know or ask your own.
Ask a new question about this device
Download the instructions for your Digital Camera in PDF format for free! Find your manual C-200 ZOOM - OLYMPUS and take your electronic device back in hand. On this page are published all the documents necessary for the use of your device. C-200 ZOOM by OLYMPUS.
USER MANUAL C-200 ZOOM OLYMPUS
- Before you use this camera, read this manual and then store it in a safe location where you can find it for future use.
- We recommend that you spend some time taking test shots and experimenting with all of the features before you take important pictures.
- These instructions are only for quick reference. For more details on the functions described here, refer to the software CD's instructions on CD-ROM.
Manuel de Base
Learning the Basics 10
Playing Images Back 19
Taking Better Pictures 22
Transferring Your Pictures to a Computer 30
Appendix 32
These instructions are only for quick reference. For more details on the functions described here, refer to the camera's Reference Manual on the software CD.
Copyright 2001. Olympus Optical Co., Ltd. All rights reserved.
Thank you for purchasing an Olympus digital camera. Before you start to use your new camera, please read these instructions carefully to enjoy optimum performance and a longer service life. Keep this manual in a safe place for future reference.
For Customers in Canada
This Class B digital apparatus meets all requirements of the Canadian Interference-Caising Equipment Regulations.
For Customers in Europe

"CE" mark indicates that this product complies with the European requirements for safety, health, environment and customer protection.
For Customers in USA
Declaration of Conformity
Model Number: D-510 ZOOM
Trade Name: OLYMPUS
Responsible party: Olympus America Inc.
Address: 2 Corporate Center Drive, Melville, New York 11747-3157 U.S.A.
Telephone number: 631-844-5000
Tested to comply with FCC standards
FOR HOME OR OFFICE USE
This device complies with Part 15 of the FCC rules. Operation is subject to the following two conditions:
(1) This device may not cause harmful interference, and
(2) This device must accept any interference received, including interference that may cause undesired operation.
Trademarks
- IBM is a registered trademark of International Business Machines Corporation.
- Microsoft and Windows are registered trademarks of the Microsoft Corporation.
- Macintosh is a trademark of Apple Computer, Inc.
- All other company and product names are registered trademarks of their respective owners.
Getting Started
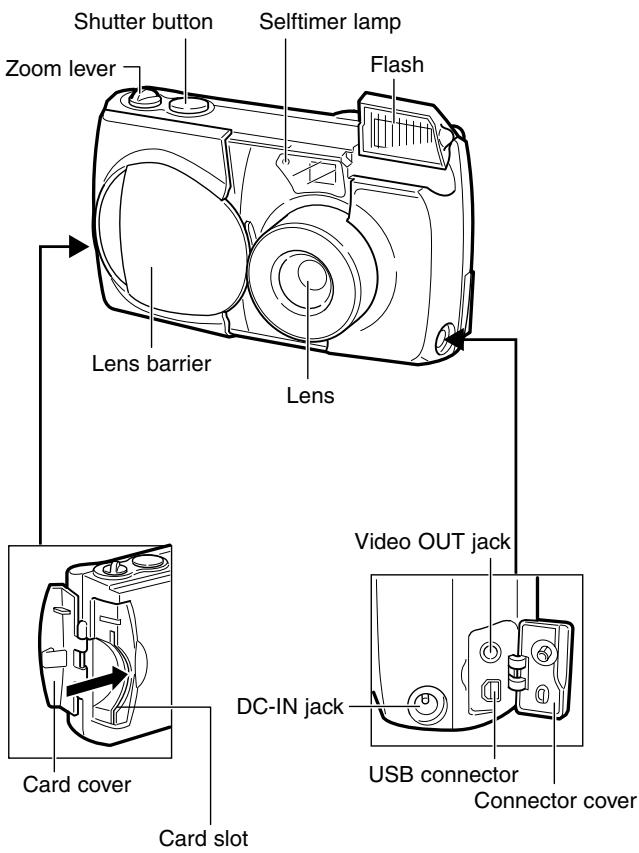
Names of Parts
Camera
Camera (continued)
Arrow pad
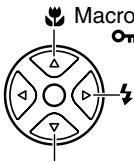
Macro button/
On Protect button
Flash mode button

Seliftimer button/
Erase button
Diopter adjustment dial
Viewfinder
Monitor
Battery compartment lock
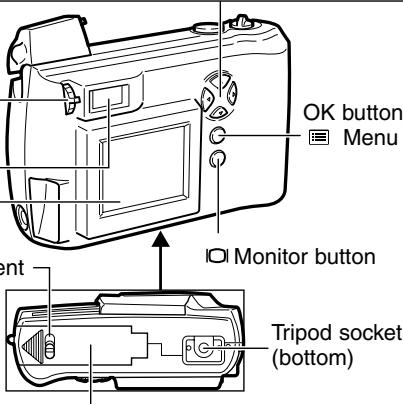
OK button/
Menu button
Battery compartment cover (bottom)
Viewfinder
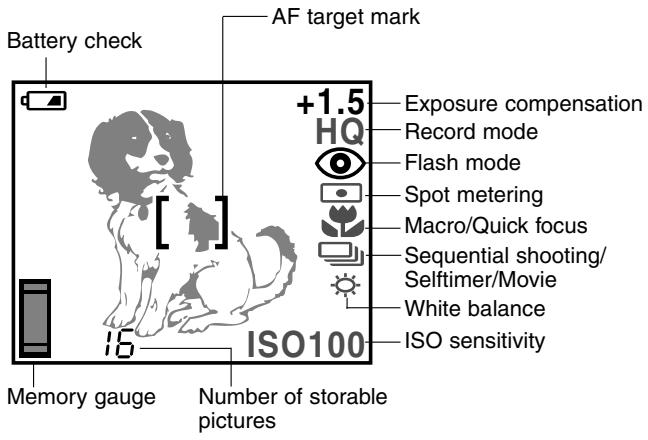
AF target mark
Monitor
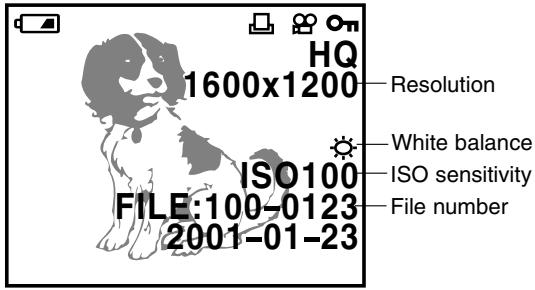
Shooting mode display
Playback mode display
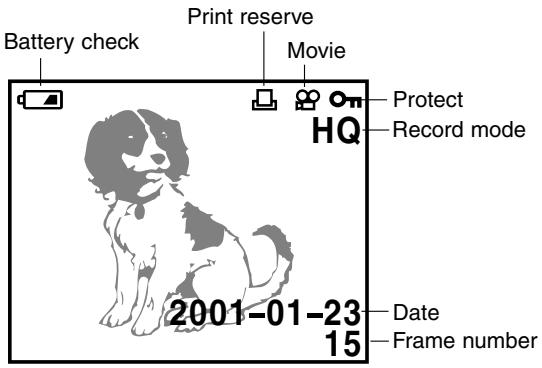
Playback mode display (with image information display on)
Attaching the Strap
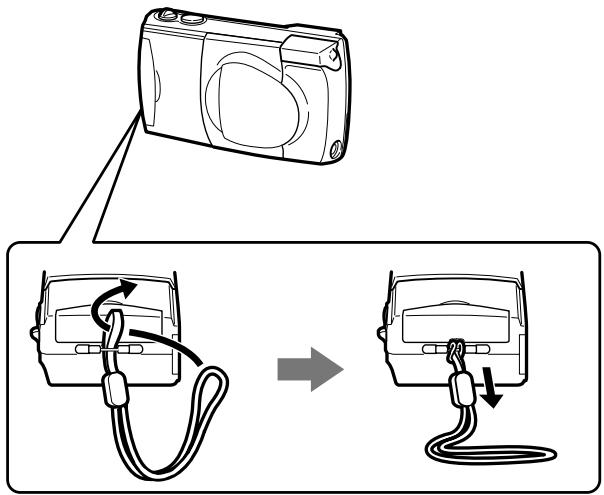
Attach the strap to the camera as shown in the diagram.
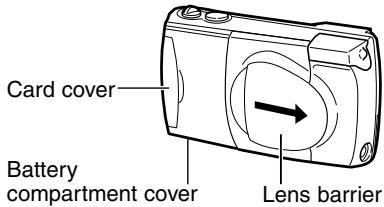
1 Make sure the lens barrier is closed.
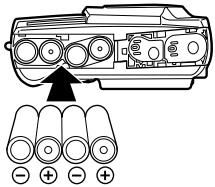
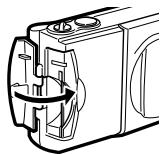
2 Slide the battery compartment lock from to . Slide the battery compartment cover to the side and lift it up to open.
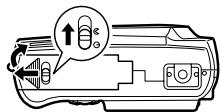
3 Insert the batteries into the camera as shown in the diagram, making sure that the negative and positive poles are correctly aligned.
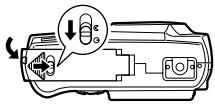
4 Close the battery compartment cover, and slide the battery compartment lock from 心 to 心 .
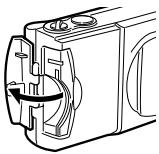
5 Open the card cover.
6 Insert the SmartMedia card into the camera as shown in the diagram, making sure that it is pushed all the way in.
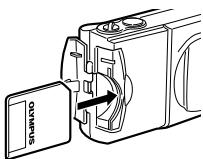
7 Close the card cover so it clicks into place.
Setting the Date and Time
1 Make sure the SmartMedia is inserted, then slide the lens barrier open.
2 Press the menu button ( ) to open the shooting menu.
3 Press or to select SET, and then press .
4 Press or to select the date setting, and then press .
5 Press or to select the date format, and then press .
6 Press or to set the first date/time position, and then press. Pressing moves right to the next position, and pressing moves back to the previous position.
7 Repeat Step 6 until the date/time settings are completed.
Press the OK button.
9 Press the monitor button (IOI).
Adjusting the Viewfinder
1 Slide the lens barrier open until it clicks.
2 While looking through the viewfinder, gently turn the diopter adjustment dial.
3 Stop turning the dial when the AF target mark is clearly visible.
4 You are ready to take some pictures.
Learning the Basics
Switching Power On/Off
To switch the camera on
To switch the camera on, slide the lens barrier open until it clicks. The lens extends and the flash pops up.
When the lens does not extend, the lens barrier is not fully opened.
Slide the lens barrier open until it clicks.
Standby Mode
- To extend battery life, always switch the camera off when it is not in use.
- If the camera remains idle for three minutes, the camera enters standby mode and the monitor goes off to save battery energy. To resume shooting, lightly press the shutter button or zoom lever, close and open the lens barrier, or press any button on the arrow pad, the OK button, the menu button, or the monitor button.
- Normally if the camera remains idle for four hours in the standby mode, it will turn off completely. (If new batteries are installed, then it may take longer for the camera to shut down, depending on the type of batteries in use.)
CAUTION
- To avoid losing images stored on the card, always switch the camera off before you open the card cover, remove the card or batteries, or disconnect the AC adapter.
To switch the camera off
1 Close the lens barrier halfway until you hear it click slightly, and then wait for the lens to retract automatically.
2 After the lens retracts, close the lens barrier completely until you hear a click. This allows to close the flash.
3 Close the flash.
- The pictures you have taken are stored on the SmartMedia card and will not be lost after the power is turned off, or when batteries are replaced.
CAUTION
- To avoid damaging the lens, never push the lens barrier against the lens. Always wait for the lens to retract automatically.
Checking the Monitor
Is the Card Inserted?
If you forget to insert the card, or if there is any other problem with the card, the monitor will display a message. Read the message and correct the problem.
Monitor

NO CARD
When the "NO CARD" error message is displayed:
- The card may not be inserted properly.
- Turn the power off. Then remove and re-insert the card.
For other error messages:
- Follow the directions on the monitor.
Monitor (Card Setup)

When the card setup screen is displayed:
- You have inserted a card which needs to be formatted. When a card is formatted, all of the recorded images on the card are deleted.
Checking the Batteries
When the monitor is turned on, it displays the estimated remaining battery life.
After opening the lens barrier and turning on the power (shooting mode), the monitor will automatically illuminate, display information, and then go off after a short time.

lights (and turns off automatically).
The batteries are OK and have enough power to take pictures.

blinks and other indicators on the monitor are displayed normally.
The batteries are low. It is still possible to take pictures, but the power may cut off while doing so. Replace the batteries.
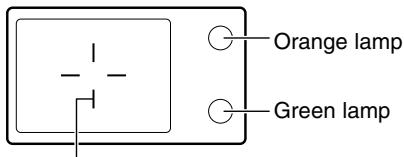
Orange lamp
Green lamp
The monitor will go out and the green and orange lamps next to the viewfinder will illuminate simultaneously.
The batteries are dead. Replace the batteries.
To recheck the batteries
Display the shooting menu first. When the shooting menu is turned off, the remaining battery life will be displayed.
CAUTION
- If the battery is low, the camera may beep continuously after taking a picture or turning the power on, and the frame number on the monitor may blink. If this happens after taking a picture, the camera may not be taking pictures properly. Replace the batteries before continuing to take pictures.
Does the Card Have Enough Room for More Pictures?
When the power is turned on with the camera in shooting mode, the monitor displays a remaining picture count. When the monitor display has gone out, press the monitor button (O) to turn the monitor back on.
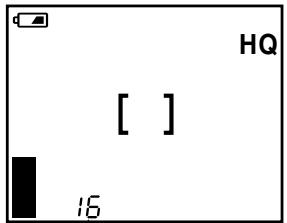
The number of storable pictures
- If the count drops to 0, the camera beeps, the green lamp blinks and the monitor displays the message "CARD FULL".
This will repeat every time the power is turned on.
- The number of storable pictures varies depending on the record mode.
Approximate storable still pictures
| Record mode SmartMedia Resolution capacity | SQ* | HQ | SHQ | TIFF* | |
| NORMAL | SQ-HIGH | ||||
| 640×480 | 1600×1200 | ||||
| 8MB | 82 | 32 | 16 | 5 | 1 |
| 16MB | 165 | 66 | 31 | 11 | 2 |
| 32MB | 331 | 132 | 64 | 22 | 5 |
| 64MB | 664 | 265 | 128 | 45 | 11 |
- The SQ and TIFF modes can be set for different resolutions.
Approximate maximum movie lengths, in seconds
| Record mode | Resolution | SmartMedia capacity | |||
| 8MB | 16MB | 32MB | 64MB | ||
| HQ | 320×240 | 23 | 47 | 96 | 193 |
| SQ | 160×120 | 105 | 210 | 424 | 851 |
- There is a limit to the number of frames that may be shot when operating the shutter button a single time.
- The maximum movie length may be different from the table above for C-200 ZOOM models sold in the PAL color system regions if movie pictures are shot with the video cable connected.
Shooting Technique Depends on Distance to the Subject
Deciding whether to use the viewfinder or the monitor display when shooting depends on the distance between you and your subject. Determine the approximate distance before taking the picture.
For normal and long-range photography (from approx. 1.5m (59^ ) to (infinity)):
We recommend using the viewfinder.
For close-ups (from 0.8m (31") to approx. 1.5m (59')):
Although you can use the viewfinder to take pictures, in some cases it is better to use the monitor. See below for details.
For extreme close-ups (0.2m (8") ~ 0.8m (31")):
Use the macro mode and compose the shot with the monitor to take pictures. Although it is possible to take such shots without using the macro mode, proper exposure and focus may not be achieved.
Characteristics of the viewfinder and the monitor
You can use either the monitor or the viewfinder to determine the proper shooting range. Consider the following when deciding whether to use the viewfinder or the monitor for a particular shot:
Viewfinder
Advantage: You can maintain the proper subject composition with less camera movement.
Disadvantage: Close-up photography causes inconsistencies between the picture frame as seen in the viewfinder and the actual edge of the picture.
Monitor
Advantage: You can check the subject composition more accurately.
Disadvantage: It is more difficult to hold the camera steady, and battery life is decreased.
Taking Still Pictures
1 Compose the shot in the viewfinder. (The area of the actual picture will be slightly larger than the composed shot.)
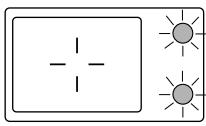
2 Half-press and hold down the shutter button until the green lamp next to the viewfinder lights.
3 Slowly full-press the shutter button. The camera beeps when the shot is completed and the green lamp next to the viewfinder will flash as the image is stored. If the orange lamp next to the viewfinder lights, the flash will fire automatically.
4 Wait for the green lamp next to the viewfinder to stop flashing before you take another picture.
- Always make sure the green lamp is off before you take another picture.
- The time you must wait between shots while the green lamp is blinking (2 to 40 sec.) depends on the record mode selected.
(Larger images require more time for storing.)
CAUTION
- To avoid losing images stored on the card, including the image currently being stored, while the green lamp next to the viewfinder is flashing, never remove the batteries, remove the card, or disconnect the AC adapter.
1 With the lens barrier open, press the monitor button (IOI).
2 Compose the shot in the monitor.
3 To complete the shot, continue from Step 2 in the previous section for taking pictures through the viewfinder.
4 To release the camera from monitor shooting, press the monitor button (口).
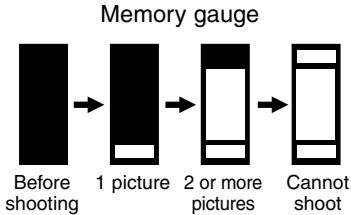
When shooting with the monitor:
- The memory gauge is displayed while the shot is being stored.
- When the memory gauge displays full, you must wait several seconds for the memory gauge to go off before you can take the next shot.
- The memory gauge may be displayed for a short or long time, depending on the selected record mode. (Larger images require more time for storing.)
CAUTION
- To avoid losing images stored on the card, including the image currently being stored, while the green lamp next to the viewfinder is flashing, never remove the batteries, remove the card, or disconnect the AC adapter.
Enlarging Your Shots (Optical Zoom)
Push the zoom level toward W (wide angle) to capture a wide area in the shot. Pull the zoom lever toward T (telephoto) to zoom in and make subjects appear larger.
Playing Back Your Still Pictures (Quick View)
1 With the lens barrier open, quickly press the monitor button (O) twice to display the most recent shot on the monitor.
2 Use the arrow pad buttons to browse the other images stored on the card.
: Previous image
Next image
: Back to previous 10th image
: Forward to next 10th image
3 To return to shooting, press the monitor button (IO) once.
NOTE
- If you want to take a picture while viewing stored pictures, compose the picture in the viewfinder, and then full press the shutter button.
Taking Movie Pictures
- Open the lens barrier.
- Press on the arrow pad.
- Press repeatedly until the (movie) mark is displayed on the monitor.
- Position the subject in the picture frame, then press the shutter button all the way down.
Memory gauge
The gauge level rises as you continue to shoot. If you continue shooting, the level reaches the top and the camera stops shooting.
Remaining second count
Indicates the time remaining before the camera must stop shooting.
- Full-press the shutter button again.
Playing Back Movie Pictures (Movie Playback)
When playing back movie pictures, before going to the playback menu, the images with the movie "®" mark that you would like to play back have to be displayed. For operating instructions, see "Using thePlayback Menu".
Press to highlight "B". Movie playback will begin shortly.
To pause playback, press any button on the arrow pad.
2 While the camera is on pause, the following operations are possible:
: Returns to the beginning of the movie pictures.
: Advances to the end of the movie pictures.
:Fast forward
:Rewind
3 To resume playback, quickly press on the arrow pad. The movie on the monitor will play back again.
4 To end, press the OK button while the image is paused.
Playing Images Back
Getting Started
Turning the Power On in Playback Mode
- Make sure the lens barrier is closed.
- Press the monitor button (口).
- The functions available for the playback mode can also be used for Quick View.
If the camera is left untouched for three minutes when using the batteries, it automatically turns off. It is strongly recommended, however, that you switch power off promptly when you are finished using the camera.
When using new batteries, it may take longer for the camera to shut down automatically depending on the type of batteries being used.
Turning the Power Off in the Playback Mode
- Press the monitor button (IOI).
Displaying Images Frame by Frame
1 With the lens barrier closed, press the monitor button (O). The camera switches on and displays the most recent shot on the monitor.
2 Use the arrow pad buttons to browse the other images stored on the card.
: Previous image
Next image
: Back to previous 10th image
: Forward to next 10th image
Important shooting information (record mode, resolution, etc.) is displayed for about 3 seconds with each picture.
Displaying All Frames (Index Display)
With the lens barrier closed, press the monitor button (IOI). The camera switches on and displays the most recent shot on the monitor. Pushing the zoom lever to Wide (23) displays several frames simultaneously. You can select a desired frame with the arrow pad. To fully display the desired frame, pull the zoom lever to Telephoto () . You can change the number of frames displayed with the playback menu.
Checking the Focus by Enlarging a Selected Picture (Displaying Close-ups)
Pulling the zoom lever to Telephoto ( ) enlarges a picture 1.5x and will continue to enlarge 0.5x (up to 3x) each time you pull the zoom lever to Telephoto ( ). Use the arrow pad to scroll and view other parts of the picture that you cannot see.
To Avoid Accidentally Erasing Pictures You Want to Keep (Image Protection)
Press the monitor button with the lens barrier closed to turn on power in playback mode and display the last image taken. Use the arrow pad to select the image you want to protect, then press (On) for at least 1 second. To cancel image protection, press for at least 1 second again.
One-Frame Erase
Press the monitor button with the lens barrier closed to turn on power in playback mode and display the last image taken. Use the arrow pad to select the image you want to erase, then press ( ) for at least 1 second. When the one-frame erase screen appears, select "YES" by pressing or , then press the OK button. The camera beeps once and erases the picture.
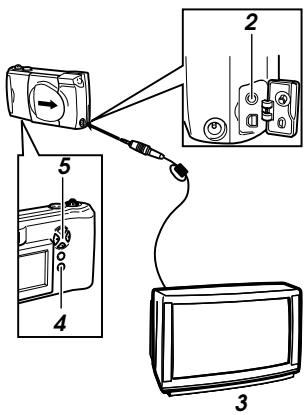
Connecting to a Television Set
Before connecting, make sure the camera and television power are off, and that the camera lens barrier is closed.
2 Connect the video cable by inserting one end into the video OUT jack on the camera and the other end into the video IN jack on the television.
3 Turn on the television, and set to "video input."
4 Press the monitor button (□) on the camera.
5 Select the image that you want to display by pressing the arrow pad.
CAUTION
- Video signal is either NTSC or PAL compatible depending on the regional video standard in the intended area of distribution.
Taking Better Pictures
- Depending on the distance from the subject to camera, the final picture may not match the image in the viewfinder, and zooming in can make the discrepancy even greater. Use the monitor for close-ups.
- Subjects may be difficult to focus if they (1) have little contrast, (2) appear excessively bright in the center, (3) have no vertical lines, (4) are at varying distances, (5) are moving quickly, or (6) not within the AF target mark.
To correct the situation either:
- Focus the camera at something the same distance as your subject, allow it to focus, then aim it back at the subject and shoot.
- Set the focus at .
For subjects with no vertical lines, hold the camera vertically to focus, then move it back to the horizontal position to take the shot.
1 Subjects with low contrast
2 Subjects that appear excessively bright in the center

3 Subjects with no vertical lines

4 Subjects of varying distances

5 Fast-moving subjects

6 Subjects not within the AF target mark

AF target mark
When Not Able to Focus on a Subject While Shooting
Determine the Position of the Subject After Focusing (Focus Lock) If your main subject is not centered inside the AF target mark, use the focus lock feature explained below:
1 Open the lens barrier.
2 Look through the viewfinder and position the AF target mark on the subject you wish to focus on.
3 Half-press the shutter button so the green lamp next to the viewfinder lights up.
4 Keep the shutter button half-pressed while you reposition your subject(s) within the picture frame. Then full-press the shutter button.
Fixing a Far-Distance Focus (Quick Focus)
The lens can be set for far-distance focus () . Use this function when it is difficult to focus on a subject in the background.
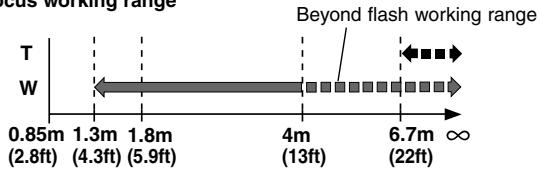
Quick focus working range
Press on the arrow pad. The mark is displayed on the monitor. Now you are ready to take a picture. After the picture is taken, quick focus is automatically cancelled.
Taking Close-up Pictures (Macro Mode)
Press the monitor button (O) to switch on the monitor. Press on the arrow pad repeatedly until the macro mark (\~) is displayed. Compose the picture and shoot. The minimum distance to the subject is approximately 20cm (8^ ) . To cancel the macro mode, press repeatedly until the macro mark (\~) disappears.
Using the Selftimer
Secure the camera on the tripod. Press on the arrow pad repeatedly until the selftimer mark ( ) is displayed on the monitor. Set up the shot and full-press the shutter button. The selftimer lamp lights up and then blinks. The shutter is released after 12 seconds the shutter button is pressed. The selftimer is automatically cancelled after taking a picture.
Using the Flash
Switching Between Flash Modes
The camera is automatically set to auto-flash mode when the power is turned on. Changing the flash mode to other settings will cause the flash mode mark to be displayed on the monitor.
Each time you press , the flash mode settings are displayed in order.
| Flash mode | Function/purpose: |
| →Auto-flash ↓ (no Mark) | Automatically fires in lowlight and backlit conditions. |
| Red-eye reduction ↓ | Significantly reduces the red-eye phenomenon (i.e. when the flash causes a subject's eyes to appear red in the picture). |
| Fill-in flash ↓ | Fires regardless of available light. |
| No flash ↓ | Flash does not fire regardless of the lighting conditions. Good for taking photos where flash is prohibited. |
| Night scenes ↓ | Taking photos at night using the flash and slow shutter speeds. |
| Night scenes + Red-eye reduction | Taking photos of people at night using flash and slow shutter speeds. |
Auto-Flash
In auto-flash mode, the flash will automatically fire in lowlight and backlit conditions.
To fire the flash in a backlit shot, position the subject inside the AF target mark.
Red-eye Reduction ( ⑨ )
When shooting people, eyes may appear red. Use the red-eye reduction flash mode to compensate for this phenomenon.
In the red-eye reduction flash mode, the camera will emit a series of rapid pre-flashes before the actual flash fires. This makes the subject's pupils contract, significantly reducing the red-eye effect. Be sure to hold the camera firmly until the shutter releases, which takes approximately one second.
Fill-in Flash ( )
Forces the flash to fire on every shot.
Using the fill-in flash mode, the flash fires regardless of available light. This feature can be used to light up a subject's face, when shaded by a tree for example, or to correct uneven lighting conditions caused by backlighting, fluorescent lighting, etc. This mode may not have the desired effect in excessively bright light.
No Flash ( ① )
Use this mode in situations where flash photography is prohibited, such as art museums and live stage performances, or when taking pictures in twilight or of night scenes.
The shutter speed automatically slows down to 1/2 second in low-light situations. The use of a tripod is recommended to prevent blurriness caused by camera movement.
Night Scenes ( )
For taking pictures at night, using flash and slow shutter speeds. This setting fires the flash to expose the foreground while the shutter stays open to expose the details in the background.
Night Scenes + Red-eye Reduction ( ⋅ Ⓞ )
The combination of these two modes works best for taking pictures of people at night.
The night scene flash and red-eye reduction flash both operate at the same time.
The shutter speed automatically slows down to 1/2 second in low-light conditions. The use of a tripod is recommended to prevent blurriness caused by camera movement.
The flash will fire automatically when necessary.
Using the Shooting Menu
The shooting menu allows you to adjust image qualities, change the record mode, and use the various picture-taking functions.
The functions contained in the shooting menu are divided into 4 groups.
1 To switch on the camera, slide the lens barrier open until it clicks.
2 Press the menu button ( ) to open the shooting menu.
3 On the arrow pad, press or to select a settings group (Shooting, Image, Card, Settings).
- The selected item is highlighted green, and the current setting is enclosed in brackets to the right of each item.
Press the OK button to change the setting and return to the first screen.
4 Press to highlight one of the items.
5 Press or to move to the desired item.
6 Press to display the possible settings.
7 Press or to highlight the desired setting.
or
To cancel a setting, press .
9 Confirm that the new setting is correct, and then press the OK button twice to save the setting and close the menu display.
To change a setting temporarily for a shot
1 Follow Steps 1 to 7 above.
2 Take the picture with the new setting.
3 Press twice, then press the OK button. The temporary setting is replaced by the default setting and the shooting menu closes.
For more details on the functions described here, refer to the camera's Reference Manual on the software CD.
| Group | Item | Purpose | Possible Settings |
| CAM(Shooting) | Spot metering mode | Exposure is measured at only the center of the subject. | (ESP) SPOT |
| Exposure compensation | Adjusting image brightness. | +2.0 +1.5 +1.0 +0.5 (0)-0.5 -1.0 -1.5 -2.0 | |
| ISO ISO sensitivity | By setting the ISO sensitivity, you can adjust the camera's sensitivity to light. | (AUTO) 100 200 400 | |
| DIGITAL ZOOM Digital zoom | Allows up to 9x zoom shooting. | (OFF) ON | |
| PANorama Panorama shooting | Allows panoramic shots to be taken. CAMEDIA Master software is required. | — | |
| PIC(Image) | WB White balance | Canceling automatic color balance adjustment, and adjusting the setting to suit daylight, overcast, incandescent or fluorescent lighting conditions. | (AUTO) |
| Record mode | Selecting picture size and image resolution, as well as increasing or decreasing the number of storable pictures. | TIFF SHQ (HQ) SQ | |
| Sharpness | Sharpens the distinctness and strength of the contours of the subject. | HARD (NORMAL) SOFT | |
| Contrast | Allows a harder contrast (more distinction between lighter and darker areas) for pictures to be selected. | HIGH (NORMAL) LOW | |
| CARD(Card) | CARD SETUP Card setup | Formats (initializes) SmartMedia cards. Used only when necessary. | — |
| SET(Settings) | REC VIEW Rec view | Displays the picture just taken even while it is still being written to the SmartMedia card. | (OFF) ON |
| File naming | Selecting how files are named. | (NAME RESET) AUTO FILE | |
| Clear settings | Retaining all settings in memory even after the power is turned off. | (RESET) HOLD | |
| Beep sound | Setting the camera warning beep sound on or off. | (ON) OFF | |
| Date & time | Allows the date and time to be set. | (January 1 2001 00:00) | |
| Monitor adjustment | Allows the brightness of the monitor to be adjusted. | (Set to the midpoint of the adjustment bar) |
(The default settings are indicated in parentheses.)
Using the Playback Menu
The playback menu is used for playback functions including automatically playing images in order and playing movie pictures stored in the camera.
1 With the lens barrier closed, press the monitor button (□) to switch on the camera in the playback mode.
2 Press the menu button ( ) to open the playback menu.
3 On the arrow pad, press or to select a settings group (Playback, Card, Settings).
- The selected item is highlighted green, and the current setting is enclosed in brackets to the right of each item.
4 Press to highlight one of the items.
5 Press or to move to the desired item.
6 Press to display the possible settings.
7 Press or to highlight the desired setting.
Press the OK button to change the setting and return to the first screen.
or
To cancel a setting, press < .
9 Press the OK button twice to save the setting and close the menu display.
For more details on the functions described here, refer to the camera's Reference Manual on the software CD.
| Group | Item | Purpose | Possible Settings |
| PLAY(Playback) | Automatic playback* (Slide show) | Allows images to be played back in order automatically. | — |
| Movie playback** | Allows movie pictures to be played back. | — | |
| Print reserve | Allows image printing to be set before taking the SmartMedia card to a DPOF-equipped photo lab. | (OFF) DATE TIME | |
| ROTATE Rotated playback | Allows individual images taken with the camera on its side to be rotated so that they are played back vertically. | — | |
| INFO Image information display | Selects whether or not to display image information set during shooting on the monitor. | (OFF) ON | |
| CARD(Deck) | EDIT Edit | Changes the image color or reduces the image size. | — |
| CARD SETUP Card setup | |||
| Erase all frames | Allows all images that are not protected to be erased. | — | |
| Format | Formats (initializes) SmartMedia cards. Used only when necessary. | — | |
| SET(Settings) | Index display | Allows setting of the number of images that will be shown on the monitor at one time when index display is being used. | 4 (9) 16 |
| Clear settings | Retaining all settings in memory even after the power is turned off. | (RESET) HOLD | |
| Beep sound | Selects whether or not to have the camera use beeping sounds to indicate alerts. | (ON) OFF | |
| Date & time | Allows setting of date and time information. | (January 1 2001 00:00) | |
| Monitor adjustment | Allows the monitor brightness to be adjusted. | (Set to the midpoint of the adjustment bar) |
(The default settings are indicated in parentheses.)
Appears in the playback menu only when still pictures are being played back on the monitor.
* Appears in the playback menu only when movie pictures are being played back on the monitor.
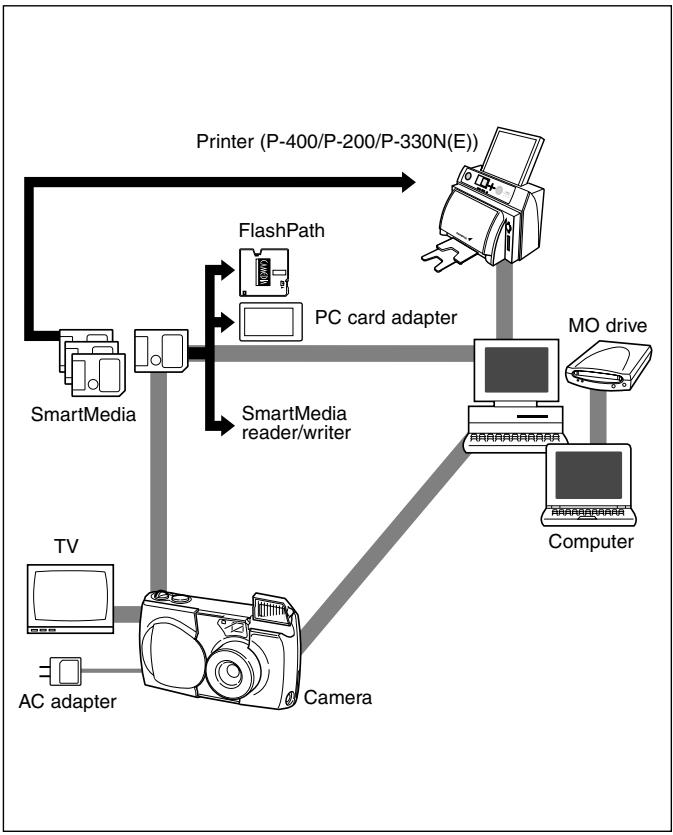
Transferring Your Pictures to a Computer
Read Before Connecting to a Computer
Connecting the camera to a personal computer using the included USB (Universal Serial Bus) cable allows you to transfer images stored on the SmartMedia card installed in the camera to the computer's hard disk. Using the USB cable to connect the camera and computer may require a computer equipped with a USB connector and certain pieces of supporting software (driver), which will vary (see below) depending on the computer's operating system.
Please consult the computer manufacturer for more information about your computer's operating system and the level of USB support.
| Operating System | Software Needed for Connection | Notes on First-Time Use |
| Windows 2000 Professional Windows Millennium Edition (Me) MacOS 9~9.1 *1 | None | None |
| Windows 98 Windows 98 Second Edition (98SE) | USB driver *2 (included software CD) | Install the USB driver software after con-necting the USB cable. |
| Windows 95 Windows NT System 7.5.1~Mac OS 8.5.1 | USB connections are not supported. Use other transfer methods such as a floppy disk adapter (sold separately), etc.. | |
*1 For Macintosh computers running Mac OS 8.6, systems with the following specification have been verified as to be compatible.
- Standard USB equipped.
- Mac OS 8.6 and USB MASS Storage Support 1.3.5 have been preinstalled at the time of shipment.
Contact Apple Computer, Inc. for USB support.
*2 Newest version downloadable from the Olympus Website, too.
Playing movie pictures on the computer requires QuickTime 4.0 or higher. QuickTime 4.0 is available on the included software CD.
For more details on the functions described here, refer to the camera's Reference Manual on the software CD.
Transferring Files Without Using the Camera
Using an adapter capable of accepting SmartMedia cards allows image files to be transferred from the camera to a computer without directly connecting the two.
Consult your Olympus Customer Support Center for the most up-to-date information on the various available devices and products.
| Computer Conditions | Usable Devices |
| 3.5-inch floppy disk drive available | Floppy disk adapter FlashPath |
| PC card slot available | PC card adapter |
| USB terminal present | SmartMedia card reader/writer |
CAUTION
- Adapter may not be usable depending on the computer's operating environment and storage capacity. Confirm these before using.
- Consult your user manual for more detailed information on using each specific device.
Appendix
Error Codes
The monitor displays error codes to alert you to various problems.
| Warning Monitor Display | Error | Remedy |
| NO CARD | There is no card in the camera. | Insert the card. |
| The card is not inserted correctly. | Remove and reinsert the card. | |
| CARD FULL | The card is full. | Replace the card, erase unwanted pictures, or transfer the data to a computer and erase all the data to free up space on the card. |
| WRITE PROTECT | The camera cannot enter picture, erase or card-format mode. | Remove the write-protect seal before taking any pictures. |
| CARD ERROR | You are unable to shoot, playback, or erase pictures with this card. | Wipe the contact area of the card (the gold-colored area) with a clean, soft, dry cloth and insert the card again. If the error occurs again, it means that the card cannot be used. |
Using the Camera with Optional Equipment
This camera can be used with the following optional equipment:
As of March 2001
Visit the Olympus web site for the latest information on optional items.
http://www.olympus.com
Specifications
| Product type: | Digital Camera Image Recording System for shooting and playing back photo images. |
| Still pictures: | Digital recording, JPEG, TIFF non-compression DCF compliant/DPOF compliant |
| Movie pictures: | QuickTime Motion JPEG compliant |
| Recording medium: | 3V (3.3V) SmartMedia card |
| 4MB, 8MB, 16MB, 32MB, 64MB, 128MB |
| No. of storable still pictures (8MB card): | |
| 1 shot (TIFF Mode/1600 × 1200 pixels) | |
| Approx. 5 shots (SHQ Mode) | |
| Approx. 16 shots (HQ Mode) | |
| Approx. 32 shots (SQ-HIGH Mode/640 × 480 pixels) | |
| Approx. 82 shots (SQ Mode/640 × 480 pixels) | |
Erase: One-Frame Erase, Erase All Frames
Image pickup element: 1/2.7 inch CCD solid-state image pickup 2,110,000 pixels (gross)
| Resolution (number of pixels): | |
| 640 × 480 pixels ~ 1600 × 1200 pixels (still picture) | |
| White balance: | Full auto TTL, Preset (daylight, overcast, tungsten light, fluorescent light) |
| Lens: | Olympus lens 5.4 ~ 16.2mm, F2.8 ~ 4.4, 8 elements in 6 groups (equivalent to 35 ~ 105mm lens on a 35mm camera) |
Photometric system: Digital ESP metering system, Spot metering system
| Exposure control: | Program auto exposure |
| Aperture*: | W: F2.8, F5.6 |
| T: F4.4, F8.6 |
| Shutter*: | 1/2 ~ 1/1000 sec. |
| (used with mechanical shutter) | |
| *Manual setting of shutter speed is not supported | |
| Shooting range: | 0.8m (31") ~ ∞ (in standard mode) |
| 0.2m (8") ~ 0.8m (31") (in macro mode) |
Viewfinder: Optical real image viewfinder (with AF target mark), monitor
| Monitor: | 1.8 inch TFT color LCD |
| No. of pixels: | Approx. 61,000 |
| On-screen display: | Date/time, frame number, write-protect, picture mode, battery check, file number display, print reserve, menu, etc. |
Battery charging time for flash:
| Approx. 8 sec. or less (at room temperature with new batteries) | |
| Flash working range: | W: Approx. 0.2m (8") ~ 4m (13ft)T: Approx. 0.2m (8") ~ 2.6m (8.5ft) |
| Flash modes: | Auto-Flash (automatic flash activation in low light and backlight), Red-eye Reduction Flash, Off (no flash), Fill-In Flash, Night Scene Flash, Night Scene Flash + Red-eye Reduction Flash |
| Autofocus: | TTL system autofocus |
| Exposure compensation: | Exposure compensation system |
| Focusing range: | 0.2m (8") ~ ∞ |
| Selftimer: | 12 sec. delay |
| External connectors: | DC-IN jack,USB connector,Video OUT jack |
| Date and time: | Recorded in picture data |
| Automatic calendar system: | Up to year 2031 |
| Calendar power supply: | Backup by capacitor |
| Usage environment: | Temperature: 0 ~ 40°C (32 ~ 104°F) (in use) / -20 ~ 60°C (-4 ~ 140°F) (in storage)Humidity: 30 ~ 90% (in use) / 10 ~ 90% (in storage) |
| Power supply: | This camera uses either four AA (R6) alkaline, NiMH, lithium or NiCd batteries. Two CR-V3 lithium battery packs are also available. Do not use zinc-carbon (manganese) batteries in this camera.Exclusive AC adapter (optional) |
| Dimensions (excluding the raised portion): | |
| 117.5mm (4.6") (W) x 49.5mm (1.9") (H) x 66.0mm (2.6") (D) | |
| Weight: | 240g (8.5oz) (excluding batteries/SmartMedia card |
Specifications are subject to change without any notice or obligation on the part of the manufacturer.
TABLE DES MATIÈRES
Partie responsible: Olympus America Inc.
Adresse: 2 Corporate Center Drive, Melville, New York 11747-3157 U.S.A.
Appareil photo (suite)
117,5 (L) x 49,5 (H) x 66,0 (P) mm
LCD-Monitor (Karten-Setup)
CARD SETUP
GO→OK
Responsible: Olympus America Inc.
San-Ei Building, 22-2, Nishi Shinjuku 1-chome, Shinjuku-ku, Tokyo, Japan. (Customer support) Tel. 0426-42-7499 Tokyo
OLYMPUS AMERICA INC.
Two Corporate Center Drive, Melville, NY 11747-3157, U.S.A. Tel. 631-844-5000
(Technical support) Tel. 1-888-553-4448 (Toll-free for within 30 days of purchase.)
Tel. 1-631-844-5520 (After 30 days of purchase, contact this number.)
distec@olympus.com
OLYMPUS OPTICAL CO. (EUROPA) GMBH.
(Premises/Goods delivery) Wendenstraße 14-18, 20097 Hamburg, Germany. Tel. 040-237730 (Letters) Postfach 10 49 08, 20034 Hamburg, Germany.
(Hotline Numbers)
Tel. 01805-67 10 83
Tel. 00800-67 10 83 00
Tel. +49 180 5-67 10 83
Tel. +49 40-237 73 899
for Germany
for Austria, Belgium, Denmark, France, Netherlands, Norway, Sweden, Switzerland, United Kingdom
for Finland, Italy, Luxemburg, Portugal, Spain, Czech Republic
for Greece, Croatia, Hungary and the Rest of Europe
Our Hotline is available from 9 am to 6 pm (Monday to Friday)
(E-Mail) di/support@olympus-europa.com