
VT-1693 - Microwave Vitek - Free user manual and instructions
Find the device manual for free VT-1693 Vitek in PDF.


| Product Type | Microwave Oven |
| Brand | Vitek |
| Model | VT-1693 |
| Capacity | 20 Liters |
| Power Output | 800 W |
| Voltage | 230 V / 50 Hz |
| Dimensions (W x D x H) | 45 x 35 x 25 cm |
| Weight | 10 kg |
| Control Type | Digital Touch |
| Cooking Modes | Microwave, Defrost, Auto Cook, Timer |
| Child Lock | Yes |
| Auto Shut-Off | Yes |
| Interior Light | Yes |
| Turntable | Yes (25 cm diameter) |
| Door Opening | Side hinge |
| Display | LED Digital |
| Cleaning | Wipe with a damp cloth; avoid abrasive cleaners |
| Safety Features | Child lock, door interlock, auto shut-off |
| Spare Parts | Contact Vitek service center; turntable roller available |
| Repairability | Modular design; professional service recommended |
| General Information | Vitek VT-1693 is a compact microwave oven suitable for home use. Refer to the manual for detailed instructions. |
Frequently Asked Questions - VT-1693 Vitek
User questions about VT-1693 Vitek
0 question about this device. Answer the ones you know or ask your own.
Ask a new question about this device
Download the instructions for your Microwave in PDF format for free! Find your manual VT-1693 - Vitek and take your electronic device back in hand. On this page are published all the documents necessary for the use of your device. VT-1693 by Vitek.
USER MANUAL VT-1693 Vitek
natural_image
Simple line drawing of a pair of hair blisters (no text or symbols)
natural_image
Line drawing of a steam iron (no text or symbols)
natural_image
Line drawing of a vacuum cleaner (no text or symbols)
natural_image
Line drawing of a kitchen feeder (no text or symbols)
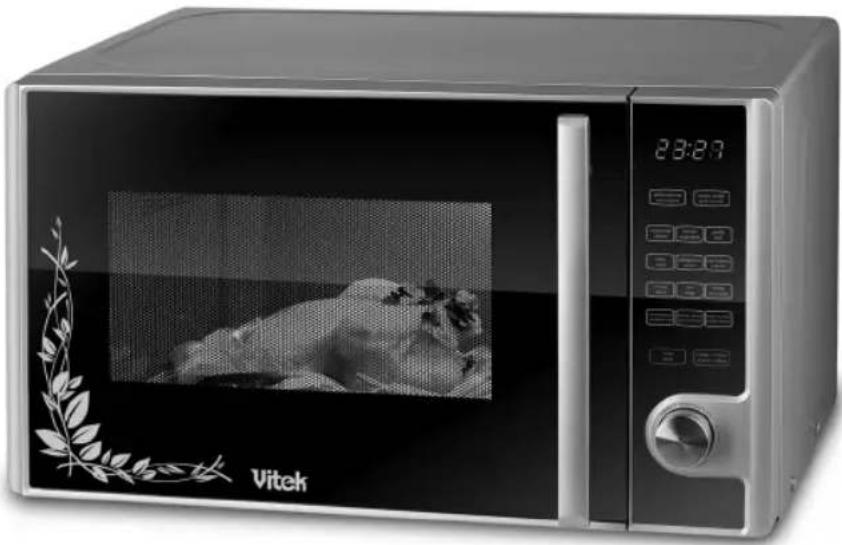
natural_image
Vitck microwave oven with digital display showing a sleeping photo, no visible text or symbols on the device itself.MANUAL INSTRUCTION
GB MANUAL INSTRUCTION 3
DE DIE BETRIEBSANWEISUNG 15
RUS ИНСТРУКЦИЯ ПО ЭКСПЛУАТАЦИИ 29
KZ ПАЙДАЛАНУШЫФА НУСКАУ 43
PL INSTRUKCJA OBSŁUGI 57
CZ NÁVOD K POUŽITÍ 69
UA ІНСТРУКЦІЯ З ЕКСПЛУАТАЦІЇ 82
BEL ІНСТРУКЦЫЯ ПА ЭКСПЛУАТАЦЫИ 96
UZ ФОЙДАЛАНИШ КОИДАЛАРИ 110
www.vitek-aus.com
2
ENGLISH
MICROWAVE OVEN
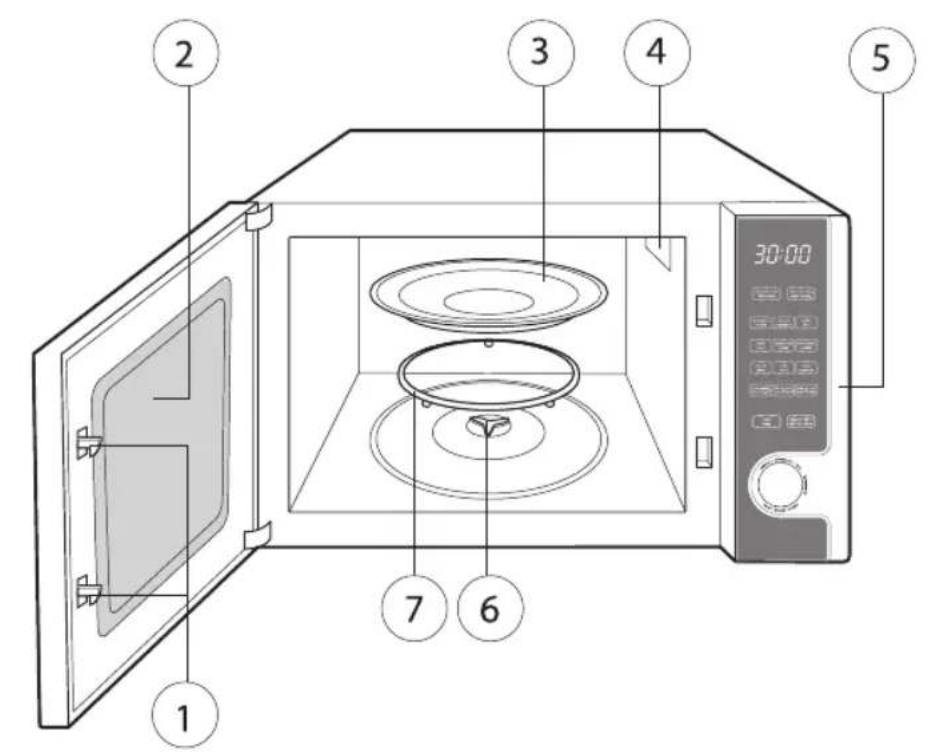
Description
-
Safety block system for breaking power supply by opening the door during oven operation
-
View window
-
Glass tray
-
Microwaves output
-
Control panel
-
Glass tray support
-
Roller ring
-
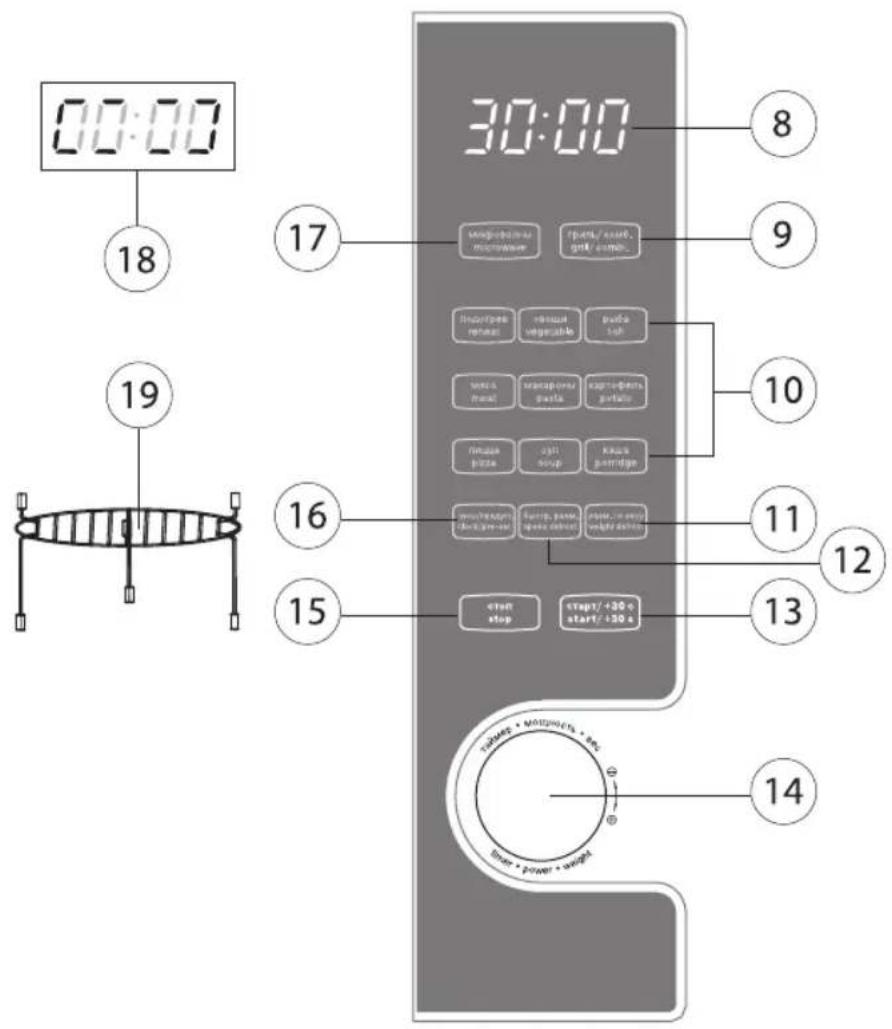
Display
-
Button for switching on grill/combined cooking mode
-
Button for switching on automatic cooking/warming mode
-
Button for selecting weight defrost mode
-
Button for selecting speed defrost mode
-
Button for switching on/increasing time of cooking
-
Knob for setting up power/weight/time
-
Button for setting up cooking mode/reset wrong input data
-
Button for setting up current time/cooking start time
-
Button for switching on microwave mode and selecting power
-
Blocking-against-children mode icon
-
Grill (applicable in Grill mode only)
Safety guards to avoid exposure to dangerous microwave radiation
- It is forbidden to operate this oven with open door as this leads to exposure to dangerous microwave radiation
- Do not modify electric circuits of safety locking of the oven door.
- Do not put any objects in between the housing of the oven and its door, remove dirt and remnants of detergent from inner surface of the door.
- Do not operate damaged oven, it is particularly important that the door should
be duly closed, and there must be no damages of:
- doors (bending),
- joints and latches (broken or loose).
- Oven adjustment or repair should be undertaken by qualified professionals at authorized service centers only.
Important safety rules
Following safety rules is necessary while operating electrical appliances.
Attention! In order to avoid burns, electric shock, fire, exposure to microwave radiation and any other injuries:
-
Read all instructions carefully before using this appliance.
-
Before switching on make sure, the supply line voltage corresponds to the voltage specified on the appliance
-
Use microwave oven only for its intended purpose as stated in these instructions.
-
Microwave oven is intended for cooking foodstuff and warming up ready dishes only.
-
So, not switch the oven on without any foodstuff loaded in.
-
Do not use the oven in case its power cord or plug is damaged, the appliance malfunctions, or was dropped down.
Attention! Children are allowed using this appliance in your presence only after they are given appropriate instructions. They should realize danger of incorrect usage of the oven and be able to operate it following safety guards.
- To avoid risk of fire starting inside the operating chamber of the oven:
- Watch the process of warming any foodstuff in paper or plastic wrapping to avoid risk of fire.
- Remove wire ties from paper or plastic bags before putting them into the oven.
- In case of fire starting inside the oven, switch it off immediately and discon-
ENGLISH
nect from the wall outlet. Do not open the door, otherwise fire would break out.
- Do not use operating chamber as storage, do not leave paper or foodstuff inside it.
Attention! Do not reheat liquids or foodstuff in tightly closed package or containers.
-
Be careful taking cookware out of the oven, as boiling of beverages reheated in a microwave oven could continue even after reheating process is over.
-
It is forbidden frying foodstuff in the oven.
-
It is forbidden cooking or reheating shell eggs in microwave oven as they could explode even after reheating.
-
Pierce hard skin of fruits and vegetables such as potato, marrow, and apple.
-
Shake baby bottle and check temperature of its contents before feeding children to avoid burns.
-
Cookware could get very hot through hot foodstuff, thus use mittens and oven gloves.
-
Cookware should be examined before placing it into the microwave oven.
-
Do not block ventilation outlets located on the housing of microwave oven.
-
Do not store or use microwave oven outdoors.
-
Do not use microwave oven near water, close to kitchen sink, in humid basements or near swimming pool.
-
Do not immerse power cord or power cord plug into water.
-
Avoid touching hot surfaces by power cord or plug.
-
Do not allow power cord hanging over table edge.
-
Use soft non-abrasive detergents and sponge or soft cloth for cleaning doors and surfaces of microwave oven.
Attention! It is very dangerous to carry out
any repair or maintenance procedures connected with removal of protecting housings preventing exposure to harmful microwave radiation on your own. Do not do it!
Rules on cooking foodstuff in microwave ovens
- While cooking bacon do not put it on the glass tray, as local overheating of glass could result in cracks.
- Use cookware recommended for microwave ovens for cooking. Install it on the glass tray.
- For uniform heating put thicker pieces closer to walls of cookware.
- Keep an eye on the time of cooking. Set shorter time, and increase it if required. Do not exceed time of preparation, as it may result in foodstuff burning or even fire starting.
- Cook under glass cover to prevent juice or fat from spraying out and provide uniform cooking.
- Turn over once such light foodstuff as chicken or hamburger to speed up the process of cooking. If pieces of meet are big, turn them over twice or even three times while cooking.
- Mix foodstuff while cooking, move them up and down, from center to the edges of cookware.
Cookware election guide
- Ideal material suitable for microwave oven should be transparent for microwaves, thus allowing their energy going through cookware inside foodstuff.
- Microwaves can not penetrate through metal, so do not use metal ware or capacities with metallic finish.
- Do not put any objects produced out of reused paper, as it could contain metal inclusions and result in starting fire.
- Circle and oval plates are preferable for using inside microwave oven than rectangular ones.
ENGLISH
Checking cookware before using inside microwave oven
- Put cookware to be tested into the operating chamber of the oven (for example, a plate), and place glass filled with water on it.
-
Switch microwave oven to maximum power and set time of operation for not more then 30 seconds.
-
Touch the cookware carefully, if it is hot, and water in the glass is cold, do not use such ware for cooking in microwave oven.
- Avoid increasing time of testing, do not set more then 30 sec.
Materials and cookware suitable for using inside microwave oven
| Aluminum foil | Foil could be used only in grill operating mode. The distance between foil and the wall of microwave oven should be at least 2.5 cm. Small pieces of foil could be used for covering meat or chicken slices to avoid over frying.If foil is located too close to oven walls in microwave mode, sparking, burning of screening grating on the door and oven damage is possible. In this case you lose the free warranty servicing and repair. |
| Ware for frying | Follow manufacturer directions.Bottom of ware for frying should be 5 mm thicker then rolling glass tray. Inappropriate usage of cookware for frying can result in cracks appearing in ware or glass tray. |
| Dinner ware | Intended for using inside microwave oven only. Follow manufacturer directions.Do not use cracked cookware. |
| Glass containers | Only containers produced out of heatproof glass and intended for using in microwave oven. Make sure there is no metallic finish. Do not use cracked cookware. |
| Glass ware | Only containers produced out of heatproof glass and intended for using in microwave oven. Make sure there is no metallic finish. Do not use cracked cookware. |
| Cooking in microwave oven using special bags | Follow manufacturer's directions. Do not fasten the bags by metallic strings or ties. Pierce one or more holes in a bag to provide steam outlet. |
| Paper plates and cups | Use for short term cooking or for warming only. Do not leave the microwave oven unattended while cooking/warming foodstuff in such ware. |
| Paper towels | You can cover foodstuff with such a towel to keep heat inside or for preventing fat from splashing. Keep under continuous control and for short term cooking/warming only. |
| Parchment paper | Use for preventing fat from splashing or as wrapper.Keep under continuous control and for short term cooking/warming only. |
ENGLISH
| Plastic | Only plastic tools having an appropriate marking, “For microwave oven”. Follow manufacturer’s instructions. Some plastic containers could become soft because of heating of foodstuff inside. Hermetically sealed container should be pierced or cut through as mentioned on the container. |
| Plastic wrapping | Only plastic tools having an appropriate marking. Use for covering foodstuff to keep moisture inside. |
| Wax paper | Use for preventing fat from splashing and for keeping moisture inside. |
Materials and cookware not suitable for using inside microwave oven
| Aluminum trays | It may cause sparking.Use cookware intended for microwave oven specially. |
| Cardboard cap with metallic handle | It may cause sparking.Use ware intended for microwave oven specially. |
| Metallic ware or ware with metallic rim | Metal screens microwaves energy. Metallic rim could provoke sparkling. |
| Metallic spins | It may cause sparking and starting fire of packing during cooking/warming foodstuff. |
| Paper bags | It may cause fire starting in microwave oven. |
| Soap | Soap would be fused and cause dirtying of microwave oven operating chamber. |
| Wood | Wooden ware could become dried out, cracked all over and flared up. |
Oven grounding directions
Microwave oven should be grounded securely. In case of any short circuit, the grounding prevents the risk of electric shock, as current would be discharged through grounding cable. Power cable with grounding wire and power cord plug with grounding pin are provided with this microwave oven. The plug should be inserted into the wall outlet with corresponding grounding contact.
Warning: Inserting plug with grounding pin into a slot without grounding contact can lead to electric shock. Consult a qualified electrician if you do not understand instructions on grounding or in case of any
doubts about the security of the microwave grounding.
In order to prevent power cable from tangling, this microwave oven is provided with short power cable.
In case of using extension cord, use only 3-wire extension cords with grounding contacts in its plug and slots.
- Marking on the wire section of microwave oven power cable and on the extension cord should be the same.
- There must be a grounding wire in the extension cord.
- Extension power cable should not hang over the edges of a table, where children could pull it; it should be placed in such
ENGLISH
a way as to prevent people from walking over it.
Setting up
- Make sure the operating voltage of the power supply line meets the voltage marked on the housing of the appliance.
- Make sure that all elements of packing are removed from the operating chamber of the oven.
- Do not remove light-gray mica plate from inside of the operating chamber, located at the place of microwave radiation output (4). It serves as magnetron protection.
Attention! Make sure there are not any damages, such as the following: door is bent or broken, fastening or latch joints are broken or loose, there are dents inside the oven or on the door. It is forbidden using the microwave oven in case of any damage.
- Install the microwave oven on a firm flat surface, able to bear its weight and maximum weight of foodstuff to be prepared. The place for installation should be not accessible by small children.
- Do not install the oven at any places with excessive humidity or temperature, and also near highly inflammable objects.
- Good ventilation is essential for normal operation of this appliance. Provide free space: 30 cm above the oven and 7-8 cm behind and at both sides. Do not cover or block any openings on the appliance housing. Do not detach small legs on the bottom of the oven.
- It is forbidden using the oven in case the glass tray and rolling ring is absent.
- Make sure power cable is not damaged and does not run under the oven or on any hot surfaces or over any sharp objects.
Assembling microwave oven
Remove packing material and accessories out of the operating chamber of the oven. Examine the oven in order to detect any damages if any. Pay special attention to the door, make sure it is functioning properly. Do not install and switch on the oven in case there are any damages.
Protective coating
Housing: Remove protective film from the surface of the housing if any.
Do not remove light-gray mica plate located inside the housing, at the place of microwaves output (4), it serves as magnetron protection.
Glass tray installation
- Insert the support of glass tray (6) into the opening on the bottom of the operating chamber.
- Install the rolling ring (7) on the bottom of the operating chamber.
-
Carefully install glass tray (3) on the rolling ring (7) uniting its lugs with the slots of the support (6).
-
Never install glass tray upside down.
- Do not interfere with free rotation of the glass tray during microwave oven operation.
• Always use glass tray and rolling ring for cooking any foodstuff. - Place cookware on the glass tray only.
- Glass tray could rotate clockwise or anticlockwise. It is normal.
- If any cracks or cleavages on the glass tray, stop using the oven immediately and replace the tray.
Operation
- Before switching on, make sure the operating voltage of power supply line meets the voltage marked on the housing of the appliance.
- Put foodstuff into the operating chamber and close the door.
ENGLISH
1. Setting time
After switching on the oven sound signal will be played and time "0:00" will appear on the display. You can set the time in range 0:00-23:59;
1.1 Press button (16) «clock/preset», blinking digits «0:» will appear on the display.
1.2 Set the hour by rotating knob (14).
1.3 Press button (16) «clock /preset» blinking digits «:00» will appear on the display.
1.4 Set the minutes by rotating knob (14).
1.5 Press button (16) «clock /preset» to complete setting current time. Current time will appear on the display with blinking separator (:).
Notice:
- If the clock is not set, current time will not be displayed.
- In case of wrong clock setting, press button (1) "stop" to reset the display and repeat steps 1.1-1.5.
2. Cooking in microwave oven
Choose microwave oven power level and set the time of operation.
2.1 Open the door of the oven, put foodstuff inside the operating chamber, and close the door.
2.2 Press button (17) «microwave», indication "P-100" starts blinking on the display. Press button (17) «microwave» to choose required power level or rotate knob (14). Power mode will be displayed.
| Number of strokes | Display indication | Oven power |
| 1 P100 100% | ||
| 2 P80 80% | ||
| 3 P50 50% | ||
| 4 P30 30% | ||
| 5P10 10% |
2.3 Press button (13) «start/+30 s» to confirm the power mode you have chosen.
2.4 Set time of cooking by rotating knob (14). Chosen time will be displayed. You can set up cooking time in range 0:05 – 95:00 with step mentioned in the table below.
| Time interval | Time setting step |
| 0 - 1 min | 5 sec |
| 1 - 5 min | 10 sec |
| 5 - 10 min | 30 sec |
| 10 - 30 min | 1 min |
| 30 – 95 min | 5 min |
2.5 Press button (13) « start/+30 s» to start cooking, indication of remaining time is displayed. After the operation is over, the oven will be stopped and five sound signals will be played.
3. Cooking using grill mode
3.1 Open the door of the oven, put food-stuff inside the operating chamber, and close the door.
3.2 Press button (9) « grill/comb», symbol "G" will be blinking on the display.
Notice: You can also choose cooking in grill mode by pressing button (9) consequently or by rotating knob (14) after pressing this button.
3.3 Press button (13) « start/+30 s», to confirm the mode you have chosen.
3.4 Set time of cooking by rotating knob (14). Preset time will be displayed.
3.5 Press button (13) « start/+30 s», to start cooking, indication of remaining time will be displayed.
Notice: In order to have the best effect of using grill, turn over foodstuff several times during cooking. After half of preset cooking time is over, you hear two sound signals reminding you about the necessity to turn
ENGLISH
over the dish. Open the door, turn the food over, close the door and press button (13) «start/+30 s», to continue cooking. It is not necessary turning foodstuff over if you do not want doing it.
3.6 After the operation is over, the oven will be stopped and five sound signals will be played.
4. Combined cooking mode
4.1 Open the door of the oven, put food-stuff inside the operating chamber, and close the door.
4.2 Press button (9) « grill/comb», symbol "G" will be blinking on the display.
4.3 Pressing button (9) consequently or by rotating knob (14) after pressing this button choose one of the two modes of combined cooking. Chosen mode «C-1» or «C-2» will be displayed.
4.4 Press button (13) « start/+30 s», to confirm the mode you have chosen.
4.5 Set time of cooking by rotating knob (14). Preset time will be displayed.
4.6 Press button (13) « start/+30 s», to start cooking, indication of the remaining time will be displayed. After the operation is over, the oven will be stopped and five sound signals will be played.
Combined cooking variants
| Mode | Display indication | Oven power | Grill power |
| 1 C-1 | 55% 45% | ||
| 2 C-2 | 36% 64% |
5. Defrost foodstuff by weight
5.1 Open the door of the oven, put food-stuff inside the operating chamber, and close the door.
5.2 Press button (11) «weight defrost», indication "dEF-1" (weight defrost) will be displayed.
5.3 Set foodstuff weight by rotating knob (14). You could input weight in range from 100 up to 2000 g.
5.4 Press button (13) « start/+30 s» to start defrost process. Remaining time is displayed. It is set up automatically depending on chosen weight. After the operation is over the oven will stop and five sound signals will be played.
6. Speed defrost
6.1 Open the door of the oven, put food-stuff inside the operating chamber, and close the door.
6.2 Press button (12) «speed defrost» indication "dEF-2" (speed defrost) will be displayed.
6.3 Set foodstuff weight by rotating knob (14). You could input weight in range from 100 up to 2000 g.
6.4 Press button (13) «start/+30c start/+30 s» to start defrost process. Remaining time is displayed. It is set up automatically depending on chosen weight. After the operation is over, the oven will be stopped and five sound signals will be played.
7. Multi-stage cooking
This oven allows cooking in two steps. When first step is completed, you hear sound signal, after which the second step is initiated.
Notice: Defrost mode could be set up only for the first step. Automatic modes cannot be chosen for any step of cooking. For example, you need to defrost 500g of foodstuff and then cook it in microwave mode at power 80% fir 7 minutes. To accomplish it do the following:
7.1 Open the door of the oven, put food-stuff inside the operating chamber, and close the door.
7.2 Press button (11) «weight defrost», indication "deF-1" (weight defrost) will be displayed.
7.3 Set foodstuff weight (500g) by rotating knob (14).
ENGLISH
7.4 Press button (17) «microwave», indication "P-100" is displayed. To select power level 80 % press button (17) once more or rotate knob (14). Indication «P-80» will be displayed.
7.5 Press button (13) «start/+30 s», to confirm the mode you have chosen.
7.6 Set time of cooking (7 minutes) by rotating knob (14). Indication «07:00» will be displayed.
7.7 Press button (13) «start/+30 s», to start cooking process. Remaining time is displayed. It is set up automatically depending on chosen weight. After the operation is over, the oven will stop and five sound signals will be played.
8. Setting up cooking tart time
8.1 Open the door of the oven, put foodstuff inside the operating chamber, and close the door.
8.2 Check if preset time is correct, and choose cooking program according to your preference.
Notice: You can set up maximum two steps of cooking. If you delay time of cooking start up, defrost mode cannot be chosen as a program of cooking.
For example, you need to cook something in microwave mode at power level 80% for 7 minutes. To accomplish it do the following:
- Press button (17) «microwave», indication "P-100" is displayed. To select power level 80 % press button (17) once more or rotate knob (14). Indication «P-80» will be displayed.
- Press button (13) «start/+30 s», to confirm the mode you have chosen.
- Set time of cooking (7 minutes) by rotating knob (14). Indication «07:00» will be displayed.
8.3 Press button (16) «clock/preset», blinking hour digits will be displayed.
8.4 Set the hours by rotating knob (14).
8.5 Press button (16) «clock/preset» blinking minute digits will be displayed.
8.6 Set the minutes by rotating knob (14).
8.7 Press button (13) «start/+30 s», to complete setting the time.
When current time meets the preset time, you hear two sound signals and cooking process is started. Remaining time is displayed. It is set up automatically depending on chosen weight. After the operation is over, the oven will stop and five sound signals will be played.
You can check out preset time of cooking by pressing button (16) «clock/preset».
9. Automatic cooking mode
You can choose one of the next modes by pressing the corresponding button:
- «reheat»
• «vegetable»
• «fish»
• «meat»
• «pasta»
• «potato»
• «pizza»
• «soup»
• «porridge»
Automatic cooking table
| Button / automatic mode | Weight (g) | Number of strokes | Display indication |
| (reheat) / A-1 | 150 | Once | 150 |
| 250 | Twice | 250 | |
| 350 | Trice | 350 | |
| 400 | Four times | 400 |
ENGLISH
| (vegetable) / A-2 | 150 Once 150 | ||
| 350 Twice 350 | |||
| 500 Trice 500 | |||
| (fish) /A-3 | 150 Once 150 | ||
| 250 Twice 250 | |||
| 350 Trice 350 | |||
| 400 Four times 400 | |||
| 450 Five times 450 | |||
| (meat) / A-4 | 150 Once 150 | ||
| 300 Twice 300 | |||
| 450 Trice 450 | |||
| 600 Four times 600 | |||
| (pasta) / A-5 | 50 (450 g воды) Once 50 | ||
| 100 (800 g of water) | Twice 100 | ||
| 150 (1200 g of water) | Trice 150 | ||
| (potato) / A-6 | 1 (about 200 g) Once 1 | ||
| 2 (about 400 g) Twice 2 | |||
| 3 (about 600 g) Trice 3 | |||
| (pizza) / A-7 | 1 (about 80 g) | Once 1 | |
| 2 (about 160 g) Twice 2 | |||
| 3 (about 250 g) Trice 3 | |||
| (soup) / A-8 | 500 Once 500 | ||
| 700 Twice 700 | |||
| 1000 | Trice | 1000 | |
| (porridge) / A-9 | 550 Once 550 | ||
| 1000 | Twice | 1000 |
Example: preparation of 350 g of vegetables:
- Open the door of the oven, put foodstuff inside the operating chamber, and close the door.
- Press button vegetable, number of the automatic mode «A-2» is displayed, choose required weight of vegetables by pressing button vegetable for second time and then input required weight of foodstuff (350 g), which is displayed.
- Press button (13) «start/+30 s» to start automatic cooking. Time of preparation will be set automatically. Remaining time is displayed. It is set automatically depending on chosen weight. After the operation is over, the oven will be stopped and five sound signals will be played.
ENGLISH
10. Speed cooking mode
- Press button (13) «start/+30 s» to start cooking at full power for 30 sec, each consequent pressing on this button adds 30 sec of operation. Maximal time of cooking in this mode is 95 sec.
Notes
- It is possible to add time of cooking using button (13) «start/+30 s» in microwave mode, grill mode and combined mode.
- In multi-step cooking mode, automatic cooking mode and defrost mode addition of time is not possible.
- After the operation is over, the oven will stopp and five sound signals will be played.
11. Blocking against children
Blocking: press and hold button (15) «stop» for 3 sec, sound signal is played, and pictogram (18) is displayed.
Canceling blocking: in blocking mode pres and hold button (15) «stop» for 3 sec, sound signal is played, and pictogram (18) is deemed.
12. Viewing preset modes
- In microwave mode press button (17) «microwave», preset power level value will be displayed for 2-3 sec.
- In one-step mode of cooking press button (16) «clock/preset», current time will be displayed for 2-3 sec.
- If time of cooking start up is preset, press button (16) «clock/preset», cooking start up time will be displayed for 2-3 sec.
13. Display indications
- In stand by mode current time with blinking separator “:” is indicated on the display.
-
In presets selection mode the corresponding values are displayed.
-
In blocking-against-children mode pictogram (18) is displayed.
- During operation remaining time of cooking is displayed.
Notice: You can pause cooking process by pressing button (15) «stop» or by opening the door of the oven. To resume current operating mode, press button (13) «start/+30 s».
To switch off the mode of cooking press button (15) «stop» twice.
Cleaning and Maintenance
- Switch off the oven before cleaning and disconnect power cord plug from the wall outlet.
- Do not allow moisture dropping on control panel. Clean control panel with soft damp cloth.
- Keep operating chamber clean. If there are pieces of foodstuff or drips of liquids, remove them with damp cloth.
- In case of considerable dirtying of the operating chamber, you could use soft detergent.
- Do not use abrasive detergents, wire brushes for cleaning the oven either inside, or outside.
- Watch water and detergent does not drop inside through openings intended for steam release of ventilation which are located on oven lid.
- It is forbidden using detergents based on ammonia.
- Clean outer surfaces with damp cloth.
- Door of the oven should always be clean. Do not allow crumbs of food gathering between the door and the face panel of the oven, as this prevents the door from closing in normal way.
- Clean ventilation openings through which air for cooling is supplied located on the surface of the housing, from dust and dirt regularly.
- Detach and clean glass tray and its sup-
ENGLISH
port regularly; wipe bottom of the operating chamber of the oven.
- Wash glass tray and rolling ring with neutral soapy solution.
- Do not immerse hot glass tray into water, it could be broken because of sudden temperature drop.
- To remove unpleasant odors out of the operating chamber put cup of water with a little bit of lemon juice inside and boil the water for several minutes. Wipe walls of the chamber with soft cloth very carefully.
MALFUNTIONS AND TROUBLE SHOOTING
Normal operation
| Microwave oven interferes with reception of TV or radio signals. | Interference with reception of TV or radio signals could appear during microwave oven operation. Similar interferences appear while operations of small electrical appliances like mixer, vacuum cleaner and hair dryer. This is normal. |
| Low intensity of backlight | If low power level of microwave radiation is set on, intensity of backlight could be low. This is normal. |
| There is steam condensation on the door, hot air is going out of the ventilation outlets. | While cooking water is vaporized out of foodstuff, most of the steam is released through ventilation outlets, but some steam could condensate on the inner side of the door. This is normal. |
| Microwave oven is switched on without any foodstuff loaded in. | Switching microwave oven for short time without any foodstuff loaded in would not result in any malfunction. Always check if there is any foodstuff inside the operating chamber before switching on. |
Trouble shooting
| Problem Possible | cause Removal | |
| Oven cannot be turned on | Power cord plug is not inserted in wall outlet | Unplug power cord from wall outlet. After 10 sec insert it back. |
| Wall outlet's malfunction | Try connecting another appliance to the same wall outlet for control | |
| There is no heating Door | is closed not tightly Close the door | tightly |
| Rolling glass tray issues strange noise during operation | Rolling ring or lower part of operating chamber is dirty | Detach glass tray and rolling ring.Wash rolling ring and bottom of operating chamber. |
In case the malfunction is still there, apply to a service center, do not try to repair or adjust the oven on your own.
Delivery set
Microwave oven - 1 item
Glass tray - 1 item
Roller ring - 1 item
Grill grating - 1 item
ENGLISH
Technical specifications
Supplied voltage: AC 220V \~ 50 Hz
Supplied power in microwave mode: 1270 W
Rated output power of microwave mode: 800 W
Grill output power: 1000 W
Oven capacity: 20 Litters
Glass tray: 245 mm
Specifications subject to change without prior notice.
MINIMUM SERVICE LIFE - 5 YEARS
GUARANTEE
Details regarding guarantee conditions can be obtained from the dealer from whom the appliance was purchased. The bill of sale or receipt must be produced when making any claim under the terms of this guarantee.

This product conforms to the EMC-Requirements as laid down by the Council Directive 89/336/EEC and to the Law Voltage Regulation (73/23 EEC)
DEUTSCH
BESCHREIBUNG
NIESPRAWNOŚCI I SPOSOBY ICH USUNIECIA
Normalna praca
Masalan: 350g sabzavot pishirish:
- Mikro to'lqinli pechkaning eshikchasini oching, ovqatlarni ish kamerasiga qo'ying, eshikchasini yoping.
- Sabzavot (vegetable) tugmachasini bosing, displayda «A-2» avtomatik pishirish rejimining raqami ko'rsatiladi, sabzavot (vegetable) tugmachasini taqrordan bosing ovqatlarning tegishli vaznini (350 g) tanlang, vazni ham displayda ko'rsatiladi.
- Ovqatlarni avtomatik pishirish jarayonini boshlash uchun (13) «start /+30s start/+30s» tugmachasini bosing. Pishirish muddati avtomatik tanlanadi. Displeyda qolgan zamanning hisoblanishi ko'rsatiladi. Pishirish jarayoni tamom bo'lishi paytida pechka uziladi va besh ovozli signal chiqariladi.
ЎЗБЕК
10. Tezda pishirish rejimi
- Bor quvvat bilan 30 soniya ichida pishirish jarayonini boshlash uchun (13) «start /+30s start/+30 s» tugmachasini bosing, tugmachani taqror bosish har marta 30 soniya ilova etadi, eng uzoq muddat 95 daqiga soniya.
Eslatmalar
- Mikro to'lqin rejimida, grill rejimida va kombinatsiyalashtirilgan pishirish rejimida (13) «start /+30s start/+30 s» tugmachasi bilan muddatni uzaytirish mumkin.
- Ovqatlarni ko'p qadamli pishirish rejimida, avtomatik pishirish rejimida va yaxdan tushirish rejimida muddatni uzaytirish mumkin emas.
- Pishirish jarayoni tamom bo'lishi paytida pechka uziladi va besh ovozli signal chiqariladi.
11. Bolalardan bloklash funksiyasi
Bloklash: (15) «stop /stop» tugmachasini bosib 3 soniya tuting, ovozli signal chiqariladi va displayda piktogramma (18) ko'rsatiladi.
Bloklashni bekor qilish: bloklash rejimida (15) «stop /stop» tugmachasini bosib 3 soniya tuting, ovozli signal chiqariladi va displaydagi piktogramma (18) so'nadi.
12. Belgilangan rejimlarni qarab chiqish
- Mikro to'lqin rejimida (17) «mikro to'lqinlar /microwave» tugmachasini bosing, displayda 2-3 soniya ichida belgilangan quvvatning raqami ko'rsatiladi.
- Bir qadamli pishirish rejimida displayda (16) «soat/ dastlabki belgilash clock/preset» tugmachasini bosing, displayda 2-3 soniya ichida hozirgi soat ko'rsatiladi.
- Agar pishirish jarayonini boshlash vaqti belgilangan, (16) «soat/dastlabki belgilash clock/preset», tugmachasini
bosing, displeyda 2-3 soniya ichida pishirish jarayonini boshlash vaqti ko'rsatiladi.
13. Displey ko'rsatishlari
- Kutish rejimida displayda hozirgi soat ko'rsatiladi va (:) ajratish belgisi milt-milt etadi.
- Ma'lumotlarni kirgizish rejimida displayyda tegishli ma'lumotlar ko'rsatiladi.
- Bolalardan bloklash rejimida displayda piktogramma (18) ko'rsatiladi.
- Ishlash zamanida rejimida qolgan pishirish zamani ko'rsatiladi.
Eslatma: (15) «stop/stop» tugmachasini bosib yoki eshikchani ochib pishirish rejimini to'xtata olasiz. Ishlashni yangidan boshlash uchun (13) «start /+30s start/+30 s» tugmachasini dosing.
Ovqatlarni pishirish rejimini uzish uchun (15) «стоп/stop» tugmachasini ikki marta bosing.
TOZALASH VA PARVARİSH
- Tozalash oldidan pechkani uzing va tarmoq shnurining vilkasini rozetkadan chiqaring.
- Boshqarish paneliga namning tushishiga yo'l qo'ymang.
Yumshoq bir oz nam lattacha bilan tozalang. - Pechkaning ish kamerasini toza holatida saqlang. Pechkaning devorlarida ovqotlarning parchalari yoki suyuqlikning izlari qolgan holda nam lattacha bilan olib chiqaring.
- Ish kamerasi juda ifl as bo'lgan holda yumshoq yuvish vositalaridan foydalanish mumkin.
- Abraziv yuvish vositalaridan va simdan yasalgan cho'tkalardan pechkani ichidan va tashqaridan tozalash uchun foydalanmang.
- Pechkaning tomida joylashgan havo va bug' chiqishiga belgilangan teshiklarga
ЎЗБЕК
su va yuvish vositalarining tushishiga yo'l qo'ymang.
- Ammiak asosida qilingan yuvish vositalaridan foydalanish taqiqlanadi.
- Tashki yuzalarini nam lattacha bilan tozalash kerak.
- Pechkaning eshikchasini toza holatida saqlang. Pechkaning eshikchasi va oldingi paneli orasida ushoqlarning to'planishiga yo'l qo'ymang chunki eshikchaning yopilishiga to'sqinlik qiladi.
-
Pechkaning qutisida joylashgan ventilyatsiya teshiklarini muntazam tozalang, chang va islosni chiqarib oling.
-
Oynali taglikni va tayanchini bir maromda tozalang, pechkaning ish kamerasining tagini surtib tozalang.
- Oynali taglik va rolikli halqani neytral sovuq eritmasi bilan yuving.
- Issiq oynali taglikni sovuq suga qoymangchunki yorilishi mumkin.
- Ish kamerasidan badbo'ylarni ketkizish uchun pechkaga bir oz limon shirasi qo'shilgan bir kosa su qo'ying va bir necha daqiga davomida qaynating. Ish kamerasining devorlarini yumshoq lattacha bilan yaxshilab surtib tozalang.
MUAMMOLAR VA ULARNING BARTARAF QILINISHI
Normal ish
| Mikroto’lqinli pechka tele- va radio signallarini qabul qilishga to’sqinlik qiladi. | Mikroto’lqinli pechkaning ishlashda tele- va radio signallarini qabul qilishga to’sqinliklar paydo bo’la oladi. Mikser, changso’rar, elektrik fen kabi kichik elektr jihazlarning ishlashda o’hshash to’sqinliklar paydo bo’la oladi. Bu normaldir. |
| Yoruglikning past quvvati. | Mikro to’lqin nurlanishining past darajasi belgilangan holda ish kamerasida yoritish quvvati da past bo’la oladi. Bu normaldir. |
| Eshikning ichida bug’ning to’planishi, ventilyatsiya teshiklaridan issik havoning chiqishi. | Pishirish jarayonida rishirilayotgan ovqatlardan bug’ chiaqa oladi. Bug’ ventilyatsiya teshiklaridan chiqadi lekin qisman eshikning ich tomonida qola oladi. Bu normaldir. |
| Mikroto’lqinli pechka ovqatsiz ulangan. | Mikroto’lqinli pechkani qisqa muddatga ovqatsiz ulash buzilishiga olib bormaydi. Pechkani ulash oldidan mutlaqo ovqatlarning bor bo’lishini tekshiring. |
MUAMMOLAR VA ULARNING BARTARAF QILINISHI
| Muammo Mumkin sababi Bartaraf qilinishi | ||
| Pechka ulanmadi. | Tarmoq kabelining vilkasi rozet-kaga mahqam emas solingan. | Vilkani rozetkadan chiqaring. 10 soniya o'tgandan keyin vilkani qaytadan rozetkaga soling. |
| Tarmoq rozetkasi buzilgan | Tekshirish uchun rozetkaga bos-hqa elektr jihazini ulang | |
| Isitish yo'q. | Eshiqcha mahqam emas yo-pilgan | Eshiqchani mahkam yoping |
| Pechka ishlaganda aylanayotgan oynali taglik shovqin chiqaradi. | Rolikli halqa yoki ish kamerasi-ning pastki qismi ifl os. | Oynali taglik va rolikli halqani chiqaring. Rolikli halqani va ish kamerasining tagini yuving. |
ЎЗБЕК
AGAR KOR QİLMADİ MARHAMAT MUXTOR XIZMAT MARKAZINING MUTAHASSISLARIGA MUROJAAT QILING, PECHKANI MUSTAQIL SOZLAMANG VA TA'MIR QILMANG.
Ta'minlash to'plami
Mikroto'lqinli pechka – 1 dona.
Oynali taglik – 1 dona.
Rolikli halqa – 1 dona.
Grill uchun panjara – 1 dona.
Texnik xususiyatlari
Kuchlanishi:220 \~ 50 Gts
Mikroto'lqin rejimida foydalanilayotgan quvvat: 1270 vt
Mikroto'lqin rejimining nominal chiqish quvvati: 800 vt
Grill rejimida chiqish quvvati: 1000 vt
Pechkaning sig'imi: 20 l
A production date of the item is indicated in the serial number on the technical data plate. A serial number is an eleven-unit number, with the first four figures indicating the production date. For example, serial number 0606xxxxxxx means that the item was manufactured in June (the sixth month) 2006.
DE
- MANUAL INSTRUCTION
- ENGLISH
- MICROWAVE OVEN
- Description
- Safety guards to avoid exposure to dangerous microwave radiation
- Important safety rules
- Rules on cooking foodstuff in microwave ovens
- Cookware election guide
- Checking cookware before using inside microwave oven
- Oven grounding directions
- Setting up
- Assembling microwave oven
- Protective coating
- Glass tray installation
- Operation
- Setting time
- Notice:
- Cooking in microwave oven
- Cooking using grill mode
- Combined cooking mode
- Defrost foodstuff by weight
- Speed defrost
- Multi-stage cooking
- Setting up cooking tart time
- Automatic cooking mode
- Speed cooking mode
- Notes
- Blocking against children
- Viewing preset modes
- Display indications
- Cleaning and Maintenance
- MALFUNTIONS AND TROUBLE SHOOTING
- Delivery set
- Technical specifications
- GUARANTEE
- DEUTSCH
- BESCHREIBUNG
- NIESPRAWNOŚCI I SPOSOBY ICH USUNIECIA
- ЎЗБЕК
- Tezda pishirish rejimi
- Eslatmalar
- Bolalardan bloklash funksiyasi
- Belgilangan rejimlarni qarab chiqish
- Displey ko'rsatishlari
- TOZALASH VA PARVARİSH
- MUAMMOLAR VA ULARNING BARTARAF QILINISHI
- Ta'minlash to'plami
- Texnik xususiyatlari
- DE
Brand : Vitek
Model : VT-1693
Category : Microwave