FE-280 - Digital Camera OLYMPUS - Free user manual and instructions
Find the device manual for free FE-280 OLYMPUS in PDF.

User questions about FE-280 OLYMPUS
0 question about this device. Answer the ones you know or ask your own.
Ask a new question about this device
Download the instructions for your Digital Camera in PDF format for free! Find your manual FE-280 - OLYMPUS and take your electronic device back in hand. On this page are published all the documents necessary for the use of your device. FE-280 by OLYMPUS.
USER MANUAL FE-280 OLYMPUS
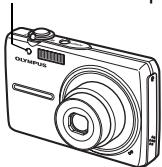
natural_image
Line drawing of a Olympus digital camera with lens and control buttons (no text or symbols on body)
text_image
AUTO GUIDE P P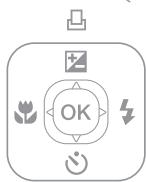
text_image
OK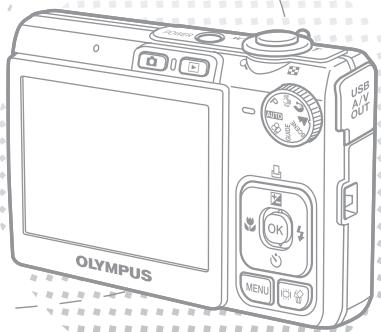
text_image
OLYMPUS USB AIV OUT MENU OKContents
Gather these items (box contents).... 3
Attach the strap 3
Prepare the camera 4
Turn the camera on.... 6
Set the date and time....7
About the date and time setting screen....7
Set the language 9
Take a picture.... 10
Review your pictures.... 11
Erase pictures 11
Basic operation.... 12
Shooting Mode Buttons 12
Scene Modes 13
Macro Mode 13
Flash Modes....14
Self-Timer 14
Power Save Feature....14
Menus and settings 15
Top Menu 15
Erase All Pictures 15
Connecting the camera 16
Playback on a TV 16
Direct Printing (PictBridge) 17
Transfer images 18
OLYMPUS Master software.... 20
Specifications 21
Safety Precautions.... 23
● Before using your camera, read this manual carefully to ensure correct use.
- We recommend that you take test shots to get accustomed to your camera before taking important photographs.
- Please observe the safety precautions at the end of this manual.
- The images on the LCD screen and illustrations of the camera used in this manual may differ from the actual product.
Gather these items (box contents)
natural_image
Line drawing of a Olympus digital camera with no text or symbols on the device bodyDigital Camera

natural_image
Simple line drawing of a knotted rope or cord (no text or symbols)Strap

natural_image
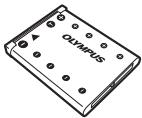
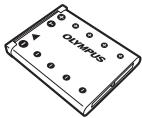
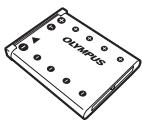
Illustration of an Olympus battery pack with mounting holes (no text or symbols on body)Lithium Ion Battery (LI-42B)
natural_image
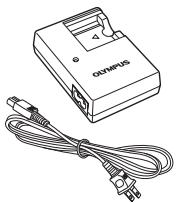
Illustration of a Olympus device with a coiled cable and power plug (no text or symbols visible)Battery Charger (LI-40C)
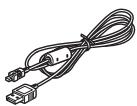
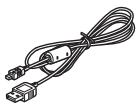
USB Cable
natural_image
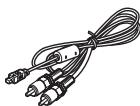
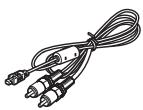
Line drawing of a cable with two connectors and a central connector (no text or symbols)AV Cable

OLYMPUS Master 2
CD-ROM
Items not shown: Advanced Manual (CD-ROM), Basic Manual (this manual), and the Warranty Card. Contents may vary depending on purchase location.
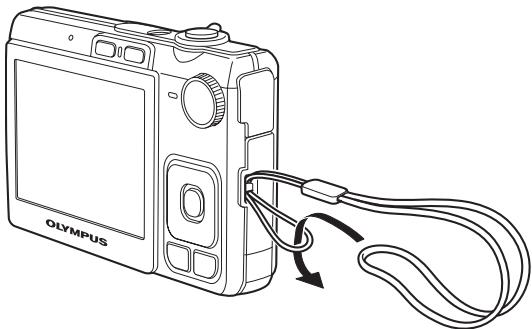
Attach the strap
natural_image
Line drawing of a Olympus digital camera with attached cable and scroll (no text or symbols)- Pull the strap tight so that it does not come loose.
Prepare the camera
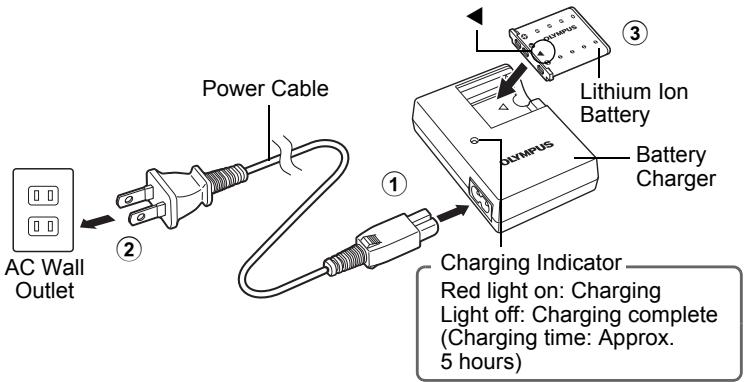
a. Charge the battery.
text_image
AC Wall Outlet Power Cable Lithium Ion Battery Battery Charger ① ② ③ ④ Charging Indicator Red light on: Charging Light off: Charging complete (Charging time: Approx. 5 hours)● Battery comes partially charged.
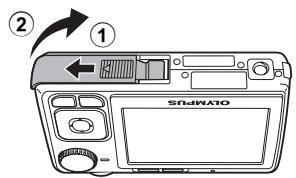
b. Insert the battery and an xD-Picture Card (optional).
text_image
② ① SONIKATO- Insert the battery by putting in the ▼ marked side first, with the ⏻ marks toward the battery lock knob. If you insert the battery incorrectly, you will not be able to remove it. Do not use force. Contact authorized distributors/service centers. Damage to the battery exterior (scratches, etc.) may produce heat or an explosion.

text_image
③ Olympus Olympus SOJMX10 Battery ● To remove the battery lock kn of the arrow.Battery lock knob
● To remove the battery, press the battery lock knob in the direction of the arrow.
text_image
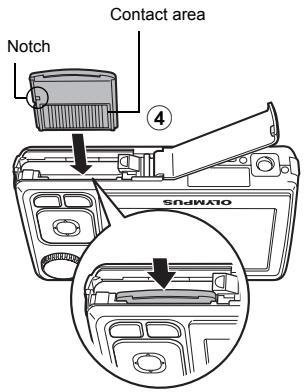
Contact area Notch ④ OATMIPS- Orient the card as shown, and insert the card straight in until it clicks into place.
● To remove the card, push the card all the way in, release slowly, grasp the card, then remove.
text_image
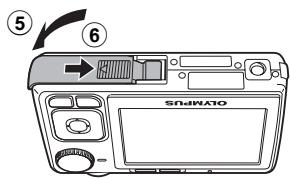
⑤ ⑥ SOJIMATO- With this camera, you can take pictures without inserting the optional xD-Picture Card™ (hereinafter referred to as “the card”). If you shoot pictures with this camera without using an xD-Picture Card, the pictures will be recorded in the internal memory. For details on the card, please refer to the Advanced Manual.
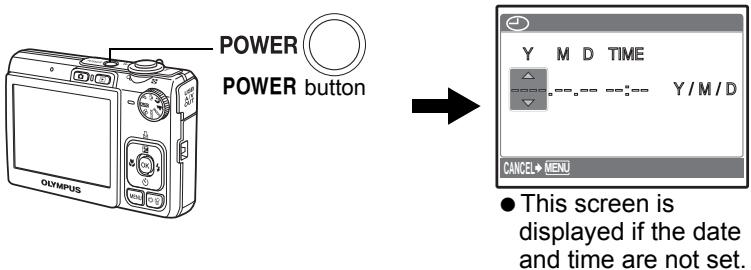
Turn the camera on
This explains how to turn on the camera in shooting mode.
a. Set the mode dial to AUTO.

text_image
Olympus When shooting still pictures When shooting moviesStill picture shooting modes
| AUTO | The camera determines the optimum settings for the shooting conditions automatically. |
| P | The camera automatically sets the optimum aperture value and shutter speed. |
| «¶)» | This function reduces the blur incurred by a moving subject, or camera shake when taking pictures. |
| Suitable for taking pictures of people. | |
| Suitable for taking pictures of a landscape. | |
| SCENE | Select from 15 available scene modes according to the shooting conditions. |
| GUIDE | Use the shooting guide displayed on the screen to shoot pictures according to the situation. |
b. Press the POWER button.
text_image
POWER POWER button Y M D TIME Y/M/D CANCEL MENU ● This screen is displayed if the date and time are not set.● To turn off the camera, press the POWER button once again.
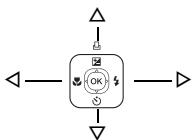
Hint
The directions of the arrow pad is indicated with in the supplied instruction manual.
flowchart
graph TD
    A["Start"] --> B["OK"]
    B --> C["Return"]
    B --> D["Feedback Loop"]
    D --> E["End"]
Set the date and time
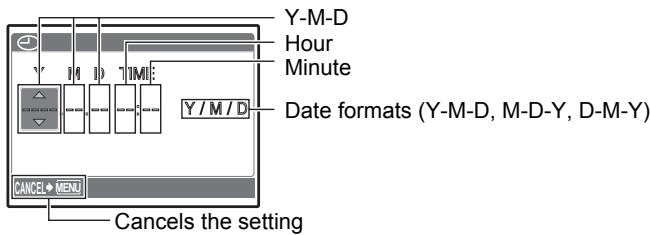
About the date and time setting screen
text_image
Y-M-D Hour Minute Date formats (Y-M-D, M-D-Y, D-M-Y) CANCE# MENU Cancels the settinga. Press the △/□ and ▽ √ buttons to select [Y].
- The first two digits of the year are fixed.
![OLYMPUS FE-280 - a. Press the △/□ and ▽ √ buttons to select [Y]. - 1](/content/2025/01/84228/images/a41b5f3c609425254567fc8c7ba7b9c1d12780ab5ffd350f89ff7126b33af16a.jpg)
flowchart
graph LR
    A["Olympus Device"] -->|button| B((OK))
    B --> C["button"]
    C --> D["Y M D TIME 2007"]
    D --> E["Y/M/D"]
    E --> F["CANCEL MENU"]
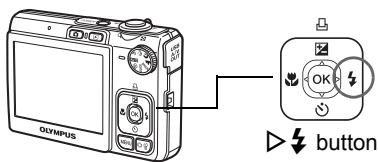
b. Press the ▷↓ button.
text_image
Olympus OK buttonc. Press the △/□ and ▽ √ buttons to select [M].
![OLYMPUS FE-280 - c. Press the △/□ and ▽ √ buttons to select [M]. - 1](/content/2025/01/84228/images/da181f40c7d2f3f73a37d14cad2cf1ef32b90f31a82b410578561969dacf02db.jpg)
text_image
Y M D TIME 2007.12.—————— Y / M / D CANCEL→ MENUd. Press the ▷↓ button.
e. Press the △/□ and ▽ √ buttons to select [D].
f. Press the ▷↓ button.
g. Press the △/□ and ▽ √ buttons to select the hours and minutes.
- The time is displayed in the 24-hour format.
![OLYMPUS FE-280 - c. Press the △/□ and ▽ √ buttons to select [M]. - 2](/content/2025/01/84228/images/ada18090a803c58f7d6290cd8b85f374c313edf0829626591fd98686f91460cf.jpg)
text_image
Y M D TIME 2007.12.10 ---:--- Y/M/D CANCEL→ MENU![OLYMPUS FE-280 - c. Press the △/□ and ▽ √ buttons to select [M]. - 3](/content/2025/01/84228/images/88210b61620e3756a065c3aa24912152e06adb6d7d518e3d5caad3f68a58ecb5.jpg)
text_image
Y M D TIME 2007.12.10 12:30 Y/M/D CANCEL→ MENU SET+ OKh. Press the ▷↓ button.
i. Press the △/□ and ▽ √ buttons to select [Y/M/D].
![OLYMPUS FE-280 - c. Press the △/□ and ▽ √ buttons to select [M]. - 4](/content/2025/01/84228/images/bb546a4a5f525f3acfbbcc0c68adaef181919bd79d15297f82633d862a59edc6.jpg)
text_image
Y M D TIME 2007.12.10 12:30 < Y/M/D CANCEL→MENU SET→OKj. After all settings have been set, press OK.
- For a more accurate setting, press OK when the time signal hits 00 seconds.
![OLYMPUS FE-280 - c. Press the △/□ and ▽ √ buttons to select [M]. - 5](/content/2025/01/84228/images/f0f130e02833956f32029174af2a5e7b6f42c1b2e8117933800a6ea8cd3a1ba3.jpg)
text_image
OK button Olympus HQ 3264x2448Set the language
a. Press the MENU button to display the top menu.

text_image
Olympus MENU button MENU
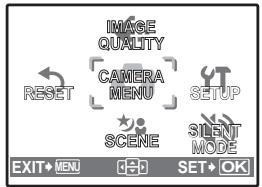
flowchart
graph TD
    A["RESET"] --> B["IMAGE QUALITY"]
    B --> C["CAMERA MENU"]
    C --> D["SETUP"]
    D --> E["SCENE"]
    E --> F["SILENT MODE"]
    F --> G["EXIT MEN"]
    G --> H["OK"]
b. Press the ▷↓ button to select [SETUP], and press OK.
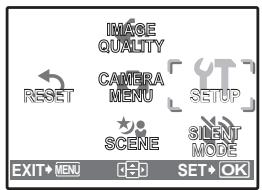
text_image
RESET IMAGE QUALITY CAMERA MENU SETUP SCENE SILENT MODE EXIT MEN H2D SET•OKc. Press the △/□ and ▽ √ buttons to select [●-□], and press OK.
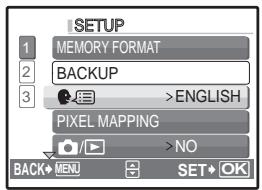
text_image
1 MEMORY FORMAT 2 BACKUP 3 >ENGLISH PIXEL MAPPING >NO BACK→MENU SET→OKd. Press the arrow pad ( ) to select a language, and press OK.
- You can add other languages to your camera with the provided OLYMPUS Master software. Please refer to the Advanced Manual.
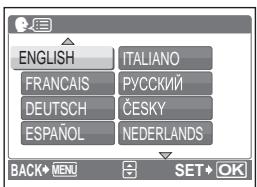
text_image
ENGLISH FRANÇAIS DEUTSCH ESPAÑOL ITALIANO РУССКИЙ ČESKY NEDERLANDS BACK→MENU SET→OKTake a picture
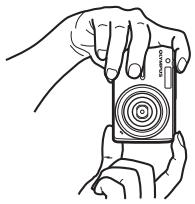
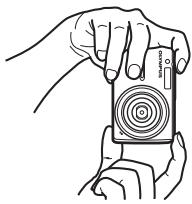
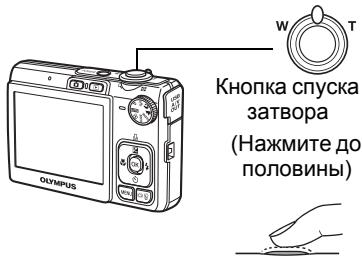
a. Hold the camera.
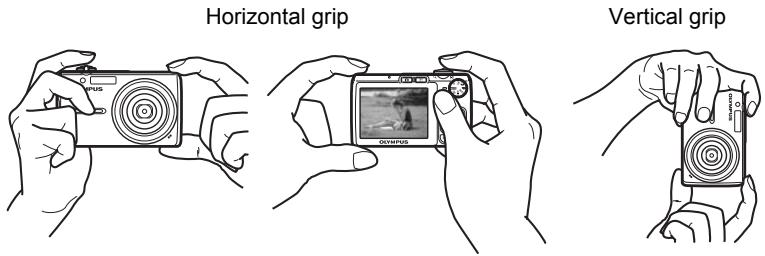
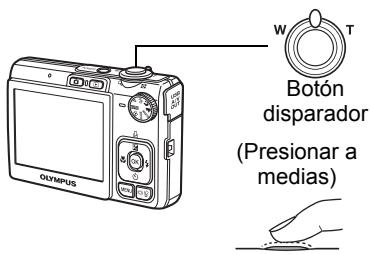
b. Focus.
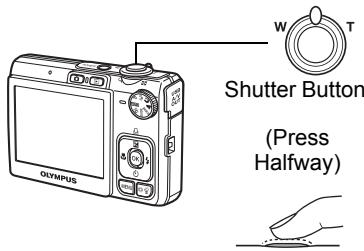
text_image
Shutter Button (Press Halfway)Place this mark over your subject.

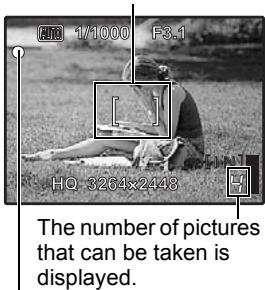
text_image
1/1000 F3.1 HQ 3264x2448 The number of pictures that can be taken is displayed.When the focus and exposure are locked, the green lamp lights up, and the shutter speed and aperture value are displayed.
c. Shoot.
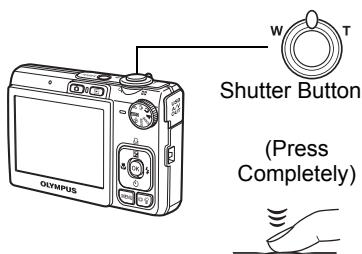
text_image
Shutter Button (Press Completely)The card access lamp
blinks.

natural_image
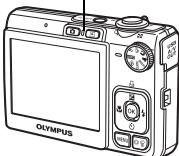
Line drawing of a Olympus digital camera with control panel and display screen (no text or symbols on body)Review your pictures
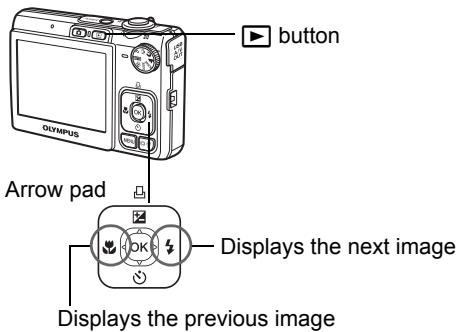
a. Press the ▶ button.
text_image
button Arrow pad Displays the next image Displays the previous image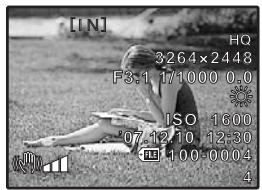
text_image
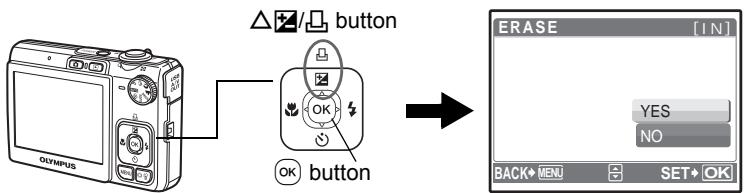
[IN] HQ 3264x2448 F3:1 17/1000 0.0 ISO 1600 07:12 10:12:30 HJ 100:0004 4Erase pictures
a. Press the ◀ and ▷ buttons to display the picture you want to erase.
b. Press the |☐|/♦ button.
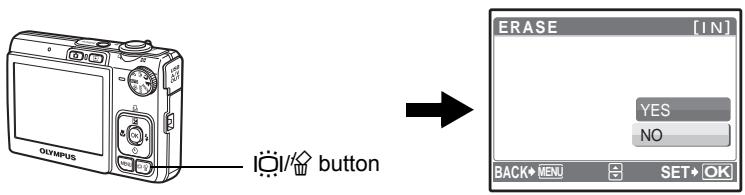
text_image
Olympus button ERASE [IN] YES NO BACK MENU SET OKc. Press the △/□ button, select [YES], and press OK.
flowchart
graph LR
    A["Olympus"] -->|button| B((OK button))
    B --> C["ERASE [IN"]
YES NO BACK→MENU SET→OK]
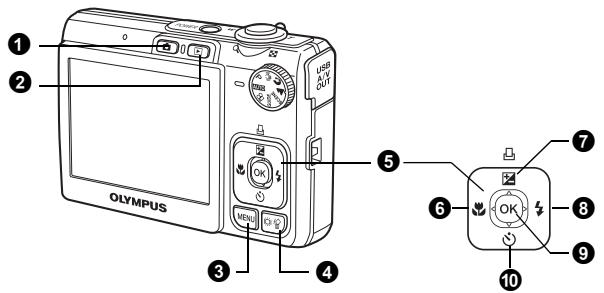
Shooting Mode Buttons
While in shooting mode, use these buttons for quick access to some of the more commonly used features.
text_image
1 2 3 4 5 6 7 8 9 10 Olympus① button (Shooting)
Selects the shooting mode.
② ▶ button (Playback)
Selects the playback mode.
③ MENU button
Displays the top menu.
4 📄/💡 button (Backlight boost/Erase)
Press I☐I in shooting mode. The monitor becomes brighter for 10 seconds.
⑤ Arrow pad (△▽◀◀)
Selects scenes, playback pictures and menu items.
6 ◀ button (Macro Mode)
Enables macro or super macro mode for taking close-up pictures.
⑦ △/ button (Exposure Compensation/Print)
While in shooting mode, press this button to adjust the exposure compensation value, which affects picture brightness.
8 ▷↓ button (Flash Mode)
Selects from 4 flash modes - AUTO, Ⓞ (Red-eye reduction), ↓ (Fill-in flash), or ⏻ (Flash off).
9 OK button (OK)
Confirms settings.
10 ∇ button (Self-timer)
Sets the self-timer to take the shot approximately 12 seconds after the shutter button is pressed.
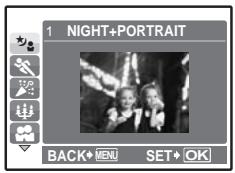
Scene Modes
This function allows you to switch the SCENE (scene mode) according to the subject.
① Set the mode dial to SCENE.
text_image
1 NIGHT+PORTRAIT BACK MENU SET OK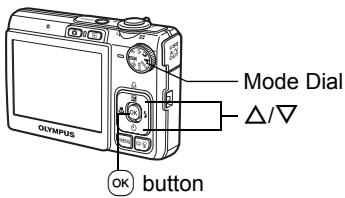
text_image
Olympus Mode Dial Δ/▽ OK button2 Press / to select the scene modes and press OK.
Shooting Scene Modes
• ★ NIGHT+PORTRAIT
CANDLE
- FIREWORKS
• DOCUMENTS
• 1 UNDER WATER WIDE1
- SPORT
• SELF PORTRAIT
BEHIND GLASS
• AUCTION
• 2 UNDER WATER WIDE2
INDOOR
• SUNSET
• 🥘¶ CUISINE
• SMILE SHOT
• UNDER WATER MACRO
Macro Mode
This mode lets you take pictures as close as 10 cm (3.9 in.) to your subject. (at the widest angle)
Use this mode to take pictures as close as 5 cm (2.0 in.) to your subject. In mode, the position of the zoom lens is fixed.
① Press the ◀ button repeatedly to select [◀] or [s◀] and press Ⓞ.
Flash Modes
① Press the ▷↓ button repeatedly to select the flash mode and press Ⓞ.
② Press the shutter button halfway.
- When the flash is set to fire, the ⚣ mark lights.
3 Press the shutter button completely to take the picture.
| Icon | Flash Mode | Description |
| No indication | Auto flash | The flash fires automatically in low light or backlight conditions. |
| [SKHD] | Red-eye reduction flash | The red-eye reduction flash mode significantly reduces this phenomenon by emitting pre-flashes before firing the regular flash. |
| Fill-in flash | The flash fires regardless of the available light. | |
| Flash off | The flash does not fire. |
Self-Timer
① Press the ▽ button to select [💡] and press Ⓞ.
② Press the shutter button fully to take the picture.
- The self-timer lamp lights for approximately 10 seconds after the shutter button is pressed, then starts blinking. After blinking for approximately 2 seconds, the picture is taken.
Self-timer Lamp
natural_image
Line drawing of a digital camera with an Olympus logo and control panel (no text or symbols on body)Power Save Feature
- To save the battery power, the camera automatically enters sleep mode and stops operating if not used for approximately 3 minutes. Operate the shutter button or zoom lever to reactivate the camera.
- If the camera is not operated for approximately 12 minutes after the camera enters sleep mode, it automatically retracts the lens and turns off. To resume operation, turn on the power again.
Top Menu
① Press the MENU button to display the top menu on the monitor.
② Use the arrow pad ( ) to select menu items.
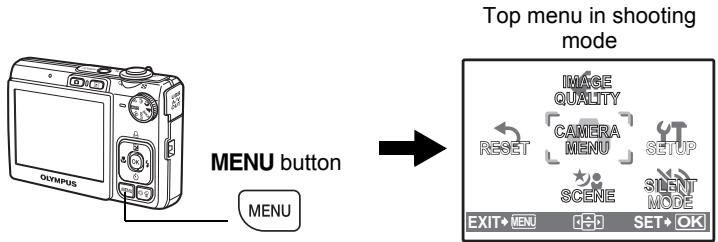
flowchart
graph LR
    A["Olympus"] --> B["MENU button"]
    B --> C["Top menu in shooting mode"]
    C --> D["EXIT+MENU"]
    C --> E["SET+OK"]
    C --> F["SETUP"]
    C --> G["CAMERA MENU"]
    C --> H["SCENE"]
    C --> I["SILENT MODE"]
IMAGE QUALITY
Sets image quality and resolution.
CAMERA MENU
Adjusts various shooting settings.
RESET
Resets to the factory default settings.
SCENE
Select a scene according to the subject and shooting condition.
SILENT MODE
Mutes the operation sounds, warning sounds, shutter sound, etc... during shooting and playback.
SETUP
Sets the date and time, language and other settings.
Erase All Pictures
1 Press the MENU button to display the top menu in playback mode.
2 Select [ERASE] -> [ALL ERASE], and press OK.
3 Select [YES], and press OK.
● All the pictures are erased.
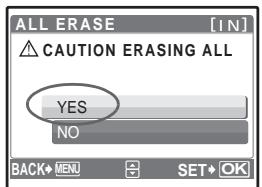
text_image
ALL ERASE [IN] CAUTION ERASING ALL YES NO BACK→ MENU → SET→ OKConnecting the camera
Playback on a TV
Use the AV cable provided with the camera to playback recorded images on your TV. Both still pictures and movies can be played back.
Make sure that the TV and camera are turned off. Connect the multi-connector on the camera to the video input terminal on the TV using the AV cable.
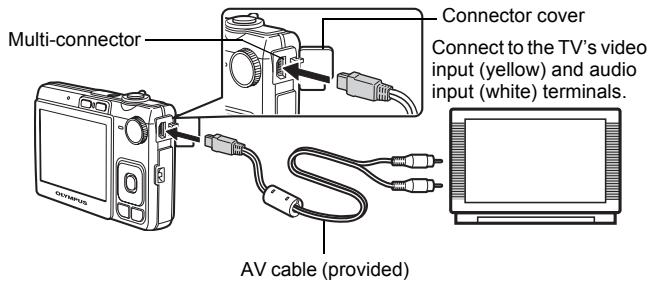
text_image
Multi-connector Connector cover Connect to the TV's video input (yellow) and audio input (white) terminals. AV cable (provided)② Turn the TV on and set it to the video input mode.
- For details on switching to video input, refer to your TV's instruction manual.
3 Turn the camera on and press the ▶ button to select the playback mode.
- The last picture taken is displayed on the TV. Use the arrow pad ( ) to select the picture you want to display.
Direct Printing (PictBridge)
Using the provided USB cable, you may connect your camera directly to a PictBridge compatible printer to make prints. You can print a picture with simple operations.
① In playback mode, display the picture you want to print out on the monitor.
2 Connect one end of the provided USB cable into the camera's multi-connector and the other end into the printer's USB connector.
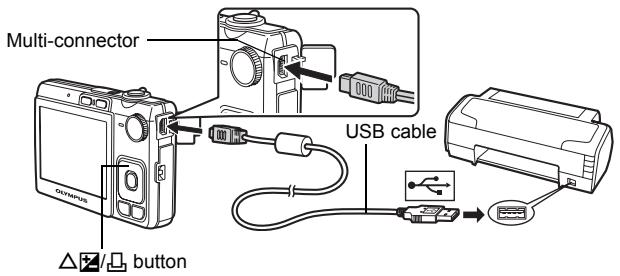
text_image
Multi-connector USB cable button③ Press the △/□ button.
- Printing starts.
- When you are finished, disconnect the USB cable from the camera with the picture selection screen displayed.

text_image
EASY PRINT START ✪ PC / CUSTOM PRINT ✕ OKTransfer images
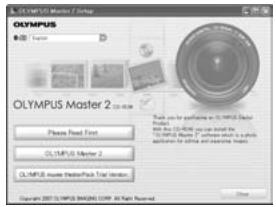
a. Install the software
1 Insert the OLYMPUS Master CD-ROM.
② Windows: Click the "OLYMPUS Master 2" button.
Macintosh: Double-click the "Setup" icon.
③ Simply follow the on-screen instructions.
text_image
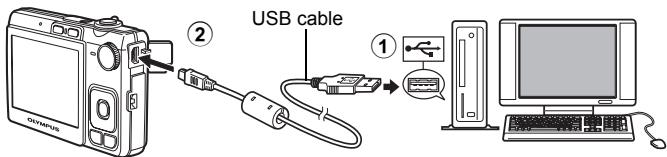
OLYMPUS Master 2 Please Read First OLYMPUS Master 2 OLYMPUS Master 2 (Previewed) All rights Reserved. OK Cancelb. Connect the camera to the computer
① Connect the camera and computer using the USB cable (provided).
● The monitor will turn on automatically.
text_image
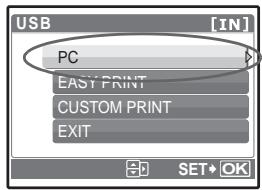
USB cable ②② Select [PC] on the monitor, and press OK.
text_image
USB [IN] PC EASY PRINT CUSTOM PRINT EXIT SET• OK- Your PC will now recognize your camera as a removable storage drive.
c. Transfer images to the computer
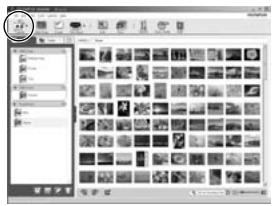
① With the camera now connected, open OLYMPUS Master.
② Click “Transfer Images” 📋 on the browse window, and then click “From Camera” 📋.
③ Simply follow the on-screen instructions.
text_image
Screenshot of a software interface showing a grid of image thumbnails with Chinese labels, likely from an older document or photo editing tool.Tips
- For more detailed information regarding camera setup and usage, please refer to the camera's “Advanced Manual” provided on CD-ROM.
- For additional assistance, refer to the "Help" file in the OLYMPUS Master software.
OLYMPUS Master software
OLYMPUS Master Software: Use this software to download pictures from the camera, view, organize, retouch, e-mail and print your digital pictures, movies and more!

text_image
OLYMPUS Software for Editing & Managing Design OLYMPUS Master 2 Microsoft Excel Master 2 Options ■ Microsoft Excel ■ Microsoft PowerPoint ■ Microsoft Excel Master ■ Microsoft Excel Master Microsoft Excel Master● System Requirements
| OS | Windows 2000 Professional/XP Home Edition/XP Professional/Vista or Mac OS X (v10.3 or later) |
| CPU | Pentium III 500 MHz/Power PC G3 500 MHz/Intel Core Solo/Duo 1.5 GHz, or later |
| RAM | 256 MB or more |
| Hard Disk | 500 MB or more free space |
| Connection | USB port/IEEE 1394 port |
| Monitor | 1024 × 768 pixels resolution or more with minimum 65,536 colors (Windows), 32,000 colors (Macintosh) |
| Other | Internet Explorer 6 or later (Windows), Safari 1.0 or later, QuickTime 6 or later (Macintosh) |
For the latest support information, visit the Olympus website (http://www.olympus.com/)

User Registration
Register your camera when you install OLYMPUS Master to activate your warranty, receive notifications for software and camera firmware updates, and more.
● Camera
| Product type | : Digital camera (for shooting and displaying) |
| Recording system | |
| Still pictures | : Digital recording, JPEG (in accordance with Design rule for Camera File system (DCF)) |
| Applicable standards | : Exif 2.2, Digital Print Order Format (DPOF), PRINT Image Matching III, PictBridge |
| Sound with still pictures | : Wave format |
| Movie | : AVI Motion JPEG |
| Memory | : Internal memoryxD-Picture Card (16 MB – 2 GB) (Type H/M, Standard) |
| Number of effective pixels | : 8,000,000 pixels |
| Image pickup device | : 1/2.35" CCD (primary color filter),8,500,000 pixels (gross) |
| Lens | : Olympus lens 6.3 to 18.9 mm, f3.1 to 5.9(equivalent to 36 to 108 mm on a 35 mm camera) |
| Photometric system | : Digital ESP metering |
| Shutter speed | : 4 to 1/2000 sec. |
| Shooting range | : 0.6 m (2.0 ft.) to ∞ (W), 1.0 m (3.2 ft) to ∞ (T) (normal)0.1 m (0.3 ft.) to ∞ (W), 0.6 m (2.0 ft.) to ∞ (T) (macro mode)0.05 m (0.2 ft.) (super macro mode) |
| Monitor | : 2.5" TFT color LCD display, 230,000 pixels |
| Outer connector | : USB connector, A/V OUT jack (multi-connector) |
| Automatic calendar system | : 2000 up to 2099 |
| Operating environment | |
| Temperature | : 0°C to 40°C (32°F to 104°F) (operation)/-20°C to 60°C (-4°F to 140°F) (storage) |
| Humidity | : 30% to 90% (operation)/10% to 90% (storage) |
| Power supply | : One Olympus lithium ion battery (LI-42B/LI-40B) |
| Dimensions | : 91.8 mm (W) × 55.7 mm (H) × 19.1 mm (D)(3.6 × 2.2 × 0.8 in.) (excluding protrusions) |
| Weight | : 108 g (3.8 oz) without battery and card |
● Lithium ion battery (LI-42B)
| Product type | : Lithium ion rechargeable battery |
| Standard voltage | : DC 3.7 V |
| Standard capacity | : 740 mAh |
| Battery life | : Approx. 300 full charges (varies on usage) |
| Operating environment | |
| Temperature | : 0°C to 40°C (32°F to 104°F) (charging)/-10°C to 60°C (14°F to 140°F) (operation)/-20°C to 35°C (-4°F to 95°F) (storage) |
| Dimensions | : 31.5 × 39.5 × 6 mm (1.2 × 1.5 × 0.2 in.) |
| Weight | : Approx. 15 g (0.5 oz) |
● Battery charger (LI-40C)
| Power requirements | : AC 100 to 240 V (50 to 60 Hz)3.2 VA (100 V) to 5.0 VA (240 V) |
| Output | : DC 4.2 V, 200 mA |
| Charging time | : Approx. 5 hours |
| Operating environment | |
| Temperature | : 0°C to 40°C (32°F to 104°F) (operation)/-20°C to 60°C (-4°F to 140°F) (storage) |
| Dimensions | : 62 × 23 × 90 mm (2.4 × 0.9 × 3.5 in.) |
| Weight | : Approx. 65 g (2.3 oz) |
Design and specifications subject to change without notice.

CAUTION
RISK OF ELECTRIC SHOCK DO NOT OPEN

CAUTION: TO REDUCE THE RISK OF ELECTRICAL SHOCK, DO NOT REMOVE COVER (OR BACK). NO USER-SERVICEABLE PARTS INSIDE. REFER SERVICING TO QUALIFIED OLYMPUS SERVICE PERSONNEL.

An exclamation mark enclosed in a triangle alerts you to important operating and maintenance instructions in the documentation provided with the product.

DANGER
If the product is used without observing the information given under this symbol, serious injury or death may result.

WARNING
If the product is used without observing the information given under this symbol, injury or death may result.

CAUTION
If the product is used without observing the information given under this symbol, minor personal injury, damage to the equipment, or loss of valuable data may result.
WARNING!
TO AVOID THE RISK OF FIRE OR ELECTRICAL SHOCK, NEVER DISASSEMBLE, EXPOSE THIS PRODUCT TO WATER OR OPERATE IN A HIGH HUMIDITY ENVIRONMENT.
General Precautions
Read All Instructions — Before you use the product, read all operating instructions. Save all manuals and documentation for future reference.
Cleaning — Always unplug this product from the wall outlet before cleaning. Use only a damp cloth for cleaning. Never use any type of liquid or aerosol cleaner, or any type of organic solvent to clean this product.
Attachments — For your safety, and to avoid damaging the product, use only accessories recommended by Olympus.
Water and Moisture — For precautions on products with weatherproof designs, read the weatherproofing sections.
Location — To avoid damage to the product, mount the product securely on a stable tripod, stand, or bracket.
Power Source — Connect this product only to the power source described on the product label.
Foreign Objects — To avoid personal injury, never insert a metal object into the product.
Heat — Never use or store this product near any heat source such as a radiator, heat register, stove, or any type of equipment or appliance that generates heat, including stereo amplifiers.

WARNING
- Do not use the camera near flammable or explosive gases.
- Do not use the flash and LED on people (infants, small children, etc.) at close range.
- You must be at least 1 m (3 ft.) away from the faces of your subjects. Firing the flash too close to the subject's eyes could cause a momentary loss of vision.
- Keep young children and infants away from the camera.
- Always use and store the camera out of the reach of young children and infants to prevent the following dangerous situations which could cause serious injury:
- Becoming entangled in the camera strap, causing strangulation.
- Accidentally swallowing the battery, cards or other small parts.
- Accidentally firing the flash into their own eyes or those of another child.
- Accidentally being injured by the moving parts of the camera.
- Do not look at the sun or strong lights with the camera.
- Do not use or store the camera in dusty or humid places.
- Do not cover the flash with a hand while firing.

CAUTION
- Stop using the camera immediately if you notice any unusual odors, noise, or smoke around it.
- Never remove the batteries with bare hands, which may cause a fire or burn your hands.
● Never hold or operate the camera with wet hands.
- Do not leave the camera in places where it may be subject to extremely high temperatures.
- Doing so may cause parts to deteriorate and, in some circumstances, cause the camera to catch fire. Do not use the charger if it is covered (such as a blanket). This could cause overheating, resulting in fire.
● Handle the camera with care to avoid getting a low-temperature burn.
- When the camera contains metal parts, overheating can result in a low-temperature burn. Pay attention to the following:
- When used for a long period, the camera will get hot. If you hold on to the camera in this state, a low-temperature burn may be caused.
- In places subject to extremely cold temperatures, the temperature of the camera's body may be lower than the environmental temperature. If possible, wear gloves when handling the camera in cold temperatures.
- When used for a long period, the camera will get hot. If you hold on to the camera in this state, a low-temperature burn may be caused. - In places subject to extremely cold temperatures, the temperature of the camera's body may be lower than the environmental temperature. If possible, wear gloves when handling the camera in cold temperatures.
● Be careful with the strap.
- Be careful with the strap when you carry the camera. It could easily catch on stray objects - and cause serious damage.
Follow these important guidelines to prevent batteries from leaking, overheating, burning, exploding, or causing electrical shocks or burns.

DANGER
- The camera uses a lithium ion battery specified by Olympus. Charge the battery with the specified charger. Do not use any other chargers.
- Never heat or incinerate batteries.
• Take precautions when carrying or storing batteries to prevent them from coming into contact with any metal objects such as jewelry, pins, fasteners, etc. - Never store batteries where they will be exposed to direct sunlight, or subjected to high temperatures in a hot vehicle, near a heat source, etc.
- To prevent causing battery leaks or damaging their terminals, carefully follow all instructions regarding the use of batteries. Never attempt to disassemble a battery or modify it in any way, by soldering, etc.
- If battery fluid gets into your eyes, flush your eyes immediately with clear, cold running water and seek medical attention immediately.
- Always store batteries out of the reach of small children. If a child accidentally swallows a battery, seek medical attention immediately.

WARNING
- Keep batteries dry at all times.
- To prevent batteries from leaking, overheating, or causing a fire or explosion, use only batteries recommended for use with this product.
- Insert the battery carefully as described in the operating instructions.
- If rechargeable batteries have not been recharged within the specified time, stop charging them and do not use them.
- Do not use a battery if it is cracked or broken.
- If a battery leaks, becomes discolored or deformed, or becomes abnormal in any other way during operation, stop using the camera.
- If a battery leaks fluid onto your clothing or skin, remove the clothing and flush the affected area with clean, running cold water immediately. If the fluid burns your skin, seek medical attention immediately.
- Never subject batteries to strong shocks or continuous vibration.

CAUTION
- Before loading, always inspect the battery carefully for leaks, discoloration, warping, or any other abnormality.
- The battery may become hot during prolonged use. To avoid minor burns, do not remove it immediately after using the camera.
- Always unload the battery from the camera before storing the camera for a long period.
For customers in Europe

“CE” mark indicates that this product complies with the European requirements for safety, health, environment and customer protection. “CE” mark cameras are intended for sales in Europe.

This symbol [crossed-out wheelie bin WEEE Annex IV] indicates separate collection of waste electrical and electronic equipment in the EU countries. Please do not throw the equipment into the domestic refuse. Please use the return and collection systems available in your country for the disposal of this product.
Use Only Dedicated Rechargeable Battery and Battery Charger
We strongly recommend that you use only the genuine Olympus dedicated rechargeable battery and battery charger with this camera.
Using a non-genuine rechargeable battery and/or battery charger may result in fire or personal injury due to leakage, heating, ignition or damage to the battery. Olympus does not assume any liability for accidents or damage that may result from the use of a battery and/or battery charger that are not genuine Olympus accessories.
Trademarks
- IBM is a registered trademark of International Business Machines Corporation.
- Microsoft and Windows are registered trademarks of Microsoft Corporation.
• Macintosh is a trademark of Apple Inc. - xD-Picture Card™ is a trademark.
- All other company and product names are registered trademarks and/or trademarks of their respective owners.
- The standards for camera file systems referred to in this manual are the “Design Rule for Camera File System/DCF” standards stipulated by the Japan Electronics and Information Technology Industries Association (JEITA).
Provisions of warranty
- If this product proves to be defective, although it has been used properly (in accordance with the written Handling Care and Operating instructions supplied with it), during a period of two years from the date of purchase from an authorized Olympus distributor within the business area of Olympus Imaging Europa GmbH as stipulated on the website: http://www.olympus.com this product will be repaired, or at Olympus's option replaced, free of charge. To claim under this warranty the customer must take the product and this Warranty Certificate before the end of the two year warranty period to the dealer where the product was purchased or any other Olympus service station within the business area of Olympus Imaging Europa GmbH as stipulated on the website: http://www.olympus.com. During the one year period of the World Wide Warranty the customer may turn the product in at any Olympus service station. Please notice that not in all countries such Olympus service station exists.
- The customer shall transport the product to the dealer or Olympus authorized service station at his own risk and shall be responsible for any costs incurred in transporting the product.
- This warranty does not cover the following and the customer will be required to pay repair charge, even for defects occurring within the warranty period referred to above.
(a) Any defect that occurs due to mishandling (such as an operation performed that is not mentioned in the Handling Care or other sections of the instructions, etc.)
(b) Any defect that occurs due to repair, modification, cleaning, etc. performed by anyone other than Olympus or an Olympus authorized service station.
(c) Any defect or damage that occurs due to transport, a fall, shock, etc. after purchase of the product.
(d) Any defect or damage that occurs due to fire, earthquake, flood damage, thunderbolt, other natural disasters, environmental pollution and irregular voltage sources.
(e) Any defect that occurs due to careless or improper storage (such as keeping the product under conditions of high temperature and humidity, near insect repellents such as naphthalene or harmful drugs, etc.), improper maintenance, etc.
(f) Any defect that occurs due to exhausted batteries, etc.
(g) Any defect that occurs due to sand, mud, etc. entering the inside of the product casing.
(h) When this Warranty Certificate is not returned with the product.
(i) When any alterations whatsoever are made to the Warranty Certificate regarding the year, month and date of purchase, the customer's name, the dealer's name, and the serial number.
(j) When proof of purchase is not presented with this Warranty Certificate.
-
This Warranty applies to the product only; the Warranty does not apply to any other accessory equipment, such as the case, strap, lens cap and batteries.
-
Olympus's sole liability under this warranty shall be limited to repairing or replacing the product. Any liability for indirect or consequential loss or damage of any kind incurred or suffered by the customer due to a defect of the product, and in particular any loss or damage caused to any lenses, films, other equipment or accessories used with the product or for any loss resulting from a delay in repair or loss of data, is excluded. Compelling regulations by law remain unaffected by this.
Notes regarding warranty maintenance
-
This warranty will only be valid if the Warranty Certificate is duly completed by Olympus or an authorized dealer or other documents contain sufficient proof. Therefore, please make sure that your name, the name of the dealer, the serial number and the year, month and date of purchase are all completed or the original invoice or the sales receipt (indicating the dealer's name, the date of purchase and product type) is attached to this Warranty Certificate. Olympus reserves the right to refuse free-of-charge service if neither Warranty Certificate is completed nor the above document is attached or if the information contained in it is incomplete or illegible.
-
Since this Warranty Certificate will not be re-issued, keep it in a safe place.
* Please refer to the list on the website: http://www.olympus.com for the authorized international Olympus service network.
Disclaimer of Warranty
Olympus makes no representations or warranties, either expressed or implied, by or concerning any content of these written materials or software, and in no event shall be liable for any impelled warranty purchase are all completed or the original invoice or the sales receipt of merchantability or fitness for any particular purpose or for any consequential, incidental or indirect damages (including but not limited to damages for loss of business profits, business interruption and loss of business information) arising from the use of inability to use these written materials or software. Some states do not allow the exclusion or limitation of liability for consequential or incidental damages, so the above limitations may not apply to you.
Table des matières
natural_image
Line drawing of a standard Olympus digital camera with no visible text or symbols on the bodynatural_image
Simple line drawing of a knotted rope or cord (no text or symbols)Courroie
natural_image
Illustration of an Olympus battery pack with four pins and a label (no text or symbols beyond the label)natural_image
Line drawing of an Olympus electronic device with a coiled cable (no text or symbols visible)natural_image
Line drawing of a cable with two connectors and a central connector (no text or symbols)Câble AV

CD-ROM
OLYMPUS Master 2
natural_image
Line drawing of a Olympus digital camera with attached cable and scroll (no text or symbols)text_image
② ① SDWATOnatural_image
Line drawing of two hands holding a camera (no text or symbols)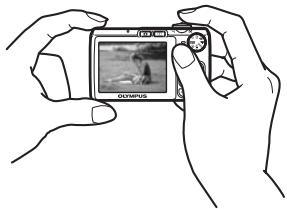
natural_image
Line drawing of two hands holding a digital camera with a photo displayed on the screen (no text or symbols visible)Tenue verticale

natural_image
Line drawing of two hands holding a camera module (no text or symbols)② Touche ▶ (Affichage)
natural_image
Line drawing of a digital camera with visible lens and control panel (no text or symbols)text_image
Programme Simulation de OLYMPUS Master 2 OLYMPUS OLYMPUS Master 2 A line as product OLYMPUS Master 2 OLYMPUS Master2 Olympus Master2 Copyright © OLYMPUS Master2 © 40% Revenuestext_image
② Câble USB ①text_image
Screenshot of a software interface displaying a grid of image thumbnails with Chinese labels, likely from an older photo editing application.Conseils
natural_image
Line drawing of a Olympus digital camera with no text or symbols on the device bodyCámara digital

natural_image
Simple line drawing of a knotted rope or cord (no text or symbols)Correa
natural_image
Illustration of an Olympus battery pack with mounting holes (no text or symbols on body)natural_image
Line drawing of a Olympus device with a coiled cable and terminal connector (no text or symbols visible)natural_image
Line drawing of a cable with three connectors (no text or symbols)Cable AV

OLYMPUS Master 2
CD-ROM
natural_image
Line drawing of a Olympus digital camera with attached cable and scroll (no text or symbols)text_image
② ① SDWATO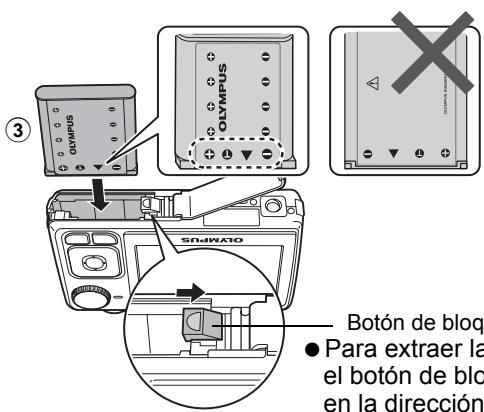
natural_image
Line drawing of two hands holding a camera (no text or symbols)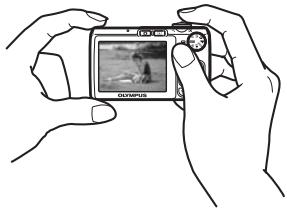
natural_image
Line drawing of two hands holding a digital camera with a small screen showing a photo (no text or symbols visible)Sujeción vertical
natural_image
Line drawing of two hands holding a camera module (no text or symbols)b. Enfoque.
text_image
W T Botón disparador (Presionar a medias) Olympusnatural_image
Line drawing of a digital camera with Olympus branding (no text or symbols on body)text_image
OLYMPUS Olympus Master 2 For first, let first prints to squarebe OLYMPUS Master 2 OLYMPUS master times/frames, then set Get the image as a separate image. © Copyright © OLYMPUS Master 2 OFF. All rights reserved.text_image
Cable USB ① ②text_image
Screenshot of a software interface displaying a grid of image thumbnails with Chinese labels, likely from an older document or photo editing tool.Consejos
natural_image
Line drawing of a Olympus digital camera with no visible text or symbols on the device bodyDigitalkamera

natural_image
Simple line drawing of a knotted string or rope (no text or symbols)Trageriemen
natural_image
Illustration of an Olympus battery pack with four pins and a label (no text or symbols beyond the label)natural_image
Illustration of an Olympus device with a coiled cable and plug (no text or symbols visible)Ladegerät (LI-40C)
USB-Kabel
natural_image
Line drawing of a cable with three connectors (no text or symbols)AV-Kabel

OLYMPUS Master 2
CD-ROM
natural_image
Line drawing of a Olympus digital camera with attached cable and clasp (no text or symbols)text_image
② ① SODIATOtext_image
OLYMPUS Master 2 Setup OLEMPUS Title: Event Website OLYMPUS Master 2 OLEMPUS Active BreakerFace, Total Version Copyright © OLYMPUS Mastercard © OLYP US Right Reserved. OLEMPUS Master 2 12.00 GB © Opentext_image
Screenshot of a software interface displaying a grid of image thumbnails with Chinese labels, likely from an older document or photo editing tool.Tipps
natural_image
Line drawing of a standard Olympus digital camera with lens and control panel (no text or symbols)Цифровая фотокамера

natural_image
Simple line drawing of a knotted rope or cord (no text or symbols)Ремешок

natural_image
Illustration of an Olympus battery pack with four pins and a label (no text or symbols beyond the label)natural_image
Line drawing of an Olympus electronic device with a coiled cable (no text or symbols visible)natural_image
Line drawing of a cable with two connectors and a central connector (no text or symbols)Кабель AV
natural_image
Line drawing of a Olympus digital camera with attached cable and scroll (no text or symbols)text_image
② ① SUNNAOtext_image
1 2 3 PIXEL MAPPING H3AD+ MENU YCTAH+ OKnatural_image
Line drawing of two hands holding a camera with a visible lens (no text or symbols)
natural_image
Line drawing of two hands holding a digital camera with a small screen (no text or symbols visible)Вертикальный захват
natural_image
Line drawing of two hands holding a camera module (no text or symbols)b. Фокусировка.
natural_image
Line drawing of a digital camera with visible lens and control panel (no text or symbols)text_image
OLYMPUS 13.1 MPDS Master 7 OLEMPUS Microsoft OLEMPUS Master 2 Options for this version should be found: OLEMPUS 13.1 MPDS is available to include: OLEMPUS 13.1 MPDS in the following: OLEMPUS Master 2 OLEMPUS master masterface, total versions: Copyright ©2017 OLYMPUS Limited ©2017 All rights reserved. Copyright ©2017 OLYMPUS Limited ©2017 All rights reserved.text_image
USB [IN] PC YCTAH OKtext_image
Screenshot of a software interface displaying a grid of image thumbnails with Chinese labels, likely from an older document or photo editing tool.На заметку
European Technical Customer Support:
Please visit our homepage http://www.olympus-europa.com
or call our TOLL FREE NUMBER*: 00800 - 67 10 83 00
for Austria, Belgium, Denmark, Finland, France, Germany, Italy, Luxemburg, Netherlands, Norway, Portugal, Spain, Sweden, Switzerland, United Kingdom
* Please note some (mobile) phone services providers do not permit access or request an additional prefix to +800 numbers.
For all European Countries not listed and in case that you can't get connected
to the above mentioned number, please make use of the following
CHARGED NUMBERS: +49 180 5 - 67 10 83 or +49 40 - 237 73 4899
Our Technical Customer Support is available from 9 am to 6 pm MET (Monday to Friday)
Authorized Distributors
| Austria: | Olympus Austria GmbHShuttleworthstr. 25, A-1210 WienTel: (01)-2 91 01-0 | Switzerland: | Olympus Schweiz AGChriesbaumstrasse 68604 VolketswilTel: +041 (0) 44 947 66 62 |
| Belgium: | Olympus Belgium N.V. | ||
| Luxemburg: | Boomsesteenweg 772630 Aartselaar Tel: +32 3 870 58 00 | United Kingdom /Eire | Olympus Service DepartmentP.O.Box 222Southall, Middlesex, UB2 4SHTel: (0207) 2530513www.olympus.co.uk |
| Canary Is.: | K.R.H.K. MAYA S.A.Edificio Tirsons, El CebadalCalle Arequipa, 835008 Las Palmas de Gran CanariaTel: (34) 928 30 41 00K.R.H.K. MAYA S.A.Edificio Tirsons, El Mayorazgo, 3738108 Santa Cruz de TenerifeTel: (34) 922 84 90 00 | Algeria: | Eurl KADDLe Telemly Alger, 146 Bd Krim.Belkacem, AlgerTel: 00 213 21 74 60 00 |
| France: | Olympus France Centre TechniqueParc d'affaires Silic 55, rue de Monthéry94533 RUNGIS CedexTel: 0 810 223 223 | Egypt: | Optoscient M.Nagui & Co10. 26th July St., CairoTel: +20 2 391 4883 |
| Germany: | Olympus Imaging Europa GmbHWendenstr. 14-18, D-20097, HamburgTel: (040) 237730Versandadresse Reparaturen: | Kenya: | Jacky’s Kenya Ltd.box 459777, 5 th floor,Laxcon house, NairobiTel: 254 20 3747222 |
| Spain: | Olympus Deutschland GmbHBredowstrasse 20, 22113, HamburgTel: (040) 23773 4121 | Morocco: | Latco183-187 Bd Ziraoui, CasablancaTel: +212 22 206245/46 |
| South Africa: | JEL Distribution South Africa (Pty) LtdLimbro Office Park 14 Voyager Street,Linbro Office Park, Marlboro, SandtonJohannesburgTel: +27 11 372 4000Fax: +27 11 608 3039E-mail: henfre.nel@jelcorp.comwww.olympus.co.za | ||
| OLYMPUS ESPAÑA S.A.Caidos de la Division Azul, 1228016-Madrid Tel: +34 902 444 104 |