
4057401112 - Fan Cotech - Free user manual and instructions
Find the device manual for free 4057401112 Cotech in PDF.


| Product Type | Ceiling Fan |
| Brand | Cotech |
| Model | 4057401112 |
| Art. No. | 36-6153 |
| Number of Blades | 5 |
| Rated Voltage | 220–240 V AC, 50 Hz |
| Fan Motor Output | Max 60 W |
| Light Bulb Base | E14 |
| Max Bulb Wattage | 1 × 60 W |
| Speed Settings | 3 (High, Normal, Low) plus Off via pull-chain |
| Rotation Direction | Switchable (Summer/Winter mode) |
| Light On/Off | Via separate pull-chain |
| Minimum Installation Height | 2.3 m (from blades to floor) |
| Ceiling Mount Weight Capacity | Min 100 kg |
| Electrical Connection | Permanent installation via all-pole switch (min 3 mm contact gap) |
| Protective Earthing | Required |
| Indoor Use Only | Yes |
| Maintenance | Turn off power before cleaning; blades can be wiped |
| Disposal | Recycle at local facility; do not dispose with household waste |
| Included Components | Fan blades, blade brackets, mounting bracket, pull-chains, lamp diffuser, hardware |
Frequently Asked Questions - 4057401112 Cotech
User questions about 4057401112 Cotech
0 question about this device. Answer the ones you know or ask your own.
Ask a new question about this device
Download the instructions for your Fan in PDF format for free! Find your manual 4057401112 - Cotech and take your electronic device back in hand. On this page are published all the documents necessary for the use of your device. 4057401112 by Cotech.
USER MANUAL 4057401112 Cotech
natural_image
Line drawing of a five-blade propeller with six blades and mounting feet (no text or symbols)Art.no
36-6153
Model
4057401112
Ver. 20160113
Ceiling Fan
Art.no 36-6153 Model 4057401112
Please read the entire instruction manual before using the product and then save it for future reference. We reserve the right for any errors in text or images and any necessary changes made to technical data. If you have any questions concerning technical problems please contact our Customer Services.
Safety
Permanent installation should only be performed by an authorised electrician.
- Never connect the fan to a wall outlet. It must be permanently installed onto the ceiling.
- Minimum distance between the fan blades and floor: 2.3 metres. The chosen fastening point must have a minimum weight bearing capacity of 100 kg in order to support the weight of the fan.
- An all-pole switch, with a minimum of 3 mm between terminal connections must be connected onto the fixed incoming mains lead.
- Only use bulbs (max 60 W) that are designed to be used in the ceiling fan's E14 lamp base.
- Turn off the fan before servicing or cleaning.
- The required electrical installation must be compliant to any local rules and regulations.
- The fan must be protectively earthed in order to avoid possible electrocution risks.
- The fan must not be installed in humid or wet environments.
- Be very careful when working close to the rotating fan blades.
- The product may be used by children who are 8 years and above and by persons with reduced physical, sensory or mental capability or lack of experience and knowledge provided they have been given supervision or instruction concerning use of the safe use of the product and understand the hazards involved.
- Never let children play with the ceiling fan.
- Cleaning and user maintenance shall not be made by children without supervision.
- For indoor use only.
Warning symbol

Warning: Minimum distance between the fan blades and floor: 2.3 metres. Risk of personal injury!
Product description

- Fan speed pull-chain
- Lamp diffuser
- C Rotational direction switch
- Light pull-chain
- Lamp housing
- Blade arm brackets ( × 5)
- Fan blades (× 5)
- Motor housing
- Ceiling rose
- Retaining screws
- Hook
- Ceiling mounting bracket
Installation/Mounting
Warning: Make sure that an all-pole switch is connected to the incoming mains lead.
Warning: Make sure that the all-pole switch is turned off before beginning installation.
Note: Have someone assist you during installation.
-
Open the box and remove the fan and its parts. Check that all the parts are present.
-
Screw the ceiling rose (9) onto the motor housing (8), using the included screws and washers (shown by the arrows) that are pre-mounted to the motor housing.

-
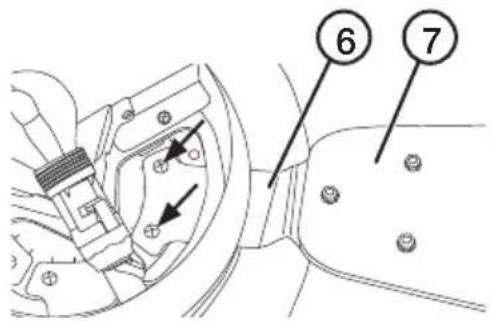
Flip the fan over so that the lamp housing is facing upwards. Screw the fan blade brackets (6) onto the motor's drive disc, in the following order: Rubber washer (pre-mounted), blade bracket, washer and screw. Use the screws and washers that are pre-mounted onto the lamp housing (shown by the arrows).
-
Screw the fan blades (7) onto the fan brackets. The fan blade's screws and washers and pull-chains (1 and 4) come in a plastic bag.
-
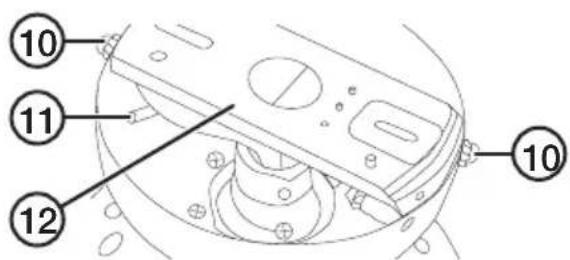
Screw the ceiling mounting bracket (12) into the ceiling, making sure that the incoming mains lead enters through the bracket's centre hole. Use appropriate screws and flat/spring washers for fastening. Make sure that the mounting surface and screws have sufficient weight bearing capacity for the weight of the fan before installing the ceiling mounting bracket. Make sure there are no hidden electrical cables or pipes in the ceiling before drilling any mounting holes.
-
Connect the electrical wires from the incoming mains conduit to the mounting bracket's terminal block (10). Connect the blue wire to the N terminal the brown wire to the L terminal and the yellow/green wire to the 12 terminal.

natural_image
Line drawing of a hand using a tool to adjust or install a mechanical component (no text or symbols present)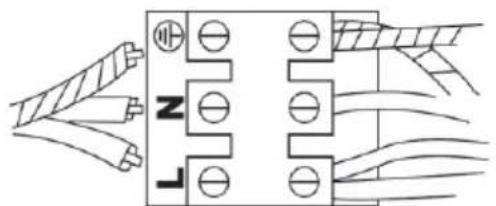
natural_image
Pure electrical circuit lines without any symbols- Hang the fan onto the ceiling bracket's resting hook. The ceiling mounting bracket's resting hook (11) is used to hang the fan during mounting or service. The ceiling rose (9) has a corresponding eyelet used for hanging the fan unit onto.

-
Connect the ceiling bracket's electrical quick-release coupling to the fan's electrical quick-release coupling.
-
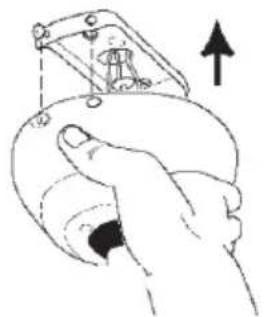
Unhook the fan from the hook. Align the ceiling rose cut-outs so that they slot under the ceiling bracket's (12) protruding screws and washers, then ceiling rose twist it until it hooks and locks into place.

natural_image
Technical line drawing of a mechanical device with attached wires and a close-up view of a hand holding a circular component (no text or symbols)-
Screw the fan securely onto the ceiling bracket using the 4 screws and washers (10).
-
Screw in an appropriate bulb and refit the lamp diffuser.
-
Clip the pull-chains (1 and 4) onto the ball chain extensions protruding from the lamp housing.
natural_image
Illustration of a hand holding a small object with an upward arrow, no text or symbols presentOperating instructions
Rotation direction
- Warning: Turn off the fan using the all-pole switch.
- Set the rotation direction using the rotational direction switch (3).
- Winter mode: Slide the switch to the right for moving warm air from the ceiling to floor level.
- Summer mode: Slide the switch to the left to recirculate the ambient air for maximum cooling.
- Turn on the all-pole switch.
Pull-chain functions: ON/Speed selection and OFF
Use the pull-chain (1) to select the desired function.
1 pull: On/high speed - 2 pulls: Normal speed - 3 pulls: Low speed - 4 pulls: OFF.
Switching the lamp on and off
Use the pull-chain (4) to turn the lamp on or off.
Responsible disposal
This symbol indicates that this product should not be disposed of with general household waste. This applies throughout the entire EU. In order to prevent any harm to the environment or health hazards caused by incorrect waste disposal, the product must be handed in for recycling so that the material can be disposed of in a responsible manner. When recycling your product, take it to your local collection facility or contact the place of purchase. They will ensure that the product is disposed of in an environmentally sound manner.

natural_image
Symbol of a trash bin crossed with no text or labels, accompanied by a black rectangular block below (no readable text or symbols)Specifications
Bulb 220–240 V AC, E14, max 1 × 60 W
Rated voltage 220–240 V AC, 50 Hz
Fan motor output Max 60 W
Takfläkt
Art.nr 36-6153 Modell 4057401112
Installation/montering

natural_image
Line drawing of a hand using a tool to adjust or install a mechanical component (no text or symbols present)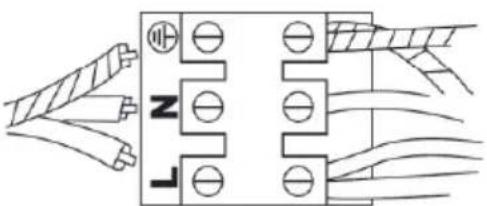
natural_image
Pure electrical circuit lines without any symbolsnatural_image
Technical line drawing of a mechanical device with attached wires and a magnified inset showing a hand holding a circular component (no text or symbols)
natural_image
Illustration of a hand holding a small object with an upward arrow, no text or symbols presentAnvändning
Rotationsriktning
natural_image
Symbol of a trash bin crossed with no text or labels, accompanied by a solid black rectangle below (no text or symbols present)Specifikationer

natural_image
Line drawing of a hand using a tool to adjust or install a mechanical component (no text or symbols present)
natural_image
Pure electrical circuit lines without any symbols- Heng deretter opp viften i taket. Opphengskonsollen har en krok (11) som er beregnet til å henge opp viften i ved montering og service. ∅vre deksel (9) har et hull som kroken passer i.

natural_image
Technical line drawing of a mechanical device with attached wires and a close-up of its cable (no text or symbols)-
Skru viften fast til opphengskonsollene med 4 skuer og skiver (10).
-
Skru i en lyskilde og monter kuppelen.
-
Monter lenkene (1 og 4) til de korte lenkene som henger fast i lampehuset.

natural_image
Illustration of a hand holding a small object with an upward arrow, no text or symbols presentBruk
Rotasjonsretning
natural_image
Symbol of a trash bin crossed with no text or labels, representing waste sorting or recycling (no text present)Spesifikasjoner
Lyskilde 220–240 V AC, E14, max 1 × 60 W
Spenning 220–240 V AC, 50 Hz
Effekt viftemotor Max 60 W
Kattotuuletin
Tuotenro 36-6153 Malli 4057401112

natural_image
Line drawing of a hand using a tool to adjust or install a mechanical component (no text or symbols present)
natural_image
Pure electrical circuit lines without any symbolsnatural_image
Technical line drawing of a mechanical device with attached wires and a close-up of its cable (no text or symbols)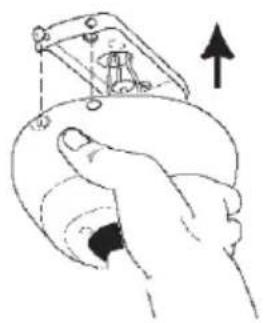
natural_image
Illustration of a hand holding a small object with an upward arrow indicating motion (no text or symbols)natural_image
Symbol of a trash bin crossed with no text or labels, accompanied by a solid black rectangle below (no text or symbols present)Tekniset tiedot
Lamppu 220–240 V AC, E14, enint. 1 × 60 W
Nimellisjännite 220–240 V AC, 50 Hz
Installation/Montage


natural_image
Line drawing of a hand using a tool to adjust or install a mechanical component (no text or symbols present)
natural_image
Pure electrical circuit lines without any symbolsnatural_image
Technical line drawing of a mechanical device with attached wires and a close-up of its cable (no text or symbols)
natural_image
Illustration of a hand holding a small object with an upward arrow, no text or symbols presentBenutzung
Drehrichtung
natural_image
Symbol of a trash bin crossed with no visible text or labelsTechnische Daten
Postal 10 – 13 Market Place
Kingston Upon Thames
Surrey
KT1 1JZ
Deutschland


- Ceiling Fan
- Safety
- Warning symbol
- Product description
- Installation/Mounting
- Operating instructions
- Rotation direction
- Pull-chain functions: ON/Speed selection and OFF
- Switching the lamp on and off
- Responsible disposal
- Specifications
- Takfläkt
- Installation/montering
- Användning
- Rotationsriktning
- Specifikationer
- Bruk
- Rotasjonsretning
- Spesifikasjoner
- Kattotuuletin
- Tekniset tiedot
- Installation/Montage
- Benutzung
- Drehrichtung
- Technische Daten
- Deutschland
Brand : Cotech
Model : 4057401112
Category : Fan