
FD-40ME3 - Fan Cotech - Free user manual and instructions
Find the device manual for free FD-40ME3 Cotech in PDF.


| Product Type | Pedestal Fan |
| Model | FD-40ME3 |
| Brand | Cotech |
| Fan Diameter | 40 cm (16 inches) |
| Overall Height | 130 cm (adjustable) |
| Weight | 4.5 kg |
| Power Supply | 220-240 V, 50 Hz |
| Power Consumption | 55 W |
| Speed Settings | 3 speeds (low, medium, high) |
| Oscillation | Yes, 80° wide angle |
| Timer | Not included (manual operation) |
| Remote Control | Not included |
| Blade Material | Plastic (high-impact ABS) |
| Stand Material | Metal with plastic base |
| Safety Grille | Removable, with anti-theft screws |
| Noise Level | ≤ 60 dB(A) at max speed |
| Protection Class | Class II (double insulation) |
| Cleaning | Disconnect power, wipe with damp cloth |
| Spare Parts Availability | Blades, motor, grille, stand available |
| Repairability Index | 7/10 (modular components) |
Frequently Asked Questions - FD-40ME3 Cotech
User questions about FD-40ME3 Cotech
0 question about this device. Answer the ones you know or ask your own.
Ask a new question about this device
Download the instructions for your Fan in PDF format for free! Find your manual FD-40ME3 - Cotech and take your electronic device back in hand. On this page are published all the documents necessary for the use of your device. FD-40ME3 by Cotech.
USER MANUAL FD-40ME3 Cotech
natural_image
Line drawing of a standard 16-inch outdoor fan with radial blades and a flat base (no text or symbols)Important:
Read the entire instruction manual carefully and make sure that you fully understand it before you use the equipment. Keep the manual for future reference.
Viktig information:
Original instructions
Bruksanvisning i original
Originalbruksanvisning
Please read the entire instruction manual before using the product and then save it for future reference. We reserve the right for any errors in text or images and any necessary changes made to technical data. In the event of technical problems or other queries, please contact our Customer Services (see address details on the back).
Safety
- This product is not intended for use by persons (including children) with reduced physical sensory or mental capabilities or lack of experience and knowledge.
- Never let children play with the product.
- Keep the packaging out of reach of children.
- Never attempt to dismantle, modify or repair the product. It contains no parts that you can repair yourself.
- Never expose the product to water or other liquid.
- Never handle the product if your hands are moist or wet.
- Do not place the product where there is a risk of it falling into water or other type of liquid.
- This product should only be connected to a 220-240V AC, 50/60Hz electrical outlet.
- Place the mains lead where it will not be damaged or tripped over.
- The product is intended for private domestic use only and only in the manner described in this instruction manual.
- Do not use the product if you have dropped it. Do not use the product if it or the mains lead is damaged in any way.
- Only use accessories that are recommended by the manufacturer or retailer.
- Using other accessories can lead to personal injury or damage to the product.
- The product must only be placed on a firm, level surface where there is no risk that it might be affected by heat from heaters, cookers, fireplaces or other sources of heat. The product should not be exposed to direct sunlight, extremely dusty environments or heavy vibrations.
- Never use the product where flammable or explosive substances are used or stored. Maintain a safety clearance of at least 30 cm from surrounding objects.
- Unplug the mains lead from the wall socket if there is a thunderstorm.
- Never block the ventilation slots in the motor housing.
- Repairs must only be carried out by qualified service technicians and only using identical replacement parts.
- If the product is to be used by a third party, ensure that this instruction manual always accompanies it.
- Treat the mains lead with care. Never carry the product by its mains lead. Always grip the plug when unplugging the fan, never pull the mains lead.
- Never poke foreign objects through the safety grille covering the fan as doing so could lead to personal injury or damage to the product.
- If an extension lead is used to connect the fan to the mains, ensure that it is suitable for the purpose.
Product description
- Fan head
- Oscillation selector knob
- Fan speed selector - I, II, III or off
- Fan head angle locking bolt
- Set screw
- Upper post section
- Middle post section
- Lower post section
- Base cover plate
- Base stabiliser weight plate
- Split washer
- Cup washer
- L-shaped screw
Buttons and functions
- Plug the mains lead into a wall socket.
• [0] Off
• [I], [II], [III] Switch on and select fan speed

Assembly
- Remove the L-shaped screw (13), the cup washer (12) and the split washer (11) from the lower post section (8).
- Place the base cover plate (9) over the weight plate (10). Place the lower post section (8) over the depression in the centre of the base cover plate (9).
- Put the split washer (11) and the cup washer (12) onto the threaded end of the L-shaped screw (13) and thread the screw into the lower post section to fasten all the parts together.

natural_image
Technical diagram of a mechanical assembly with concentric circular components and directional arrows (no text or symbols)- Stand the assembled base on a firm level surface.
- Fit the middle post section (7) onto the lower post section (8) and push them together.
- Fit the upper post section (6) onto the middle post section (7) in the same way.

natural_image
Four sequential diagrams showing vertical poles with arrows indicating rotation or movement, no text or symbols present.- Remove the set screw (5), from the bottom of the fan head (1) and fit the fan head onto the upper post section (6). Screw in the set screw (5) to fasten the parts together.

natural_image
Diagram of a mechanical fan assembly showing two stages: before and after assembly, with no visible text or symbols.Instructions for use
- Place the fan on a flat and stable surface such as the floor.
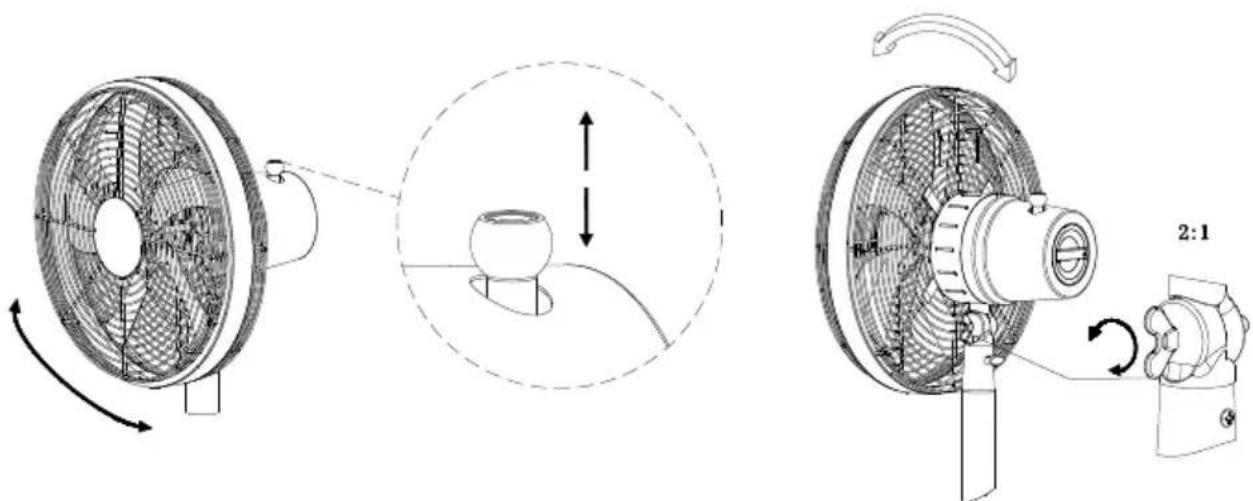
- The fan can blow air straight ahead or slightly downwards. Undo the locking bolt (4). Angle the fan head and motor by 10°. Tighten the locking bolt (4). (See figure)
- The fan can oscillate in an oscillating motion from left to right through an arc of 80^ . The oscillation function is activated/deactivated by pulling the selector knob (2) up/down.
- Plug the fan into a wall socket, making sure that the mains lead is positioned in such a way that there is no risk of anyone tripping over it.
- Switch the fan on by selecting one of the three speeds using the speed selector (3). The speeds range from low (1) to high (III). Setting the fan speed selector to 0 will switch the fan off.
Care and maintenance
• Always unplug the fan from the wall socket after use and before cleaning.
- Clean the exterior of the fan by wiping it with a damp cloth. Use only mild cleaning agents, never solvents or corrosive chemicals. Inaccessible dust inside the safety grille can be removed using a vacuum cleaner.
- Unplug the fan and store it in a dry dust-free place out of children's reach if it is not to be used for an extended period.
Responsible disposal
This symbol indicates that the product should not be disposed of with general household waste. This applies throughout the entire EU. In order to prevent any harm to the environment or health hazards caused by incorrect waste disposal, the product must be handed in for recycling so that the material can be disposed of in a responsible manner. When recycling your product, take it to your local collection facility or contact the place of purchase. They will ensure that the product is disposed of in an environmentally sound manner.

natural_image
Symbol of a trash bin crossed with no text or numbers, representing waste sorting or disposal (no text present)Specifications
Rated voltage 220–240 V AC, 50/60 Hz
Power 50 W
Height 150 cm
Fan Diameter 40 cm
Mains lead 180 cm
Weight 10.1 kg
| Description Symbol Value Unit | |||
| Max fan flow rate F 66.01 m^3/min | |||
| Fan power input P 47.6 W | |||
| Service value SV 1.39 ( m^3/min )/W | |||
| Standby power consumption | PSB – W | ||
| Fan sound power level | LwA 64.85 dB(A) | ||
| Maximum air velocity | c 2.97 metres/sec | ||
| Measurement standard for service value | IEC 60879:1986 (corr.1992) | ||
Golvfläkt
Art.nr 36-7998 Modell FD-40ME3
Montering
natural_image
Four sequential diagrams showing vertical poles with arrows indicating rotation or movement, no text or symbols present.natural_image
Technical illustration of a fan assembly with two views showing internal components and a cylindrical component (no text or symbols)Användning
natural_image
Symbol of a waste bin with no text or labels, crossed by two crossed lines and a solid black rectangle below (no text or symbols present)Specifikationer
Nätanslutning 220–240 V AC, 50/60 Hz
Effekt 50 W
Höjd 150 cm
Fläkt ∅ 40 cm
Nätkabel 180 cm
Vikt 10,1 kg
Montering
natural_image
Four sequential diagrams showing vertical poles with rotating arrows, no text or symbols presentnatural_image
Technical illustration of a dual-side fan assembly with internal components and a cylindrical base (no text or symbols)Bruk
Vedlikehold
natural_image
Symbol of a trash bin crossed with no visible text or labelsSpesifikasjoner
Nettspenning 220–240 V AC, 50/60 Hz
Effekt 50 W
Høyde 150 cm
Viftehode ∅ 40 cm
Strømkabel 180 cm
Vekt 10,1 kg
Asennus
natural_image
Four sequential diagrams showing vertical cylindrical objects on circular bases, with arrows indicating rotation or movement (no text or symbols)natural_image
Technical illustration of a mechanical device with two views showing internal components and a test tube, no text or symbols present.Käyttö
Installation
natural_image
Technical diagram of a mechanical assembly with concentric rings and a shaft, showing no text or symbols.natural_image
Four vertical poles with circular bases, each showing a rotation arrow and a separate column (no text or symbols)natural_image
Technical diagram of a mechanical fan assembly with two views showing internal components and a test tube (no text or labels)Gebrauch
Pflege und Wartung
natural_image
Symbol of a trash bin crossed with two crossed lines, no text or labels presentTechnische Daten
POSTAL 10 – 13 Market Place
Kingston upon Thames
Surrey
KT1 1JZ
DEUTSCHLAND
KUNDENSERVICE Hotline: 040 2999 78111
E-Mail: kundenservice@clasohlson.de
HOMEPAGE
www.clasohlson.de
POSTANSCHRIFT


- Safety
- Product description
- Buttons and functions
- Assembly
- Instructions for use
- Care and maintenance
- Responsible disposal
- Specifications
- Golvfläkt
- Montering
- Användning
- Specifikationer
- Bruk
- Vedlikehold
- Spesifikasjoner
- Asennus
- Käyttö
- Installation
- Gebrauch
- Pflege und Wartung
- Technische Daten
- DEUTSCHLAND
Brand : Cotech
Model : FD-40ME3
Category : Fan