
HB430-2T - Saw Cocraft - Free user manual and instructions
Find the device manual for free HB430-2T Cocraft in PDF.


| Product Type | Brushcutter / Grass Trimmer |
| Engine Type | Air-cooled 2-stroke |
| Engine Displacement | 42.7 cc |
| Max Power | 1.25 kW (1.7 hp) |
| Fuel Mixture | 50:1 (environmental petrol with 2% 2-stroke oil) |
| Tank Volume | 1.3 litres |
| Cutting Equipment | Nylon trimmer line (2.4 mm) or 3-tooth brushcutter blade (255 mm) |
| Trimmer Line Diameter | 2.4 mm |
| Blade Diameter | 255 mm (bore 1") |
| Max Spindle Speed (Trimmer Line) | 6750 min-1 |
| Max Spindle Speed (Brushcutter Blade) | 6000 min-1 |
| Idle Speed | 3000 ± 300 min-1 |
| Direction of Rotation | Anticlockwise (viewed from above) |
| Spark Plug | Torch L8RTC, NGK BM6A, or Bosch WS8E (gap 0.6–0.7 mm) |
| Sound Pressure Level | 98 dB(A) (K=3 dB) |
| Sound Power Level | 114 dB(A) (K=3 dB) |
| Vibration Level | 7.5 m/s² (K=1.5 m/s²) |
| Weight | 8.5 kg |
| Safety Features | Harness, anti-vibration handle, throttle lock, debris shield, blade guard |
| Included Accessories | Trimmer head, brushcutter blade, spark plug spanner, harness |
Frequently Asked Questions - HB430-2T Cocraft
User questions about HB430-2T Cocraft
0 question about this device. Answer the ones you know or ask your own.
Ask a new question about this device
Download the instructions for your Saw in PDF format for free! Find your manual HB430-2T - Cocraft and take your electronic device back in hand. On this page are published all the documents necessary for the use of your device. HB430-2T by Cocraft.
USER MANUAL HB430-2T Cocraft
Read the entire instruction manual carefully and make sure that you fully understand it before you use the equipment. Keep the manual for future reference.
Viktig information:
natural_image
Exterior view of a manual grassing machine with orange and silver components (no text or symbols visible)Art.no Model
31-9035 WLBC430CA-2ZAH
Ver. 20160411
Original instructions
Bruksanvisning i original
Originalbruksanvisning
Art.no 31-9035 Model WLBC430CA-2ZAH
Please read the entire instruction manual before using the product and then save it for future reference. We reserve the right for any errors in text or images and any necessary changes made to technical data. In the event of technical problems or other queries, please contact our Customer Services (see address details on the back).
Safety
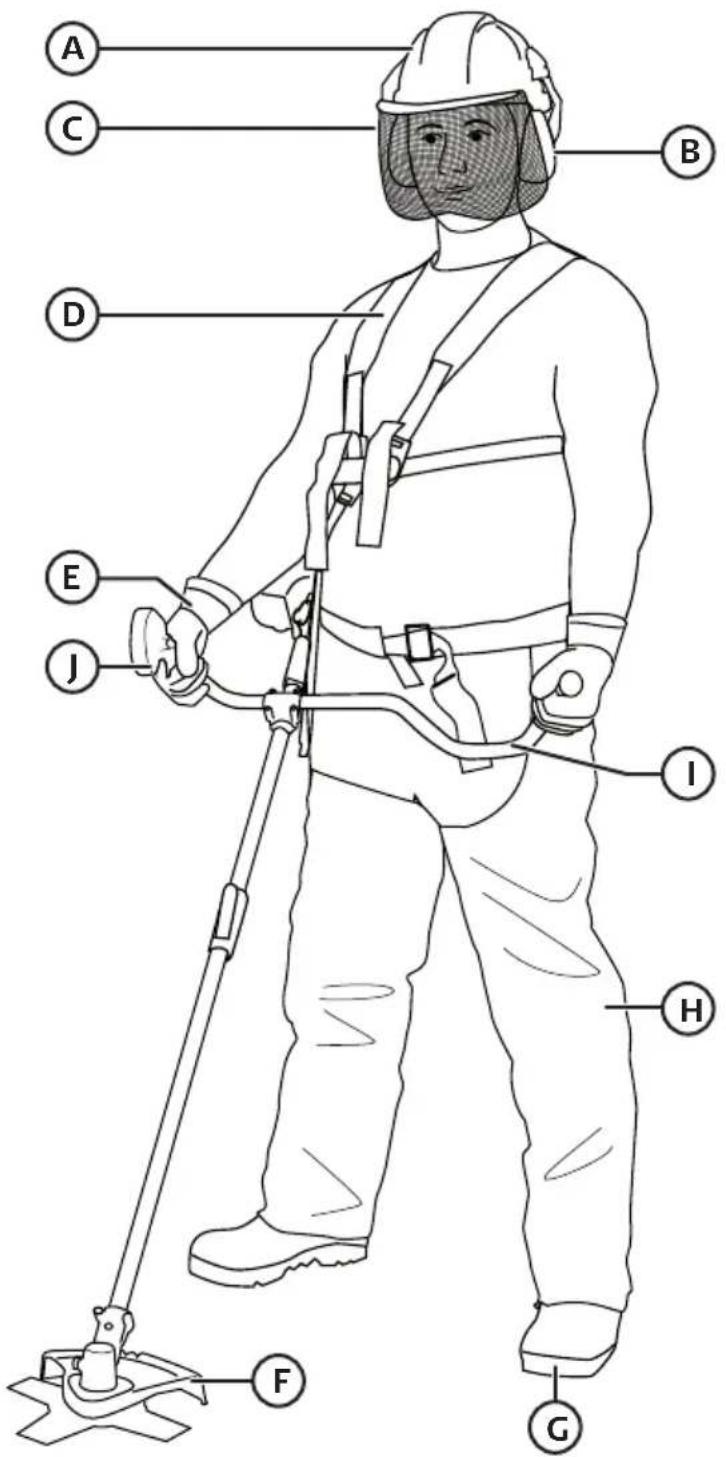
- Wear protective footwear, tight-fitting clothes and safety glasses/visor, ear defenders and a helmet.
- Never use the product when you are tired, sick, under the influence of alcohol or medicine.
- Always be careful when handling fuel. Open the fuel tank carefully and release any pressure which might have built up in the tank. Wipe off any spilt fuel and move the product at least 3 metres away from the refuelling location before starting it.
- Remove any sources of ignition, sparks, naked flames, lit cigarettes, etc. from the area where the fuel is mixed, used or stored.
- Never smoke while refuelling or using the product.
- Do not permit anyone other than the operator to come close to the product when it is being started or used. Children, pets and bystanders should keep a distance of at least 15 metres away from the product when it is being used.
- Always hold both handles of the product firmly with your fingers on one side of the handle and thumb on the other side, once the engine is running.
- Keep all body parts away from the trimmer line or brush cutter blade when the engine is running.
- Make sure that the trimmer line or cutter blade is not in contact with any object before starting.
- Only transport the product with the engine switched off.
- Always inspect the product before starting, do not start it if there are worn, damaged or missing parts. Never use the product if it is damaged, incorrectly adjusted or incorrectly assembled.
- All service of the product other than that mentioned in this instruction manual should be carried out by qualified personnel and only using original spare parts.
- Switch the product off before laying it on the ground.
- Be extra vigilant when cutting small bushes or thick grass. They can become stuck in the trimmer head.
- Keep the handles clean, dry and free from oil or fuel.
- Never start the trimmer in a closed room or building. The exhaust fumes contain carbon monoxide and are dangerous to inhale.
- Avoid running the trimmer head near small objects which can be ejected. Check the area to be trimmed for small stones and sharp objects before beginning work. Always stand below the level of the product if you are using it on a slope. Never use the product on a slope if there is the slightest risk of you losing your footing, falling or sliding. Hold the product firmly with both hands.
- Never use the product without wearing the harness.
- When working for long periods, take regular breaks.
- Keep the product free from grass cuttings and other deposits, particularly the guard, trimmer head and engine.
- The product must only be used by persons who have read and understood the contents of this instruction manual. Local regulations may restrict the age of the operator, check what minimum operator age requirements apply to your region.
- Use only two-stroke fuel mixed with 2 % good quality two-stroke oil (50:1) designed for air-cooled two-stroke engines. Using petrol without the addition of oil can lead to engine damage not covered by the guarantee.
- The silencer can become very hot, do not touch it with your hands or other parts of your body.
- The trimmer head should not be lifted up during work since the trimmer line can injure the user. Work as close to the ground as possible.
- If the product has been dropped, inspect it carefully and repair and damage before using it again.
- The product must not be used for any other purpose than for clearing undergrowth, trimming lawns and garden work.
- The product must not be used if the safety guard is damaged or missing.
- The product must not be modified or used for any purpose other than that for which it is intended. Doing so increases the risk of accidents and is not covered by the guarantee.
- Do not use the product close to flammable gases and liquids since this could cause a fire or lead to an explosion.
- Never begin using the product without having full view of the entire work area. Keep your proper footing and balance at all times.
- Be extra careful when using the brush blade for clearing small bushes or saplings. Twigs and branches can jam in the blade and cause kickback resulting in a loss of control.
- First-time users should be equipped with safety equipment and be instructed in the correct use of the product by an experienced operator.
- Never start the product indoors. The product will emit poisonous exhaust gases as soon as it is started, these gases may be invisible and odourless but are harmful if inhaled.
- Always wear gloves and keep your hands warm when using the product. Long-term exposure to hand-arm vibration form using this type of product can lead to permanent damage to hands and arms. If symptoms such as poor blood circulation, white finger tips, reduction in sense of touch, numbness or tingling in fingers, contact a doctor.
Safety equipment
A. Helmet
B. Ear protectors
C. Visor
D. Harness
E. Gloves
F. Trimmer guard/Blade guard
G. Safety boots
H. Heavy-duty work trousers
I. Anti-vibration handle
J. Throttle with stop switch
Product safety symbols and their meaning

Wear protective head gear, protective eyewear/visor and ear defenders.

Wear protective gloves.

Wear safety footwear.

Read the instruction manual carefully and make sure that you understand its contents before you use the product. Save the manual for future reference.

Stones and other debris can be ejected by the trimmer.

Foot injuries may result by coming too close to the rotating trimmer head.
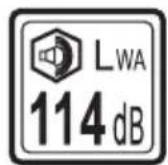
Noise emissions from outdoor equipment according to EU directive 2000/14/EC. The machine's noise emissions are stated in the Specifications and on the decal.
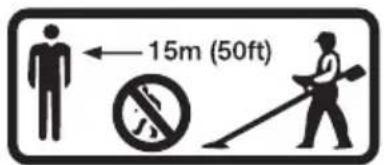
Do not permit anyone else to come close to the trimmer when it is in use. Children, pets and bystanders should keep a distance of at least 15 metres away from the trimmer while it is in use.

Warning:

This product complies with applicable European directives.
max. 6750 min ^-1
Highest allowable product speed.
Product description
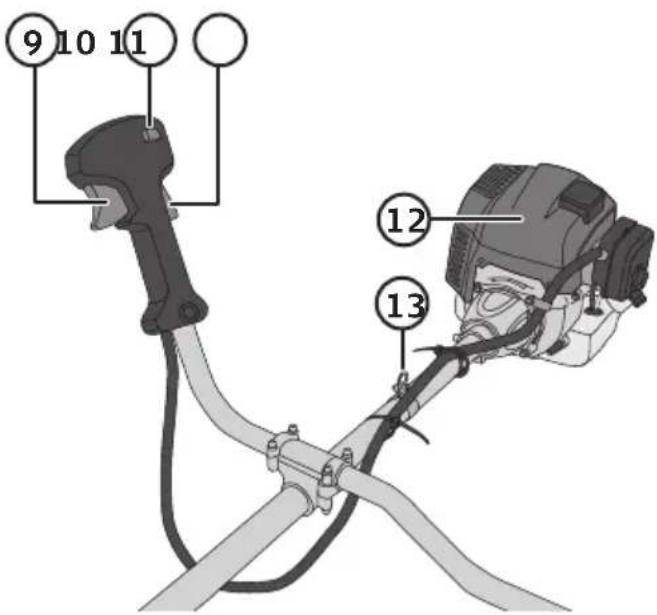
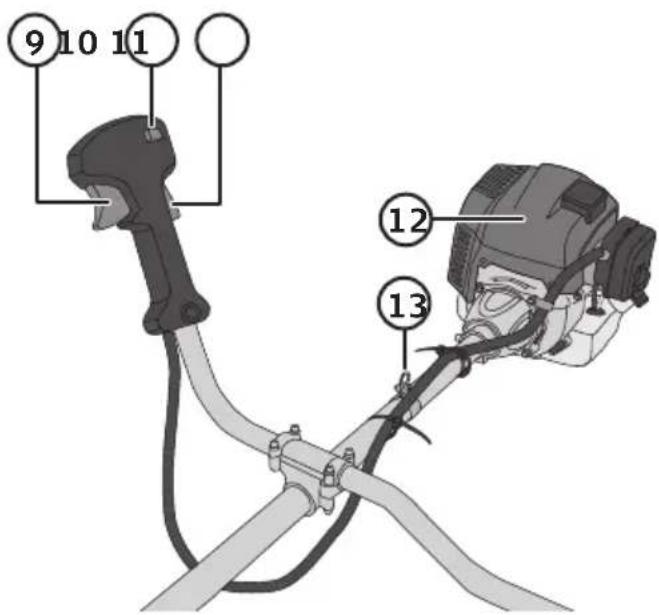
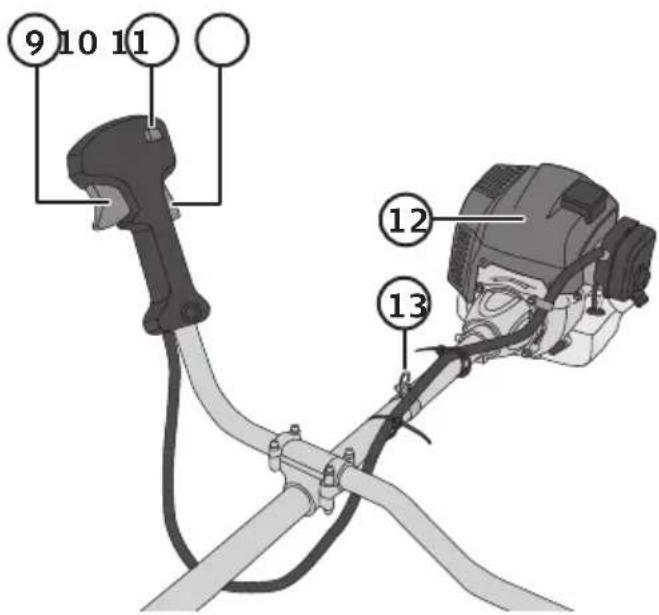
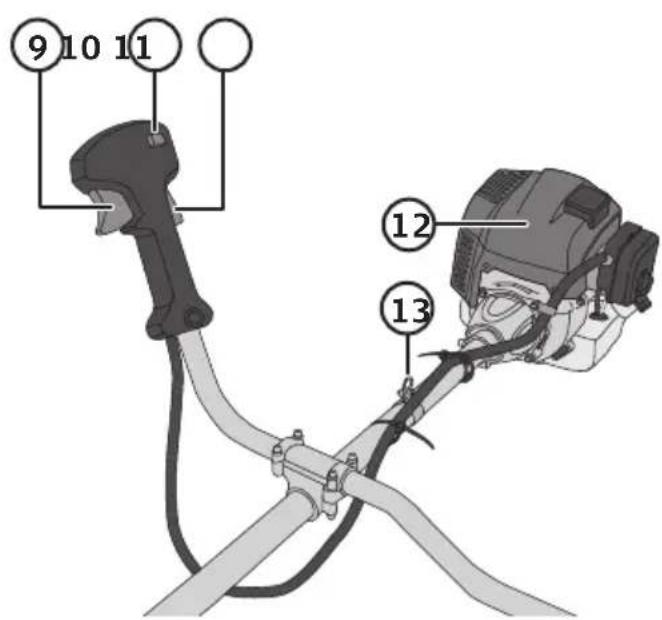
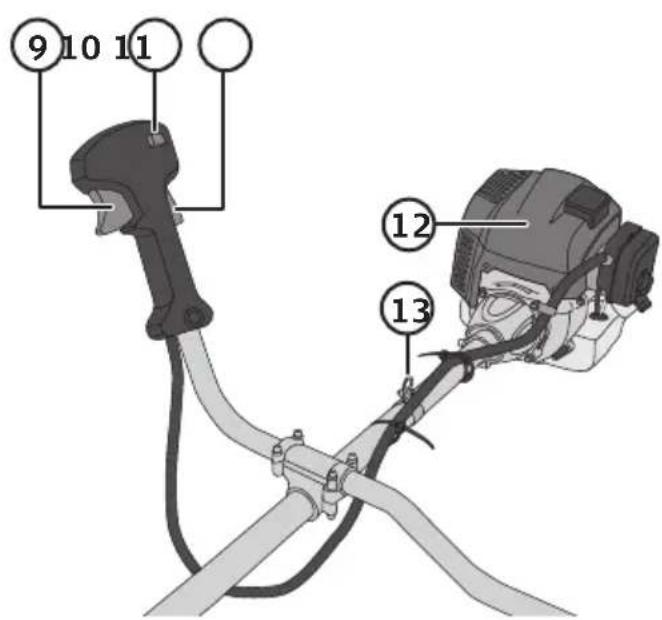
- Spark plug cable/ spark plug cap
- Choke
- Starter handle
- Fuel cap
- Fuel tank
-
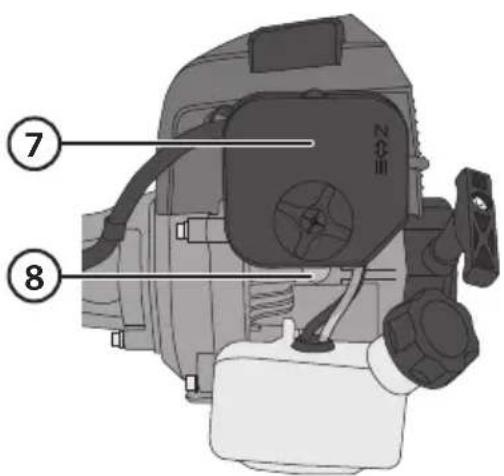
Silencer
-
Air filter
- Primer pump bulb (manual fuel pump to help starting)
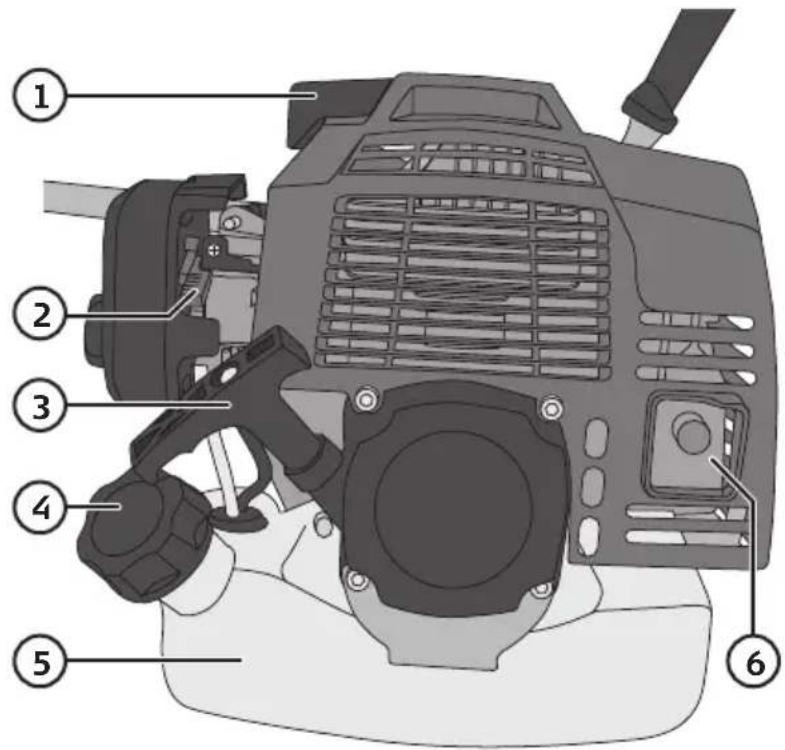
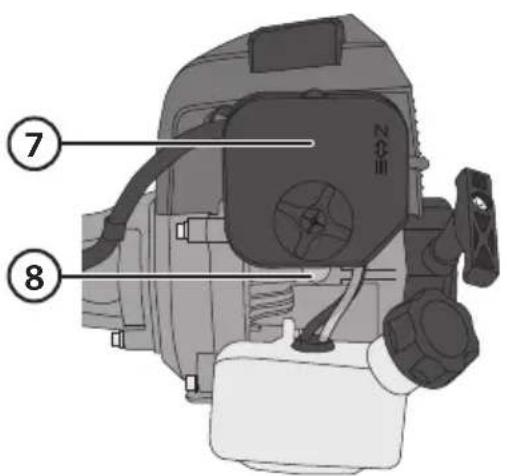
-
Throttle
-
On/off switch
- Throttle trigger lockout (must be engaged for throttle to work)
- Motor housing
-
Harness ring
-
Lower shaft connector with ball-catch and locking knob
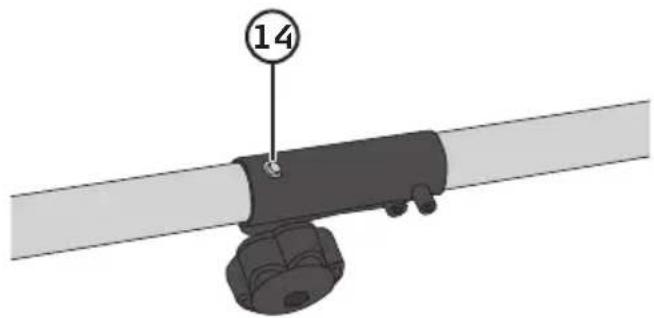
natural_image
Mechanical assembly diagram showing a lever with a numbered component (14) and a base mount (no text or symbols present)-
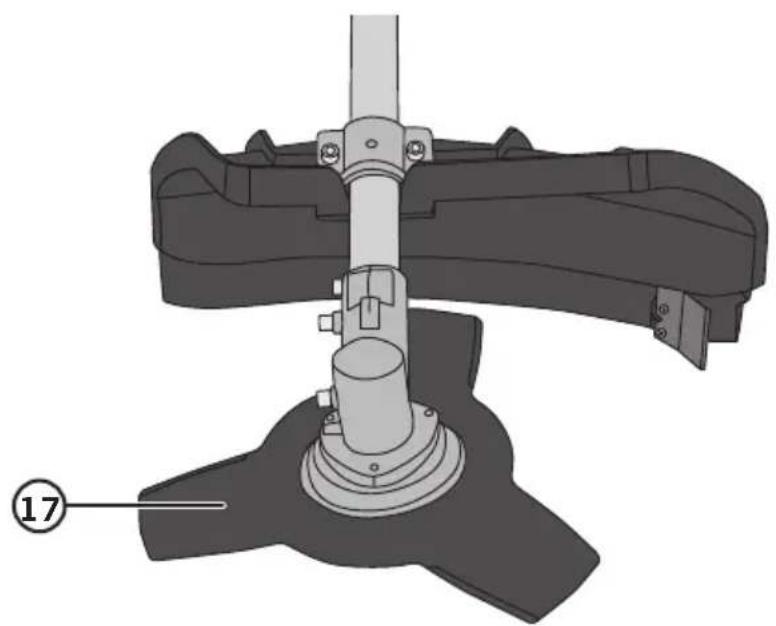
Debris shield
-
Trimmer head
-
Brush cutter blade
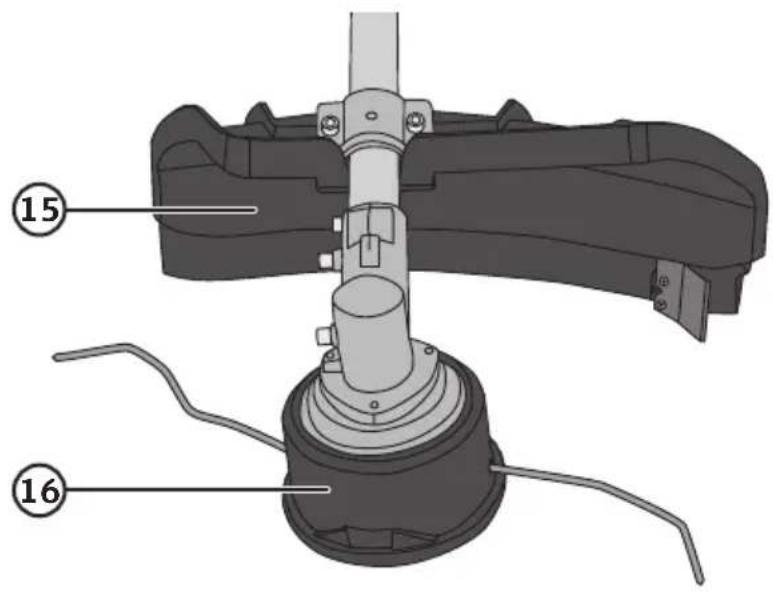
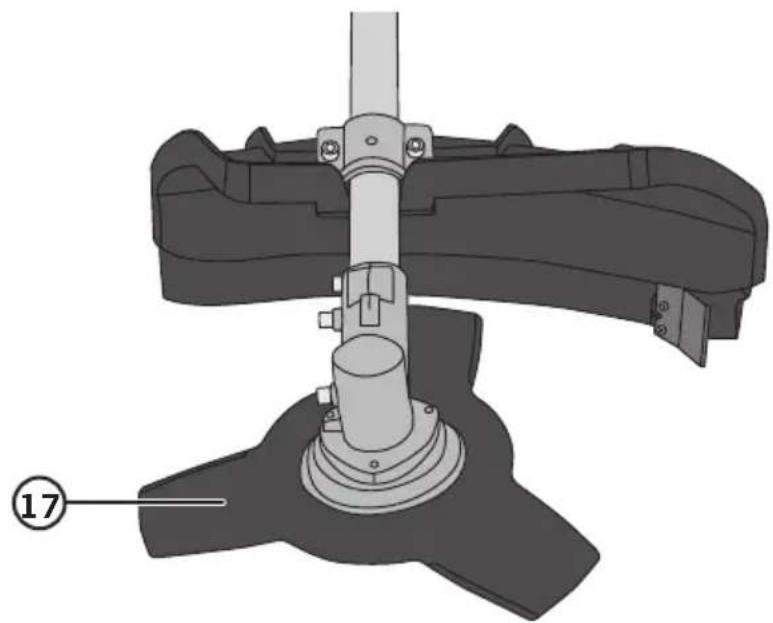
natural_image
Mechanical assembly diagram showing a lever mechanism with labeled component (17), no readable text or symbols present.Assembly
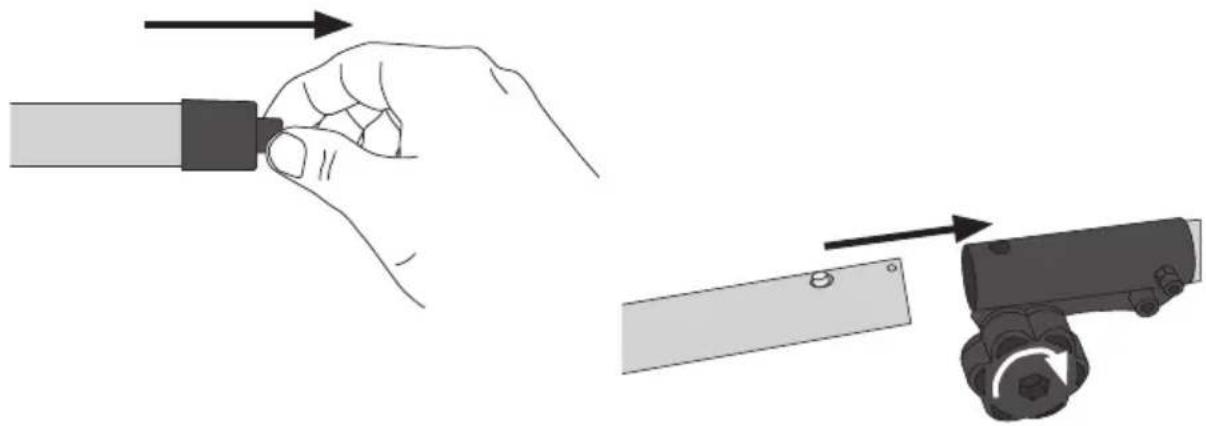
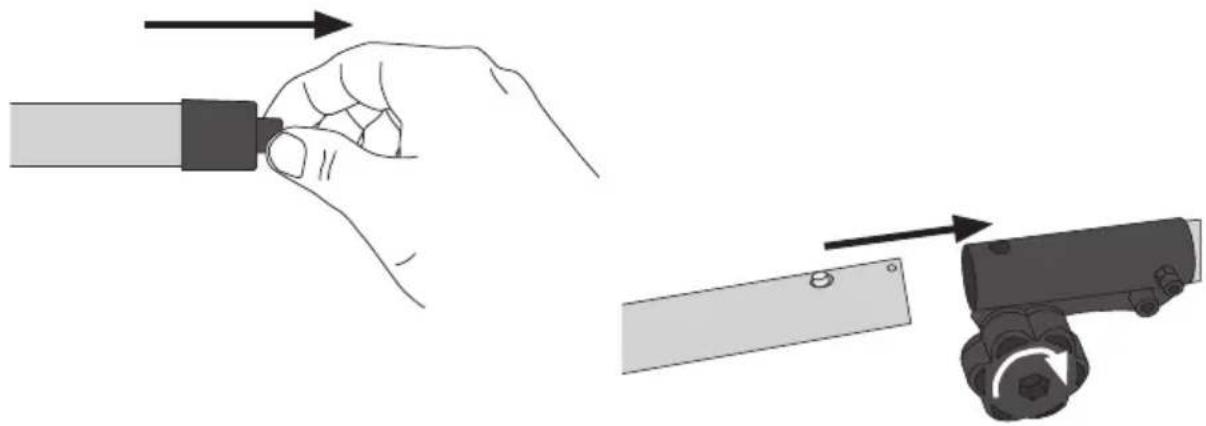
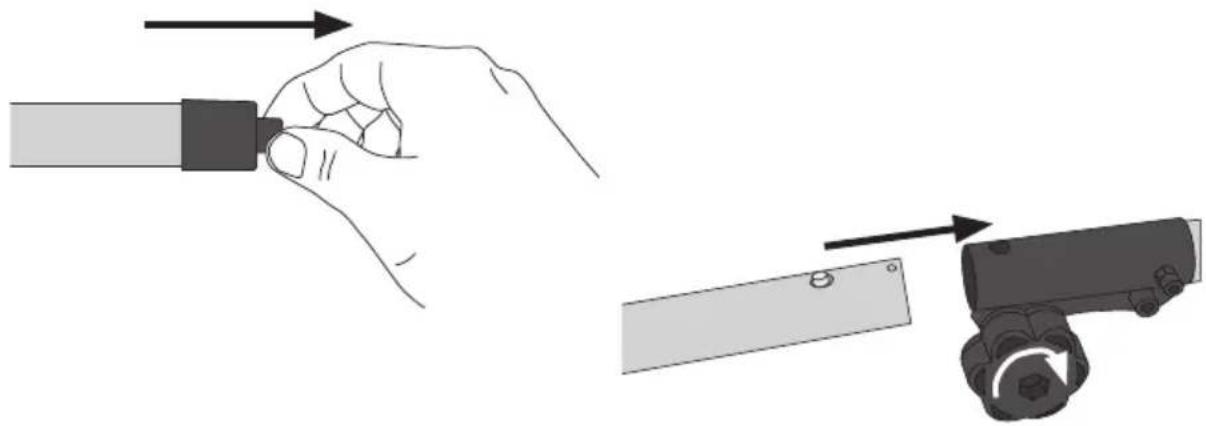
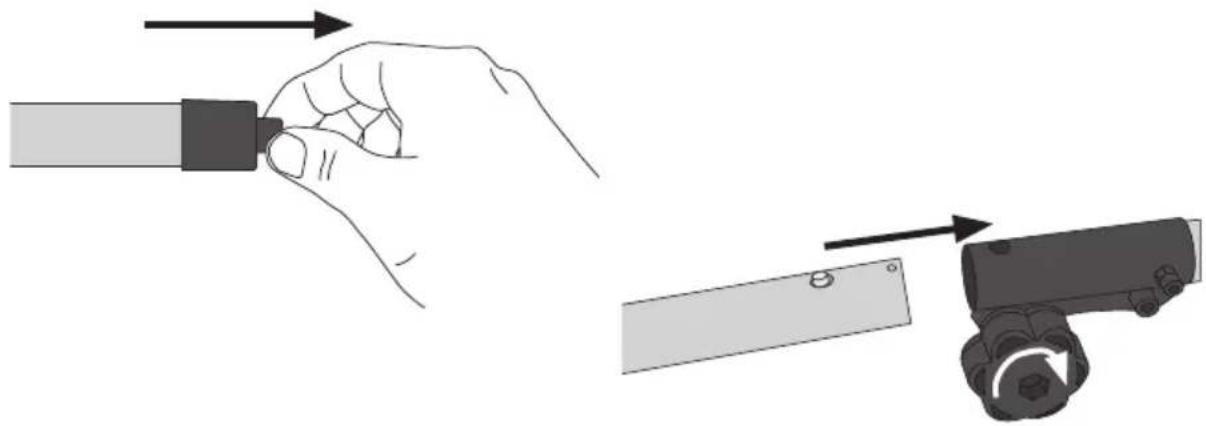
Shaft
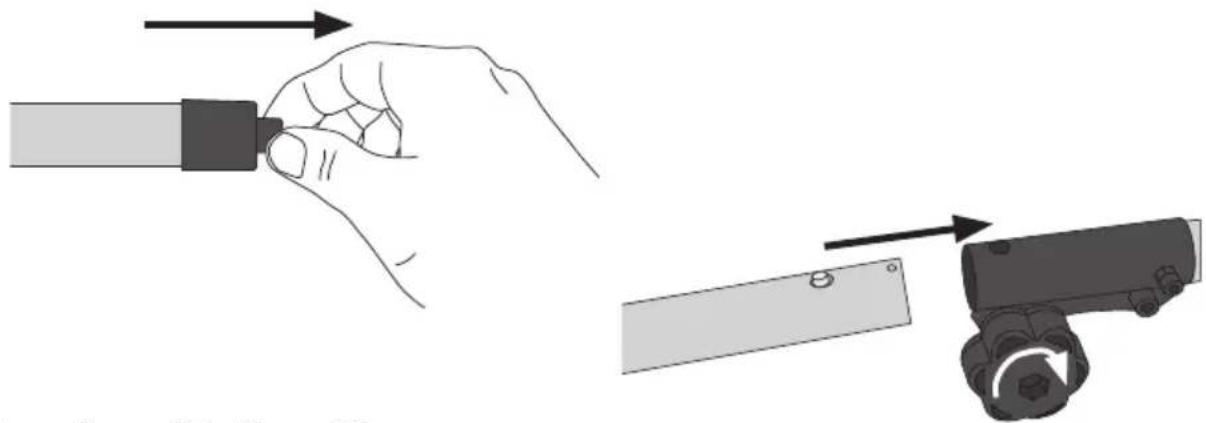
natural_image
Illustration showing a hand holding a tool and a device with an arrow indicating motion (no text or symbols present)Handle with throttle
Note: Try setting the handle to different positions to find the one that is most ergonomic for you.
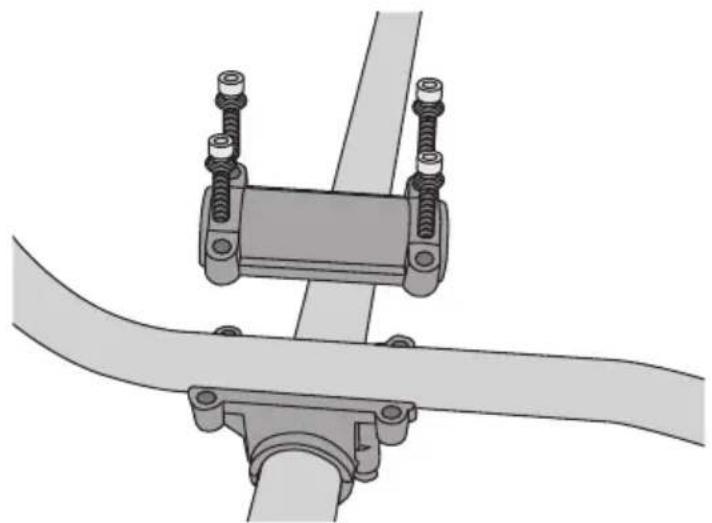
natural_image
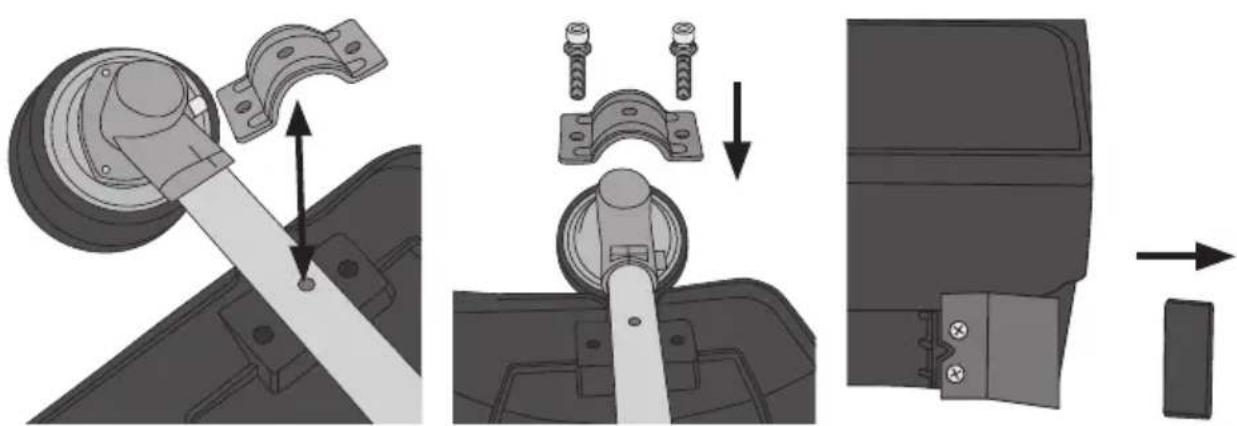
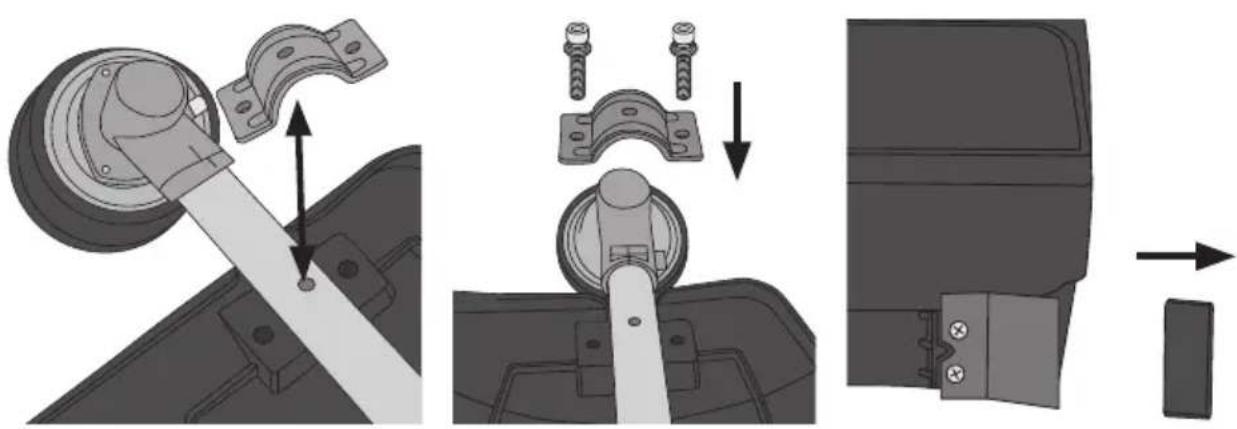
Mechanical assembly diagram showing a clamp bracket mounted on a curved pipe (no text or symbols)Debris shield
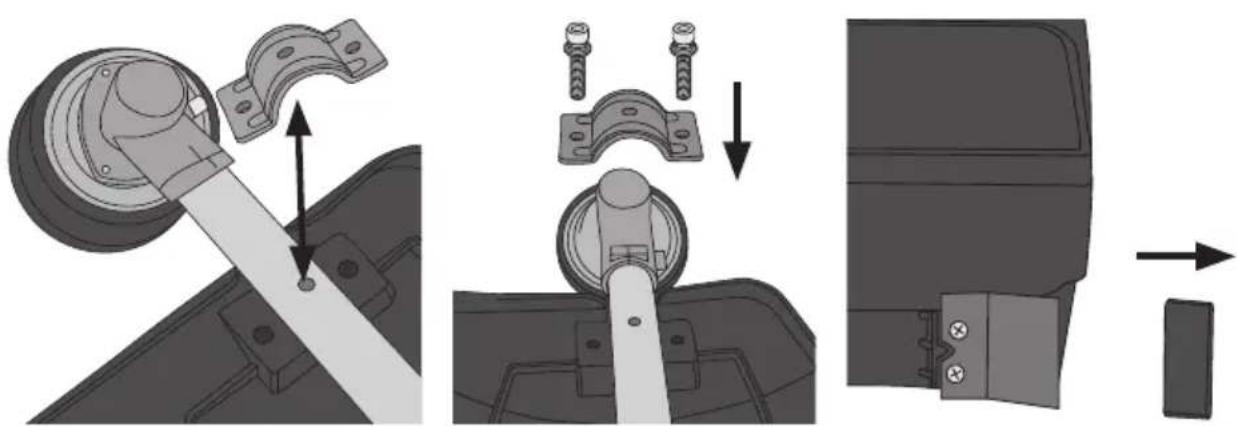
Attaching the blade/trimmer head
Warning: The brush cutter/grass trimmer must only be used with the included trimmer head and accompanying nylon trimmer line or tri-tooth brushcutter blade. Attempts to use other types of cutting accessories can lead to personal injury or damage to the product.
Trimmer head
-
Note: The trimmer head has a left-hand thread, screw it on anticlockwise.
-
Lock the drive shaft using the handle of the spark plug spanner to prevent it turning.
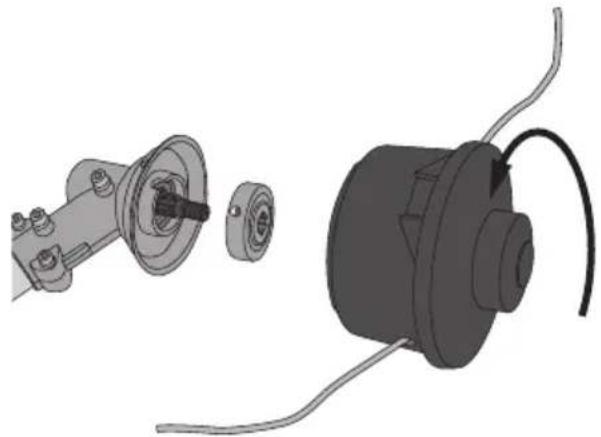
natural_image
Technical illustration of a mechanical assembly with two components: a flanged housing and a motor-like device connected by wires (no text or symbols visible)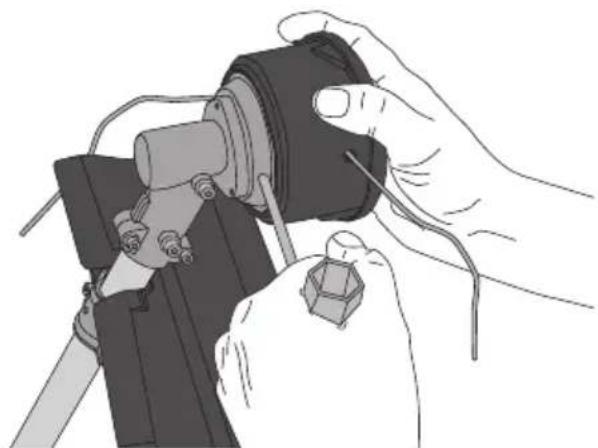
natural_image
Illustration of a hand using a tool to adjust or install a mechanical component (no text or symbols visible)Brush cutter blade
Warning: Always wear safety gloves when handling the blade, it is sharp.
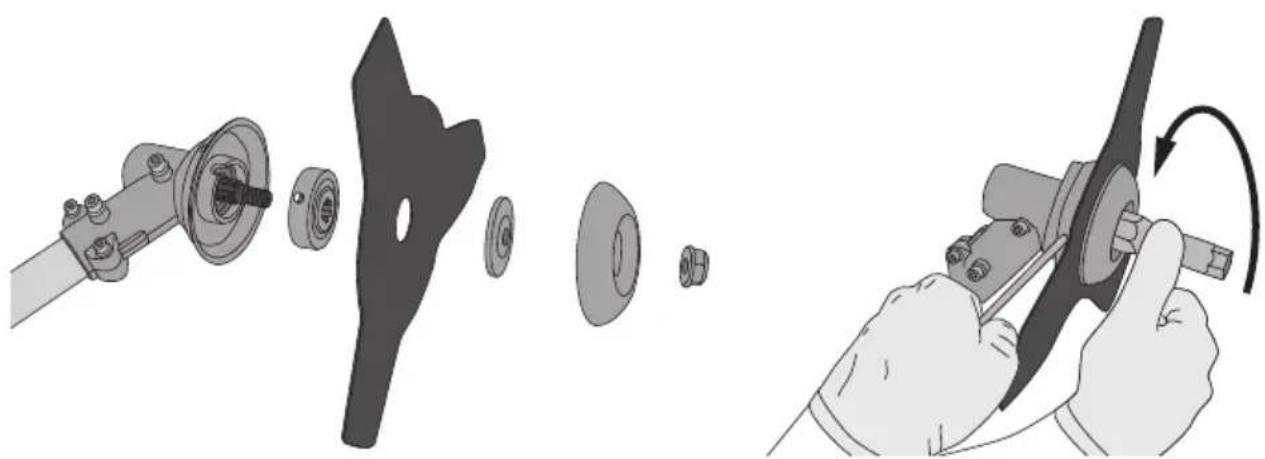
natural_image
Illustration showing a mechanical assembly with disassembled parts and a hand operating a tool (no text or symbols present)Lock the drive shaft using the handle of the spark plug spanner to prevent it turning.
Note: The nut has a left-hand thread.
Operating instructions
Harness
Note: Adjust the harness so that the trimmer is supported and well-balanced.
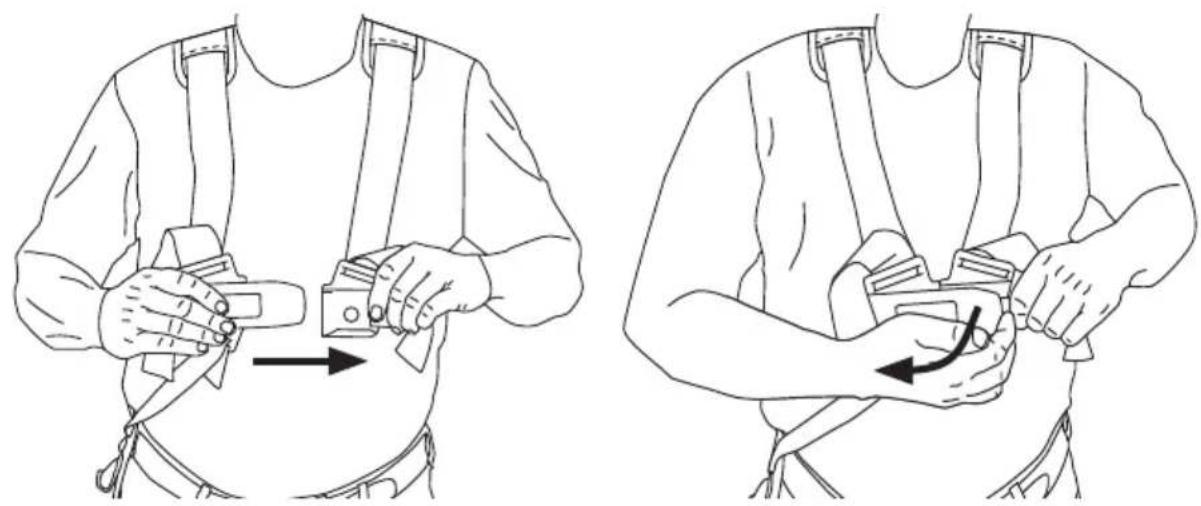
natural_image
Line drawing showing two steps of a person's belt buckle being adjusted, with no text or symbols present.Fuel
- Warning: Never refuel the product while the engine is running.
- Use ready-mixed mixture of environmentally-friendly petrol (alkylate petrol) and 2% oil.

Fire hazard. Never use the grass trimmer or handle fuel in the proximity of open flames or in areas where sparks may occur. Never smoke while refuelling, mixing fuel or when handling fuel in any other way.
Note: Always refuel outdoors, never indoors.
Switching on
Note: A new engine should be “run in” by using it at low speed and with low resistance for the first few hours. This will help all the moving parts of the engine to loosen up and mate together better and will ultimately lengthen the useful life of the engine. After it has been run in, the engine will provide maximum performance and can be operated at full load. However, the engine should only be operated at full throttle for short periods.
Warning: Before switching the trimmer on, check that:
• The harness is intact.
- The trimmer is undamaged and all the screws are tight.
- You have read and understood the entire instruction manual.
- There is fuel in the tank and that the fuel cap is locked.
- You are wearing all the necessary safety equipment (safety shoes, trousers, jacket, gloves, helmet with visor, ear defenders and glasses/goggles) that the trimmer is intact and working properly.
- The trimmer is clean and all the ventilation slits on the engine housing are free of dirt and debris.
- The throttle and throttle lock work properly.
• The on/off switch works properly. - The starter handle and cord are undamaged.
- The air filter is clean. Clean or change as necessary.
- The fuel tank, carburettor or fuel lines do not leak.
- The debris shield is intact and has no cracks in it. Replace it if it is damaged.
- The brushcutter blade is centred, sharp and intact. A cracked or damaged blade which is not centred can cause vibrations and damage the trimmer.
- The trimmer head is intact and has no cracks in it. Replace it if it is damaged.
Cold start
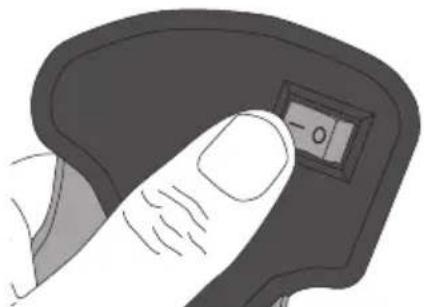
natural_image
Close-up of a finger pressing a button with a numeric display (no text or symbols visible)- Set the power switch to the (I) position.
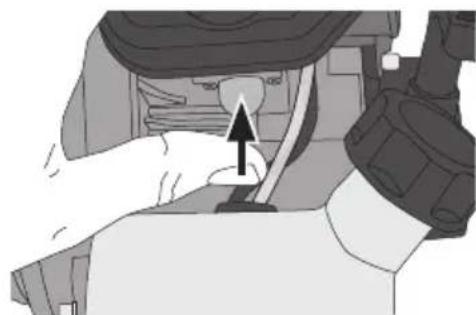
natural_image
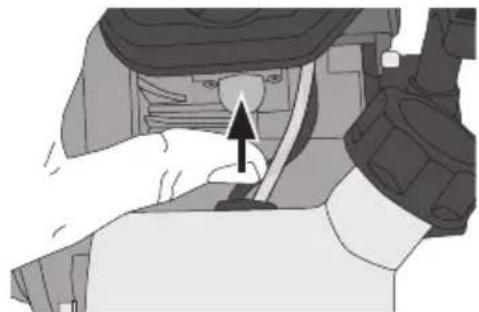
Mechanical component diagram showing a hand pressing a button with an arrow indicating motion (no text or symbols present)- Pump the primer bulb until fuel becomes visible in the clear return-fuel line.
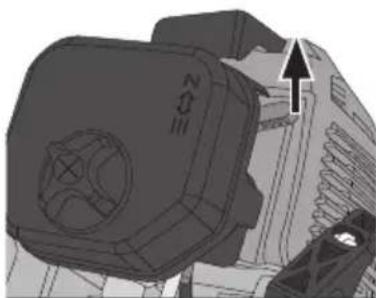
natural_image
Mechanical component with a circular head and arrow indicator (no readable text or symbols)- Engage the choke.
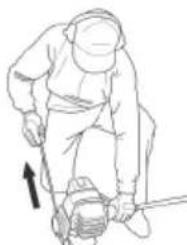
natural_image
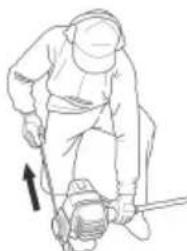
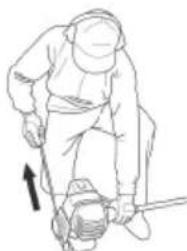
Line drawing of a person using a power tool, no text or symbols present- Pull quickly and firmly on the starter handle.
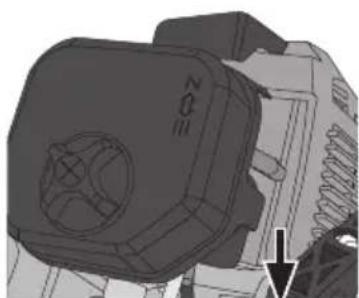
natural_image
Mechanical component diagram showing a square housing with internal components and a directional arrow (no text or symbols)-
Disengage the choke as soon as the engine is running.
-
The engine might; depending on temperature, air humidity and other environmental factors; need to run for a short while on half-choke.
Idle speed adjustment
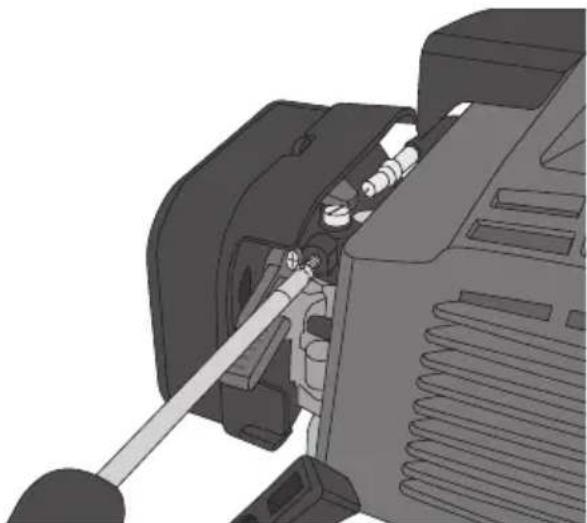
The idle speed must not be so high that the trimmer head/brushcutter blade rotates when the engine is just ticking over. Adjust if necessary.
natural_image
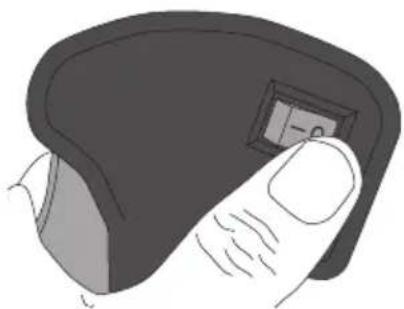
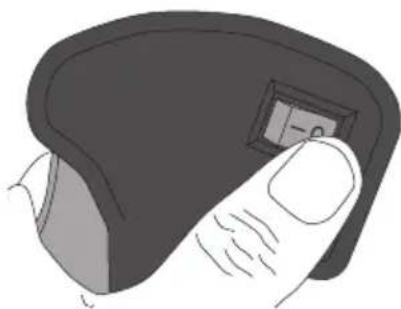
Mechanical assembly diagram showing a lever interacting with a motor or actuator component (no text or symbols visible)Switching off
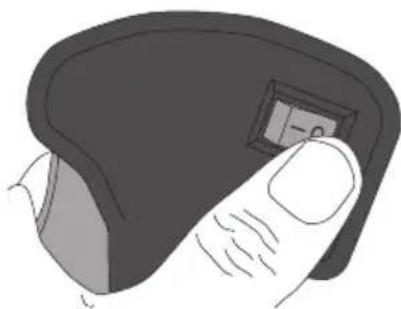
natural_image
Illustration of a finger pressing a button on a dark device (no text or symbols visible)Care and maintenance
Warning: Switch off the engine before all servicing, adjusting and cleaning the grass trimmer.
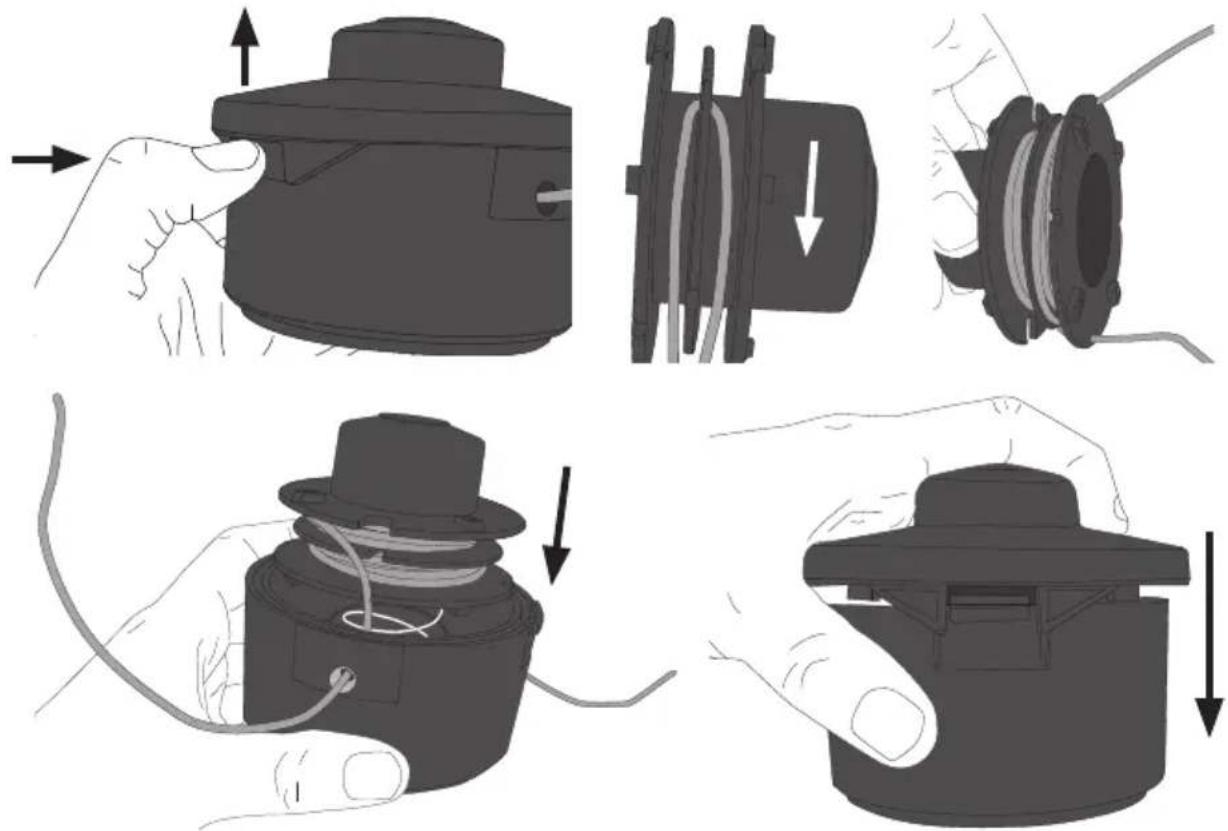
Changing trimmer line
Note: The trimmer head should first be detached from the trimmer before the line is changed.
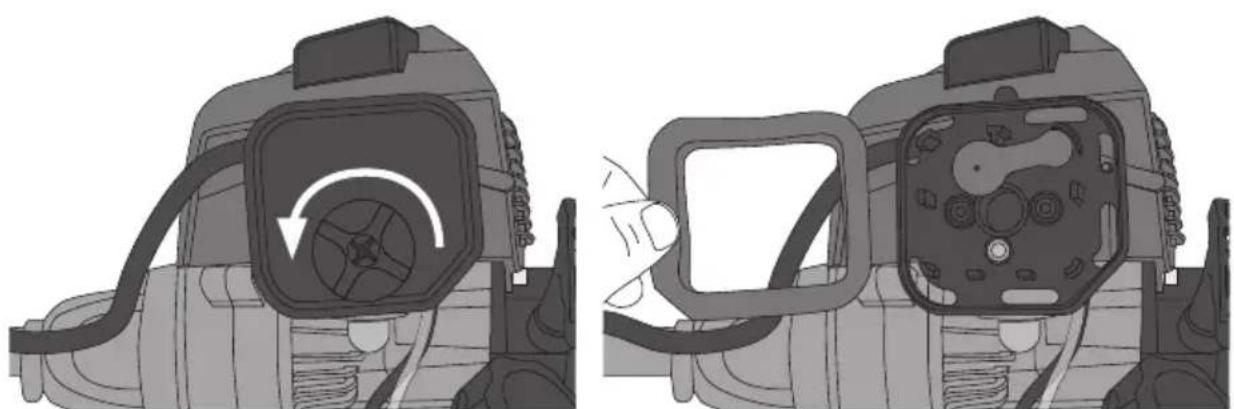
Air filter
Never use the grass trimmer without the air filter fitted.
Cleaning
The air filter should be cleaned every year, more often if the trimmer is used in dusty environments. Wash the filter in soapy water and let it air-dry.
natural_image
Two technical illustrations of a camera interior showing the front and side views of the camera frame (no text or symbols present)Spark plug
natural_image
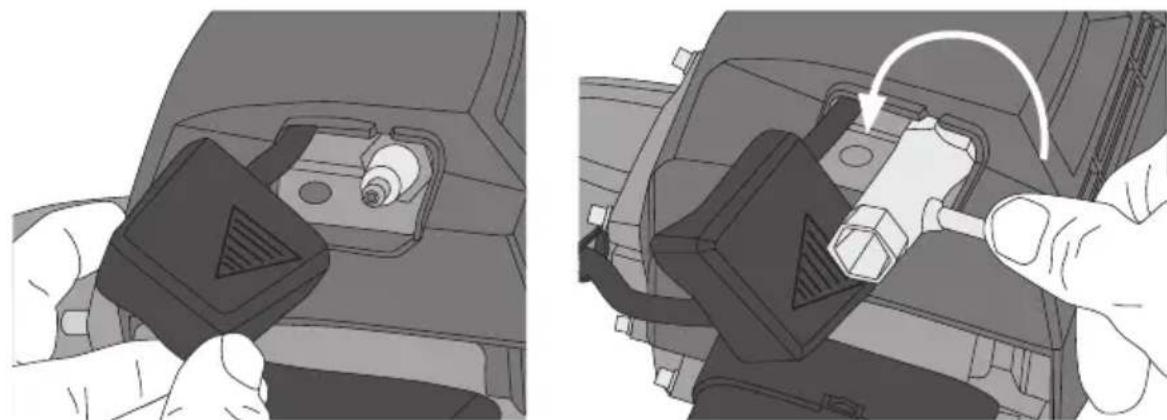
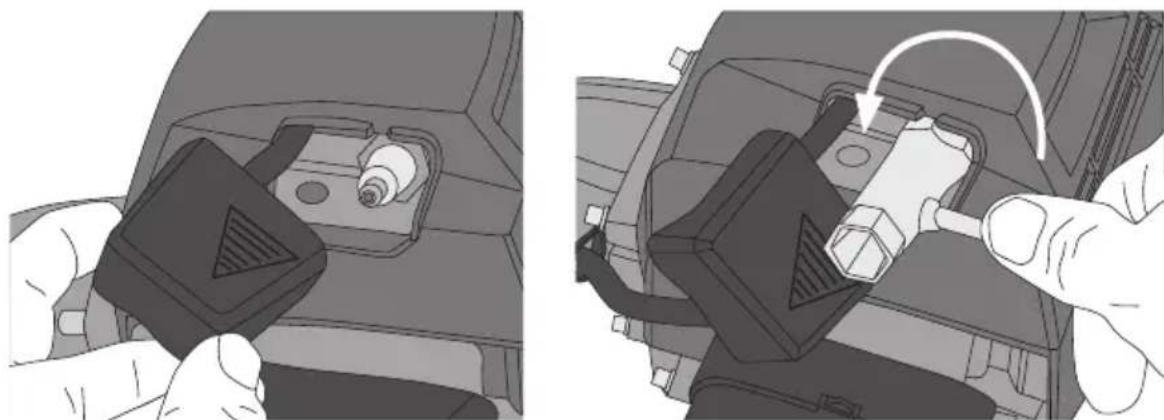
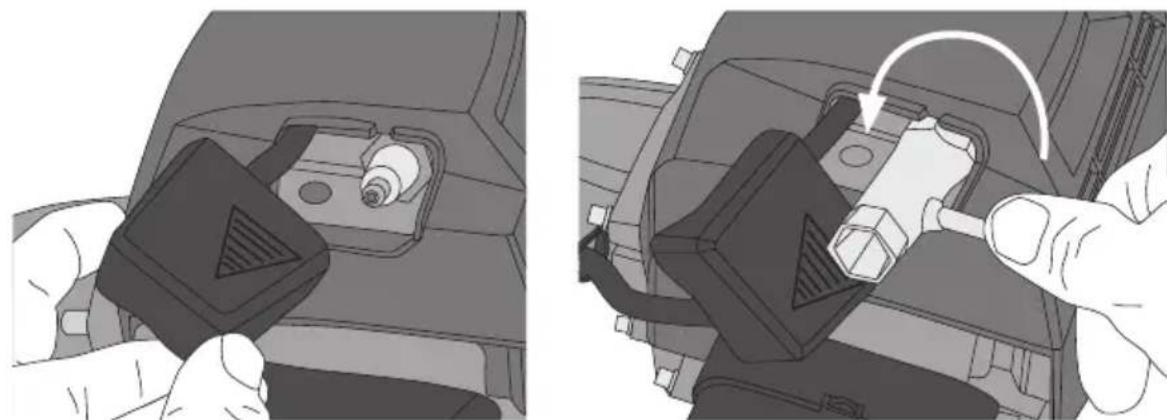
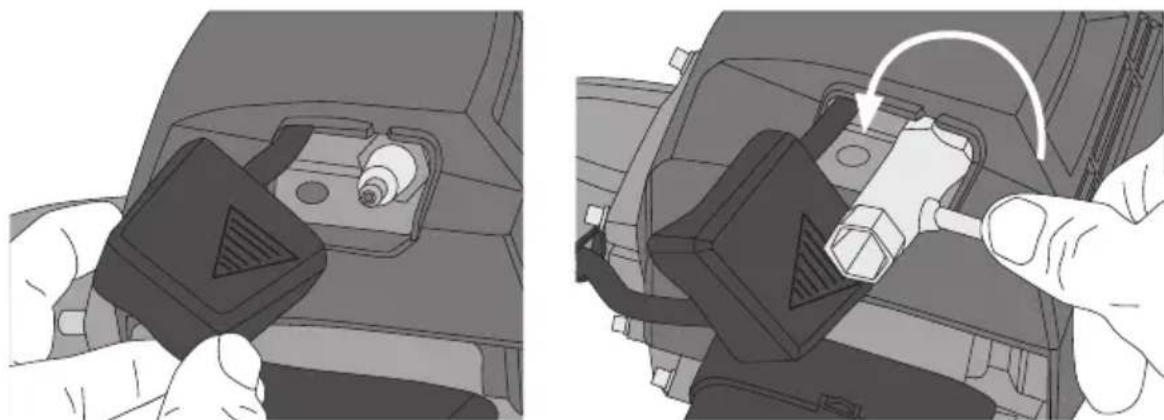
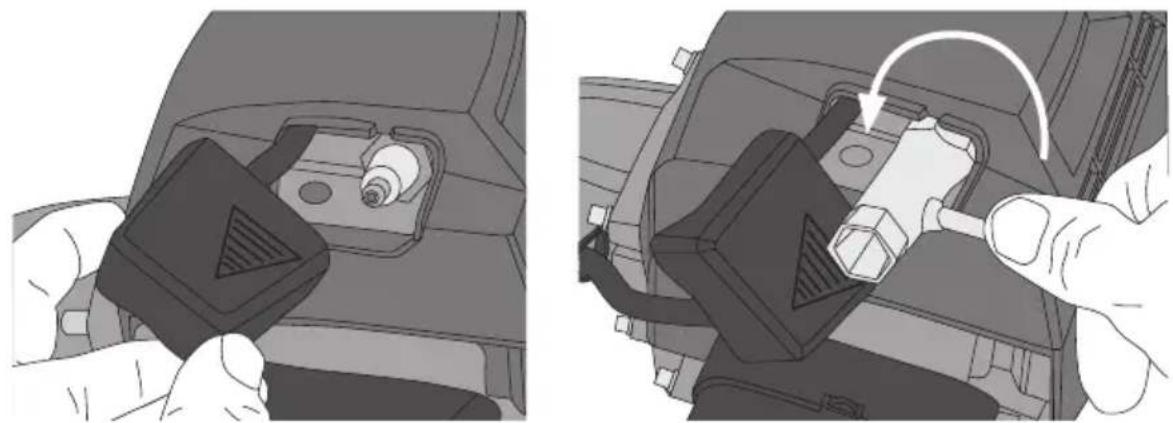
Two-step diagram showing a hand inserting a plug into a device component, with no visible text or symbols.• Type of spark plug: Torch L8RTC, NGK BM6A or Bosch WS8E
• Electrode gap: 0.6–0.7 mm
- Tightening torque: 12–15 Nm
Transport and storage
Transport
- Empty the fuel tank and tie down/secure the trimmer so that it can't move around. Fit the blade guard onto the brush cutter blade if it is attached to the trimmer.
Things to do before storing the trimmer
The following actions should be taken before the trimmer is put away for storage for an extended period (more than 30 days).
- Empty the fuel tank.
- Start the engine and let it run until it is out of fuel.
- Allow the engine to cool for 5 minutes.
- Remove the spark plug.
- Pour about 2 tablespoonfuls of 2-stroke engine oil into the cylinder.
- Check that the power switch is in the (0) position. Turn the engine over by hand using the starter handle a few times to coat all the parts with oil. Refit the spark plug.
- Clean the exterior of the trimmer.
- Fit the blade guard onto the brush cutter blade if it is attached to the trimmer.
- The trimmer should be stored in a dry location away from any sources of ignition such as naked flames, sparks, heaters and smoking areas.
Using the trimmer after long-term storage
- Remove the spark plug.
- Check that the power switch is in the (0) position. Turn the engine over by hand using the starter handle a few times to remove any excess oil from the cylinder.
- Clean the spark plug electrodes and check that the electrode gap is 0.026 inch (0.65 mm).
- Check that the trimmer is intact, lubricated and that all the safety features work as they should.
- Add fuel.
Troubleshooting guide
| The trimmer won’t start, runs poorly. | Make sure that the correct fuel is used. If necessary, empty the tank and change the fuel. Use ready-mixed mixture of environmental petrol and 2% oil.Check the spark plug and replace it if necessary.Make sure that the choke is in the correct position.Cold start:Begin with full choke and then reduce to no choke (or half choke) when the engine has started.Warm start:No choke.The engine might have been flooded by too many attempts to start it. What to do:1. Disconnect the spark plug lead from the spark plug.2. Remove the spark plug and turn the engine over a few times to help the fuel evaporate.3. Wipe the spark plug dry with a clean cloth and refit it (or replace it with a new one). |
Responsible disposal
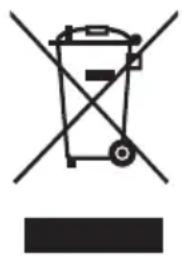
This symbol indicates that this product should not be disposed of with general household waste. This applies throughout the entire EU. In order to prevent any harm to the environment or health hazards caused by incorrect waste disposal, the product must be handed in for recycling so that the material can be disposed of in a responsible manner. When recycling your product, take it to your local collection facility or contact the place of purchase. They will ensure that the product is disposed of in an environmentally sound manner.
natural_image
Symbol of a trash bin crossed with no visible text or labelsSpecifications
Engine Air-cooled 2-stroke
Engine capacity 42.7 cc
Fuel Mixture of environmental petrol and oil 50:1
Max engine power 1.25 kW (1.7 hp)
Max spindle speed Trimmer line spool 6750 min -1, Brushcutter blade 6000 min -1
Max engine speed Trimmer line spool 9000 min ^-1 , Brushcutter blade 8000 min ^-1
Idle speed 3000 ± 300 min -1
Direction of rotation Anticlockwise (viewed from above)
Spark plug Torch L8RTC, NGK BM6A or Bosch WS8E
Tank volume 1.3 litres
Cutter equipment Nylon trimmer line: Diameter: 2.4 mm 3-tooth brush cutter blade: Diameter: 255 mm, bore: 1" (25.4 mm)
Vibration value of both handles 7.5 m/s^2 , K = 1.5 m/s^2
Sound pressure level in accordance with EN 22868 LpA = 98 dB(A), K = 3 dB(A)
Sound power level in accordance with EN 22868 LwA = 114 dB(A), K = 3 dB(A)
Weight 8.5 kg
Grästrimmer 2T
Art.nr 31-9035 Modell WLBC430CA-2ZAH
Montering
Riggrör
natural_image
Illustration showing a hand holding a tool and a device with arrows indicating motion (no text or symbols)natural_image
Mechanical assembly diagram showing a clamp bracket mounted on a curved pipe (no text or symbols)Trimmer-/klingskydd
Montera skärutrustning
natural_image
Technical illustration of a mechanical assembly with two components and wiring (no text or symbols)natural_image
Illustration of hands using a mechanical tool to adjust or install a component (no text or symbols visible)Slyklinga
natural_image
Illustration showing a mechanical assembly with disassembled parts and a hand operating a tool (no text or symbols present)natural_image
Illustration of two-step instructions for adjusting a belt buckle, showing hand positioning and movement arrows (no text or symbols)Bränsle
natural_image
Close-up of a finger pressing a button on a dark surface, with no visible text or symbolsnatural_image
Illustration of a person's seatbelt being adjusted for a cable or cable (no text or symbols visible)natural_image
Mechanical component with a circular feature and an arrow pointing to a section (no visible text or symbols)- Stäng choken.
natural_image
Line drawing of a person using a power tool, no text or symbols presentnatural_image
Close-up of a mechanical component with a circular feature and an arrow pointing to a section (no visible text or symbols)natural_image
Mechanical assembly diagram showing a lever interacting with a motor or engine component (no text or symbols visible)Stopp
natural_image
Illustration of a finger pressing a button on a dark device (no text or symbols visible)Luftfilter
natural_image
Two technical illustrations of a camera interior showing the wheel and camera module (no text or symbols present)Tändstift
natural_image
Two-step diagram showing a hand inserting a plug into a device component, with no visible text or symbols.• Tändstift typ: Torch L8RTC, NGK BM6A eller Bosch WS8E
• Elektrodavständ: 0,6–0,7 mm
- Åtdragningsmoment: 12–15 Nm
Produktmerking med sikkerhetssymboler på maskinen

- Luftfilter
- Primerpumpe (manuell bensinpumpe for å lette starten)
Montering
Riggrør
natural_image
Illustration showing a hand holding a tool and a device with arrows indicating motion (no text or symbols)natural_image
Mechanical assembly diagram showing a clamp bracket mounted on a curved pipe (no text or symbols)Trimmer-/bladbeskyttelse
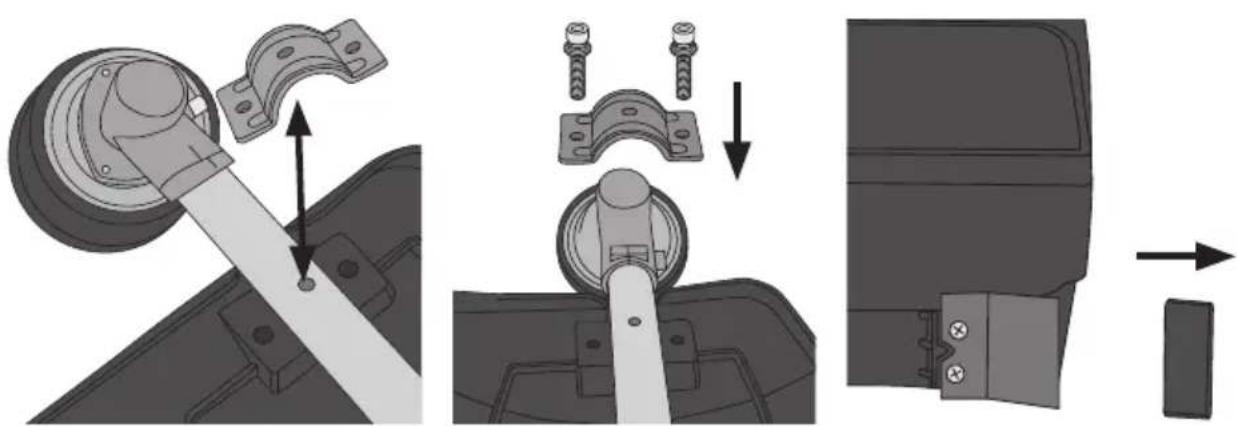
natural_image
Technical illustration of a mechanical assembly with two components and wiring (no text or symbols)natural_image
Illustration of a hand using a tool to adjust or install a mechanical component (no text or symbols visible)Buskklinge
natural_image
Illustration showing a mechanical assembly with disassembled parts and a hand operating a tool (no text or symbols present)natural_image
Line drawing showing two steps of a person's belt buckle being adjusted, with no text or symbols present.Drivstoff
- Advarsel! Fyll aldri på drivstoff mens motoren er i gang.
- Bruk ferdigblandet miljøbensin med 2 % oljeinnblanding.

natural_image
Close-up of a finger pressing a button on a dark surface, with no visible text or symbolsnatural_image
Illustration of a person's seatbelt being adjusted for a cable or cable, with no visible text or symbols- Pump til bensinen syns i den transparente returslangen.
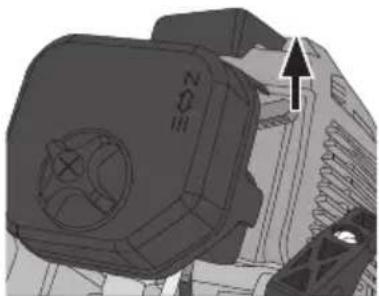
natural_image
Mechanical component with a highlighted section and an arrow pointing to it (no visible text or symbols)- Steng choken.
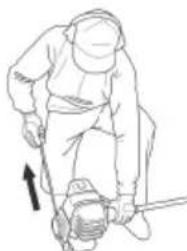
natural_image
Line drawing of a person using a power tool, no text or symbols presentnatural_image
Mechanical component with a circular feature and an arrow pointing to a section (no visible text or symbols)natural_image
Mechanical assembly diagram showing a lever interacting with a motor or engine component (no text or symbols visible)Stopp
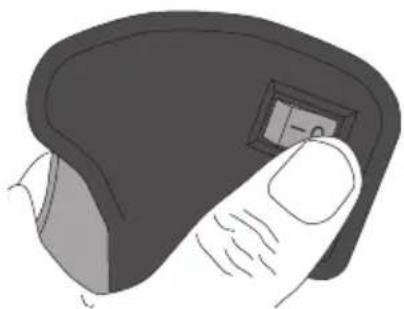
natural_image
Illustration of a finger pressing a button on a dark device (no text or symbols visible)Luftfilter
natural_image
Two technical illustrations of a camera interior showing the wheel and camera module (no text or symbols present)Tennplugg
natural_image
Two-step diagram showing a hand inserting a plug into a device component, with no visible text or symbols.- Tennpluggtype: Torch L8RTC, NGK BM6A eller Bosch WS8E
• Elektrodeavstand: 0,6–0,7 mm - Tiltrekkingsmoment: 12–15 Nm
Asennus
Putki
natural_image
Illustration showing a hand holding a tool and a device with arrows indicating motion (no text or symbols)natural_image
Mechanical assembly diagram showing a clamp bracket mounted on a curved pipe (no text or symbols)Trimmeri-/teräsuoja
natural_image
Technical illustration of a mechanical assembly with two components and wiring (no text or symbols)natural_image
Illustration of a hand using a tool to adjust or install a mechanical component (no text or symbols visible)Vesakkoterä
natural_image
Illustration showing mechanical assembly steps: disassembly of a component, rolling wheel, and tooling (no text or symbols)natural_image
Illustration of a person adjusting a belt buckle, showing two sequential steps with arrows indicating movement (no text or symbols present)Polttoaine
natural_image
Close-up of a finger pressing a button with a small display (no text or symbols visible)- Aseta virtakytkin asentoon (I).
natural_image
Illustration of a person adjusting a vehicle seatbelt with an upward arrow (no text or symbols)natural_image
Mechanical component with no visible text or symbols, featuring a circular feature and an arrow pointing to a section (no readable text or symbols)- Sammuta rikastin.
natural_image
Line drawing of a person in protective gear using a tool, with an upward arrow indicating motion (no text or symbols)natural_image
Mechanical component with no visible text or symbols, featuring a circular feature and an arrow pointing to a specific part (no readable text or symbols)natural_image
Mechanical assembly diagram showing a lever interacting with a motor or actuator component (no text or symbols visible)Sammutus
natural_image
Illustration of a finger pressing a button on a dark device (no text or symbols visible)Huolto ja ylläpito
Ilmansuodatin
natural_image
Two technical illustrations of a camera interior showing the front and side views of the camera frame (no text or symbols present)Sytytystulppa
natural_image
Two-step diagram showing a hand inserting a plug into a device component, with no visible text or symbols.natural_image
Symbol of a trash bin crossed with no text or numbers, representing waste sorting or disposal (no text present)Tekniset tiedot
natural_image
Mechanical assembly diagram showing a lever with a numbered component (14) and a base mount (no text or symbols present)- Messer
natural_image
Mechanical assembly diagram showing a motor or lift mechanism with labeled component (17), no readable text or symbols present.Montage
Rohrstange
natural_image
Illustration showing a hand holding a tool and a device with arrows indicating motion (no text or symbols)Griff mit Gashebel
natural_image
Mechanical assembly diagram showing a clamp bracket mounted on a curved pipe (no text or symbols)natural_image
Technical illustration of a mechanical assembly showing a motor, gear, and cable connection (no text or symbols)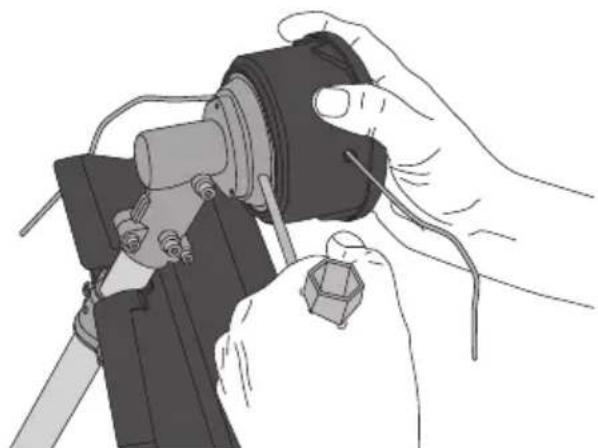
natural_image
Illustration of a hand using a tool to adjust or install a mechanical component (no text or symbols visible)Messer
natural_image
Illustration showing a mechanical assembly and tool application (no text or symbols)natural_image
Illustration of a person adjusting a belt buckle, showing two sequential steps with arrows indicating motion (no text or symbols present)Treibstoff
natural_image
Close-up of a finger pressing a button labeled '-0' (no other text or symbols visible)natural_image
Illustration of a person's seatbelt being adjusted for a cable or cable (no text or symbols visible)natural_image
Technical illustration of a mechanical component with no visible text or symbolsnatural_image
Line drawing of a person using a power tool on a mechanical device (no text or symbols)natural_image
Mechanical component with a highlighted section and arrow, no visible text or symbolsnatural_image
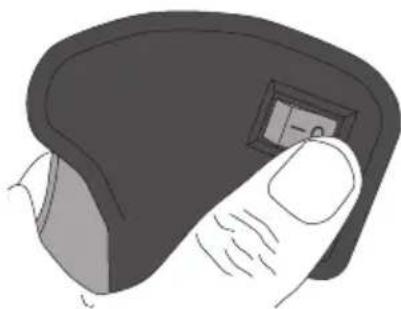
Mechanical assembly diagram showing a lever interacting with a motor or actuator component (no text or symbols visible)Stopp
natural_image
Illustration of a finger pressing a button on a dark device (no text or symbols visible)Pflege und Wartung
Luftfilter
natural_image
Two-panel illustration of a camera interior showing the front and side views of the camera frame (no text or symbols)Zündkerze
natural_image
Two-step diagram showing hands installing or adjusting a mechanical component, with no visible text or symbols.natural_image
Symbol of a trash bin crossed with no text or labels, accompanied by a blank rectangular block below (no text or symbols present)Technische Daten
Declaration of Conformity
Declares that this product complies with the requirements of the following directives and standards
COCRAFT 31-9035 / WLBC430CA-2ZAH
Machinery Directive 2006/42/EC
EN ISO 11806-1:2011
Henrik Alfredsson
Manager Technique & Quality
Insjön, Sweden, 2016-04-07
Sverige
Postal 10 - 13 Market Place
Kingston Upon Thames
Surrey
KT1 1JZ
Deutschland
Kundenservice

- Viktig information:
- Safety
- Safety equipment
- Product safety symbols and their meaning
- Product description
- Assembly
- Shaft
- Handle with throttle
- Debris shield
- Attaching the blade/trimmer head
- Trimmer head
- Brush cutter blade
- Operating instructions
- Harness
- Fuel
- Switching on
- Warning: Before switching the trimmer on, check that:
- Cold start
- Idle speed adjustment
- Care and maintenance
- Changing trimmer line
- Air filter
- Cleaning
- Spark plug
- Transport and storage
- Transport
- Things to do before storing the trimmer
- Using the trimmer after long-term storage
- Troubleshooting guide
- Responsible disposal
- Specifications
- Grästrimmer 2T
- Montering
- Riggrör
- Trimmer-/klingskydd
- Montera skärutrustning
- Slyklinga
- Bränsle
- Luftfilter
- Tändstift
- Produktmerking med sikkerhetssymboler på maskinen
- Buskklinge
- Drivstoff
- Tennplugg
- Asennus
- Vesakkoterä
- Polttoaine
- Huolto ja ylläpito
- Ilmansuodatin
- Sytytystulppa
- Tekniset tiedot
- Montage
- Rohrstange
- Griff mit Gashebel
- Messer
- Treibstoff
- Pflege und Wartung
- Zündkerze
- Technische Daten
- Declaration of Conformity
- COCRAFT 31-9035 / WLBC430CA-2ZAH
- Sverige
- Deutschland
Brand : Cocraft
Model : HB430-2T
Category : Saw