
HC 503-V - Compressor Cocraft - Free user manual and instructions
Find the device manual for free HC 503-V Cocraft in PDF.


| Product Type | Air Compressor |
| Brand | Cocraft |
| Model | HC 503-V (EZ-3050V/10-L) |
| Rated Voltage | 220-240 V AC, 50 Hz |
| Motor Power | 2.2 kW |
| No-Load Speed | 2850 min⁻¹ |
| Air Displacement | 354 L/min |
| Free Air Delivery (at 6 bar) | 187 L/min |
| Max Working Pressure | 10 bar |
| Air Tank Capacity | 50 L |
| Noise Level (Sound Pressure) | 74.7 dB(A) (KpA=3 dB) |
| Noise Level (Sound Power) | 94.7 dB(A) (KwA=3 dB) |
| Operating Temperature | +5°C to +40°C |
| Storage Temperature | +5°C to +40°C |
| Dimensions (L × W × H) | 76 × 41 × 64 cm |
| Weight | 40 kg |
| Oil Capacity | Approx. 400 ml (SAE 30 or ISO 68) |
| First Oil Change | After 10 hours of operation |
| Regular Oil Change Interval | Every 120 hours |
| Air Filter Cleaning Interval | Every 120 hours |
| Safety Features | Pressure switch, safety valve, motor overload cut-out |
| Included Accessories | Wheels, rubber feet, air filter |
Frequently Asked Questions - HC 503-V Cocraft
User questions about HC 503-V Cocraft
0 question about this device. Answer the ones you know or ask your own.
Ask a new question about this device
Download the instructions for your Compressor in PDF format for free! Find your manual HC 503-V - Cocraft and take your electronic device back in hand. On this page are published all the documents necessary for the use of your device. HC 503-V by Cocraft.
USER MANUAL HC 503-V Cocraft
MAX WORKING PRESSURE: 10 BAR
KOMPRESSOR KOMPRESSORI

Important!
Read the entire instruction manual carefully and make sure that you fully understand it before you use the equipment. Keep the manual for future reference.
Viktig information:
natural_image
Line drawing of a Cocraft air compressor with wheels and control panel (no text or symbols on the diagram itself)Art.no Model
41-1821
EZ-3050V/10-L
Ver. 20200918
Original instructions
Bruksanvisning i original
Originalbruksanvisning
Please read the entire instruction manual before using the product and then save it for future reference. We reserve the right for any errors in text or images and any necessary changes made to technical data. In the event of technical problems or other queries, please contact our Customer Services (see address details on the back).
Safety
• Always use ear defenders and safety goggles when using the compressor.
- Reduce the risk of electric shocks. Avoid body contact with earthed objects such as water pipes and radiators.
- Use a face mask for dusty work.
- Never use the compressor in areas where flammable liquids/materials or gases (petrol, solvents, gas cylinders) are stored or used.
- Never switch the compressor off by pulling out the plug, always use the ON/OFF button.
- Always unplug the mains lead and empty the pressure vessel of air before servicing or repairing the compressor.
- Always unplug the mains lead and empty the pressure vessel of air before moving the compressor.
- Make sure that the mains lead does not come into contact with heat, oil, or sharp edges.
- Never move the compressor around by pulling the mains lead or air hoses. The compressor must only be moved using the handle.
- If the mains lead is damaged, to prevent any risk of fire or electrocution, it must only be replaced by a qualified electrician.
- Make sure that any air hoses and air tools connected to the compressor are rated to withstand the pressure generated by the compressor and that they are connected correctly.
- This product must not be used by anyone (including children) suffering from physical or mental impairment. This product should not be used by anyone that has not read the instruction manual unless they have been instructed in its use by someone who will take responsibility for their safety.
- Never let children play with the product.
- Do not weld or in any way modify the pressure vessel.
- Never aim compressed air at yourself or any other person.
Symbols

Read the entire instruction manual carefully.

Use ear defenders.

Risk of electric shock.

This unit is remote controlled and can start without warning.

Warning: Hot surfaces.
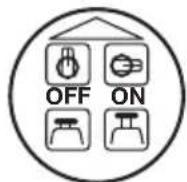
Never switch off the compressor by pulling out the plug or using the isolator switch (if fitted). Always use the ON/OFF button on the compressor.

Do not open the cock before the air hose is attached
Product description
The compressor increases the pressure of the air which is pumped into the pressure vessel. When the air pressure in the vessel reaches max, a pressure switch switches off the motor driving the compressor. At the same moment, the air in the compressor is released. This occurs to reduce the pressure in the compressor so that it can restart when the pressure drops to below the minimum pressure. A safety valve releases the air in the pressure vessel if the pressure switch should fail to turn the motor off.
Buttons and functions
- Overload safety cut-out
- Air filter
-
Air tank (pressure vessel)
-
Oil inlet
- Window for checking oil level
-
Drain tap
-
[På/av] On/off switch
- Pressure gauge – working pressure
- Air outlet
- Pressure regulator (working pressure)
- Pressure gauge – tank pressure
- Safety valve (pressure relief valve)
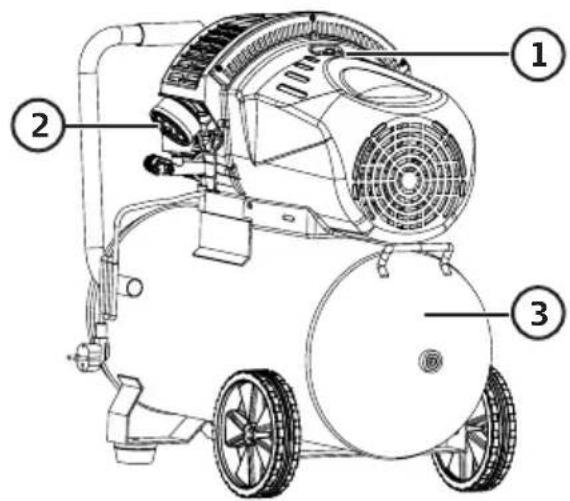
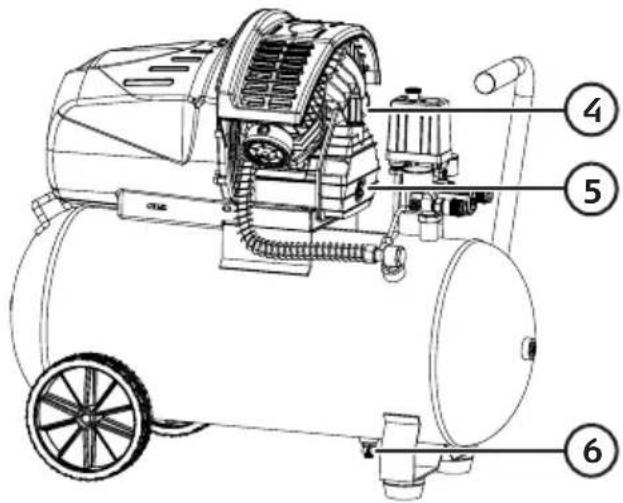
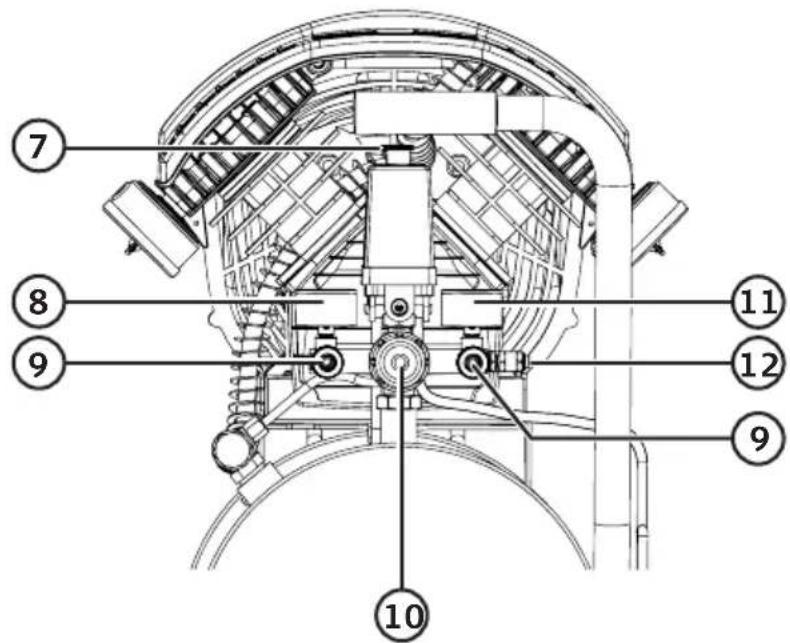
Getting started
- Attach the wheels, rubber feet and air filter.
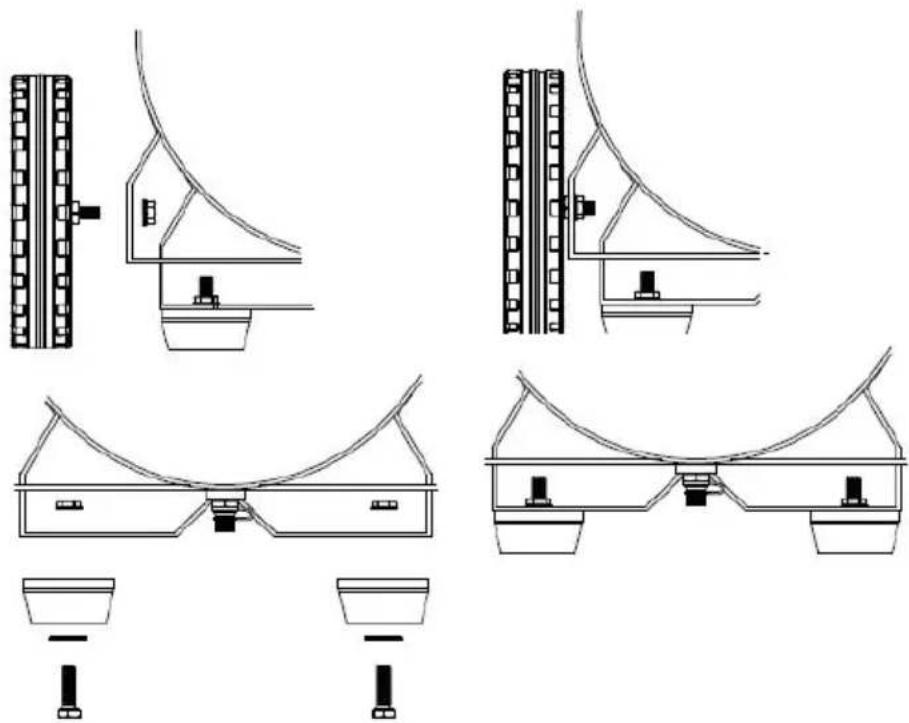
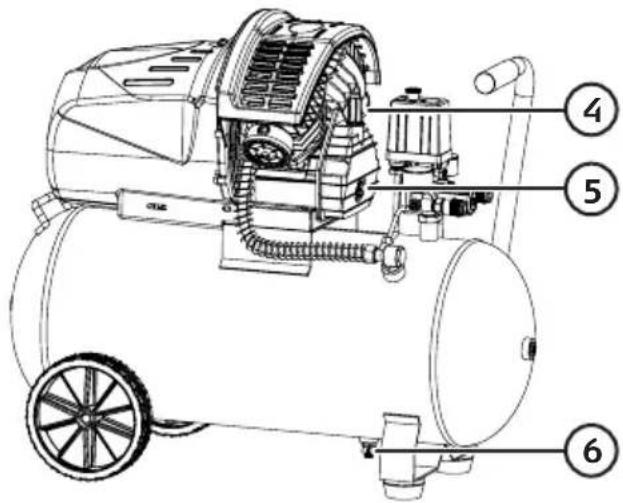
- If the oil inlet (4) is fitted with a transit bung, remove it and replace it with the proper oil filler cap.
- Pour approximately 400 ml oil into the oil inlet and fit the proper oil filler cap. Check the oil level through the oil level window (5).
- Place the compressor in a clean, dry and well-ventilated location.
- Make sure that it is stable and cannot tip over.
- Make sure that the oil level is up to the red circle in the oil level window (5).
- Connect the mains lead to a 230 V wall socket.
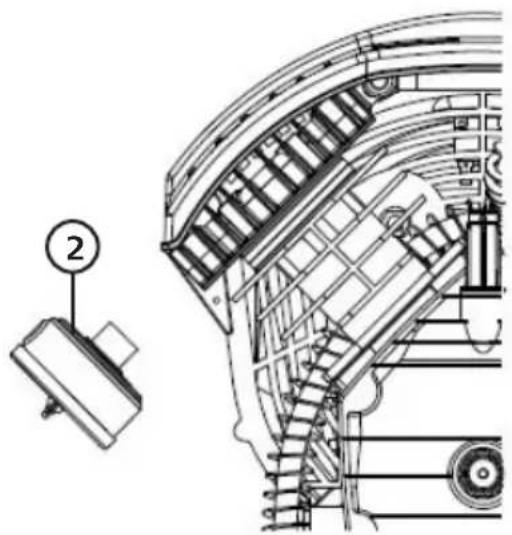
natural_image
Technical line drawing of a mechanical assembly with a numbered component (no text or symbols present)
Before using the air compressor for the first time:
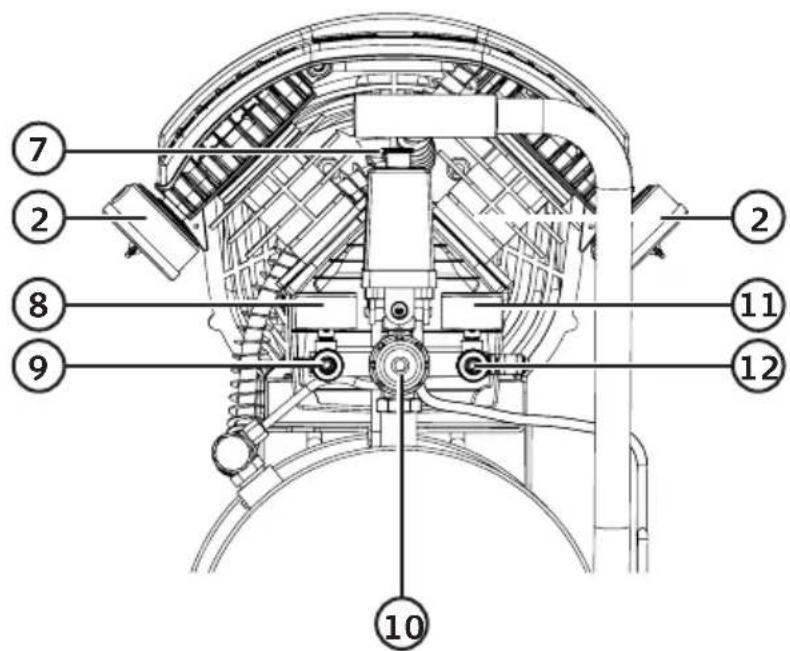
Open the drain tap (6) in the bottom of the air tank, switch the compressor on (by pulling the button of the ON/OFF switch (7) up) and let it run for 10 minutes to lubricate all the moving parts. Close the drain tap.
Instructions for use
- Check the oil level in the window (5).
- Attach the appropriate air tool for the work you wish to undertake: blow gun, spray gun, tyre inflator, etc.
- Read the instruction manual of the connected air tool and if necessary, set the recommended working pressure using the pressure regulator (10).
- When you have finished work and the compressor has been turned off, the pressure must be released by pulling out the safety valve (12).
Use an oil suitable for air compressors such as SAE 30, ISO 68 or equivalent.
Motor overload cut-out
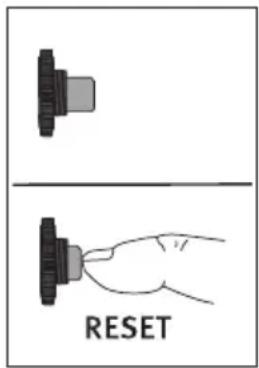
- If the safety cut-out has tripped, the motor has been overloaded in some way.
- The button on the motor overload cut-out (1) will pop out a couple of millimetres when it has been tripped and is reset by pushing it back in.
- There are a number of possible reasons why the overload cut-out might trip such as a voltage drop caused by the use of long extension leads, low ambient temperature (under 10 °C), or that the pressure switch is not used to turn the compressor on/off in the event of a power cut for example.
Care and maintenance
• Repairs must only be carried out by qualified service technicians and only using original spare parts.
- An initial replacement of the oil in the air compressor should be carried out after 10 hours of operation.
- Change the oil and clean the air filter after every 120 hours of use. Check the safety valve and pressure gauges at the same time.
- Test the safety valve by unscrewing the uppermost nut until it is loose and then pulling it out until the spring-loaded valve opens. If the safety valve is working properly (and the air tank is under pressure) air should seep out through the safety valve. Once the valve has been tested, screw the uppermost nut back in again.
- Perform a visual inspection at least once a year to check that the inside and outside of the air tank is free of corrosion. Under no circumstances must the wall thickness of the air tank be less than 2 mm.
- Under no circumstances must the safety valve be tampered with or blocked.
- Regularly check that the ventilation hole in the oil filler cap (4) is open.
- Regularly check that all bolts holding the compressor and air tank together are tight.
- Make it a habit to open the drain tap (6) and release any condensation inside the air tank.
- Do not clean the compressor or air tank with solvents or flammable liquids.
- If the compressor is not to be used for a long time: Unplug the mains lead, empty the air tank
and open the drain tap (6).
Changing the oil
- Before changing the oil, make sure that the air compressor is switched off and unplugged from the wall socket.
- Remove the oil filler cap from the oil inlet (4).
- Tilt the compressor so that oil can run out of the oil filler hole into an appropriate receptacle.
- Let the oil completely drain from the compressor.
- Replace with new oil until the oil reaches the middle of the oil-display window. Refit the oil filler cap.
- Oil requirement, approx. 400 ml (not included).
- Use an oil suitable for air compressors such as SAE 30, ISO 68 or equivalent. Compressor oil is especially designed for compressors, amongst other things it has additives that prevent foaming. If no compressor oil is available then SAE 10–30 engine oil can be used as a substitute.
Troubleshooting guide
| The compressor does not start. | Is it plugged into a wall socket?Is the wall socket live?Has the motor's overload protection tripped? Reset by pushing in the button (1).Is the mains lead damaged? |
| Heavy vibrations and/or unusual sounds. | Check that all bolts holding the compressor and pressure vessel together are tight.Check all other joints and connections. |
| No pressure build-up in vessel or pressure too low. | Make sure the safety valve is not leaking.Make sure the drain tap is not leaking.Check all hose connections for leaks.Air filter is clogged. |
| Oil consumption too high. | Too much oil in the compressor.The ventilation hole in the oil filler cap is clogged. |
Responsible disposal
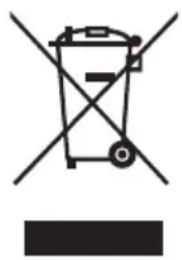
This symbol indicates that this product should not be disposed of with general household waste. This applies throughout the entire EU. In order to prevent any harm to the environment or health hazards caused by incorrect waste disposal, the product must be handed in for recycling so that the material can be disposed of in a responsible manner. When recycling your product, take it to your local collection facility or contact the place of purchase. They will ensure that the product is disposed of in an environmentally sound manner.
natural_image
Symbol of a trash bin crossed with no text or labels, accompanied by a black rectangular block below (no readable text or symbols)Specifications
Rated voltage 220–240 V AC, 50 Hz
Motor power 2.2 kW
No-load speed 2850 min-1
Air displacement 354 L/min
Free air delivery at 6 bar 187 L/min
Max working pressure 10 bar
Noise level LpA = 74.7 dB(A), KpA = 3 dB(A)
LwA = 94.7 dB(A), KwA = 3 dB(A)
Operating temperature +5°/+40°C
Storage temperature +5°/+40°C
Air tank 50 L
Size (L × W × H): 76 × 41 × 64 cm
Oil requirement approx. 400 ml (not included).
Weight 40 kg
Kompressor
Art.nr 41-1821 Modell EZ-3050V/10-L
Att komma igång
natural_image
Technical line drawing of a mechanical assembly with a numbered component (no text or symbols present)
natural_image
Symbol of a trash bin crossed out by two crossed lines, with no text or labels present.Specifikationer
Nätanslutning 220-240 V AC, 50 Hz
Motoreffekt 2,2 kW
Varvtal 2850 min-1
Kom i gang
natural_image
Technical line drawings of mechanical components and supports, showing structural assembly (no text or symbols)natural_image
Technical line drawing of a mechanical assembly with a numbered component (no text or symbols present)
natural_image
Symbol of a trash bin crossed with no text or numbers, representing waste sorting or disposal (no text present)Spesifikasjoner
Strømtilkobling 220–240 V AC, 50 Hz
Motoreffekt 2,2 kW
Turtall 2850min-1
Sylindervolum 354 l/min
Käytön aloittaminen
natural_image
Technical line drawing of a mechanical assembly with a numbered component (no text or symbols present)Käyttö
natural_image
Symbol of a trash bin crossed with no text or numbers, representing waste sorting or disposal (no text present)Tekniset tiedot
Erste Schritte
natural_image
Technical line drawings of mechanical components and supports, showing structural assembly (no text or symbols)natural_image
Technical line drawing of a mechanical assembly with no visible text or symbols
natural_image
Symbol of a trash bin crossed with no text or numbers, representing waste sorting or disposal (no text present)Technische Daten
Declaration of Conformity
Declares that this product complies with the requirements of the following directives and standards
Machinery Directive 2006/42/EC
EN 1012-1: 2010
EN 60204-1: 2006+A1: 2009
EMC Directive 2014/30/EU
EN: 61000-3-2: 2014
EN: 61000-3-3: 2013
EN: 55014-1: 2017
EN: 55014-2: 2015
Hemid Alfredson
Henrik Alfredsson
Manager Technique & Quality
Insjön, Sweden, 2020-09-18
Sverige
Postal 10 - 13 Market Place
Kingston Upon Thames
Surrey
KT1 1JZ
Deutschland
Kundenservice Hotline: 040 2999 78111
E-Mail: kundenservice@clasohlson.de
Homepage
www.clasohlson.de

- Important!
- Viktig information:
- Safety
- Symbols
- Product description
- Buttons and functions
- Getting started
- Before using the air compressor for the first time:
- Instructions for use
- Motor overload cut-out
- Care and maintenance
- Changing the oil
- Troubleshooting guide
- Responsible disposal
- Specifications
- Kompressor
- Att komma igång
- Specifikationer
- Kom i gang
- Spesifikasjoner
- Käytön aloittaminen
- Käyttö
- Tekniset tiedot
- Erste Schritte
- Technische Daten
- Declaration of Conformity
- Sverige
- Deutschland
Brand : Cocraft
Model : HC 503-V
Category : Compressor