
HH 500-L - Hedge trimmers Cocraft - Free user manual and instructions
Find the device manual for free HH 500-L Cocraft in PDF.


| Product Type | Hedge Trimmer |
| Brand | Cocraft |
| Model | HH 500-L |
| Power Supply | 220–240 V, 50 Hz AC |
| Power Consumption | 500 W |
| No-Load Speed | 1700 strokes/min |
| Cutter Bar Length | 492 mm |
| Max Cutting Capacity | 20 mm branch diameter |
| Weight | 2.6 kg |
| Dimensions (L×W×H) | 90 × 20 × 17 cm |
| Noise Level (LpA) | 87 dB(A), K=3 dB(A) |
| Noise Level (LwA) | 99 dB(A), K=3 dB(A) |
| Vibration Level | 5.8 m/s², K=1.5 m/s² |
| Double-Sided Blade | Yes, cuts in both directions |
| Safety Features | Safety lock button, blade sheath, two-hand operation |
| Maintenance | Lubricate cutter bar regularly; clean ventilation slits; sharpen blades when needed |
| Spare Parts & Repairability | Use only original spare parts; repairs by qualified service personnel only |
| Storage | Store in dry, dust-free place; always fit blade sheath when not in use |
| Included Accessories | Blade sheath, front handle guard, screws |
| Warranty & Support | Contact customer service per manual; warranty details not specified |
Frequently Asked Questions - HH 500-L Cocraft
User questions about HH 500-L Cocraft
0 question about this device. Answer the ones you know or ask your own.
Ask a new question about this device
Download the instructions for your Hedge trimmers in PDF format for free! Find your manual HH 500-L - Cocraft and take your electronic device back in hand. On this page are published all the documents necessary for the use of your device. HH 500-L by Cocraft.
USER MANUAL HH 500-L Cocraft
Read the entire instruction manual carefully and make sure that you fully understand it before you use the equipment. Keep the manual for future reference.
Viktig information:
natural_image
Product photo of a blue and black OJ craft hair shaver with 49 cm length标注 (no text or symbols on the device itself)Art.no Model
18-4760
31-9409
HTEG48B-550
HTEG48B-550
Ver. 20170210
Original instructions
Bruksanvisning i original
Originalbruksanvisning
Please read the entire instruction manual before using the product and then save it for future reference. We reserve the right for any errors in text or images and any necessary changes made to technical data. In the event of technical problems or other queries, please contact our Customer Services (see address details on the back).
Safety
General safety instructions for power tools
Warning: Read all the instructions. Failure to adhere to the following instructions may lead to electric shocks, fires or serious injuries.
SAVE THESE INSTRUCTIONS.
The term “power tools” in the following warning text refers to your handheld mains operated or battery operated tool.
1) Work area
a) Keep the work area clean and well illuminated. Cluttered and poorly lit areas invite accidents.
b) Do not use power tools in explosive environments, e.g. near to flammable liquids, gases or dust. Power tools generate sparks that can easily ignite dust or fumes.
c) Keep children and other bystanders away from the area where you are using the power tool. Distractions can cause you to lose concentration and control.
2) Electrical safety
a) The power tool's plug must fit correctly into the wall socket. Never modify the plug in any way. Never use an adaptor together with earthed power tools. Unmodified plugs and suitable wall sockets minimize the risk of electric shocks.
b) Avoid physical contact with earthed objects such as pipes, radiators, ovens and refrigerators. There is an increased risk of receiving an electrical shock if your body is earthed.
c) Do not expose the power tool to rain or other wet conditions. If water gets inside the power tool, it increases the risk of electric shock.
d) Do not abuse the mains lead. Never use the lead to carry the tool or pull the plug from a wall socket. Keep the lead away from heat, oil, sharp edges and moving parts. Damaged or tangled leads increase the risk of electric shock.
e) When using power tools outdoors, use an extension lead that is suitable for such purpose. The use of an extension lead designed for outdoor use decreases the risk of electric shocks.
f) If the use of the power tool in a wet environment is unavoidable, a wall socket equipped with a residual current device (RCD) should be employed. Use of an RCD significantly reduces the risk of electric shock.
3) Personal safety
a) Pay attention to what you are doing and use common sense when using power tools. Never use power tools if you are tired or under the influence of drugs, alcohol or medication. One moment of inattention while using a power tool may result in serious injury.
b) Wear protective clothing. Always wear safety glasses. Using protective clothing such as dust masks, non-slip safety shoes, helmets and ear defenders decreases the risk of injury.
c) Avoid accidental starts. Make sure that the power switch is set to OFF before plugging the power tool into a wall socket, fitting the battery or picking up/carrying the power tool. Carrying a power tool with your finger on the power switch/trigger or connecting the power tool to a wall socket when the power switch is set to ON is inviting an accident.
d) Remove all service tools/keys before switching on the power tool. A service tool left on any of the power tool's rotating parts may result in injury.
e) Do not overreach. Make sure you stand steady and well balanced at all times. This ensures better control over the power tool in unexpected situations.
f) Wear suitable clothing. Do not wear loose-fitting clothing or jewellery. Keep hair, clothes and gloves away from moving parts. Loose-fitting clothes, jewellery or long hair could become caught in moving parts.
g) If equipment for dust extraction or collecting is available make sure it is connected and used properly. Using of the aforementioned technical aids may decrease the risk of dust related hazards.
4) Use and maintenance of the power tool
a) Do not force the power tool. Use a power tool suitable for the work you are about to perform. The proper power tool will perform the task better and safer if used at the correct feed rate.
b) Never use the power tool if the power switch does not switch the tool on and off properly. All power tools that cannot be controlled by the power switch are dangerous and must be repaired.
c) Unplug the lead from the wall socket or remove the battery before making any adjustments, changing accessories or storing the power tool.
These precautions reduce the risk of the power tool starting unexpectedly.
d) Store power tools that are not being used out of children's reach. Do not allow people who are unfamiliar with the tool or its functions to operate the tool. Power tools can be dangerous if they fall into the hands of inexperienced users.
e) Maintaining power tools. Check for any incorrect settings, parts that catch, broken parts or anything else which may cause the power tool to malfunction. Any detected damage must be repaired before use. Accidents are frequently caused by poorly maintained power tools.
f) Keep cutting tools sharp and clean. Properly maintained cutting tools with sharp blades are less likely to jam and are easier to control.
g) Use the power tool, and any accessories in accordance with these instructions, take into consideration the working conditions and the work that is to be performed. Use of power tools for purposes other than that for which they are intended could result in a dangerous situation.
5) Service
a) Repairs and service should only be performed by qualified tradesmen, and only with original spare parts. This guarantees that the power tool's safety features are correctly maintained.
Specific safety instructions for hedge trimmers
- Keep all body parts away from the cutter bar. Do not remove cut debris or hold onto any material that you are cutting whilst the cutter bar's blades are in motion. Remove the battery before dislodging any debris. One moment of carelessness can result in serious personal injury.
- Turn off the hedge trimmer and carry it by the handle when moving it short distances. Always have the blade guard in place when storing or transporting the hedge trimmer. Correct use of the hedge trimmer will reduce the likelihood of personal injury caused by the cutter bar's blades.
- This product must not be used by anyone (including children) suffering from physical or mental impairment. This product should not be used by anyone that has not read the instruction manual unless they have been instructed in its use by someone who will take responsibility for their safety.
- Never allow children to play with the product.
• Always hold the hedge trimmer in both hands when using it.
- The blades will continue in motion for a few seconds after the power has been turned off.
- Note: Do not touch the blades while they are in motion.
- Keep all body parts away from the cutter bar's blades. Do not remove debris from the blades or hold onto any material that you are cutting whilst the trimmer blades are in motion. Remove the battery before dislodging any debris.
- Always switch off the hedge trimmer and have the blade guard mounted in place whenever moving or transporting it.
- Always inspect the hedge before cutting it to make sure that it does not contain any foreign objects.
• Always hold the hedge trimmer in both hands during use.
Safety symbols

Read the entire instruction manual before using the hedge trimmer.

Warning: Danger! Incorrect use of the hedge trimmer can present a danger both to you and your surrounding environment.

Always use safety glasses.

Always use ear protection.

Always use respiratory protection.

Never leave the hedge trimmer exposed to the rain or humid conditions.
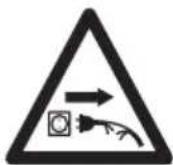
Unplug the product immediately if the mains lead has been severed, damaged in any way or even if the product is left unattended.
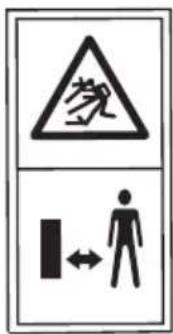
Objects ejected by the blades of the product could hit the operator or other persons in the vicinity. Always ensure that other people and pets keep at a safe distance when the product is in use. Under no circumstances must children enter the work area while the product is in use.
Buttons and functions
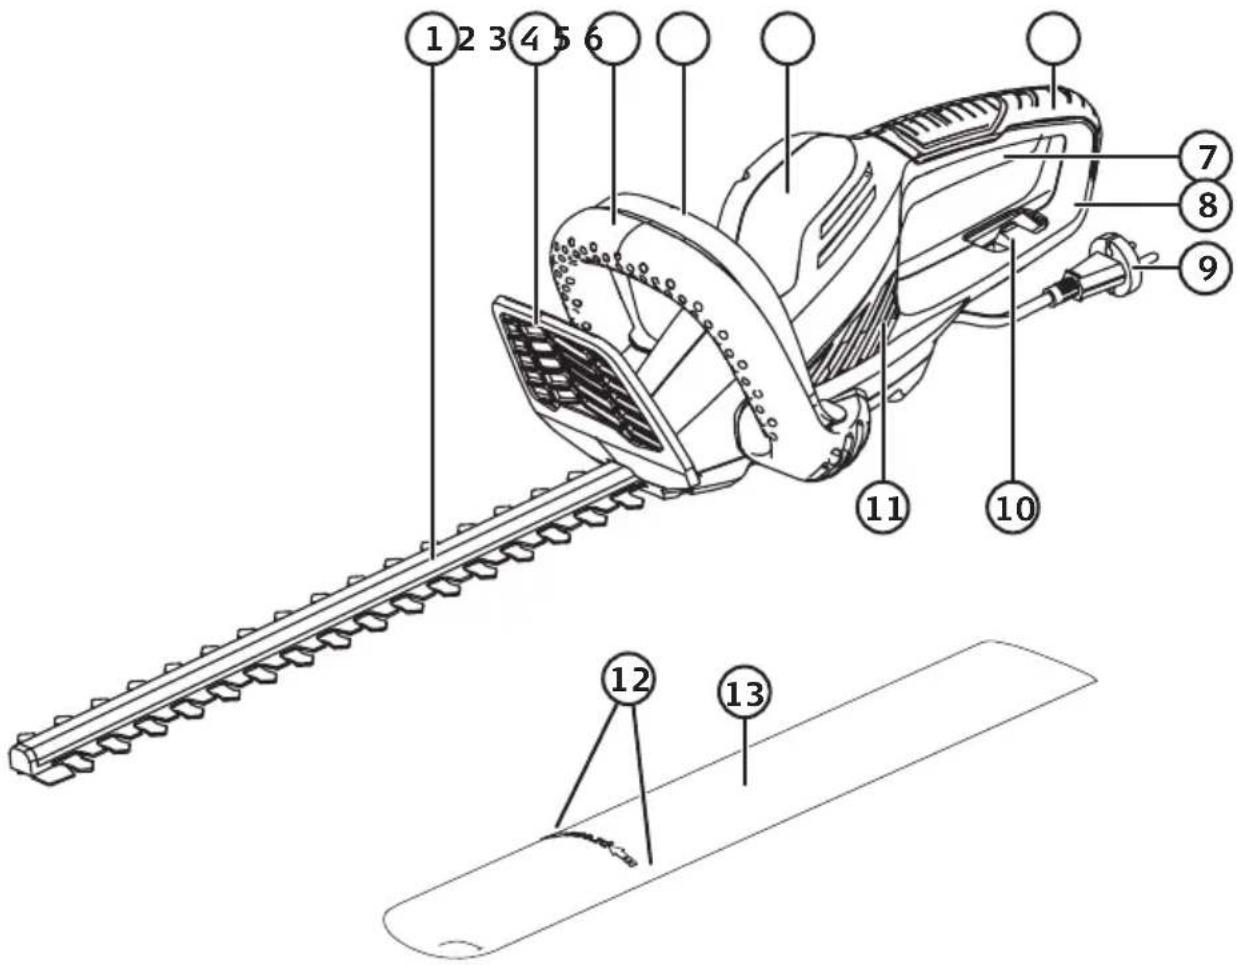
- Cutter bar and blades
- Front handle guard
- Front handle
- Trigger safety lock button
- Rear cover
- Rear handle
- Power trigger
- Rear guard
- Power lead with plug
- Power cord strain relief
- Motor housing ventilation slits
- Pressure points
- Blade sheath
Assembly
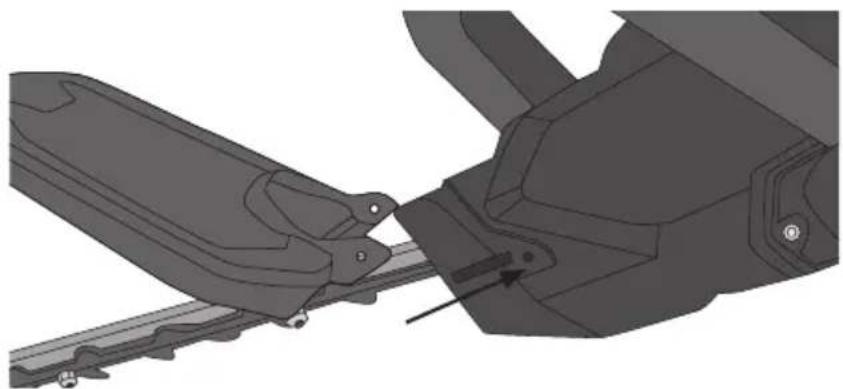
Attaching the front handle guard:
-
Slide the trimmer onto the front of the housing and align the screw holes.
-
Secure the trimmer guard using the included screws.
natural_image
Mechanical assembly diagram showing a bracket and mounting bracket with a directional arrow (no text or symbols)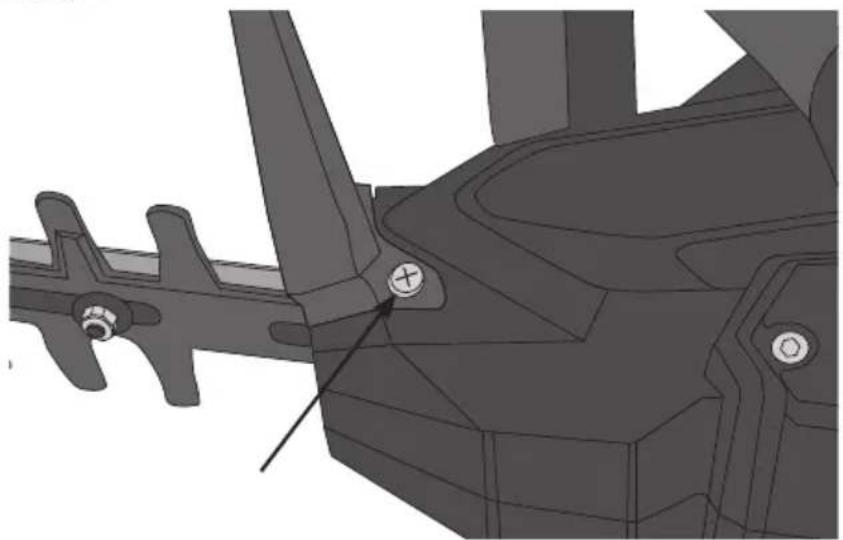
natural_image
Mechanical assembly diagram showing a bracket with mounting holes and a central bolt (no text or symbols)Operating instructions
Preparations
-
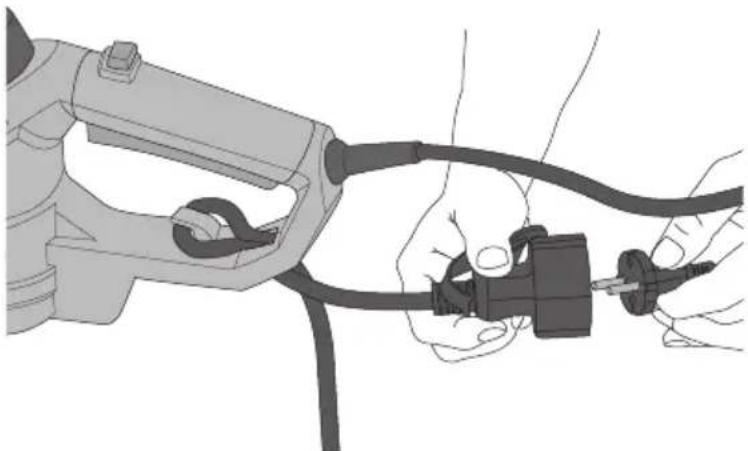
Make a loop in the extension lead about 30 cm from the end and loop it over the strain relief (10).
-
Plug the power lead (9) into the extension lead.
-
Plug the extension lead into a socket outlet.
-
Press in the pressure points (12) on the blade sheath and remove it.
natural_image
Illustration of hands connecting a cable to a plug, showing electrical connections (no text or symbols)Switching on
Before switching the trimmer on, check that:
• the ventilation slits (11) are not clogged.
- the trimmer and its power lead are undamaged.
- the safety lock button (4) and power trigger (7) are easily depressed and that they do not stick or function abnormally in any way.
- both handles (3 and 6) are clean and easily gripped.
- Hold the saw firmly with one hand on the front handle (3) and the other hand on the rear handle (6).
- First press in the safety lock button (4) and then pull the power trigger (7). The trimmer should now start.
- Switch the trimmer off by releasing either the safety lock button or the power trigger.
Cutting/trimming
- Make sure that there are no foreign objects (e.g. wire fences or posts) hidden in the hedge which you are about to cut.
• Max branch diam: 20 mm. - Hold the trimmer firmly; maintain a steady stance and do not lean out too far. Be extra careful when using a ladder.
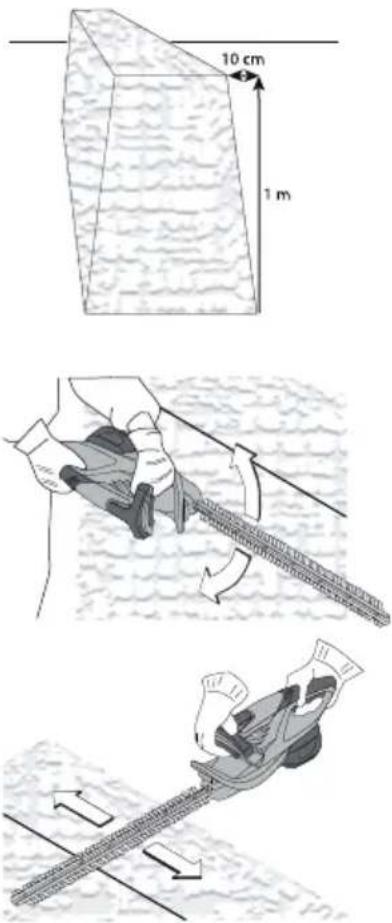
- Move the trimmer along in a slow and steady motion.
- The double-sided cutter bar enables trimming in both directions or in a pendulum action from side to side.
- For even trimming on the sides it is better to cut in the direction of growth, from the bottom up. If you trim from the top down, the thinner twigs will bend out and there is a risk of holes or thin patches appearing in your hedge.
- In order to ensure a straight top edge, you can stretch a length of string over the hedge as a guide.
Care and maintenance
Note: Always disconnect the hedge trimmer from the power supply before carrying out any maintenance or cleaning.
- Do not expose the tool to rain.
- Wear protective gloves when handling or cleaning the blades.
- Regularly check that the power trigger and safety lock are undamaged and work correctly.
- Regularly check the condition of the blades and make sure that all the nuts on the cutter bar are tight.
- Lubricate the cutter bar with an appropriate lubricant if the trimmer is not to be used for a long time.
- Clean the exterior of the tool with a soft brush and cloth. Do not use any water, solvents or polish.
- Remove all dirt, especially from around the motor housing ventilation slits.
- Store the trimmer in a dry, dust-free environment out of the reach of children.
- Always keep the blade sheath on when the hedge trimmer is not in use.
Troubleshooting guide
| Problem Solution | |
| The trimmer does not start. | Make sure that the mains lead is undamaged and properly connected to the wall socket.Check that the wall socket is live.Make sure that you have fully depressed both the safety lock and power trigger. |
| The cutter bar and blades become hot. | Lubricate the blades and sharpen them if necessary. |
| The hedge trimmer is sluggish. | Check that the extension lead is undamaged.Try another wall socket.Clean the ventilation slits of the motor regularly. |
| Unsatisfactory cutting result. | Don’t try to cut branches thicker than 20 mm.Have the blades sharpened by a professional. |
| Abnormal noise and vibration. | Check that the blades are sharp and undamaged.Tighten any loose screws/bolts. |
Responsible disposal
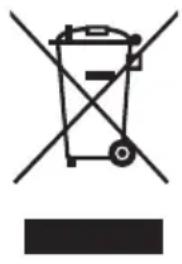
This symbol indicates that this product should not be disposed of with general household waste. This applies throughout the entire EU. In order to prevent any harm to the environment or health hazards caused by incorrect waste disposal, the product must be handed in for recycling so that the material can be disposed of in a responsible manner.
When recycling your product, take it to your local collection facility or contact the place of purchase. They will ensure that the product is disposed of in an environmentally sound manner.
natural_image
Symbol of a trash bin with crossed-out lines and a solid black rectangle below (no text or labels)Specifications
Voltage 220–240 V, 50 Hz
Wattage 500 W
No-load speed 1700 strokes/min
Cutter bar length 492 mm
Cutting capacity 20 mm
Weight 2.6 kg
Size 90 × 20 × 17 cm
Noise emission LpA = 87 dB(A), K = 3 dB(A)
LwA = 99 dB(A), K = 3 dB(A)
Vibration value 5.8 m/s ^2 , K=1.5 m/s ^2
Häcksax 500 W
Art.nr 18-4760 Modell HTEG48B-550
31-9409 HTEG48B-550
natural_image
Mechanical assembly diagram showing a bracket and mounting bracket with a directional arrow (no text or symbols)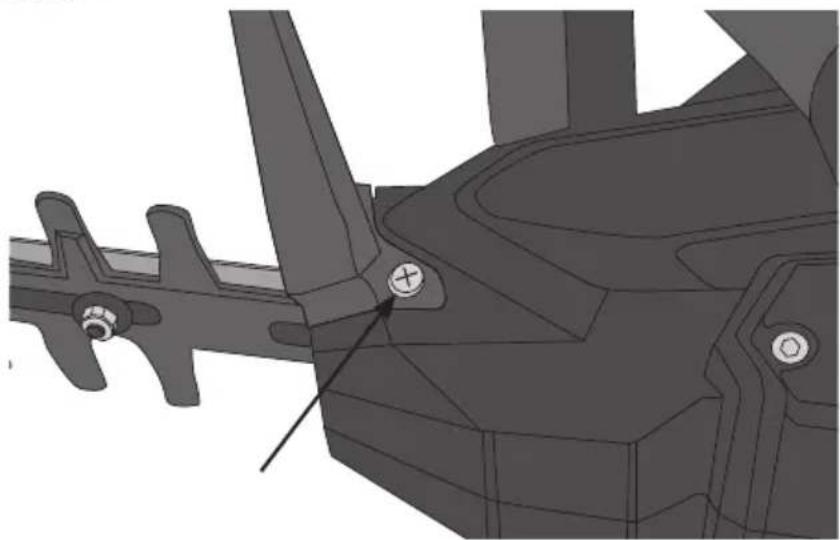
natural_image
Mechanical assembly diagram showing a bracket with mounting holes and a central bolt (no text or symbols)natural_image
Illustration of hands connecting a plug into a cable, no text or symbols presentStart
natural_image
Symbol of a trash bin with crossed-out lines and a solid black rectangle below (no text or labels)Specifikationer
Nätanslutning 220–240 V, 50 Hz
Spänning 500 W
Varvtal 1700 v/min
natural_image
Mechanical assembly diagram showing a bracket and mounting bracket with a tool interacting (no text or symbols visible)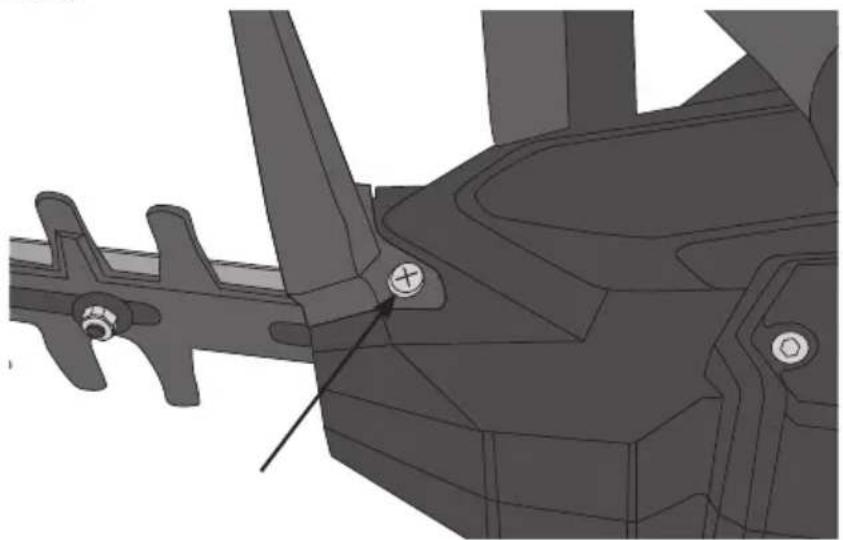
natural_image
Mechanical component diagram showing a bracket and mounting features (no text or symbols)Bruk
Forberedelser
natural_image
Illustration of hands connecting a plug to a cable with a plug inserted (no text or symbols)Start
natural_image
Symbol of a trash bin with crossed lines indicating no waste or restriction, and a solid rectangle below (no text or labels)Spesifikasjoner
Hekksaks
Strømtilkobling 220–240 V, 50 Hz
Spenning 500 W
Turtall 1700 o/min
Maks klippelengde 492 mm
Kapasitet ∅ 20 mm
Vekt 2,6 kg
Mål 90 × 20 × 17 cm
Lyd LpA = 87 dB(A), K = 3 dB(A)
LwA = 99 dB(A), K = 3 dB(A)
natural_image
Mechanical assembly diagram showing a bracket and mounting bracket with a directional arrow indicating movement (no text or symbols present)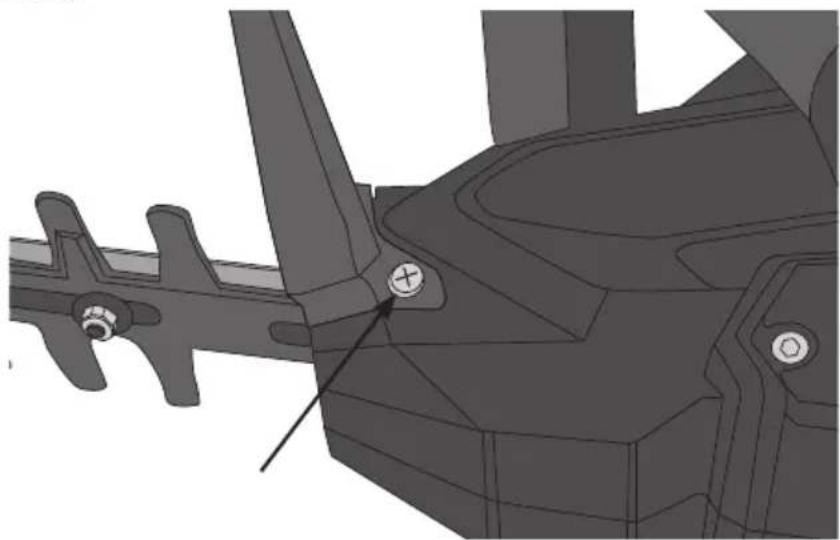
natural_image
Mechanical assembly diagram showing a bracket with mounting holes and a central bolt (no text or symbols)Käyttö
Esivalmistelut
natural_image
Illustration of hands connecting a cable to a plug, showing electrical connections (no text or symbols)Käynnistys
natural_image
Symbol of a trash bin with crossed lines indicating no waste or restriction, and a solid rectangle below (no text or labels)Tekniset tiedot
Pensasleikkuri
natural_image
Mechanical assembly diagram showing a bracket and mounting bracket with no visible text or symbolsnatural_image
Mechanical assembly diagram showing a bracket with mounting holes and a central bolt (no text or symbols)natural_image
Illustration of hands connecting a cable to a plug, showing wiring and installation (no text or symbols)Start
natural_image
Symbol of a trash bin with crossed-out lines and a solid black rectangle below (no text or labels)Technische Daten
Heckenschere
Declaration of Conformity
Declares that this product complies with the requirements of the following directives and standards
Manager Technique & Quality
Insjön, Sweden, 2017-01-16
Sverige
Postal 10 - 13 Market Place
Kingston Upon Thames
Surrey
KT1 1JZ
Deutschland
Kundenservice Hotline: 040 2999 78111
E-Mail: kundenservice@clasohlson.de
Homepage
www.clasohlson.de


- Viktig information:
- Safety
- General safety instructions for power tools
- 1) Work area
- 2) Electrical safety
- 3) Personal safety
- 4) Use and maintenance of the power tool
- 5) Service
- Specific safety instructions for hedge trimmers
- Safety symbols
- Buttons and functions
- Assembly
- Operating instructions
- Preparations
- Switching on
- Cutting/trimming
- Care and maintenance
- Responsible disposal
- Specifications
- Häcksax 500 W
- Start
- Specifikationer
- Bruk
- Forberedelser
- Spesifikasjoner
- Hekksaks
- Käyttö
- Esivalmistelut
- Käynnistys
- Tekniset tiedot
- Pensasleikkuri
- Technische Daten
- Heckenschere
- Declaration of Conformity
- Sverige
- Deutschland
Brand : Cocraft
Model : HH 500-L
Category : Hedge trimmers