
KM0507 - Receiver Krüger&Matz - Free user manual and instructions
Find the device manual for free KM0507 Krüger&Matz in PDF.


| Product Type | Stereo Receiver |
| Model | KM0507 |
| Brand | Krüger&Matz |
| Continuous Power Output | 45 W x 2 CH (20 Hz-20 kHz, 0.07% THD, 8 Ω) |
| Frequency Response | Line Level Inputs: 20 Hz – 100 kHz ±1 dB |
| Total Harmonic Distortion | <0.07% at rated power |
| Signal-to-Noise Ratio | >100 dB |
| Channel Separation | >85 dB (Line inputs) |
| Tone Controls | Bass and Treble: ±6 dB at 100 Hz / 10 kHz |
| Input Sensitivity | Phono: 2.5 mV, Line: 200 mV |
| Input Overload | 5V (Line inputs) |
| Analog Audio Inputs | 4 x RCA (PHONO, CD, BD/DVD, TUNER) |
| Digital Audio Inputs | 1 x Optical, 1 x Coaxial |
| Outputs | Subwoofer Out, REC Out, Headphones (3.5mm), Speaker Terminals (Screw-type) |
| Bluetooth | External module (supplied), supports A2DP and SCMS-T |
| USB Playback | MP3, WMA, WAV, AAC (via rear USB port) |
| Speaker Impedance | 8 Ω (recommended) |
| Power Supply | 115V/60Hz or 230V/50Hz (selectable) |
| Power Consumption | 220 W (max), <0.5 W (standby) |
| Dimensions (W x H x D) | 430 x 72 x 240 mm |
| Weight | 6.2 kg (net) |
| Special Features | High-quality aluminum front panel, gold-plated speaker posts, DIRECT mode for pure audio |
| Cleaning | Disconnect power, use soft slightly damp cloth, no chemical agents |
Frequently Asked Questions - KM0507 Krüger&Matz
User questions about KM0507 Krüger&Matz
0 question about this device. Answer the ones you know or ask your own.
Ask a new question about this device
Download the instructions for your Receiver in PDF format for free! Find your manual KM0507 - Krüger&Matz and take your electronic device back in hand. On this page are published all the documents necessary for the use of your device. KM0507 by Krüger&Matz.
USER MANUAL KM0507 Krüger&Matz
natural_image
Completely black image with no visible content or text.
bar
| Year | Value | |---|---| | 2018 | 100 |natural_image
Diagram showing two mechanical or electrical components with arrows indicating motion, no text or symbols presentHinweis:
- Read this instruction manual carefully before use, and keep it for future reference.
- Protect the product from water and humidity. Make sure to place this device in a well ventilated, cool, dry location, away from direct sunlight, sources of heat, dust, moisture, vibrations and extreme temperatures. (The product should be located away from heat sources such as radiators, heat vents, or other devices that produce heat.)
- In order to avoid electromagnetic interference place this device away from other electrical appliances.
- Do not cover the product. Covering of the ventilation grill may lead to overheating and in consequence fire or product damage/personal injury.
- This product, in combination with headphones or speakers, may be capable of producing sound levels that could cause permanent hearing loss. Do not operate for a long period of time at a high volume level or at a level that is uncomfortable. If you experience any hearing loss or ringing in the ears, seek for medical advice.
- The product should be connected to a power supply only of the type described in the operating instructions or as marked on the product.
- While disconnecting the device from wall outlet, grasp and pull the plug, never the cord.
- Never use this device if the power supply cord is damaged.
- Disconnect the device from the power supply if it is not going to be used for a long time.
- This lightning flash with arrowhead symbol, within an equilateral triangle is intended to alert the user to the presence of uninstalled “dangerous voltage” within the product’s enclosure
that may be of sufficient magnitude to constitute a risk of electric shock to persons.
- The exclamation point within an equilateral triangle is


intended to alert the user to the presence of important operating and maintenance (servicing) instructions in the literature accompanying the appliance.
- ALWAYS disconnect this device from power supply mains before cleaning. Clean it with soft, slightly damp cloth only. Do not use any chemical agents to clean the product.
- OVERLOADING: Do not overload wall outlets or extension cords as this can result in the risk of fire or electric shock.
- Make sure to place this product on flat, dry and stable surface.
- POWER-CORD PROTECTION: The power supply cables should be routed so that they are not likely to be walked on or pinched by items placed upon or against them, paying particular attention to cables at plugs and the point where they exit from the product.
- Do not use unauthorized accessories as they may damage the unit.
- Unplug this product from the wall outlet and refer servicing to qualified service personnel under the following conditions:
- If the unit exhibits sudden unusual operation or unusual display characteristics.
- If liquid has been spilled, or objects have fallen into the product.
- If the product has been exposed to rain or water.
- If the product has been dropped or damaged in any way.
- If the product exhibits a distinct change in performance.
- SERVICING: Do not attempt to service this product yourself as removing cover may expose you to dangerous voltages or other hazards. Refer all servicing to qualified service personnel.
- Do not disassemble the device, as it may cause risk of electric shock. The product has no user-serviceable parts inside.
- LIGHTNING: For added protection for this product during a thunderstorm, or when it is left unattended and unused for long period of time, unplug it from the wall outlet and disconnect the antenna or cable system. This will prevent damage to the product due to lightning and power line surges.
- Before moving the device make sure to switch it to standby mode and unplug it from the mains supply.
22. NOTES ON USE:
- Avoid high temperatures
- Allow for sufficient heat dispersion when installed on a rack.
- Hold the plug when unplugging the cord.
- Keep the set free from moisture, water and dust.
- Unplug the power cord when not using the set for long periods of time.
- Do not obstruct the ventilation holes
-
Never disassemble or modify the set in any way.
-
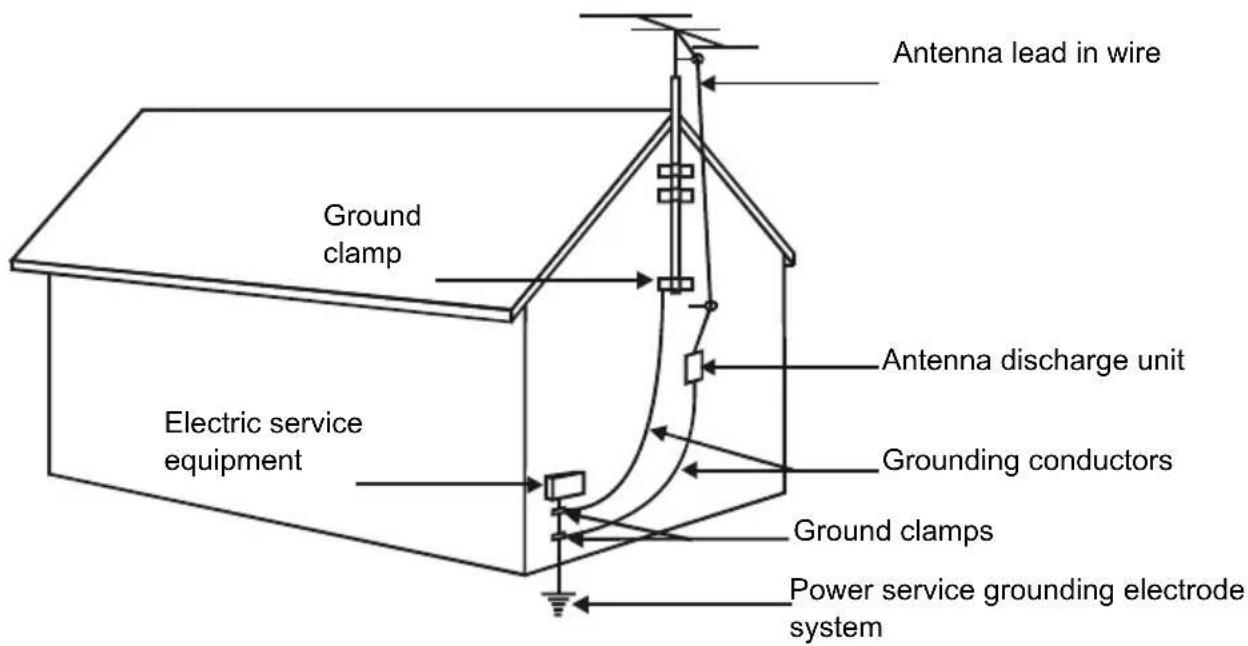
OUTDOOR ANTENNA GROUNDING: If an outside antenna or cable system is connected to the product, be sure the antenna or cable system is grounded so as to provide some protection against voltage surges and built-up static charges. The example below is for reference only. Correct grounding should always be installed by an electrician.
PRODUCT DESCRIPTION
FRONT PANEL

- ON/OFF: Turn the unit into On/Standby.
- SOURCE: Input source selection (DIGITAL IN/B.T., CD, BD/DVD, TUNER, PHONO, LINE IN/USB)
• DIGITAL IN/B.T.:
» Optical: LED - Orange color
» Coaxial: LED - Green color
» B.T.: LED - Red color
» LINE IN/USB:
» LINE IN: LED - Green color
» USB: LED - Red color
- VOLUME: Volume level control of all audio channels.
- BALANCE: Speaker balance adjustment
- TREBLE: Treble adjustment.
- BASS: Bass adjustment.
- LINE IN: LINE IN device input socket
- DIRECT: DIRECT mode selection (when ON, sound signals are output directly, without being passed through the various adjustment circuits (bass, treble, etc.) This allows for reproduction of the sound with greater fidelity, and at the same time disables any settings made with bass, treble, balance.
- MUTE: Press to mute sound
- REMOTE SENSOR
- PHONES: Headphones cable socket
REAR PANEL

-
Analog audio In: PHONO, CD, BD/DVD, TUNER
-
REC OUT: This analog audio output is for connecting a recorder with an analog audio input.
-
Sub OUT: Subwoofer connection socket
-
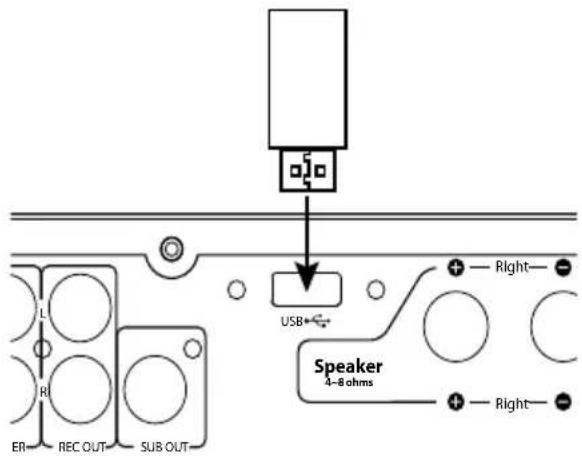
USB: USB port
-
SPEAKER: Terminal posts for connecting speakers
-
Optical Digital: Optical digital audio input for connecting components with optical digital audio output (e.g. CD, DVD/BD players)
-
Coaxial Digital: Coaxial digital audio input for connecting components with coaxial digital audio output (e.g. CD, BD/DVD players)
-
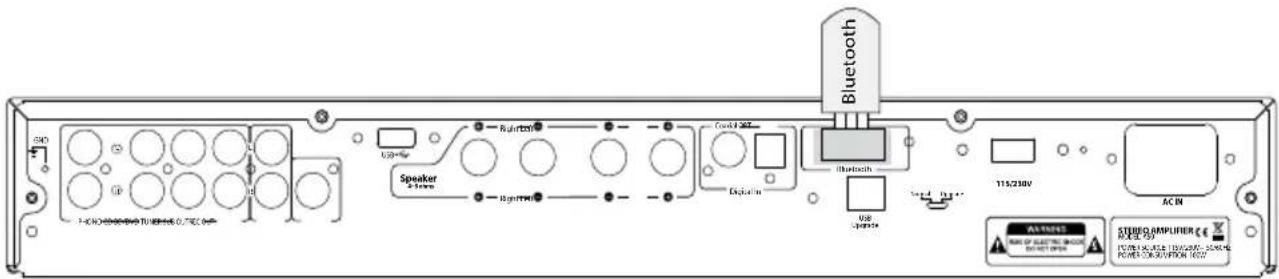
Bluetooth: External bluetooth module socket
-
115V / 230V selector: (Before connecting this device to power mains, select the voltage appropriate to local power mains voltage).
-
AC Outlet: Power supply socket
-
Normal/Update: For dealer use only - Switches the unit between normal (default) mode and update modes. Do not change the mode to update mode as damage may result!
-
USB Upgrade (service upgrade)
REMOTE CONTROL
-
Standby button (turn on/off)
-
Mute button.
Press to mute/unmute
- VOL + button
Press to adjust volume level
- CD button
Press to select CD source
- BD/DVD button
Press to select Blue-Ray Disc/DVD source
- USB button
Press to select USB source
7.
Press to start/pause playback
- TUNER button
Press to select TUNER source
- PHONO
Press to enter earphones mode
- VOL -
Press to adjust volume level
- LINE IN
Press to select Bluetooth as input source
13.
Press to select previous track
14.
Press to select next track
- Coaxial
Press to select digital coaxial input
- Optical
Press to select digital optical input

BATTERY INSTALLATION
- Remove the battery compartment cover.
- Insert two "AAA" batteries. Make sure the batteries are inserted with their positive "+" and negative "-" poles positioned correctly.
- Close the cover until it clicks.
Notes:
- Even if the remote control unit is operated within the effective range, remote control operation may be impossible if there are any obstacles between the unit and the remote control.
- If the remote control unit is operated near other appliance which generates infrared rays, or if other remote control devices using infrared rays are used near the unit, it may operate incorrectly.
- The power is turned on/standby by pressing the Standby button on the remote control.
- Remove the batteries if the remote control is not going to be used for an extended period of time.

- Do not drop or cause impact to the remote control.
- Do not spill water or any liquid on the remote control, nor place it on wet surfaces.
- Do not place the remote control under the direct sunlight or near sources of heat.
- Clean this remote control only with soft, slightly damp cloth.
- Do not heat or disassemble batteries and never dispose of old batteries by throwing them in a fire.
- Point the remote control towards the remote sensor IR of the front of the unit.
- Make sure that there is no obstacle between the infrared remote sensor of the unit and remote control.
CONECTION
Before making any connections, read the manuals supplied with your other components. Don't connect the power cord until you've completed and double-checked all connections.
Connection Color Coding

RCA-type connections are usually color-coded: red, white, and yellow. Use red plugs to connect right-channel audio inputs and outputs (typically labeled "R"). Use white plugs to connect left-channel audio inputs and outputs (typically labeled "L").
- Push plugs in all the way to make good connections (loose connections can cause noise or malfunctions).
- To prevent interference, keep audio and video cables away from power cords and speaker cables.

CABLES & JACKS
| Optical digital audio |  |  | Offers the best sound quality and allows you to enjoy surround sound (e.g., Dolby Digital, DTS). The audio quality is the same as for coaxial. |
| Coaxial digital audio |  |  | Offers the best sound quality and allows you to enjoy surround sound (e.g., Dolby Digital, DTS). The audio quality is the same as for optical. |
| Analog audio (RCA) |   |  | This cable carries analog audio. It's the most common connection format for analog audio, and can be found on virtually all AV components. |
LOUDSPEAKER CONNECTIONS
Speaker Connection Precautions
- Disconnect the power cord from the wall outlet before making any connections.
- Check the impedance of your speakers.
• Dedicated speakers' impedance is 8 Ohms. The amplifier's red speaker terminals are the + (positive) terminals and the black terminals are the – (negative) terminals.
- The red (+) speaker cable connect to red (positive) terminal at the amplifier; connect the black (-) speaker cable to black (negative) terminal at the back of the amplifier.
- Prepare the speaker cords for connection by stripping off approximately 10 mm or less (no more as this could cause a short circuit) of the outer insulation. Twist the wires tightly together so that they are not straggly.

natural_image
Diagram showing two mechanical or electrical components with arrows indicating motion, no text or symbols presentCONNECTING THE SPEAKER CABLES
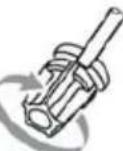
- Unscrew the knob
- Insert the speaker cable.
- Tighten the knob and secure the cable.

①
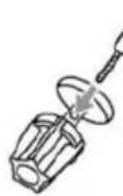
2
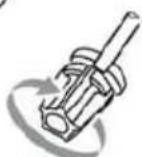
③

AUDIO CONNECTION
- Use audio cables to connect the decoder's audio jacks to your compatible CD player or other audio playback device.
- Select the input source for audio playback.
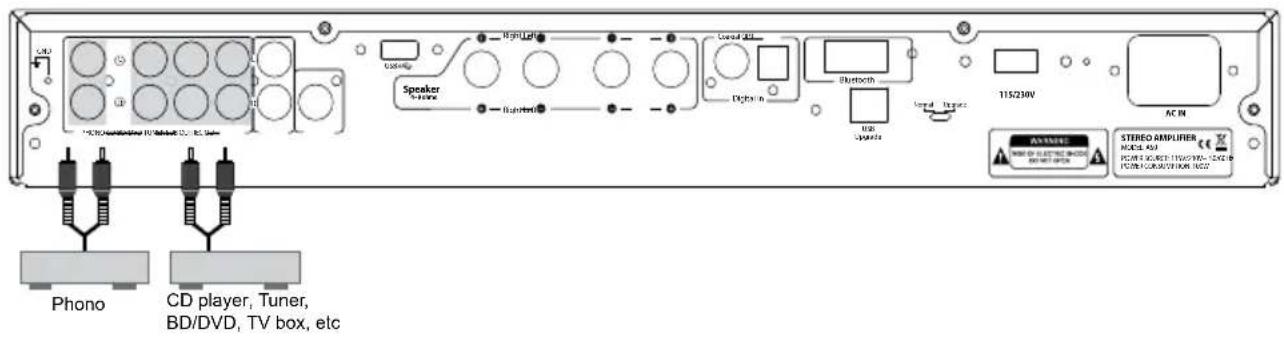
ANALOGUE AUDIO CONNECTION
This unit has four analogue audio input terminals: PHONO, CD, BD/DVD, TUNER.
Note: Do not plug in the mains power lead or turn on the unit before all connections have been made.
Connect to source equipment using phono cables (stereo 2RCA-2RCA).
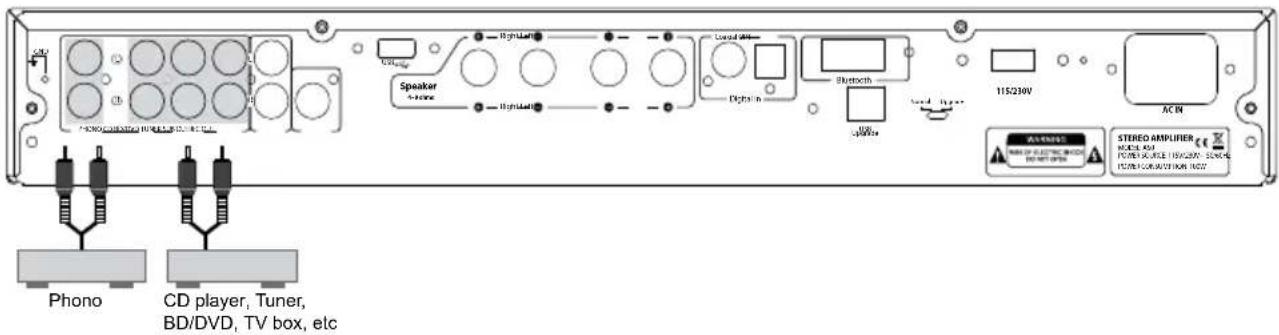
DIGITAL AUDIO CONNECTION

This unit has two digital audio connections: Optical digital connection and coaxial digital connection.
BLUETOOTH CONNECTION
When the Bluetooth module is connected to this unit, a product equipped with Bluetooth wireless technology can be used to listen to music wirelessly.
The Bluetooth module supports SCMS-T contents protection, so music can also be enjoyed on devices equipped with SCMS-T type Bluetooth wireless technology.
AC CORD CONNECTION
Note: BEFORE connecting this device to power mains, select AC voltage appropriate with local mains supply, using voltage selector at the back of the unit.
Connect the power cord after you've completed and double-checked all connections.
OPERATION
TURNING ON THE UNIT
To turn on the unit, press the [ON/OFF] button on the unit or the ⏻ button on remote control. Press the button again to set the unit to Standby.
Note:
Unplug the power cord from the wall outlet in order to completely turn off the power. Be sure to stop playback before turning the power off.
STANDBY MODE
The unit (in each mode except tuner mode) will automatically enter Standby mode (power consumption <0.5 W) if there is no operation for 30 minutes continuously, with no signal input.
USING HEADPHONES
Turn down the volume, and then connect your stereo headphones to the [PHONES] jack. You can adjust the volume by using the VOLUME control knob on the unit or by pressing [VOL +/-] button on remote control.
INPUT SOURCES SELECTION
Use the input selector buttons (either on front panel of the unit or remote control) to select the input source.
VOLUME ADJUSTMENT
Use the VOLUME control knob on the unit or [VOL+/-] button on remote control.
TONE CONTROL SETTINGS
To adjust the bass and treble for the front speakers rotate BASS and TREBLE control knobs on the front panel of the unit.
USB PLAYBACK
-
Insert your USB flash drive into USB socket at the rear of the unit.
-
Select "USB" input source using the [USB] button on remote control or SOURCE control knob on the front panel of the unit.
-
To start/pause/resume playback, press the Play button. Playback will start with the top file in the folder structure.
Note:
- When all music files of a USB flash drive have been played, the unit will stop playback.
- Please connect your USB flash drive directly to the unit's USB port instead of via a USB hub.
- USB port is designed for USB flash drive, it cannot be guaranteed for hard disk.
When the Bluetooth module is connected to this unit, a product equipped with Bluetooth wireless technology can be used to listen to music wirelessly.
Note: External device have to supports A2DP Bluetooth standard.
Pair this device with the Bluetooth external one before first use. Pairing needs to be done only once.
Pairing
- Press the Bluetooth button on the remote control to activate Bluetooth mode.
- Turn on the Bluetooth on your external device, and search for other devices.
- Connect it with the Bluetooth module: place it near the system and set it into the pairing mode. Insert default password "0000" if necessary.
Operation
Once you perform pairing with a given external device, connect the devices as instructed below:
- Turn ON the Bluetooth on the external device.
- Activate Bluetooth mode on the amplifier (insert Bluetooth module and press the Bluetooth button on the remote control).
- Begin to play music on the Bluetooth enabled external device
Note:
- Connect only the Bluetooth module supplied with this device. Do not connect unoriginal BT modules to this device.
- Remote control operation is not guaranteed for all Bluetooth enabled devices.
SERVICE/NORMAL
Switches at the rear of the unit between normal (default) mode and update modes are for dealer use only.
Do not change the mode to update mode as damage may result!
TROUBLESHOOTING GUIDE
To determine any problem with your receiver, check the table below first. If the problem remains, consult your nearest dealer.
| Problem Possible cause Suggestion | ||
| Amplifier | ||
| When listening to the music in stereo left/right speakers reversed | Speakers are connected wrong | Reconnect if necessary |
| Low hum or buzz sound Power | cords placed near this product | Place this product as far as possible from power cords |
| Sound is only heard from one channel | One of the input cords is disconnected.The BALANCE control is set to one side | Connect the input leads and adjust the BALANCE control |
| Sound cuts off when listening to the music or no sound even though power is ON | Speaker impedance is less than prescribed for this unit | After turning off the power and then turning it on again, reduce the volume or change to the correct 8 ohm speakers |
| Low bass response Speaker polarity (+/-) is reversed | Check all speakers for correct polarity | |
| Remote Control | ||
| Remote control does not work | The batteries are empty Replace with new batteries | |
| The remote control unit is too far from the receiver or out of the effective range | Operate the Remote Control unit within the effective range | |
SPECIFICATIONS
Specifications
Continuous power output: 45 W x 2 CH (20 Hz-20 kHz, <0.07%, 8 Ω)
Total Harmonic Distortion (20 Hz-20 kHz): <0.07% at rated power 45 W
Frequency Response: Line Level Inputs 20 Hz-100 kHz ±1 dB
Phono input: 2.5 mV
Line level inputs: 200 mV
Input overload: line level inputs 5V
Tone Controls-Bass/Treble: 100 Hz/ 10 kHz, ±6dB
Signal to Noise Ratio: >100dB
Channel Separation: Line inputs >85dB
Features
High Quality Aluminum Front Panel
Hi-Fi Grade Gold-plated Speaker Posts
Remote Controller
2 x Digital inputs: coaxial, optical
4 x Analogue inputs: RCA
Bluetooth External module
USB port
USB Playback (MP3, WMA, WAV, AAC)
Standby power consumption: <0.5W
General
Power requirements: 115V/60Hz (USA) and 230V/50Hz (EU) selector
Power consumption: 220 W
Dimensions: 430x240x72 mm
Weight (Net): 6.2 Kg
Specifications are subject to change without prior notice.
"The Lechpol company declares that product KM0507 is consistent with the essential requirements and other relevant provisions of directive 1999/5/EC. The proper declaration for download from www.lechpol.eu"

English
Correct Disposal of This Product
(Waste Electrical & Electronic Equipment)


(Applicable in the European Union and other European countries with separate collection systems) This marking shown on the product or Its literature, indicates that It should not be disposed with other household wastes at the end of its working life. To prevent possible harm to the environment or human health from uncontrolled waste disposal, please separate this from other types of wastes and recycle it responsibly to promote the sustainable reuse of material resources. Household users should contact either the retailer where they purchased this product, or their local government office, for details of where and how they can take this item for environmentally safe recycling. Business users should contact their supplier and check the terms and conditions of the purchase contract This product should not be mixed with other commercial wastes for disposal.
Made in China for LECHPOL Zbigniew Leszek, Miętne, 1 Garwolińska Street, 08-400 Garwolin.
KWESTIE BEZPIECZEŃSTWA:
natural_image
Diagram showing two mechanical or electrical components with arrows indicating motion, no text or symbols presentnatural_image
Two mechanical screwdrivers with rotating heads and adjustment rings (no text or symbols)②
③

PODŁĄCZENIA AUDIO
Uwaga:
Moc RMS: 45 W x 2 CH (20 Hz-20 kHz, <0.07%, 8 Ω)
natural_image
Diagram showing two mechanical or electrical components with arrows indicating motion, no text or symbols presentCONECTAREA CABLURILOR AUDIO
natural_image
Two mechanical components with arrows indicating motion or assembly (no text or symbols)②
3

CONEXIUNE AUDIO
CONEXIUNE AUDIO ANALOGICA
Nota:
natural_image
Completely black image with no visible content or text.
bar
| Year | Value | |---|---| | 2018 | 100 |
natural_image
Completely black image with no visible content or text.
line
| X | Y | |---|---| | 0.0 | 0.0 | | 0.1 | 0.1 | | 0.2 | 0.2 | | 0.3 | 0.3 | | 0.4 | 0.4 | | 0.5 | 0.5 | | 0.6 | 0.6 | | 0.7 | 0.7 | | 0.8 | 0.8 | | 0.9 | 0.9 | | 1.0 | 1.0 | | 1.1 | 0.9 | | 1.2 | 0.8 | | 1.3 | 0.7 | | 1.4 | 0.6 | | 1.5 | 0.5 | | 1.6 | 0.4 | | 1.7 | 0.3 | | 1.8 | 0.2 | | 1.9 | 0.1 | | 2.0 | 0.0 |www.krugermatz.com
Krüger&Matz is a registered trademark


- Hinweis:
- NOTES ON USE:
- PRODUCT DESCRIPTION
- REAR PANEL
- REMOTE CONTROL
- BATTERY INSTALLATION
- Notes:
- CONECTION
- Connection Color Coding
- CABLES & JACKS
- LOUDSPEAKER CONNECTIONS
- Speaker Connection Precautions
- CONNECTING THE SPEAKER CABLES
- AUDIO CONNECTION
- ANALOGUE AUDIO CONNECTION
- BLUETOOTH CONNECTION
- AC CORD CONNECTION
- OPERATION
- TURNING ON THE UNIT
- STANDBY MODE
- USING HEADPHONES
- INPUT SOURCES SELECTION
- VOLUME ADJUSTMENT
- TONE CONTROL SETTINGS
- USB PLAYBACK
- Note:
- Pairing
- SERVICE/NORMAL
- TROUBLESHOOTING GUIDE
- SPECIFICATIONS
- Features
- General
- English
- KWESTIE BEZPIECZEŃSTWA:
- PODŁĄCZENIA AUDIO
- Uwaga:
- CONECTAREA CABLURILOR AUDIO
- CONEXIUNE AUDIO
- CONEXIUNE AUDIO ANALOGICA
- Nota:
Brand : Krüger&Matz
Model : KM0507
Category : Receiver