
ZMM2853B - Meat Grinder Zelmer - Free user manual and instructions
Find the device manual for free ZMM2853B Zelmer in PDF.


| Product Type | Electric Meat Grinder |
| Brand | Zelmer |
| Model | ZMM2853B |
| Power | 800 W (estimated standard) |
| Rated Voltage | 220-240 V ~ 50/60 Hz (typical) |
| Continuous Operation Time | 10 minutes max, then cool down |
| Housing Material | Plastic body, aluminum alloy cap |
| Blade Material | Stainless steel double-side blade |
| Feed Screw Material | Metal with coupling |
| Mesh Sieve Sizes Included | 3 mm, 5 mm, 7 mm |
| Accessories Included | Food tray, pusher, sausage accessory with separator, vegetable accessory (fine grater, coarse grater, coarse slicer, ultra-fine grater), mesh sieves, ring collar |
| Functions | Meat grinding, sausage making, potato mashing, garlic mashing, noodle making, shredding, slicing |
| Safety Features | Lock button, automatic shut-off when overloaded, non-slip feet |
| Cord Length | Approx. 1 m (typical) |
| Weight | Approx. 3 kg |
| Dimensions (L x W x H) | Approx. 30 x 20 x 20 cm |
| Cleaning | Hand wash plastic parts; metal parts rinse and dry immediately; do not immerse motor base |
| Dishwasher Safe | Plastic parts only; not metal parts |
| Repairability | Official technical service only; do not open device |
| Warranty | 2 years (EU) |
Frequently Asked Questions - ZMM2853B Zelmer
User questions about ZMM2853B Zelmer
0 question about this device. Answer the ones you know or ask your own.
Ask a new question about this device
Download the instructions for your Meat Grinder in PDF format for free! Find your manual ZMM2853B - Zelmer and take your electronic device back in hand. On this page are published all the documents necessary for the use of your device. ZMM2853B by Zelmer.
USER MANUAL ZMM2853B Zelmer
ZMM2851B / ZMM2853B /
ZMM2854B
MASZYNKA DO MIELENIA MIĘSA
Мясорубка
/ Meat mincer
zelmer
natural_image
White zelmer electrician tool with handle and screw, no visible text or symbols on the device body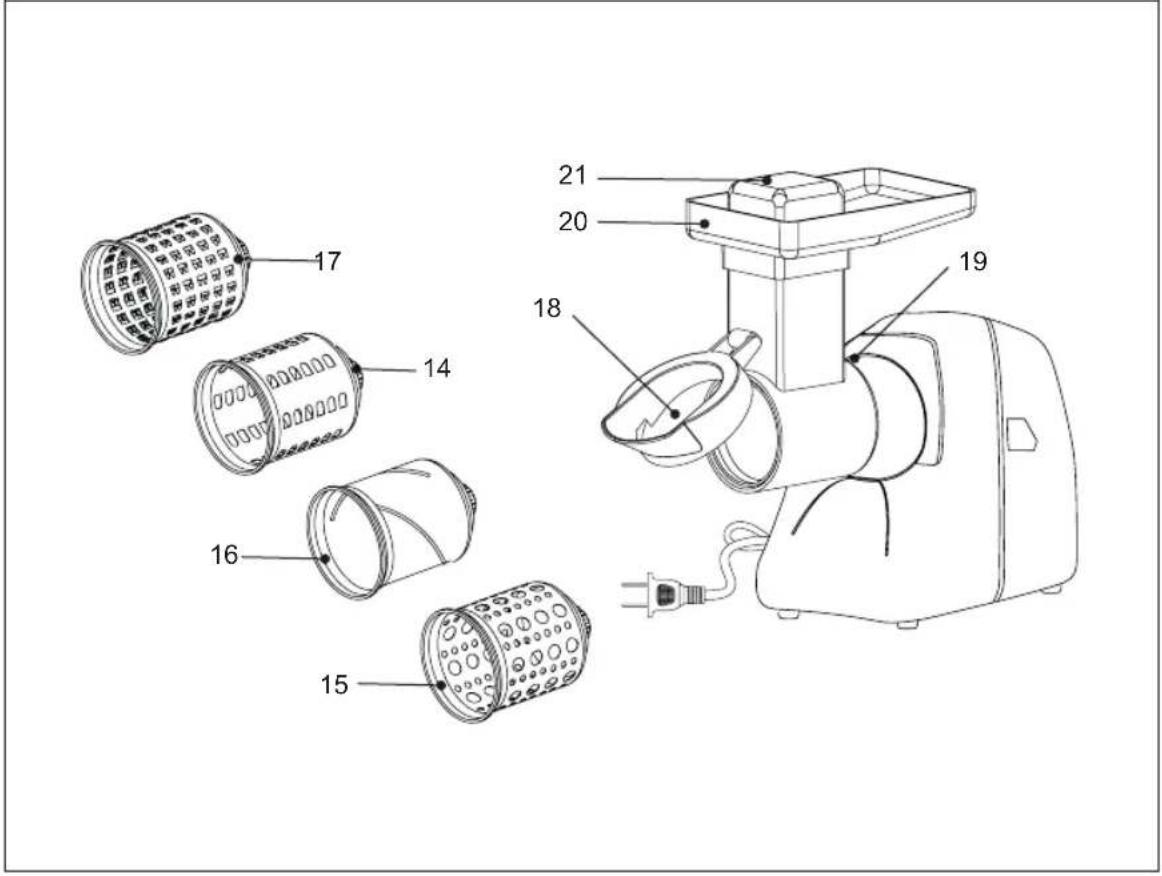

1
2
natural_image
Line drawing of a sewing machine with labeled parts (1, 2), no text or symbols present3
natural_image
Line drawing of a sewing machine with a power plug and a tool, no text or symbols present4
natural_image
Line drawing of a sewing machine with a close-up view showing the blade and base (no text or symbols)5
6
natural_image
Line drawing of a standard electrician's meat processing device (no text or symbols)7
8
natural_image
Line drawing of a manual electric shaver with labeled parts (1, 2), no text or symbols present


9
natural_image
Line drawing of a manual electric motor with plug, shaft, and power outlet (no text or symbols)10
natural_image
Line drawing of a manual electric stove with internal components and power outlet (no text or symbols)11
natural_image
Line drawing of a manual electric motor with cooling fan and power plug (no text or symbols)12
natural_image
Line drawing of a standard electrician's feedstock with a power outlet (no text or symbols)PL
DZIEKUJEMY ZA WYBÓR MARKI ZELMER. ŻYCZYMY SATYSFAKCJI Z UŻYTKOWANIA URZĄDZENIA.
OSTRZEŻENIE
WE WOULD LIKE TO THANK YOU FOR CHOOSING ZELMER. WE WISH THE PRODUCT PERFORMS TO YOUR SATISFACTION AND PLEASURE.
WARNING
Please read the instructions for use carefully prior to using the product. store these in a safe place for future reference.
DESCRIPTION
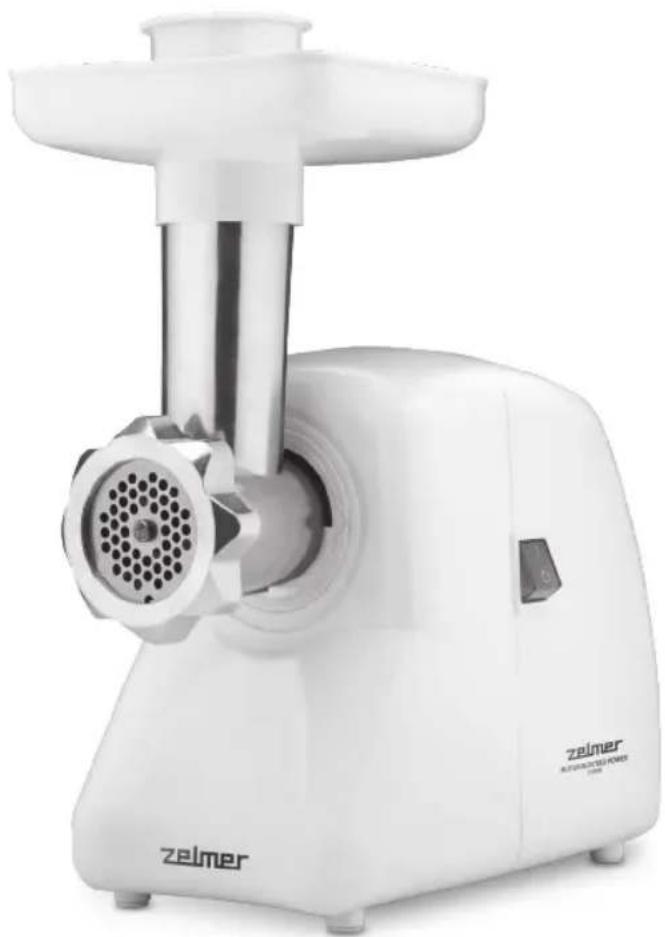
- Main unit
- Switch
- Lock button
- Mincing chamber
- Feed screw with assembled coupling
- Double side blade
- Mesh sieve with 3mm holes
- Mesh sieve with 5mm holes
- Mesh sieve with 7mm holes
- Ring collar
- Food tray
- Food pusher
- Sausage accessory with separator
Vegetables accessory
- Fine grater
- Coarse grater
- Coarse slicer
- Ultra-fine grater
- Accessory body
- Locking tab
- Tray
- Pusher
SAFETY INSTRUCTIONS
If the supply cord is damaged it must be replaced by the manufacturer, its service agent or similarly qualified persons in order to avoid a hazard.
Respect the operating times of the accessories indicated in their specific sections of the manual.
Proceed according to maintenance and cleaning section of this manual for cleaning. Warning: potential injury from misuse!
EN
Care shall be taken when handling the sharp cutting blades and during cleaning.
Always disconnect the appliance from the supply if it is left unattended and before assembling, disassembling or cleaning.
Switch off the appliance and disconnect from supply before changing accessories or approaching parts that move in use.
This appliance shall not be used by children. Keep the appliance and its cord out of reach of children.
Appliances can be used by persons with reduced physical, sensory or mental capabilities or lack of experience and knowledge if they have been given supervision or instruction concerning use of the appliance in a safe way and if they understand the hazards involved. Children shall not play with the appliance.
IMPORTANT WARNINGS
This appliance is designed for home use and should never be used for commercial or industrial use under any circumstances. Any incorrect use or improper handling of the product shall render the warranty null and void.
Prior to plugging in the product, check that your mains voltage is the same as the one indicated on the product label.
The mains connection cable must not be tangled or wrapped around the product during use.
Do not use the device, or connect and disconnect to the supply mains with the hands and/or feet wet.
Do not pull on the connection cord in order to unplug it or use it as a handle Unplug the product immediately from the mains in the event of any breakdown or damage and contact
This appliance is designed for home use and should never be used for commercial or industrial use under any circumstances. Any incorrect use or improper handling of the product shall render the warranty null and void.
Prior to plugging in the product, check that your mains voltage is the same as the one indicated on the product label.
Do not pull on the connection cord in order to unplug it or use it as a handle.
Do not process tough foods, such as bones, nuts (such as dry and hard soybeans) or other food with tough fiber.
Please utilize the feeder push during operation, instead of pushing food by hands.
Check the filter before squeezing juicer per time. Do not use the juicer any more in case of any cracks or
damage, and get in touch with the nearest dealer and manufacturer.
Unplug the product immediately from the mains in the event of any breakdown or damage and contact an official technical support service. In order to prevent any risk of danger, do not open the device. Only qualified technical personnel from the brand's Official technical support service may carry out repairs or procedures on the device.
Eurogama Sp. z o.o. disclaims all liability for damages that may occur to people, animals or objects, for the non-observance of these warnings.
INSTRUCTIONS FOR USE
Meat Grinder
The continuous operation should not exceed 10 minutes; suspend the operation in the event of exceeding 10 minutes and restart the machine after cooling down.
Installation method for meat grinder.
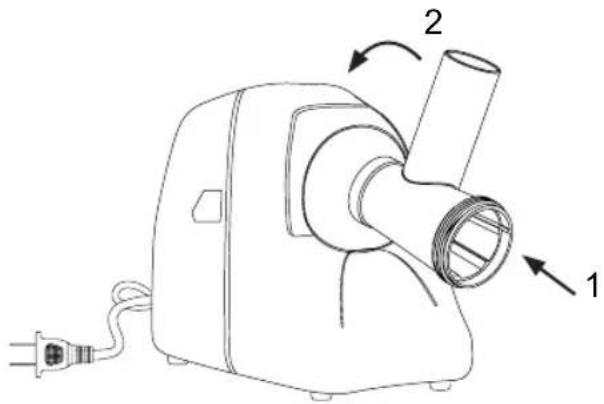
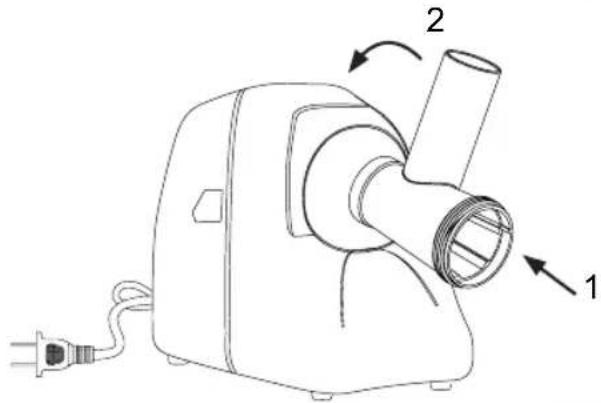
Step 1: hold and tilt the tee-junction of minced meat toward the switching push button at about 45 degrees embedded in the output gear, anticlockwise screw in the body (as shown in the picture) for fastening, and the lock button will automatically fix the tee-junction. (Fig.1)
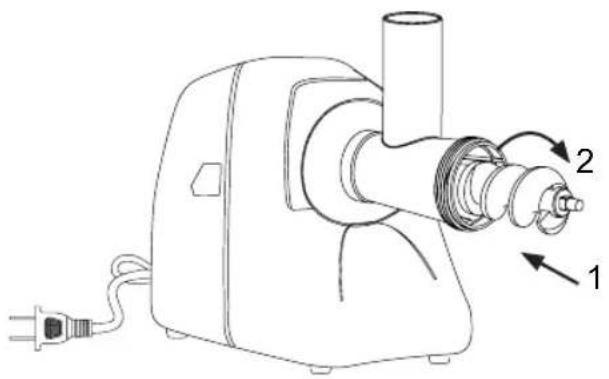
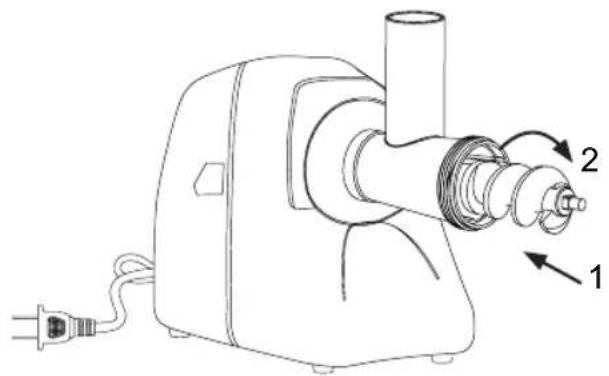
Step 2: put the screw into the tee-junction of minced meat (as shown in the picture) (Fig.2)
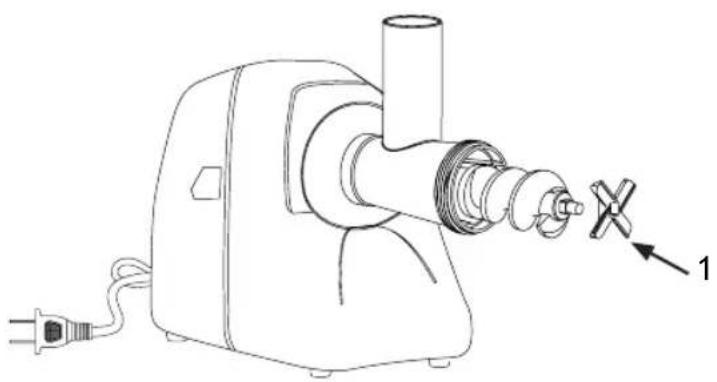
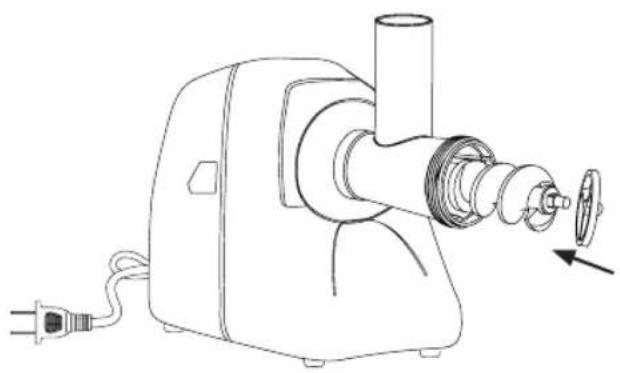
Step 3: assemble the crossblade on the screw shaft (as shown in the picture) with blade outward (failure will be caused by incorrect placement). (Fig.3)
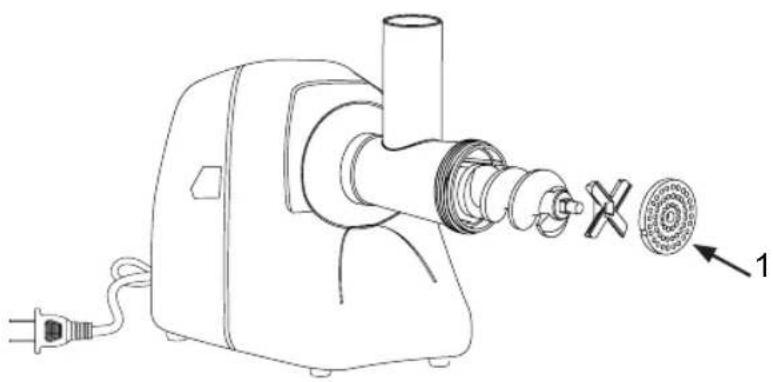
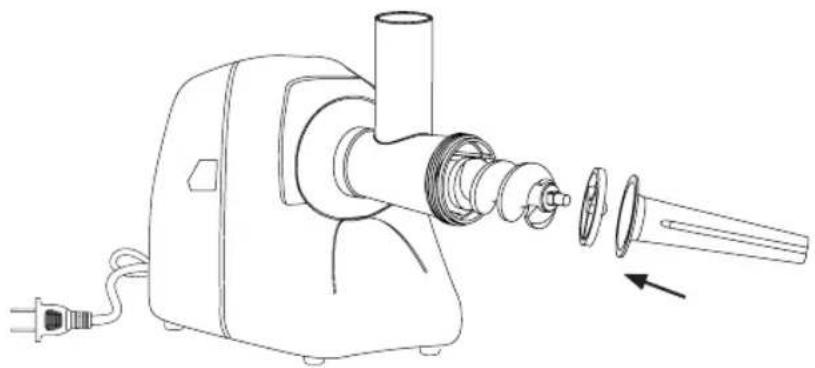
Step 4: attach the mesh sieve to the crossblade (select micropore mesh sieve, mesopore mesh sieve and macropore mesh sieve as needed), and lock the half slot of mesh sieve to the adjusting pin of tee-junction (as shown in the picture). (Fig.4)
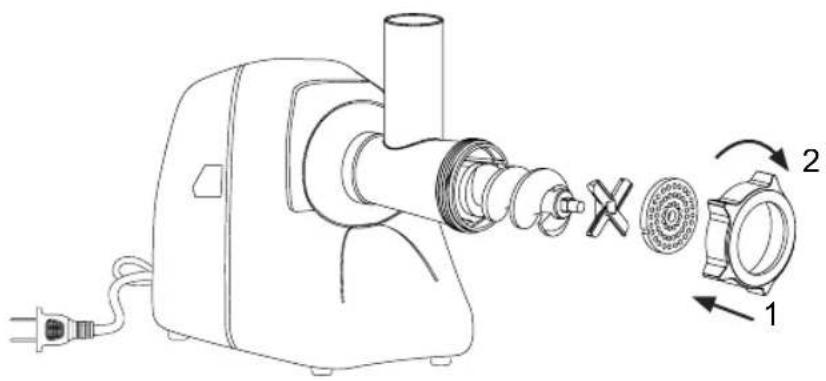
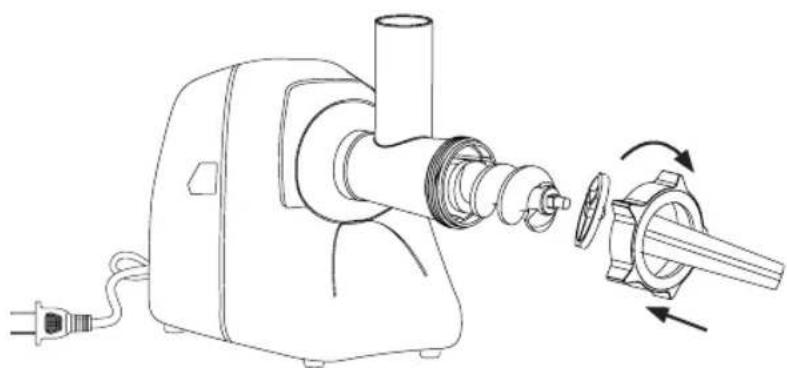
Step 5: press on the center of the mesh sieve with one hand and screw the aluminum alloy cap with the other hand (as shown in the picture). (Fig.5)
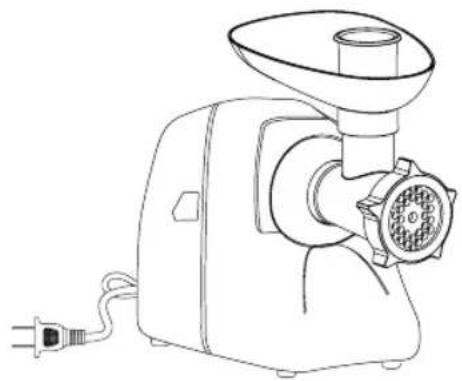
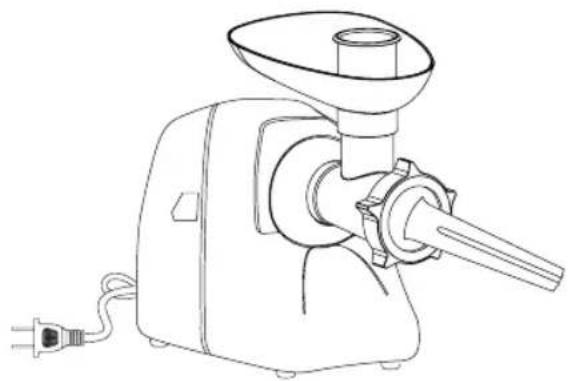
Step 6: put and fix the material plate into the tee-junction, and fix the assembled appliance on a stable surface. (Fig.6)
Operational Approach:
Cut the meat into long strip of about 20mm×20mm×60mm (meat without bone or tendons is recommended) and put it into the material plate.
Turn on the power switch, and put the prepared meat into feed port of tee-junction in turn after confirming the normal operation of the appliance.
In case the food failed to be automatically drawn into the meat screw, slowly press the food with feeder push. (Feeder push is allowed only).
Please disconnect the power plug after use.
Note: in case food locked in the screw out of work during the operation, immediately turn off the power.
Making Sausages
Installation method:
Step 1: hold and tilt the tee-junction of minced meat toward the switching push button at about 45 degrees embedded in the output gear, anticlockwise screw in the body (as shown in the picture) for fastening, and the lock button will automatically fix the tee-junction. (Fig.7)
Step 2: put the screw of minced meat into the tee-junction (as shown in the picture). (Fig.8)
Step 3: assemble sausage filter (as shown in the picture). (Fig.9)
Step 4: put the sausage tube into the tee-junction (as shown in the picture). (Fig.10)
Step 5: screw up the aluminum alloy cap (as shown in the picture). (Fig.11)
Step 6: put and fix the material plate into tee-junction. (Fig.12)
EN
Operational approach:
Fix the assembled appliance on the stable surface, turn on the power switch, embed the clean-washed casing into the discharge port (for fastening) after confirming the normal operation of the appliance, put the marinated food into the material plate, and push it into feed port by feeder push.
Please disconnect the power plug after use.
Scope of application: a variety of meat without bone or tendon, meat and seasoning mixture.
Making mashed potato and garlic
Important notice: the installation method for making mashed potato and garlic is same as that of juicer, except replacing juicer mesh tube in step 2 with mashing cylinder and replacing juicer nozzle with mashing nozzle in step 4.
Operational approach:
Fixed the assembled appliance on the stable surface, cut the potato (peeled garlic) into strip of approximately 20mm×20mm×20mm and put them into material plate.
Turn on the power switch and slowly press the food into feed port by feeder push after confirming normal operation of the appliance.
Disconnect the power supply after use and take processed food away.
Important notice: the installation method of making noodles is same as that of juicer, except replacing juicer mesh tube in step 2 with mashing cylinder and replacing juicer nozzle with round-noodle/linguine nozzle in step 4.
Operational approach:
Fix the assembled appliance on the stable surface and put the duff into material plate.
Turn on the power switch and slowly put the duff into feed port after confirming the normal operational of the appliance.
Disconnect the power supply after use.
Shred and Slice
Installation method:
Step 1: hold and tilt the tee-junction of shred and slice toward the switching push button at about 45 degrees embedded in the output gear, anticlockwise screw in the body for fastening and the lock button will automatically fix the tee-junction. (Fig.18)
Step 2: upward open the tee-junction of shred and slice and put the cutter in (select cutter of thick filament, thin filament and slice as needed). (Fig.19)
Step 3: tighten the tee-junction cover of shred and slice, and fix the assembled appliance on the stable surface. (Fig.20)
Operational approach:
Put the prepared fruits or vegetables in the material plate.
Turn on the power switch, put the food into feed port in turns after confirming the normal operation of the appliance and press the food by feeder push.
Scope of application: pumpkin, cucumber, sponge gourd, potato, sweet potato, carrot and other fruits or vegetables with fine fibers.
Note: in case food locked on the screw out of work during the operation, immediately turn off the power supply.
MAINTENANCE AND CLEANING
Before cleaning, always turn off the appliance and unplug it from the power supply.
Do not immerse the appliance and power cord in water or other liquids or wash them in the dishwasher.
Prompt: it is suggested that clean the appliance immediately after use, which is easy for cleaning.
In the event of disassembling the appliance, rotate the appliance on the opposite direction of installation direction.
When disassembling all tee-junctions, press on the lock button 1 with one hand and screw off the tee-junction with the other hand as the direction of the arrow shown in the right picture.
Please be careful for the disassembly of the appliance, so as not to scratch your fingers.
Do not use abrasives, scrubbers, acetone and alcohol to clean juicer.
Since some parts are relatively sharp, clean them with a brush, so as not to scratch fingers;
Neither immerse the motor in water, nor rinse it under the water tap. Water temperature for cleaning should not exceed 60^ C.
Only plastic parts are suitable for dishwashing machine. For the metal parts it is recommended to rinse them under tap water and dry them immediately.
Table of recipes
The continuous operation should not exceed 10 minutes; suspend the operation in the event of exceeding 10 minutes and restart the machine after cooling down.
| Accessory Load Quantity Time of operation | ||
| Mincer function Beef 5.0 kg 15 minutes | ||
| Shredder and grater Soaked carrots 0.5 kg 1 minute |
PRODUCT DISPOSAL
This product complies with European Directive 2012/19/EU on electrical and electronic devices, known as WEEE (Waste Electrical and Electronic Equipment), provides the legal framework applicable in the European Union for the disposal and reuse of waste electronic and electrical devices. Do not dispose of this product in the bin, instead going to the electrical and electronic waste collection centre closest to your home.
DE
WIR MÖCHTEN IHNEN DANKEN, DASS SIE SICH FÜR ZELMER ENTSCHIEDEN HABEN. WIR WÜNSCHEN, DASS DAS PRODUKT ZU IHRER ZUFRIEDENHEIT UND FREUDE FUNKTIONIERT.
ACHTUNG
Installationsmethode:
Installationsmethode:
ELIMINAREA PRODUSELOR
EUROGAMA Sp. Z o.o. guarantees compliance of this product for the use for which it is intended for a period of two years. In the case of breakdown during the term of this warranty, users are entitled to repair or else the replacement of the product at no charge if the former is unavailable, unless one of these options proves impossible to fulfill or is disproportionate. In this case, you can then opt for a reduction in price or cancellation of the sale, which must be dealt with directly with the sales vendor. This also covers replacement of spare parts provided that the product has been used according to the recommendations specified in this manual for both cases, and has not been tampered with by any third party that is not authorised by EUROGAMA Sp. Z o.o.. The warranty will not cover any parts subject to wear and tear. This warranty does not affect your rights as a consumer in accordance with the provisions in Directive 1999/44/EC for member states of the European Union.
USE OF WARRANTY
Customers must contact a EUROGAMA Sp. Z o.o. authorised Technical Service for repair of the product.
Since any tampering of the same by anyone not authorised by EUROGAMA Sp. Z o.o., or the careless or improper use of the same shall render this warranty null and void. The warranty must be fully completed and delivered along with the receipt or delivery docket for the effective exercise of rights under this warranty.
This warranty should be retained by the user as well as the invoice, receipt or the delivery docket to facilitate the exercise of these rights. For technical service and after-sales care outside the Polish territory, please submit your query to the point of sale where you purchased the item or check for further aftersales information at www.zelmer.com
GARANTIE-ERKLÄRUNG

- zelmer
- PL
- OSTRZEŻENIE
- WARNING
- DESCRIPTION
- Vegetables accessory
- SAFETY INSTRUCTIONS
- EN
- IMPORTANT WARNINGS
- INSTRUCTIONS FOR USE
- Meat Grinder
- Installation method for meat grinder.
- Operational Approach:
- Making Sausages
- Installation method:
- Making mashed potato and garlic
- Shred and Slice
- MAINTENANCE AND CLEANING
- Table of recipes
- PRODUCT DISPOSAL
- DE
- ACHTUNG
- Installationsmethode:
- ELIMINAREA PRODUSELOR
- USE OF WARRANTY
- GARANTIE-ERKLÄRUNG
Brand : Zelmer
Model : ZMM2853B
Category : Meat Grinder