
BM-900 - Autre appareil ménager Vivax - Free user manual and instructions
Find the device manual for free BM-900 Vivax in PDF.

| Product Type | Bread Maker |
| Model | BM-900 |
| Brand | Vivax |
| Programs | 12 automatic programs: Basic, French, Whole Wheat, Quick, Sweet, Ultra Fast I & II, Dough, Jam, Cake, Sandwich, Bake |
| Loaf Size Options | 1.5 lb (I) and 2.0 lb (II) |
| Crust Color Control | Selectable: Light, Medium, Dark |
| Delay Timer | Up to 13 hours (adjustable in 10-minute increments) |
| Keep Warm Function | Automatic 60-minute keep warm after baking |
| Memory Function | Resumes operation within 15 minutes after power interruption |
| Display | LCD with program indicators, time, and status |
| Control Panel | Buttons: Menu, Color, Loaf Size, Time+, Time-, Start/Stop |
| Bread Pan | Non-stick coated, removable, dishwasher safe |
| Kneading Blade | Non-stick, removable, dishwasher safe, includes hook for removal |
| Accessories Included | Measuring cup, measuring spoon, hook |
| Safety Features | Overheat protection (H:HH display), sensor error detection (E:EE display), cool-touch handle |
| Cleaning and Maintenance | Wipe with damp cloth; do not immerse housing; bread pan and kneader dishwasher safe |
| Power Supply | 220-240 V, 50/60 Hz (typical, as per EU standard) |
| Power Consumption | Approx. 700 W (typical bread maker) |
| Warranty | Refer to warranty card included with product |
Frequently Asked Questions - BM-900 Vivax
User questions about BM-900 Vivax
0 question about this device. Answer the ones you know or ask your own.
Ask a new question about this device
Download the instructions for your Autre appareil ménager in PDF format for free! Find your manual BM-900 - Vivax and take your electronic device back in hand. On this page are published all the documents necessary for the use of your device. BM-900 by Vivax.
USER MANUAL BM-900 Vivax
natural_image
Line drawing of a kitchen appliance with handle, wheels, and top panel (no text or symbols)Slika 2
natural_image
Symbol of a trash bin crossed with no text or numbers, representing waste sorting or restriction (no text present)
natural_image
Line drawing of a kitchen appliance with a dome-shaped lid and side panels (no text or symbols)Pre upotrebe temeljno pročitajte ovaj priručnik i sačuvajte ga za buduću upotrebu
VAŽNE PREDOSTROŽNOSTI:
Slika 2
Prilikom prve upotrebe
-
Molimo proverite jesu li svi delovi i dodaci na broju i neoštećeni.
-
Očistite sve delove skladno uputstvima u odeljku “Čišćenje i održavanje”
- Postavite pekač hleba u način rada za pečenje i praznog pecite otprilike 10 minuta. Kada se ohladi ponovno ga očistite.
- Temeljno posušite sve delove i sastavite ih, te je uređaj spreman za upotrebu.
Kako praviti hleb
- Postavite posudu u položaj, te je okrenite udesno dok se ne čuje klik. Učvrstite lopaticu za mešanje na osovinu. Okrenite lopaticu udesno dok se ne čuje klik. Preporučuje se da napunite rupe margarinom otpornim na toplotu pre postavljanja lopatice, čime ćete sprečili lepljenje testa ispod lopatice i omogućiti jednostavno uklanjanje lopatica iz hleba.
- Postavite sastojke u posudu za hleb. Molimo pridržavajte se rasporeda navedenog u receptu. Obično bi trebalo prvo staviti vodu ili tečni sastojak, zatim dodati šećer, so i brašno, uvek dodati kvasac ili prašak za pecivo kao zadnji sastojak. U slučaju teškog sa velikim udelom raži ili pšenice preporučujemo da sastojke dodajete obrnutim redosledom, tj. da prvo umetnete raž i brašno, te na kraju tečnost radi boljeg mešanja.
- Prstom napravite malu rupu na jednoj strani brašna. U rupu dodajte raž. Pazite da ne dođe u dodir sa tečnim sastojcima ili solju.
- Nežno zatvorite poklopac i uključite strujni kabal u strujnu utičnicu.
- Pritiscima dugmeta Meni odaberite željeni program.
- Pritisnite dugme BOJA za odabir željene boje kore.
- Pritisnite dugme VELIČINA VEKNE za odabir željene veličine (0.75 kg ili 0.90 kg).
- Postavite vreme odgode dugmićima Vrijeme+ ili Vrijeme-. Ovaj korak možete preskočiti ukoliko želite da pekač hleba odmah započne sa radom.
- Pritisnite dugme START/STOP za početak rada.
10.Za programe OSNOVNI, FRANCUSKI, PŠENIČNI, SLATKI, SENDVIČ, tokom rada će se čuti dugi zvučni signal. On vas podseća da dodate sastojke. Otvorite poklopac i umetnite neke sastojke. Moguće je da tokom pečenja kroz ventilacijske otvore izlazi para. To je normalno. - Po završetku postupka oglasiće se 10 zvučnih signala. Možete pritisnuti dugme START/STOP na otprilike 3-5 sekundi kako biste prekinuli postupak i izvadili hleb, te kuhinjskom rukavicom čvrsto primite dršku posude za hleb. Okrenite posudu ulevo, te je izvucite uspravno prema gore iz uređaja.
12.Nelepljivom lopaticom nežno odvojite strane hleba od posude.
natural_image
Symbol of a trash bin crossed with no visible text or labelsnatural_image
Line drawing of a kitchen appliance with a dome-shaped lid and side panels (no text or symbols)Figura 2
natural_image
Line drawing of a kitchen appliance with a dome-shaped lid and side panels (no text or symbols)Слика 2
При првата употреба
natural_image
Symbol of a trash bin crossed out by two diagonal lines (no text or numbers present)natural_image
Line drawing of a kitchen appliance with a dome-shaped lid and side panels (no text or symbols)Read this booklet thoroughly before using and save it for future reference
IMPORTANT SAFEGUARDS:
Before using the electrical appliance, the following basic precautions should always be followed:
- Read all instructions.
- Before using check that the voltage of wall outlet corresponds to the one shown on the rating plate.
- Do not operate any appliance with a damaged cord or plug or after the appliance malfunctions, or is dropped or damaged in any manner. Return appliance to manufacturer or the nearest authorized service agent for examination, repair or electrical or mechanical adjustment.
-
Do not touch hot surfaces. Use handles or knobs.
-
To protect against electric shock do not immerse cord, plugs, or housing in water or other liquid.
-
Unplug from outlet when not in use, before putting on or taking off parts, and before cleaning.
-
Do not let cord hang over edge of table or hot surface.
-
The use of accessory attachments not recommended by the appliance manufacturer may cause injuries.
-
Close supervision is necessary when your appliance is being used near children or infirm persons.
-
Do not place on or near a hot gas or electric burner, or in a heated oven.
11.Do not touch any moving or spinning parts of the machine when baking.
-
Never switch on the appliance without properly placed bread pan filled ingredients.
-
Never beat the bread pan on the top or edge to remove the pan, this may damage the bread pan.
-
Metal foils or other materials must not be inserted into the bread maker as this can give rise to the risk of a fire or short circuit.
-
Never cover the bread maker with a towel or any other material, heat and steam must be able to escape freely. A fire can be caused if it is covered by, or comes into contact with combustible material.
-
Do not operate the appliance for other than its intended use.
17.Do not use outdoors.
- Save these instructions.
Household use only
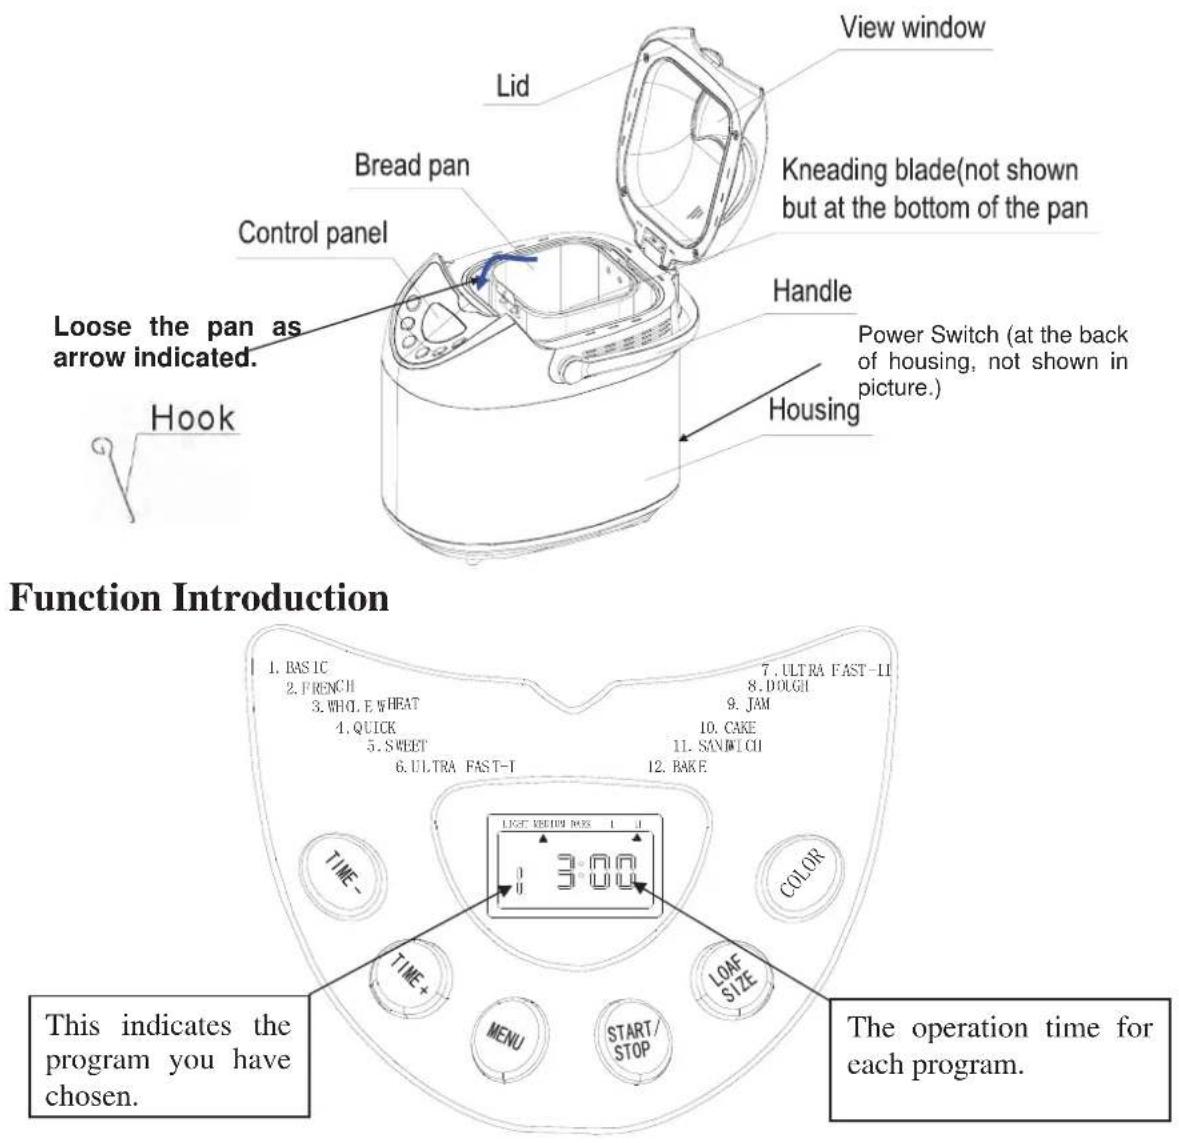
Know your bread maker
Measuring cup

Measuring spoon

AFTER POWER-UP
As soon as the bread maker is plugged the power supply and the Power Switch has been turn on, a beep will be heard and “3:00” appears in the display after a short time. But the two dots between the “3” and “00” don’t flash constantly. The arrow points to “T”. It is the default setting.
Note: the “I” setting, it means the loaf size is 1.5LB; while the “II” setting represent 2.0LB size.
START / STOP
For starting and stopping the selected baking program.
To start a program, press the "START/STOP" button once. A short beep will be heard and the two dots in the time display begin to flash and the program starts. Any other button is inactivated except the "START/STOP" button after a program has begun.
To stop the program, press the "START/STOP" button for approx. 3 seconds until a beep confirms that the program has been switched off. This feature will help to prevent any unintentional disruption to the operation of program.
MENU
It is used to set different programs. Each time it is pressed (accompanied by a short beep) that the program will vary. Press the button continuously the 12 menus will be cycled to show on the LCD display. Select your desired program. The functions of 12 menus will be explained below.
-
Basic: kneading, rise and baking normal bread. You may also add ingredients to add flavor.
-
French: kneading, rise and baking with a longer rise time. The bread baked in this menu usually will have a crisper crust and light texture.
-
Whole wheat: kneading, rise and baking of whole wheat bread. This setting has longer preheat time to allow the grain to soak up the water and expand. It is not advised to use the delay function as this can produce poor results.
-
Quick: kneading, rise and baking loaf with baking soda or baking powder. Bread baked on this setting is usually smaller with a dense texture.
-
Sweet: kneading, rise and baking the sweat bread. For baking the crisp and sweet bread.
-
Ultra fast-I: kneading, rise and baking 1.5Lb loaf in a shortest time. Usually the bread made is smaller and rougher than that made with Quick program.
-
Ultra fast-II: the same as above, but applicable for 2.0Lb loaf.
-
Dough: kneading and rise, but without baking. Remove the dough and shaping it to make bread rolls, pizza, steamed bread, etc.
-
Jam: boiling jams and marmalades.
-
Cake: kneading, rise and baking, rise with soda or baking powder.
-
Sandwich: kneading, rise and baking sandwich. For baking light texture bread with a thinner crust.
12.Bake: only baking, no kneading and rise. Also used to increase the baking time on selected settings
COLOR
With the button you can select a LIGHT, MEDIUM or DARK color for the crust. Press this button to select your desired color.
LOAF SIZE
Press this button to select the Loaf size of the bread. Please note the total operation time may vary with the different loaf size.
DELAY (TIME + or TIME - )
If you want the appliance do not start working immediately you can use this button to set the delay time.
You must decide how long it will be before your bread is ready by pressing the "TIME + "or "TIME - ". Please note the delay time should include the baking time of program.
That is, at the completion of delay time, there is hot bread can be serviced. At first the
program and degree of browning must be selected, then pressing “TIME+” or “TIME-” to increase or decrease the delay time at the increment of 10 minutes. The maximum delay is 13 hours.
Example: Now it is 8:30p.m, if you would like your bread to be ready in the next morning at 7 o'clock, i.e. in 10 hours and 30 minutes. Select your menu, color, loaf size then press the TIME+ or TIME - to add the time until 10:30 appears on the LCD. Then press the STOP/START button to activate this delay program. You can see the dot flashed and LCD will count down to show the remaining time. You will get fresh bread at 7:00 in the morning, If You don't want to take out the bread immediately, the keeping warm time of 1 hour starts.
Note: For time delayed baking, do not use any easily perishable ingredients such as eggs, fresh milk, fruits, onions, etc.
KEEP WARM
Bread can be automatically kept warm for 60 minutes after baking. If you would like to take the bread out, switch the program off with the START/STOP button.
MEMORY
If the power supply has been broken off during the course of bread making, the process of bread making will be continued automatically within 15 minutes, even without pressing Start/stop button. If the break time exceeds 15 minutes the memory cannot be kept and the bread maker must be restarted, But if the dough is no further than the kneading phase when the power supply breaks off, you can press the “START/STOP” straight to continue the program from the beginning.
ENVIRONMENT
The machine may work well in a wide range of temperatures, but there could be a difference in loaf size between a very warm room and a very cold room. We suggest the room temperature should be between 15 °C and 34°C.
WARNING DISPLAY:
1、If the display shows “H:HH” after the program has been started, (see below figure 1) the temperature inside is still too high. Then the program has to be stopped. Open the lid and let the machine cool down for 10 to 20 minutes.
2、If the display shows “E:EE” after you have pressed START/STOP, (see below figure 2) the temperature sensor is disconnected please check the sensor carefully by Authorized expert.
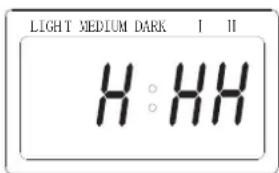
Figure 1
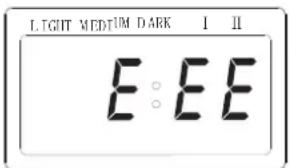
Figure 2
. For the first use
1、Please check if all parts and accessories are complete and free of damage.
2、Clean all the parts according to the latter section “Cleaning and Maintenance”
3、set the bread maker in baking mode and bake empty for about 10 minutes. After cooling it down clean once more.
4、Dry all parts thoroughly and assembly them, so the appliance is ready for using.
How to make bread
- Place the pan in position, then turn it clockwise until they click in correct position. Fix the kneading blade onto the drive shafts. Turn the kneaders clockwise until they click into place. It is recommended to fill holes with heat-resisting margarine prior to placing the kneaders, this avoids the dough to stick below the kneaders and the kneaders could be removed from bread easily.
- Place ingredients into the bread pan. Please keep to the order mentioned in the recipe. Usually the water or liquid substance should be put firstly, then add sugar, salt and flour, always add yeast or baking powder as the last ingredient. In case of heavy dough with high Rye or wholemeal portion we advise to reverse the order of ingredients. i.e. to fill in first the dry yeast and flour, and finally the liquid to get a better kneading result.
- With finger make a small indentation on one side of the flour. Add yeast to indentation, Make sure it does not come into contact with the liquid ingredients or salt.
- Close the lid gently and plug the power cord into a wall outlet.
- Press the Menu button until your desired program is selected.
- Press the COLOR button to select the desired crust color.
- Press the LOAF SIZE button to select the desired size (1.5 LB or 2.0 LB).
- Set the delay time by pressing Time+ or Time- button. This step may be skipped if you want the bread maker to start working immediately.
- Press the START/STOP button to start working.
- For the program of BASIC, FRENCH, WHOLE WHITE BREAD, SWEET, SANDWICH, a long beep sound will be heard during operation. This is to prompt you to add ingredients. Open the Lid and put in some ingredients. It is possible that steam will escape through the vent slits in the lid during baking. This is normal.
11.Once the process has been completed 10 beeps sound will be heard. You can press START/STOP button for approx. 3-5 seconds to stop the process and take out the bread. Open the Lid and while using oven mitts, firmly grasp the bread pan handle. Turn the pan anti-clockwise and gently pull the pan straight up and out of the machine. - Use non-stick spatula to gently loosen the sides of the bread from the pan.
Caution: the Bread pan and bread may be very hot! Always handle with care and use oven mitts.
- Turn bread pan upside down onto a clean cooking surface and gently shake until bread falls out onto rack.
- Remove the bread carefully from the pan and cool for about 20 minutes before slicing.
- If you are out of the room or have not pressed START/STOP button at the end of operation, the bread will be kept warm automatically for 1 hour and then stop further keeping warm.
- When do not use or completely operation, turn off the power switch and unplug the power cord.
Note: Before slicing the loaf, use the hook to remove out the Kneading blade hidden on the bottom of loaf. The loaf is hot, never use the hand to remove the kneading blade.
• Special introduction
1、For Quick breads
Quick breads are made with baking powder and baking soda that activated by moisture and heat. For perfect quick breads, it is suggested that all liquids be placed in the bottom of the bread pan, dry ingredients on top. During the initial mixing of quick bread batters and dry ingredients may collect in the corners of the pan, it may be necessary to help machine mix to avoid flour clumps. If so, use a rubber spatula.
2、About Ultra fast program
The bread maker can bake loaf within 1 hour with ultra fast program. These 2 settings can bake bread in 58 minutes, the bread is a little more dense in texture. Ultra fast I is for baking 1.5LB bread while Ultra fast II is for 2.0LB. Please noted ingredient of water should be hot water in the range of 48—50°C, you must use a cooking thermometer to measure the temperature. The water temperature is very critical to the performance of baking. If the water temperature is too low the bread will not be rise to expected size; if the water temperature is too high it will kill the yeast prior to rising, which also will largely affect the baking performance.
• Cleaning and Maintenance
Disconnect the machine from the power and let it cool down prior to cleaning.
- bread pan: Rub inside and outside with a damp cloth. Do not use any sharp or abrasive agents for the consideration of protecting the non-stick coating. The pan must be dried completely prior to installing.
- kneading blade: If the kneading bar is difficult to remove from the axle, In such an event fill the Container with warm water and allow it to soak for approx.30minutes.The kneader can then be easily removed for cleaning. Also wipe the blade carefully with a cotton damp cloth, Please note both the bread pan and kneading blade are dishwashing safe components.
- lid and window: clean the lid inside and outside with a slightly damp cloth.
- Housing: gently wipe the outer surface of housing with a wet cloth. Do not use any abrasive cleaner to clean as this would degrade the high polish of the surface. Never immerse the housing into water for cleaning.
- Before the bread maker is packed away for storage, ensure that it has completely cooled down, is clean and dry, and the lid is closed.
Introduction of bread ingredients
1. Bread flour
Bread flour has high content of high gluten (so it can be also called high-gluten flour which contains high protein), it has good elastic and can keep the size of the bread from sunken after rising. As the gluten content is higher than the common flour so it can be
used for making bread with large size and better inner fiber. Bread flour is the most important ingredients of making bread.
2. Plain flour
Plain flour is made by mixing well-chosen soft and hard wheat and applicable for making express bread or cakes.
3. Whole wheat flour
Whole wheat flour is made by grinding whole wheat, it contains wheat skin and gluten whole wheat flour is heavier and more nutrient than common flour. The bread made by whole wheat flour is usually small in size. So many recipes usually combine the whole wheat flour and bread flour to achieve best results.
4. Black wheat flour
Black wheat flour, also named by “rough flour”, is a kind of high fiber flour that is similar to whole wheat flour. To obtain the large size after rising it must be used in combination with high proportion of bread flour.
5. Cake powder
Cake powder is made by grinding soft wheat or low protein wheat, which is specially used for making cakes. Different flour seems to be alike, Actually yeast performance or absorbability of various flour differs largely for growing areas, growth reasons, grinding process and storage life. You may choose flour with different trademark to test, taste and compare in local market, and select the one which could produce the best result according to your own experiences and taste.
6. Corn flour and oatmeal flour
Corn flour and oat flour are made by grinding corn and oatmeal respectively, they both are the additive ingredients of making rough bread, which are used for enhancing the flavor and texture.
7. Sugar
Sugar is very important ingredient to add sweet taste and color of bread. While it helps to yeast bread as nourishment. white sugar is largely used. Brown sugar, powder sugar or cotton sugar may be called by special requirements.
8. Yeast
Yeast passes doughy yeasting process, then produces carbon dioxide, making bread expand and inner fibre soft. However, yeast fast breeding needs carbohydrate in sugar and flour as nourishment.
1 tsp. active dry yeast = 3/4 tsp. instant yeast
5tsp. active dry yeast =1 tsp. instant yeast
2tsp. active dry yeast = 1.5 tsp. instant yeast
Yeast must be stored in refrigerator as it will be killed at high temperature, before using check the date and storage life of your yeast. Store it back to the refrigerator as soon as possible after each use. Usually the failure of bread rising is caused by the dead yeast.
The ways described below will check whether your yeast is fresh and active or not.
(1) pour 1/2 cup warm water (45-50°C) into a measuring cup
(2) Put 1 tsp. white sugar into the cup and stir, then sprinkle 2 tsp. yeast over the water.
(3) Place the measuring cup in a warm place for about 10min. Do not stir the water.
(4) The froth will be up to 1 cup. Otherwise the yeast is dead or inactive.
9. Salt
Salt is necessary to improve bread flavor and crust color. But salt can also restrain yeast from rising. Never use too much salt in a recipe. if you don't want to use salt, omit it. And bread would be larger if without salt.
10. Egg
Eggs can improve bread texture, make the bread more nourish and larger in size, add special egg flavor to bread. when using it must be peeled and stirred evenly.
11. Grease, butter and vegetable oil
Grease can make bread be soft and delay storage life. Butter should be melted or chopped to small particles prior use, so as to be stir evenly when you take it out from refrigerator.
12. Baking powder
Baking powder mainly is used to rise the Ultra Fast bread and cake. As it do not need rise time and produce gas which will form bubble or soften the texture of bread utilizing chemical principle.
13. Soda
The same principle as above. It can also used in combination with baking powder.
14. Water and other liquid
Water is essential ingredient for making bread. Generally speaking, water temperature between 20^ C and 25^ C is the most proper. But the water temperature should be within 45-50^ C for achieving rising speed for make Ultra Fast bread. The water may be replaced by fresh milk or water mixed with 2% milk powder, which may enhance bread flavor and improve crust color. Some recipes may call for juice for the purpose of enhancing bread flavor, eg: apple juice, orange juice, lemon juice and so on.
Ingredients weight
One of important step for making good bread is utilizing proper amount of ingredients.
It is strongly suggest to use measuring cup, measuring spoon to obtain accurate amount, otherwise the bread will be largely influenced.
1. Weighing liquid ingredients
Water, fresh milk or milk powder solution should be measured with measuring cups.
Observe the level of the measuring cup with your eyes horizontally.
When you measure cooking oil or other ingredients, clean the measuring cup thoroughly without any other ingredients.
2. Measure dry powder
Dry powder should be kept in natural and loose conditions, level the cup mouth gently by blade to ensure accurate measure.
3. Ingredient sequence
The sequence of placing ingredients should be observed, generally speaking, the sequence is: liquid ingredients, eggs, salt and milk powder etc. When placing the ingredients, the flour can't be wet by liquid completely. The yeast can only be placed on the dry flour. Exclusively, yeast can't touch with salt. After the flour has been kneaded for some time and a beep remind you to put Fruit ingredients into the mixture. If the fruit ingredients are added too early the flavor will be diminished after long time mixing. When you use the delaying function for a long time, never add the perishable ingredients such as eggs, fruit ingredient.
Trouble shooting guide
| No. | Problem Course Solution | ||
| 1 | Smoke from ventilation hole when baking | Some ingredients adhere to the heat element or nearby, for the first use, oil remained on the surface of heat element | Unplug the bread maker and clean the heat element, but be careful not to burn you, during the first use, dry operating and open the lid. |
| 2 | Bread bottom crust is too thick | Keep bread warm and leave bread in the bread pan for a long time so that water is losing too much | Take bread out soon without keeping it warm |
| 3 | It is very difficult to take bread out | Kncader adheres tightly to the shaft in bread pan | After taking bread out, put hot water into bread pan and immerge kneader for 10 minutes, then take it out and clean. |
| 4 | Stir ingredients not evenly and bake badly | 1.selected program menu is improper | Select the proper program menu |
| 2.after operating, open cover several times and bread is dry, no brown crust color | Don't open cover at the last rise | ||
| 3.Stir resistance is too large so that kneader almost can't rotate and stir adequately | Check kneader hole, then take bread pan out and operate without load, if not normal, contact with the authorized service facility. | ||
| 5 | Display “H:HH” after pressing “start/stop” button | The temperature in bread maker is too high to make bread. | Press “start/stop” button and unplug bread maker, then take bread pan out and open cover until the bread maker cools down |
| 6 | Hear the motor noises but dough isn't stirred | Bread pan is fixed improperly or dough is too large to be stirred | Check whether bread pan is fixed properly and dough is made according to recipe and the ingredients is weighed accurately |
| 7 | Bread size is so large as to push cover | Yeast is too much or flour is excessive or water is too much or environment temperature is too high | Check the above factors, reduce properly the amount according to the true reasons |
| 8 | Bread size is too small or bread has no rise | No yeast or the amount of yeast is not enough, moreover, yeast may have a poor activity as water temperature is too high or yeast is mixed together with salt, or the environment temperature is lower. | Check the amount and performance of yeast, increase the environment temperature properly. |
| 9 | Dough is so large to overflow bread pan | The amount of liquids is so much as to make dough soft and yeast is also excessive. | Reduce the amount of liquids and improve dough rigidity |
| 10 | Bread collapses in the middle parts when baking dough | 1.used flour is not strong powder and can't make dough rise | Use bread flour or strong powder. |
| 2.yeast rate is too rapid or yeast mperature is too high te | Yeast is used under room temperature | ||
| 2.Excessive water makes dough too wet and soft. | According to the ability of absorbing water, adjust water on recipe | ||
| 11 | Bread weight is very large and organization construct is too dense | 1.too much flour or short of water Reduce flour or increase water | |
| 2.too many fruit ingredients or too much whole wheat flour | Reduce the amount of corresponding ingredients and increase yeast | ||
| 12 | Middle parts are hollow after cutting bread | 1.Excessive water or yeast or no salt | Reduce properly water or yeast and check salt |
| 2.water temperature is too high Check water temperature | |||
| 13 | Bread surface is adhered to dry powder | 1.there is strong glutinosity ingredients in bread such as butter and bananas etc. | Do not add strong glutinosity ingredients into bread. |
| 2.stir not adequately for short of water | Check water and mechanical construct of bread maker | ||
| 14 | Crust is too thick and baking color is too dark when making cakes or food with excessive sugar | Different recipes or ingredients have great effect on making bread, baking color will become very dark because of much sugar | If baking color is too dark for the recipe with excessive sugar, press start/stop to interrupt the program ahead 5-10min of intended finishing time. Before removing out the bread you should keep the bread or cake in bread pan for about 20 minutes with cover closed |
Environment friendly disposal

natural_image
Symbol of a trash bin crossed out by two crossed lines (no text or numbers present)
You can help protect the environment!
Please remember to respect the local regulations: hand in the non-working electrical equipments to an appropriate waste disposal center.
POŠTOVANI!
Zahvaljujemo na kupnji Vivax uređaja i nadamo se da ćete biti zadovoljni odabirom. Ako u jamstvenom periodu bude potreban popravak proizvoda, molim savjetujte se sa ovlaštenim prodavačem koji Vam je proizvod prodao ili nas kontaktirajte na dolje navedene brojeve i adrese. MOLIMO VAS DA PRIJE UPOTREBE PROIZVODA PAŽLJIVO PROČITATE TEHNIČKU DOKUMENTACIJU I UPUTE KOJI SU PRILOŽENI UZ PROIZVOD!
JAMSTVENI LIST
VIVAX
HR
MODEL UREĐAJA
SERIJSKI BROJ
DATUM PRODAJE
BROJ RAČUNA PRODAVATELJA
POTPIS I PEČAT PRODAVATELJA
POTPIS I PEČAT PRODAVATELJA
- Ovom garancijom garantira
| Brčko | Mij as Trade d.o.o. | RDŽ Čauševića 52 | 049/ 233 500 |
Kosova Electronic Service Center
Kosova Electronic Service Center
-VIVAX Air Conditions; White Goods and Small Home Appliances
Warnings:
- This appliance is not intended for use by persons (including children) with reduced physical, sensory or mental capabilities, or lack of experience and knowledge, unless they have been given supervision or instruction concerning use of the appliances by a person responsible for their safety.
- Children should be supervised to ensure that they do not play with the appliance.
Upozorenja:
- Ovaj uređaj nije namijenjen za uporabu od strane osoba (uključujući djecu) sa smanjenim fizičkim, senzornim ili mentalnim sposobnostima, ili nedostatkom iskustva i znanja, osim ukoliko nisu nadzirane ili upućene u način uporabe uređaja od strane osobe odgovorne za njihovu sigurnost.
- Djecu bi trebalo nadzirati kako se ne bi igrala sa uređajem.
Upozorenje:
- Ovaj uređaj nije namjenjen za upotrebu od strane osoba (uključujući decu) sa smanjenim fizičkim, senzornim ili mentalnim sposobnostima ili nedostatkom iskustva i znanja, osim ukoliko nisu nadzirane ili upućene u način upotrebe uređaja od strane osobe odgovorne za njihovu sigurnost.
- Decu bi trebalo nadzirati, kako se ne bi igrala sa uređajem.
Opozorila:
- VAŽNE PREDOSTROŽNOSTI:
- Prilikom prve upotrebe
- Kako praviti hleb
- При првата употреба
- IMPORTANT SAFEGUARDS:
- Household use only
- Know your bread maker
- AFTER POWER-UP
- START / STOP
- MENU
- COLOR
- LOAF SIZE
- DELAY (TIME + or TIME - )
- KEEP WARM
- MEMORY
- ENVIRONMENT
- WARNING DISPLAY:
- For the first use
- How to make bread
- • Special introduction
- 1、For Quick breads
- 2、About Ultra fast program
- • Cleaning and Maintenance
- Introduction of bread ingredients
- Bread flour
- Plain flour
- Whole wheat flour
- Black wheat flour
- Cake powder
- Corn flour and oatmeal flour
- Sugar
- Yeast
- Salt
- Egg
- Grease, butter and vegetable oil
- Baking powder
- Soda
- Water and other liquid
- Ingredients weight
- Weighing liquid ingredients
- Measure dry powder
- Ingredient sequence
- Environment friendly disposal
- POŠTOVANI!
- JAMSTVENI LIST
- VIVAX
- HR
- MODEL UREĐAJA
- POTPIS I PEČAT PRODAVATELJA
- Kosova Electronic Service Center
- Warnings:
- Upozorenja:
- Upozorenje:
- Opozorila:
Brand : Vivax
Model : BM-900
Category : Autre appareil ménager