NI-GT200 - Iron PANASONIC - Free user manual and instructions
Find the device manual for free NI-GT200 PANASONIC in PDF.

| Brand | Panasonic |
| Model | NI-GT200 |
| Product Type | Steam Iron |
| Dimensions (approx) | 28 x 12 x 15 cm |
| Weight | 1.2 kg |
| Power | 2400 W |
| Water Tank Capacity | 300 ml |
| Soleplate Material | Ceramic |
| Continuous Steam Output | 40 g/min |
| Steam Boost | 150 g/min |
| Spray Function | Yes |
| Vertical Steaming | Yes |
| Self-Clean Function | Yes |
| Anti-Calc System | Yes |
| Auto Shut-Off | Yes (8 min vertical, 30 sec horizontal) |
| Cord Length | 2.5 m |
| Variable Temperature | Yes (dial control) |
| Heat-Up Time | ~30 seconds |
| Safety Features | Auto shut-off, heat-resistant handle |
| Cleaning & Maintenance | Use self-clean function monthly; descale as needed |
| Spare Parts Availability | Soleplate, water tank cap, buttons (via service center) |
| Repairability | Moderate; professional repair recommended |
| Warranty | 2 years (standard) |
Frequently Asked Questions - NI-GT200 PANASONIC
User questions about NI-GT200 PANASONIC
0 question about this device. Answer the ones you know or ask your own.
Ask a new question about this device
Download the instructions for your Iron in PDF format for free! Find your manual NI-GT200 - PANASONIC and take your electronic device back in hand. On this page are published all the documents necessary for the use of your device. NI-GT200 by PANASONIC.
USER MANUAL NI-GT200 PANASONIC
M-C1502 series-01 Series ind. 1


NI-GT500
Panasonic
Operating Instructions
使用说明古
Arahan Penggunaan
Huang dan su dung
Warranty registration
The warranty can be registered online. Please visit the website by www.cpr.com
Only Singapore | Only Vietnam | Only Malaysia


c Panasonic Corporation 2021
Website: http://www.panasonic.com
P0921-0
Printed in China
2021.19.75 14:35:17


Panasonic

Operating Instructions (Household Use Only) Steam Generator Iron

Model No. NI-GT500
NI-GT200

EN English 03-23
CN 繁體中文 25-42
MY Melayu 43-63
VN Tiếng Việt 65-85
TH ไทย 87-109
RU Русский 111-132
UK Українська 133-154
(KZ) Казакша 155-176
Contents
| Safety precautions | 04-09 |
| Parts identification | 10-12 |
| Operating instructions for each part | 12-13 |
| How to use | 14-16 |
| After use | 17 |
| Cleaning | 17-19 |
| Specifications | 19 |
| Fabric and ironing recommendations | 20-21 |
| Troubleshooting | 22-23 |
Thank you for purchasing this Panasonic product.
Before operating this unit, please read these instructions completely and save them for future use.
M-1502 mmol-4 °C, mL 313013629 14:34:25


-
Safety precautions
5
To reduce the risk of electric shock, injury, fire, loss of life, and damage to equipment or property, always observe the following safety precautions.
Explanation of symbols
The following symbols are used to classify and describe the level of hazard, injury, and property damage caused when the denotation is disregarded and improper use is performed.
A
WARNING
Denotes a potential hazard that could result in serious injury or death.
A
CAUTION
in minor injury or damage your belongings.
The following symbols are used to classify and describe the type of instructions to be observed.
[NO TEXT]
This symbol is used to alert users to a specific operating procedure that must not be performed.
0
This symbol is used to alert users to a specific operating procedure that must be followed in order to operate the unit safely.
04
MG1502 series 4th, mH 4307.52D 14:24:25
A
WARNING
K
Do not use when the power plug or power cord is damaged or hot.
Never use the product if the power plug fits loosely in a household outlet.
- Doing so may cause electric shock, or fire due to a short circuit.
K
Do not leave the product unattended while it is connected to the outlet.
- Doing so may cause fire.
K
Do not connect or disconnect the power plug to a household outlet or the power base with wet hands.
[Non-Text]
- Doing so may cause electric shock or injury.
K
Do not damage, modify, forcibly bend, pull, or twist the power cord. Do not place anything heavy on or pinch the power cord.
- Doing so may cause electric shock or fire due to a short circuit.
K
Do not allow the power cord to touch hot surfaces of the iron.
- Doing so may cause electric shock or injury.
[NO TEXT]

A
WARNING
(no text)
Do not use with the power cord bundled. - Doing so may cause electric shock or fire due to a short circuit.
C
Do not use the product with wet hands. - Doing so may cause electric shock or fire due to a short circuit.
©
Never modify, disassemble, or repair the product by yourself. - Doing so may cause ignition or injury due to abnormal operation. Contact an authorized service agent for repair.
∅
Do not use in proximity of flammable materials (such as benzine or the like).
- Doing so may cause an explosion or fire.
∅
Do not wrap the power cord around the product for storage.
- Doing so may cause breakage to the wire of the power cord, and may cause electric shock or fire due to a short circuit.
∅
Do not immerse the product in water or other liquids.
- Doing so may cause burns, electric shock or fire due to a short circuit.
∅
The iron is not to be used if it has been dropped, and there are visible signs of damage or if it is leaking.
- Refer servicing to authorized service personnel.
©
Do not use in a way exceeding the rating of the household outlet or the wiring. - Exceeding the rating by connecting too many plugs to one household outlet may cause fire due to overheating.
0
Always ensure the product is operated on an electric power source matched to the rated voltage indicated on the product. Fully insert the power plug
- Failure to do so may cause injury, electric shock or fire.
0
Regularly clean the power plug to prevent dust from accumulating.
- Disconnect the power plug and wipe with a dry cloth.
0
Independently use a household outlet, and do not use extension cord.
[Non-Text]
- Failure to do so may cause electric shock or fire.
0
This product must use the electrical outlet with earth connection.
- Failure to do so may cause fire or electric shock.
m = 311
m = 311
[Unreadable]
B11
B
(No text)
[Non-Text]
[Non-Text]
[Non-Text]
[Non-Text]
[Non-Text]
[Non-Text]
[Non-Text]
[Non-Text]
[Non-Text]
[Non-Text]
[Non-Text]
[Non-Text]
[Non-Text]
[Non-Text]
[Non-Text]
[Non-Text]
[Non-Text]
中
05

[NO TEXT]


WARNING

This product is not intended for use by persons (including children) with reduced physical, sensory or mental capabilities, or lack of experience and knowledge, unless they have been given supervision or instruction concerning use of the product by a person responsible for their safety. Children should be supervised to ensure that they do not play with the product.
- Failure to do so may cause an accident or injury.
Immediately stop using and remove the power plug if there is an abnormality or malfunction. - Using it in such conditions may cause fire, electric shock, or injury.
• The power cord is damaged (like it cracks, or the core wire is exposed).
- The main body, power cord or power plug is abnormally hot, deformed or discolored.
- The product cannot power on occasionally after the power cord is moved.
• The power plug or power cord smells of burning.
- Immediately request inspection or repair at an authorized service center.
If the power cord is damaged, it must be replaced by the manufacturer, its service center, or similarly qualified persons in order to avoid a hazard.
- Failure to do so may cause an accident or injury.
! Be sure to take out the water tank when adding water; be sure to install the water tank in place when installing it back to the power base.
- Failure to do so may cause electric shock.
The iron must be firmly rested on the power base, and the power base must be placed on a flat and stable surface. When this product is used as a horizontal steam iron, the iron must be used on a flat, stable surface.
- The iron may be scratched, or even injuries or scald may be caused if the iron falls over.
CAUTION
Do not insert pins or needles into the iron or use the product on clothes with sewing needles or the like inserted.
- Doing so may cause electric shock or injury.
Do not put the soleplate too close to you or others since steam may unexpectedly erupt from it.
- Doing so may cause scalds or injury.

CAUTION
Do not use the product with the exception of fabric.
- Failure to do so may cause damage it.
Do not store the product until it has fully cooled down.
- Doing so may cause scalds.
Do not take out the water tank while you are using the product.
- Doing so may cause water leakage.
Do not store the product while the power cord is twisted.
- Doing so may cause breakage to the wire of the power cord, and may result in scalds, electric shock or fire due to a short circuit.
Do not add perfume, vinegar, starch, descaling agents, ironing alds or other chemicals in the water tank. Please only use room-temperature pure water or distilled water in this product.
- Otherwise the clothes may be stained or discolored.
Do not use any ironing accessories available on the market.
- Doing so may cause bums or damage to cloth due to incorrect operation.
Do not use the product near walls or furniture that cannot withstand high temperature or humidity.
- Doing so may damage the wall or furniture.
Do not move or lift the power base by pulling on the corded hose.
- Doing so may damage the corded hose, thus resulting in electric shock or fire.
Do not use steam when wearing gloves through which steam can penetrate.
- Doing so may cause scalds.
Do not use the product with the corded hose compressed or clogged.
- Otherwise the hot water may come out from the power base and thus damage the floors and carpels or result in scalds.
Do not use the product with the corded hose or power cord entangled.
- Doing so may damage the corded hose, thus resulting in electric shock or a fire.


06
M-1502 mmol-4" Lb. mH 5307362D 14:24:25
中
07


CAUTION

Do not use steam while the iron is rested on the power base.
- Doing so may cause scalds
Do not tilt or move the power base violently
- Doing so may cause water leakage.
Do not touch the hot surface (such as the surface of the soleplate, any side of the iron, the corded hose, the heat-insulation pad and the hot area around it) during use.
- Doing so may cause scalds
• Do not place your hands, feel, go under the
ironing board.
- Do not place the iron on
your hand, knee or any
other part of the body. Do not use a poem when
the iron is partially slicking out from the ironing board.
Do not touch the steam during use. - Do not aim the steam towards your hand, knee, or any other part of the body.
- Do not iron clothes that you are
Weaning.

Do not place the power base sidelong.
- Doing so may cause water
leakage, and then damage
floors and carpets.
Do not put the iron on a carpet or the floor.
- Doing so may damage the
product, carpet or floor

Make sure the product has fully cooled down before opening the bottom knob.
- Failure to do so may cause scalds.

CAUTION
1 Disconnect the power plug by holding the power
plug instead of pulling the power cord. Failure to do so may break the power cord, and
Please see to be sure may break this power cord, and may cause burns, electric shock, or fire due to a short circuit.
Care should be taken when using the product. - Steam emission may cause burns.
Use the product only for its intended purpose, for ironing fabrics.
- Failure to do so may cause injury.
When using with following fabric, test on an inconspicuous area, or place a cloth over the fabric to prevent the fabric from marking.
• Expensive or specially processed fabrics (velvet,
acrylic, nylon, cashmere, etc.)
- Fabrics that are labeled as "low heat" or "medium
heat, or dark colored fabrics.
- Failure to do so may cause damage fabric.
Always unplug the power plug during filling,
- Failure to do so may cause electric shock or fire due to electrical leakage resulting from insulation deterioration.
When ironing wet clothes, please use dry
- Failure to do so may cause scalds due to hot water splashes from the main body.
Place the iron correctly as instructed after use.
- Failure to do so may cause the product to fall over thus resulting in injury or scalds.

2

×

(二)本说明仅供参考。

O

M-1507

09

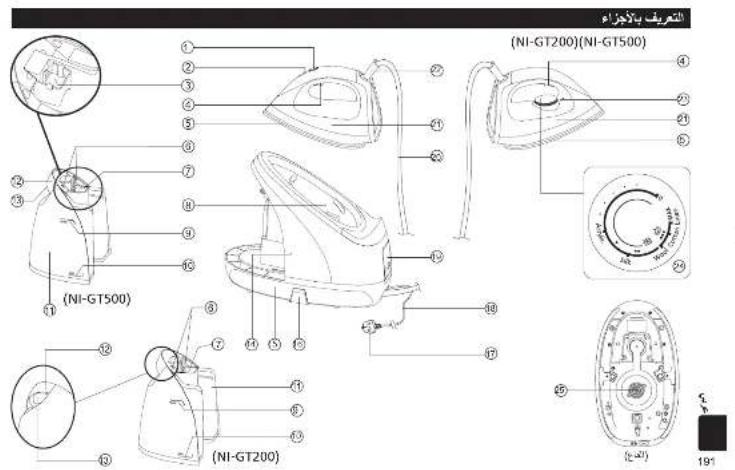
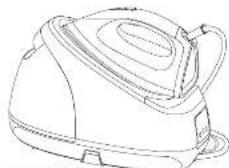
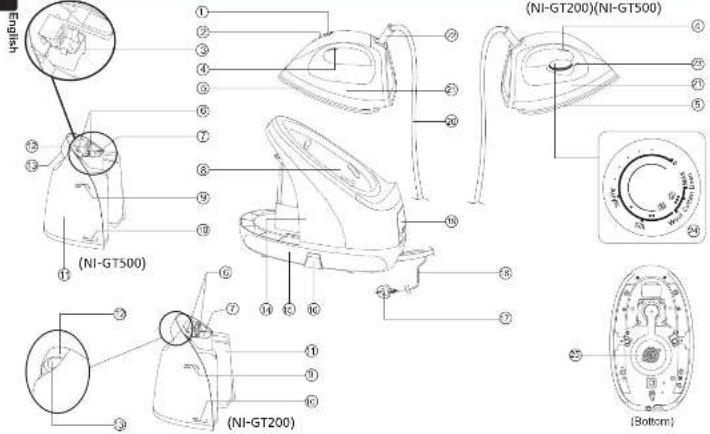
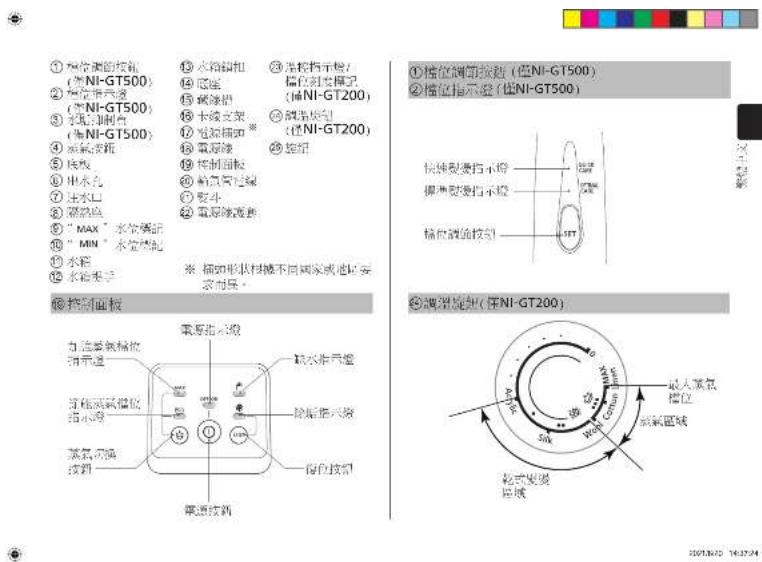
Parts identification
M-1502 serio-4' 1h. mH 73073629 14:34:24


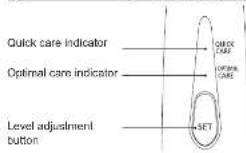
① Level adjustment button
(for NI-GT500 only)
② Level indicator (for ALL CT500 only)
(for NI-GT500 only)
③ State Inhibition Box (for NI-GT500 poly)
④ Slearn bullon
⑤ Sisplate
⑥ Water outlet
⑦ Water inlet
⑧ Heat-insulation pad
③ "MAX" water level mark
① "MIN" water level mark
1) Water tank
⑫ Water tank handle
(1) 2017年1月1日
13 Water tank latch
Power base
15 Cable Irough
16 Cable holder
① Power plug®
①8 Power cord
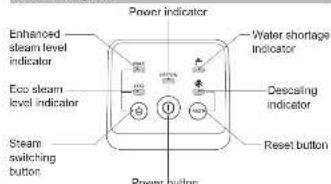
B Control pane
Corded hose
② Iron
22 Power cord sheath
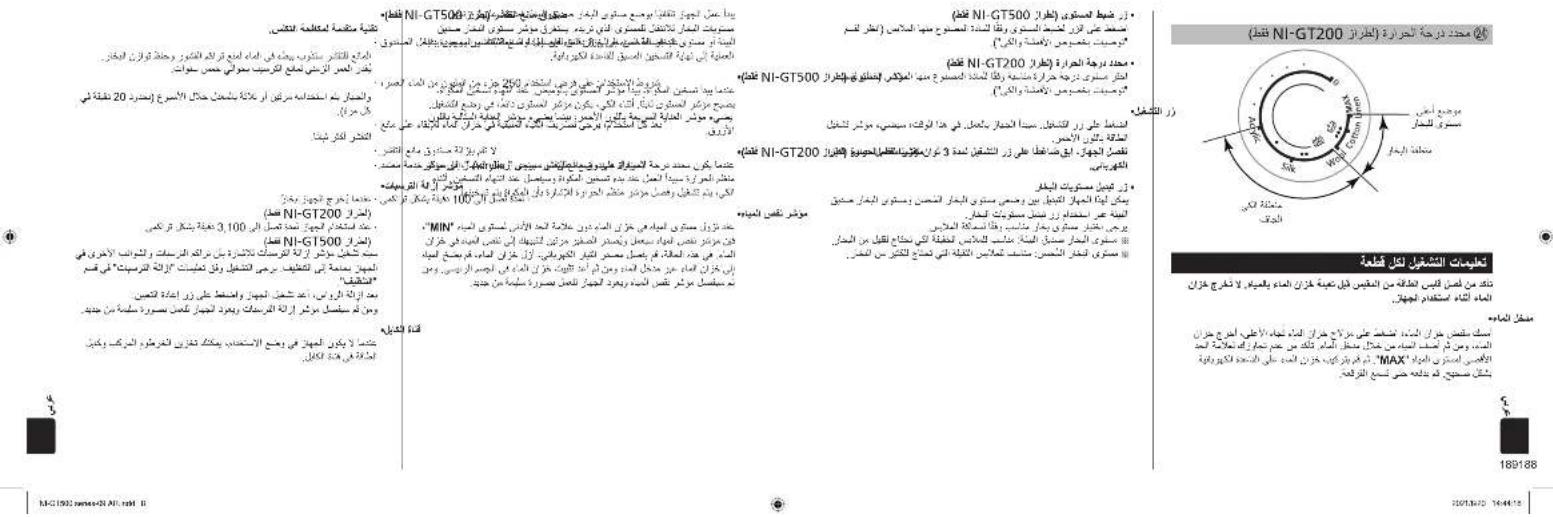
2) Thermostat indicator Level
scale mark For Nl-CT
(15) NI-GT200 only) Temperature selector
Temperature selector (for NL-GT300 m/s)
② Knob
*Plug type may vary comply with respective country or region requirement.
⑲ Control panel
English
① Level adjustment button (for NI-GT500 only)
② Level indicator (for NI-GT500 only)
1110

How to use
English
-
Remove the label on the product.
-
Set the level adjustment button (for NI-GT500 only) / temperature selector (for NI-GT200 only) of iron by following the instructions for "Steam ironing", and then iron a wet cloth for a few minutes to clear the residue from the soleplate.
14
M-C1502 name-4* Lh. mfd 93001362D 14:24:25
Notes:
a. When you use the product for the first time, you may smell an odor. The odor will disappear naturally after the product is used for several times. Please rest assured.
b. When the product is used for the first time, some particles may appear on the soleplate. This is normal. The particles are harmless and will disappear after a short period of time.
c. When the product is started, a sound may be heard, which is the sound of pumping by the water pump. This is normal.
d. During heating of the soleplate, a few drops of water may keep dripping out for about 3 seconds. This is normal.
e. After the first use, a small amount of condensate water may appear in the corded hose. When the product is used the next time, the condensate water will be ejected together with steam when steam is ejected from the soleplate, which will last several seconds. This is normal.
1. When removing the water tank from the power base, you will see some drops of water at the position where the water tank is installed on the power base. This is normal.
[NO TEXT]
Operating instructions
This product has been designed for dry ironing and steam ironing.
- Dry ironing
- Place the iron on the heat-insulation pad of the power base.
-
Connect the power supply. Then a beep is sounded.
-
Press the power button. Then the power indicator turns on.
- For NL CT500 buttons
Press the level adjustment button to set the level according to materials of clothes (See the section "Fabric and ironing recommendations"). The corresponding level indicator and the eco-steam level indicator start flashing and the product starts heating. When the iron finishes heating, the level indicator will become steady on from flashing. This indicates that you can start dry ironing.
4.2ForNI-GT200 only:
Turn the temperature selector to set the level according to materials of clothes (See the section "Fabric and ironing recommendations"). The thermostat indicator turns on, the eco steam level indicator starts flashing and the product starts heating. After the iron finishes heating, the thermostat indicator turns off. This indicates that you can start dry ironing.

- Steam ironing
- Place the power base on a stable surface.
- Take out the water tank and inject water through the water inlet. It is recommended to use purified water with less mineral content. The maximum capacity of the water tank is 1.8 L. Please make sure that the "MAX" water level mark
is not exceeded. Then attach the water tank onto the power base correctly. Push it until a click sound is heard. - Place the iron on the heat-insulation pad of the power base.
4.1 For NI-GT500 only.
(1) Connect the power supply and press the power button. The power indicator turns on. Press the level adjustment button to set the level according to materials of clothes (See the section 'Fabric and ironing recommendations'). The corresponding level indicator and the eco steam level indicator start flashing and the product starts heating.
② Wait about 2 minutes until the level indicator becomes steady on from flashing, which indicates that the soleplate finishes heating. About 3 minutes later, the steam level indicator becomes steady on from flashing, which indicates that the power base finishes heating. Then, you can press the steam button to use steam for ironing. - Water may leak when the iron sprays steam at the beginning. Please press the steam level adjustment button to set the steam level to "QUICK CARE" or rest the iron on the power base for about 15 seconds.
English
The image is too blurry to recognize any text content.
15

English
4.2 For NI-GT200 only
① Connect the power supply and press the power button. The power indicator turns on. Presses the steam switching button to set the steam level and rotate the temperature selector to align the desired level with the thermostat indicator (See the section "Fabric and ironing recommendations"). The steam level indicator starts flashing and the thermostat indicator turns on. ② Wait about one minute until the thermostat indicator turns off, allowing it to fill the counter. If the steaming of the finishes heating. About three minutes later, the steam level indicator becomes steady on from flashing, which indicates that the power base finishes heating. Then, you can press the steam button to use steam for ironing. - Do not press the steam button when the level set by the temperature selector is outside the steam area and the steam level indicator are still blinking. Otherwise, water may leak from the soleplate
- Steam boost
When the enhanced steam level is set, if you press the steam button twice in one second, steam boost will be generated in a short time (about 2 seconds).
• Automatic shut-off
When the product is not operated within 10 minutes or the product uses only dry ironing continuously for 10 minutes, the product will be automatically powered off. To restart the product, press the power button again.
16
M-C190 series-0' 18. rmb 1020365D 142435
Notes:
a. During use, a few drops of water and steam may be ejected from the soleplate at the same time. This is normal.
b. Do not touch the soleplate before it has fully cooled down.
c. Do not iron clothes that you are wearing.
d. Do not allow the soleplate surface to gel close to
yourself or others.
e. Do not use steam when the iron is rested on the power base in case of scalding.
1. During use, a large amount of steam will be ejected when the steam button is first pressed and later the amount of steam will slowly decrease and tend to be flat. If a large amount of steam is needed, please put the iron back to the power base and heal it for about 15 seconds.
[NO TEXT]
After use
- After ironing, place the iron on the heal-insulation pad correctly, and then press and hold the power button for about two seconds. When the product shuts down and all indicators turn off, remove the power plug.
- Take out the water tank and pour out the remaining water.
- Install the water tank back to the power base and clean residual water from where the water tank is installed.
- Store the product in a safe place.
Cleaning
Notes:
a. After use, remove the power plug and leave the product to cool down for more than 60 minutes before any cleaning or maintenance.
b. Never use such cleaning products as the thinner, cleanser and volatile solvent to wash the product. Otherwise, the product may be damaged.
• Cleaning the main body
For stubborn stains, use a soft cloth dipped with neutral
detergent to clean the surface of the main body.
- Cleaning the soleplate surface If glue or the like sticks to the soleplate surface, wipe it with a wet cloth.

- Cleaning steam vents
If scale appears on steam vents, remove the scale with a wooden or bamboo toothpick and then wipe the soleplate with a wet cloth.
- Descaling(Please perform the operation in a place convenient for drainage)
*ForNI-GT200 only: When the product has output steam for up to 100 minutes accumulatively.
*ForNI-GT500 only: When the product has been used for up to 3,100 minutes accumulatively.
The descaling indicator will turn on.
indicating that accumulated scale and other impurities in the product need to be cleared. Descaling indicator Please follow the steps below for descaling:
1. Disconnected the power supply and wait (for more than 60 minutes) until the product has fully cooled down.
2. Take out the water tank.

©
17

English
- Turn over the power base, place it horizontally on a stable surface and make sure that the power base is placed stably. Then rotate the bottom knob counterclockwise to remove the knob.
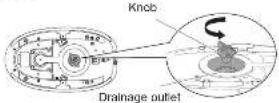
Note: Scalds may be caused. Make sure the product is completely cooled before opening.
The knob shall not be opened during use.
- Turn over the power base and shake it horizontally several times to pour out the scale and impurities in the boiler inside the product.
- Add an appropriate amount of water to the drainage outlet on the bottom of the power base and shake the power base horizontally several times.
- Turn over the power base, and pour out the scale and impurities in the main body.
- Repeat steps 4-5. Repeat the cleaning process until all the scale and impurities in the main body are poured out. This can prevent reduction of the amount of steam caused by increase of scale.
18
M-C190 series-0' 18. rmb 11 20235D 142458
- After pouring out all the scale and impurities, tighten the knob, restart the product and press the "RESET" button. Then the product can work properly

9. Wind and place the corded hose and power cord in the
Storage of the
Storage of the power cord
- Cleaning frequency: After the descaling indicator lights up Note: Depending on the using region and water quality, the product may need to be descaled multiple times.


Notes:
- Steam output may be significantly decreased before the descaling indicator turns on, depending on the using region or the composition of the used tap water. Therefore, cleaning is recommended before the descaling indicator turns on.
- If steam output is significantly decreased after cleaning, the scale inhibitor may be used up soon. Please contact the after-sales service personnel for replacement of parts.
• In addition to the reduced effect of the descaling agent, the shortened service life of the product may also result in decreased steam output
- When the product will not be in use for a long period of time:
- ForNI-GT200 only: Drain water in the water tank and rotate the temperature selector to set the product to the "Silk" steam level.
*ForNI-GT500 only: Drain water in the water tank and press the level adjustment button to set the product to the optimal care steam level.
Specifications
| Model | NI-GT500 N-GT200 | |
| Rated voltage | 220-240 V ~ 50-60 Hz | |
| Power consumption 2 | 900-2 400 W | |
| Weight Approx. 4.4 kg | Approx. 4.3 kg | |
| Dimensions (assembly) | (W x D x H) Approx. 350 x 200 x 300 mm | |
| Power plug/Cond length | Single-phase 3-pole plug/ Approx. 1.8 m | |
| Water tank capacity Approx. 1.8 L | ||
This product is intended for household use only.
English
19

[NO TEXT]

Fabric and ironing recommendations
English
- Do not use the product on leather products.
• To iron heat-sensitive materials or dark-colored fabrics, test on a small corner of the fabric before ironing the entire garment to avoid damages. - Keep the soleplate slightly away from the clothes when ironing clothes labeled "Use press cloth" or "Cool iron".
- Iron the clothes labeled "No steam" in the dry ironing mode
• To iron blended yam fabrics, select the level according to the material requiring the lowest heat setting.
• To iron clothes without a fabric care label, select the level by referring to the following table.
| Fabric. | For NI-GT500 only For NI-GT200 only | ||||||||||
| Ironing method Level Ironing method Level | |||||||||||
| Soleplate against | Soleplate slightly away | QUICK CARE | OPTIMAL CARE | Soleplate against | Soleplate slightly away | Acrylic | Silk Wool | Cotton | Linen | ||
| Acrylic Acetate Nylon Silk | ○ | ○ | × | ○ | ○ | ○ | ○ | ○ | × | × | × |
| Wool Cashmere | ○ | ||||||||||
| Rayon (Chiffon) Polyester | ○Dry ironing only | ○ | × | ○ | ○Dry ironing only | ○ | ○ | ○ | ○ | × | × |
| Cotton Linen | ○ | ○ | ○ | ○ | ○ | ○ | ○ | ○ | ○ | ○ | ○ |
20
M-190 mmHg 18. mm 1220350 142457
Fabric and ironing recommendations
| Fabric Tips | |
| Acrylic Acetate Nylon Silk | ·When pressing the soleplate slightly sway the garment, keep the soleplate about 1 cm away from the garment.·Iron the fluffy garment inside out to help them retain their shape. |
| Wool | |
| Cashmere | |
| Rayon (Chiffon) Polyester | ·When pressing the soleplate against the garment, place a cloth over the fabric and iron the garment by sliding the iron quickly in the dry ironing mode.·Ironing rayon clothes for a long time may cause shrinkage of clothes. |
| Cotton | ·Slowly move the soleplate while ironing. It may be hard to remove the wrinkle if the movement is too quick. |
| Linen | |
English
21

Troubleshooting
| Problem Causes Solution | |
| The product produces no steam or irregular steam. | The power plug is not inserted; the power button is not pressed. |
| There is no or insufficient water in the water tank. | |
| The product is not fully heated. | |
| The corded hose is bent and thus the steam cannot smoothly run through it. | |
| The circuit fails or the fuse is burned out. | |
| Water leaks out from the power base. | The water tank is not installed correctly only; the power base. |
| The bottom knob is not tightened. Tighten the bottom knob. | |
| The water tank is broken. | |
| The inner pipe is loose or damaged. | |
| A lot of water dips from the scaleplate (for NI-GT200 only) | The temperature selector is not set to the steam level. |
| The quick care indicator and the optimal care indicator are flashing at the same time. | |
22
M-C1502 series-0* (H. rnh 13)
[NO TEXT]

Troubleshooting
| Problem Causes Solution | |
| The quick care indicator and the optimal care indicator are flashing alternately. | External abnormal electromagnetic noise causes interference. |
| No steam is generated after the steam button is pressed. | |
| Unexpected steam is output when no operation is performed. | |
| The temperature cannot be changed. | |
| The amount of steam cannot be changed. | |
| The product is powered off abnormality. | |
| The problem persists even after you have followed the above solutions. | |
| Steam keeps coming out from the bottom of the power base. | |
| A lot of water leaks from the soleplate. | |
| The descaling indicator cannot be turned off. | |
English
23
2101.3970 14:34:27


Panasonic
使用說明書
(偏限家)使用)壓力式蒸氣電裂斗
型號 NI-GT500
NI-GT200

日文
M-C1592 series-D CN unit 7
m = 311
No. Model NI-GT500 NI-GT200
Kandungan
| Langkah peringalan | 44.49 |
| Pengenalpastan bahan | 50.52 |
| Arahan pengencalian bagi setap banaglan | 52.53 |
| Cama penggunaan | 54.56 |
| Selepas penggunaan | 57 |
| Penecujan | 57.59 |
| Speelikasi | 59 |
| Cadangan fabrik dan penyeterlikaan | 60.61 |
| Penyelisalan Masalah | 62.63 |
MY Melayu
Dicetak di China
m = 311
N-C1502 series-CD NY series 47291850 1438110
AMARAN
Jangan gunakan seterika apabila palam kuasa atau kord kuasa rosak atau panas. Jangan sekall-kall menggunakan produk sekranya palam kuasa dipasang longgar di dalam salur keluar rumah.
M-C1502 series-CD NY series 07201850 1438121

55


telayu

4.2 Unluk NI-GT200 sahaja:
M-C190 series-CHY and 10/2013/02 14:31/21
Nota:
M-C190 series-DI-NY and 12301390 143121
M-C1502 series-CL NY instant 13
[NO TEXT]

M-C1502 series-04 Vb. rml 31301362D 14:28:27
CÁNH BẢO
M-C1502 series-04 Vb. rml 43071392D 14:28:28
- CHI DAS MUSE: db 15 Mang Eap
M-C1502 series-04 Vb. rml 12
[NO TEXT]

Xù lý sự cố
M-G1502 version-05 (11 March 8)

91013870 14:42:05


ข้อควรระวัง
M-C1502 series 45 (11/19) 6207802 14-4010
[NO TEXT]
M-C1502 series 45 (11/19) 9.2071802 14-4018
bar
| Category | Value | |---|---| | Bar 1 | 0 | | Bar 2 | 0 | | Bar 3 | 0 | | Bar 4 | 0 | | Bar 5 | 0 | | Bar 6 | 0 | | Bar 7 | 0 | | Bar 8 | 0 | | Bar 9 | 0 | | Bar 10 | 0 | | Bar 11 | 0 | | Bar 12 | 0 | | Bar 13 | 0 | | Bar 14 | 0 | | Bar 15 | 0 | | Bar 16 | 0 | | Bar 17 | 0 | | Bar 18 | 0 | | Bar 19 | 0 | | Bar 20 | 0 | | Bar 21 | 0 | | Bar 22 | 0 | | Bar 23 | 0 | | Bar 24 | 0 | | Bar 25 | 0 | | Bar 26 | 0 | | Bar 27 | 0 | | Bar 28 | 0 | | Bar 29 | 0 | | Bar 30 | 0 | | Bar 31 | 0 | | Bar 32 | 0 | | Bar 33 | 0 | | Bar 34 | 0 | | Bar 35 | 0 | | Bar 36 | 0 | | Bar 37 | 0 | | Bar 38 | 0 | | Bar 39 | 0 | | Bar 40 | 0 | | Bar 41 | 0 | | Bar 42 | 0 | | Bar 43 | 0 | | Bar 44 | 0 | | Bar 45 | 0 | | Bar 46 | 0 | | Bar 47 | 0 | | Bar 48 | 0 | | Bar 49 | 0 | | Bar 50 | 0 | | Bar 51 | 0 | | Bar 52 | 0 | | Bar 53 | 0 | | Bar 54 | 0 | | Bar 55 | 0 | | Bar 56 | 0 | | Bar 57 | 0 | | Bar 58 | 0 | | Bar 59 | 0 | | Bar 60 | 0 | | Bar 61 | 0 | | Bar 62 | 0 | | Bar 63 | 0 | | Bar 64 | 0 | | Bar 65 | 0 | | Bar 66 | 0 | | Bar 67 | 0 | | Bar 68 | 0 | | Bar 69 | 0 | | Bar 70 | 0 | | Bar 71 | 0 | | Bar 72 | 0 | | Bar 73 | 0 | | Bar 74 | 0 | | Bar 75 | 0 | | Bar 76 | 0 | | Bar 77 | 0 | | Bar 78 | 0 | | Bar 79 | 0 | | Bar 80 | 0 | | Bar 81 | 0 | | Bar 82 | 0 | | Bar 83 | 0 | | Bar 84 | 0 | | Bar 85 | 0 | | Bar 86 | 0 | | Bar 87 | 0 | | Bar 88 | 0 | | Bar 89 | 0 | | Bar 90 | 0 | | Bar 91 | 0 | | Bar 92 | 0 | | Bar 93 | 0 | | Bar 94 | 0 | | Bar 95 | 0 | | Bar 96 | 0 | | Bar 97 | 0 | | Bar 98 | 0 | | Bar 99 | 0 | | Bar100 | -1.5%M-C1902 series-05 (11/12) 14-2021.09.20 14:42:13


Panasonic
The image is too blurry to recognize any text content.

⚠ YBAΓA
M-C1502 series-07 UKILL and 9/20/13/20 14:42:11
Примітки:
The image is too blurry to recognize any text content.
Капакиа


ECKEPTY
4.2 Tek NI-GT200 yuH:
M-C1502 series-N All, rel.


M-C1502 series-24 All rights

2107.3970 14:44:18

• الكى بشخر
a_1 =
NI-GT500 4.1
[Illegible due to severe distortion and noise]
M-C1502 series-N All- rnh 7

01013270 14:44:18


M-C1592 name=2N AII, rshI 9:3071.82D 14:44:17
| ### ## ### ### ### | 1### ## ## ## ## ## |
| ### ## ## ## ## ## | 2### ## ## ## ## |
| ### ## ## ## ## | 3### ## ## ## |
| ### ## ## ## ## | 4### ## ## ## |
| ### ## ## ## ## | 5### ## ## ## |
| ### ## ## ## | 6### ## ## |
| ### ## ## ## | 7### ## ## |
| ### ## ## ## | 8### ## ## |
| ### ## ## ## | 9### ## ## |
| ### ## ## ## | 10### ## |
| ### ## ## ## | 11### ## |
| ### ## ## | 12### ## |