
MOD-35 - Vacuum Cleaner MPM - Free user manual and instructions
Find the device manual for free MOD-35 MPM in PDF.


| Product Type | Cordless Cyclone Vacuum Cleaner |
| Brand | MPM |
| Model | MOD-35 |
| Battery Type | Lithium-ion (Li-ion) |
| Charging Time | Approx. 3.5–4.5 hours |
| Runtime (Low Suction) | Up to 30 minutes |
| Suction Power Levels | 2 (standard and MAX) |
| Maximum Sound Level | 82 dB |
| Dust Collection System | Cyclone, bagless dust canister |
| Dust Canister Capacity | Approx. 0.5 L (estimated) |
| Filtration System | HEPA filter, cloth filter, sponge filter |
| Attachments Included | Multi-purpose electric brush with LED lighting, slide-out multi-purpose tool, slot tool |
| Brush Modes | Carpet / Floor |
| Wand Type | Aluminium telescopic suction wand |
| Wall Parking Mount | Included for storage |
| Weight | Approx. 2.5 kg (estimated) |
| Dimensions (HxWxD) | Not specified; compact design |
| Power Source | Battery (rechargeable); use only supplied charger |
| Indoor Use Only | Yes; dry surfaces only |
| Safety Features | Automatic shut-off not specified; do not immerse; keep away from heat sources |
| Maintenance | Empty dust canister and clean filters after each use; do not wash with water for electrical parts |
| Accessories Replacement | Use identical battery type; filters washable and reusable |
Frequently Asked Questions - MOD-35 MPM
User questions about MOD-35 MPM
0 question about this device. Answer the ones you know or ask your own.
Ask a new question about this device
Download the instructions for your Vacuum Cleaner in PDF format for free! Find your manual MOD-35 - MPM and take your electronic device back in hand. On this page are published all the documents necessary for the use of your device. MOD-35 by MPM.
USER MANUAL MOD-35 MPM
natural_image
Exterior view of a white and silver vacuum cleaner with red circular headrest (no text or symbols visible)natural_image
Exploded view of a mechanical device with a central component and multiple circular components (no text or symbols visible)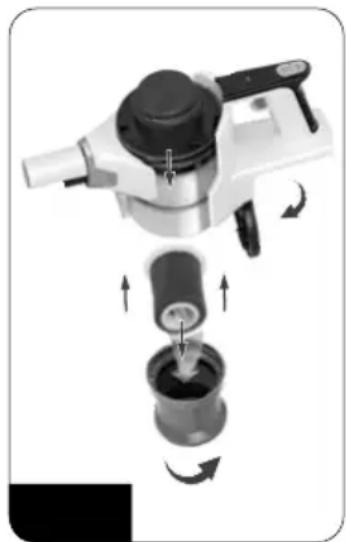
natural_image
Mechanical assembly diagram showing a spray gun with internal components and directional arrows indicating motion (no text or symbols)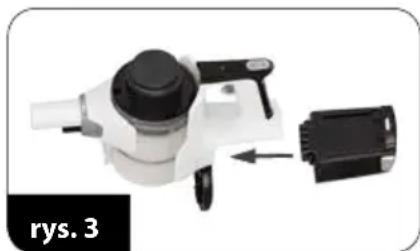
natural_image
Mechanical device with black and white components, labeled 'rys. 3' (no other text or symbols visible)natural_image
Close-up of a medical device with labeled ports (A, B, C) and a close-up view showing internal components (no text or symbols on the device itself)CZYSZCZENIE I KONSERWACJA
PROBLEMY I SPOSÓB ICH USUWANIA
natural_image
Close-up of a mechanical component with internal channels and a labeled arrow pointing to it, no readable text or symbols present.PROBLEM PRZYCZYNA SPOSÓB USUNIĘCIA
Read carefully this manual before using the appliance.
Always remove the plug from the power outlet when not used, or before cleaning the appliance.
Before the first use check if mains voltage conform with vacuum cleaner.
Do not hang the power cord over sharp edges and do not allow the power cord to touch hot surfaces.
Do not pull the cord to unplug the appliance.
Do not leave the operating vacuum cleaner unattended.
- Close supervision is necessary when using the appliance near children.
Do not allow the vacuum cleaner to go over the power cord in case it can damage its insulation.
Do not try to use the vacuum cleaner if you suspect any technical damage.
Do not use the appliance, also if the power cord or plug is damaged - return the appliance for repair to an authorized service centre.
To avoid the risk of damage, fire or injury, always use the attachments recommended by the manufacturer.
Take extreme caution when cleaning the stairs.
Do not immerse the appliance, its cord and plug in water or any other liquids, keep it dry at all times.
Do not use the vacuum cleaner to collect flammable and corrosive liquids, solvents, matches, ash, cigarette ends, oil, sharp items etc. It can cause damage or even fire! Do not vacuum-clean near flammable liquids and substances!
Because of the vacuum cleaner plastic housing keep the appliance away from any heat sources (heaters, stoves etc.)
Do not cover the vacuum cleaner outlet and inlet!
This vacuum cleaner is designed for domestic use only.
This appliance is not intended for use by children under 8 years of age and individuals with reduced physical, sensory or mental capabilities, or lack of experience and knowledge, unless they have been given supervision or instruction concerning use of the appliance in a safe way and if they understand the hazards involved. Cleaning and user maintenance shall not be carried out by children without supervision.
Children should be supervised to ensure that they do not play with the appliance.
- Store the appliance and its cord out of reach of children under 8 years of age.
Do not vacuum-clean people or animals, take special care not to move suction nozzles near eyes and ears.
Turn off and disconnect the appliance from supply circuit before replacing accessories.
Do not vacuum without bag, filters and in case of damage.
Check the hose, wand and suction nozzles and remove any litter from them.
Use the vacuum cleaner only indoors and on dry surfaces. Dry the washed carpets before vacuum-cleaning.
Keep your children safe: do not leave any parts of the packaging readily accessible (i.e. plastic bags, cardboard boxes, polystyrene inserts, etc.).
WARNING! Never let children play with plastic film or bags. Choking/asphyxiation hazard!
SAFETY INSTRUCTIONS FOR THE BATTERY
The device contains a lithium-ion battery. Read the following tips carefully. Failure to comply with them may result in equipment damage, electric shock or fire.
Do not open the battery housing. Do not replace the battery cells.
- Protect the battery against moisture, sunlight and fire. Do not place the battery near other electrical and heating equipment.
Store and use the battery in a temperature range of 5-40 °C. Too high temperature may damage the battery. Low temperature reduces the capacity and lifetime of the battery.
▶ Always replace the same type of battery dedicated to the device. Do not use a different type of battery.
- Protect the battery from mechanical damage, do not allow the battery to shake or fall.
Do not charge the battery unattended. Charge only with the dedicated charger on the battery pack.
▶ After charging the battery, disconnect the charger from the mains.
Do not short circuit the battery contacts. Short-circuiting can cause battery damage and even fire. Keep the battery away from paper clips, nails, coins and other metal objects.
- Charge the battery fully before using the device for the first time.
OVERVIEW
MOD-35 features the operating convenience of a cordless cyclone vacuum cleaner. The cyclone operation helps filter out the collected dust with a centrifugal effect and without any dust bags. The dust is collected into a canister, which is easily emptied to a dust bin. The lithium-ion battery features one of the highest capacity to mass ratio to make the vacuum cleaner light in weight and run for a long time before recharging. The vacuum cleaner has two suction power levels to choose from.

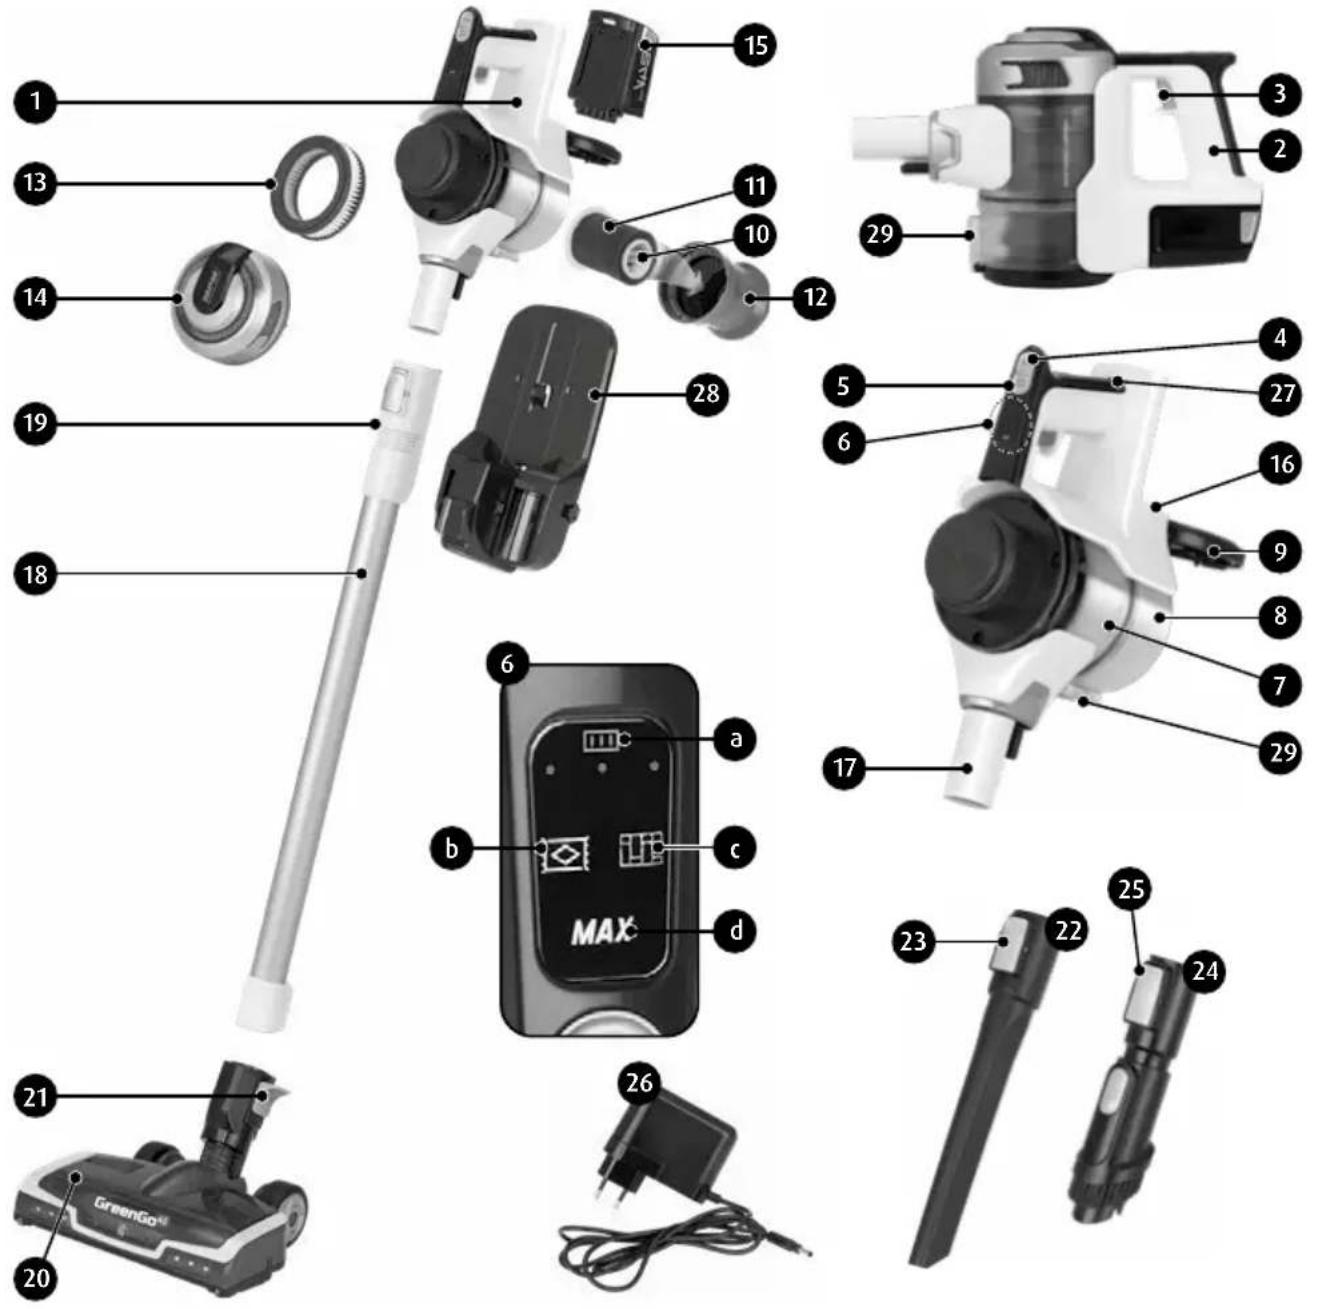
- Motor module
- Handle
- On/off switch
- Maximum suction power selection button (MAX)
- Electric brush mode selection button: CARPET/FLOOR
- LED display
a. battery charge indicator
b. electric brush mode icon "CARPET"
c. electric brush mode icon "FLOOR"
d. maximum suction power indicator (MAX)
-
Dust canister body
-
Bottom part of the canister body
-
Hinged canister body cover
- Cloth filter
- Sponge filter
- Filter cage
- HEPA filter
- Outlet lid
- Lithium-ion battery
- Battery holder
- Suction wand socket
- Aluminium suction wand
- Wand unlock button
- Multi-purpose electric brush with lighting
- Electric brush unlock switch
-
Slot tool
-
Slot tool unlock button
- Slide-out multi-purpose tool
- Multi-purpose tool unlock button
-
Battery charger
-
Power adapter input
- Wall parking mount
- Dust canister hinged cover release button
BEFORE FIRST USE
- Remove the vacuum cleaner from the cardboard box. Remove all stickers, shipping locks, plastic bags, and filling material.
- Inspect the vacuum cleaner carefully for damage which may have occurred in transport. If damage is suspected, consult your reseller.
- Assemble the vacuum cleaner (see Section "ASSEMBLING THE VACUUM CLEANER").
- Charge the vacuum cleaner battery (see Section "CHARGING THE BATTERY").
- Verify that your power mains match the nameplate ratings of the vacuum cleaner.
ASSEMBLING (AND DISASSEMBLING) THE VACUUM CLEANER
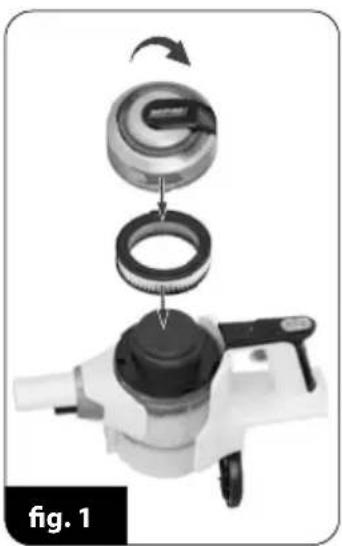
- Place a HEPA filter (13) on the dust canister body (7), and then place the outlet lid (14) and gently turn to engage the lock (fig. 1).
- Place the cloth filter (10) with sponge filter on top of it (11) into the filter cage (12) and then place the filter cage inside the dust canister body (7) and gently turn to engage the lock (fig. 2). Close the canister body hinged cover (9).
- Place the battery (15) inside the battery holder (16) by gently sliding it in the direction of the dust canister (fig. 3). Sliding the battery out is possi-
ble after pressing and holding the buttons on the sides of the battery.
- Attach a suction wand (18) into the suction wand socket (17) or directly attach an appropriate brush. Detaching the wand of tools is possible after pressing the unlock button or switch (19), (21), (23) or (25).
natural_image
Mechanical assembly diagram showing a device with a central component and multiple circular components, labeled 'fig. 1' (no text or symbols on the diagram itself)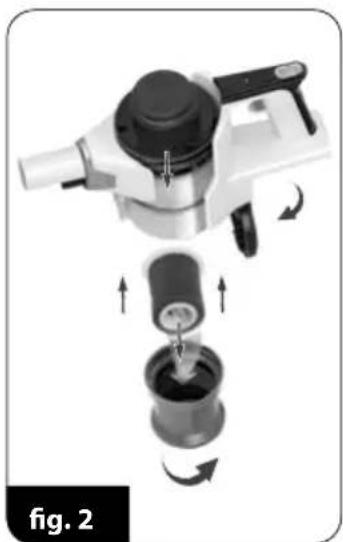
natural_image
Mechanical assembly diagram showing a disassembly of a spray gun into a cylindrical component (no text or symbols visible)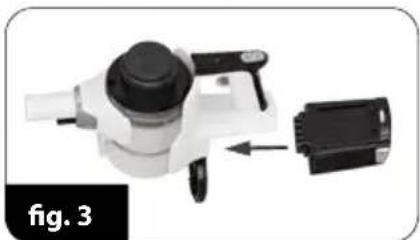
natural_image
Mechanical device with a black-and-white component and a black connector, labeled 'fig. 3' (no readable text or symbols on the device itself)CAUTION! Do not turn on a disassembled vacuum cleaner!
CAUTION! Attach the wand and accessories carefully to avoid damaging the delicate connections powering the electric brush.
CHARGING THE BATTERY
CAUTION! Charge the battery before the first use. Charging the battery takes about 3.5-4.5 hours.
CAUTION! Use only the supplied charger for charging the battery. It is not possible to turn on the vacuum cleaner while charging the battery.
- Install the battery (15) in the motor module (1), do not turn the vacuum cleaner on.
- Plug the charger cable (26) to the power adapter input (27) and plug the charger into the power outlet – the battery charge indicator will start flashing (6a) – during the charging process 1, 2 or 3 dots will be flashing.
- Full battery charge is signalled by three continuously lit dots on the display (6a), and the display will turn off afterwards.
- Unplug the charger from the power outlet and the charger cable from the vacuum cleaner.
- Make sure that the vacuum cleaner has been assembled properly and the battery is charged.
- Attach appropriate tools:
- multi-purpose electric brush with lighting (20) – for all types of solid surfaces and carpets, LED lighting illuminates the cleaned surface, ensuring perfect vacuuming
- slide-out multi-purpose tool (24) – intended for vacuuming of blinds, lampshades, mirrors and all areas which require gentle cleaning, adjustable length of the brush makes it suitable for different vacuuming conditions
- slot tool (22) – for vacuuming corners, spaces under furniture and other hard to reach areas inaccessible to other accessories.
Depending on the needs, plug the tools to the suction wand (18) or the socket (17).
- Turn on the vacuum cleaner with the switch (3). The vacuum cleaner with operate at low suction power. After turning the vacuum cleaner on, the battery charge indicator also lights up. (6a).
- To activate high suction power press the maximum suction power button "MAX" (4). Pressing the button again deactivates the high suction power. The activated high suction power is displayed by the indicator (6d).
- While using the electric brush (20) set the mode dedicated for vacuuming floors or carpets. Selection of a mode is done with the electric brush mode selection button (5). Selection of a mode is signalled by a corresponding "CARPET" icon (6b) or "FLOOR" icon (6c).
- Monitor the capacity of the dust canister (8). An overfilled canister reduces the vacuuming efficiency, increases energy consumption and leads to quicker accumulation of dust on the filters.
CAUTION! Do not allow the dust canister to become overfilled! The dust level in the canister cannot exceed the "MAX" level.
CAUTION! If the suction power of the vacuum cleaner dropped significantly, it means that the wand and/or the suction nozzle are clogged and/or the dust canister is full. Clear the wand and/or the suction nozzle and/or empty the dust canister.
- Should you require to empty the dust canister, proceed as follows:
- turn off the vacuum cleaner with the switch (3)
- place the dust canister over a waste bin
- press the hinge cover release button (29) and empty the contents of the canister into the waste bin
- close the hinged cover (9)
- turn on the appliance and resume vacuuming.
- After the vacuuming is complete, turn off the vacuum cleaner with the switch (3), clear the dust canister and charge the battery. A fully charged battery provides up to 30 minutes of operation at low suction level. Apart from the battery charge indicator (6a), the vacuum cleaner will signal the necessity of recharging by a significant loss of suction power.
PARKING THE VACUUM CLEANER IN THE WALL MOUNT
The MOD-35 vacuum cleaner includes a wall parking mount (28) for easy and space-saving storage. Install the wall parking mount on a wall to use it:
-
Choose a place on a wall high enough above the floor so that the vacuum cleaner fits parked and with its telescopic wand and electric brush. Make sure there is no wiring in the wall within the envelope of the wall parking mount.
-
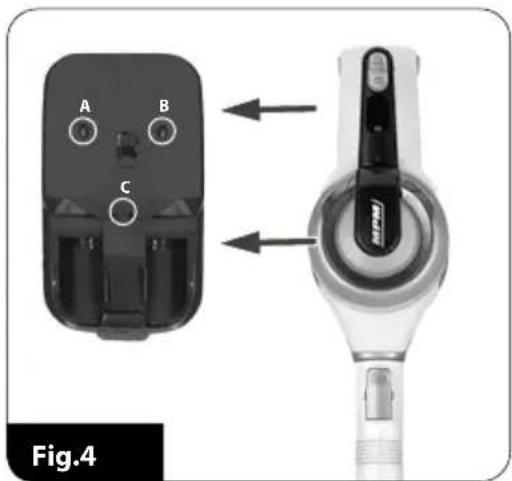
Place the parking mount (28) on the wall and mark the hole positions (A, B, C) with a pencil – fig. 4.
-
Drill the holes at the marked locations, insert the wall plugs, place the parking mount (28) and secure it with screws. Now, you can park and store the vacuum cleaner on the mount.
natural_image
Diagram showing a device with labeled ports (A, B, C) and an external device with directional arrows indicating movement or connection (no text or symbols on the device itself)CLEANING AND MAINTENANCE
CAUTION! Never immerse the vacuum cleaner, the battery charger, the battery or the battery dock in water!
CAUTION! Empty the dust canister and clean the filters after each use for the best performance.
CAUTION! Maintain the vacuum cleaner powered off and disconnected from the battery charger!
-
Clean the outer surfaces of the vacuum cleaner with a damp cloth and wipe them dry. Use a bit of a neutral detergent to remove persistent dirt.
-
Empty the dust canister, detach the filter cage (12), take out the cloth filter (10) and gently remove the sponge filter (11). Remove the HEPA filter (13) as well. Rinse all the filters and the filter cage (12) under running water and then dry completely before inserting into the vacuum cleaner.
-
In order to thoroughly clean the dust canister, you can separate the dust canister body (7) from the bottom part of the canister (8) by gently twisting the two parts (see: markings on the canister). Wash the bottom part of the canister (8) in water with mild detergent, rinse and dry completely before assembly.
CAUTION! Do not install any filter when not dry: the vacuum cleaner can fail!
-
Recharge the battery after each use. Do not store the vacuum cleaner with the discharged battery. Use the supplied battery charger only. Do not short the battery poles. Use the identical battery type for replacement.
-
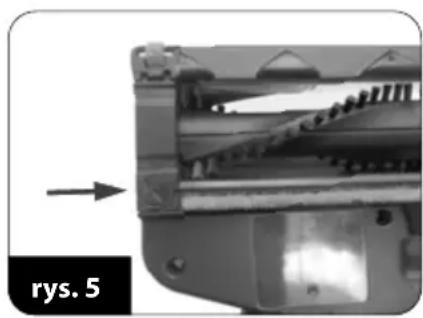
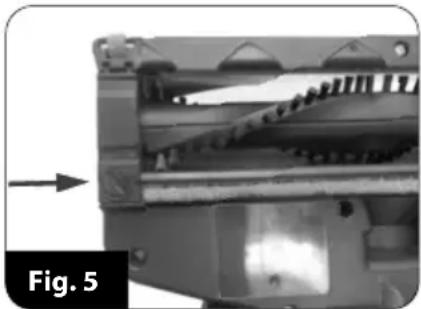
Regularly clean the rotary shaft of the electric brush. The shaft can be detached after disen-
gaging the lock in the bottom part of the electric brush, indicated by an arrow in fig. 5. After cleaning the shaft, insert it into the electric brush and engage the lock.
CAUTION! Do not dispose of used batteries with household waste. Dispose of batteries by returning them to an authorized waste collection point or the original reseller. Never throw batteries into fire!
natural_image
Close-up of a mechanical component with internal channels and a labeled arrow, no readable text or symbols present.TROUBLESHOOTING
| PROBLEM CAUSE SOLUTION | ||
| The vacuum cleaner fails to start. | Discharged battery. Recharge the battery. | |
| Battery charging in progress. Wait until complete. | ||
| Low suction power. | Clogged wand and/or tool. Unclog. | |
| Dust canister full. Empty the dust canister. | ||
| The vacuum cleaner blows out dust. | Clogged filters. Clean the filters. | |
| The dust canister is poorly installed. Install the dust canister properly. | ||
TECHNICAL SPECIFICATION
See the product's nameplate for technical specifications.
Maximum sound level: 82 dB


Charger Vacuum
cleaner
Note! MPM agd S.A. may introduce technical modifications to its products without notice.
PROPER DISPOSAL OF THE PRODUCT (waste electrical and electronic equipment)

This symbol on the product indicates that the product, after its lifetime, should not be disposed with other household wastes. To avoid harmful influence on the environment and human health due to uncontrolled waste disposal, dispose the waste device to the service point of waste household appliances or report collecting it from home. In order to obtain detailed information about the location and how to dispose the waste electrical and electronic equipment in a safe way, contact your retailer or local Department of
Environmental Protection. Do not dispose the device with other municipal waste
natural_image
Mechanical assembly diagram showing a motor with gears and a valve, no text or symbols present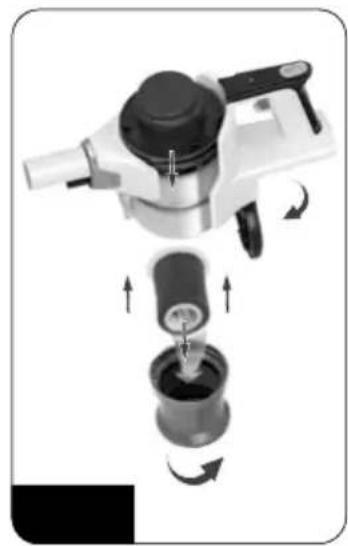
natural_image
Mechanical device with internal components and directional arrows indicating motion (no text or symbols)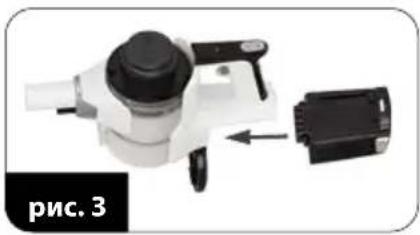
natural_image
Mechanical device with black housing and connector, shown with a close-up view of its internal components (no text or symbols visible)natural_image
Close-up of a mechanical component with internal channels and a directional arrow, labeled 'рис. 5' (no readable text or symbols beyond label)natural_image
Mechanical assembly diagram showing a device with a central component and multiple circular components, no visible text or symbols.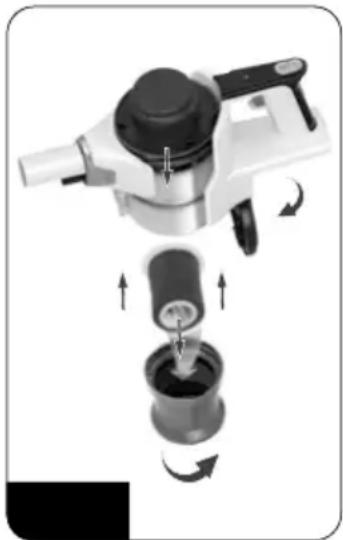
natural_image
Mechanical assembly diagram showing a motor, cylinder, and base with directional arrows indicating motion (no text or symbols)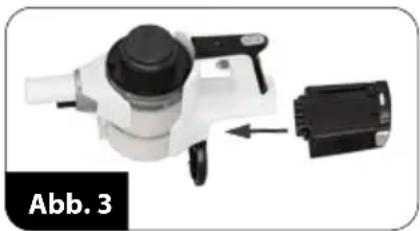
natural_image
Mechanical device with a black-and-white body and a black connector, labeled 'Abb. 3' (no readable text or symbols on the device itself)natural_image
Close-up of a mechanical device with internal components and a directional arrow, labeled 'Abb. 5' (no readable text or symbols beyond label)natural_image
Exploded view of a mechanical device showing internal components and a labeled part (no readable text or symbols)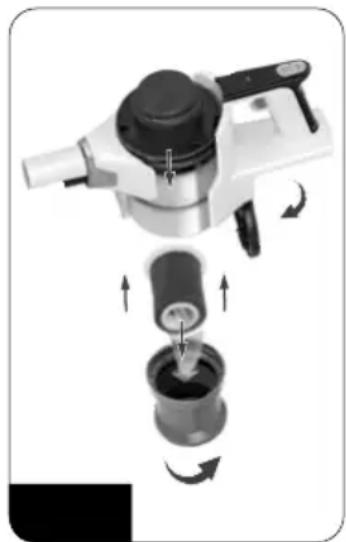
natural_image
Mechanical assembly diagram showing a device with internal components and directional arrows indicating motion (no text or symbols)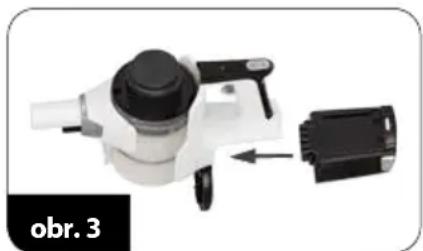
natural_image
Mechanical component with a black-and-white body, showing a shaft and housing assembly (no visible text or symbols)natural_image
Close-up of a mechanical component with internal channels and a directional arrow, labeled 'obr. 5' (no readable text or symbols beyond label)natural_image
Mechanical assembly diagram showing a device with a central component and multiple parts, no visible text or symbols.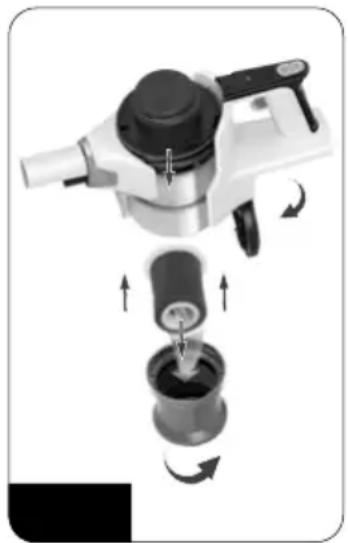
natural_image
Mechanical assembly diagram showing a device with rotating components and directional arrows (no text or symbols)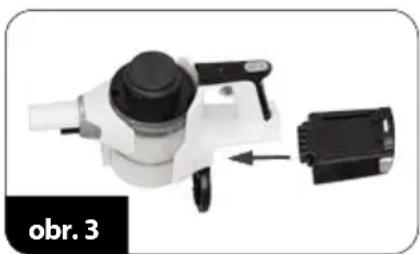
natural_image
Mechanical device with black housing and connector, labeled 'obr. 3' (no other text or symbols visible)natural_image
Close-up of a mechanical component with an arrow pointing to a section, labeled 'obr. 5' (no other text or symbols visible)PROBLÉMY A SPÔSOBY ICH ODSTRAŇOVANIA
We wish you satisfaction from using the product and invite you to check a wide range of other MPM appliances
natural_image
Line drawing of a vacuum cleaner with a cat silhouette and bulb (no text or symbols)MPM agd S.A.
- CZYSZCZENIE I KONSERWACJA
- PROBLEMY I SPOSÓB ICH USUWANIA
- SAFETY INSTRUCTIONS FOR THE BATTERY
- OVERVIEW
- BEFORE FIRST USE
- ASSEMBLING (AND DISASSEMBLING) THE VACUUM CLEANER
- CAUTION! Do not turn on a disassembled vacuum cleaner!
- CHARGING THE BATTERY
- PARKING THE VACUUM CLEANER IN THE WALL MOUNT
- CLEANING AND MAINTENANCE
- TECHNICAL SPECIFICATION
- PROPER DISPOSAL OF THE PRODUCT (waste electrical and electronic equipment)
- PROBLÉMY A SPÔSOBY ICH ODSTRAŇOVANIA
Brand : MPM
Model : MOD-35
Category : Vacuum Cleaner