
VS110W - Fountain Pen GORENJE - Free user manual and instructions
Find the device manual for free VS110W GORENJE in PDF.


| Product Type | Vacuum Sealer (Food Preservation System) |
| Brand | Gorenje |
| Model | VS110W |
| Power Supply | 220-240V~, 50/60Hz |
| Main Functions | Vacuum/Seal, Seal Only, Cancel, Cover Lock, Indicator Lamps (Vacuum & Seal) |
| Sealing Strip Material | Teflon-coated heating wire |
| Vacuum Mechanism | Internal vacuum pump with airproof sponge loop |
| Bag Compatibility | Compatible with standard vacuum sealer bags and rolls (not included) |
| Safety Features | Automatic shut-off after 30 seconds without reaching vacuum; overheat protection via cool-down period |
| Cleaning & Maintenance | Wipe exterior with damp cloth; do not immerse; keep cover open when not in use; do not wash cover |
| Storage | Store in flat, safe place out of reach of children |
| Intended Use | Household indoor use only for food preservation and dry goods packaging |
| Warranty & Service | Contact Gorenje Customer Care Centre or local dealer |
| Weight (approx.) | 2.5 kg |
| Dimensions (approx.) | 40 x 20 x 10 cm |
Frequently Asked Questions - VS110W GORENJE
User questions about VS110W GORENJE
0 question about this device. Answer the ones you know or ask your own.
Ask a new question about this device
Download the instructions for your Fountain Pen in PDF format for free! Find your manual VS110W - GORENJE and take your electronic device back in hand. On this page are published all the documents necessary for the use of your device. VS110W by GORENJE.
USER MANUAL VS110W GORENJE
VS 110 W
- Seal only
- Sealing indicator light
- Cancel
- Vacuuming indicator light
Step 2: Close the lid by pressing down.
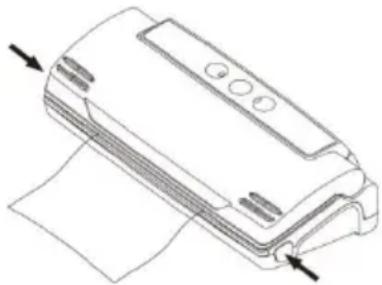
Step 1: Place the opening of the bag under the air outlet.
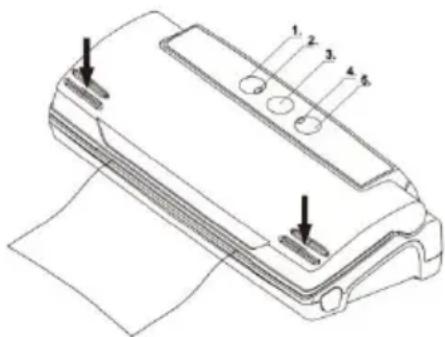
- Seal only
- Sealing indicator light
- Cancel
- Vacuuming indicator light
Step 2: Close the lid by pressing down.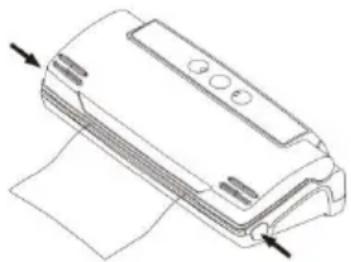
Step 3: Open the lid by pressing.
OPERATING THE APPLIANCE
When using this electrical appliance, safety precautions should always be observed, including the following:
Read all of the instructions before using the appliance.
Warning
- Before plugging the cord into a wall outlet, or disconnecting, make sure the control is OFF, and unplug from the outlet when not in use or before cleaning.
- This appliance is not a toy. When used by or near children, close attention is necessary. Store this appliance in a safe place, out of the reach of children.
- Do not use any attachments not recommended or appointed, and do not use this appliance for any purpose other than its intended use.
- Stop using the machine immediately if the cord is damaged, and have it replaced by a professional.
- Keep away from moving parts.
- Do not attempt to repair this appliance.
- Do not use the appliance if it has fallen or if it appears to be damaged.
- Avoid doing the following: pull or carry by the cord, use the cord as a handle, close a door on the cord, or pull the cord around sharp edges or corners. Do not operate the appliance over the cord, or if the cord or plug is wet.
- Keep away from hot gas, heated ovens, electric burners, and any other hot surfaces.
- It is better not to use an extension cord with this unit. However, if one is used, it must have a rating equal to or exceeding the rating of this appliance.
- When disconnecting, to avoid any injury, unplug by grasping the plug, not the cord.
- Before plugging in or operating the appliance, make sure your hands are dry and safe to do the actions.
- When it is in the "ON" or working position, always place it on a stable surface, such as a table or counter.
- There is no need to use any lubricant, such as lubricating oils or water, on this appliance.
- When cleaning, do not immerse this appliance in water or any other liquid.
- Do not use this appliance outdoors or on a wet surface; it is recommended for household, indoor use only.
- This appliance is not intended for use by persons (including children) with reduced physical, sensory, or mental capabilities, or lack of experience and knowledge, unless they have been given supervision or instruction concerning use of the appliance by a person responsible for their safety.
- Children should be supervised to ensure that they do not play with the appliance.
- If the supply cord is damaged, it must be replaced by the manufacturer, its service agent, or similarly qualified persons in order to avoid a hazard.
- When using the vacuum canister, please press the canister cover with your hand first; this will improve the vacuum.
- After finishing the vacuum work, please always leave the machine cover open; do not fasten the cover, as it will affect the machine's function.
- Please do not wash the canister cover; it will affect the function.
This appliance is marked according to the European directive 2002/96/EC on Waste Electrical and Electronic Equipment (WEEE). This guideline is the framework for a European-wide validity of return and recycling of Waste Electrical and Electronic Equipment.
Functions and features
Vacuum/Seal: For drawing air out of the bag and automatically switching to seal the bag after vacuuming is completed.
Seal Only: For sealing the bag without vacuuming, so that the vacuum can be formed.
Cancel: To switch off the vacuuming and sealing action whenever the operator wants to stop the operation.
Cover Lock: To unlock or lock the cover. There is one key-press on the left side and one on the right side of the cover. Indicator lamp: To indicate the status of the vacuum or seal process.
Sealing strip: Contains a heating wire covered with Teflon which allows the bag to seal but not stick to the strip.
Sealing gasket: Presses the bag onto the sealing strip. Vacuum surface: Draws air out of the bag and catches any liquid overflow.
Airproof loop of sponge: Airproofs the vacuum area and prevents vacuum leaking.
Sketch for operating instructions
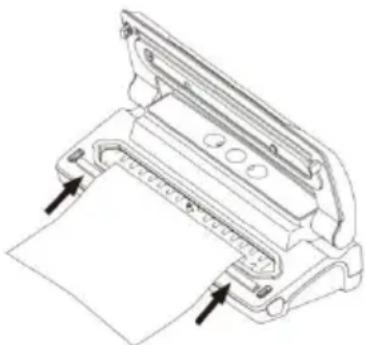
Step 1: Put the bag opening below the air portal.
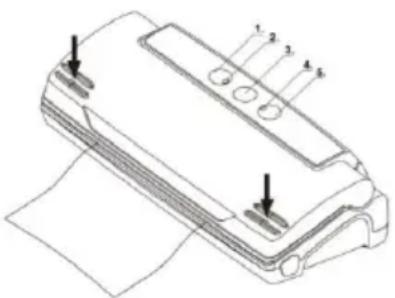
- Seal only
- Indicator Lamp (for seal)
- Cancel
- Indicator Lamp (for vacuum)
- Vacuum / seal
Step 2: Press to lock.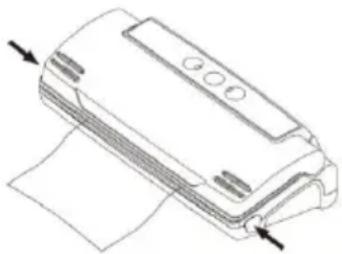
Step 3: Press to release
OPERATING INSTRUCTIONS
Making a bag using the bag roll
- Plug the unit into a 220-240V~ power source, and turn the switch "ON";
- Unroll the bag and place one end of the bag on top of the black rubber strip, then close the cover – see sketch #1;
- Press the cover down firmly on both sides along the marked lines using both hands – until you hear two clicks. (See sketch step 2);
- Press the "Seal Only" button and you will see the red LED light up;
- When the LED light goes off, the bag seal is complete;
- Then pull out the bag roll and cut it to your desired bag length. The bag is ready.
Preserve items with vacuum:
- Place the items you want to preserve inside the bag;
- Clean and straighten the open end of the bag, making sure there are no wrinkles or ripples on the panels of the open ends;
- Ensure that both panels of the bag are positioned within the rippled area (vacuum plate), but below the round post which is the vacuum pump hole to prevent vacuum leaks (see sketch 3);
- Close the cover and then press firmly on both sides of the cover along the marked lines until you hear two clicks!
- Press the "vacuum/seal" button and the bag will be automatically vacuumed and sealed.
- When the above is done, press the two "Cover Lock" buttons and the process is complete.
Hints for best vacuuming performance:
- Do not put too much stuff inside the bag: leave enough empty length in the open end of the bag so that the bag can be placed on the vacuuming plate more positively;
- Do not wet the open end of the bag. A wet bag may be difficult to melt and seal tightly!
- There are many non-food uses for vacuum packing. Keep camping supplies such as matches, first aid kits, and clothing clean and dry. Keep flares for auto emergencies ready. Keep silver and collectibles untarnished.
- Clean and straighten the open end of the bag before sealing the bags. Make sure nothing is left on the open area of the bag, no wrinkles or creased lines appear on the open panels. Foreign objects or creased bags may cause difficulty in sealing tightly;
- Do not leave too much air inside the bag. Press the bag to allow extra air to escape from the bag before vacuuming it. Too much air inside the bag increases the vacuum pump loading and may cause the motor to have insufficient power to draw away all the air inside the bag!
- Do not vacuum packaging objects with sharp points like fish bones and hard shells! Sharp points may penetrate and tear the bag!
- Fill a bag about 2/3 full with water, seal the end (don't vacuum). Freeze the bag and use for ice in the cooler, or ice packs for sports injuries.
- Suggest to vacuum seal one bag within 1 minute, to let the appliance resume enough.
- If it's not reaching the required vacuum for some unknowable reason, the vacuum system will shut automatically after 30 seconds. In this situation, please check if the bag has a leak, or the bag is not placed properly, or any other reason.
OPEN A SEALED BAG
Cut bag straight across with scissors, just inside the seal.
RESEALING
You can reseal many foods in their original store packages (i.e., potato chip bags). Follow the steps of "Preserve Stuff with Vacuum" on this page to seal when resealing foods.
Note: The vacuum sealer cannot be directly used for the vacuum sealing of canisters or canning jars.
CLEANING AND
MAINTENANCE
System of Vacuum Preservation
- Always unplug the unit before cleaning.
- Do not immerse in water or any other liquid.
- Do not use abrasive cleaners to clean the unit, for they will scratch the surface.
- Wipe the outside of the unit with a damp cloth or sponge and mild dish soap.
- To clean the inside of the unit, wipe away any food or liquid with a paper towel.
- Dry thoroughly before using again.
Preservation bags
- Wash the bagging material in warm water with a mild dishwashing soap, then rinse the bags well and allow them to dry thoroughly before reusing.
- Bags can be washed on the top rack in your dishwasher by turning the bags inside out. Stand the bag up so the water can flow out from inside the bag. Dry thoroughly before reusing.
Note: Bags used to store raw meats, fish, or greasy foods cannot be reused.
Storing Your Vacuum Preservation:
Keep the unit in a flat and safe place, out of the reach of children.
Vacuum Bag Guidelines
Vacuum sealing for the refrigerator For the busy family, on-the-go meals can be prepared ahead and vacuum-sealed in individual servings, and ready to heat anytime.
Preparing food for the freezer
- In properly stored conditions, the vacuum sealer helps you to maintain the food's freshness. Try to start with the freshest food possible.
- To freeze the foods which need to hold its shape or fragile, then vacuum seal in a vacuum bag and return to freezer. Food such as meats, berries and breads can be frozen without fear of freezer burn for up to 24 hours.
- For vacuum sealing liquid-based foods, such as soups, casseroles or stews, first freeze it in a baking pan or tempered dish, vacuum seal, label and stack in your freezer as soon as it is in frozen solid,
- Blanch the vegetables by cooking briefly in boiling water or microwave oven, cool them down in crunchy position, then vacuum seal in convenient portions.
- To vacuum seal the foods not frozen, two extra inches is required for bag length to allow for expansion while freezing. Place the meat or fish on a paper towel, and vacuum seal with the paper towel in the bag, this way will help to absorb moisture from the foods.
- Before storing the foods such as tortillas, crepes or hamburger patties, use wax or parchment paper between them to stack the pieces, this will be convenient to remove some of the food, reseal the rest and immediately replace in the freezer.
FOOD STORAGE SAFETY INFORMATION
This Vacuum Sealer will change the way you purchase and store foods. Once you are accustomed to vacuum packing, it will become an indispensable part of your food preparation. To follow the certain procedures to ensure food quality and safety, when use this appliance to vacuum seal foods:
- Chemical reactions in the food to air, temperature, moisture, and enzyme action, growth of microorganisms or contamination from insects will cause food spoilage.
- The main element to cause food to lose nutritive value, texture, flavor, and overall quality is oxygen in the air. Most microorganisms' growth relies on air, for it will carry moisture into and out of foods unless they are protected with moisture-proof packing. Frozen foods being exposed to freezer air will result in freezer burn.
- The vacuum seal packing removes up to 90% of the air from the package. It's approximately 21% oxygen in the air, so 90% air removal leaves a 2% to 3% residual oxygen level in vacuum-sealed foods. When the oxygen level is at or below 5%, as you know, most microorganisms are inhibited from growth.
- In general, there are three categories of microorganisms: mold, yeast, and bacteria. They are present everywhere, but only under certain conditions can they cause problems.
- In a low oxygen environment or in the absence of moisture, mold cannot grow. In moisture, sugar, and a moderate temperature, yeast can grow with or without air. Refrigeration will slow the growth of yeast, and freezing stops it completely. Bacteria can grow with or without air.
- One of the extremely dangerous types of bacteria is Clostridium botulinum, which can grow under the right conditions without air: in the temperature range of 40°F to 115°F (4°C to 46°C). Conditions for growth are foods lacking acid, low oxygen environment, and temperatures greater than 40°F (4°C) for extended time.
- Frozen, dried, high in acid, salt, or sugar foods can resist botulinum. Non-acid foods include meats, seafood, lye-cured olives, poultry, fish, eggs, and mushrooms; low-acid foods are mostly vegetables; medium-acid foods include overripe tomatoes, onions, chili peppers, figs, and cucumbers. These are easy to be infected by botulinum.
- Foods most susceptible to botulinum should be refrigerated for short-term storage and frozen for long-term storage, and consumed immediately after heating.
- Some dried foods, such as flour and cereals, may contain insect larvae. If not vacuum-sealed, larvae may hatch during storage and contaminate the foods. To prevent weevils and other insects from hatching, storing these foods in vacuum-sealed packages is necessary.
- To avoid spoilage, foods should be stored at low temperatures, as few microorganisms can grow without air.
- If temperatures in the refrigerator are greater than 40°F (4°C) (especially for extended periods of time), it will support the growth of harmful microorganisms. Therefore, we should keep the temperature at 40°F (4°C) or below.
- When the temperature for the freezer is 0°F (-17°C) or lower, it is suitable for storing foods. Although freezing does not kill microorganisms, it retards their growth.
- The vacuum-sealed storage temperature will affect dried foods: their shelf life is extended 3-4 times for every 18°F (10°C) drop in temperature.
FUNCTIONS
1.) The main function of this appliance is to store a wide variety of foods to keep them fresh longer, preserve flavor, and provide convenience. In general, vacuum packaging keeps food fresh up to three times as long as other traditional food storage methods. Once this appliance
becomes an indispensable part of your life, it will reduce food spoilage and save more money.
- Cook in advance to vacuum seal and store individual portions or entire meals. This vacuum bag is not recommended for microwave or boil-in-
bag cooking; please use the general cooking method to reheat the vacuum-sealed foods.
- Prepare foods in advance for picnics, camping trips, or barbecues.
- Eliminate freezer burn.
- Package foods such as meat, fish, poultry, seafood, and vegetables to freeze or refrigerate.
- 5) Package dry foods such as beans, nuts, and cereals to store longer. 2.) It's ideal to prepackage ingredients as well as individual portions for the health-conscious, such as those who are weight-conscious or on diets or nutritional regimes with special requirements. 3.) This system can also be used to store and protect other items: valuable items such as photos, important documents, stamp collections, book collections, jewellery, cards, comics, etc.; hardware items such as screws, nails, studs, and bolts; medicines, band-aids, and other first-aid items, etc.
General rules for food safety
From scientific study and common sense, we can learn the following food safety rules, which will lead you to improved safety and optimal food storage.
- If perishable foods have been heated, defrosted, or left unrefrigerated, consume them immediately.
- To re-vacuum the vacuum-packed foods after they have been opened, follow the instructions to refrigerate after opening and store re-vacuumed packages properly.
- The suitable way to defrost your food is to place it in the refrigerator until defrosted; never defrost foods in hot water, via heat sources, or in a microwave oven.
- It will be harmful if you consume foods that have been left out at room temperature for more than a few hours, especially if they have been prepared with a thick sauce, in a vacuum package, or in some other low-oxygen environment.
- To cool down food temperature quickly, spread vacuum packages evenly throughout the refrigerator or freezer.
We advise the following when packaging large volumes of meat, fish, or any food products:
- Before vacuum sealing, it's necessary to clean your hands, and all utensils and surfaces to be used for cutting and vacuum sealing foods.
- Refrigerate or freeze the perishable foods immediately after vacuum sealing, and do not leave them sitting at room temperature.
- The shelf life of dry foods such as nuts, coconut, or cereals will be extended in vacuum-sealed packages, while storing them in a cool, dark place.
Oxygen and warm temperature will cause high-fat content foods to become rancid.
- Before vacuum sealing some fruits and vegetables, such as apples, bananas, potatoes, and root vegetables, peeling them will extend their shelf lives.
- When vacuum sealing some vegetables such as broccoli, cauliflower, and cabbage fresh for refrigeration, they will emit gases, so it's necessary to blanch and freeze these foods before vacuum sealing.
TROUBLESHOOTING
Nothing happens when pressing the vacuum sealer.
- Make sure the power cord is correctly plugged into the electrical outlet, and the unit is in the "on" position. Test the electrical outlet by plugging in another appliance; if it doesn't work, please check the circuit breakers or fuses in your home.
- Check the power cord and plug, and make sure they are not damaged in any way. If damaged, do not use the vacuum sealer.
Air is not removed from the bag completely.
- To seal properly, the open end of the bag should be resting entirely inside the vacuum channel area.
- Check the sealing strip and gasket beneath the lid for debris and position. Wipe clean and smooth them back into place.
- The bag may have a hole. To test, seal the bag with some air in it, submerge it in water, and apply pressure. If there are bubbles present, it indicates a leak and a new bag should be used.
- To check if lid is completely latched into place.
Vacuum sealer bag loses vacuum after being sealed.
- Wrinkles, crumbs, grease or liquids may cause leaks along the seal. Reopen bag, wipe the top inside of the bag and smooth it out along the sealing strip before resealing.
- To check if there have moisture or juices from the food present within the bag, if yes, you may need to cut open the bag and reseal it, or use an entirely new bag. Foods with excess liquids should be frozen before vacuum sealing.
- If items with sharp edges, they may have punctured the bag, and released the vacuum. Cushion sharp edges in the contents of the bag with paper towels.
Vacuum sealer not sealing bag properly
- If sealing strip overheat and melt the bag, it's necessary to lift the lid and allow sealing strip to cool for a few minutes.
- Before re-pressing the "seal only" key, allow the unit to resume for 15 seconds.
Environment
Do not throw away the appliance with the normal household waste at the end of its life, but hand it in at an official collection point for recycling. By doing this, you help to preserve the environment.
Guarantee & service
If you need information or if you have a problem, please contact the Gorenje Customer Care Centre in your country (you find its phone number in the worldwide guarantee leaflet). If there is no Customer Care Centre in your country, go to your local Gorenje dealer or contact the Service department of Gorenje domestic appliances.
For personal use only!
GORENJE WISHES YOU A LOT OF PLEASURE WHEN USING YOUR APPLIANCE
We reserve the right to any modifications!
Important
Step 1: Place the bag opening below the air portal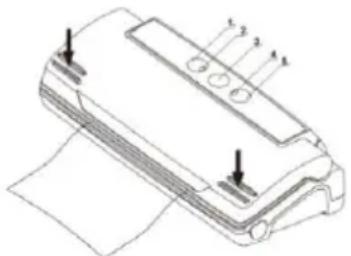
- Seal only
- Indicator light (for sealing)
- Cancel
- Indicator light (for vacuuming)
- Vacuum / seal
Step 1: Insert the open side of the bag into the device.
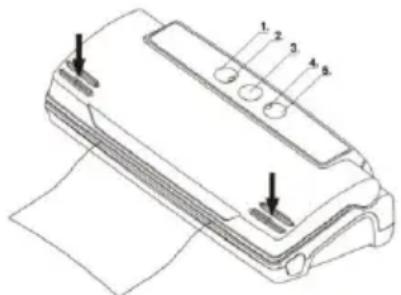
Step 3: Press to unlock.
OPERATING INSTRUCTIONS
- OPERATING THE APPLIANCE
- WARNING
- FUNCTIONS AND FEATURES
- SKETCH FOR OPERATING INSTRUCTIONS
- OPERATING INSTRUCTIONS
- MAKING A BAG USING THE BAG ROLL
- PRESERVE ITEMS WITH VACUUM
- HINTS FOR BEST VACUUMING PERFORMANCE
- OPEN A SEALED BAG
- RESEALING
- CLEANING AND
- MAINTENANCE
- SYSTEM OF VACUUM PRESERVATION
- PRESERVATION BAGS
- STORING YOUR VACUUM PRESERVATION
- VACUUM BAG GUIDELINES
- PREPARING FOOD FOR THE FREEZER
- FOOD STORAGE SAFETY INFORMATION
- FUNCTIONS
- GENERAL RULES FOR FOOD SAFETY
- WE ADVISE THE FOLLOWING WHEN PACKAGING LARGE VOLUMES OF MEAT, FISH, OR ANY FOOD PRODUCTS
- TROUBLESHOOTING
- NOTHING HAPPENS WHEN PRESSING THE VACUUM SEALER
- AIR IS NOT REMOVED FROM THE BAG COMPLETELY
- VACUUM SEALER BAG LOSES VACUUM AFTER BEING SEALED
- VACUUM SEALER NOT SEALING BAG PROPERLY
- ENVIRONMENT
- GUARANTEE & SERVICE
- GORENJE WISHES YOU A LOT OF PLEASURE WHEN USING YOUR APPLIANCE
- IMPORTANT
Brand : GORENJE
Model : VS110W
Category : Fountain Pen