
IAN 354447 - Uncategorized CRIVIT - Free user manual and instructions
Find the device manual for free IAN 354447 CRIVIT in PDF.

| Product Type | Exercise Ball (Gymnastics Ball) |
| Brand | Crivit |
| Model / IAN | IAN 354447_2010 |
| Diameter Options | 65 cm, 75 cm, 85 cm |
| Weight of Ball | Approx. 1100 g (65 cm), 1500 g (75 cm), 1850 g (85 cm) |
| Maximum Load | 120 kg |
| Intended Use | Private gymnastics and exercise; not for long-term seating, medical, or commercial use |
| Package Contents | 1 exercise ball, 1 deflation tube, 2 stoppers, 1 air pump adapter, 1 stopper lifter, instructions for use |
| Material | PVC (assumed, typical for exercise balls) |
| Inflation Method | Use commercial foot pump or double-stroke piston pump with adapter; do not use compressor or mouth |
| Deflation Method | Remove stopper with stopper lifter or use deflation tube for rapid deflation |
| Safety Features | Maximum load warning, keep children supervised, maintain 0.6 m clear space, train on flat non-slip surface |
| Cleaning Instructions | Wipe with dry cloth only; no harsh cleaning agents |
| Storage Instructions | Store clean and dry at room temperature; protect from extreme temperatures, sun, and dampness |
| Disposal | Dispose in accordance with local regulations; packaging not suitable for children |
| Guarantee | 3 years from purchase date for material and manufacturing defects (conditions apply) |
| Country of Origin / Manufacture Date | Manufactured 05/2021 (example: 2021) |
Frequently Asked Questions - IAN 354447 CRIVIT
User questions about IAN 354447 CRIVIT
0 question about this device. Answer the ones you know or ask your own.
Ask a new question about this device
Download the instructions for your Uncategorized in PDF format for free! Find your manual IAN 354447 - CRIVIT and take your electronic device back in hand. On this page are published all the documents necessary for the use of your device. IAN 354447 by CRIVIT.
USER MANUAL IAN 354447 CRIVIT
Instructions for use
[NO TEXT]
MJUK GYMNASTIKBOLL
Bruksanvisning
LT
MINKŠTAS GIMNASTIKOS KAMUOLYS
Naudojimo instrukcija
IV
Before reading, told out the illustration page and get to know all of the functions of your unit.
四
GS Usage and safety information Page 08
natural_image
Two side-by-side illustrations of a person performing seated exercise on a foam roller (no text or symbols)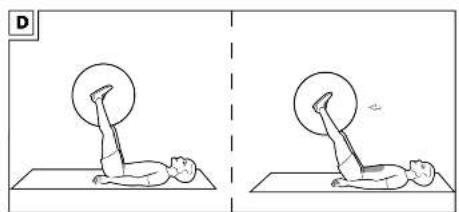
natural_image
Illustration of a person performing a leg raise exercise using a circular motion bike (no text or symbols)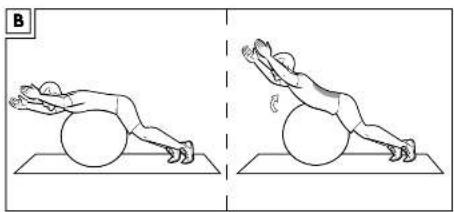
natural_image
Two sequential illustrations of a person performing a push-up exercise on a foam roller (no text or symbols)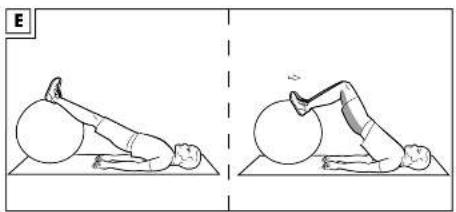
natural_image
Illustration of two exercise poses: one showing a person performing a leg lift exercise on a foam block, the other showing a person performing a resistance band exercise on a foam block (no text or symbols)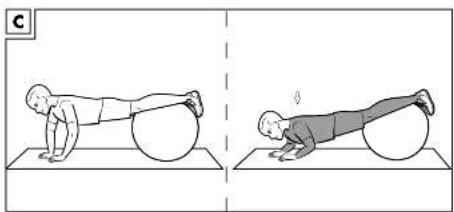
natural_image
Two-panel illustration showing a person performing a push-up exercise on a foam roller (no text or symbols)
natural_image
Two-panel line drawing showing a person performing a plank exercise on a foam roller, with no text or symbols present.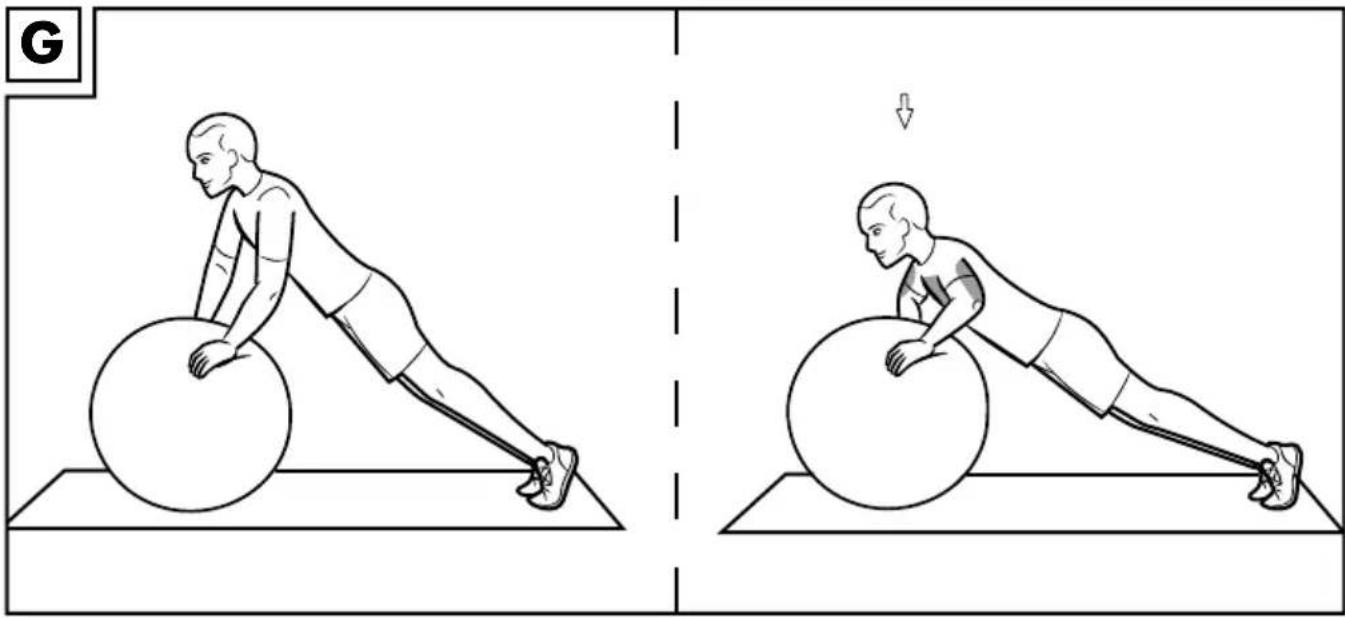
natural_image
Two sequential illustrations of a person performing a push-up exercise on a large ball, showing motion and posture (no text or symbols)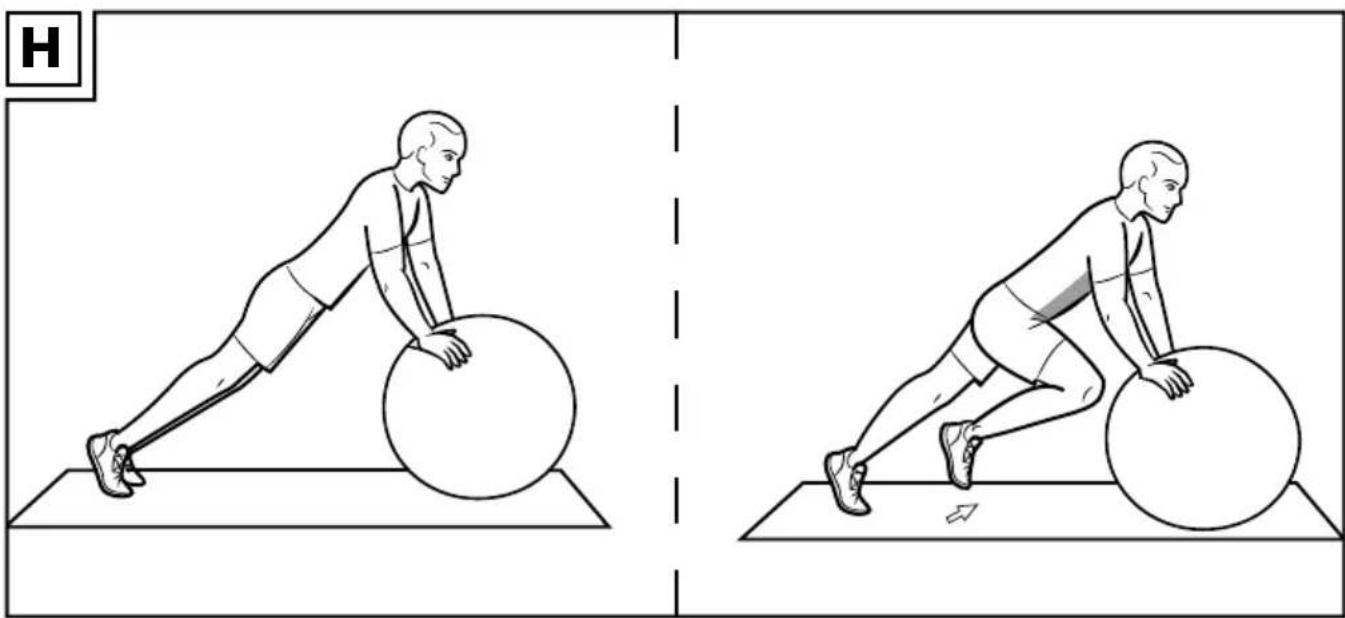
natural_image
Two sequential illustrations of a person performing a physical exercise with a large sphere on a mat, no text or symbols present.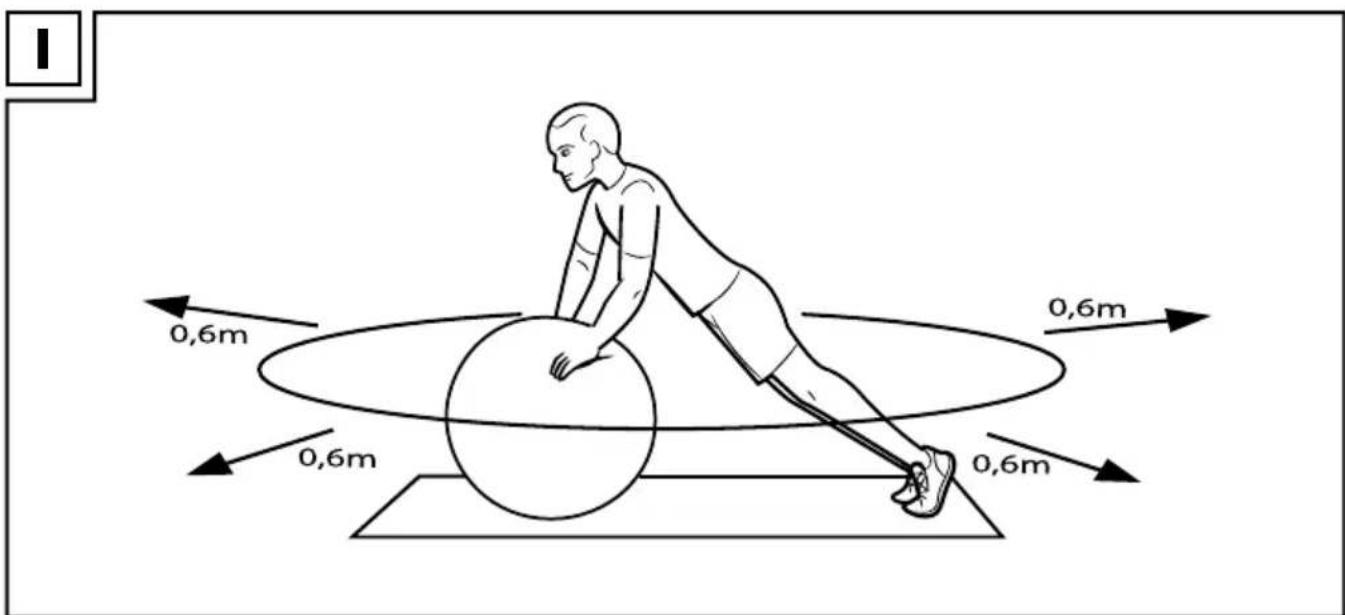
GB
Package contents 8
Technical data 8
Intended use 8
Safety information 8 - 9
Risk of injury! 8
Extra caution - risk of injury to children! 8
Dangers due to wear and tear 8
Avoiding damage to property 9
Inflating 9
Deflating 9
General training instructions 9
Warming up 9-10
Exercise suggestions 10 - 12
Stretching 12
Storage, cleaning 12
Disposal 12
Notes on the guarantee and service handling 12 - 13
FI
Toimitussisältö 14
Tekniset tiedot 14
You have chosen to purchase a high-quality product. Familiarise yourself with the product before using it for the first time.

Read the following instructions for use carefully.
Use the product only as described and only for the given areas of application. Store these instructions for use carefully. When passing the product on to third parties, please also hand over all accompanying documents.
Package contents
1 x exercise ball
1 x deflation tube
2 x stopper
1 x air pump adapter
1 x stopper lifter
1 x instructions for use
Technical data

Maximum load: 120kg
Weight of ball: approx. 1100g/approx. 1500g/ approx. 1850g Diameter: approx. 65cm/approx. 75cm/ approx. 85cm

Date of manufacture (month/year): 05/2021
Intended use
This product is constructed as a gymnastics and exercise device for persons with a maximum weight of 120kg, and is not suitable for long-term seating. The product is designed for private exercise and is not suitable for medical or commercial purposes.

Safety information Risk of injury!
- The product may only be used under adult supervision and should not be used as a toy.
-
Consult your doctor before you start training. Make sure you are healthy enough to train.
-
Always remember to warm up before training and train according to your current performance ability.
High exertion and overtraining can lead to serious injuries. Stop exercising immediately and contact a doctor if you experience pain, weakness or fatigue. - Always keep the instructions for use with the exercise instructions readily available.
- Observe the maximum permissible load of 120kg. Exceeding the weight limit can damage the product or impair its function.
- Pregnant women should only train after consulting with their doctor.
- Keep a clear space of approx. 0.6m around the training area (Fig. I).
- Train on a flat, non-slip surface only.
- Do not use the product near steps or landings.
- Never use the product near an open flame or stove.
- The product may not be used in water or for swimming! It does not offer buoyancy and is not suitable as a flotation device. The surface of the product can be damaged by salt water and chlorinated water.
- Check the product for damage or wear before each use. Only use the product if it is in perfect condition!

Extra caution – risk of injury to children!
- Do not let children use this product unsupervised. Show them the correct use of the training equipment and supervise them.
Only allow the use of the product if the child's mental and physical development allows it. This product is not a toy.

Dangers due to wear and tear
- The product may only be used if it is in perfect condition. Check the product for damage or wear before each use. The safety of the product can only be guaranteed if it is regularly inspected for damage and wear and tear. If damaged, it must not be used anymore.

Avoiding damage to property
- All inflatable products are sensitive to cold. Never unfold and inflate the product at temperatures below 15 °C!
- Protect the product from sunlight. If the air pressure increases in direct sunlight, this must be rectified by releasing the corresponding amount of air.
- Avoid contact with sharp, hot, pointy or hazardous items. Make sure that your training area is free of pointy objects.
- Only insert suitable air pump adapters into the valve. Otherwise the valve could be damaged.
- Do not over-inflate – this can result in the seams splitting open. Ensure the valve is firmly closed after inflating.
- Do not use a compressor or compressed air canister to inflate the product. This can damage the product.
Inflating
IMPORTANT:
- Only adults may inflate the product.
- Do not inflate the product beyond the specified diameter.
- Only air may be used to inflate.
- Do not inflate with your mouth, as this may result in dizziness.
To inflate the product, use commercial foot pumps or double-stroke piston pumps with the appropriate pump attachments.
You may also use the adapter provided. The adapter comes with a small and a large thread. The small thread is for commercial ball pumps, and the large for bicycle and car tyre pumps, for example. Close the product with the stopper provided for this purpose.
Tip! How to check the required diameter of 65cm/75cm/85cm:
- On a wall, make a mark 65cm/75cm/85cm off the ground.
- Place the inflated ball against the wall.
- Place a level on the highest point of the ball and use the wall marking to check whether the ball has reached the diameter of 65cm/75cm/85cm.
Deflating
Remove the stopper with the stopper lifter and slowly release the air. Alternatively, remove the stopper and insert the deflation tube into the seal in order to release the air quickly.
Note! The stopper must not be removed with a sharp or sharp-edged item. This could severely damage the ball.
General training instructions
Training procedure
- Wear comfortable sports clothing and athletic shoes.
- Warm up before each training session and end the training session gradually.
• Take sufficient breaks between the exercise routines and drink enough. - If you are a beginner, never train with too much intensity. Increase the intensity of the training sessions slowly.
- Perform all exercises smoothly, not jerkily or fast.
- Be sure to breathe steadily. Exhale during exertion and inhale upon release.
- Maintain correct body posture while exercising.
General training plan
Create a training plan that suits your needs with sets of 6-8 exercises.
Pay attention to the following fundamentals:
- A set should consist of approx. 15 repetitions of one exercise.
• Each set can be repeated 3 times. - You should take a 30-second break between each set.
- Warm up your muscle groups well before each training session.
- We also recommend stretching after each training session.
Warming up
Take sufficient time before each training session to warm up. Some simple exercises to do this are shown below.
You should repeat each exercise 2 to 3 times.
Neck muscles
- Turn your head slowly to the left and to the right. Repeat this movement 4 to 5 times.
- Rotate your head slowly, first in one direction, and then in the other.
Arms and shoulders
- Clasp your hands behind your back and pull them carefully upwards.
If you bend your upper body forwards at the same time, all your muscles will be maximally warmed up. - Rotate both your shoulders forwards at the same time and then change direction after one minute.
- Pull your shoulders up to your ears and let your shoulders fall again.
- Rotate your right and left arms alternately forwards and then, after one minute, backwards.
Important: don't forget to keep breathing steadily!
Leg muscles
- Stand on one leg and lift the other leg with your knee bent approx. 20cm off the floor.
- First rotate your raised foot in one direction, and then change direction after a few seconds.
- Then switch to your other leg and repeat this exercise.
- Lift your legs one at a time and take a few steps in place. Make sure you only lift your legs to a height where you are still able to maintain your balance well.
Exercise suggestions
Below are some of the many possible exercises.
Pelvic tilt (Fig. A)
Starting position
- Sit upright on the product and place your feet on the floor, shoulder-width apart.
- Cross your arms at the back of your neck. Your elbows are pointing outward.
End position
-
Tighten your abdominal muscles and pull your shoulder blades toward your spine. The shoulders remain lowered and relaxed.
-
Alternate between slowly tilting your pelvis forward and backward. The product will move along with your movements.
-
Repeat this exercise 10 to 15 times for three sets.
Important: maintain body tension and keep your upper body upright during the exercise.
Back stretcher (Fig. B)
Starting position
- Lie with your stomach on the product.
- Stabilise your posture with the balls of your feet on the floor.
- Stretch your arms out forward and tighten your buttock and abdominal muscles.
End position
-
Raise your arms and upper body until your back is straight. Your lower back remains almost straight while doing so. Make sure that you do not arch your back.
-
Your head is an extension of your spine and your shoulders are lowered.
- Maintain bodily tension and then lower your upper body again.
- Repeat this exercise 10 to 15 times for three sets.
Important: maintain body tension and keep your head aligned with your spine during the exercise.
Press-up (Fig. C)
Starting position
- Lie down in the press-up position with your legs on the product.
- Keep your body straight and tighten your buttock and abdominal muscles.
End position
- Lower your upper body to do a press-up.
Your elbows are pointing slightly outward and your hands remain under your shoulders. -
Maintain bodily tension and then raise your upper body again.
Make sure that your upper body remains straight and your head is aligned with your spine. -
Repeat this exercise 10 to 15 times for three sets.
Important: always keep your back straight during the exercise.
Leg lift (Fig. D)
Starting position
- Lie down with your back on a mat and grip the product between your legs.
- Stretch your legs upward with the product. Your arms are lying close to your body.
End position
- Tighten your abdominal muscles and slightly lower your legs downward. Your feet are not touching the floor and your lower back remains continuously on the floor.
- Maintain bodily tension for a short time and then raise your legs with the product once more.
- Repeat this exercise 10 to 15 times for three sets.
Important: keep your lower back on the mat during the exercise.
Ball leg curl (Fig. E)
Starting position
- Lie down with your back on a mat and your lower legs on the product. Your feet and lower legs are resting on the product.
- Lift up your body until your upper body forms a line with your legs. Your arms are outstretched and close to your body.
- Your head and shoulders are on the mat.
End position
- Tighten your buttock and abdominal muscles.
- Lift your buttocks upward and simultaneously use your feet to roll the product toward you until only your feet are on the product, your buttocks forming a roughly 90-degree angle with your legs.
- Hold this position for a short time.
- Then lower your buttocks and simultaneously use your feet to roll the product away from you until your lower legs are on the product.
- Repeat this exercise 10 to 15 times for three sets.
Important: keep your back straight and your body tense during the exercise.
Buttock lift (Fig. F)
Starting position
-
Lie down in the press-up position with your feet and shins on the product. Your arms are tensed, elbows are pointing outward and your hands are below your shoulders.
-
Keep your body straight and tighten your abdominal muscles.
End position
- Lift one outstretched leg as high as you can while ensuring your back remains straight. Make sure that you do not arch your back.
- Hold this position for a short time and then lower your leg again. Make sure that your upper body remains straight and your head is aligned with your spine.
- Switch legs and repeat the exercise 10 to 15 times for three sets.
Important: maintain consistent bodily tension. Your head is an extension of your spine and your shoulders are lowered.
Press-up (Fig. G)
Starting position
- Lie down in the press-up position with your hands on the product. Your hands are below your shoulders and your elbows are pointing slightly outward. Only the balls of your feet are touching the floor.
- Raise your upper body and maintain a straight posture.
End position
- Tighten your buttock and abdominal muscles.
- Lower your upper body to do a press-up. Your elbows are pointing outward and your hands remain under your shoulders.
- Maintain the bodily tension for a short time and then raise your upper body again. Be sure to keep your upper body straight and to keep your head aligned with your spine.
- Repeat this exercise 10 to 15 times for three sets.
Important: always keep your back straight during the exercise.
Mountain climber (Fig. H)
Starting position
- Lie down in the press-up position with your hands on the product. Your hands are below your shoulders and your elbows are pointing slightly outward. Only the balls of your feet are touching the floor.
- Raise your upper body and maintain a straight posture.
End position
- Tighten your abdominal muscles.
- Lift up one leg and pull it up toward your chest. Your elbows are pointing outward and your hands remain under your shoulders.
- Lower your leg again and pull the other leg up toward yourself. Make sure that your upper body remains straight and your head is aligned with your spine.
- Switch legs and repeat the exercise 10 to 15 times for three sets.
Important: keep your back straight during the exercise.
Stretching
Take sufficient time to stretch after each training session. Some simple exercises to do this are shown below.
You should perform each exercise 3 times per side for 15-30 seconds.
Neck muscles
- Position yourself in a relaxed posture. Pull your head gently to one side with one hand, first to the left and then to the right. This exercise stretches the sides of your neck.
Arms and shoulders
- Stand up straight with your knees slightly bent.
- Bend your right arm behind your head until your right hand is between your shoulder blades.
- Grab your right elbow with your left hand and pull it backwards.
- Change sides and repeat the exercise.
Leg muscles
- Stand upright and lift one foot off the floor.
- Rotate it slowly, first in one direction, then in the other.
- Switch feet after a while.
Important: make sure your thighs remain parallel to each other. Push your hips forwards, keeping your upper body upright.
Storage, cleaning
When not in use, always store the product clean and dry at room temperature.
Wipe clean with a dry cloth only. Protect the product from extreme temperatures, sun and dampness.
Improper storage and use of the product could lead to premature wear and tear, which could result in injury. IMPORTANT! Never clean the product with harsh cleaning agents.
Disposal
Dispose of the article and the packaging materials in accordance with current local regulations. Packaging materials such as foil bags are not suitable to be given to children. Keep the packaging materials out of the reach of children.

Dispose of the products and the packaging in an environmentally friendly manner.
The recycling code is used to identify various materials for recycling.
The code consists of the recycling symbol - which is meant to reflect the recycling cycle - and a number which identifies the material.
Notes on the guarantee and service handling
The product was produced with great care and under continuous quality control. DELTA-SPORT HANDELSKONTOR GmbH gives private end customers a three-year guarantee on this product from the date of purchase (guarantee period) in accordance with the following provisions. The guarantee is only valid for material and manufacturing defects. The guarantee does not cover parts subject to normal wear and tear that are thus considered wear parts (e.g. batteries) or fragile parts such as switches, rechargeable batteries, or parts made of glass.
Claims under this guarantee are excluded if the product has been used incorrectly, improperly, or contrary to the intended purpose, or if the provisions in the instructions for use were not observed, unless the end customer proves that a material or manufacturing defect exists that was not caused by one of the aforementioned circumstances.
Claims under the guarantee can only be made within the guarantee period by presenting the original sales receipt. Please therefore keep the original sales receipt. The guarantee period is not extended by any repairs carried out under the guarantee, under statutory guarantees, or as a gesture of goodwill. This also applies to replaced and repaired parts.
If you wish to make a claim please first contact the service hotline mentioned below or contact us by e-mail. If there is a guarantee case, then the product will be repaired or replaced free of charge to you or the purchase price will be refunded, depending on our choice.
Your legal rights, in particular guarantee claims against the respective seller, are not limited by this guarantee.
IAN: 354447_2010
GB Service Great Britain
Tel.: 0800 404 7657
E-Mail: deltasport@lidl.co.uk
Onneksi olkoon!
Ball Leg Curl (rys. E)
Pozycja wyjściowa
E-post: deltasport@lidl.ee
Apsveicam!
Bumbas svars: apt. 1100 g/apt. 1500 g / apt. 1850 g Diametrs: apt. 65 cm/apt. 75 cm/apt. 85 cm
