
ICR-NT300 - Dictaphone SANYO - Free user manual and instructions
Find the device manual for free ICR-NT300 SANYO in PDF.


| Product Type | Digital Voice Recorder |
| Brand | Sanyo |
| Model | ICR-NT300 |
| Recording System | Built-in Flash Memory |
| Maximum Recording Time | 920 minutes in normal mode |
| Available Recording Qualities | Standard (15h20), LQ (11h30), HQ (4h30), LQHQ (3h00) |
| Message Capacity | Up to 200 messages, 127 max per folder |
| Number of Folders | 8 |
| Built-in Speaker | 0.25 W / 8 Ω |
| Output Power | 120 mW |
| Power Supply | 2 AAA batteries (UM-4) 3 V DC |
| Microphone | Built-in + external microphone jack |
| Microphone Sensitivity | 2 levels: High (distant) / Low (close) |
| Special Functions | Voice-activated recording (VOX), Hold REC, pre-listen, message or folder repeat |
| Connectors | Headphone jack (3.5 mm), external microphone jack (3.5 mm) |
| Display | LCD with indicators for playback, pause, recording, lock, battery, etc. |
| Key Lock | LOCK switch (ON/OFF) |
| Listening Safety | Recommendations: set low volume before listening, do not listen at high volume for extended periods |
| Maintenance | Clean with a soft, dry cloth; avoid moisture and shock |
| Reset | Remove and reinstall batteries (messages retained) |
Frequently Asked Questions - ICR-NT300 SANYO
User questions about ICR-NT300 SANYO
0 question about this device. Answer the ones you know or ask your own.
Ask a new question about this device
Download the instructions for your Dictaphone in PDF format for free! Find your manual ICR-NT300 - SANYO and take your electronic device back in hand. On this page are published all the documents necessary for the use of your device. ICR-NT300 by SANYO.
USER MANUAL ICR-NT300 SANYO
natural_image
Color calibration bar with grayscale and RGB color swatches, no text or symbols presentSANYO
INSTRUCTION MANUAL BEDIENUNGSANLEITUNG MODE D'EMPLOI MANUAL DE INSTRUCCIONES MANUAL DE INSTRUÇÕES
ICR-NT300 XE
Digital Voice Recorder Digitaler Stimmenrecorder Magnétophone numérique Grabador de Voz Digital Gravador de Voz Digital
| ENGLISH | |
| DEUTSCH | 16 |
| FRANÇAIS | -24 |
| ESPAÑOL | -32 |
| PORTUGUÊS | 33 - 40 |

natural_image
Color calibration bar with grayscale and RGB color swatches, no text or symbols presentLOCATION OF CONTROL
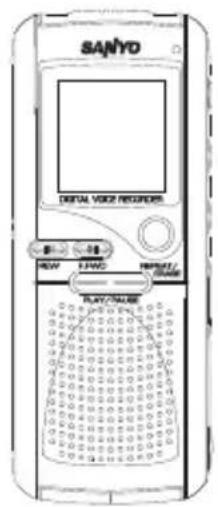
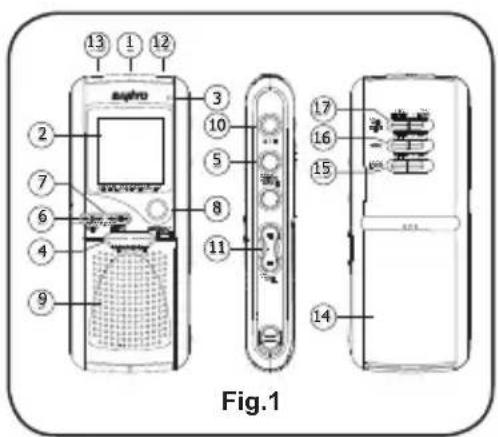
1.) Built-in Microphone
2.) Display Window
3.) Recording Indication LED
4.) Play/Pause Button
5.) Stop/Mode Button
6.) Rewind Button
7.) Fast Forward Button ▶▶▶
8.) Repeat/Erase Button
9.) Built-in Speaker
10.) Record/Pause Button ●/II
11.) Volume Button
12.) Earphone Jack
13.) External Microphone Jack
14.) Battery Compartment
15.) Lock Switch
16.) VOX Switch
17.) MIC Sens Switch
LCD DISPLAY
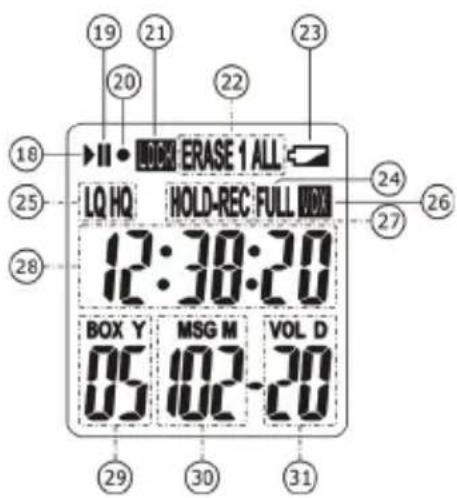
18.) Playback Indicator
19.) Pause Indicator
20.) Recording Indicator
21.) Lock Indicator
22.) Erase One/All Indicator
23.) Low Battery Indicator
24.) Message Box Full Indicator
25.) Recoding Mode Indicator
26.) VOX Indicator
27.) Hold-REC Indicator
28.) Clock
29.) Year/Box Number
30.) Month/Message Number
31.) Date/Volume

natural_image
Color calibration bar with grayscale and RGB color swatches, no text or symbols presentFEATURES
Your appliance, 920-Minute Digital Recorder with VOX is lightweight, compact and easy to operate. You can use it to record up to 200 messages using solid-state flash memory so you never need tape.
There are the following features on this recorder:
Flash Storage Memory
Digital recording means no tapes needed.
920-Minute Record/Play
Lets you record and store messages in eight separate folders (total 920 minutes), you can store message on different subjects separately.
Clock Function
Reminds you the current time and notes down the recording time of your messages.
2 MIC Sensitivities
Lets you switch between low and high microphone sensitivities to get your desired recording.
VOX
Lets you set the recorder to automatically record when it picks up sound and stop after a few seconds of silence.
Remaining/ Elapsed Time Indicator
Lets you see how many recording time is left and how many time you have already used.
Message Erase
Makes it easy to erase individual or all messages you no longer needed.
Message Full
Lets you know that the memory is full and recording cannot be continued before undesired messages are erased.
Electric Volume
Lets you easy adjust the sound level from 0 to 26.
Recording Indication LED
Indicates the recording function is playing.
Built-in Microphone
Lets you easy to operate the recording function.
Built-in Speaker
Lets you easy to listen the recorded message without extra Earphone.
Earphone Output Jack
Lets you listening the recorded message privately by plugging Earphone.
External Microphone Jack
Lets you extending the recording distance by plugging an extra Microphone.

natural_image
Color calibration bar with grayscale and RGB color swatches, no text or symbols presentPREPARATION
Installing Batteries
You can power the recorder using 2 pcs AAA battery (not included). For the best performance and longest life, we recommend using alkaline batteries.
Follow these steps to install the batteries:
- Open the battery compartment cover by sliding it.
- Insert batteries in the compartment as indicated by polarity symbols (+ & -) inside.
- Close the cover.
Cautions:
- Use only fresh batteries of the required size and recommended type.
- Do not mix used and new batteries (standard, alkaline, or rechargeable), or rechargeable batteries of different capacities.
- Never leave dead or weak batteries in the recorder. Batteries can leak chemicals that can damage the recorder's electronic parts.
- If you do not plan to use the recorder for several days, remove the batteries.
Using an Earphone
For private listening, plug the earphone into the recorder's phone jack. This will automatically disconnect the recorder's internal speaker.
Listening Safely
To protect your listening, follow these guidelines when you use earphone.
- Set the volume to the lowest setting before you commence listening. When you are listening the message, adjust the volume to a comfortable level.
- Do not listen at extremely high volume levels. Extended high volume listening can lead to permanent hearing loss.
- Once you set the volume, do not increase it. Over time, your ears adapt to the volume level, so a volume level that does not cause discomfort might still damage your hearing.
Using an External Microphone
To record using an optional external microphone, plug the microphone into the MIC jack on top of the recorder. This automatically disconnects the built-in microphone.

natural_image
Color calibration bar with grayscale and RGB color swatches, no text or symbols presentOPERATION
Releasing Lock Function
Slide LOCK switch on rear side of the unit to OFF position to release Lock function.
Low Voltage Checking
The recorder will automatically check the voltage in every 30 seconds in non-recording status, or in every 5 seconds in recording status. When the voltage is lower, the Low Battery Indicator will display and the recording function can't be played, which reminds you replacing the batteries.
If the recorder detects the voltage is lower in the recording status, It will terminate playing the recording function.
Resetting the Recorder
If your recorder is exposed to a strong static electrical charge, the recorder may lock up or the display may dim. This rarely happens, but if it does, reset the recorder by removing batteries, and then re-installing the batteries. All settings return to the preset values except the messages are kept without change.
Calendar and Time Setting
After batteries are installed, the display will indicate the time and year, month and date as 01 01-01, the recorder automatically enters time display mode, so that you can start to set your time.
- Press and hold STOP/MODE button 3 seconds to enter into set mode, then press STOP/MODE button three times again, "SET DATE" will display.
- Press PLAY/PAUSE button to enter into time and Calendar set mode. The digital of Year will flash. Press REW or F.FWD button to set the Year, and then press PLAY/PAUSE button to confirm and go to Month setting, the number of Month will flash.
- Then set the Month, Date, Hour and Minute same as mentioned in point 3.
- Press PLAY/PUASE Button to store your memory once completion of setting.
To Turn the Unit On
Besides clock functions, being a Recorder is the unit's major features. So it has 2 basic displays. One is Time Display mode, and another is Digital Voice Recorder mode, under which the unit is ready for recording operations.
To switch between Time Display mode and Digital Voice Recorder mode:
- In Time Display mode, press PLAY/PAUSE or REC/PAUSE button, the unit will enter into Digital Voice Recorder mode. Press STOP/MODE for returning to Time Display mode.
- The unit will automatically return to Time Display mode when no function key is pressed within 30 seconds.
Volume Control
In Digital Voice Recorder mode, press VOL+ or VOL- to adjust the volume to your comfortable level.
Selecting a Folder
This unit has 8 memory storage areas (file folders) to choose from, labeled 1 to 8. You can store a total of 200 messages or 920 minutes in normal mode (690 minutes in LQ mode, 270 minutes in HQ mode and 180 minutes

natural_image
Color calibration bar with grayscale and RGB swatches, no text or symbols presentin LQHQ mode) in all the folders. 127 messages are the limit for each folder.
- Press and hold STOP/MODE button 3 seconds, folder (box) number will flash. Press REW or F.FWD button to select the folder from 1 to 8 for storing you message to be recorded.
- Press PLAY/PAUSE button to confirm your selection.
NOTE: The recorder is preset to use Folder 1.
Selecting MIC Sensibility
The recorder provides two different microphone recording sensibility based on recording distance. To get better sound quality, switch MIC Sense to HIGH position when recording is far away. If recording is near by, just switch MIC Sense back to LOW position.
Key Lock
To prevent unintentional operation of the recorder, sliding LOCK switch to ON position, it will disable all function keys and LOCK icon appears.
Selecting Record Quality
The recorder provides four different voice recording quality modes. For the best performance, select LQHQ (Super High Play time: 03:00:00); for very good sound quality, choose HQ (High Play time: 04:30:00). For a reasonably good quality, select LQ (Medium Play time: 11:30:00) and for longer recording time, choose standard (Long Play time 15:20:00).
Follow these steps to select the recording quality modes.
- In Time Display mode, press and hold STOP/MODE button 3 seconds, then press STOP/PUASE button again to enter into recording quality-setting mode. The recording time and "LEFT" will display.
- Repeatedly press REW or F.FWD button to select the desired recording mode (Standard, LQ, HQ or LQHQ).
- Press PAUSE/MODE button to confirm your selection and exit.
Recording Messages
The unit is capable of recording only when the sound is heard. To use this feature, see next "VOX Recording". For normal recording, follow steps below.
- Make sure VOX switch on rear of the unit is set to OFF, then selecting the desired recording quality mode as described in "Selecting Recording Quality" (Standard, LQ, HQ or LQHQ).
- Select a desired folder as described in "Selecting a Folder" (1\~8).
-
To record message: In Time Display mode, press REC/STOP or PLAY/PAUSE to enter into Digital Voice Recorder mode. Press REC/PAUSE again to commence recording. Speak to the built-in microphone or the external microphone that has plugged into the MIC jack.
The recording REC lamp turns on. A new message number and REC signal appears on the display, and the elapsed recording time is also shown. -
Press REC/PAUSE button to pause recording, the signal of PAUSE appears on display and flashes together with REC LED. Press REC/PAUSE again to resume recording.
-
Press STOP/MODE button to stop the recording. The recording signal will disappear and Digital Voice Recorder mode will display.

natural_image
Color calibration bar with grayscale and RGB swatches, no text or symbols present- As well as normal recording mode, you can also use the HOLD REC mode by pressing REC/PAUSE button for 3 seconds, the HOLD-REC signal will appear. To keep pressing REC/PAUSE button for commencing the recording. To loosen the REC/PAUSE button for stopping recording.
In case of VOX function turns on in HOLD REC mode, the PAUSE signal and REC LED will flash when loosen the REC/PAUSE button and the unit detects a pause of a few seconds. It will resume recording without keeping pressing REC/PAUSE button, when the unit detects the sound. Press the STOP/MODE button to cancel the HOLD REC mode.
- When you commence recording in the folder you selected, the recorder assigns a number to your recording and displays the number on the display. The counter starts at 1. Each time you end a message and start a new recording, the counter will increase, up to 127.
- The "FULL" icon will flash when a folder is fully saved with 127 messages. Please go to next folder for the continuation of recording.
- When 200 messages have been fully saved or the total recording time has reached to maximum, the "FULL" icon will also flash. Please delete some messages, if you need to continue the recording.
- The built-in audio level control automatically sets the recording level.
- To record another message, press REC/STOP button. The message number increases one by one and the new message is saved after any message you have already recorded.
- For normal voice levels, a distance of 5 to 9 inches (13 to 22 cm) between the recorder and the recording source (person speaking, for example) should be appropriate. To find the optimum distance between the recording source and the recorder, please experiment with various distances.
Checking Message
You can check the message by pressing REW or F.FWD button in Digital Voice Recorder mode, the message number and its recording time length will be shown on the display.
NOTE: Remaining time is the estimated time left for recording under current recording mode.
Voice Activated Recording
To set VOX on, switch the VOX button on rear side of the recorder to "ON" position and VOX icon will appear in DVR mode.
Voice Activated Recording will allow dictation only when you speak. When the unit detects a pause of a few seconds, it will temporarily stop recording until it detects sound again. If no sound is detected, PAUSE signal and REC LED will flash.
NOTE: The built-in Automatic Level Control (ALC) automatically sets the recording level once recording starts.
Playing Back Messages
Your recorder has several options for playing back your messages. You can play the most recent messages and go directly from playback to recording. You can also fast forward through messages or skip backward or skip forward to get to the message you want to hear.
- Press PLAY/PAUSE or REC/PAUSE button to enter into Digital Voice Recorder mode from Time Displaying mode.
- Select a desired folder as described in "Selecting a Folder" (1\~8).

natural_image
Color calibration bar with grayscale and RGB swatches, no text or symbols present- Select your desired message number by pressing REW or F.FWD button, the message number and the message length will appear in the display.
- Press PLAY/PAUSE button again to start playing. During playback, the Play signal and the elapsed time of the message will appear in the display.
-
After completing the playing message, the next message number will appear. If that is the final message, the message number and message length will be remained same.
-
As well as the Normal Playing mode, there are two Loop Playing modes, including Message Loop Playing and Folder Loop Playing.
-
When playing the message in normal mode, press ERASE button one time to enter into message Loop Playing mode, Repeat one indicator "1" will appear. Press ERASE button again to enter into folder Loop Playing model, Repeat all indicator "All" will appear. To stop Loop Playing by pressing "ERASE" button again, It will return to Normal Playing mode.
-
To press STOP/MODE button to stop the playing, Digital Voice Recorder mode will appear.
-
To press PLAY/PAUSE button to pause the playing, the PAUSE icon will flash in Digital Voice Recorder mode. Press PLAY/PAUSE button again to resume the playing.
-
Playing Fast Forward and Fast Backward function by pressing the REW or F.FWD button over 1 second during playing the message, the message will be played at the present position when you loosen the REW or F.FWD button.
-
Playing Skip backward function by pressing REW button one time during playing message, the message will be played again from the beginning. When you press the REW button twice during playing message, the previous message will be played. When your press the F.FWD button one time during playing message, the next message will be played. If that is the first message or last message, such message will be played again when you play the Skip function.
Scan Playing
This function is for playing first 5 seconds of every message in a folder.
- Select a folder you want to scan playing.
- Press PLAY/PAUSE button 3 seconds in Digital Voice Recorder mode, the SCAN signal will appear and the Scan playing will commence.
- Press PLAY/PAUSE button one time during Scan playing, the message will be played in normal playing mode.
- Press STOP/MODE button one time during Scan playing, it will stop and return to Digital Voice Recorder mode.
Delete the Message
- Select the folder and pressing the REW or F.FWD button to select the message you want to delete.
- Press ERASE button one time in Digital Voice Recorder mode, ERASE signal will appear and first 5 second of the selected message will be played.
- Press ERASE button again, the selected message will be deleted. The next message will display and the message number will go back to previous message number. If not any button is pressed after 5 seconds, the display will return to Digital Voice Recorder mode.

natural_image
Color calibration bar with grayscale and RGB color swatches, no text or symbols present- To cancel the delete function, press any button except ERASE button during playing the selected message or after playing the such message.
-
To delete the all messages in 8 folders:
-
Press ERASE button for 3 seconds in Digital Voice Recorder mode, the ERASE ALL signal will appear.
- Press ERASE button again within 5 seconds, all messages will be deleted and Digital Voice Recorder mode will display. If the ERASE button is not pressed again within 5 seconds, the messages will not be deleted, the display will return to Digital Voice Recorder mode.
SPECIFICATIONS
RECORDING SYSTEM : Built-in Flash Memory
RECORDING TIME : 920 Minutes in normal mode
DIMENSIONS : W41 x H103 x D17mm
WEIGHT : 47g (without batteries)
Specifications are subject to change without prior notice.


natural_image
Color calibration bar with grayscale and RGB color swatches, no text or symbols presentnatural_image
Color calibration bar with grayscale and RGB color swatches, no text or symbols presentBESCHREIBUNG
natural_image
Color calibration bar with grayscale and RGB color swatches, no text or symbols presentVORBEREITUNG
natural_image
Color calibration bar with grayscale and RGB color swatches, no text or symbols presentOPERATION
natural_image
Color calibration bar with grayscale and RGB swatches, no text or symbols presentLautstärkekontrolle
natural_image
Color calibration bar with grayscale and RGB swatches, no text or symbols presentnatural_image
Color calibration bar with grayscale and RGB color swatches, no text or symbols presentnatural_image
Color calibration bar with grayscale and RGB swatches, no text or symbols presentAbtastwiedergabe
AUSMAßE : W41 x H103 x D17mm
natural_image
Color calibration bar with grayscale and RGB color swatches, no text or symbols presentEMPLACEMENT DES COMMANDES
natural_image
Color calibration bar with grayscale and RGB color swatches, no text or symbols presentCARACTÉRISTIQUES
natural_image
Color calibration bar with grayscale and RGB color swatches, no text or symbols presentPRÉPARATION
Installer les piles
natural_image
Simple geometric diagram with a gray rectangle and a circle intersected by perpendicular lines (no text or symbols)

natural_image
Color calibration bar with grayscale and RGB color swatches, no text or symbols presentFONCTIONNEMENT
natural_image
Color calibration bar with grayscale and RGB color swatches, no text or symbols presentnatural_image
Simple geometric diagram with a gray rectangle and a circle intersected by perpendicular lines (no text or symbols)
natural_image
Color calibration bar with grayscale and RGB color swatches, no text or symbols presentnatural_image
Color calibration bar with grayscale and RGB swatches, no text or symbols presentnatural_image
Simple geometric diagram with a gray rectangle and a circle intersected by perpendicular lines (no text or symbols)

natural_image
Color calibration bar with grayscale and RGB color swatches, no text or symbols presentDIMENSIONS : W41 x H103 x D17mm
POIDS : 47g (sans les piles)
natural_image
Color calibration bar with grayscale and RGB color swatches, no text or symbols presentnatural_image
Color calibration bar with grayscale and RGB color swatches, no text or symbols presentFUNCIONES
natural_image
Color calibration bar with grayscale and RGB color swatches, no text or symbols presentPREPARACIÓN
natural_image
Color calibration bar with grayscale and RGB color swatches, no text or symbols presentOPERACIÓN
natural_image
Color calibration bar with grayscale and RGB swatches, no text or symbols presentnatural_image
Color calibration bar with grayscale and RGB swatches, no text or symbols presentnatural_image
Color calibration bar with grayscale and RGB swatches, no text or symbols presentnatural_image
Color calibration bar with grayscale and RGB color swatches, no text or symbols presentnatural_image
Color calibration bar with grayscale and RGB color swatches, no text or symbols presentnatural_image
Color calibration bar with grayscale and RGB color swatches, no text or symbols presentCARACTERÍSTICAS
natural_image
Color calibration bar with grayscale and color swatches, no text or symbols presentPREPARAÇÃO
natural_image
Color calibration bar with grayscale and RGB color swatches, no text or symbols presentFUNCIONAMENTO
natural_image
Color calibration bar with grayscale and RGB swatches, no text or symbols presentnatural_image
Color calibration bar with grayscale and RGB color swatches, no text or symbols presentVerificar as mensagens
natural_image
Color calibration bar with grayscale and RGB swatches, no text or symbols presentnatural_image
Color calibration bar with grayscale and RGB color swatches, no text or symbols presentnatural_image
Color calibration bar with grayscale and RGB color swatches, no text or symbols presentManufacturer and Address
SANYO Electric Co., Ltd.
5-5, Keihan-hondori, 2-chome, Moriguchi City.
Osaka, Japan
Authorized Representative and Address
SANYO FISHER Sales (Europe) GmbH
Stahlgruberring 4, D-81829 Munich, Germany
SANYO
SANYO Electric Co., Ltd.
MADE IN CHINA
XE
ICR_NT300_EN1.indd
10 2008-3-28
16:17:07




- SANYO
- LOCATION OF CONTROL
- LCD DISPLAY
- FEATURES
- Flash Storage Memory
- 920-Minute Record/Play
- Clock Function
- MIC Sensitivities
- VOX
- Remaining/ Elapsed Time Indicator
- Message Erase
- Message Full
- Electric Volume
- Recording Indication LED
- Built-in Microphone
- Built-in Speaker
- Earphone Output Jack
- External Microphone Jack
- PREPARATION
- Installing Batteries
- Cautions:
- Using an Earphone
- Listening Safely
- Using an External Microphone
- OPERATION
- Releasing Lock Function
- Low Voltage Checking
- Resetting the Recorder
- Calendar and Time Setting
- To Turn the Unit On
- Volume Control
- Selecting a Folder
- Selecting MIC Sensibility
- Key Lock
- Selecting Record Quality
- Recording Messages
- Checking Message
- Voice Activated Recording
- Playing Back Messages
- Scan Playing
- Delete the Message
- SPECIFICATIONS
- BESCHREIBUNG
- VORBEREITUNG
- Lautstärkekontrolle
- Abtastwiedergabe
- EMPLACEMENT DES COMMANDES
- CARACTÉRISTIQUES
- PRÉPARATION
- Installer les piles
- FONCTIONNEMENT
- FUNCIONES
- PREPARACIÓN
- OPERACIÓN
- CARACTERÍSTICAS
- PREPARAÇÃO
- FUNCIONAMENTO
- Verificar as mensagens
Brand : SANYO
Model : ICR-NT300
Category : Dictaphone