
ICR-FP600D - Dictaphone SANYO - Free user manual and instructions
Find the device manual for free ICR-FP600D SANYO in PDF.


| Product Type | Digital Voice Recorder |
| Brand | Sanyo |
| Model | ICR-FP600D |
| Dimensions (W x H x D) | Approx. 36.6 x 96 x 13.3 mm |
| Weight (including battery) | Approx. 49 g |
| Power Source | 1 AAA/LR03/HP16 alkaline battery |
| Recording Media | SD memory card (512 MB – 2 GB) or SDHC memory card (4 GB, 8 GB) |
| Recording Format | MP3 (MPEG1 Layer3, MPEG2 Layer3) |
| Recording Modes | HQ stereo (192 kbps), HQLP stereo (64 kbps), LP mono (32 kbps) |
| Voice Activated System (VAS) | Yes, adjustable sensitivity (levels 1-5) |
| Timer Recording | Yes, one-time setting (30 min, 1h, 2h, or fill) |
| Playback Speed Control | 50% to 200% (5% increments from 50-100%, 10% increments from 100-200%) |
| Repeat Modes | Single file repeat or folder repeat, A-B repeat |
| Equalizer | Bass, Pop, Rock, Jazz presets |
| Hold Function | Yes, disables button operation |
| Auto Power Off | After 30 minutes in stop state |
| Recording LED Indicator | Can be turned on/off |
| External Microphone Input | Yes, 3.5 mm stereo mini plug |
| Line Input | Yes, for recording from external sources |
| Care and Cleaning | Clean with a soft, dry cloth; do not use benzene, thinner, or alcohol |
| Safety Precautions | Do not expose to water, do not use in extreme temperatures (below 5°C or above 35°C), keep out of reach of infants |
| PC Connectivity | Not supported on ICR-FP600D (only ICR-FP700D) |
| User Manual | PDF available for free download |
Frequently Asked Questions - ICR-FP600D SANYO
User questions about ICR-FP600D SANYO
0 question about this device. Answer the ones you know or ask your own.
Ask a new question about this device
Download the instructions for your Dictaphone in PDF format for free! Find your manual ICR-FP600D - SANYO and take your electronic device back in hand. On this page are published all the documents necessary for the use of your device. ICR-FP600D by SANYO.
USER MANUAL ICR-FP600D SANYO
natural_image
Color palette bar with grayscale swatches and a central circle, no text or symbols presentSANYO
INSTRUCTION MANUAL
ICR-FP600D
ICR-FP700D
Digital Voice Recorder
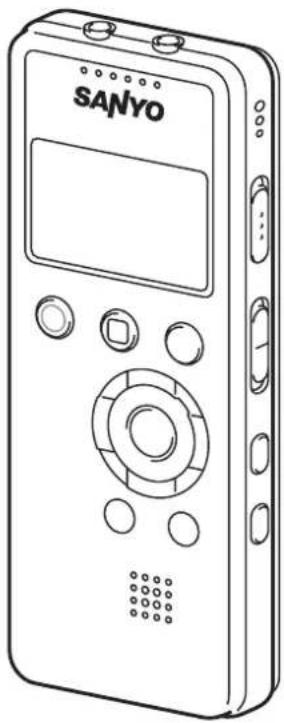
natural_image
Line drawing of a SANYO mobile phone with control panel and buttons (no text or symbols on device body)GB
English
D
Deutsch
F
Français
E
Español
ENGLISH
Please read this manual before use.
Keep the manual in a safe place for future reference.
FOR EU USERS
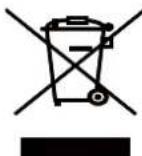
The symbol mark and recycling systems described below apply to EU countries and do not apply to countries in other areas of the world.
Your SANYO product is designed and manufactured with high quality materials and components which can be recycled and/or reused.
The symbol mark means that electrical and electronic equipment, batteries and accumulators, at their end-of-life, should be disposed of separately from your household waste.
Note:
If a chemical symbol is printed beneath the symbol mark, this chemical symbol means that the battery or accumulator contains a heavy metal at a certain concentration. This will be indicated as follows: Hg: mercury, Cd: cadmium, Pb: lead
In the European Union there are separate collection systems for used electrical and electronic equipment, batteries and accumulators.
Please, dispose of them correctly at your local community waste collection/recycling centre.
Please, help us to conserve the environment we live in!
FOR CANADIAN USERS
This class B digital apparatus complies with
Canadian ICES-003.
SANYO FISHER Sales (Europe) GmbH
Stahlgruberring 4, D-81829 München, Germany
SANYO Electric Co., Ltd.
1-1, Sanyo-cho, Daito City, Osaka 574-8534, Japan
GB-1

natural_image
Color palette bar with grayscale and RGB swatches, no text or symbols presentCAUTION
- It is forbidden to copy this manual, whole or in part, without prior written permission.
- All images and illustrations given in this manual are for explanation purposes and may differ slightly from that of the actual product. Also, actual specifications are subject to change without prior notice and therefore may differ from the contents of this manual.
Sanyo cannot be held responsible for damage caused by improper use or modifications to the device, or data that is lost or destroyed.
GB-2

Precautions
- The apparatus shall not be exposed to dripping or splashing.
- Do not remove the battery during operating the unit.
- Do not insert pins, etc., inside the unit.
- Do not drop the unit or subject it to strong shocks.
- Do not throw into a fire or apply heat.
- Do not immerse in water or use in humid areas such as a bathroom.
- Do not use while driving.
- Do not listen for long periods of time at high volume.
- Keep out of reach of infants. Store in an area out of reach of small children.
- Do not use where there are extremes of temperature (below 5^ C or exceeding 35^ C). Store in a dry cool place.
- Do not use in the presence of strong electromagnetic waves.
- Do not let the unit get near locations where strong magnetic fields are produced.
- Microsoft, Windows Media™, and the Windows® Logo are trademarks or registered trademarks of Microsoft Corporation in the United States and/or other countries.
- SD logo and SDHC logo are registered trademarks

- In this document, "SD™ Memory Card" and "SDHC™ Memory Card" are collectively called "SD Card."
- Other system and product names generally are the registered trademarks or trademarks of the respective development manufacturers. The symbols ™ and ® are not shown in this manual.
- SANYO takes no responsibility for recording failure due to power cuts or damage to the unit.
- To avoid potential risk of data loss caused by accidental operation or malfunction of the unit, we recommend that you save a backup copy of your recorded messages on a PC, etc..
- Recording copyright material without permission of the copyright owners is usually an infringement. If you wish to re-record copyright material, permission from the copyright owner is necessary. SANYO does not approve of, and cannot be held responsible for, any unlawful use of this machine.
- Never handle batteries with wet or moist hands.
- Do not modify or disassemble the unit.
- In this event of getting battery liquid in the eyes, wash them out with clean water and see a doctor immediately.
GB-3
Contents
Introduction 5
Accessories 5
Controls 6
Main unit 6
LCD display 7
File and folder 8
Folders for recording....8
Recording file names 9
Folder for music 9
Sort function in the "MUSIC" folder .....10
Preparation 11
Inserting a battery 11
Turning the power on and off 12
Turning the power on 12
Turning the power off 12
Battery indicator 13
Auto power off function 13
Resume function 13
Preventing mishandling (Hold function) 14
Inserting and removing the SD card ....15
Notes on handling the SD card 16
Setting the date and time 17
Recording 18
Recording with microphone....18
Using an external microphone....19
VAS (Voice activated system) 19
Setting the voice sensing level (VAS Value) .. 20
Recording from external sources ......20
Playback 22
Playing a file 22
Operations available during playback ....22
Volume adjustment 22
Fast forward....23
Fast reverse 23
Skipping to next file 23
File return 23
Changing the playback speed 23
5-second back playback 23
Repeat playback 24
Repeat between two points in current
playback file (A-B repeat) 24
Playback from designated position
(Time search) 25
Folder skip
(only if "MUSIC " folder is selected) ......26
Erasing 27
Recording at Designated Time (Timer) 29
Dividing Recorded File 30
File division and file naming after division 31
Menu 32
Method of operation (example of sound quality setting) ……32
List of menus 33
Main menu 33
Sub menu 34
Other functions 35
Beep sound 35
Lighting of recording LED indicator light ....35
Automatically dividing a file at a silent pause (line input only) 36
Setting the equalizer 37
Checking the file information 37
Connecting to a PC (ICR-FP700D only) 38
What you can do by using a PC 38
Computer system requirements ......39
Notes 40
How to connect to / disconnect from your PC 41
Notes on connection 41
Connecting this unit to your PC 42
Displaying folders in this unit 43
Disconnecting this unit from your PC ....45
Copying a file from this unit to your PC... 46
Copying files to CD-R/RW 47
Troubleshooting Guide 49
If this unit is not recognized by a PC: (ICR-FP700D only) 49
Troubleshooting 49
Frequently asked questions (Q & A) .....51
Cleaning the cabinet 52
Data 53
Specifications 53
GB-4
Introduction
Accessories
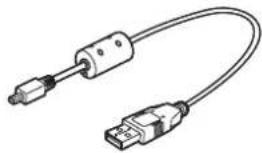
[ICR-FP700D]
USB connection cable 1 AAA/LR03/HP16
natural_image
Illustration of a USB cable with two connectors (no text or symbols)alkaline battery 1
Instruction Manual
(This book) 1
[ICR-FP600D]
Instruction Manual
(This book) 1
GB-5
Controls
Main unit
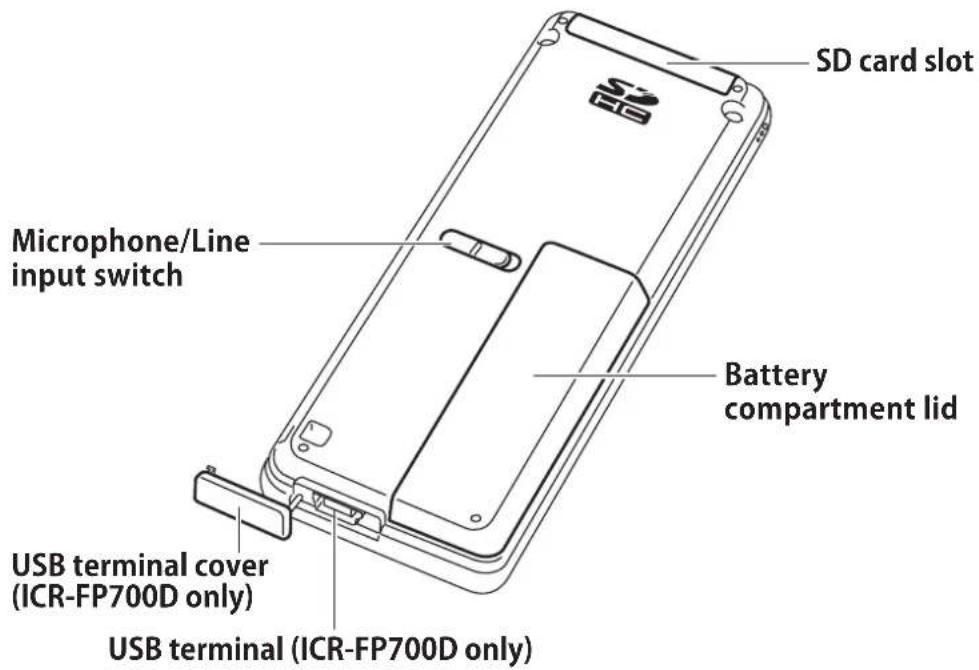
![[Front] Recording LED (See Page 35) Built-in microphones (ICR-FP700D only) Folder/ (repeat) button Stop button Record button OK (play) button ← (fast-reverse) button Volume button ( → ) Stereo headphones socket External input (microphone/ line) socket Built-in microphones (ICR-FP700D : stereo) Built-in microphone (ICR-FP600D : mono) Power/Hold switch LCD display Scene select (microphone sensitivity) switch Volume button ( + Menu button → (fast-forward) button Erase button Speaker Playback speed (-/+) buttons](/content/2026/05/844800/images/b4f573761661550114eeaf085397870bfcee38976b597e102a2e0246d73ed30d.jpg)
[Back]
GB-6

natural_image
Color palette bar with grayscale swatches and a central circle, no text or symbols presentLCD display
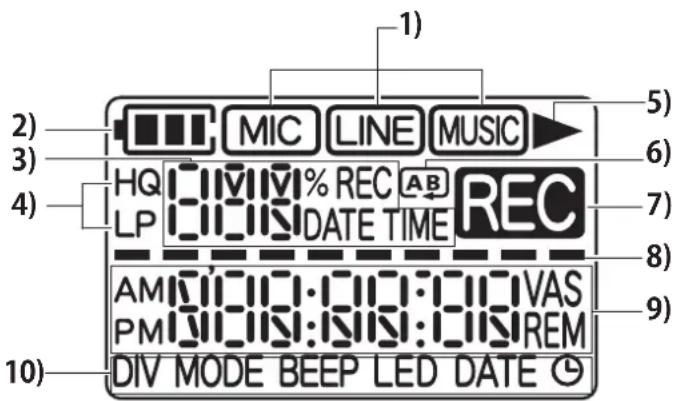
1) Folder name (storage location of recorded voice) (See Page 8)
MIC : Storage location of microphone recorded voice files
LINE : Storage location of voice files recorded using other equipment
MUSIC : Storage location of files transferred from PC
2) Battery indicator
Battery low
Battery fully charged
3) Information display
Displays the file number of the recorded voice file, etc.
4) Recording quality display (See Page 32)
HQ : High quality mode (192 kbps, stereo)
HQ : Standard quality mode (64 kbps, stereo)
LP : Long-play mode (32 kbps, mono)
☐ Lit : Repeats the song currently playing
Blink: Repeats playback of all files in a folder
AB : Repeats playback between two preset points in a file
7) Recording display(REC) (See Page 18)
8) Level meter Displays recording state remaining capacity of SD card, current playback position, volume setting, etc.
9) Information display Displays time, etc.
10) Main menu setting items (See Page 33)
GB-7

natural_image
Color palette bar with grayscale swatches and a central circle, no text or symbols presentFile and folder
A "File" is an individual voice recording and a "Folder" is a location to classify and store multiple files.
- This unit includes three folders: MIC, LINE, and MUSIC. Files can be stored in each folder.
Note A "DATA" folder for storing PC data is included, though it is not shown on this unit. (See Page 38)
Folders for recording
These folders are used for recording on this unit. The "MIC" folder stores voice files recorded with a microphone and the "LINE" folder stores voice files recorded through a line-in from external source.
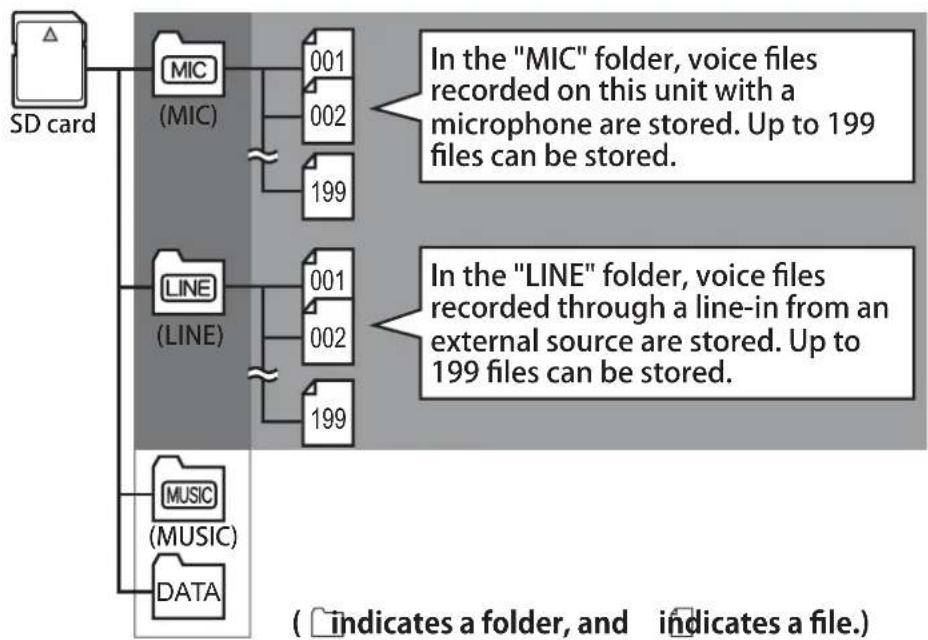
flowchart
graph TD
    A["SD card"] --> B["MIC (MIC)"]
    B --> C["001"]
    B --> D["002"]
    B --> E["199"]
    F["LINE (LINE)"] --> G["001"]
    F --> H["002"]
    F --> I["199"]
    J["MUSIC (MUSIC)"] --> K["DATA"]
    style A fill:#f9f,stroke:#333
    style F fill:#ccf,stroke:#333
    style J fill:#cfc,stroke:#333
    style B fill:#ffc,stroke:#333
    note right of B: In the "MIC" folder, voice files recorded on this unit with a microphone are stored. Up to 199 files can be stored.
    note right of F: In the "LINE" folder, voice files recorded through a line-in from an external source are stored. Up to 199 files can be stored.
    note right of F: (indicates a folder, and indicates a file.)
GB-8

natural_image
Color palette bar with grayscale shades and a central circle, no text or symbols presentRecording file names
Files recorded with this unit, are automatically given a name with the following configuration.
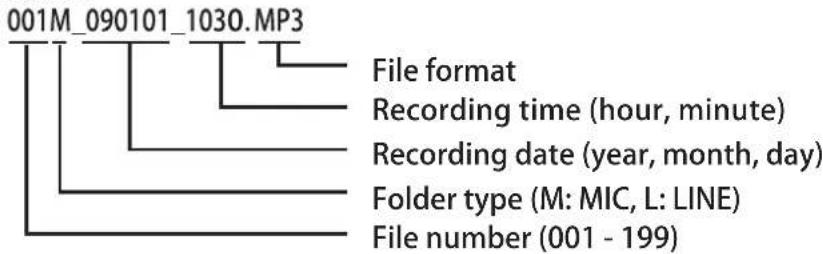
flowchart
graph TD
    A["001M_090101_1030.MP3"] --> B["File format"]
    A --> C["Recording time (hour, minute)"]
    A --> D["Recording date (year, month, day)"]
    A --> E["Folder type (M: MIC, L: LINE)"]
    A --> F["File number (001 - 199)"]
- On this unit, only the file number in the file name above is displayed. The file name can be seen when this unit is connected to a PC.
- If the name of a file recorded with this unit is changed on a PC, the file cannot be played in the "MIC" folder or the "LINE" folder. Give a name according to the file name rules above or move the file to the "MUSIC" folder and play it from there.
Folder for music
The "MUSIC" folder is a folder used for transferring MP3 files from a PC and playing them. By transferring your music to your PC, such as songs imported from CD's and transferring these files to the "MUSIC" folder, you can use this unit as a music player.
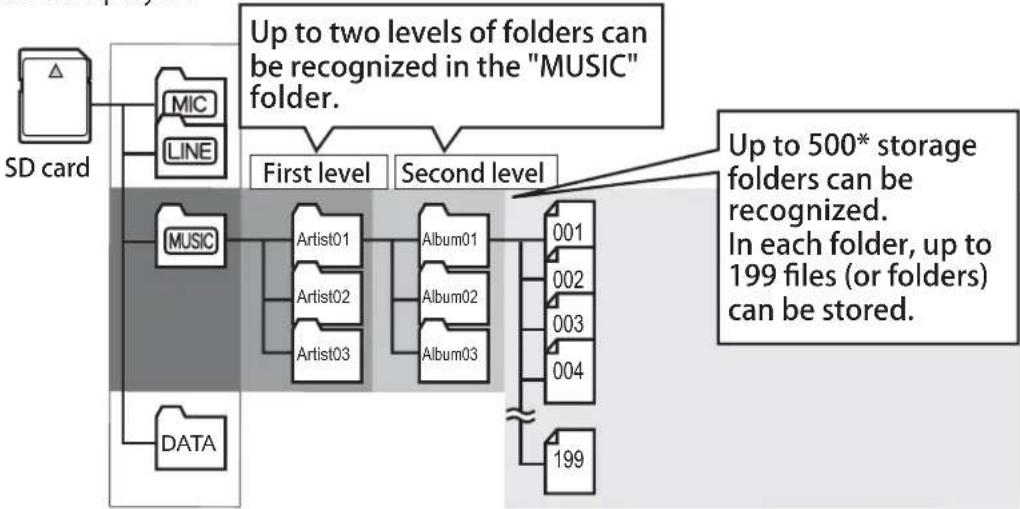
flowchart
graph TD
    A["SD card"] --> B["MIC"]
    A --> C["LINE"]
    B --> D["MUSIC"]
    C --> D
    D --> E["Artist01"]
    D --> F["Artist02"]
    D --> G["Artist03"]
    E --> H["Album01"]
    F --> I["Album02"]
    G --> J["Album03"]
    H --> K["001"]
    I --> L["002"]
    J --> M["003"]
    K --> N["004"]
    L --> O["199"]
    M --> O
    N --> O
    O --> P["Up to 500* storage folders can be recognized. In each folder, up to 199 files (or folders) can be stored."]
    style A fill:#f9f,stroke:#333
    style B fill:#ccf,stroke:#333
    style C fill:#ccf,stroke:#333
    style D fill:#cfc,stroke:#333
    style E fill:#fcc,stroke:#333
    style F fill:#fcc,stroke:#333
    style G fill:#fcc,stroke:#333
    style H fill:#cff,stroke:#333
    style I fill:#cff,stroke:#333
    style J fill:#cff,stroke:#333
    style K fill:#ffc,stroke:#333
    style L fill:#ffc,stroke:#333
    style M fill:#ffc,stroke:#333
    style N fill:#ffc,stroke:#333
    style O fill:#ffc,stroke:#333
(indicates a folder, and indicates a file.)
* Folders in which no file is stored directly under the folder, as well as folders in which no playable file is stored are not counted.
GB-9

natural_image
Color palette bar with grayscale swatches and a central circle, no text or symbols presentSort function in the "MUSIC" folder
In the "MUSIC" folder, files in each folder are automatically sorted in ascending order of the first number of the file name and then played. In the case of numbers starting in "001...", "01...", and "1...", "001..." takes precedence and "01..." and "1..." follow after.
GB-10

Preparation
Inserting a battery
Note
Be sure to turn the power off when you replace the battery. Inserting or removing the battery with the power on may cause a failure or damage to data.
Illustrations of ICR-FP700D are used below for explanation.
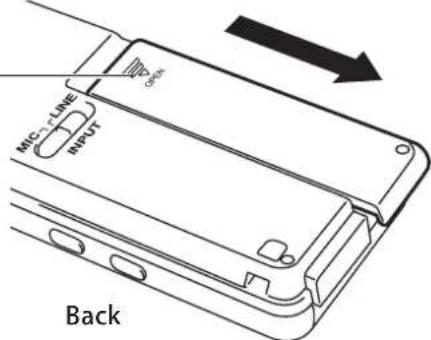
1 While gently pressing the portion of the battery compartment lid shown in the figure, slide the lid in the direction indicated by the arrow.
Press here and slide the lid.
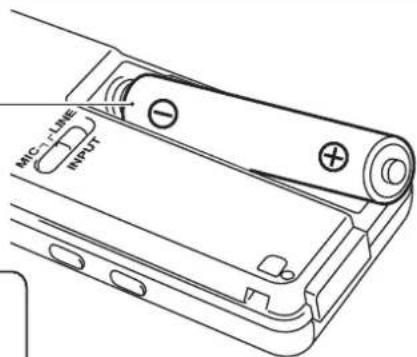
2 Insert an AAA/LR03/HP16 battery.
First insert the minus side and then insert the plus + side.
Note
Always make sure the battery is inserted in conformity with the +/- polarity markings.
3 Close the battery compartment lid.
GB-11
Turning the power on and off
Turning the power on
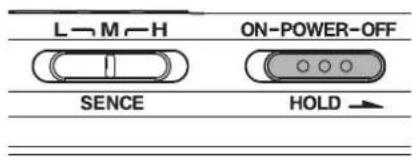
Set the Power/Hold switch on the side of the unit to the "ON" position.
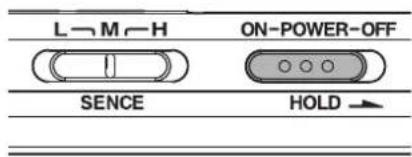
When the power is turned on, the screen initializes in the following order.
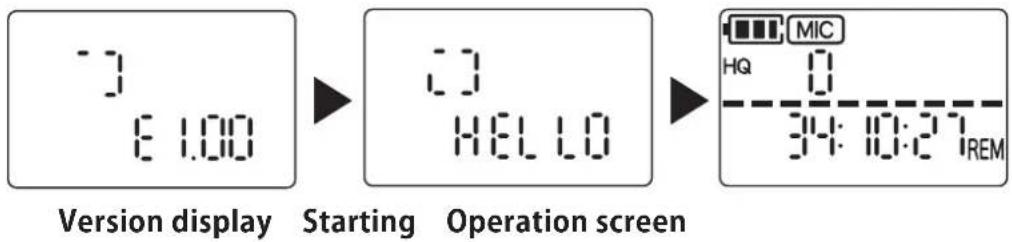
flowchart
graph LR
    A["Version display"] --> B["Starting Screen"]
    B --> C["Operation Screen"]
    C --> D["MIC Control"]
* The screens above are examples.
The operation screen that was last displayed when the power was turned off, will be displayed. (Resume function)
Note - If you turn the power on with the "MUSIC" folder selected, "CREATE" may be displayed on start-up depending on the number of files.
- If no SD card is inserted in this unit, "NO - SD" is displayed when the power is turned on and this unit cannot be operated. Be sure to insert an SD card.
Turning the power off
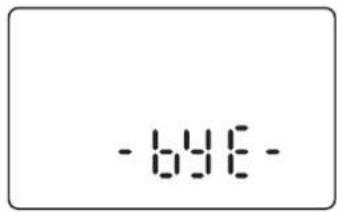
Set the Power/Hold switch on the side of this unit to the "OFF" position.
The following screen is displayed and the power turns off.
GB-12


natural_image
Color palette bar with grayscale swatches and a central circle, no text or symbols presentBattery indicator
Remaining battery power is displayed.

Battery fully charged Low battery
If the battery is exhausted, "L" is displayed and then the power turns off automatically.
Note The battery indicator display varies according to surrounding temperature and status of use.
Use this indicator as reference.
Note
- If☐ is indicated, replace the battery promptly.
- Even if the remaining quantity of battery power is very low, turning the power off and on may cause a larger quantity to be indicated than is actually available. Note that if you record or use timer recording in this state, recording may stop in the middle due to lack of battery power.
Auto power off function
If the unit is left on for 30 minutes in the "stop" state, the power turns off automatically.
To turn the power on again, set the Power/Hold switch to "OFF" and then to "ON".
Resume function
This function remembers the state of folder, file, and playback position selected before the power turns off and then starts the unit in the same state when the power is turned on again.
In the following cases, however, the resume function does not operate.
-This unit is connected to a PC.
-The battery or the SD card is removed without turning off the power.
-The SD card is inserted after the power is turned on.
GB-13
Preventing mishandling (Hold function)
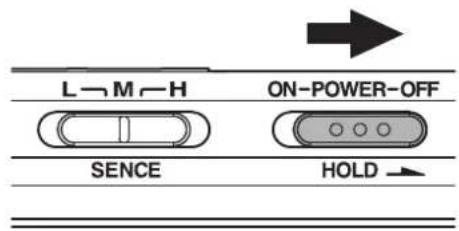
When this unit is placed in a pocket and used, this function can prevent unintentional battery consumption and operation of the device due to inadvertent pushing of buttons.
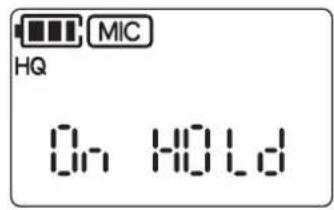
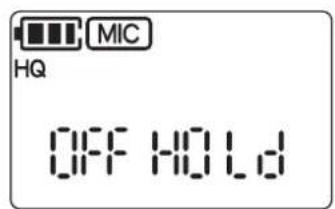
Set the Power/Hold switch to (OFF) in the figure below during playback or recording. The following screen is displayed and button operation is disabled.
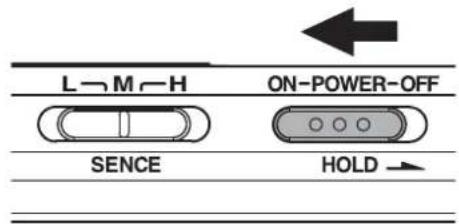
If the Power/Hold switch is set to (ON) in the figure below, the following screen is displayed and button operation is enabled.
Note - For the Scene select (microphone sensitivity) switch and the Microphone/Line input switch, the hold function does not operate even if it is set.
- When recording or playback is complete and the hold function is on, the power turns off automatically.
Inserting and removing the SD card
All recorded files are stored on the SD card. Before using this unit, ensure that the SD card is correctly inserted.
1 Check that the Power/Hold switch is set to "OFF."(See Page 12)
2 Open the SD card slot cover. Open the cover fully.
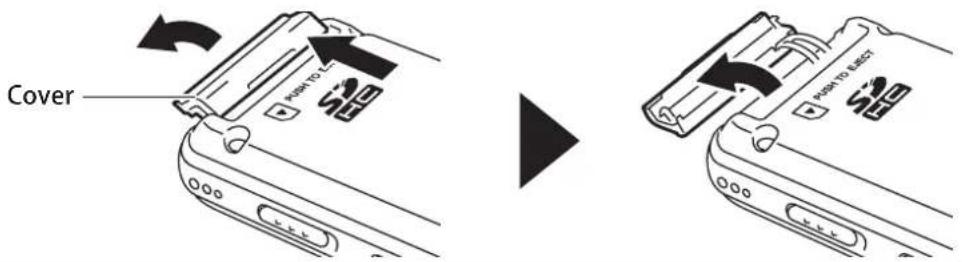
Note Do not pull the cover too hard. The cover may be damaged.
3
Pay attention to orientation.
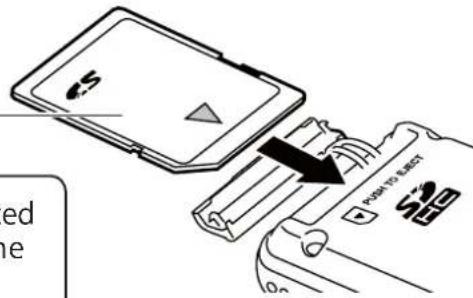
Note If the SD card is incorrectly oriented upon insertion, this unit and the SD card may be damaged.
When the SD card comes out, pull it gently to remove.
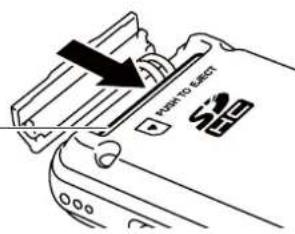
4 Close the cover.
GB-15
Notes on handling the SD card
- Do not directly touch the terminals, allow them to make contact with metal or hard objects, or short-circuit them. Data may be damaged or lost by static electricity or the like.
- Insert the SD card with the correct orientation all the way into the unit. If it is inserted with an incorrect orientation or is insufficiently inserted, the unit will not operate properly.
- Do not release your fingers from the card before the card is completely inserted or removed.
- Keep out of the reach of children. Young children may put the card in their mouth and choke or cause some other unexpected injury or accident.
- The cards are precision devices. Do not bend, drop, or subject them to strong forces or shocks.
- Avoid using or storing the cards in places with extremely high or low temperatures, subject to direct sunlight, in a completely closed vehicle, near air conditioners or heaters, or in humid or dusty locations.
- Avoid using or storing the cards in locations where strong static electrical charges or electrical noise can be easily generated.
- When using an SD card in this unit, be sure to format it in this unit (initialization). (See ALL ERASE in "Erasing" on page 27.)
An SD card that was formatted in another IC recorder or a PC may not be used with this unit.
- SD cards that can be used in this unit are SD cards with a capacity of 512 MB to 2 GB and SDHC cards with a capacity of 4GB and 8 GB (as of December 2008). Some SD cards do not function correctly in this unit depending on the manufacturer and the type. For cards for which Sanyo has confirmed operation, see page 53.
- If the SD card is locked, recording files, erasing files, or division of files cannot be carried out.
- Note that the SD card may be locked when it is inserted into this unit.
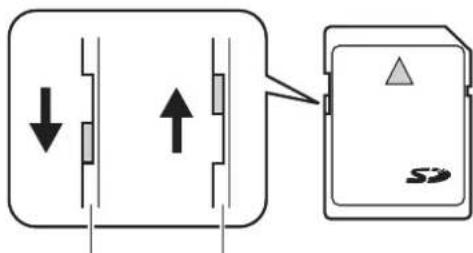
UnlockedLocked
GB-16

Setting the date and time
If the date and time are set, information regarding "Recording date and time" is automatically logged in the file being recorded (Time stamp function).
Also the recording date and time information is included in each file name therefore it is recommended to set the date and time correctly.
1 Turn the power on and press the [Mention.
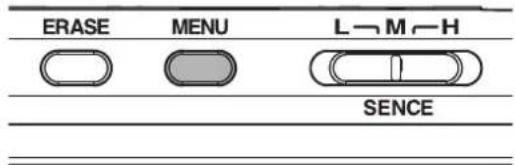
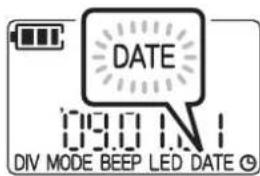
2 Press the [ (fast-reverse)] or[ (fast forward)] button to select " DATE " and press the [ ok( play) ] button.
3 Press the [ ] or [ ] button to set the year ( 45 ) and press the [ (fast-forward)] button.
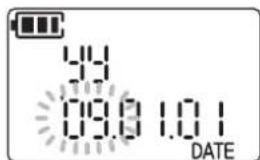
Setting time and date to 5:03 P.M. on Feburary 25, 2009 is shown here.
4 Set the month (m) and the day ( ) using the same operation as step 3.
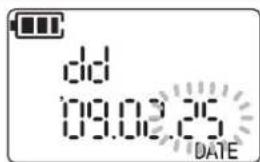
Note To return to the previous setting item, press [◀◀(fast-reverse)].
5 Press the [ ] for [ ] button to select the time display method and press the [ (fast-forward)] button.
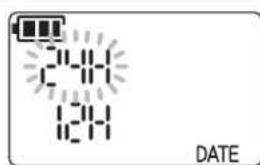
6 Set the hour (HH) and the minute (MM) using the same operation as step 3 and press the [▶(play)] button.
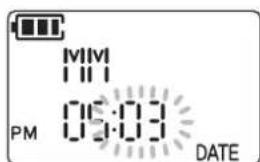
Date and time setting is now complete.
GB-17
Recording
Two recording methods are provided: recording with a microphone and recording from external sources.
Note During recording, you can monitor the recorded voice through headphones. Press the [+] or [-] button to adjust the volume.
Recording with microphone
1 Turn the power on.(See Page 12)
2 Set the microphone sensitivity according to the recording conditions.
Set the [SENCE(microphone sensitivity)] switch located on the side of this unit.
L : Low sensitivity. Use this setting when recording by placing this unit near the sound source like a microphone.
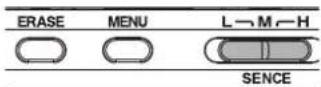
M: Intermediate sensitivity. Use this setting when recording conversation of several persons around a table.
H: High sensitivity. Use this setting when recording in an open location such as a conference room or a lecture hall.
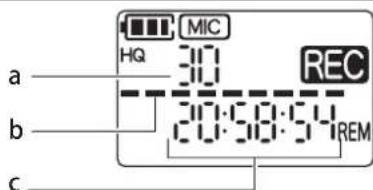
3 Press the [ ] button to start recording.
a : Recording file number
b: Input level meter
c : Remaining recordable time
Note
- If the [REC] button is pressed again during recording, the REC indication blinks and recording pauses. If the button is pressed again, recording resumes. If the unit is left for approximately 30 minutes after recording pauses, recording stops and the unit turns off.
- Each time (fast-forward) is pressed during recording, the indication of 'b' toggles between input level meter and remaining recordable time.
- Each time (fast-reverse) is pressed during recording, the indication of 'c' toggles between remaining recordable time and elapsed recording time.
4 To stop recording, press the [ STOP] button.
Recording is now complete.
GB-18

natural_image
Color palette bar with grayscale swatches and a central circle, no text or symbols presentUsing an external microphone
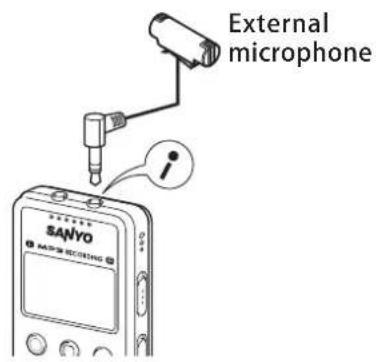
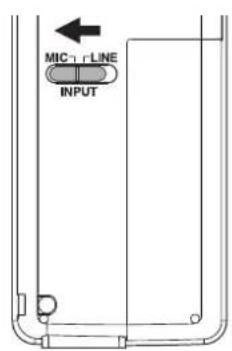
To use an external microphone for recording, connect the microphone to the external input socket and set the [Microphone/Line input] switch to the [Microphone] position in advance.
VAS (Voice activated system)
VAS is a function that automatically starts recording when the unit senses a voice, and causes recording to pause automatically putting the unit in the recording standby state, when the voice becomes lower than a certain level.
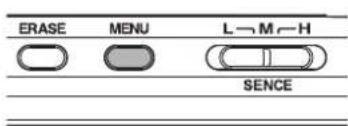
1 Turn the power on and press and hold down the [MENU] button for two seconds or more in the stop state.
2 Press the [ (fast-reverse)] or [ (fast-forward)] button to select "WAS". Press the [ + ] or [ +button to select "On and press the [OK (play)] button.
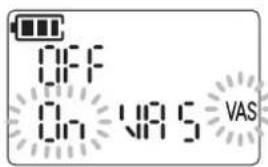
Setting is now complete.
3 Recording starts. (See Page 18) When no voice is sensed, recording pauses. While recording pauses, "REC" and "VASink.
When a voice is sensed, recording starts automatically.
GB-19

Setting the voice sensing level (VAS value)
You can adjust the voice sensing level in five steps (1-5) to accommodate the source volume level.
A larger value will increase the voice activation sensitivity so recording will be triggered by lower-level audio. If the value is too small, this unit may not detect voice. Set the microphone sensitivity (see page 18) in accordance with the source input level so that the VAS function can work more effectively.
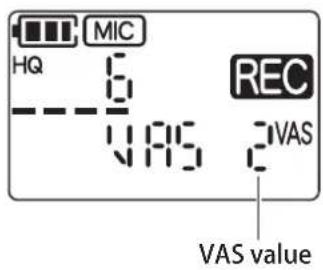
Procedure:
To adjust the voice sensing level, press the [recording with the VAS function turned on.
PLAY SPEED (+) / [ ┌️ buttons while
Note
- When recording begins with the VAS function on, recording will occur for two seconds just after starting, regardless of whether sound is detected or not.
- If the voice level is lower than a certain level for approximately two seconds, recording pauses.
- Since low voices may not be recorded during the use of the VAS function, to ensure recording in such situations, turn off the VAS function.
Recording from external sources
This unit can record music, etc played on external equipment such as CD or MD players, radio-cassette recorders, and component stereos.
1 Turn the power on. (See Page 12)
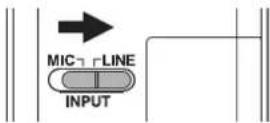
2 Set the [Microphone/Line input] switch to the "LINE" position.
3 Use a commercially available audio cable to connect the external input socket of this unit with the audio output (headphone) socket of the external source.
Use an audio cable (stereo mini plug, 3.5 , without resistor).
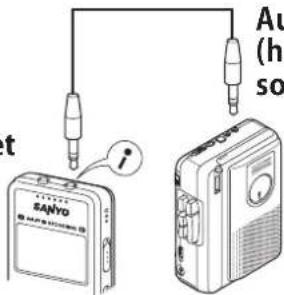
Audio output (headphone) socket
External input socket
GB-20

natural_image
Color palette bar with grayscale swatches and a central circle, no text or symbols present4 Change the recording quality of this unit as required. (See Page 32)
5 Start playback on the external source.
6 Press the [ ] REOton of this unit to start recording.
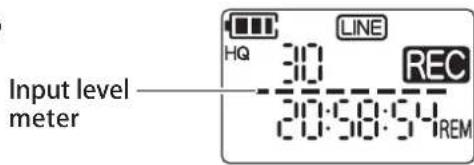
Note - Conduct test recording to adjust the playback volume of the external source. If the volume is too high, sound distortion may occur.
- By pressing the [▶▶(fast-forward)] button during recording, you can toggle the display between the input level meter and the remaining recordable time.
- By pressing the [ ◀◀ (fast-reverse)] button, you can toggle the display between remaining recordable time and elapsed recording time.
7 To finish recording, press the [ STORON.
Recording is now complete.
GB-21
Playback
Play a recorded file or a file transferred from a PC.
Playing a file
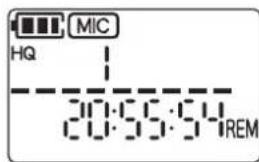
1 Press the [ [repeat] ] button to select the folder in which the desired file for playback is stored.
2 Press the [ (fast-reverse)] or [ (fast-forward)] button to select the desired file number for playback.
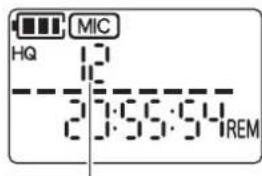
File number
3 Press the [play)] button to start playback. To finish playback, press the [STOP] button.
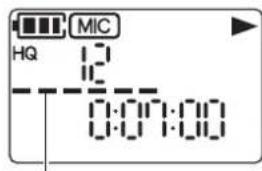
Display of playback progress status
Note If the same file is played successively, playback resumes from the stop position.
Operations available during playback
Volume adjustment
Adjust the volume by pressing the [ ] or [ ] — button with the power on.
The volume ( V) can be adjusted in a range from 0 to 20.
Volume level meter indication
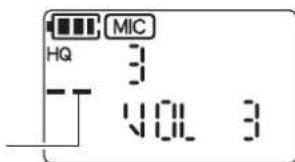
Note Adequate volume depends on recording conditions and the sound source. Raise the volume gradually in order to avoid raising it too high.
GB-22

natural_image
Color palette bar with grayscale swatches and a central circle, no text or symbols presentFast forward
Pressing and holding down the [▶fast-forward)] button during playback for one second or more starts fast forward. After fast forward starts, it continues even if the button is released.
To return to normal playback speed, press the [OK (play)] button.
Fast reverse
Pressing and holding down the [←←st-reverse)] button during playback for one second or more starts fast reverse. After fast reverse starts, it continues even if the button is released.
To return to normal playback speed, press the [OK (play)] button.
Skipping to next file
Pressing the [▶(fast-forward)] button makes playback skip to the next file.
File return
Pressing the [ ◀fast-reverse)] button makes playback return to the top of current file. Pressing the [ ◀(fast-reverse)] button successively makes playback skip to the previous file.
Changing the playback speed
Pressing the [PLAY] button during playback to increase the value increases the speed.
Pressing the [ ─ PLAY SPEED ] button during playback to decrease the value decreases the speed.
The speed can be adjusted in 5% increments between 50% and 100% and 10% increments between 100% and 200%.
5-second back playback
Pressing the [▶(play)] button during playback restarts playback from a position five seconds previous.
GB-23
Repeat playback
One file can be played repeatedly or all files in a folder can be played repeatedly. Press and hold down the [ FOLDER/AB (repeat)] button for two seconds or more during stop or playback to toggle between repeat modes.
☐ Lit :Only the selected one file is played repeatedly.
☐ Blink :All files in the selected folder are played repeatedly. Setting over two or more folders is not available.
No display :Normal playback. When playback of the last file finishes, the unit stops.
Repeat between two points in current playback file (A-B repeat)
1 Press the [F0repe@AB] button at the start point of the part you want to repeat during playback of the file. "A"blinks.
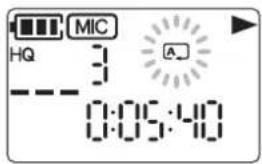
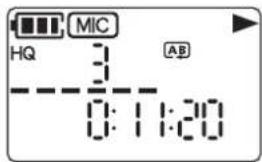
2 Press the [FLOPEA] button again at the end point of the part you want to repeat.
If "ABs displayed, the setting is correct.
Playback is repeated between the two set points.
Note - To cancel the setting, press the folder (repeat)] button again to clear " ".
- If the [ STOP] button is pressed to stop playback, or if fast forward or fast reverse is used, the setting is cancelled.
- If the interval between the two points is too short, A-B repeat cannot be set.
- If point A is set but point B is not set, the end of file is set as point B.
- An A-B repeat setting over two or more files is not available.
GB-24

natural_image
Color palette bar with grayscale shades and a central circle, no text or symbols presentPlayback from designated position (Time search)
The start position (start time) of playback can be designated.
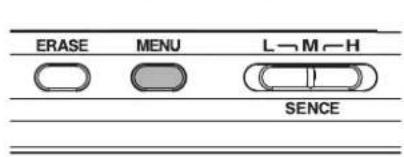
1 Press the [Menton during playback.
Playback stops and the current position (time) is displayed.
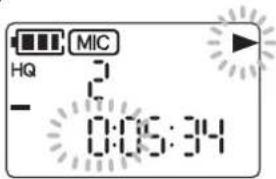
Set the designated time.
1) Press the [ ◀◀ (fast-reverse)] and [ ▶▶ (fast-forward) buttons to select "Hour," "Minute," and "Second."
2) Press the [ + ] or [ +button to adjust the value.
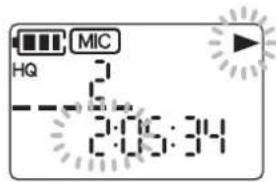
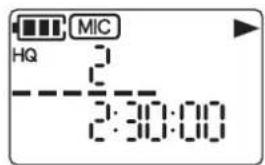
3 Press the [play)] button.
Playback starts from the designated position.
Note This setting can be applied only to the currently played file. The setting is not stored.
GB-25
Folder skip (only if "MUSolder is selected)
If the "MUSIColder is selected, pressing the [ ] or PLAY SPEED button in T SPEED stop state skips folders in the "MUSIC" folder sequentially and selects the first file in each folder.
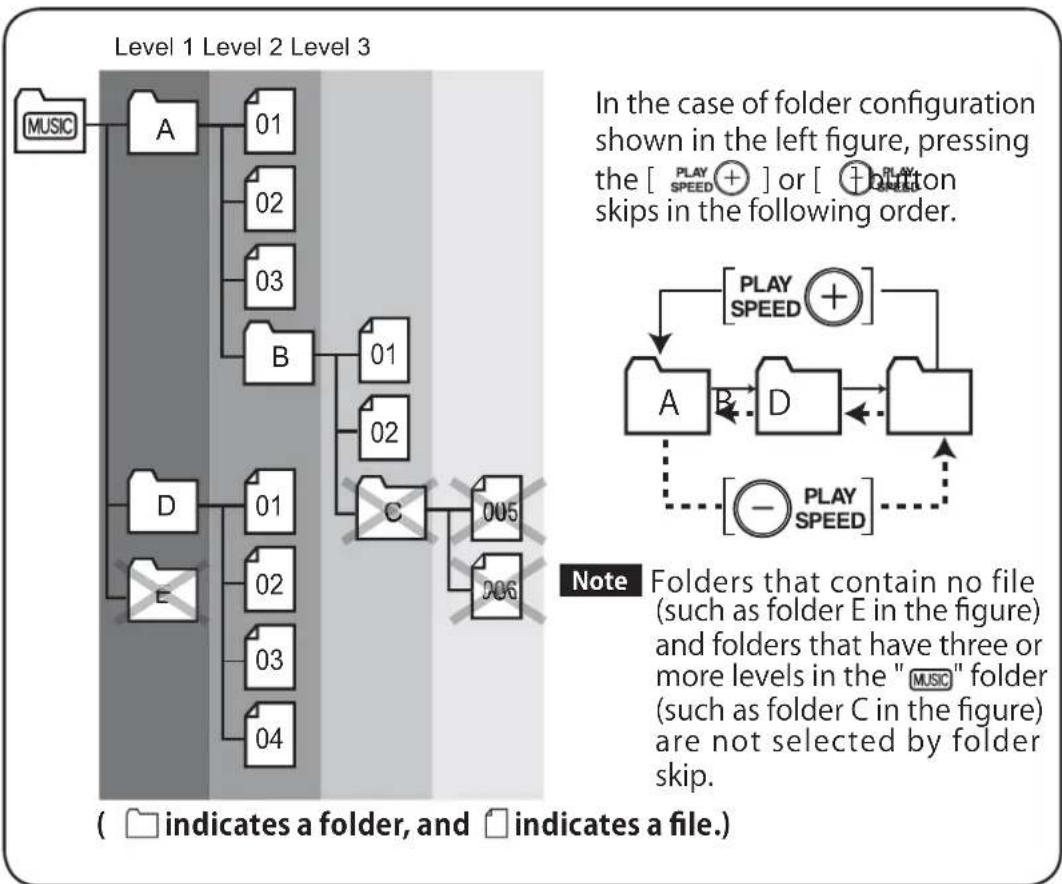
flowchart
graph TD
    A["MUSIC"] --> B["A"]
    B --> C["01"]
    B --> D["02"]
    B --> E["03"]
    B --> F["B"]
    F --> G["01"]
    F --> H["02"]
    F --> I["C"]
    I --> J["005"]
    I --> K["006"]
    L["D"] --> M["01"]
    N["E"] --> O["02"]
    N --> P["03"]
    N --> Q["04"]
    style A fill:#f9f,stroke:#333
    style B fill:#ccf,stroke:#333
    style C fill:#cfc,stroke:#333
    style D fill:#fcc,stroke:#333
    style E fill:#cff,stroke:#333
    style F fill:#ffc,stroke:#333
    style G fill:#cfc,stroke:#333
    style H fill:#cfc,stroke:#333
    style I fill:#fcc,stroke:#333
    style J fill:#cfc,stroke:#333
    style K fill:#cfc,stroke:#333
    note right of I: Note: Folders that contain no file (such as folder E in the figure) and folders that have three or more levels in the "MUSIC" folder (such as folder C in the figure) are not selected by folder skip.
    note right of J: In case of folder configuration shown in the left figure, pressing_the["PLAY SPEED+"] or["PLAY SPEED"] on skips in the following order.
In the example of the figure above, each time folder skip is conducted, the screen display changes as shown below.

Note
- Up to 500 folders in which playable files are stored can be recognized.
- If a music file is copied just under the "MUSIC" folder, the file can be played in the folder "FOL-001".
GB-26
Erasing
Erase unnecessary files.
Three methods of erasing are provided.
- FILE : Erases one selected file.
- FOLDER : Erases all files in a selected folder.
- ALL ERPISE: Erases all data in the SD card (formatting).
Note
- The erased file is not recoverable. Carefully confirm whether or not the file is needed before erasing.
- Before this operation, check that the remaining quantity of battery power is sufficient.
- With file erasing, only files playable on this unit can be erased. If you try to erase a file with the read only attribute, "ERROR" is displayed and the file cannot be erased. In this case, connect this unit to a PC and erase it from the PC.
- With folder erasing, only folders in which files playable on this unit are stored can be erased.
- If "sd LOCK" is displayed, release the SD card lock.(See Page 18)
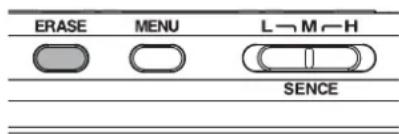
1 Press the [repeat] button to select the desired folder to erase or the folder that contains the desired file to erase.
2 Press the [ (fast-forward) ] or [ (fast-forward) ] button to select the desired file to erase.
If the method of erasing is " POTDER not required.
All this operation is
3 Press the [ EBASEon.
GB-27

natural_image
Color palette bar with grayscale swatches and a central circle, no text or symbols present4 Press the [ (fast-reverse)] or [ (fast-forward)] button to select the method of erasing and press the [ ▶ (play)] button.
Select one of " P", " E", and GOLDER ALL ERASE ". In this operation, select erasing of one file.
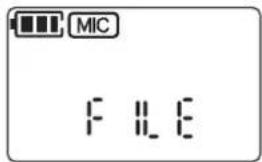
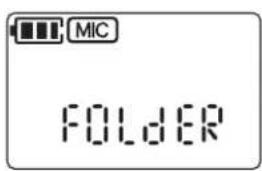
FOLDER (Folder erasing)
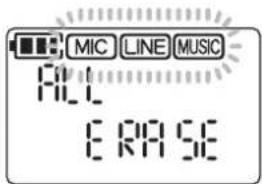
ALL ERASE (Formatting)
Note Take care not to select "FOR" by mistake when erasing only one file.
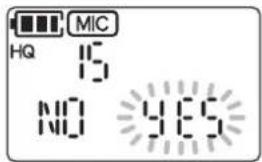
5 Press the [ (last-reverse)] or [ (fast-forward) ] button to select " YES " and press the [ ▶ (play)] button.
If " E R is displayed and then " " is displayed, erasing is complete.
Note Folder erasing erases files in a folder but cannot erase any folder. Since empty folders in the MUSIC folder cannot be seen on this unit, erase unnecessary folders when this unit is connected with a PC.
GB-28
Recording at Designated Time (Timer)
Recording can be started automatically at a designated time.
Before setting, check that the remaining quantity of battery power is sufficient.
1 In the stop state, press the [MENU button.
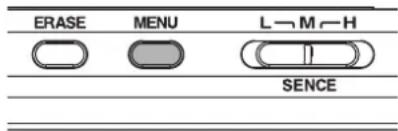
2 Press the [ (fast-reverse)] or [ (fast-forward)] button to select " 🔒" and press the [ ▶ (play)] button.
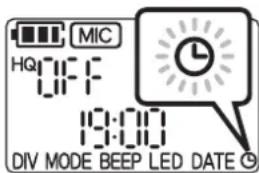
3 Press the [ ] or [ ] button to select the recording time and press the [ ▶▶▶ (fast-forward)] button.
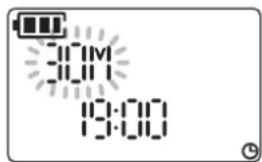
300M : 30 minutes
H : 1 hour
24 : 2 hours
FILL : Until all available space is used.
OFF : Cancels timer setting.
4 Press the [ ] or [ ] button to designate the hour of recording start time and press the ▶ (fast-forward)] button.
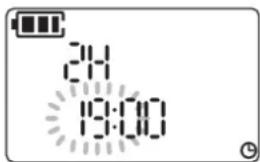
5 Press the [ + ] or [ - ] button to designate the minute of recording start time and press the [ ▶ (play)] button.
When " 🔒 " is displayed at the lower right of the screen, setting is complete.
One minute before the designated time, the power turns on automatically and the unit enters the standby mode for timer recording.
When recording starts and the preset time elapses, recording stops automatically.
Note - If the designated time approaches during playback, playback stops automatically one minute before the designated time and this unit enters the standby mode for timer recording.
- To stop recording during the timer recording session, press the [STOP] button.
- Even if the power is off, this unit turns on at the timer start time and operation commences. At the timer end time, the unit turns off.
GB-29
Dividing Recorded File
A file can be divided. This function is useful for dividing a file into necessary parts and unnecessary parts. For dividing a file, available space is required. Only files in the MIC folder and the LINE folder can be divided.(Files in the MUSIC folder cannot be divided.)
1 Play the desired file to divide.(See Page 22)
2 Press the [ \$FORon at the desired division position to stop playback.
3 Press the [Mention. "DIVolinks.
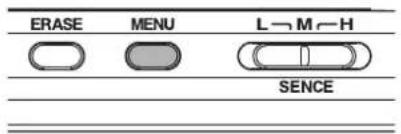
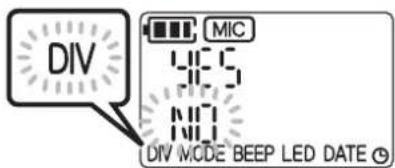
4 Press the [ ] or [ ] button to select "YES" and press the [ ] button.
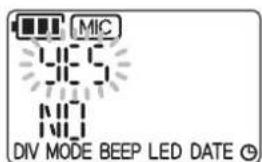
When "OR" is displayed, division of the file is complete.
GB-30
File division and file naming after division
Example: File 001M_090101_1631.MP3 is divided.
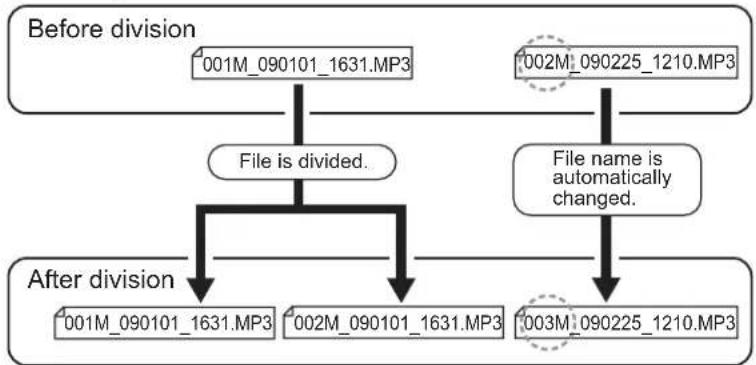
flowchart
graph TD
    A["Before division"] --> B["001M_090101_1631.MP3"]
    A --> C["1002M_090225_1210.MP3"]
    B --> D["File is divided."]
    C --> E["File name is automatically changed."]
    D --> F["After division"]
    E --> G["After division"]
    F --> H["001M_090101_1631.MP3"]
    F --> I["002M_090101_1631.MP3"]
    G --> J["003M_090225_1210.MP3"]
If file 001M_090101_1631.MP3 is divided, file 002M_090101_1631.MP3 is created. If a file of the same file number exists already in the folder, the file created at the division takes precedence and the name of the former file is changed.
For example, if file 001M_090101_1631.MP3 is divided, 001M_090101_1631.MP3 and 002M_090101_1631.MP3 are created and 002M_090225_1210.MP3 that has existed in the folder is changed to 003M_090225_1210.MP3.
- There is a small portion of overlap that occurs at the point where the two files are divided.
The file overlap time and the recording time required for file division are shown in the table below.
| Recording mode Duplicated time Recording time of file | |||
| MP3 | LP(32kbps) Approx. 8 seconds | Approx. 16 seconds or more | |
| HQLP(64kbps) Approx. 4 seconds Approx. | 8 seconds or more | ||
| HQ(192kbps) Approx. 1 second Approx. 2 | seconds or more | ||
Note
- When a file is divided, the division point may be displaced a little in either direction from the designated position.
-
A file cannot be divided in the following cases.
-
Insufficient available space in the SD card.
- The number of files has reached the upper limit.
- Division at the beginning of the file is attempted.
- File in the "MUSIC" folder.
- The SD card is locked.
GB-31
Menu
Method of operation (example of sound quality setting)
On the menu screen, the settings of this unit can be changed and various functions of the unit can be used.
1 Turn on the unit and press the [MENU] button in the stop state.
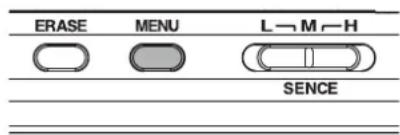
2 Press the [←fast-reverse)] or [ (f→+forward)] button to select the desired menu item.
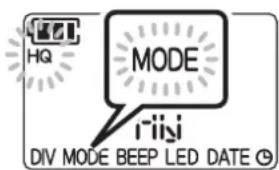
3 Press the [ ] or [ ] button to select the desired setting item.
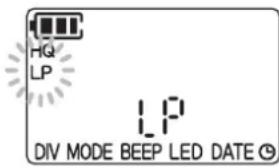
4 Press the [play)] button.
Setting is now complete.
GB-32

natural_image
Color palette bar with grayscale swatches and a central circle, no text or symbols presentList of menus
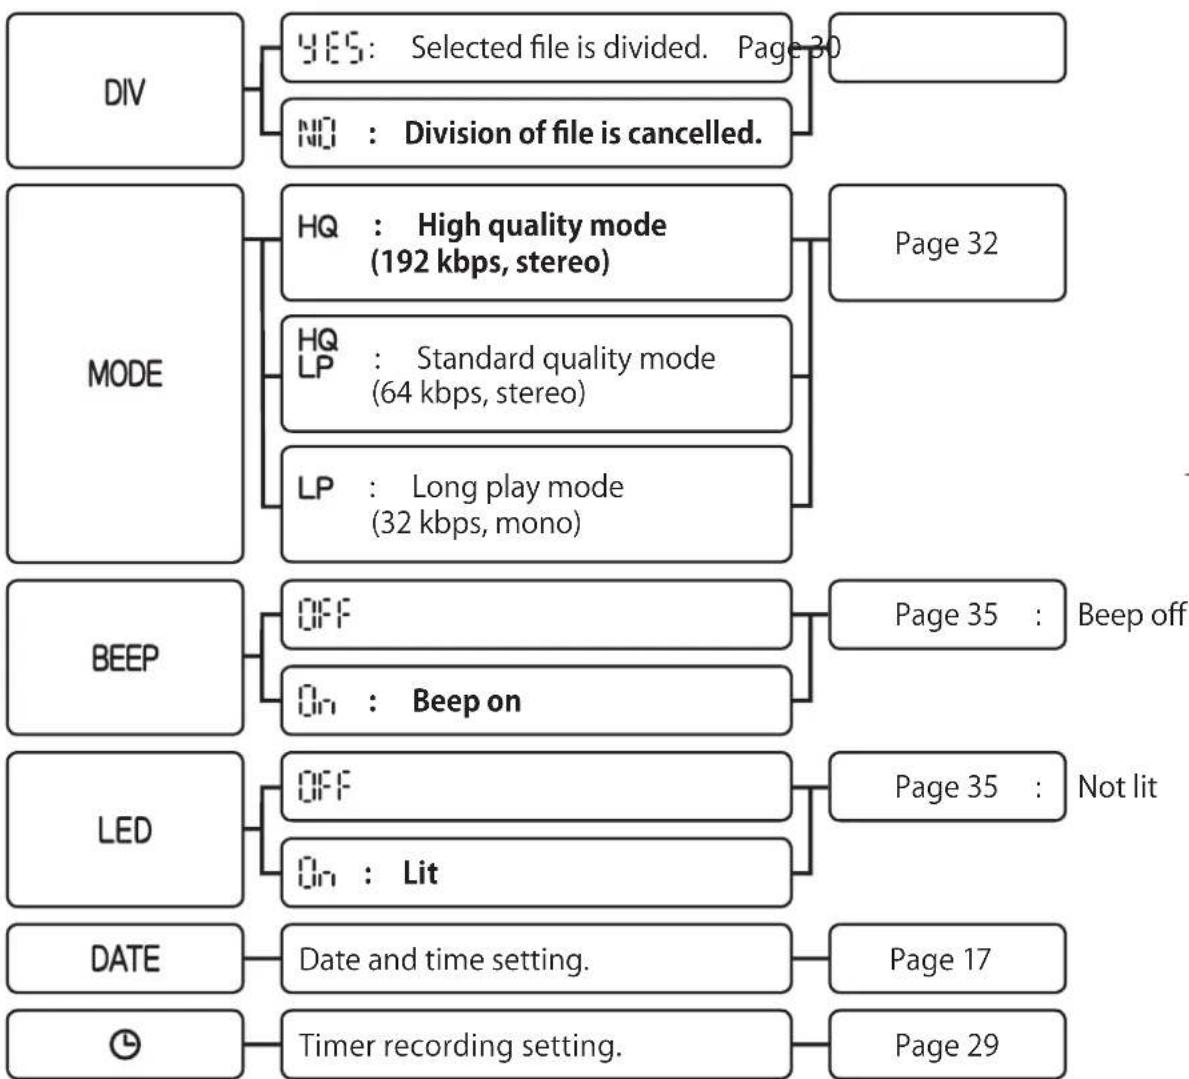
Main menu
Press the [M]kutton in the stop state.
*Settings indicated with boldface characters are factory default settings.
Menu item Setting Page for reference
flowchart
graph TD
    A["DIV"] --> B{YES: Selected file is divided. Page 30}
    A --> C{NO: Division of file is cancelled.}
    B --> D["Page 30"]
    C --> E["Page 30"]
    F["MODE"] --> G["HQ: High quality mode (192 kbps, stereo)"]
    F --> H["HQ LP: Standard quality mode (64 kbps, stereo)"]
    F --> I["LP: Long play mode (32 kbps, mono)"]
    G --> J["Page 32"]
    H --> K["Page 32"]
    L["BEEP"] --> M["OFF"]
    L --> N["On: Beep on"]
    M --> O["Page 35: Beep off"]
    N --> P["Page 35: Not lit"]
    Q["LED"] --> R["OFF"]
    Q --> S["On: Lit"]
    R --> T["Page 35: Not lit"]
    U["DATE"] --> V["Date and time setting."]
    W["Timer recording setting."]
    X["Page 17"] --> Y["Page 17"]
    Z["Page 29"] --> AA["Page 29"]
Note "DIV(Division)" can be operated only in the MIC folder or the LINE folder.
GB-33

natural_image
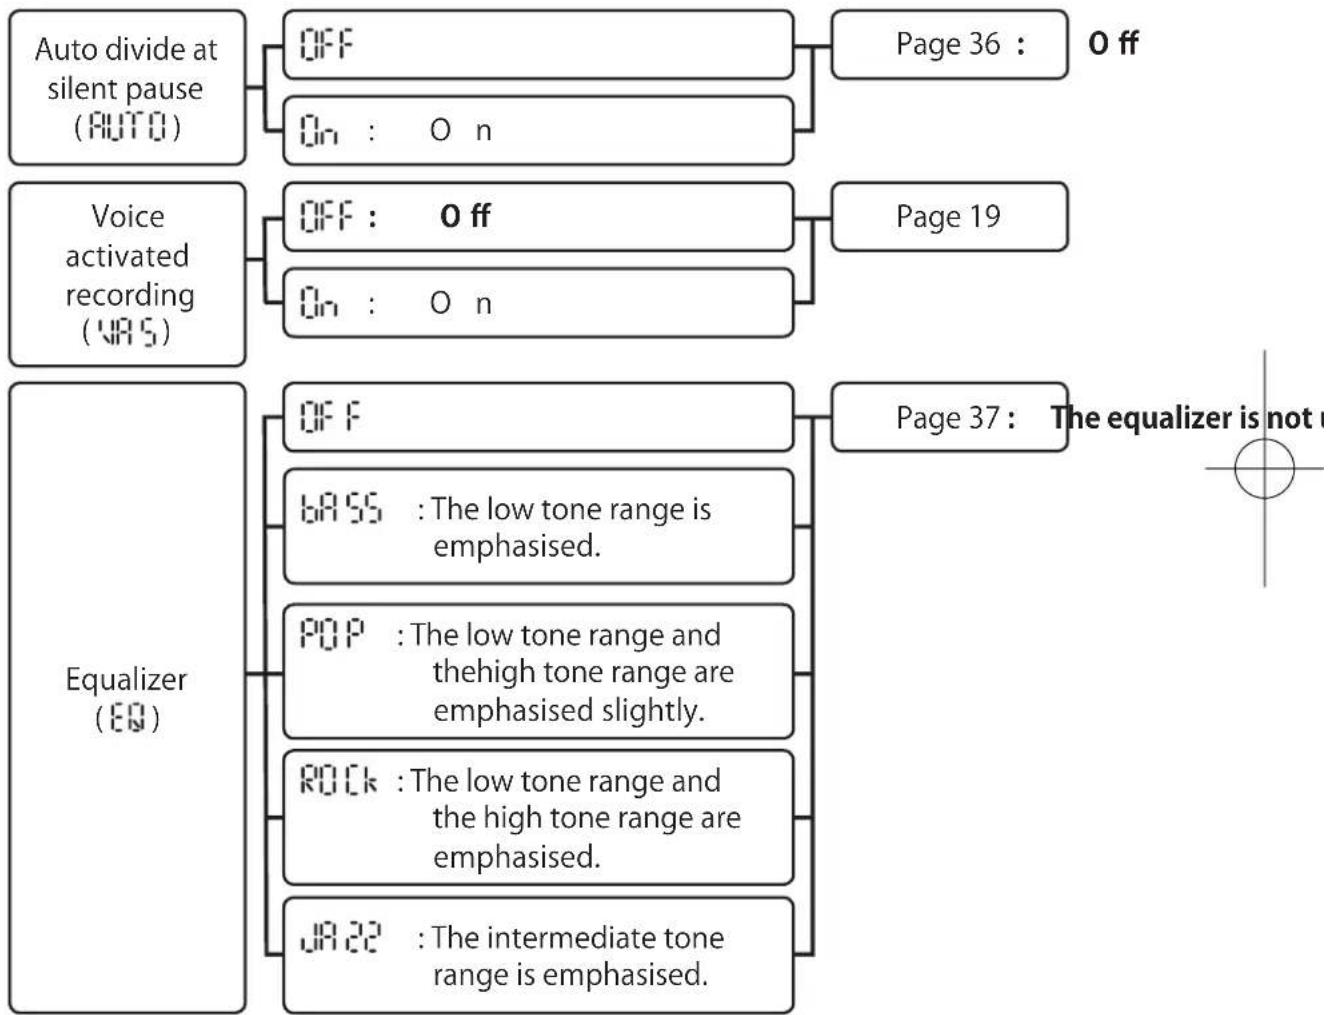
Color palette bar with grayscale and RGB swatches, no text or symbols presentSub menu
Press and hold down the [ MENuton for two seconds or more in the stop state.
*Settings indicated with boldface characters are factory default settings.
Menu item Setting Page for reference
flowchart
graph TD
    A["Auto divide at silent pause (AUTO)"] --> B["OFF"]
    A --> C["On : On"]
    B --> D["Page 36 : Off"]
    C --> E["OFF : Off"]
    C --> F["On : On"]
    G["Voice activated recording (VAS)"] --> H["OFF : Off"]
    G --> I["On : On"]
    H --> J["Page 19"]
    I --> K["OFF : Off"]
    I --> L["On : On"]
    M["Equalizer (EQ)"] --> N["OFF"]
    M --> O["bASS : The low tone range is emphasised."]
    M --> P["POP : The low tone range and thehigh tone range are emphasised slightly."]
    M --> Q["ROCK : The low tone range and the high tone range are emphasised."]
    M --> R["jA22 : The intermediate tone range is emphasised."]
    S["Page 37 : The equalizer is not i"] --> T["End"]
Note The equalizer can be set even during playback.
Other functions
Beep sound
Whether or not a beep is emitted during operation of the unit can be set.
1 Turn on this unit and press the [MENUTON in the stop state.
2 Press the [←(fast-reverse)] or [ (fast-forward)] button to select "BEEP".
3 Press the [ + ] or [ - ] button to select " On " or " OFF " and press the [ OK (play)] button.
On :A beep is emitted during operation.
OFF :A beep is not emitted during operation.
Setting is now complete.
Lighting of recording LED indicator light
Whether or not to light the recording LED indicator light during recording can be set.
1 Turn on this unit and press the [MENUTON in the stop state.
2 Press the [←(fast-reverse)] or [ (fast-forward)] button to select "LED".
3 Press the [ +or [ ] button to select " " or [ " and press] the [ ▶ (play)] button.
On :The recording LED indicator lights up during recording.
OFF :The recording LED indicator does not light up during recording.
Setting is now complete.
GB-35
Automatically dividing a file at a silent pause (line input only)
When a recording is made with external equipment connected, if there is a silent pause for two seconds or more in playback sound at the source, recording stops automatically. When any sound is produced, recording restarts as another file.
1 Turn on this unit and press and hold down the [ mention for two seconds or more in the stop state.
2 When "his displayed, press the [ ] or [ ] button to select "in" and press the [play)] button.
"DIVis displayed at the lower left of screen.
Note
When the MUSIC folder has been selected, " & displayed. In this case, press the [ ◀◀ (fast-reverse)] or [ ▶▶(fast-forward)] button and then conduct the operation above.
Setting is now complete.
3 Start recording from an external source. (See Page 20)
During temporary stop due to a silent pause, "DIVblinks.
Note
- If a silent pause continues more than 15 seconds, recording stops automatically. This setting remains even if the power is turned off.

natural_image
Color palette bar with grayscale swatches and a central circle, no text or symbols presentSetting the equalizer
Adjust the volume of high tone/ intermediate tone/ low tone to a preferred level according to the type of music.
1 Turn on the unit and press and hold down the [MENUP on for two seconds or more in the stop state.
2 When " [ ] is displayed, press the [ ] or [ + button to select the desired category of music and press the [ ▶ (play)] button.
OFF :The equalizer is not used.
bA 55: The low tone range is emphasised.
POP :The low tone range and the high tone range are emphasised slightly.
ROCK :The low tone range and the high tone range are emphasised.
JA 22: The intermediate tone range is emphasised.
Note If the MIC folder or the "Lider has been selected," " is AUTO displayed. In this case, press the [◀(fast-reverse)] or [▶(fast-forward)] button and then conduct the operation above.
Setting is now complete.
3 Play a file. (See Page 22)
Note This setting remains even if the power is turned off.
Checking the file information
Press the [ STOP] button in the stop state to check the file information such as date, current time, recording date and time, and remaining recordable time. The information displayed depends on the selected folder.
GB-37
Connecting to a PC (ICR-FP700D only)
What you can do by using a PC
By connecting this unit to a PC, you can transfer files between this unit and the PC.
- Files in this unit can be copied to a PC.
Recorded files on this unit can be copied to a PC and played on the PC. (See Page 46) - Voice files can then be copied to a CD-R/RW.
If your PC is equipped with a CD-R/RW drive, recorded files from this unit can be copied to a CD-R/RW disk (CD in which data can be recorded). (See Page 48) - This unit can be used as a music player.
By copying MP3 files created on your PC from CD or the like, you can listen to music on this unit. - Data in your PC can be copied to this unit.
This unit can be used as a relay point, namely as PC data temporary storage, for transferring data to another PC.
Computer system requirements
This unit can be connected to a PC that satisfies the following requirements.
| Supported PCs Windows preinstalled PC | |
| Supported OS | Windows VistaWindows XPWindows 2000 Professional (After SP3) |
| USB port One required for connection | |
| Other | Speakers or headphones requiredSound playback function required |
* The system environment as of January 2009 is listed above.
Use any of the following Windows Media Player versions compatible with your OS.
| Windows Media Player11 Windows Vista/Windows XP |
| Windows Media Player10 Windows XP |
| Windows Media Player9 Windows 2000 Professional (SP3 or later) |
* For Windows Media Player versions other than those listed above, operation is not guaranteed.
* Obtain the latest Windows Media Player through the URL shown below. http://www.microsoft.com/windows/windowsmedia/

natural_image
Color palette bar with grayscale and RGB swatches, no text or symbols presentNotes
- Operation is not guaranteed for Macintosh PCs.
- Operation is not guaranteed for the following environments.
Upgraded Windows environments Windows 95, Windows NT, Windows 98, Windows 98 SE, Windows Me Dual-boot Windows environments - Standby, suspend, and other modes may not work properly with your particular environment. If this is the case, do not use those modes.
- This is not guaranteed to operate with all PCs in the recommended setup.
- When using Windows Vista, Windows XP or Windows 2000, log in as an administrator.
- "Dynamic Disc" introduced in Windows 2000 is not supported.
- Depending on the versions of your PC and its OS, the PC screens may be different from the screens shown in this document. (The screens used in this document are those of Windows XP/Windows Media Player 11.)
GB-40
How to connect to / disconnect from your PC
Notes on connection
- If a recorded file from this unit is copied to a PC and the file name is changed, the file cannot be played after it is restored to the original folder (storage location) of this unit. Assign a name according to the following "File name rules" or move the file to the "MUSIC" folder and then play the file.
File name rules
- "MIC" folder : Three-digit number (001 - 199) + M + _ + Date + _ + Time (hour, minute) + . + Extension
(Example: 001M_090101_0935.mp3)
- "LINE" folder : Three-digit number + L + _ + Date + _ + Time (hour, minute) + . + Extension
(Example: 001L_090101_0935.mp3)
* The first three-digit number is automatically changed so that serial numbers are given to files in a folder.
- Format SD cards in this unit. If a card is formatted in a PC, recording may not be function correctly.
For formatting a card in this unit, refer to page 28, "Erasing" and execute "ALL ERASE".
- If a bus power type USB hub or a USB cable other than the supplied cable is used, operation is not guaranteed. Be sure to use the supplied dedicated USB cable to connect the unit to a PC.
- Even if no battery is inserted in this unit, data can be transferred between this unit and a PC.
Connecting this unit to your PC
1 Open the USB terminal cover of this unit.
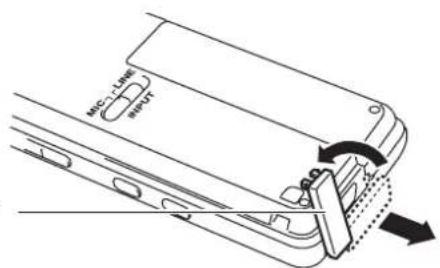
USB terminal cover
2 Use the supplied dedicated USB cable to connect this unit to your PC.
When this unit is connected to your PC, "PC" is displayed on the screen of this unit.
USB terminal of PC
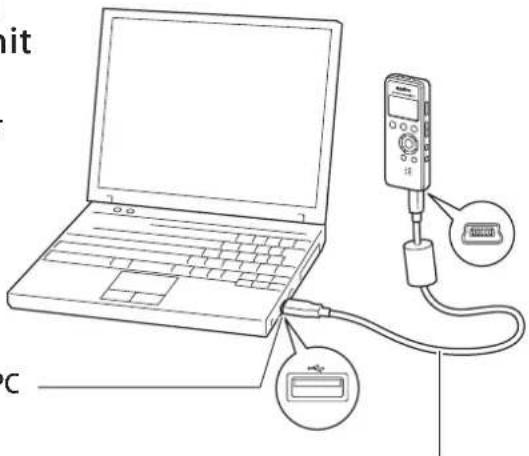
USB connection cable (supplied, ICR-FP700D)
3 When the following screen is displayed, click "Open folder to view file" to select and click the [OK] button,
The folders in this unit are displayed.
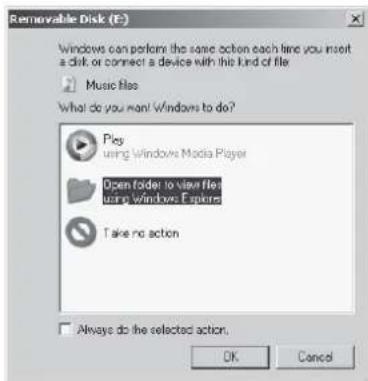
GB-42

natural_image
Color palette bar with grayscale swatches and a central circle, no text or symbols presentDisplaying folders in this unit
1 Connect this unit to your PC. (See Page 42, "Connecting this unit to your PC")
2 Click [Start] and then [My Computer]. Alternatively double-click the [My Computer] icon on the Desktop.
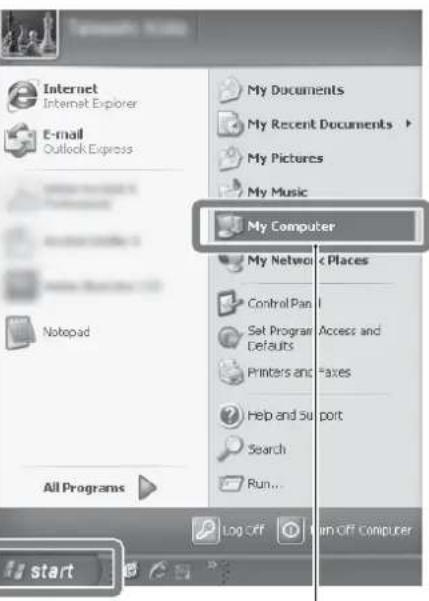
1) Click.
2) Click.
GB-43

natural_image
Color palette bar with grayscale and RGB swatches, no text or symbols present3 Double-click the [Removable Disk] icon. The folders in this unit are displayed.
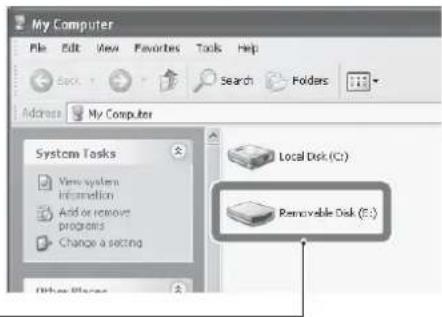
Double-click.
Note If the "Removable Disk" icon is not displayed, refer to page 49, "If this unit is not recognized by a PC."
Folder names in this unit
For folder names, the display on this unit is different from the display on a PC.
| Displayed folder name | ||||
| Display on this unit | MIC | LINE | MUSIC | -(*) |
| Display on PC MIC LINE MUSIC DATA | ||||
* Although data from a PC can be put in the "DATA" folder, this folder cannot be seen on this unit.
GB-44

natural_image
Color palette bar with grayscale and magenta squares above a central circle, no text or symbols presentDisconnecting this unit from your PC
Note Before disconnecting, make sure no data is being transferred.
1 Click displayed in the task tray (normally at the lower right) of PC screen.

2 When message "Safely remove USB Mass Storage Device" is displayed, click it.

3 When the following message is displayed, remove the USB connection cable (supplied) from the PC and this unit.
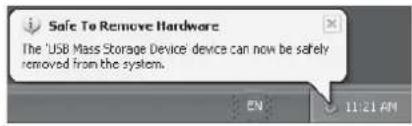
GB-45
Copying a file from this unit to your PC
1 Connect the unit to your PC and open the removable disk. (See Pages 42, 43, 44)
2 Double-click the folder in which the desired file to copy is stored.
An example of copying a file from the [MIC] folder is used here for explanation. Double click
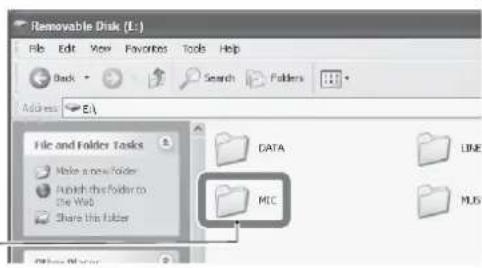
Double-click.
3 Right-click the desired file to copy and click [Copy] in the displayed menu.
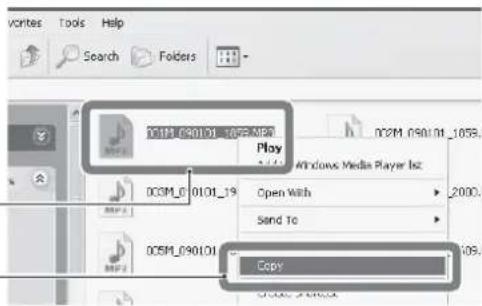
1) Right-click.
2) Click.
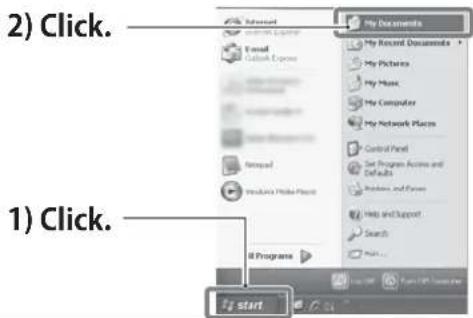
4 Open the folder in which you wish to store the file.
An example of copying a file into the [My Documents] folder in the PC is used here for explanation.
5 In the folder window, click [Edit] and then [Paste].
1) Click.
2) Click.
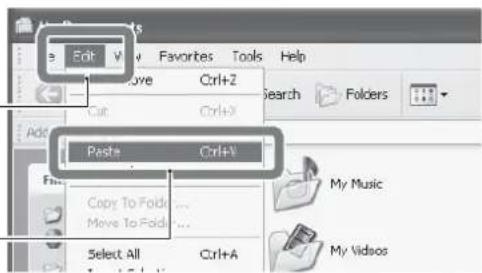
Note: While copying a file, never remove the USB connection cable from this unit or the PC.
6 Disconnect this unit from the PC. (See Page 45)
GB-46
Copying files to CD-R/RW
Copy files that have been copied from this unit to a PC and then on to CD-R/RW using Windows Media Player.
Note
While copying files to CD-R/RW, do not conduct other operations on the PC. Doing so may cause extraneous noise.
1 Copy the desired files to your PC. (See Page 46)
2 Click [Start], [All Programs], and then [Windows Media Player]. Windows Media Player starts.
3 Click [Burn].
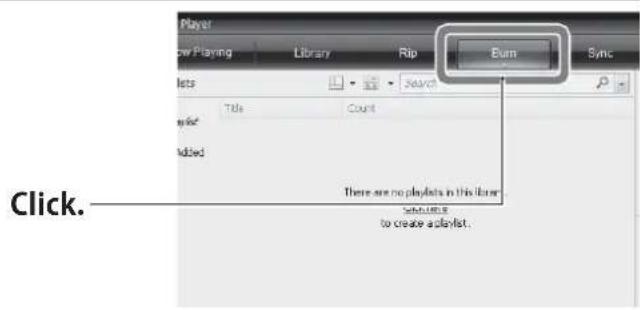
4 Right-click [Burn] and click the type of CD to create.
2) Click one of them.
1) Right-click.
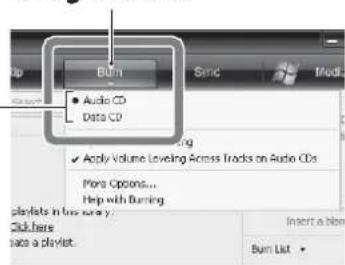
5 Insert CD-RW or unused CD-R into the CD-R/RW drive of the PC.
Information of CD in PC
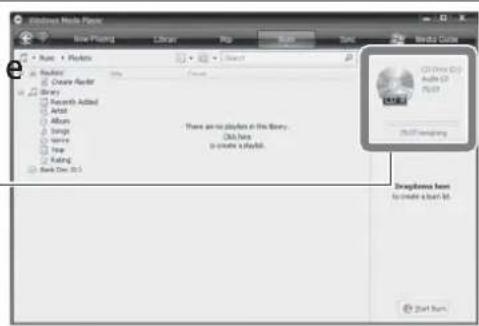
GB-47

natural_image
Color palette bar with grayscale swatches and a central crosshair (no text or symbols)6 Open the folder in which the files you wish to copy are stored.
An example of files stored in the [My Documents] folder of PC is used here.
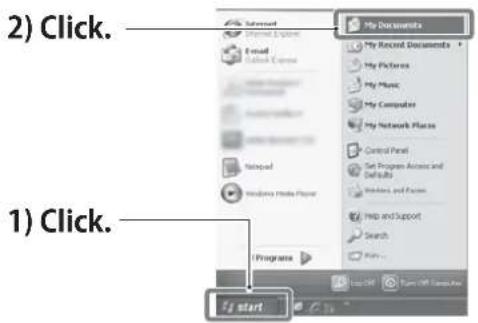
7 Drag and drop the desired files to copy into the [Burn list] of Windows Media Player.
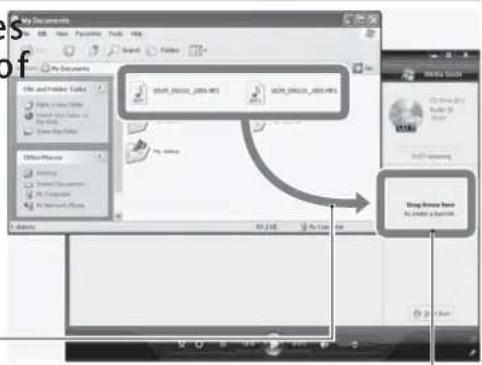
Drag and drop the files.
Burn list
8 Click the [Start Burn] button.
Click.
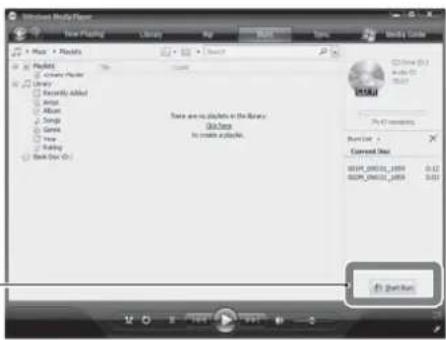
When "Complete" is displayed, copying to CD-R/RW is complete.
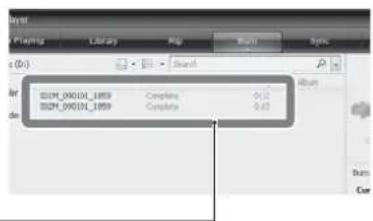
Display of "Complete"
GB-48
Troubleshooting Guide
If this unit is not recognized by a PC: (ICR-FP700D only)
Follow the procedure below to check for problems.
- Check whether or not the supplied USB connection cable is used for connection.
- Close all applications.
- Remove all USB devices leaving only the regular mouse and keyboard. In this state, connect this unit to the PC.
- If the PC is equipped with multiple USB terminals, connect this unit to each terminal sequentially.
- If this unit is connected to a bus power type USB hub (peripheral for distributing USB terminals), remove the USB hub from the PC and connect this unit directly to a USB terminal of the PC.
Troubleshooting
Buttons do not respond.
| Possible cause The | hold function is set. |
| Corrective action | Turn off the hold function.(See Page 14) |
| Possible cause The | unit is still coconnected to the PC. (ICR-FP700D only) |
| Corrective action Disconnect the unit from the PC. (See Page 45) | |
" is displayed.
| Possible cause The | SD card is locked. |
| Corrective action Unlock the SD card. (See Page 16) | |
" - " is displayed on the screen and playback cannot be conducted.
| Possible cause | The file format is not compatible for playback on this unit or the file is damaged. |
| Corrective action | Use a compatible file in the mp3 format. |
GB-49
A file in the "MOR" "foldone" cannot be played.
| Possible cause The | file name is wrong. |
| Corrective action | If the name of a recorded file from this unit is changed on a PC, the file cannot be played after it is restored to the MIC or LINE folder, but can be played if it is transferred into the MUSIC folder. (See Page 9) |
A file in the "Mifolder cannot be played at all or cannot be played correctly.
| Possible cause The file format is not MP3. | |
| Corrective action Use an MP3 format file that can be played normally. | |
| Possible cause A copy-protected file cannot be played. | |
| Corrective action Use an MP3 format file that is not copy-protected. |
A file cannot be divided.
| Possible cause | Available memory space is insufficient or the unit has reached a maximum number of files. |
| Corrective action | Erase unnecessary files. (See Page 27) |
| Possible cause You | tried to divide a file at the beginning. |
| Corrective action | Play the file until the desired position for division is reached. |
"Nis displayed.
| Possible cause The | SD card is not inserted correctly. |
| Corrective action | Turn off the Power/Hold switch of this unit and insert the SD card again. |
The recorded sound skips
| Possible cause | The SD card was formatted not on this unit, but on a computer or other device. |
| Corrective action | Format the SD card in this unit. (See Page 27) |
GB-50
Frequently asked questions (Q & A)
Q: Can a manganese battery or a rechargeable battery be used?
A: Manganese battery and nickel-cadmium battery cannot be used. It is recommended to use an alkaline battery. Although our rechargeable battery "eneloop" can be used, its duration is approximately 70% in comparison with an alkaline battery. Also since the voltage is different, the battery indicator of this unit may not be accurate. Alternately, an Oxyride battery can be used. Its duration is almost the same as an alkaline battery.
Q: Why is noise included in playback sound?
A: If you move the hand or fingers that hold this unit during recording, that sound will also be recorded. Do not move the unit if at all possible during recording. For recording with this unit placed in a breast pocket, it is recommended to use a tie-pin type stereo microphone (sold separately).
Q: Does "recordable time" mean "recordable time for each file"?
A: No. The recordable time is the total recording time remaining until the SD card capacity becomes full, for that recording mode. If a file is recorded until the time is exhausted, no further recording will be possible, even if file or folder is changed.
Q: How can a recording be stored on tape, MD or the like?
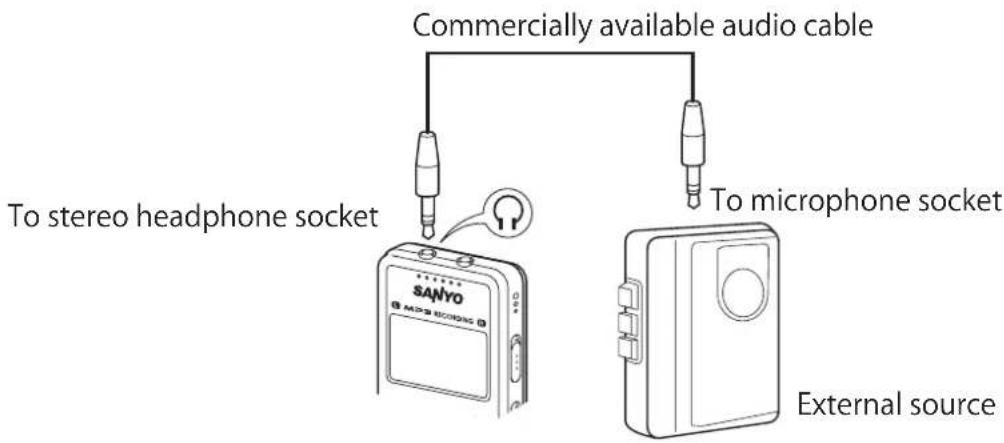
A: By using a commercially available audio cable (mini plug: 3.5 ¢, you can easily dub a recorded file from this unit to external equipment such as a tape recorder or MD recorder to store it.
GB-51

natural_image
Color palette bar with grayscale and RGB swatches, no text or symbols presentCleaning the cabinet
Clean the outside of the unit with a clean soft cloth. If the dirt is heavy, wipe it off with a dry cloth.
Note: Do not use benzene, thinner or alcohol because they will deteriorate or discolour the unit.
Temperature rise
If this unit is used for a long time, the temperature of the main unit may rise but this is not a failure.
GB-52

Data
Specifications
Note The following specifications (recording time, battery duration, etc.) show values obtained with an SD memory card manufactured by Toshiba. The recording time, playback time, and battery duration depend on the type and manufacturer of battery and SD memory card. The time values below are for reference and are not guaranteed.
Applicable media : SD memory card, SDHC memory card
Depending on the manufacturer and the type, the SD
memory card may not function correctly in this unit.
Recording mode and recordable time
| Capacity of SD/SDHC memory card | |||||
| Recording mode | 512MB 1GB | 2GB 4GB | 8GB | ||
| HQ stereo mode | Approx. 5h 30m | Approx. 11h | Approx. 22h 30m | Approx. 45h | Approx. 90h |
| HQLP stereo mode | Approx. 17h | Approx. 33h | Approx. 68h | Approx. 136h | Approx. 272h |
| LP monaural mode | Approx. 34h | Approx. 66h | Approx. 136h | Approx. 272h | Approx. 544h |
* The recording time may be shorter depending on the manufacture and the specifications of SD memory card.
Frequency response : 60 - 20,000 Hz (HQ stereo mode, 192 kbps)
60 - 7,500 Hz (HQLP stereo mode, 64 kbps)
60 - 6,500 Hz (LP monaural mode, 32 kbps)
Recording format : MP3
Playback format : MP3(MPEG1 LAYER3, MPEG2 LAYER3)
Frequency response : 40 - 20,000 Hz ( playback)
Sampling frequency : 16 - 44.1 kHz
Bit rate : 16 - 320 kbps
* Playback may not be conducted normally depending on the file.
-Continuous recording time
HQ stereo mode : Approximately 19 hours (alkaline battery)
HQLP stereo mode : Approximately 29 hours (alkaline battery)
LP monaural mode : Approximately 33 hours (alkaline battery)
* Recording environment: Recording LED: OFF; Recording monitor: No
- Continuous playback time (playback to headphones)
HQ stereo mode : Approximately 18 hours (alkaline battery)
HQLP stereo mode : Approximately 27 hours (alkaline battery)
LP monaural mode : Approximately 29 hours (alkaline battery)
- Continuous playback time (playback to speakers)
HQ stereo mode : Approximately 12 hours (alkaline battery)
HQLP stereo mode : Approximately 16 hours (alkaline battery)
LP monaural mode : Approximately 17 hours (alkaline battery)
* The continuous recording time and playback time vary with the type and the manufacturer of the battery, storage condition, operating conditions, operating temperature of the surrounding area, SD card, etc. The values above are for reference and are not guaranteed.
* For batteries other than alkaline batteries, operation is not guaranteed.
Dimensions (W x H x D) : Approx. 36.6 x 96 x 13.3 mm
Weight : ICR-FP600D : Approx. 49g (including battery) ICR-FP700D : Approx. 50g (including battery)
Accessories : [ICR-FP700D]
USB connection cable 1
AAA alkaline battery 1
Instruction Manual (this book) 1
[ICR-FP600D]
Instruction Manual (this book) 1
* Specifications are subject to change without notice.
GB-54



- SANYO
- INSTRUCTION MANUAL
- ICR-FP600D
- ICR-FP700D
- ENGLISH
- FOR EU USERS
- Note:
- FOR CANADIAN USERS
- SANYO FISHER Sales (Europe) GmbH
- SANYO Electric Co., Ltd.
- CAUTION
- Precautions
- Contents
- Introduction 5
- Preparation 11
- Recording 18
- Playback 22
- Erasing 27
- Recording at Designated Time (Timer) 29
- Dividing Recorded File 30
- Menu 32
- Connecting to a PC (ICR-FP700D only) 38
- Troubleshooting Guide 49
- Data 53
- Introduction
- Accessories
- Controls
- Main unit
- LCD display
- File and folder
- Folders for recording
- Recording file names
- Folder for music
- (indicates a folder, and indicates a file.)
- Sort function in the "MUSIC" folder
- Preparation
- Inserting a battery
- Note
- Turning the power on and off
- Turning the power on
- Turning the power off
- Battery indicator
- Auto power off function
- Resume function
- Preventing mishandling (Hold function)
- Inserting and removing the SD card
- Notes on handling the SD card
- Setting the date and time
- Recording
- Recording with microphone
- Using an external microphone
- VAS (Voice activated system)
- Setting the voice sensing level (VAS value)
- Procedure:
- Recording from external sources
- Playback
- Playing a file
- Operations available during playback
- Volume adjustment
- Fast forward
- Fast reverse
- Skipping to next file
- File return
- Changing the playback speed
- 5-second back playback
- Repeat playback
- Repeat between two points in current playback file (A-B repeat)
- Playback from designated position (Time search)
- Press the [Menton during playback.
- Set the designated time.
- Press the [play)] button.
- Folder skip (only if "MUSolder is selected)
- Erasing
- Press the [ (fast-reverse)] or [ (fast-forward)] button to select the method of erasing and press the [ ▶ (play)] button.
- Press the [ (last-reverse)] or [ (fast-forward) ] button to select " YES " and press the [ ▶ (play)] button.
- Recording at Designated Time (Timer)
- Dividing Recorded File
- File division and file naming after division
- Menu
- Method of operation (example of sound quality setting)
- List of menus
- Main menu
- Sub menu
- Other functions
- Beep sound
- Lighting of recording LED indicator light
- Automatically dividing a file at a silent pause (line input only)
- Setting the equalizer
- Checking the file information
- Connecting to a PC (ICR-FP700D only)
- What you can do by using a PC
- Computer system requirements
- Notes
- How to connect to / disconnect from your PC
- Notes on connection
- Connecting this unit to your PC
- Displaying folders in this unit
- Folder names in this unit
- Disconnecting this unit from your PC
- Copying a file from this unit to your PC
- Copying files to CD-R/RW
- Troubleshooting Guide
- If this unit is not recognized by a PC: (ICR-FP700D only)
- Troubleshooting
- " is displayed.
- " - " is displayed on the screen and playback cannot be conducted.
- Frequently asked questions (Q & A)
- Q: Can a manganese battery or a rechargeable battery be used?
- Q: Why is noise included in playback sound?
- Q: Does "recordable time" mean "recordable time for each file"?
- Q: How can a recording be stored on tape, MD or the like?
- Cleaning the cabinet
- Temperature rise
- Data
- Specifications
Brand : SANYO
Model : ICR-FP600D
Category : Dictaphone