
ICR-B150 - Dictaphone SANYO - Free user manual and instructions
Find the device manual for free ICR-B150 SANYO in PDF.


| Product Type | Digital Voice Recorder |
| Model | ICR-B150 |
| Brand | Sanyo |
| Dimensions | Approximately 115 x 35 x 18 mm |
| Weight | Approximately 45 g including battery |
| Power Supply | 1 x AAA battery or USB power via included cable |
| Battery Life | Up to 20 hours recording on 1 AAA |
| Recording Format | MP3 / WAV (depending on mode) |
| Memory Capacity | Built-in 4 GB (expandable via microSD up to 32 GB) |
| Recording Modes | Dictation, Meeting, Lecture, and Custom |
| Playback Features | Adjustable speed (0.5x-2.0x), skip-back, skip-forward |
| Microphone | Built-in high-sensitivity stereo microphone |
| Speaker | Built-in 40 mm loudspeaker |
| Headphone Jack | 3.5 mm stereo jack for private listening |
| Connectivity | USB 2.0 (Micro USB) for file transfer and charging |
| Display | LCD display with backlight (date/time, recording status, battery) |
| Main Functions | Record, Playback, Pause, Stop, Fast Forward, Rewind, Delete, Lock |
| Maintenance | Clean with soft, dry cloth. Avoid moisture and direct sunlight. |
| Safety | Do not disassemble. Keep away from children. Use only specified batteries. |
| Spare Parts & Repair | Contact Sanyo authorized service center for battery replacement or repairs. |
| General Information | Supports multiple languages menu. Firmware upgradeable via Sanyo website. |
Frequently Asked Questions - ICR-B150 SANYO
User questions about ICR-B150 SANYO
0 question about this device. Answer the ones you know or ask your own.
Ask a new question about this device
Download the instructions for your Dictaphone in PDF format for free! Find your manual ICR-B150 - SANYO and take your electronic device back in hand. On this page are published all the documents necessary for the use of your device. ICR-B150 by SANYO.
USER MANUAL ICR-B150 SANYO
natural_image
Line drawing of a portable electronic device with control panel and buttons (no text or symbols)SANYO'S HELP-LINE
Call the toll-free number below if you have any difficulties operating this product.
1-877-999-1840 (Weekdays 8:00 AM - 5:00 PM, Pacific Time)
LINEA DE CONSULTA SANYO
ICR-B150, Issue Number 1, Printed in Japan
ESPAÑOL
ENGLISH
CONTENTS
Accessories 2
Precautions 2
Controls.... 3
Power Supply 5
MultiMediaCard™ 6
Before Operation....7
Adjusting the Date and Time 8
Selecting the Folder and Menu 9
Recording.... 13
Editing the Recorded Data 15
Playback 16
Selecting Display 18
Erasing 19
Erase Guard.... 24
Voice Alarm Timer 25
Before Installing the Application Software 26
Playing Back/Editing a Data File Recorded with Your PC...... 26
PC Connection 28
How to format the MultiMediaCard in the unit 30
Enrolling/Transcribing a Data File (Using ViaVoice) 31
Cleaning the Cabinet 35
Specifications 35
FCC Information.... 36
Canadian ICES-003 Information 36
Troubleshooting Guide 37
User License Agreement.... 39
Warranty (For USA) 44
Warranty (For Canada) 47
Please read this manual before use.
Keep the manual in a safe place for future reference.
Notes on clock setting
Be sure to set the date and time of the unit's clock before use.
(See “ADJUSTING THE DATE AND TIME” on page 8.)
ACCESSORIES
Audio cable x 1 Case x 1
CD-ROM x 1 MultiMediaCard x 1
USB cable x 1
Foot control for PC
(SANYO Model No. FS-USB1, option)
PRECAUTIONS
- Never remove the MultiMediaCard while operating the unit. This will damage the MultiMediaCard, recorded contents and the unit.
- If the line of rectangles in the battery indicator ( ) disappear during recording, stop the recording immediately and replace the batteries.
- Do not disconnect the AC adaptor or remove the batteries while operating the unit.
- Before erasing, make sure that the battery indicator is full.
- The unit should not be exposed to dripping or splashing.
- Do not insert pins, etc., inside the unit.
- Do not drop the unit or subject it to strong shocks.
- Do not use where there are extreme temperatures (below 5^ C ( 40^ F) or exceeding 35^ C ( 95^ F)).
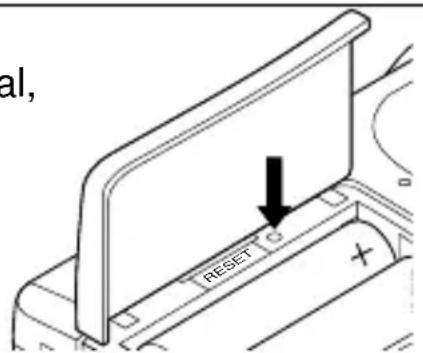
WHAT TO DO IF...
If the operation of the unit or display is not normal,
- Open the battery compartment lid.
- Press the RESET switch using a small ball-point pen, etc.
- Resume operation.
CONTROLS
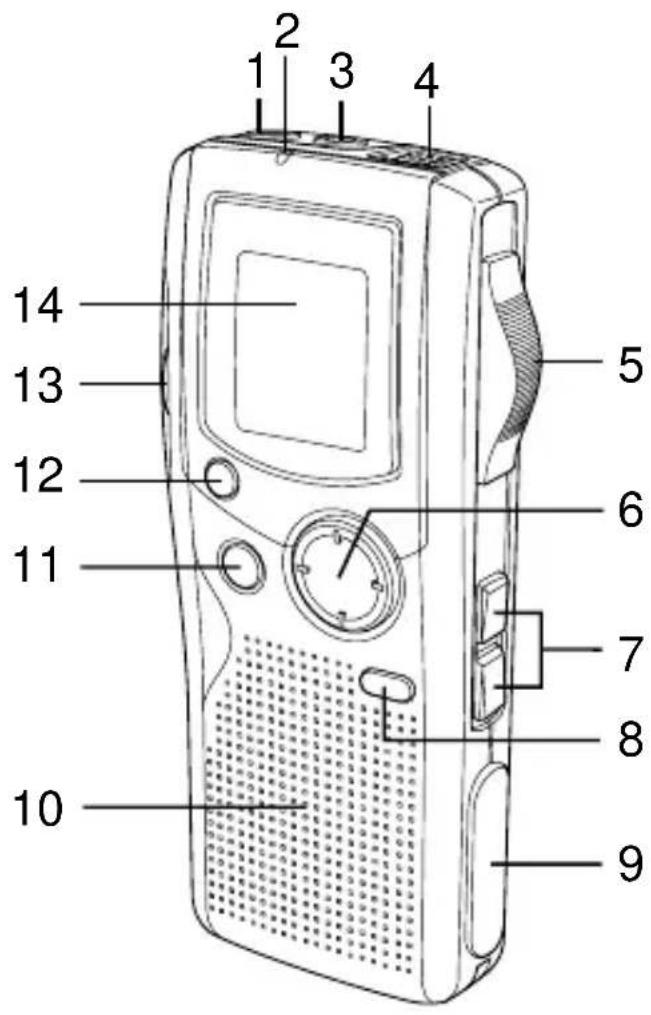
- Earphone jack (EAR)
- Recording indicator
- External microphone jack (MIC)
- Built-in microphone
- Operation switch (DICT, STOP, PLAY, REV)
- Control button (VOLUME, TIME/SET, MENU/FOLDER)
- Fast forward/Rewind buttons (▷▷, ◀◀)
- Create file/Pause button (CREATE FILE)
- Digital I/O terminal (DIGITAL I/O)
- Built-in speaker
- Erasing button (ERASE)
- Index/Cancel button (INDEX/CANCEL)
- MultiMediaCard compartment
- Display
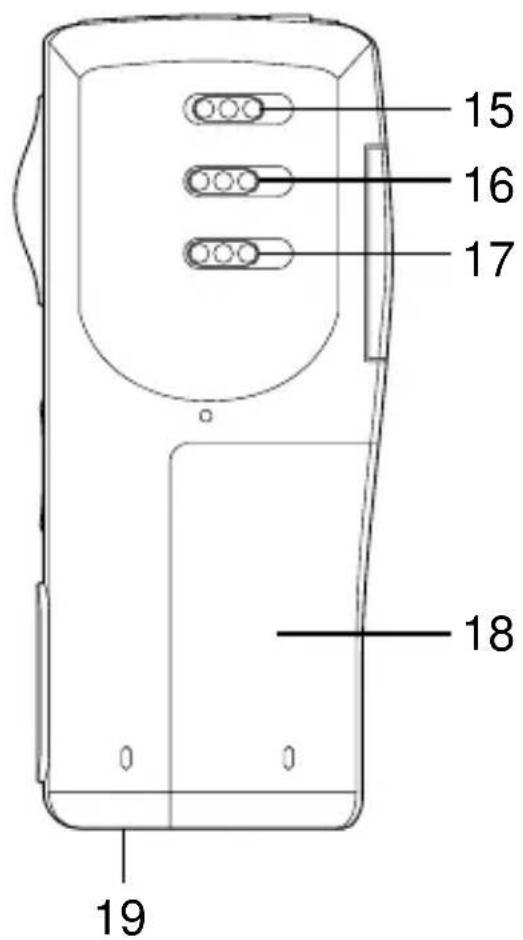
- Power switch (POWER)
- Record mode switch (REC MODE)
- Playback speed control switch (SPEED CONTROL)
- Battery compartment
- External DC jack (EXT DC 3V, bottom of the unit)
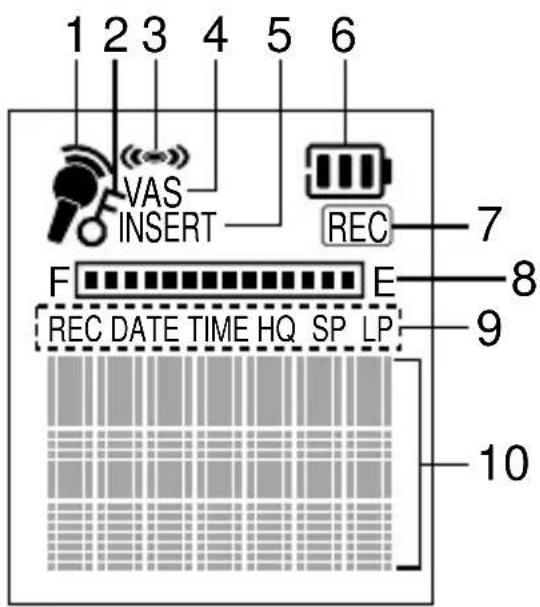
Display
- Record mode indicator
- Erase guard indicator
- Alarm indicator
- Voice activated system indicator
- Insertion recording indicator
- Battery indicator
- Record indicator
- Memory capacity indicator
- Recorded date/time, and recording time mode indicators
- User, folder, recording time, operation guides, etc.
POWER SUPPLY
Battery
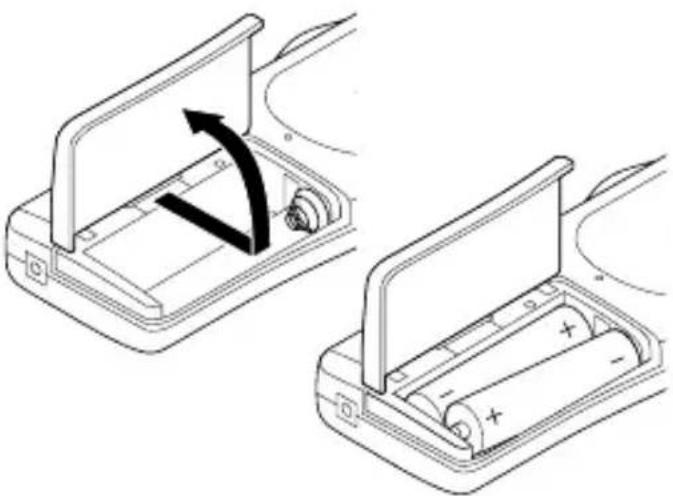
- Open the battery compartment lid.
- Install two "AAA" batteries (not supplied). Observe proper polarity.
natural_image
Diagram showing two battery charging setups with a curved arrow indicating rotation (no text or symbols)Battery indicator ( ☐)
The line of rectangles is the battery gauge. Black rectangles show the battery condition while the unit is operating.
: Full, good condition
☐ ("LOW BATT" appears.): Weak or exhausted batteries, must be replaced.
CAUTION:
Remove the batteries if the unit will not be used for a month or longer.
IMPORTANT NOTE:
SPENT OR DISCHARGED BATTERIES MUST BE RECYCLED OR DISPOSED OF PROPERLY IN COMPLIANCE WITH ALL APPLICABLE LAWS.
FOR DETAILED INFORMATION, CONTACT YOUR LOCAL COUNTY SOLID WASTE AUTHORITY.
AC adaptor
Connect the AC adaptor (SANYO Model No. 3CV-120US, not supplied) to the EXT DC 3V jack. (The batteries are automatically disconnected and the battery indicator does not light.)
- The center pin of the EXT DC 3V jack is positive (+).
MultiMediaCard™
Inserting the MultiMediaCard
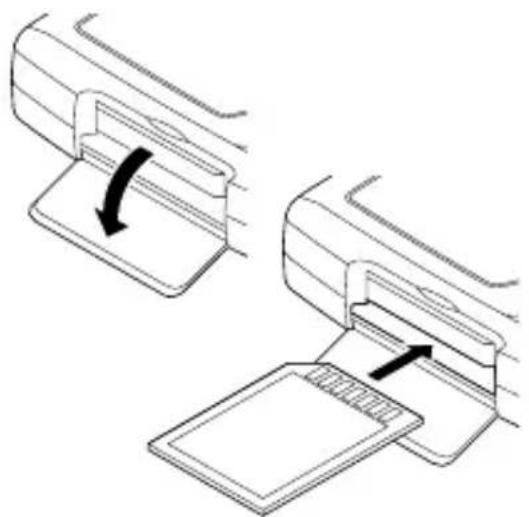
- Open the MultiMediaCard compartment lid.
- Check the edge of the card and insert the card as shown in the illustration.
- Close the lid.
natural_image
Diagram showing two steps of a device being inserted into a tray, with no visible text or symbols.Removing the MultiMediaCard
- Slide the POWER switch (back of the unit) to the OFF position.
- Open the MultiMediaCard compartment lid.
- Push the card slightly into the slot to release.
- Pull it out.
Notes:
- Never remove the card while operating the unit.
- Do not place the card where it is exposed to static electricity or electric noise.
- Recorded data on the card may not work correctly with a different Digital Voice Recorder.
- If the card is not inserted, "NO CARD" appears when the power is turned on.
- When a MultiMediaCard is loaded, the unit automatically creates a VoiceRec folder, etc. Do not erase them.
- Do not use a SD Memory Card.
- Up to 128MB MultiMediaCard can be used.
WARNING!
Keep the MultiMediaCard out of reach of young children who might swallow it. If it is accidentally swallowed, call a doctor immediately.
BEFORE OPERATION
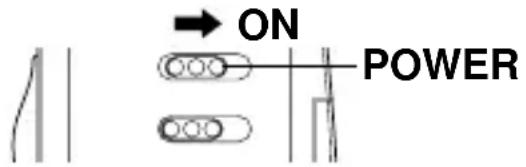
Turning the power on and off
Slide the POWER switch to the ON position to turn on the power.
The unit is now in stand-by mode.
Example:

flowchart
graph TD
    A["Folder name"] --> B["Current file number"]
    B --> C["BU"]
    C --> D["NEW"]
    D --> E["1/1"]
    E --> F["Author name"]
    F --> G["Total file number"]
To turn off the power, slide the POWER switch to the OFF position in the stop mode.
Auto power off function
The power turns off automatically when 5 minutes have elapsed after entering the stop mode.
Hold function
If the control switch or operating button is pressed while the POWER switch is set to the OFF position, "POWER OFF" appears briefly on the display. It prevents accidental playback or recording.
Earphone
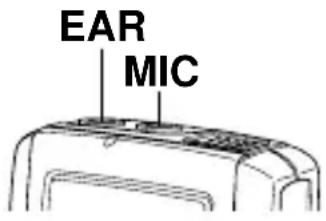
Connect an earphone (8 ohms, cord length less than 2 meters (6 feet 6 inches), not supplied) to the EAR jack. (The speaker is automatically disconnected.)
Note:
Be sure to reduce the volume before connecting or disconnecting the earphone.
External microphone
Connect an external microphone (not supplied) to the MIC jack. (The built-in microphone is automatically disconnected.)
ADJUSTING THE DATE AND TIME
- Press and hold the MENU/FOLDER button down at least 2 seconds in the stop mode. "AUTHOR" appears.
- Press the MENU/FOLDER button repeatedly until the date and time
display appears.
Example:
0:00
2002
JUL.01
INDEX/ CANCEL
MENU/FOLDER
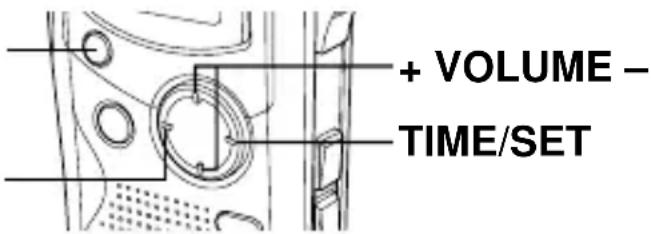
- Press the TIME/SET button. The year display blinks.
- Press the + or - VOLUME button repeatedly to select the year.
- Press the TIME/SET button. The month display blinks.
- Set the month, day, hour and minute by following steps 4 \~ 5 above.
- The time can be set accurately by pressing the TIME/SET button when a time signal is heard.
Example:
10:35
2002
JUL.08
Note: The example is 24-hour display.
- Press the INDEX/CANCEL button to return to the original display.
Changing the clock to the 12-hour (or 24-hour) display
- Press and hold the MENU/FOLDER button down at least 2 seconds in the stop mode.
- Press the MENU/FOLDER button repeatedly until "12/24" appears.
- Press the TIME/SET button. "24 HOUR" (or "12 HOUR") blinks.
- Press the + or - VOLUME button once. "12 HOUR" (or "24 HOUR") blinks.
- Press the TIME/SET button again.
- Press the INDEX/CANCEL button to return to the original display.
SELECTING THE FOLDER AND MENU
Selecting the folder
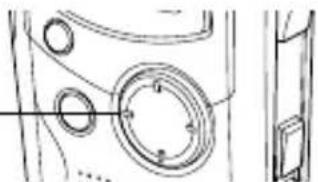
Press the MENU/FOLDER button briefly in the stop mode.
Each time the button is pressed, the display changes as follows:
FOLDER
BUSI (Business)
LECT (Lecture)
OTHERS (Others)
ALARM (Alarm)
MENU/FOLDER
natural_image
Technical line drawing of a mechanical component with circular features and a side view (no text or symbols)Note:
After few seconds, it returns to the stand-by mode on the selected folder display. The abbreviation of the folder name appears (except "ALARM").
Example:
USER-01
BU 1/1
NEW
The abbreviation of the folder name
BUSI → BU
LECT LE
OTHERS → OT
Selecting the menu
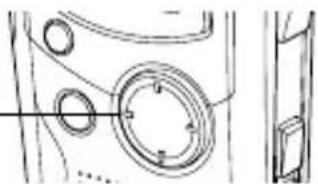
- Press and hold the MENU/FOLDER button down at least 2 seconds in
the stop mode.
Example:
AUTHOR
ID01 ID number
USER-01 Author name
MENU/FOLDER
natural_image
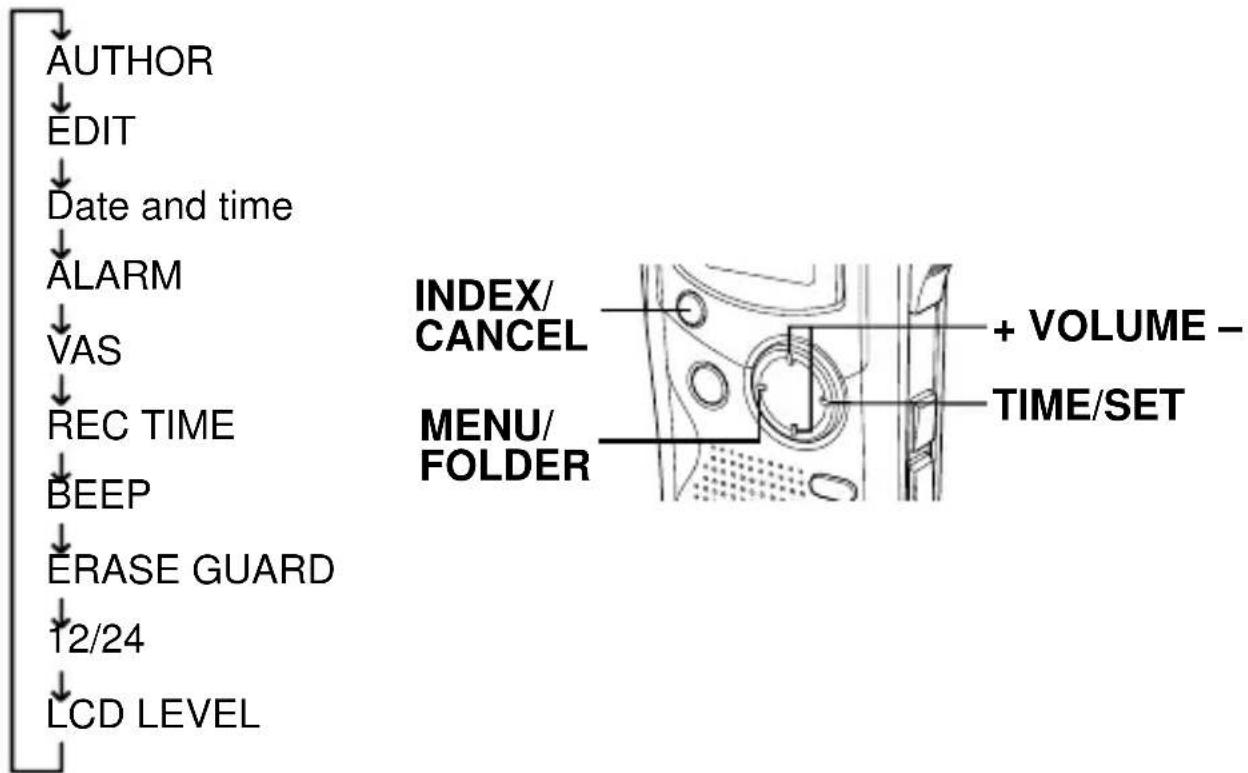
Technical line drawing of a mechanical component with circular features and a side view (no text or symbols)- Press the MENU/FOLDER button repeatedly to select the desired menu. Each time the button is pressed, the display changes as follows:
flowchart
graph TD
    A["AUTHOR"] --> B["EDIT"]
    B --> C["Date and time"]
    C --> D["ALARM"]
    D --> E["VAS"]
    E --> F["REC TIME"]
    F --> G["BEEP"]
    G --> H["ERASE GUARD"]
    H --> I["12/24"]
    I --> J["LCD LEVEL"]

    K["INDEX/CANCEL"] --> L["+ VOLUME - TIME/SET"]
    M["MENU/FOLDER"] --> N["Diagram of device with circular components and labeled parts"]
- To change the setting of a submenu in the selected menu, press the TIME/SET button so that the display blinks.
- Press the + or - VOLUME button to select a new submenu. (See "Various menu modes" on page 11.)
- Press the TIME/SET button to set it.
- Repeat steps 2 \~ 5 to change other settings.
- Press the INDEX/CANCEL button to return to the original display. Example:
USER-01
BU 1/1
NEW
Various menu modes
AUTHOR (Selecting ID number/Author name)
ID01/USER-01 \~ ID99/USER-99
Note:
Author name is automatically created. You may change it by your PC.
For more details, see the instruction manual in CD-ROM.
EDIT (Selecting edit mode)
OVER WRITE: Overwirte recording
INSERT: Insertion recording ("INSERT" appears on the display.)
Date and time (See “ADJUSTING THE DATE AND TIME” on page 8.)
ALARM (Selecting alarm mode)
OFF: No alarm sound
ON: Alarm sound (“<=” appears on the display.)
(After setting "ON", the year display blinks. Use the TIME/SET, + and -
VOLUME buttons to set the alarm ON time. Refer to "ADJUSTING THE
DATE AND TIME" on page 8.)
VAS (Selecting Voice Activated System mode)
OFF: To start and stop recording manually
ON: Recording begins when the microphone picks up sound, and stops automatically after the sound stops. "VAS" appears.
Press the + or – VOLUME button to set the microphone's sensitivity when recording begins. The VAS sensing level appears on the display ("VAS 0" \~ "VAS 10").
REC TIME (Selecting recording time mode)
SP: For standard recording
LP: For long time recording
HQ: For high-quality recording
Approximate Recording Times
Setting or changing recording time can be used for a new file recording. When overwrite or insertion recording starts on the recorded file, it follows the file's recording time.
BEEP (Selecting beep mode)
ON: Every time the operation buttons are pressed, a beep sound will be heard.
OFF: No beep sound
ERASE GUARD (Selecting erase guard mode (See “ERASE GUARD” on page 24.))
OFF: You may erase the data.
ON: You cannot erase the data. ("♂" appears on the display.)
12/24 (See “Changing the clock to the 12-hour (or 24-hour) display” on page 8.)
LCD LEVEL (Selecting the LCD display brightness)
“LEVEL 1” \~ “LEVEL 10” can be selected.
RECORDING
- Slide the REC MODE switch to the desired recording mode.
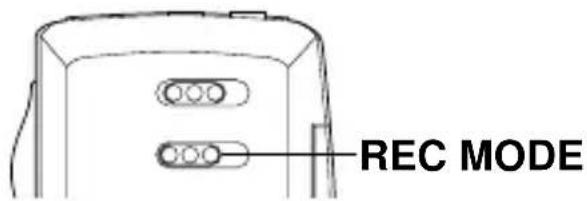
DICT (Dictating):
"REC MODE DICT" appears briefly and " 🔍 " appears on the display.
CONF (Conference):
"REC MODE CONF" appears briefly and " ", appears on the display.
LECT (Lecture):
"REC MODE LECT" appears briefly and " ” appears on the display.
- If necessary, select AUTHOR, VAS, REC TIME, etc. (See "SELECTING THE FOLDER AND MENU" on page 9.)
- Press the MENU/FOLDER button repeatedly to select the desired FOLDER.
- Slide the operation switch to the DICT position to start recording.
• The recording indicator lights.
- “REC” appears on the display.
Example:
USER-01
LE 1/1
0:01
- Slide the operation switch to the STOP position to stop recording at any time.
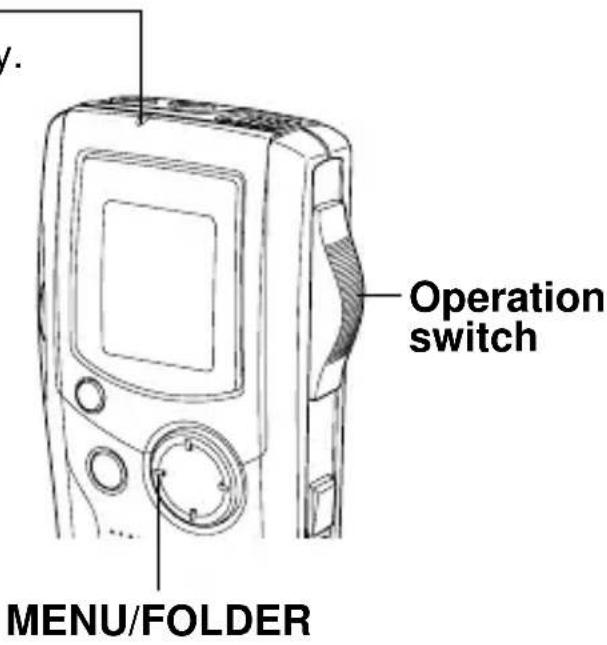
Notes:
- The unit can record up to file number 99 for each folder (except ALARM folder).
- “F ■■■■■■■■■■■■■■■■■■■■■■■■■■■■■■■■■■■■■■■■■■■■■■■■■■■■■■■■■■■■■■■■■■■■■■■■■■■■■■■■■■■■■■■■■
- When the recording time is full, “MEMORY FULL” appears briefly. In this case, erase unnecessary files.
- If the INDEX/CANCEL button is pressed during recording, an index mark is made (“INDEX” appears briefly) and recording continues. (Up to 32 index marks, for each file, can be made. If you try to enter more index marks, “INDEX FULL” appears briefly. Index marks cannot be deleted individually.)
Caution:
Try not to record messages close to high field strength area or devices, e.g. high power cable or mobile phone operation, unexpected noise may be recorded.
Temporarily stopping recording (Recording pause)
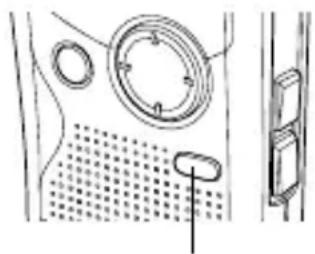
Press the CREATE FILE button during recording. The elapsed recording time and "REC" blink on the display. To resume recording, press the button again.
Creating a new file number
Press the CREATE FILE button in the stop mode. The new file number appears.
Example:
USER-01 USER-01
LE 1/1 LE 2/2
END NEW
natural_image
Technical line drawing of a mechanical component with circular features and a textured surface (no text or symbols)CREATE FILE
EDITING THE RECORDED DATA
Overwrite recording
Note:
Previous recorded material will be erased.
-
Select the "OVER WRITE" edit mode. (See "SELECTING THE FOLDER AND MENU" on page 9.)
-
Play back the file. (See "PLAYBACK" on page 16.)
-
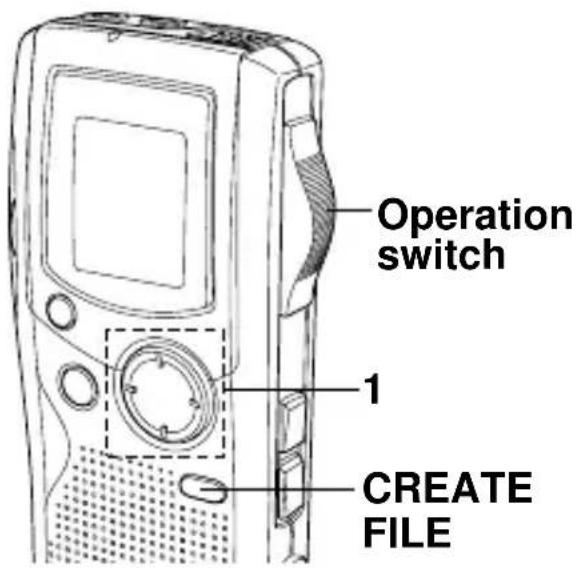
Slide the operation switch to the STOP position (or press the CREATE FILE button to set the pause mode) where you want to start overwriting.
-
Slide the operation switch to the DICT position. Overwrite recording starts.
Insertion recording
Note:
Previous recorded material will remain.
-
Select the "INSERT" edit mode. (See "SELECTING THE FOLDER AND MENU" on page 9.)
-
Play back the file. (See "PLAYBACK" on page 16.)
-
Slide the operation switch to the STOP position (or press the CREATE FILE button to set the pause mode) where you want to start insertion.
-
Slide the operation switch to the DICT position. Insertion recording starts.
Caution:
Overwrite and Insertion recording start from the stop position on the file. In "END" display, the recording starts from the END position.
If the INDEX/CANCEL button is pressed in the stop mode, "OVER WRITE" or "INSERT" edit mode can be changed.
PLAYBACK
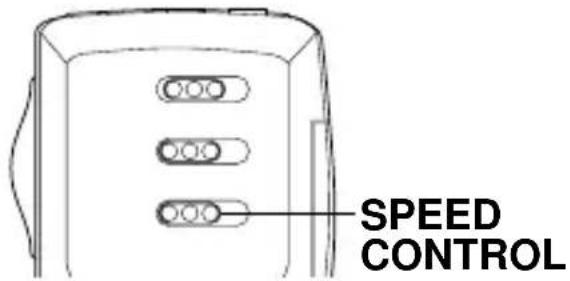
- Slide the SPEED CONTROL switch to the desired playback speed position.
SLOW:
Slow-speed playback
NORMAL:
Normal-speed playback
FAST:
Fast-speed playback
-
Select the AUTHOR and FOLDER. (See "SELECTING THE FOLDER AND MENU" on page 9.)
-
Press the ◀◀◀ or ▷▶◀ button repeatedly to select the desired file.
-
Slide the operation switch to the PLAY position to start playback. Example:
USER-01
BU 2/3
0:01
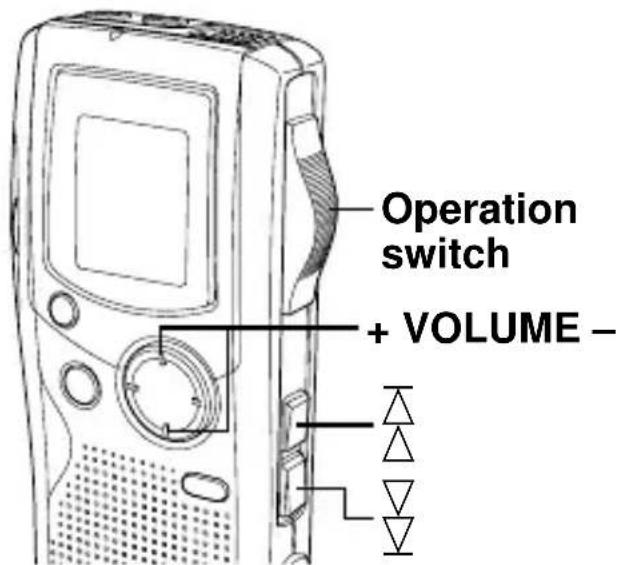
- Press the + or - VOLUME button as desired.
- When playback stops, "END" appears on the display.
- Slide the operation switch to the STOP position.
Temporarily stopping playback (Playback pause)
Press the CREATE FILE button during playback.
• The elapsed playing time blinks.
To resume playback, press the button again.
File skip
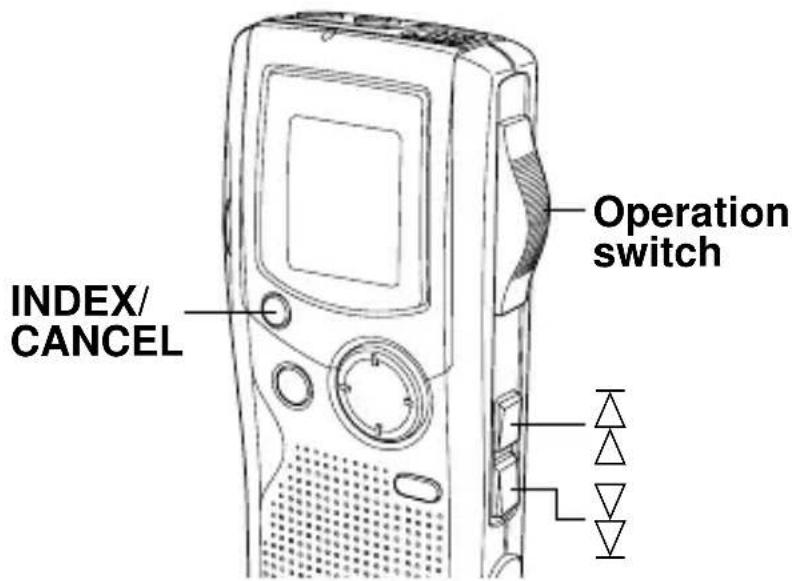
Press the ◀◀◀ or ▷▶◀ button repeatedly to skip to the desired file in the selected folder.
• In the stop mode, it skips to the beginning or end of the current, previous or next file.
- During playback mode, it skips to the beginning of the file.
File search
If the ◀◀◀ or ▷▶◀ button is pressed during playback, the unit will search at high speed in the forward or reverse direction while the button is being pressed. When the button is released, playback will continue.
These buttons are also used in the stop mode.
Review
To review the recorded sound while playing back the selected file, slide and hold the operation switch to the REV position. It works within the selected file.
To resume playback, release the switch.
Index search
If an index mark was made in the file, press the INDEX/CANCEL button during playback. The unit will search for the next index point and playback starts from that point.
SELECTING DISPLAY
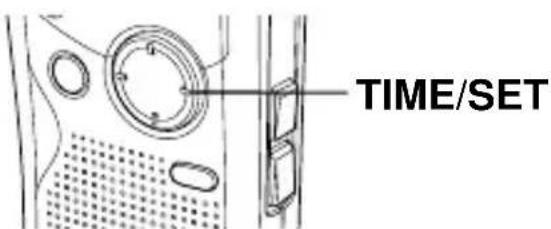
Press the TIME/SET button repeatedly during recording, playing and stop mode. The display changes as follows:
In the recording mode:
Remaining recording time → Current day/time → Original display returns
Example of remaining recording time:
Author USER-01
REMAIN
94:39 Remaining recording time
In the playback mode:
Recorded date/time → Current day/time → Remaining playing time → Original display returns
In the stop mode:
Remaining recording time → Current day/time → Original display returns
ERASING
Important Note:
Before erasing, make sure that the battery indicator is full.
Preparation
-
Slide the operation switch to the STOP position.
-
Select the AUTHOR and FOLDER. (See "SELECTING THE FOLDER AND MENU" on page 9.)
Erasing one file
- Press the ◀◀◀ or ▷▶◀ button to select the file to be erased.
Example:
USER-01
LE 3/5
0:09
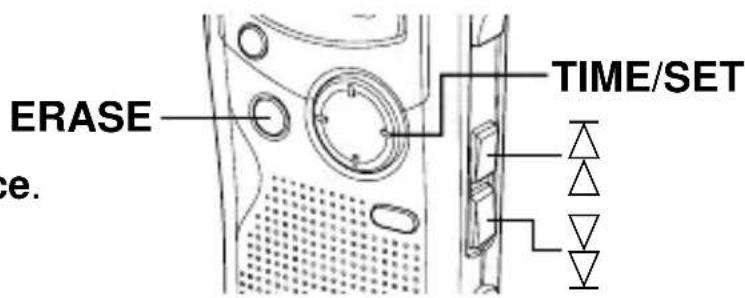
- Press the ERASE button once.
• The file number blinks.
Example:
ERASE
FILE
LECT 3

- While the display is blinking, press the TIME/SET button.
- “ERASE” appears briefly on the display.
The selected file is erased.
All the file numbers after the erased file are reduced by one.
Note:
If you make a mistake while following steps, press the INDEX/CANCEL button before pressing the TIME/SET button.
Erasing one folder
- Press the ERASE button twice.
- The folder blinks.
Example:
ERASE
FOLDER
LECT

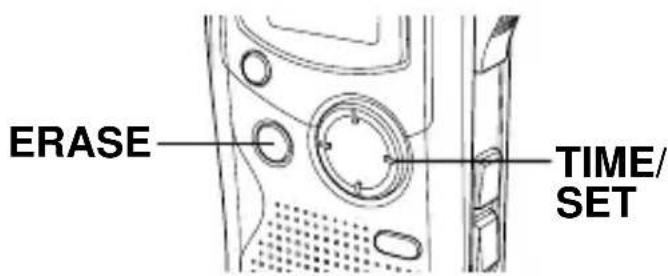
- While the display is blinking, press the TIME/SET button.
- “ERASE” appears briefly on the display.
All memories in the selected folder are erased.
- “ NEW” appears.
Example:
USER-01
LE 1/1
NEW
Erasing AUTHOR ID
- Press the ERASE button three times.
• The author blinks.
Example:
ERASE
ID
USER-03
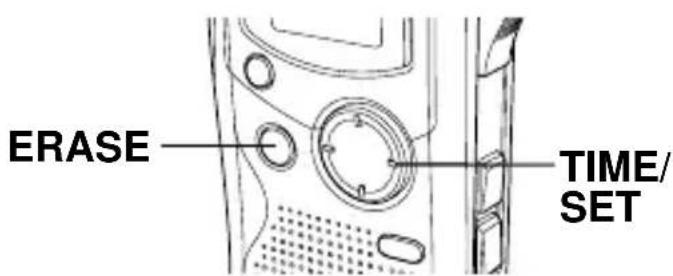
- While the display is blinking, press the TIME/SET button.
• “ ERASE” appears briefly on the display.
The AUTHOR ID is erased.
Example:
USER-02
BU 1/1
NEW
Erasing all memories
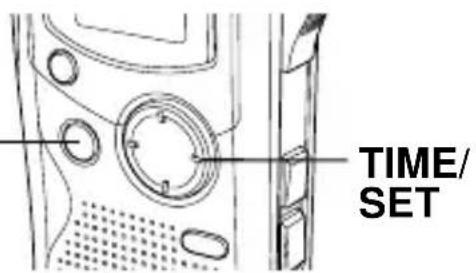
- Press the ERASE button four times.
• “ ERASE ALL MEMORY” blinks.
- While "ERASE ALL MEMORY" is blinking, press the TIME/SET button.
- “ ERASE” appears briefly.
All memories in all folders are erased.
Example:
USER-01
LE 1/1
NEW
ERASE
Notes:
- If you make a mistake while following steps, press the INDEX/CANCEL button before pressing the TIME/SET button.
- The ERASE button will not function during recording or playback.
Partial erasing (A-B erasing)
- Press the ◀◀◀ or ▷▶◀ button to select the file.
- Slide the operation switch to the PLAY position to start playback.
- Press the CREATE FILE button to pause at the starting point you want to erase (Point A).
• The elapsed playing time blinks.
Example:
USER-02
LE 1/5
0:08

- Press the ERASE button.
• “ ERASE START” blinks.
- While "ERASE START" is blinking, press the TIME/SET button.
• “ ERASE” blinks.
Playback resumes from Point A automatically.
Example:

ERASE
LE 1/5
0:09
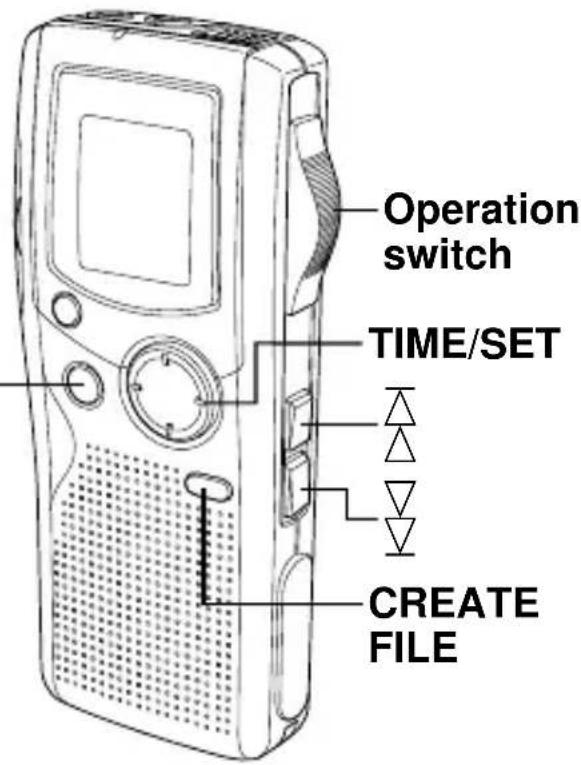
- Press the ERASE button at the ending point you want to erase (Point B).
• “ ERASE END” blinks.
- While "ERASE END" is blinking, press the TIME/SET button.
- “ERASE” appears briefly. ↓ The section between points A and B in the selected file is erased. ↓ Playback pause is set automatically. (The elapsed playing time blinks.) Press the CREATE FILE button again or stop playback.
Note:
If you make a mistake while following steps, press the INDEX/CANCEL button before pressing the TIME/SET button.
ERASE GUARD
Erase guard functions to prevent accidental erasure.
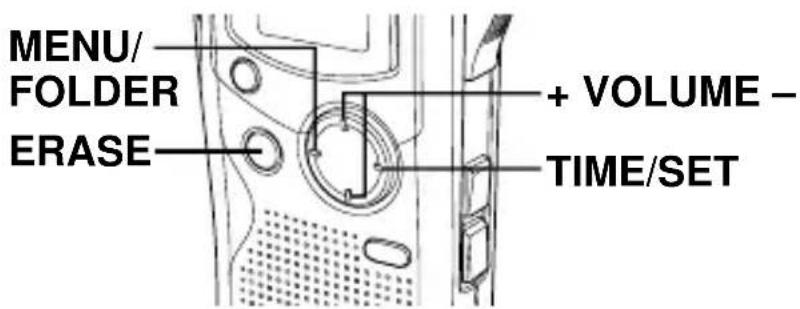
- Press and hold the MENU/FOLDER button down at least 2 seconds in the stop mode.
(See "Selecting the menu" on page 9.)
-
Press the MENU/FOLDER button repeatedly to select "ERASE GUARD".
-
Press the TIME/SET button.
- “ OFF” blinks.
ERASE
GUARD
OFF

- Press the + or - VOLUME button to select "ERASE GUARD ON".
• “♂” appears on the display.
- Press the TIME/SET button to set it.
• “♂” remains lit.
Note:
If the ERASE button is pressed after setting Erase Guard, "GUARD" appears briefly on the display.
VOICE ALARM TIMER
- Set the ALARM ON, date, and time.
(See “Selecting the menu” and “Various menu modes” in “SELECTING THE FOLDER AND MENU” on pages 9 \~ 12.) - Press the MENU/FOLDER button repeatedly to select "FOLDER ALARM".
- Slide the operation switch to the DICT position.
- Record your message into the ALARM folder (only one message).
Example:
ALARM
0:01
When the alarm ON time arrives, the voice alarm will be activated as shown below:
In the stop or power off mode:
- Voice message (If voice message is recorded.)
- Beep 5 times (If no voice message is recorded.)
During playback mode:
The operation is the same as “At the stop or power off mode” as above. And it goes back to the previous point and resumes playback.
During recording mode:
No sound (“◀”blinks on the display.)
BEFORE INSTALLING THE APPLICATION SOFTWARE
- Your PC must run Microsoft Windows98(SE)/Millennium Edition/2000 Professional/XP Professional/XP Home Edition operating system with USB port.
- You must install Microsoft Windows Media Player Ver. 6.4 or later.
- Do not connect the unit to your PC yet.
- If accidentally connect it to your PC, the "Found New Hardware Wizard" appears on the screen. Click [Cancel], and disconnect the unit.
- You must disable any anti-virus software before you install the PC Memo Scriber software.
PLAYING BACK/EDITING A DATA FILE RE-CORDED WITH YOUR PC
Digital voice recordings can be transferred to the PC for playback or editing.
Before you start, install the "PC Memo Scriber" program on the PC as follows:
- Load the PC Memo Scriber CD-ROM in the CD-ROM drive of the PC. The setup program starts automatically.
Note:
If the setup program doesn't start...
1) Choose [Run] on the Start menu.
2) Type the following line:
D:\PCMEMO\setup.exe
“D” (the drive letter) should be replaced by the CD-ROM drive letter on your PC.
3) Click [OK].
- Follow the instructions on the screen.
- After the installation is complete, you must restart Windows.
Note:
If the screen below appears, click [Continue Anyway].
Software Installation

The software you are installing has not passed Windows Logo testing to verify its compatibility with Windows XP. (Tell me why this testing is important.)
Continuing your installation of this software may impair or destabilize the correct operation of your system either immediately or in the future. Microsoft strongly recommends that you stop this installation now and contact the software vendor for software that has passed Windows Logo testing.
Continue Anyway
STOP Installation

Hardware Installation

The software you are installing for this hardware:
Sound, video and game controllers
has not passed Windows Logo testing to verify its compatibility with Windows XP. (Tell me why this testing is important.)
Continuing your installation of this software may impair or destabilize the correct operation of your system either immediately or in the future. Microsoft strongly recommends that you stop this installation now and contact the hardware vendor for software that has passed Windows Logo testing.
Continue Anyway
STOP Installation
Windows is a registered trademark of Microsoft Corporation.
Other system names and product names generally are the registered trademarks or trademarks of the respective development manufacturers. The symbols TM and (R) are not shown in this manual.
PC CONNECTION
- Slide the POWER switch to the OFF position.
- Connect the unit to the PC using the USB cable (supplied) as shown in the illustration.
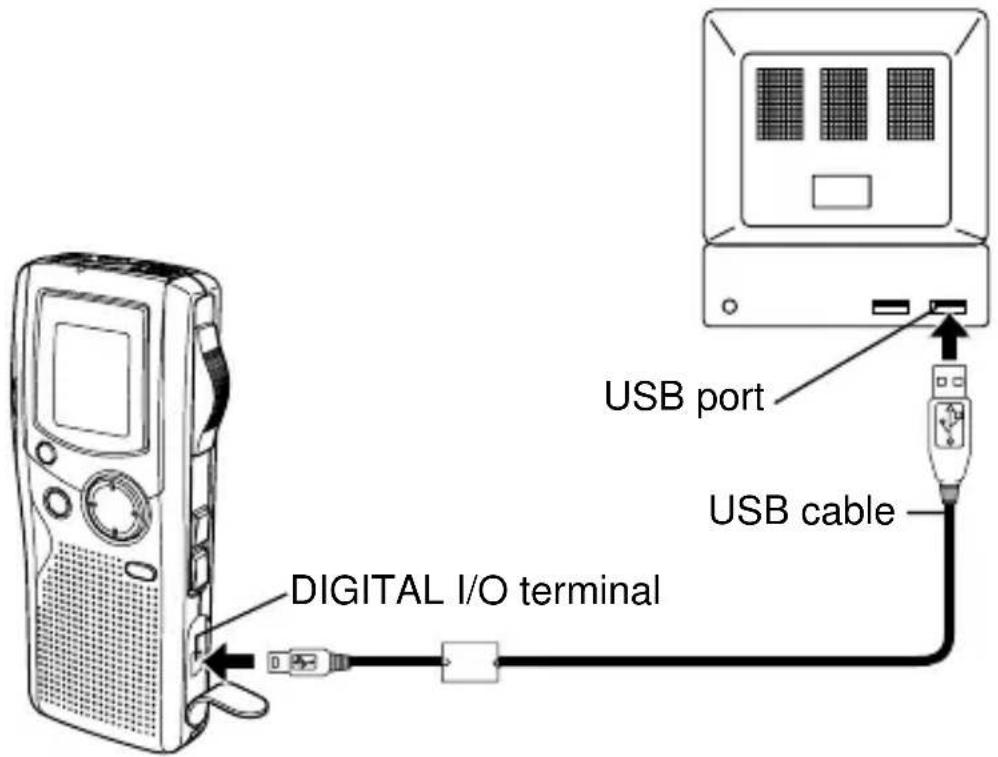
- If the "Wizard" appears on the screen, follow the instructions on the screen.
(There is a driver file in the place that you installed the software.)
If your PC is "WindowXP", the screen shows:
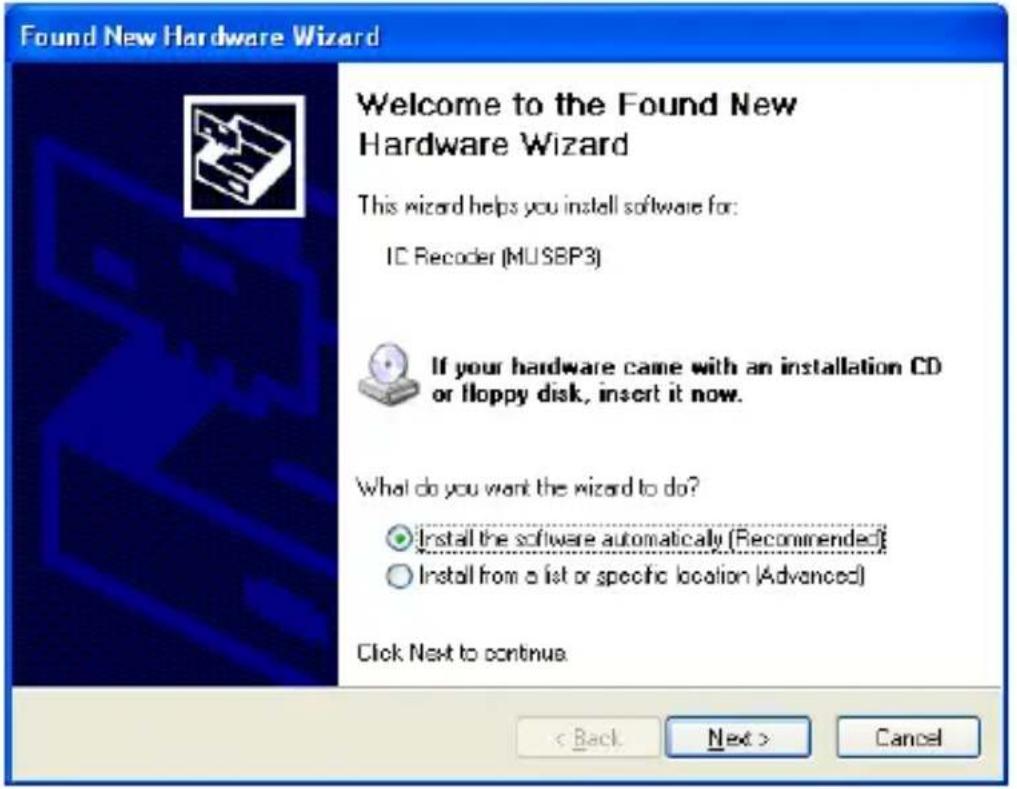
1) Click [Next].
2) Click [Continue Anyway].
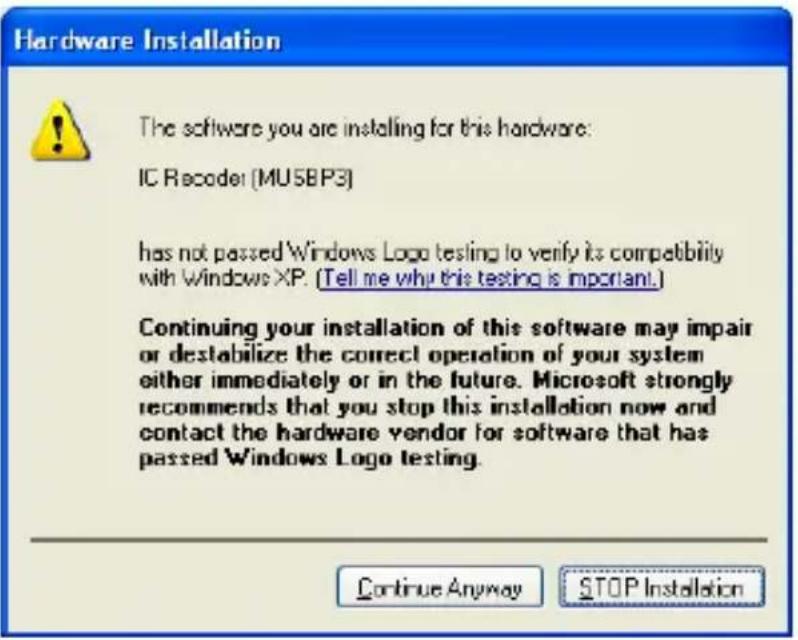
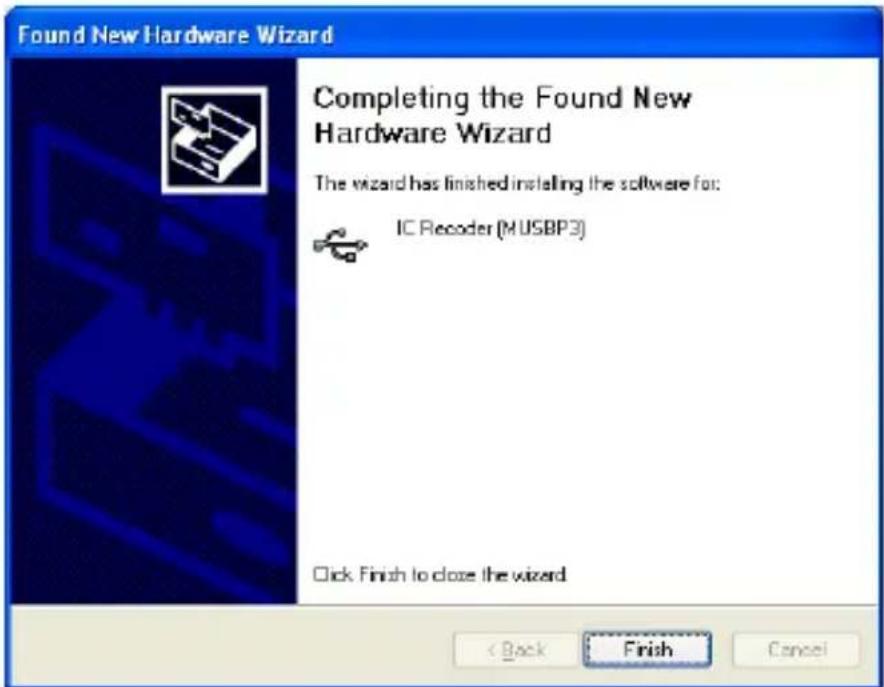
3) Click [Finish].
- Operate your PC. (Follow the instructions on the CD-ROM. Refer to "D:\Manual\manual-E.pdf".)
When the "PC Memo Scriber" program is properly started on the PC, "PC CONNECT" appears on the display of the unit, and the control buttons on the unit will not function.
How to format the MultiMediaCard in the unit
Windows 98(SE) / Millennium Edition:
Use the format menu in your PC.
Windows 2000 Professional / XP Professional / XP Home Edition:
Use the software in the supplied CD-ROM.
1) Choose [Run] on the Start menu.
2) Type: D:\Tools\FMT.exe
“D” (the drive letter) should be replaced by the CD-ROM drive letter on your PC.
3) Click [OK]. The format screen appears.
4) Follow the instructions on the screen.
ENROLLING/TRANSCRIBING A DATA FILE (USING VIAVOICE)
ViaVoice is not supplied and must be purchased separately.
Enrolling
- Disconnect the USB cable.
- Connect one end of the audio cable (supplied) to the EAR jack and the other end to the LINE-IN jack on the PC.
- Slide the POWER switch to the ON position.
- Slide the operation switch to the STOP position.
- Press the TIME/SET and INDEX/CANCEL buttons at the same time until “ENROLL” appears on the display.
- Operate the PC and start "ViaVoice". (Follow the instruction manual for ViaVoice.)
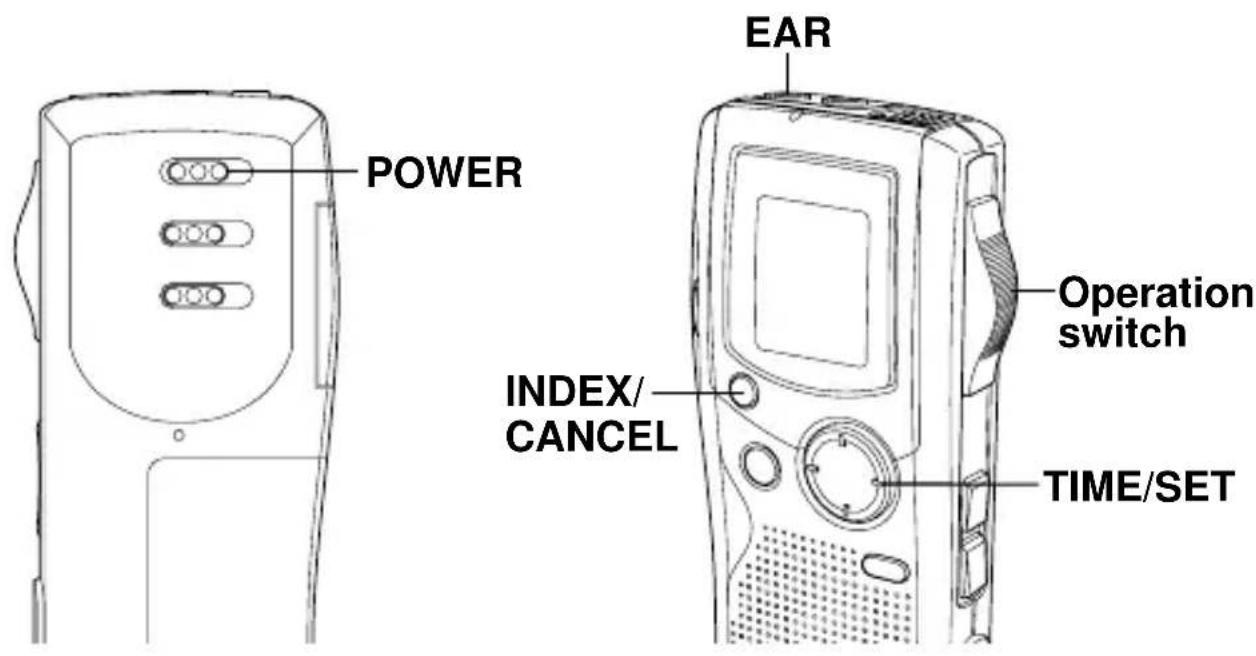
Note:
To cancel enrolling, press the INDEX/CANCEL button.
Notes on operating ViaVoice
For ViaVoice Release 8 or 9:
1) On the Windows desktop, select [Start] > [Settings] > [Control Panel]. (For Windows XP, select [Start] > [Control Panel] > [Switch to Classic View].)
Double-click [IBM ViaVoice Options] icon. The “IBM ViaVoice Options” screen appears.
2) Select [Sanyo ICR-B150 Wavefile] in the [Input Device] field.
3) Click [Add/Modify] or [Add User]. The “ViaVoice User Wizard” screen appears.
4) Set the new user's name in the "User Name" field.
5) Select “First Voice Model [Sanyo ICR-B150 Wavefile]” in the “Voice Model” field. Select “[Sanyo ICR-B150 Wavefile]” in the “Device” field.
6) Click [Next]. The Setting Up and the Enrollment will go on.
If the voice from the ICR-B150 cannot be recognized using the Audio Setup Wizard, follow the steps below.
1) On the desktop of Windows, select [Start] > [Programs] > [Accessories] > [Entertainment] > [Volume Control].
(For Windows XP, select [Start] > [All Programs] > [Accessories] > [Entertainment] > [Volume Control].)
2) On the Menu bar, click [Options] > [Properties].
3) Click [Recording] in [Adjust volume for].
4) Click the [Line-In] check box in [Show the following volume controls].
5) Click [OK].
6) In the [Recording control], click the [Select] check box under [Line-In].
- Speak into the unit.
Notes on enrolling
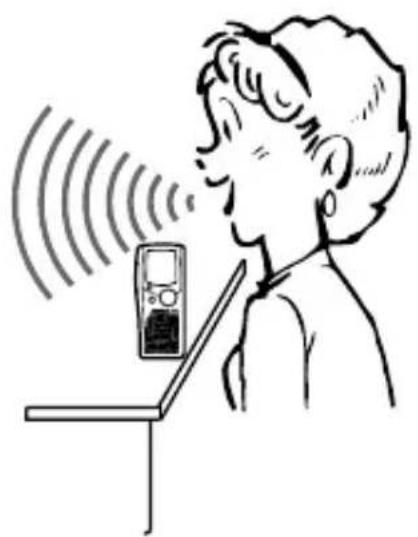
It is important to place the unit in a proper position to achieve maximum recognition precision during the transcription process.
- Place the unit 2 to 3 inches (5 to 8 cm) away from your mouth.
• To prevent the microphone from picking up your breathing, do not place the microphone right in front of your mouth. Hold it slightly to the side. - When speaking, do not touch the unit and do not breathe into the microphone.
natural_image
Illustration of a person using a mobile phone to listen, emitting sound waves (no text or symbols)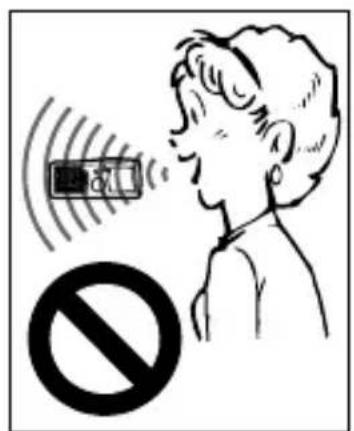
- To stop enrolling, press the INDEX/CANCEL button.
- After enrollment is completed, disconnect the audio cable.
Important Note:
When you attempt to transcribe a data file from the unit, be sure to enroll by using the unit. If you enroll data by using the headset supplied with ViaVoice, an extremely low recognition rate results.
Note:
IBM ViaVoice Release 8 or 9 must be used.
IBM and ViaVoice are registered trademarks of International Business Machines Corporation.
Creating a data file for transcription
- Slide the POWER switch to the ON position.
- Slide the REC MODE switch to the DICT position.
- Select the REC TIME "HQ" or "SP" recording time mode. (See "Selecting the menu" and "Various menu modes" in "SELECTING FOLDER AND MENU" on pages 9 \~ 12.)
- Slide the operation switch to the DICT (Recording) position, then start dictating (when dictating, pay attention to "Notes on enrolling").
Transcribing a data file
Note:
Only data files recorded under the “DICT” position and the REC TIME “HQ” or “SP” recording time mode can be used for transcription.
- Connect the unit to the PC using the USB cable.
- Operate the PC and select a file to be transcribed. (Follow the instructions on the CD-ROM.)
- Click [ ] . "ViaVoice" starts automatically and the selected file will be transcribed.
In Regard to the Display with Windows Explorer
When the Digital Voice Recorder is connected to a PC by the USB connection cable, the data recorded on the MultiMediaCard can be displayed by Windows Explorer as data on a removable device.
The Digital Voice Recorder records the data into the folder "Voicerec" on the MultiMediaCard. Do not use Explorer to edit the folder "Voicerec".
CLEANING THE CABINET
Clean the outside of the unit with a clean soft cloth, moistened with lukewarm water. Do not use benzene, thinner or alcohol since they will mar the finish of the surfaces.
SPECIFICATIONS
Frequency response:
600 Hz - 3,800 Hz
(Standard mode)
600 Hz - 1,900 Hz
(Long mode)
600 Hz - 5,300 Hz
(High-quality mode)
Output power:
100 mW (DC max.)
Power source:
DC: DC 3V (2 "AAA" batteries)
Loudspeaker:
28 mm dia. (1.1" dia.)
Output terminal:
EAR: 8 ohms
Dimensions (W x H x D):
Approx. 48 x 113 x 19 mm
(1.9" x 4.4" x 0.7")
Weight:
Approx. 65 g (2 oz.)
(without batteries)
Important Information:
Because its products are subject to continuous improvement, SANYO reserves the right to modify product designs and specifications without notice and without incurring any obligation.
FCC INFORMATION

Tested To Comply
With FCC Standards
FOR HOME OR OFFICE USE
Declaration of Conformity
Model Number: ICR-B150
Trade Name: Sanyo
Responsible Party: SANYO FISHER COMPANY
Address: 21605 Plummer Street
Chatsworth, California 91311
Telephone No.: (818) 998-7322
- This device complies with Part 15 of the FCC Rules.
Operation is subject to the following two conditions:
(1) this device may not cause harmful interference, and
(2) this device must accept any interference received, including interference that may cause undesired operation.
CANADIAN ICES-003 INFORMATION
THIS CLASS B DIGITAL APPARATUS COMPLIES WITH CANADIAN ICES-003.
TROUBLESHOOTING GUIDE
SYMPTOM
POSSIBLE CAUSE
CORRECTIVE ACTION
The unit does not operate.
The batteries are discharged or not installed.
Insert two new "AAA" batteries.
“☐” and “LOW BATT” appear.
The batteries are discharged.
Insert two new "AAA" batteries.
"POWER OFF" appears when the operation button is pressed.
Hold function is set.
Slide the POWER switch to ON.
No sound.
The earphone is plugged in.
Unplug the earphone.
The volume is turned down completely.
Press the + VOLUME button to adjust the sound level.
Cannot erase.
The erase guard is set. (" 🔍" appears.)
Cancel the erase guard. Refer to "ERASE GUARD" on page 24.
"MEMORY FULL" appears.
The memory capacity is full.
Erase unnecessary files. Refer to “ERASING” on page 19.
SYMPTOM
POSSIBLE CAUSE
CORRECTIVE ACTION
"NO CARD" appears.
The MultiMediaCard is not inserted.
Insert the MultiMediaCard. (See page 6.)
"NO DATA" appears.
The file cannot be created.
Erase unnecessary files or format the card by the PC.
"CARD ERR" appears.
The data cannot be read correctly.
Erase unnecessary files or format the card by the PC.
"ERASE ERR" appears.
It cannot be erased.
Erase it by the PC.
"SYSTEM ERR" or "AUTHOR ERR" appears.
The file cannot be created or the data of the card is not correct.
- Erase unnecessary files or format the card by the PC.
Or
- Press the ERASE button to create a new file again.
Operation or display is not normal.
The unit must be reset.
See "WHAT TO DO IF..." on page 2.
Caution:
If formatting is activated by the PC, all previous data will be cleared.
READ CAREFULLY BEFORE USE!!!
USER LICENSE AGREEMENT
IMPORTANT! — BY INSTALLING, COPYING, ACCESSING, DOWNLOADING, AND/OR USING THIS THE SOFTWARE, YOU ARE CONSENTING TO BE BOUND BY AND ARE BECOMING A PARTY TO THIS AGREEMENT AS A LICENSEE. IF YOU DO NOT AGREE TO ALL OF THE TERMS OF THIS AGREEMENT, TERMINATE THIS INSTALLATION PROCESS OR, IF THE SOFTWARE IS ALREADY INSTALLED, IMMEDIATELY UNINSTALL IT.
THIS USER LICENSE AGREEMENT ("this Agreement") shall serve as a legally binding instrument between you (as "Licensee", whether an individual or a corporation, regardless) and SANYO Technosound Co., Ltd. ("Licensor") concerning the Licensee's use of a single SANYO SOFTWARE PRODUCT ("the Software") under the terms and conditions set forth herein. The Software shall include, but without limitation, computer software and related media materials, printed materials (documents such as user manuals), and electronic documents whether or not retrieved by licensee "online", and shall include any updates and upgrades thereof supplied by Licensor having additional features and functions.
Where a separate User License Agreement is attached to any the Software supplied by Licensor, the terms and conditions of that User License Agreement shall also apply in addition to the terms and conditions set forth in this Agreement.
If you are unable to agree to any of the terms and conditions set forth herein, Licensor is unable to grant you the license to install, use or copy the Software.
The Software covered under this Agreement is protected under the international conventions and treaties on copyright and the related laws and regulations. This license shall constitute a grant of a license to Licensee for a single use of the Software and may not be deemed under any circumstances to constitute a sale of the Software itself.
Installation of ViaVoice ^™ is limited to one language.
1. Grant of License
Licensor shall grant Licensee a non-exclusive, non-sublicensable, non-transferable license for the use of the Software under the terms and conditions set forth herein:
- System Software
Licensee may use the Software only in a single computer or on a computer network ("the Computer", including without limitation, workstation, terminal, and/or other digital or electronic device) in binary executable form.
2. Other rights and limitations
- Reverse engineering, etc.
Except as expressly provided herein, Licensee shall not copy, modify reproduce, display, decompile, reverse engineer, reverse assemble, store, translate, sell, lease or otherwise transfer, distribute the Software, in whole or in part, nor may Licensee use the Software with the intent to clone any proprietary product to Licensor.
- Separation or division of the Software prohibited
This license hereby is granted for a single use only. In no circumstances shall Licensee separate, divide or compartmentalize any constituent portion(s) of the Software into multiple parts, sections, or compartments for use in multiple computers.
- Rental, lease or loan prohibited
Licensee shall not lend, lease or loan the Software to any party(ies).
- User support service by Licensor
Licensor may choose to provide user support service in accordance with the Licensor's policy set out in User Manual, On-line documents, or other printed matters made available by Licensor from time to time (the "Support Service"). All additional software code made available to Licensee as a part of the Support Service shall be deemed to constitute a part of the Software hereof to which all the terms and conditions of this Agreement shall apply. Licensor shall be entitled to use for commercial purposes or otherwise any and all technical information (the "Technical Information") provided by Licensee to Licensor, provided, however, that Licensor shall ensure that the identity of the Licensee shall remain undisclosed in the Licensor's use of all such Technical Information.
- Other Intellectual Proprietary Rights
Licensor or its supplier is the owner of all right, title and interest in and to the Software and its documents such as user manual and any and all copies thereof. The proprietary ownership of all data operated using this Software shall remain with the respective owner(s) and shall be protected by the international conventions and treaties and other intellectual proprietary rights. Licensee shall not be deemed, by anything contained in or done pursuant to this Agreement to acquire any right, title, or interest in any trademark, copyright, patent or other intellectual property of Licensor, and shall do nothing to prejudice the value or validity of the respective owner's rights therein or ownership thereof. Licensor shall preserve the proprietary ownership of any and all rights and titles in the Software not specifically provided herein.
4. Backup copy
After having installed a copy of the Software pursuant to this Agreement, Licensee may make a single copy of the Software for backup and archival purposes only, provided that any copy must contain all proprietary notices included in the original. If another original medium becomes necessary to use the Software on a computer under this Agreement, Licensee may make a single copy of the Software. Except as specifically provided herein, Licensee shall refrain from making copy of the Software or its incidental documents such as user manual in any manner whatsoever.
5. DISCLAIMER OF WARRANTY:
THE SOFTWARE IS DEEMED ACCEPTED BY LICENSEE UPON IT'S USE BY LICENSEE.
THE SOFTWARE IS PROVIDED TO LICENSEE AS IS, WITHOUT WARRANTY OF ANY KIND. TO THE MAXIMUM EXTENT PERMITTED BY APPLICABLE LAW. LICENSOR FURTHER DISCLAIMS ALL WARRANTIES, INCLUDING WITHOUT LIMITATION, ANY IMPLIED WARRANTIES OF MERCHANTABILITY, FITNESS FOR A PARTICULAR PURPOSE, AND NON INFRINGEMENT. THE ENTIRE RISK ARISING OUT OF THE USE OR PERFORMANCE OF THE PRODUCT AND DOCUMENTATION REMAINS WITH LICENSEE. IN NO EVENT SHALL LICENSOR OR ITS SUPPLIERS BE LIABLE FOR ANY CONSEQUENTIAL, INCIDENTAL, DIRECT, INDIRECT, SPECIAL, PUNITIVE OR OTHER DAMAGES WHATSOEVER (INCLUDING WITHOUT LIMITATION, DAMAGES FOR LOSS OF BUSINESS PROFITS, BUSINESS INTERRUPTION, LOSS OF BUSINESS INFORMATION, OR OTHER PECUNIARY LOSS) ARISING OUT OF THIS
AGREEMENT OR THE USE OF OR INABILITY TO USE THE PRODUCT, EVEN IF LICENSOR HAS BEEN ADVISED OF THE POSSIBILITY OF SUCH DAMAGES. LICENSOR DOES NOT WARRANT THAT THE SOFTWARE DOES NOT INCLUDE ANY VIRUS OR DEFECTS, THE SOFTWARE ROUTINE OR OTHER SOFTWARE DESIGNED TO RESTRICT UNAUTHORIZED ACCESS; OR TO DISABLE, ERASE OR OTHERWISE HARM THE SOFTWARE, HARDWARE, OR DATA; OR TO PERFORM ANY OTHER SUCH ACTIONS AND LICENSOR HEREBY EXPRESSLY DISCLAIMS ANY AND ALL LIABILITIES TO RESTORE ANY SUCH DEFECTS.
6. Indemnification:
Licensor will not have any liability to Licensee for, and Licensee will defend and hold Licensor harmless against, any claim, expense, judgment, liability, or loss (including attorneys' fees and expert witnesses' expenses) based on Licensee's use of any content of the Software, arising from any intellectual property claim (including patent, trademark, copyright, or trade secret infringement), any right of publicity or privacy claim, or any defamation or unfair competition claim.
7. Termination.
Without prejudice to any other rights, Licensor may terminate this Agreement if Licensee fails to comply with the terms and conditions herein. Licensee may also terminate this Agreement at any time by destroying the Software and Documentation and all copies thereof. The provisions of sections 2, 3, 4, 5, 6 and 7 shall survive any termination of this Agreement.
SANYO SERVICE PLUS LIMITED WARRANTY DICTATION PRODUCTS ONLY
OBLIGATIONS
In order to obtain factory warranty service for Sanyo Dictation Products, call the toll-free number below. The unit must be packed in the original carton or a well-padded sturdy carton in order to avoid shipping damage.
Note: Do not return this unit to the retail store for service.
To obtain Service Plus Warranty service, product operation information or for problem resolution, call
Toll Free 1-877-999-1840
Weekdays 8:00 AM – 5:00 PM Pacific Time
THIS WARRANTY IS VALID ONLY ON SANYO DICTATION PRODUCTS PURCHASED AND USED IN THE UNITED STATES OF AMERICA, EXCLUDING ALL U.S. TERRITORIES AND PROTECTORATES. THIS WARRANTY APPLIES ONLY TO THE ORIGINAL RETAIL USER, AND DOES NOT APPLY TO PRODUCTS USED FOR ANY INDUSTRIAL, PROFESSIONAL, OR COMMERCIAL PURPOSE. THE ORIGINAL DATED BILL OF SALE OR SALES SLIP MUST BE SUBMITTED AT THE TIME WARRANTY SERVICE IS REQUESTED.
Subject to the OBLIGATIONS above and EXCLUSIONS below, SANYO FISHER COMPANY (SFC) warrants this SANYO Dictation product against defects in materials and workmanship for the periods of LABOR and PARTS specified below. SFC will, at its option, within two business days after its receipt of any dictation product that fails to conform to this warranty at SFC's designated facility, either (a) repair such product or any of its parts which fail to conform to this warranty or (b) ship a replacement product. The warranty period commences on the date the product was first purchased at retail.
| LABOR PARTS | |
| 1 YEAR 1 YEAR |
EXCLUSIONS
This warranty does not cover (A) the adjustment of customer-operated controls as explained in the appropriate model's instruction manual, or (B) the repair of any product, whose serial number has been altered, defaced or removed. This warranty shall not apply to the cabinet or cosmetic parts, knobs or routine maintenance.
This warranty does not apply to repairs or replacements necessitated by any cause beyond the control of SFC including, but not limited to, any malfunction, defect, or failure caused by or resulting from unauthorized service or parts, improper maintenance, operation contrary to furnished instructions, shipping or transit accidents, modification or repair by the user, abuse, misuse, neglect, accident, incorrect line voltage, fire, flood, or other Acts of God, or normal wear and tear.
The foregoing is in lieu of all other expressed warranties and SFC does not assume or authorize any party to assume for it any other obligation or liability.
THE DURATION OF ANY WARRANTIES WHICH MAY BE IMPLIED BY LAW (INCLUDING THE WARRANTIES OF MERCHANTABILITY AND FITNESS) IS LIMITED TO THE TERM OF THIS WARRANTY. IN NO EVENT SHALL SFC BE LIABLE FOR SPECIAL, INCIDENTAL OR CONSEQUENTIAL DAMAGES ARISING FROM OWNERSHIP OR USE OF THIS PRODUCT, OR FOR ANY DELAY IN THE PERFORMANCE OF ITS OBLIGATIONS UNDER THIS WARRANTY DUE TO CAUSES BEYOND ITS CONTROL. SOME STATES DO NOT ALLOW LIMITATIONS ON HOW LONG AN IMPLIED WARRANTY LASTS AND/OR DO NOT ALLOW THE EXCLUSION OR LIMITATION OF CONSEQUENTIAL DAMAGES, SO THE ABOVE LIMITATIONS AND EXCLUSIONS MAY NOT APPLY TO YOU. THIS WARRANTY GIVES YOU SPECIFIC LEGAL RIGHTS. YOU MAY HAVE OTHER RIGHTS, WHICH VARY FROM STATE TO STATE. S/D R2
For your protection in the event of theft or loss of this product, please fill in the information below for your own personal records.
Model No.
Serial No.
(Located on back or bottom side of unit)
Date of Purchase ____
Purchase Price
Where Purchased
SANYO
21605 Plummer Street
Chatsworth, CA 91311
For Canada
THE SANYO COMFORT WARRANTY BUSINESS SYSTEMS - DICTA RECORDERS
WARRANTY APPLICATION
New, unused Sanyo Dicta Recorder products purchased in Canada are warranted against manufacturing defects in materials and workmanship for ONE YEAR for parts and NINETY DAYS for labour, from the date of purchase by the original retail purchaser. This warranty only applies in favour of the original retail purchaser of the warranted product.
SANYO CANADA INC.'S RESPONSIBILITY
During the warranty period, SANYO Canada Inc. will repair, or at our option, replace a Sanyo Dicta Recorder product which shows evidence of a manufacturing defect in materials or workmanship.
Replacement PARTS are warranted for the remaining portion of the warranty period.
WHAT IS NOT COVERED
(a). Dicta Recorder products purchased outside Canada.
(b). Dicta Recorder products purchased in a used condition.
(c). Problems due to product set-up and installation.
(d). Adjustments that are outlined in the Operating Manual.
(e). Accessory items including carrying cases, cassette tapes and cables.
(f). Damage in or due to transportation.
(g). Damage due to improper maintenance, accident, abuse, misuse or negligence.
ORIGINAL RETAIL PURCHASER'S RESPONSIBILITY
You, the original retail purchaser, must present your original, dated bill-of-sale together with this warranty to SANYO Canada Inc. or to an authorized Sanyo Service Depot when you make a claim under this Warranty.
You, the original retail purchaser, are responsible for any costs of TRANSPORTING the product to and from SANYO Canada Inc. or an authorized Sanyo Service Depot. You also are responsible for the cost of any MAINTENANCE necessary in respect of the product.
WARRANTY BECOMES VOID
This warranty becomes void if the product's serial numbers are altered or removed or if any repair to the product is made other than by SANYO Canada Inc. or by an authorized Sanyo Service Depot.
LIMITATIONS
(a) SANYO Canada Inc. reserves the right to change or improve the design of the model of the product warranted hereunder without incurring any obligation to make any modifications to or to install any improvement in or on the product.
(b) In no event shall SANYO Canada Inc. or any of its Authorized Dealers be liable for special or consequential damage arising from the use of this product.
STATUTORY WARRANTIES
The above provisions do not preclude the operation of any applicable provincial statute which in certain circumstances may not allow some of the limitations and exclusions described in this Warranty. Where any terms of this Warranty are prohibited by such a statute, they shall be deemed null and void but the remainder of this warranty shall remain in effect.
HOW TO OBTAIN WARRANTY SERVICE
Please contact the Sanyo Authorized Dealer from whom the product was purchased, or contact us directly at:
SANYO Canada Inc.
1-300 Applewood Crescent
Concord, Ontario
L4K 5C7
(905) 760-9944
1-800-263-2244
http://www.sanyocanada.com
SDR 01/05 (R11)
Model No. ____
Serial No. ____
(Located on back or bottom side of unit)
Date of Purchase ____
Purchase Price ____
Where Purchased
SANYO
SANYO Canada Inc.

This file has been downloaded from:
www.UsersManualGuide.com
User Manual and User Guide for many equipments like mobile phones, photo cameras, monther board, monitors, software, tv, dvd, and othes..
Manual users, user manuals, user guide manual, owners manual, instruction manual, manual owner, manual owner's, manual guide, manual operation, operating manual, user's manual, operating instructions, manual operators, manual operator, manual product, documentation manual, user maintenance, brochure, user reference, pdf manual


- SANYO'S HELP-LINE
- LINEA DE CONSULTA SANYO
- ENGLISH
- CONTENTS
- Please read this manual before use.
- Notes on clock setting
- ACCESSORIES
- PRECAUTIONS
- WHAT TO DO IF...
- CONTROLS
- Display
- POWER SUPPLY
- Battery
- Battery indicator ( ☐)
- CAUTION:
- IMPORTANT NOTE:
- AC adaptor
- MultiMediaCard™
- Inserting the MultiMediaCard
- Removing the MultiMediaCard
- Notes:
- WARNING!
- BEFORE OPERATION
- Turning the power on and off
- Auto power off function
- Hold function
- Earphone
- External microphone
- ADJUSTING THE DATE AND TIME
- Changing the clock to the 12-hour (or 24-hour) display
- SELECTING THE FOLDER AND MENU
- Selecting the folder
- Selecting the menu
- Various menu modes
- RECORDING
- Temporarily stopping recording (Recording pause)
- Creating a new file number
- EDITING THE RECORDED DATA
- Overwrite recording
- Insertion recording
- PLAYBACK
- Temporarily stopping playback (Playback pause)
- File skip
- File search
- Review
- Index search
- SELECTING DISPLAY
- In the recording mode:
- In the playback mode:
- In the stop mode:
- ERASING
- Preparation
- Erasing one file
- Erasing one folder
- Erasing AUTHOR ID
- Erasing all memories
- Partial erasing (A-B erasing)
- ERASE GUARD
- VOICE ALARM TIMER
- In the stop or power off mode:
- During playback mode:
- During recording mode:
- BEFORE INSTALLING THE APPLICATION SOFTWARE
- PLAYING BACK/EDITING A DATA FILE RE-CORDED WITH YOUR PC
- Note:
- Software Installation
- Hardware Installation
- PC CONNECTION
- How to format the MultiMediaCard in the unit
- ENROLLING/TRANSCRIBING A DATA FILE (USING VIAVOICE)
- Enrolling
- Notes on operating ViaVoice
- For ViaVoice Release 8 or 9:
- Notes on enrolling
- Creating a data file for transcription
- Transcribing a data file
- In Regard to the Display with Windows Explorer
- CLEANING THE CABINET
- SPECIFICATIONS
- Important Information:
- FCC INFORMATION
- Declaration of Conformity
- CANADIAN ICES-003 INFORMATION
- TROUBLESHOOTING GUIDE
- SYMPTOM
- POSSIBLE CAUSE
- CORRECTIVE ACTION
- READ CAREFULLY BEFORE USE!!!
- USER LICENSE AGREEMENT
- Grant of License
- - System Software
- Other rights and limitations
- - Reverse engineering, etc.
- - Separation or division of the Software prohibited
- Backup copy
- DISCLAIMER OF WARRANTY:
- Indemnification:
- Termination.
- SANYO SERVICE PLUS LIMITED WARRANTY DICTATION PRODUCTS ONLY
- OBLIGATIONS
- EXCLUSIONS
- For Canada
- THE SANYO COMFORT WARRANTY BUSINESS SYSTEMS - DICTA RECORDERS
- WARRANTY APPLICATION
- SANYO CANADA INC.'S RESPONSIBILITY
- WHAT IS NOT COVERED
- ORIGINAL RETAIL PURCHASER'S RESPONSIBILITY
- WARRANTY BECOMES VOID
- LIMITATIONS
- STATUTORY WARRANTIES
- HOW TO OBTAIN WARRANTY SERVICE
- SANYO Canada Inc.
- This file has been downloaded from:
Brand : SANYO
Model : ICR-B150
Category : Dictaphone