
ICR-1000 - Dictaphone SANYO - Free user manual and instructions
Find the device manual for free ICR-1000 SANYO in PDF.


| Product Type | Digital Voice Recorder |
| Brand | Sanyo |
| Model | ICR-1000 |
| Power Supply | 2 AAA/LR03/HP16 batteries (1.5 V) |
| Storage Media | SD card (64 MB to 2 GB) |
| Recording Formats | LP, SP, HQ, XHQ |
| Recording Modes | Dictation (DICT), Meeting (CONF), Lecture (LECT) |
| Editing Functions | Overwrite recording, Insert recording, Partial erase |
| Voice Activated System (VAS) | Yes, adjustable from VAS 0 to VAS 10 |
| Alarm | Yes, programmable |
| Erase Protection | Yes, adjustable |
| Number of Folders | 3 (Work, Meeting, Other) |
| Files per Folder | Up to 99 |
| Clock Setting | Date and time, 12/24 h display |
| PC Connectivity | USB (cable included), PC Memo Scriber software |
| Inputs/Outputs | External microphone jack (MIC), earphone jack (EAR), external DC jack (3 V), digital I/O jack |
| Built-in Speaker | Yes |
| Built-in Microphone | Yes |
| Playback Speed | Slow, normal, fast |
| Pause Function | Yes (CREATE FILE button) |
| Review (REV) | Yes (quick playback) |
| Index Search | Yes, up to 32 indexes per file |
| Auto Power Off | Yes after 10 minutes of inactivity |
| Maintenance and Cleaning | Soft cloth dampened with warm water; avoid benzene, thinner, alcohol |
| Operating Temperature | 5°C to 35°C |
| Supplied Accessories | Batteries, initialized SD card, USB cable, software CD-ROM, earphone |
Frequently Asked Questions - ICR-1000 SANYO
User questions about ICR-1000 SANYO
0 question about this device. Answer the ones you know or ask your own.
Ask a new question about this device
Download the instructions for your Dictaphone in PDF format for free! Find your manual ICR-1000 - SANYO and take your electronic device back in hand. On this page are published all the documents necessary for the use of your device. ICR-1000 by SANYO.
USER MANUAL ICR-1000 SANYO
natural_image
Line drawing of a portable electronic device with ventilation grille and control buttons (no text or symbols)GB English
D Deutsch
F Français
E Español
ENGLISH
CONTENTS
PRECAUTIONS 2
CONTROLS 3
POWER SUPPLY 5
SD CARD 6
BEFORE OPERATION 7
ADJUSTING THE DATE AND TIME......8
SELECTING THE FOLDER AND MENU 9
RECORDING 13
EDITING THE RECORDED DATA 15
PLAYBACK....17
SELECTING DISPLAY 19
ERASING 20
ERASE GUARD 24
ALARM TIMER 25
BEFORE INSTALLING THE APPLICATION SOFTWARE 26
PLAYING BACK/EDITING A DATA FILE RECORDED WITH YOUR PC ......26
PC CONNECTION 28
CLEANING THE CABINET 30
TROUBLESHOOTING GUIDE 31
USER LICENSE AGREEMENT 33
Your SANYO product is designed and manufactured with high quality materials and components which can be recycled and reused.
This symbol means that electrical and electronic equipment, at their end-of-life, should be disposed of separately from your household waste.
Please dispose of this equipment at your local community waste collection/recycling centre.
In the European Union there are separate collection system for used electrical and electronic products.
Please help us to conserve the environment we live in!
PRECAUTIONS
- Never remove the SD Card while operating the unit. Otherwise, the SD Card, recorded contents and the unit will be damaged.
- If the line of rectangles in the battery indicator (☐) disappear during recording, stop the recording immediately and replace the batteries.
- Do not disconnect the AC adaptor or remove the batteries while operating the unit.
- Before erasing, make sure that the battery indicator is full.
- The apparatus should not be exposed to dripping or splashing.
- Do not insert pins, etc., inside the unit.
- Do not drop the unit or subject it to strong shocks.
- Do not use where there are extremes of temperature (below 5°C or exceeding 35°C).
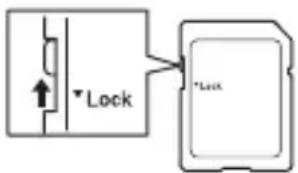
- Set the write-protect switch to “Unlock” before inserting to the unit.
• is registered trademark of SD Association. - Other system and product names generally are the
registered trademarks or trademarks of the respective development manufacturers. The symbols ^TM and ^® are not shown in this manual.
Accessories
USB cable x 1
CD-ROM x 1
Case x 1
SD Card (Initialised) x 1
AAA/LR03/HP16 Battery x 2
Notes on clock setting
Be sure to set the date and time of the unit's clock before use. (See Page 8.)
CONTROLS
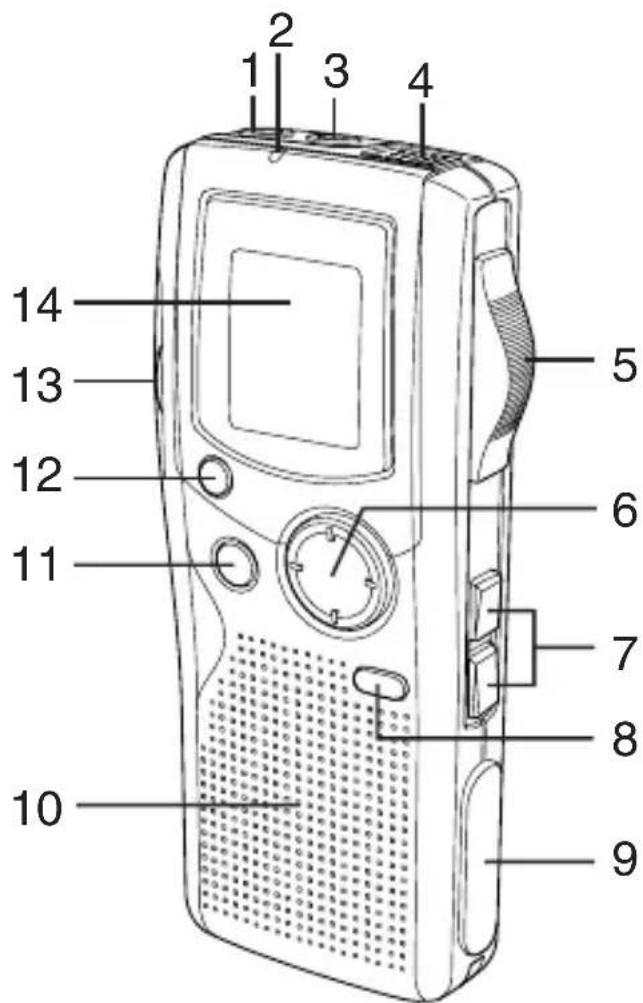
- Earphone socket (EAR)
- Recording indicator
- External microphone socket (MIC)
- Built-in microphone
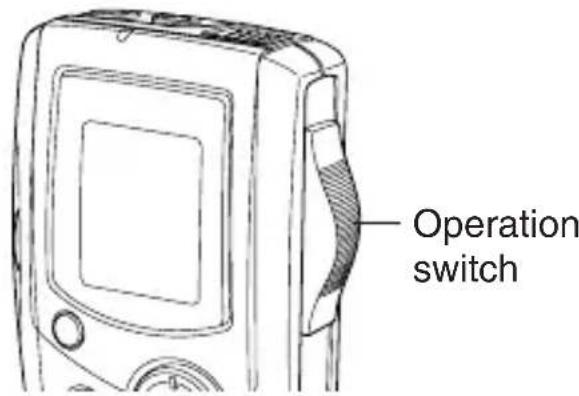
- Operation switch (DICT, STOP, PLAY, REV)
- Control button (VOLUME, TIME/SET, MENU/FOLDER)
- Fast forward/Rewind buttons (◀◀◀, ▷▶▶)
- Create file/Pause button (CREATE FILE)
- Digital I/O terminal cover (DIGITAL I/O)
- Built-in speaker
- Erasing button (ERASE)
- Index/Cancel button (INDEX/CANCEL)
- SD Card compartment lid
- Display
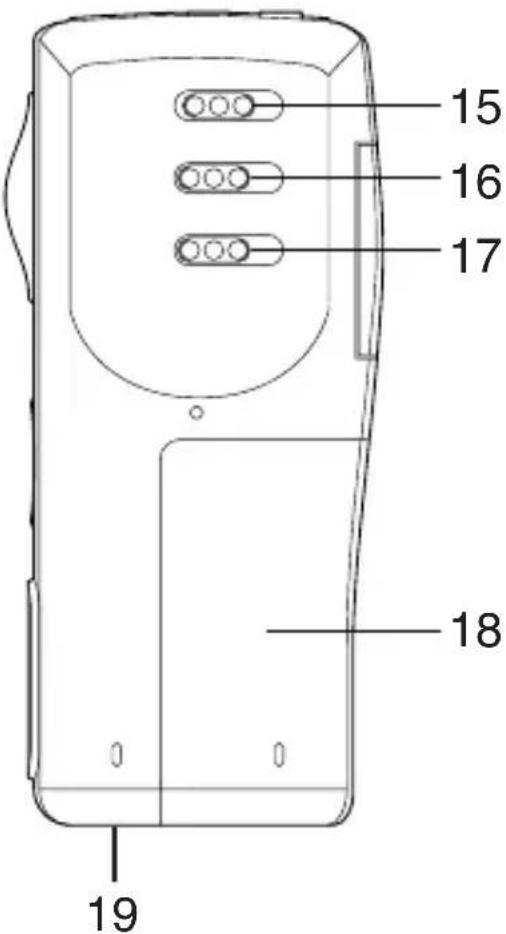
- Power switch (POWER)
- Record mode switch (REC MODE)
- Playback speed control switch (SPEED CONTROL)
- Battery compartment lid
- External DC socket (EXT DC 3V, bottom of the unit)
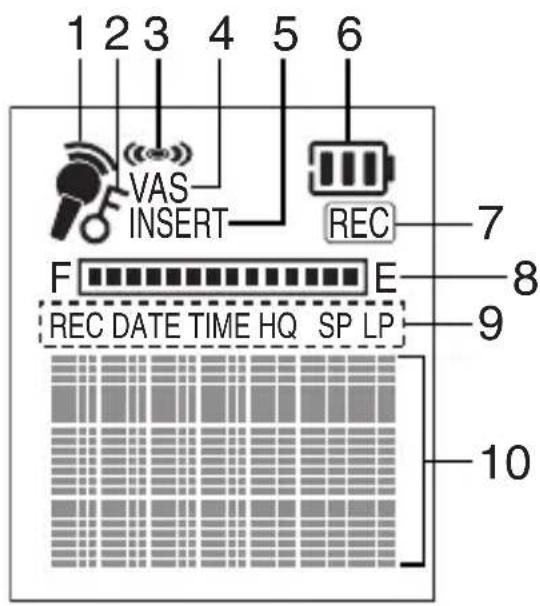
Display
- Record mode indicator
- Erase guard indicator
- Alarm indicator
- Voice activated system indicator
- Insertion recording indicator
- Battery indicator
- Record indicator
- Memory capacity indicator
- Recorded date/time, and recording time mode indicators
- User, folder, recording time, operation guides, etc.
POWER SUPPLY
Batteries
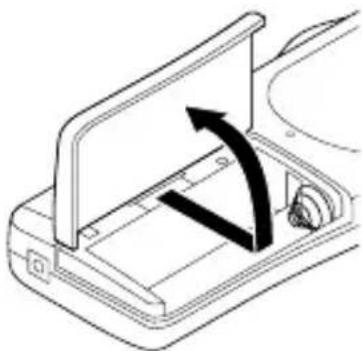
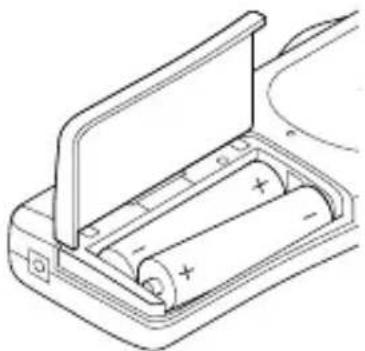
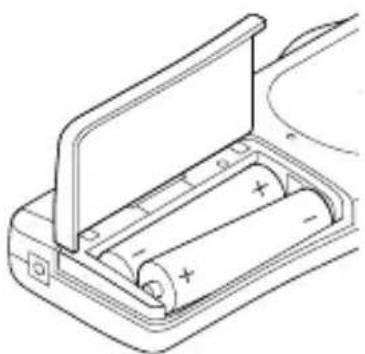
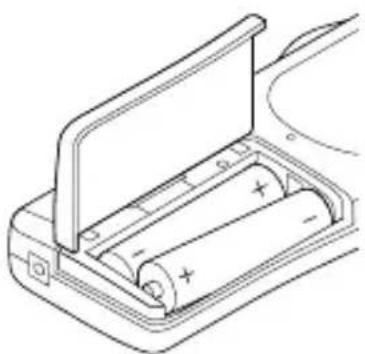
- Open the battery compartment lid.
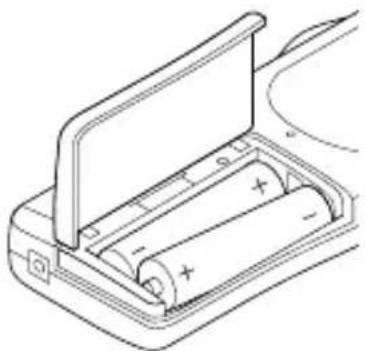
- Install two "AAA/LR03/HP16" batteries (attached). Observe proper polarity.
1
natural_image
Diagram of a mechanical device with an arrow indicating direction, no text or symbols present2
natural_image
Diagram of a battery pack with two batteries and an open casing, showing charge distribution (no text or symbols)Battery indicator ( 0)
The line of rectangles is the battery gauge. Black rectangles show the battery condition while the unit is operating.

: Full, good condition

("LOW BATT" appears.): Weak or exhausted batteries, must be replaced.
CAUTION:
- Remove the batteries if the unit will not be used for a month or longer.
- Dispose of all used batteries safely in accordance with all applicable laws.
WHAT TO DO IF...
If the operation of the unit or display is not normal,
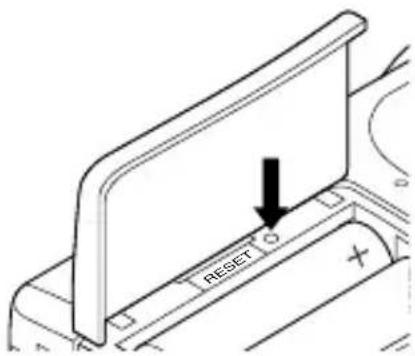
- Open the battery compartment lid.
- Press the RESET switch using a small ball-point pen, etc.
- Resume operation.
SD CARD
- When using new SD Card, “ERASE ALL MEMORY” in advance. (See Page 22.)
- Other SD Cards than formatted by this unit can not be used.
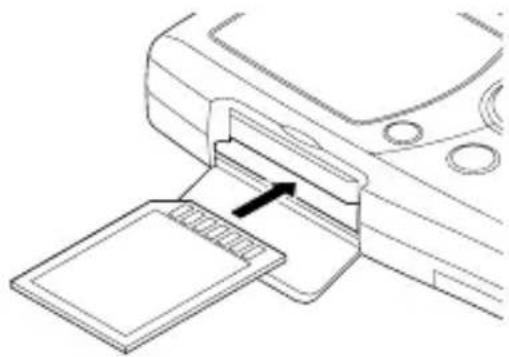
Inserting the SD Card
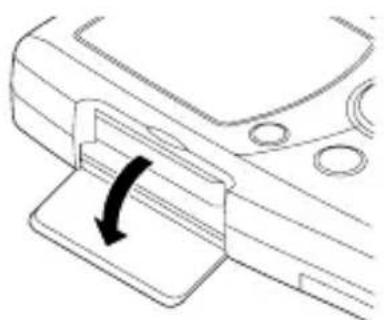
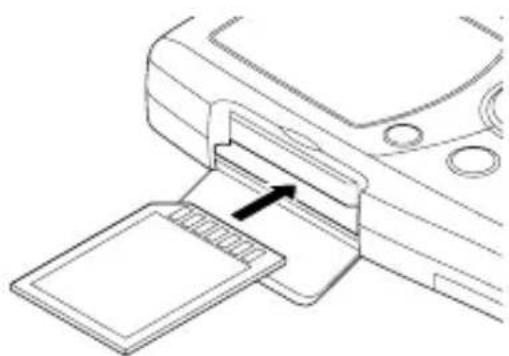
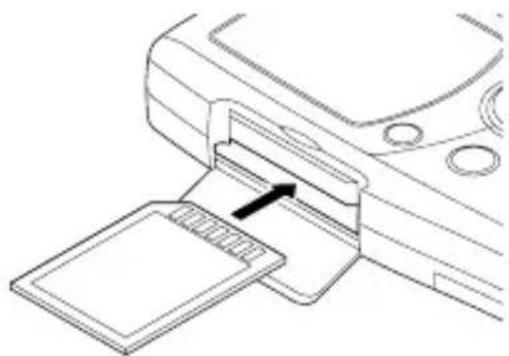
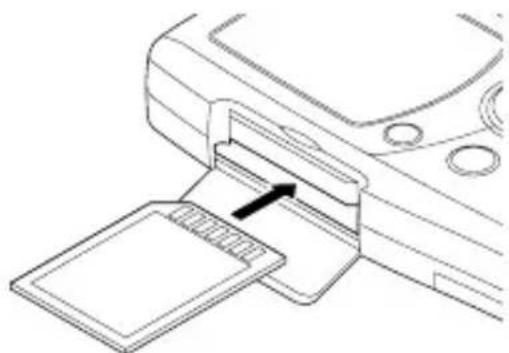
- Open the SD Card compartment lid.
- Check the edge of the card and insert the card as shown in the illustration.
1
natural_image
Technical line drawing of a mechanical component with a curved arrow indicating rotation (no text or symbols)2
natural_image
Line drawing of a printer's internal structure with an arrow indicating insertion (no text or symbols)- Close the lid.
Removing the SD Card
- Slide the POWER switch (rear of the unit) to OFF.
- Open the SD Card compartment lid.
- Push the card slightly into the slot to release.
- Pull it out.
Note:
- Never remove the card while operating the unit.
- Do not place the card where it is exposed to static electricity or electric noise.
- Recorded data on the card may not work correctly with a different Digital Voice Recorder.
- If the card is not inserted, "NO CARD" appears when the power is turned on.
- When a SD Card is loaded, the unit automatically creates a VoiceRec folder, etc. Do not erase them.
- Do not use a MultiMediaCard.
- This unit supports the SD Card having 64MB to 2GB memory.
BEFORE OPERATION
Turning the power on and off
Slide the POWER switch (rear of the unit) to ON to turn on the power. The unit is now in stand-by mode.
Example:

flowchart
graph TD
    A["Folder name"] --> B["BU 1/1"]
    B --> C["Current file number"]
    C --> D["NEW"]
    D --> E["Total file number"]
    F["USER-01"] --> G["Author name"]
To turn off the power, slide the POWER switch to OFF in the stop mode.
Auto power off function
The power turns off automatically in about 10 minutes after entering the stop mode.
Hold function
If the control switch or operating button is pressed while the POWER switch is set to OFF, “POWER OFF” appears briefly on the display. It prevents accidental playback or recording.
Earphone
Connect an earphone (not attached) to the EAR socket. (The speaker is automatically disconnected.)
Note: Be sure to reduce the volume before connecting or disconnecting the earphone.
External microphone
Connect an external microphone (not attached) to the MIC socket. (The built-in microphone is automatically disconnected.)
ADJUSTING THE DATE AND TIME
- Slide the operation switch to "STOP".
- Press and hold the MENU/FOLDER button down at least 2 seconds in the stop mode. "AUTHOR" appears.
- Press the MENU/FOLDER button repeatedly until the date and time display appears.
Example:
0:00
2006
AUG.01
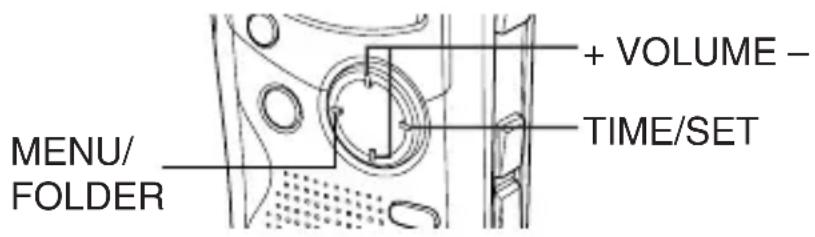
- Press the TIME/SET button. The year display blinks.
- Press the + or - VOLUME button repeatedly to select the year.
- Press the TIME/SET button. The month display blinks.
- Set the month, day, hour and minute by following steps 4 - 5 above.
- The time can be set accurately by pressing the TIME/SET button when a time signal is heard.
Example: 10:35
2006
AUG.08
- Press the INDEX/CANCEL button to return to the original display.
Changing the clock to the 12-hour (or 24-hour) display
- Press and hold the MENU/FOLDER button down at least 2 seconds in the stop mode.
- Press the MENU/FOLDER button repeatedly until "12/24" appears.
- Press the TIME/SET button. "24 HOUR" (or "12 HOUR") blinks.
- Press the + or - VOLUME button once. "12 HOUR" (or "24 HOUR") blinks.
- Press the TIME/SET button again.
- Press the INDEX/CANCEL button to return to the original display.
SELECTING THE FOLDER AND MENU
Selecting the folder
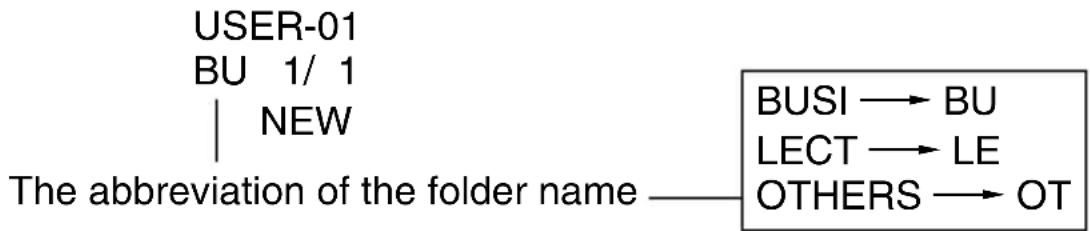
Press the MENU/FOLDER button briefly in the stop mode. Each time the button is pressed, the display changes as follows:
FOLDER
BUSI (Business) → LECT (Lecture) → OTHERS (Others)
Note:
After a few seconds, it returns to the stand-by mode on the selected folder display. The abbreviation of the folder name appears.
Example:
flowchart
graph TD
    A["USER-01"] --> B["BU 1/1"]
    B --> C["NEW"]
    C --> D["The abbreviation of the folder name"]
    D --> E["BUSI → BU"]
    D --> F["LECT → LE"]
    D --> G["OTHERS → OT"]
Selecting the menu
- Press and hold the MENU/FOLDER button down at least 2 seconds in the stop mode.
Example:
AUTHOR
ID01 ID number
USER-01 Author name
- Press the MENU/FOLDER button repeatedly to select the desired menu.
Each time the button is pressed, the display changes as follows:
AUTHOR → EDIT → Date and time → ALARM → VAS → REC
TIME → BEEP → ERASE GUARD → 12/24 → LCD LEVEL →
VERSION
- To change the setting of a submenu in the selected menu, press the TIME/SET button so that the display blinks.
- Press the + or – VOLUME button to select a new submenu. (See “Various menu modes” below.)
- Press the TIME/SET button to set it.
-
Repeat steps 2 - 5 to change other settings.
-
Press the INDEX/CANCEL button to return to the original display. Example:
USER-01
BU 1/1
NEW
Various menu modes
AUTHOR: Selecting ID number/Author name
ID01/USER-01 - ID99/USER-99
Note:
Author name is automatically created. You can change it by using the PC software attached to the CD-ROM.
EDIT: Selecting edit mode
OVER WRITE: Overwirte recording
INSERT: Insertion recording ("INSERT" appears on the display.)
Date and time (See Page 8.)
ALARM: Selecting alarm mode
OFF: No alarm sound
ON: Alarm sound (“ ” appears on the display.)
After setting "ON", the year display blinks. Use the TIME/SET, + and - VOLUME buttons to set the alarm ON time. (Refer to Page 8.)
VAS: Selecting Voice Activated System mode
OFF: To start and stop recording manually
ON: Recording begins when the microphone picks up sound, and stops automatically after the sound stops. "VAS" appears.
Press the ◀◀◀ or ▶▶◀ button to set the microphone's sensitivity when recording begins. The VAS sensing level appears on the display. "VAS 0"⇔"VAS 10"
Low ⇔ High
REC TIME: Selecting recording time mode
LP: For long time recording
SP: For standard recording
HQ: For high-quality recording (Initial Setting)
XHQ: For extra high-quality recording
Recording time in the table shows rough standard time. It will be different somewhat depending on SD Card.
Note:
- Setting or changing recording time can be used for a new file recording. When overwrite or insertion recording starts on the recorded file, it follows the file's recording time.
- When "XHQ" mode is selected, "XHQ" segment does not appear on the display.
BEEP: Selecting beep mode
ON: Every time the operation buttons are pressed, a beep sound will be heard.
OFF: No beep sound
ERASE GUARD: Selecting erase guard mode
OFF: You may erase the data.
ON: You cannot erase the data. ("♂" appears on the display.)
12/24 (See Page 8.)
LCD LEVEL: Selecting the LCD display brightness
"LEVEL 1" - "LEVEL 10" can be selected.
VERSION: Showing the current firmware version
RECORDING
- Slide the REC MODE switch (rear of the unit) to the desired recording mode.
DICT: Dictating
"REC MODE DICT" appears briefly and " 🔍 " appears on the display.
CONF: Conference
"REC MODE CONF" appears briefly and " 🔍" appears on the display.
LECT: Lecture
"REC MODE LECT" appears briefly and " 🔍" appears on the display.
- If necessary, select AUTHOR, VAS, REC TIME, etc. (See Pages 10 - 11.)
- Press the MENU/FOLDER button repeatedly to select the desired folder.
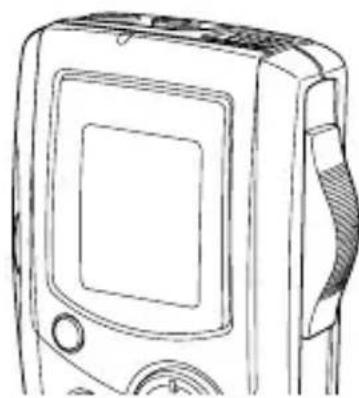
- Slide the operation switch to DICT to start recording. The recording indicator lights and "REC" appears on the display.
Example:
USER-01
LE 1/1
0m01s
- Slide the operation switch to STOP to stop recording at any time.
natural_image
Line drawing of a portable electronic device with front panel and buttons (no text or symbols)Operation switch
Note:
- The unit can record up to file number 99 for each folder.
- “F ■■■■■■■■■■■■■■■■■■■■■■■■■■■■■■■■■■■■■■■■■■■■■■■■■■■■■■■■■■■■■■■■■■■■■■■■■■■■■■■■■■■■■■■■
- When the recording time is full, “MEMORY FULL” appears briefly. In this case, erase unnecessary files.
- If the INDEX/CANCEL button is pressed during recording, an index mark is made (“INDEX” appears briefly) and recording continues. Up to 32 index marks, for each file, can be made. If you try to enter more index marks, “INDEX FULL” appears briefly. Index marks cannot be deleted individually.
Caution:
Try not to record messages close to high field strength area or devices, e.g. high power cable or mobile phone operation, unexpected noise may be recorded.
Temporarily stopping recording (Recording pause)
Press the CREATE FILE button during recording. The elapsed recording time and "REC" blink on the display. To resume recording, press the button again.
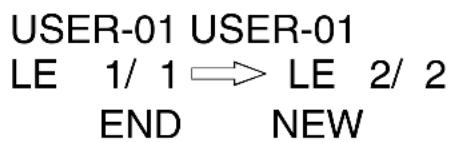
Creating a new file number
Press the CREATE FILE button in the stop mode. The new file number appears.
Example:
Note:
This unit can record up to approx. 6 hours in one file.
EDITING THE RECORDED DATA
Overwrite recording
Note:
Previous recorded material will be erased.
-
Select the "OVER WRITE" edit mode. (See Page 10.)
-
Play back the file. (See Page 17.)
-
Slide the operation switch to STOP (or press the CREATE FILE button to set the pause mode) where you want to start overwriting.
-
Slide the operation switch to DICT. Overwrite recording starts.
Insertion recording
Note:
Previous recorded material will remain.
- Select the "INSERT" edit mode. (See Page 10.)
- Play back the file. (See Page 17.)
-
Slide the operation switch to STOP (or press the CREATE FILE button to set the pause mode) where you want to start insertion.
-
Slide the operation switch to DICT. Insertion recording starts.
Caution:
• Overwrite and Insertion recording start from the stop position on the file.
- In "END" display, the recording starts from the END position.
- If the INDEX/CANCEL button is pressed in the stop mode, "OVER WRITE" or "INSERT" edit mode can be changed.
- In "Insertion Recording", start position may shift somewhat.
Note:
“Insertion Recording” and “Partial Erase” features of ICR-1000 may not work properly on 512MB or greater SD Cards, due to the properties of larger SD Cards. All other features of the recorder will work normally on all size SD Cards...
Please refer to the following table.
| SD Card | 64MB 1 | 28MB 25 | 6MB 512 | 2MB 1GB | 2GB | ||
| Recording Time | LP Yes Yes | Yes No | No No | ||||
| SP Yes Yes | Yes No | No No | |||||
| HQ Yes Yes | Yes No | No No | |||||
| XHQ Yes Yes | Yes Yes | Yes No | |||||
Yes : Insertion Recording / Partial Erase is supported.
No : Insertion Recording / Partial Erase is not supported.
PLAYBACK
- Slide the SPEED CONTROL switch (rear of the unit) to the desired playback speed position.
SLOW: Slow-speed playback
NORMAL: Normal-speed playback
FAST: Fast-speed playback
- Select the Author and Folder. (See Pages 9 - 10.)
- Press the ◀◀ or ▷▶ button repeatedly to select the desired file.
- Slide the operation switch to PLAY to start playback.
Example:
USER-01
BU 2/3
0m01s
- Press the + or - VOLUME button as desired.
- When playback stops, "END" appears on the display.
- Slide the operation switch to STOP.
Temporarily stopping playback (Playback pause)
Press the CREATE FILE button during playback. The elapsed playing time blinks.
Toresume playback, press the button again.
File skip
Press the ◀◀ or ▷▶ button repeatedly to skip to the desired file in the selected folder.
- In the stop mode, it skips to the beginning or end of the current, previous or next file.
- During playback mode, it skips to the beginning of the file.
File search
If the ◀◀◀ or ▷▶◀ button is pressed during playback, the unit will search at high speed in the forward or reverse direction while the button is being pressed. When the button is released, playback will continue.
These buttons are also used in the stop mode.
Review
Toreview the recorded sound while playing back the selected file, slide and hold the operation switch to REV. It works within the selected file.
To resume playback, release the switch.
Index search
If an index mark was made in the file, press the INDEX/CANCEL button during playback. The unit will search for the next index point and playback starts from that point.
SELECTING DISPLAY
Press the TIME/SET button repeatedly during recording, playing and stop mode. The display changes as follows:
In the recording mode:
Remaining recording time → Current day/time → Original display returns
Example of remaining recording time:
Author — USER-01
REMAIN
1h24m — Remaining recording time
Note:
- When the remaining recording time is more than one hour, it is displayed as 1h24m.
When the remaining recording time is less than one hour, it is displayed as 1m24s.
In the playback mode:
Recorded date/time → Current day/time → Remaining playing time → Original display returns
In the stop mode:
Remaining recording time → Current day/time → Original display returns
ERASING
Important Note:
Before erasing, make sure that the battery indicator is full.
If the battery indicator does not show full, please replace the batteries.
Preparation
- Slide the operation switch to STOP.
- Select the Author and Folder. (See Pages 9 - 10.)
Note:
If you make a mistake while following steps, press the INDEX/CANCEL button before pressing the TIME/SET button.
Erasing one file
- Press the ◀◀ or ▷▶ button to select the file to be erased.
Example:
USER-01
LE 3/5
0m09s
- Press the ERASE button once. The file number blinks.
Example:
ERASE
FILE
LECT 3

- While the display is blinking, press the TIME/SET button. "ERASE" appears briefly on the display.
The selected file is erased. All the file numbers after the erased file are reduced by one.
Erasing one folder
- Press the ERASE button twice. The folder blinks.
Example:
ERASE
FOLDER
LECT

- While the display is blinking, press the TIME/SET button. "ERASE" appears briefly on the display. All memories in the selected folder are erased. "NEW" appears.
Example:
USER-01
LE 1/1
NEW
Erasing Author ID
- Press the ERASE button three times. The author blinks.
Example:
ERASE
ID
USER-03

- While the display is blinking, press the TIME/SET button. "ERASE" appears briefly on the display. The Author ID is erased.
Example:
USER-02
BU 1/1
NEW
Erasing all memories
- Press the ERASE button four times. "ERASE ALL MEMORY" blinks.
- While "ERASE ALL MEMORY" is blinking, press the TIME/SET button.
“ERASE” appears briefly. All memories in all folders are erased.
Example:
USER-01
LE 1/1
NEW
Note:
The ERASE button will not function during recording or playback.
When “ERASE ALL MEMORY” is implemented, all memories in all folders in the SD Card are erased.
“.” Blinks on the display while erasing.
Example:
ERASE.

Partial erasing (A-B erasing)
- Press the ◀◀ or ▷▶ button to select the file.
- Slide the operation switch to PLAY to start playback.
- Press the CREATE FILE button to pause at the starting point you want to erase (Point A). The elapsed playing time blinks.
Example:
USER-02
LE 1/5
0m08s

- Press the ERASE button. "ERASE START" blinks.
- While "ERASE START" is blinking, press the TIME/SET button. "ERASE" blinks. Playback resumes from Point A automatically.
Example:

ERASE
LE 1/5
0m09s
- Press the ERASE button at the ending point you want to erase (Point B). "ERASE END" blinks.
- While "ERASE END" is blinking, press the TIME/SET button. "ERASE" appears briefly.
The section between points A and B in the selected file is erased.
Playback pause is set automatically. (The elapsed playing time blinks.) Press the CREATE FILE button again or stop playback.
Note:
- Some error may be produced to the time between A and B designated in partial erasing.
- “Partial Erase” feature of ICR-1000 may not work properly on 512MB or greater SD Cards, due to the properties of larger SD Cards. (Refer to Page 16.)
ERASE GUARD
Erase guard functions to prevent accidental erasure.
-
Press and hold the MENU/FOLDER button down at least 2 seconds in the stop mode.
-
Press the MENU/FOLDER button repeatedly to select "ERASE GUARD".
-
Press the TIME/SET button. "OFF" blinks.

-
Press the + or - VOLUME button to select "ERASE GUARD ON". " " appears on the display.
-
Press the TIME/SET button to set it. " ♂" remains lit.
Note:
If the ERASE button is pressed after setting Erase Guard, "GUARD" appears briefly on the display.
ALARM TIMER
When the alarm on time arrives, the alarm will be activated as shown below:
In the stop or power off mode:
- Beep for approx. 10 seconds.
During playback mode:
The operation is the same as “In the stop or power off mode” as above. And it goes back to the previous point and resumes playback.
During recording mode:
No sound (“ ” blinks on the display.)
BEFORE INSTALLING THE APPLICATION SOFTWARE
- Y our PC must run Microsoft Windows Millennium Edition/2000 Professional/XP Professional/XP Home Edition operating system with USB port.
- Y ou must install Microsoft Windows Media Player Ver. 6.4 or later.
- Do not connect the unit to your PC yet.
PLAYING BACK/EDITING A DATA FILE RECORDED WITH YOUR PC
Digital voice recordings can be transferred to the PC for playback or editing. Before you start, install the “PC Memo Scriber” programme on the PC as follows:
- Load the PC Memo Scriber CD-ROM in the CD-ROM drive of the PC. The setup programme starts automatically.
Note:
If the setup programme does not start...
1) Choose [Run] on the Start menu.
2) Type the following line:
D:\PCMEMO\setup.exe
“D” (the drive letter) should be replaced by the CD-ROM drive letter on your PC.
3) Click [OK].
- Follow the instructions on the screen.
- After the installation is complete, you must restart Windows.
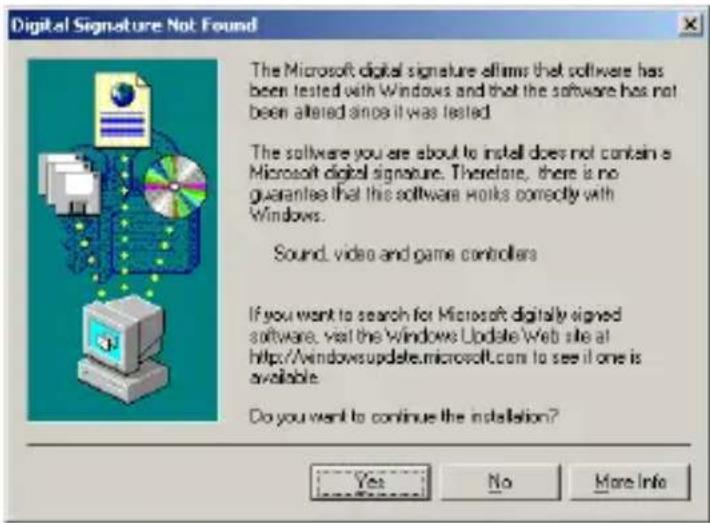
Note:
If the screen below appears, click [Continue Anyway] or [Yes].
Windows XP Professional/XP Home Edition
![Hardware Installation The software you are installing for this hardware: Sound, video and game controllers has not passed Windows Logo testing to verify its compatibility with Windows XP. [Tell me why this testing is important] Continuing your installation of this software may impair or destabilize the correct operation of your system either immediately or in the future. Microsoft strongly recommends that you stop this installation now and contact the hardware vendor for software that has passed Windows Logo testing. Continue Anyway STOP Installation](/content/2026/05/814637/images/75f7a97ed53eb8b5d58da933cfa29b9bb2c6a9cf29c4a4eaf9da4b39d594f5af.jpg)
Windows 2000 Professional
Windows is a registered trademark of Microsoft Corporation.
Other system names and product names generally are the registered trademarks or trademarks of the respective development manufacturers.
The symbols TM and (R) are not shown in this manual.
PC CONNECTION
-
Slide the POWER switch to OFF.
-
Connect the unit to the PC using the USB cable (attached) as shown in the illustration.
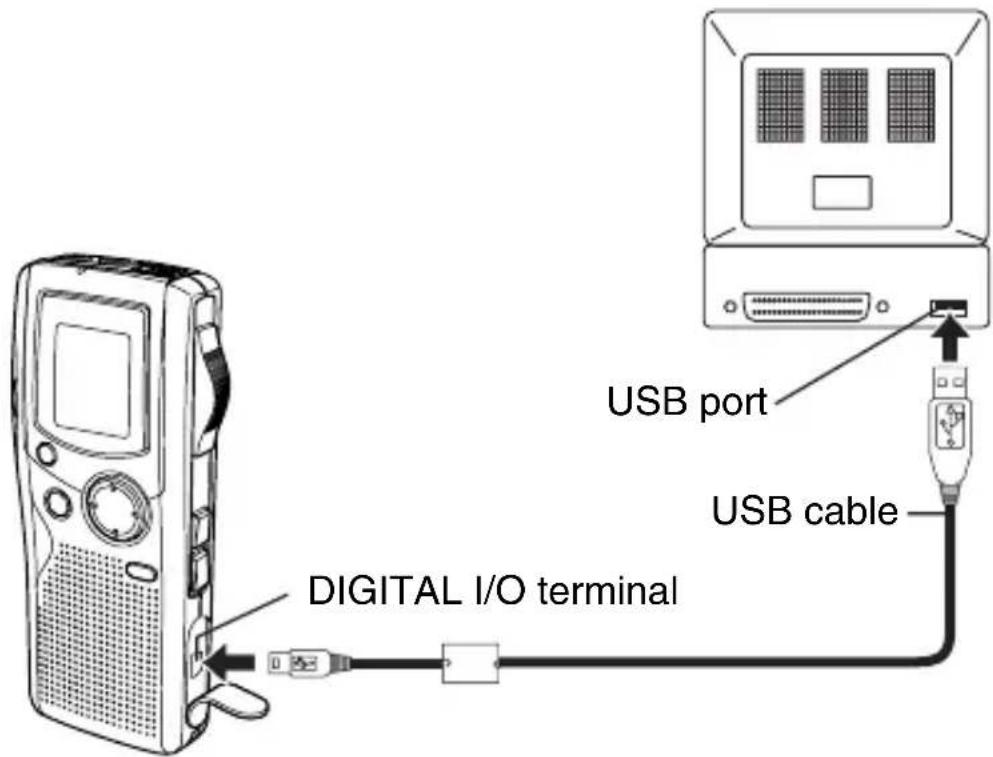
Note:
- When the unit is connected to the PC, none of the operating buttons on the unit work.
- When using a new SD Card, "ERASE ALL MEMORY" without connecting the unit to PC. (See page 22.)
- Do not format the SD Card with PC.
Selecting the action Windows is to take
After connection, the following screen will appear (Windows XP only). - F or Windows ME/2000, this operation is not needed.
The screen shots are of Windows XP.
Adjust your settings to match your PC's environment.
In this manual, [Take no action] is selected, [Always do the selected action] is checked, and [OK] is clicked. This completes the connection to the PC.
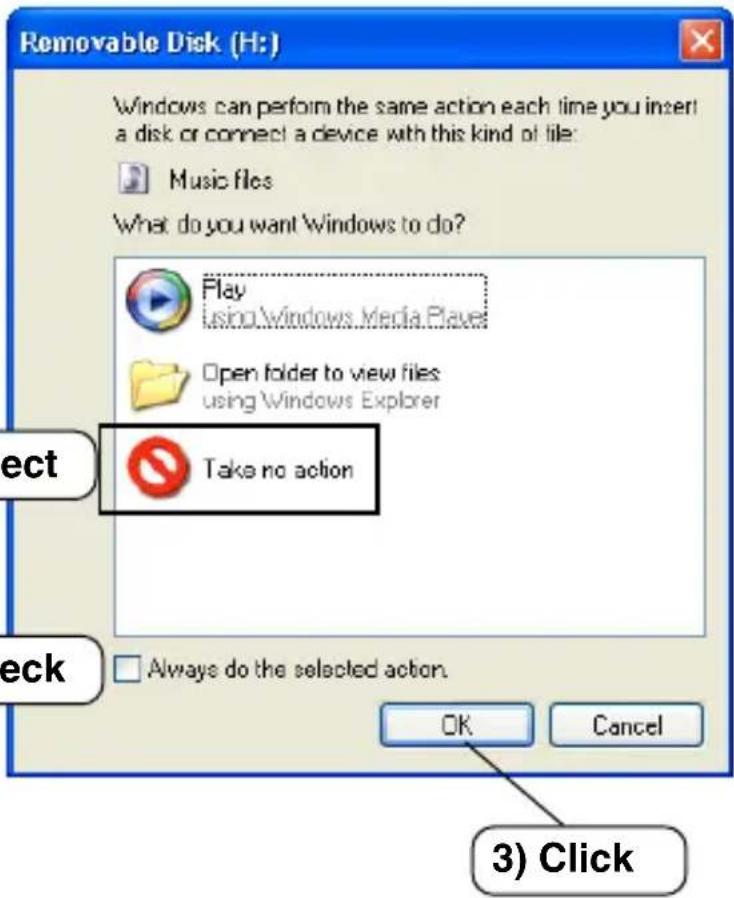
Note:
Too many files or too large file may take much time to open the PC application.
In Regard to the Display with Windows Explorer
When the Digital Voice Recorder is connected to a PC by the USB connection cable, the data recorded on the SD Card can be displayed by Windows Explorer as data on a removable device.
The Digital Voice Recorder records the data into the folder "Voicerec" on the SD Card. Do not use Explorer to edit the folder "Voicerec".
CLEANING THE CABINET
Clean the outside of the unit with a clean soft cloth, moistened with lukewarm water. Do not use benzene, thinner or alcohol since they will mar the finish of the surfaces.
SERVICE
UNITED KINGDOM
For online support and assistance contact:
UK: Freephone: 0800 328 7060 (Mon–Fri, 8am–5pm)
Outside of UK: +44 1582 730 730 (Mon–Fri, 8am–5pm)
Email: dictationsupport@sanyo.co.uk
or visit our website www.sanyodictation.co.uk
TROUBLESHOOTING GUIDE
SYMPTOM
POSSIBLE CAUSE
CORRECTIVE ACTION
The unit does not operate.
The batteries are discharged or not installed.
Insert two new “AAA/LR03/HP16” batteries.
“ ” and “LOW BATT” appear.
The batteries are discharged.
Insert two new "AAA/LR03/HP16" batteries.
"POWER OFF" appears when the operation button is pressed.
Hold function is set.
Slide the POWER switch to ON.
No sound.
The earphone is plugged in.
Unplug the earphone.
The volume is turned down completely.
Press the + VOLUME button to adjust the sound level.
Cannot erase.
The erase guard is set. ("♂" appears.)
Cancel the erase guard. Refer to "ERASE GUARD".(See Page 24.)
"CANNOT INSERT" appears.
Insertion recording is not available.
"MEMORY FULL" appears.
The memory capacity is full.
Erase unnecessary files. Refer to "ERASING". (See Page 20.)
"FILE FULL" appears.
Frequent “Insertion Recording” and “Partial Erasing” have been made on one file.
Connect to your PC then save the backup data.
SYMPTOM
POSSIBLE CAUSE
CORRECTIVE ACTION
"NO CARD" appears.
The SD Card is not inserted.
Insert the SD Card.
"NO DATA" appears.
The file cannot be created.
Execute "ERASE ALL MEMORY". (See Page 22.)
"CARD ERR" appears.
The data cannot be read correctly.
Remove the SD Card once, then insert it again. If it does not work, "ERASE ALL MEMORY". (See Page 22.)
"LIMITED TIME" appears.
Recording time is more than 6 hours.
Record on a new file.
"LOCKED CARD" appears.
The write-protect of SD Card is locked.
Set the write-protect switch to "Unlock". (See page 2.)
Operation or display is not normal.
The unit must be reset.
See "WHAT TO DO IF...". (See Page 5.)
READ CAREFULLY BEFORE USE!!!
USER LICENSE AGREEMENT
IMPORTANT! — BY INSTALLING, COPYING, ACCESSING, DOWNLOADING, AND/OR USING THIS THE SOFTWARE, YOU ARE CONSENTING TO BE BOUND BY AND ARE BECOMING A PARTY TO THIS AGREEMENT AS A LICENSEE. IF YOU DO NOT AGREE TO ALL OF THE TERMS OF THIS AGREEMENT, TERMINATE THIS INSTALLATION PROCESS OR, IF THE SOFTWARE IS ALREADY INSTALLED, IMMEDIATELY UNINSTALL IT.
THIS USER LICENSE AGREEMENT (“this Agreement”) shall serve as a legally binding instrument between you (as “Licensee”, whether an individual or a corporation, regardless) and SANYO Electric Co., Ltd. (“Licensor”) concerning the Licensee’s use of a single SANYO SOFTWARE PRODUCT (“the Software”) under the terms and conditions set forth herein. The Software shall include, but without limitation, computer software and related media materials, printed materials (documents such as user manuals), and electronic documents whether or not retrieved by licensee “on-line”, and shall include any updates and upgrades thereof supplied by Licensor having additional features and functions.
Where a separate User License Agreement is attached to any the Software supplied by Licensor, the terms and conditions of that User License Agreement shall also apply in addition to the terms and conditions set forth in this Agreement.
If you are unable to agree to any of the terms and conditions set forth herein, Licensor is unable to grant you the license to install, use or copy the Software.
The Software covered under this Agreement is protected under the international conventions and treaties on copyright and the related laws and regulations. This license shall constitute a grant of a license to Licensee for a single use of the Software and may not be deemed under any circumstances to constitute a sale of the Software itself.
1. Grant of License
Licensor shall grant Licensee a non-exclusive, non-sublicensable, non-transferable license for the use of the Software under the terms and conditions set forth herein:
- System Software
Licensee may use the Software only in a single computer or on a computer network (“the Computer”, including without limitation, workstation, terminal, and/or other digital or electronic device) in binary executable form.
2. Other rights and limitations
- Reverse engineering, etc.
Except as expressly provided herein, Licensee shall not copy, modify reproduce, display, decompile, reverse engineer, reverse assemble, store, translate, sell, lease or otherwise transfer, distribute the Software, in whole or in part, nor may Licensee use the Software with the intent to clone any proprietary product to Licensor.
- Separation or division of the Software prohibited
This license hereby is granted for a single use only. In no circumstances shall Licensee separate, divide or compartmentalize any constituent portion(s) of the Software into multiple parts, sections, or compartments for use in multiple computers.
- Rental, lease or loan prohibited Licensee shall not lend, lease or loan the Software to any party(ies).
- User support service by Licensor Licensor may choose to provide user support service in accordance with the Licensor's policy set out in User Manual, On-line documents, or other printed matters made available by Licensor from time to time (the “Support Service”). All additional software code made available to Licensee as a part of the Support Service shall be deemed to constitute a part of the Software hereof to which all the terms and conditions of this Agreement shall apply. Licensor shall be entitled to use for commercial purposes or otherwise any and all technical information (the “Technical Information”) provided by Licensee to Licensor, provided, however, that Licensor shall ensure that the identity of the Licensee shall remain undisclosed in the Licensor’s use of all such Technical Information.
3. Other Intellectual Proprietary Rights
Licensor or its supplier is the owner of all right, title and interest in and to the Software and its documents such as user manual and any and all copies thereof. The proprietary ownership of all data operated using this Software shall remain with the respective owner(s) and shall be protected by the international conventions and treaties and other intellectual proprietary rights. Licensee shall not be deemed, by anything contained in or done pursuant to this Agreement to acquire any right, title, or interest in any trademark, copyright, patent or other intellectual property of Licensor, and shall do nothing to prejudice the value or validity of the respective owner's rights therein or ownership thereof. Licensor shall preserve the proprietary ownership of any and all rights and titles in the Software not specifically provided herein.
4. Backup copy
After having installed a copy of the Software pursuant to this Agreement, Licensee may make a single copy of the Software for backup and archival purposes only, provided that any copy must contain all proprietary notices included in the original. If another original medium becomes necessary to use the Software on a computer under this Agreement, Licensee may make a single copy of the Software. Except as specifically provided herein, Licensee shall refrain from making copy of the Software or its incidental documents such as user manual in any manner whatsoever.
5. DISCLAIMER OF WARRANTY:
THE SOFTWARE IS DEEMED ACCEPTED BY LICENSEE UPON IT'S USE BY LICENSEE.
THE SOFTWARE IS PROVIDED TO LICENSEE AS IS, WITHOUT WARRANTY OF ANY KIND. TO THE MAXIMUM EXTENT PERMITTED BY APPLICABLE LAW. LICENSOR FURTHER DISCLAIMS ALL WARRANTIES, INCLUDING WITHOUT LIMITATION, ANY IMPLIED WARRANTIES OF MERCHANTABILITY, FITNESS FOR A PARTICULAR PURPOSE, AND NON INFRINGEMENT. THE ENTIRE RISK ARISING OUT OF THE USE OR PERFORMANCE OF THE PRODUCT AND DOCUMENTATION REMAINS WITH LICENSEE. IN NO EVENT SHALL LICENSOR OR ITS SUPPLIERS BE LIABLE FOR ANY CONSEQUENTIAL, INCIDENTAL, DIRECT, INDIRECT, SPECIAL, PUNITIVE OR OTHER DAMAGES WHATSOEVER (INCLUDING WITHOUT LIMITATION, DAMAGES FOR LOSS OF BUSINESS PROFITS, BUSINESS INTERRUPTION, LOSS OF BUSINESS INFORMATION, OR OTHER PECUNIARY LOSS) ARISING OUT OF THIS AGREEMENT OR THE USE OF OR INABILITY TO USE THE PRODUCT, EVEN IF LICENSOR HAS BEEN ADVISED OF THE POSSIBILITY OF SUCH DAMAGES.LICENSOR DOES NOT WARRANT THAT THE SOFTWARE DOES NOT INCLUDE ANY VIRUS OR DEFECTS, THE SOFTWARE ROUTINE OR OTHER SOFTWARE DESIGNED TO RESTRICT UNAUTHORIZED ACCESS; OR TO DISABLE, ERASE OR OTHERWISE HARM THE SOFTWARE,
HARDWARE, OR DATA; OR TO PERFORM ANY OTHER SUCH ACTIONS AND LICENSOR HEREBY EXPRESSLY DISCLAIMS ANY AND ALL LIABILITIES TO RESTORE ANY SUCH DEFECTS.
6. Indemnification:
Licensor will not have any liability to Licensee for, and Licensee will defend and hold Licensor harmless against, any claim, expense, judgment, liability, or loss (including attorneys' fees and expert witnesses' expenses) based on Licensee's use of any content of the Software, arising from any intellectual property claim (including patent, trademark, copyright, or trade secret infringement), any right of publicity or privacy claim, or any defamation or unfair competition claim.
7. Termination.
Without prejudice to any other rights, Licensor may terminate this Agreement if Licensee fails to comply with the terms and conditions herein. Licensee may also terminate this Agreement at any time by destroying the Software and Documentation and all copies thereof. The provisions of sections 2, 3, 4, 5, 6 and 7 shall survive any termination of this Agreement.
DEUTSCH
INHALTSVERZEICHNIS
flowchart
graph TD
    A["Lock"] --> B["*Lock"]
Zubehör
USB Kabel x 1
CD-ROM x 1
Gehäuse x 1
natural_image
Diagram of a mechanical device with an arrow indicating direction, no text or symbols present2
natural_image
Diagram of a battery holder with two cylindrical cells and an open casing, showing charge distribution (no text or symbols)natural_image
Diagram of a mechanical component with a curved arrow indicating rotation or movement (no text or symbols)2
natural_image
Line drawing of a printer's internal structure with an arrow indicating insertion or removal (no text or symbols)natural_image
Line drawing of a portable electronic device with a screen and buttons (no text or symbols)Betriebs- schalter
Hinweis:
ACTIONS PRÉLIMINAIRES 8
RÉGLAGE DE LA DATE ET DE L'HEURE 9
SÉLECTION DE DOSSIER ET DE MENU 10
ENREGISTREMENT 14
ÉDITION D'ENREGISTREMENTS 16
LECTURE 18
SÉLECTION DE L'AFFICHAGE 20
EFFACEMENT 21
PROTECTION CONTRE L'EFFACEMENT 25
MINUTERIE DE L'ALARME 26
CONDITIONS REQUISES POUR L'INSTALLATION DU LOGICIEL...... 27
LECTURE/ÉDITION D'UN FICHIER DE DONNÉES ENREGISTRÉ
AVEC VOTRE PC 27
CONNEXION AU PC 29
NETTOYAGE DU BOÎTIER 31
GUIDE DE DÉPANNAGE 32
ACCORD DE LICENCE 34
F-1
[FRANÇAIS]
é n é ralement des marques ou des marques d é pos é es de leurs soci é t é s d 'exploitation respectives. Les symboles ™ et ® ne figurent pas dans ce manuel.
Accessoires
Câble USB x 1
CD-ROM x 1
Étui x 1
AAA/LR03/HP16 Pile x 2
natural_image
Diagram of a mechanical device with directional arrows indicating movement or force (no text or symbols)2
natural_image
Diagram of a battery holder with two batteries and an open casing, showing charge distribution (no text or symbols)natural_image
Diagram of a mechanical component with a curved arrow indicating rotation or movement (no text or symbols)2
natural_image
Line drawing of a printer's internal structure with a paper clip inserted, showing no text or symbols.ACTIONS PRÉLIMINAIRES
AUTHOR → EDIT → Date et heure → ALARM → VAS → REC TIME
→ BEEP → ERASE GUARD → 12/24 → LCD LEVEL → VERSION
natural_image
Line drawing of a portable electronic device with buttons and a screen (no text or symbols)natural_image
Line drawing of a portable electronic device with front panel and control buttons (no text or symbols)Remarque:
Accesorios
Cable USB x 1
CD-ROM x 1
Funda x 1
AAA/LR03/HP16 Pilas x 2
natural_image
Diagram of a mechanical device with an arrow indicating direction, no text or symbols present2
natural_image
Line drawing of a battery holder with two batteries and an open casing (no text or symbols)natural_image
Diagram of a mechanical component with a curved arrow indicating rotation or force (no text or symbols)2
natural_image
Line drawing of a printer's internal structure with an arrow indicating insertion (no text or symbols)- Cierre la tapa.
natural_image
Line drawing of a portable electronic device with a screen and buttons (no text or symbols)natural_image
Line drawing of a portable electronic device with front panel and buttons (no text or symbols)Borrado parcial (borrado A-B)
Nota:
(Extra high-quality mode)
Output power
Speaker:200 mW(8 Ω, DC 3V)
Headphones:
200 mW(16 Ω, DC 3V)
Power source
DC: DC 3V
("AAA/LR03/HP16" x 2)
Output terminal
EAR
Loudspeaker
28 mm dia.
Dimensions (W x H x D)
Approx. 48 x 113 x 19 mm
Weight
Approx. 65 g (without batteries)
IMPORTANT INFORMATION
Because its products are subject to continuous improvement, SANYO reserves the rights to modify product designs and specifications without notice and without incurring any obligation.
This set complies with the EMC Directive 89/336 and with the LVD Directive 73/23.



- ENGLISH
- CONTENTS
- PRECAUTIONS
- Accessories
- Notes on clock setting
- CONTROLS
- Display
- POWER SUPPLY
- Batteries
- Battery indicator ( 0)
- CAUTION:
- WHAT TO DO IF...
- SD CARD
- Inserting the SD Card
- Removing the SD Card
- Note:
- BEFORE OPERATION
- Turning the power on and off
- Auto power off function
- Hold function
- Earphone
- External microphone
- ADJUSTING THE DATE AND TIME
- Changing the clock to the 12-hour (or 24-hour) display
- SELECTING THE FOLDER AND MENU
- Selecting the folder
- Selecting the menu
- Various menu modes
- RECORDING
- Temporarily stopping recording (Recording pause)
- Creating a new file number
- EDITING THE RECORDED DATA
- Overwrite recording
- Insertion recording
- PLAYBACK
- Temporarily stopping playback (Playback pause)
- File skip
- File search
- Review
- Index search
- SELECTING DISPLAY
- In the recording mode:
- In the playback mode:
- In the stop mode:
- ERASING
- Important Note:
- Preparation
- Erasing one file
- Erasing one folder
- Erasing Author ID
- Erasing all memories
- Partial erasing (A-B erasing)
- ERASE GUARD
- ALARM TIMER
- BEFORE INSTALLING THE APPLICATION SOFTWARE
- PLAYING BACK/EDITING A DATA FILE RECORDED WITH YOUR PC
- PC CONNECTION
- Selecting the action Windows is to take
- In Regard to the Display with Windows Explorer
- CLEANING THE CABINET
- SERVICE
- UNITED KINGDOM
- TROUBLESHOOTING GUIDE
- SYMPTOM
- POSSIBLE CAUSE
- CORRECTIVE ACTION
- READ CAREFULLY BEFORE USE!!!
- USER LICENSE AGREEMENT
- Grant of License
- - System Software
- Other rights and limitations
- - Reverse engineering, etc.
- - Separation or division of the Software prohibited
- Other Intellectual Proprietary Rights
- Backup copy
- DISCLAIMER OF WARRANTY:
- Indemnification:
- Termination.
- DEUTSCH
- INHALTSVERZEICHNIS
- Zubehör
- Hinweis:
- F-1
- [FRANÇAIS]
- Accessoires
- ACTIONS PRÉLIMINAIRES
- Remarque:
- Accesorios
- Borrado parcial (borrado A-B)
- Nota:
- IMPORTANT INFORMATION
Brand : SANYO
Model : ICR-1000
Category : Dictaphone