USER MANUAL WD90TA046BE SAMSUNG
natural_image
Blurred grayscale image with no discernible text, symbols, or identifiable objects
Washing Machine
User manual
WD9*TA***** / WD8*TA***** / WD7*TA*****

Contents
What you need to know about the safety instructions 4
Important safety symbols 4
Important safety precautions 5
Critical installation warnings 8
Installation cautions 9
Critical usage warnings 10
Usage cautions 11
Critical cleaning warnings 14
Instructions about the WEEE 15
Installation 16
What's included 16
Installation requirements 18
Step-by-step installation 20
Before you start 30
Initial settings 30
Laundry guidelines 30
Detergent recommendation 33
Detergent drawer guidelines 34
Operations 37
Control panel 37
Simple steps to start 38
Drying Only 39
Cycle overview 40
Settings 44
2 English
Maintenance 45
Drum clean 45
Smart check
Emergency drain 47
Cleaning
Recovery from freezing 51
Care against an extended time of disuse 51
Troubleshooting 52
Checkpoints
Information codes 56
Specifications 59
Fabric care chart 59
Protecting the environment 60
Spare parts guarantee 60
Specification sheet 61
English 3


Congratulations on your new Samsung washing machine. This manual contains important information on the installation, use and care of your appliance. Please take some time to read this manual to take full advantage of your washing machine's many benefits and features.
What you need to know about the safety instructions
Please read this manual thoroughly to ensure that you know how to safely and efficiently operate the extensive features and functions of your new appliance. Please store the manual in a safe location close to the appliance for future reference. Use this appliance only for its intended purpose as described in this instruction manual.
Warnings and Important Safety Instructions in this manual do not cover all possible conditions and situations that may occur. It is your responsibility to use common sense, caution and care when installing, maintaining and operating your washing machine.
Because the following operating instructions cover various models, the characteristics of your washing machine may differ slightly from those described in this manual and not all warning signs may be applicable. If you have any questions or concerns, contact your nearest service centre or find help and information online at www.samsung.com.
Important safety symbols
What the icons and signs in this user manual mean:

WARNING
Hazards or unsafe practices that may result in severe personal injury, death and/or property damage.

CAUTION
Hazards or unsafe practices that may result in personal injury and/or property damage.

NOTE
Indicates that a risk of personal injury or material damage exists.

Read the instructions
These warning signs are here to prevent injury to yourself and others.
Please follow them explicitly.
After reading this manual, store it in a safe place for future reference.
Read all instructions before using the appliance.
As with any equipment that uses electricity and moving parts, potential hazards exist. To safely operate this appliance, familiarize yourself with its operation and exercise care when using it.
4 English

Important safety precautions
WARNING
To reduce the risk of fire, electric shock, or injury to persons when using your appliance, follow basic precautions, including the following:
- This appliance is not to be used by persons (including children) with reduced physical, sensory or mental capabilities, or lack of experience and knowledge, unless they have been given supervision or instruction concerning use of the appliance by a person responsible for their safety.
- For use in Europe: This appliance can be used by children aged from 8 years and above and persons with reduced physical, sensory or mental capabilities or lack of experience and knowledge if they have been given supervision or instruction concerning use of the appliance in a safe way and understand the hazards involved. Children shall not play with the appliance. Cleaning and user maintenance shall not be made by children without supervision.
- Children should be supervised to ensure that they do not play with the appliance.
- If the supply cord is damaged, it must be replaced by the manufacturer, its service agent or similarly qualified persons in order to avoid a hazard.
- The new hose-sets supplied with the appliance are to be used and that old hose-sets should not be reused.
- For appliances with ventilation openings in the base, that a carpet must not obstruct the openings.
English 5
-
For use in Europe: Children of less than 3 years should be kept away unless continuously supervised.
-
CAUTION: In order to avoid a hazard due to inadvertent resetting of the thermal cut-out, this appliance must not be supplied through an external switching device, such as a timer, or connected to a circuit that is regularly switched on and off by the utility.
-
The tumble dryer is not to be used if industrial chemicals have been used for cleaning.
-
The lint trap has to be cleaned frequently, if applicable.
-
Lint must not to be allowed to accumulate around the tumble dryer. (not applicable for appliances intended to be vented to the exterior of the building)
-
Adequate ventilation has to be provided to avoid the back flow of gases into the room from appliances burning other fuels, including open fires.
-
Do not dry unwashed items in the tumble dryer.
-
Items that have been soiled with substances such as cooking oil, acetone, alcohol, petrol, kerosene, spot removers, turpentine, waxes and wax removers should be washed in hot water with an extra amount of detergent before being dried in the tumble dryer.
-
Items such as foam rubber (latex foam), shower caps, waterproof textiles, rubber backed articles and clothes or pillows fitted with foam rubber pads should not be dried in the tumble dryer.
-
Fabric softeners, or similar products, should be used as specified by the fabric softener instructions.
-
The final part of a tumble dryer cycle occurs without heat (cool down cycle) to ensure that the items are left at a temperature that ensures that the items will not be damaged.
- Remove all objects from pockets such as lighters and matches.
- WARNING: Never stop a tumble dryer before the end of the drying cycle unless all items are quickly removed and spread out so that the heat is dissipated.
- Exhaust air must not be discharged into a flue which is used for exhausting fumes from appliances burning gas or other fuels.
- The appliance must not be installed behind a lockable door, a sliding door or a door with a hinge on the opposite side to that of the tumble dryer, in such a way that a full opening of the tumble dryer door is restricted.
- WARNING: The appliance must not be supplied through an external switching device, such as a timer, or connected to a circuit that is regularly switched on and off by a utility.
-
This appliance is intended to be used in household only and it is not intended to be used such as:
-
staff kitchen areas in shops, offices and other working environments;
- farm houses;
- by clients in hotels, motels and other residential type environments;
- bed and breakfast type environments;
- areas for communal use in blocks of flats or in launderettes.


Critical installation warnings

WARNING
The installation of this appliance must be performed by a qualified technician or service company.
- Failure to do so may result in electric shock, fire, an explosion, problems with the product, or injury.
The appliance is heavy, therefore take care when lifting it.
Plug the power cord into an AC 220 - 240 V / 50 Hz wall socket or higher and use the socket for this appliance only. Never use an extension cord.
- Sharing a wall socket with other appliances using a power strip or extending the power cord may result in electric shock or fire.
- Ensure that the power voltage, frequency, and current are the same as those of the product specifications. Failure to do so may result in electric shock or fire. Plug the power plug into the wall socket firmly.
Remove all foreign substances such as dust or water from the power plug terminals and contact points using a dry cloth on a regular basis.
• Unplug the power plug and clean it with a dry cloth.
- Failure to do so may result in electric shock or fire.
- Plug the power plug into the wall socket so that the cord is running towards the floor. If you plug the power plug into the socket in the opposite direction, the electric wires within the cable may be damaged and this may result in electric shock or fire.
Keep all packaging materials out of the reach of children as these may be dangerous.
• If a child places a bag over its head, it may suffocate.
When the appliance, power plug or power cord is damaged, contact your nearest service centre.
This appliance must be properly grounded.
Do not ground the appliance to a gas pipe, plastic water pipe, or telephone line.
• This may result in electric shock, fire, an explosion, or problems with the product.
- Never plug the power cord into a socket that is not grounded correctly and make sure that it is in accordance with local and national regulations.
Do not install this appliance near a heater or any inflammable material.
Do not install this appliance in a humid, oily or dusty location, or in a location exposed to direct sunlight or water (rain drops).
Do not install this appliance in a location exposed to low temperatures.
- Frost may cause the tubes to burst.
8 English
Do not install this appliance in a location where gas may leak.
• This may result in electric shock or fire.
Do not use an electric transformer.
• This may result in electric shock or fire.
Do not use a damaged power plug, damaged power cord, or loose wall socket.
• This may result in electric shock or fire.
Do not pull or excessively bend the power cord.
Do not twist or tie the power cord.
Do not hook the power cord over a metal object, place a heavy object on the power cord, insert the power cord between objects, or push the power cord into the space behind the appliance.
• This may result in electric shock or fire.
Do not pull the power cord when unplugging the power plug.
• Unplug the power plug by holding the plug.
- Failure to do so may result in electric shock or fire.
This appliance should be positioned so that the power plug, the water supply taps, and the drain pipes are accessible.
Following the repair by a non-authorized service provider, self-repair or non-professional repair of the product, Samsung is not liable for any damage to the product, any injury or any other product safety issue caused by any attempt to repair the product which does not carefully follow these repair and maintenance instructions. Any damage to the product caused by an attempt to repair the product by any person other than a Samsung certifie service provider will not be covered by the warranty.
Installation cautions

CAUTION
This appliance should be positioned in such a way that the power plug is easily accessible.
- Failure to do so may result in electric shock or fire due to electric leakage.
Install your appliance on a solid, level floor that can support its weight.
- Failure to do so may result in abnormal vibrations, movement, noise, or problems with the product.
English 9


Critical usage warnings

WARNING
If the appliance is flooded, turn off the water & power supplies immediately and contact your nearest service centre.
- Do not touch the power plug with wet hands.
- Failure to do so may result in electric shock.
If the appliance generates a strange noise, a burning smell, or smoke, unplug the power plug immediately and contact your nearest service centre.
- Failure to do so may result in electric shock or fire.
In the event of a gas leak (such as propane gas, LP gas, etc.), ventilate immediately without touching the power plug. Do not touch the appliance or power cord.
• Do not use a ventilating fan.
• A spark may result in an explosion or fire.
Do not let children play in or on the washing machine. In addition, when disposing of the appliance, remove the washing machine door lever.
• If trapped inside the product, children may suffocate to death.
Make sure to remove the packaging (sponge, styrofoam) attached to the bottom of the washing machine before using it.
Do not wash items contaminated with gasoline, kerosene, benzene, paint thinner, alcohol or other inflammable or explosive substances.
• This may result in electric shock, fire, or an explosion.
Do not open the washing machine door by force while it is operating (high-temperature washing/drying/spinning).
- Water flowing out of the washing machine may result in burns or cause the floor to be slippery. This may result in injury.
- Opening the door by force may result in damage to the product or injury.
Do not insert your hand under the washing machine while an operation is in progress.
• This may result in injury.
Do not touch the power plug with wet hands.
• This may result in electric shock.
Do not turn the appliance off by unplugging the power plug while an operation is in progress.
- Plugging the power plug into the wall socket again may cause a spark and result in electric shock or fire.
Do not let children climb in or onto the appliance.
• This may result in electric shock, burns or injury.
Do not insert your hand or a metal object under the washing machine while it is operating.
• This may result in injury.
Do not unplug the appliance by pulling the power cord. Always grip the plug firmly and pull it straight out of the outlet.
- Damage to the power cord may cause a short-circuit, fire and/or electric shock.
Do not attempt to repair, disassemble, or modify the appliance yourself.
- Do not use a fuse (such as copper, steel wire, etc.) other than a standard fuse.
- When the appliance needs to be repaired or reinstalled, contact your nearest service centre.
- Failure to do so may result in electric shock, fire, problems with the product, or injury.
If the water supply hose comes loose from the water tap and floods the appliance, unplug the power plug.
- Failure to do so may result in electric shock or fire.
Unplug the power plug when the appliance is not being used for long periods of time or during a thunder or lightning storm.
- Failure to do so may result in electric shock or fire.
If any foreign substance enters into the appliance, unplug the power plug and contact you nearest Samsung Customer Service.
• This may result in electric shock or fire.
Do not let children (or pets) play in or on your washing machine. The washing machine door does not open easily from the inside and children may be seriously injured if trapped inside.
Usage cautions

CAUTION
When the washing machine is contaminated by a foreign substance such as detergent, dirt, food waste, etc., unplug the power plug and clean the washing machine using a damp, soft cloth.
- Failure to do so may result in discolouration, deformation, damage, or rust.
The front glass may be broken by a strong impact. Take care when using the washing machine.
• If the glass is broken, it may result in injury.
After a water supply failure or when reconnecting the water supply hose, open the water tap slowly.
Open the water tap slowly after a long period of non-use.
- The air pressure in the water supply hose or the water pipe may damage a product part or result in a water leak.
If a draining error occurs during an operation, check if there is a draining problem.
- If the washing machine is used when it is flooded because of a draining problem, it may result in electric shock or fire.
Insert the laundry into the washing machine completely so that the laundry does not get caught in the door.
- If laundry gets caught in the door, it may result in damage to the laundry or the washing machine, or result in a water leak.
Turn the water supply off when the washing machine is not being used.
Ensure that the screws on the water supply hose connector are properly tightened.
- Failure to do so may result in property damage or injury.
Ensure that the rubber seal and front door glass are not contaminated by a foreign substance (e.g. waste, thread, hair, etc.).
- If a foreign substance is caught in the door or the door is not completely closed, it may cause a water leak.
Open the water tap and check if the water supply hose connector is firmly tightened and that there is no water leak before using the product.
• If the screws on the water supply hose connector are loose, it may result in a water leak.
The product you have purchased is designed for domestic use only.
Using the product for business purposes qualifies as a product misuse. In this case, the product will not be covered by the standard warranty provided by Samsung and no responsibility can be attributed to Samsung for malfunctions or damages resulting from such misuse.
Do not stand on the appliance or place objects (such as laundry, lighted candles, lighted cigarettes, dishes, chemicals, metal objects, etc.) on the appliance.
• This may result in electric shock, fire, problems with the product, or injury.
Do not spray volatile material such as insecticide onto the surface of the appliance.
- As well as being harmful to humans, this may result in electric shock, fire or problems with the product.
Do not place objects that generate electromagnetic fields near the washing machine.
• This may result in injury due to a malfunction.
Water drained during a high-temperature wash or drying cycle is hot. Do not touch the water.
• This may result in burns or injury.
12 English
Do not wash, spin, or dry water-proof seats, mats, or clothing (*) unless your appliance has a special cycle for washing these items.
(*): Woollen bedding, rain covers, fishing vests, ski pants, sleeping bags, diaper covers, sweat suits, and bicycle, motor cycle and car covers, etc.
- Do not wash thick or hard mats even if the washing machine mark is on the care label. This may result in injury or damage to the washing machine, walls, floor, or clothing due to abnormal vibrations.
- Do not wash throw rugs or doormats with rubber backing. The rubber backing may come off and stick to inside the drum, and this may result in malfunction such as a drainage error.
Do not operate the washing machine when the detergent drawer is removed.
• This may result in electric shock or injury due to a water leak.
Do not touch the insides of the drum during or just after drying as it is hot.
• This may result in burns.
The door glass becomes hot during washing and drying. Therefore, do not touch the door glass.
Also, do not allow children to play around the washing machine or touch the door glass.
• This may result in burns.
Do not insert your hand into the detergent drawer.
- This may result in injury as your hand may be caught by the detergent input device.
- The liquid detergent guide (applicable models only) is not used for powder detergent. Remove the guide when using powder detergent.
Do not place any objects (such as shoes, food waste, animals) other than laundry into the washing machine.
- This may result in damage to the washing machine, or injury and death in the case of pets due to the abnormal vibrations.
Do not press the buttons using sharp objects such as pins, knives, fingernails, etc.
• This may result in electric shock or injury.
Do not wash laundry contaminated by oils, creams or lotions usually found in skincare shops or massage clinics.
- This may cause the rubber seal to become deformed and result in a water leak.
Do not leave metal objects such as safety pins, hair pins or bleach in the drum for long periods of time.
• This may cause the drum to rust.
- If rust starts appearing on the surface of the drum, apply a (neutral) cleansing agent to the surface and use a sponge to clean it. Never use a metal brush.
Do not use dry cleaning detergent directly and do not wash, rinse, or spin laundry contaminated by dry cleaning detergent.
- This may result in spontaneous combustion or ignition due to the heat from the oxidation of the oil.
Do not use water from water cooling/heating devices.
• This may result in problems with the washing machine.
Do not use natural hand-washing soap for the washing machine.
- If it hardens and accumulates inside the washing machine, it may result in problems with the product, discolouration, rust, or bad odours.
Place socks and brassieres in a washing net and wash them with the other laundry.
Do not wash large laundry items such as bedding in the washing net.
- Failure to do so may result in injury due to abnormal vibrations.
Do not use hardened detergent.
• If it accumulates inside the washing machine, it may result in a water leak.
Make sure that the pockets of all the clothing items to be washed are empty.
- Hard, sharp objects such as coins, safety pins, nails, screws, or stones can cause extensive damage to the appliance.
Do not wash clothing with large buckles, buttons or other heavy metal objects.
Sort the laundry by color on the basis of its colorfastness and select the recommended cycle, water temperature and additional functions.
• This may result in discoloration or fabric damage.
Take care that children's fingers are not caught in the door when you close it.
- Failure to do so may result in injury.
To prevent odours and mould, leave the door open after a wash cycle to allow the drum to dry.
To prevent limescale build up, leave the detergent drawer open after a wash cycle and dry inside it.
Critical cleaning warnings

WARNING
Do not clean the appliance by spraying water directly onto it.
Do not use the a strong acidic cleaning agent.
14 English
Do not use benzene, thinner or alcohol to clean the appliance.
- This may result in discolouration, deformation, damage, electric shock or fire.
Before cleaning or performing maintenance, unplug the appliance from the wall socket.
- Failure to do so may result in electric shock or fire.
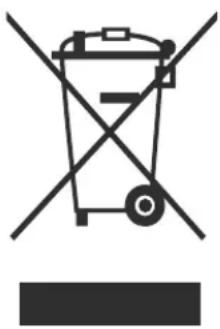
Instructions about the WEEE
natural_image
Symbol of a trash bin crossed with no text or numbers, representing environmental restriction (no text present)
Correct Disposal of This Product (Waste Electrical & Electronic Equipment)
(Applicable in countries with separate collection systems)
This marking on the product, accessories or literature indicates that the product and its electronic accessories (e.g. charger, headset, USB cable) should not be disposed of with other household waste at the end of their working life. To prevent possible harm to the environment or human health from uncontrolled waste disposal, please separate these items from other types of waste and recycle them responsibly to promote the sustainable reuse of material resources.
Household users should contact either the retailer where they purchased this product, or their local government office, for details of where and how they can take these items for environmentally safe recycling.
Business users should contact their supplier and check the terms and conditions of the purchase contract. This product and its electronic accessories should not be mixed with other commercial wastes for disposal.
For information on Samsung's environmental commitments and product regulatory obligations, e.g. REACH, WEEE or Batteries, visit our sustainability page available via www.samsung.com
Installation
Follow these instructions carefully to ensure proper installation of the washing machine and to prevent accidents when doing laundry.
What's included
Make sure all the parts are included in the product package. If you have a problem with the washing machine or the parts, contact a local Samsung customer centre or the retailer.
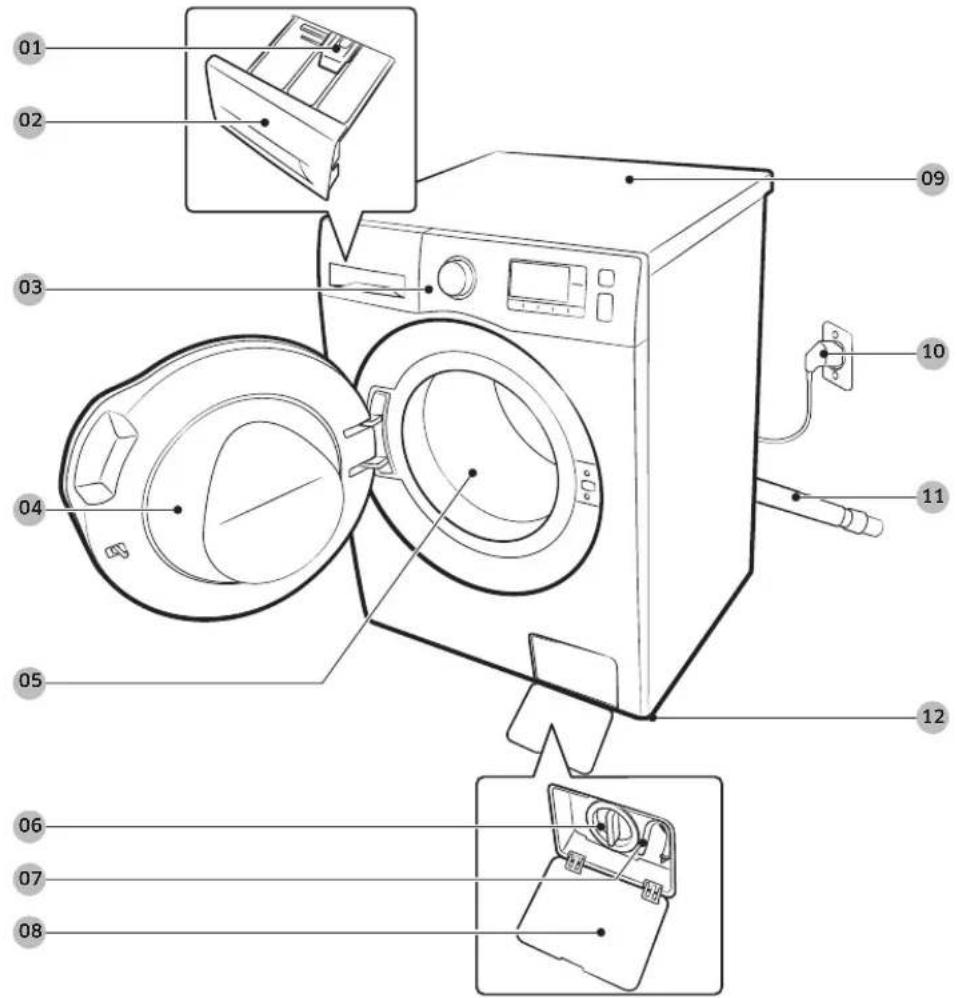
01 Release lever
04 Door
07 Emergency drain tube
10 Power plug
02 Detergent drawer
05 Drum
08 Filter cover
11 Drain hose
03 Control panel
06 Lint filter
09 Worktop
12 Levelling feet
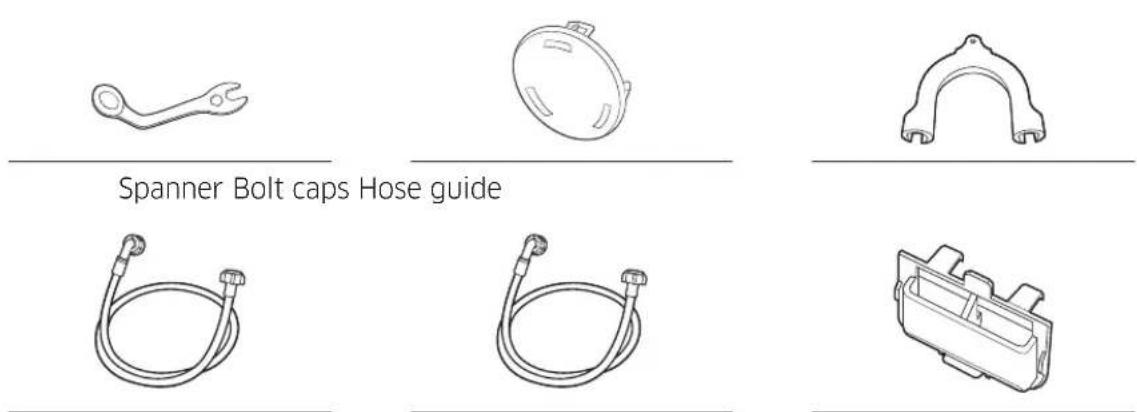
Cold water hose Hot water hose Liquid detergent container
Cap fixer
NOTE
- Spanner: For removing the shipping bolts and levelling the washing machine.
- Bolt caps: For covering the holes after removing the shipping bolts. The provided number of bolt caps (3 to 6) depends on the model.
- Hose guide: For hanging the drain hose in the drainpipe or wash-basin.
- Cold/Hot water hose: For supplying water to the washing machine. (Hot water hoses is for applicable models only.)
- Liquid detergent guide: Insert it in the detergent compartment to use liquid detergent. (Applicable models only)
Installation
Installation requirements
Electrical supply and grounding
• AC 220-240 V / 50 Hz fuse or circuit breaker is required
- Use an individual branch circuit specific to the washing machine
To ensure proper grounding, the washing machine comes with a power cord featuring a three-prong grounding plug for use in a properly installed and grounded outlet.
Check with a qualified electrician or serviceperson if you are not sure about the grounding.
Do not modify the provided plug. If it does not fit the outlet, call a qualified electrician to install a proper outlet.

WARNING
- Do NOT use an extension cord.
- Use only the power cord that comes with the washing machine.
- Do NOT connect the ground wire to plastic plumbing, gas lines, or hot water pipes.
- Improperly connected grounding conductors may cause electric shock.
Water supply
A proper water pressure for this washing machine is between 50 kPa and 800 kPa. Water pressure less than 50 kPa may cause the water valve not to close completely. Or, it may take longer to fill the drum, causing the washing machine to turn off. Water taps must be within 120 cm from the rear of the washing machine so that the provided inlet hoses reach the washing machine.
To reduce the risk of leaks:
- Make sure water taps are easily accessible.
- Turn off the taps when the washing machine is not in use.
- Check for any leaks at the water inlet hose fittings on a regular basis.

CAUTION
Before using the washing machine for the first time, check all connections at the water valve and taps for any leaks.
Drain
Samsung recommends a standpipe in height of 60\~90 cm. The drain hose must be connected through the hose clip to the standpipe, and the standpipe must fully cover the drain hose.
Flooring
For best performance, the washing machine must be installed on a solid floor. Wood floors may need to be reinforced to minimize vibration and/or unbalanced loads. Carpeting and soft tile surfaces are not a good resistance to vibrations and may cause the washing machine to move slightly during the spin cycle.

CAUTION
Do NOT install the washing machine on a platform or a poorly supported structure.
Water temperature
Do not install the washing machine in areas where water may freeze as the washing machine always retains some water in its water valves, pumps, and/or hoses. Frozen water left in the connection parts may cause damage to belts, the pump, and other components of the washing machine.
Alcove or closet installation
Minimum clearance for stable operation:
| Sides 25 | mm Rear | 50 mm | |
| Top 25 | mm Front | 550 mm | |
If both the washing machine and a dryer are installed in the same location, the front of the alcove or closet must have at least a 550 mm unobstructed air opening. Your washing machine alone does not require a specific air opening.

Installation
Step-by-step installation
STEP 1 Select a location
Location requirements:
• Solid, level surface without carpeting or flooring that may obstruct ventilation
• Away from direct sunlight
- Adequate room for ventilation and wiring
• The ambient temperature is always higher than the freezing point (0 °C)
• Away from a heat source
STEP 2 Remove the shipping bolts
Unpack the product package and remove all shipping bolts.

NOTE
Number of shipping bolts may differ depending on the model.

WARNING
- Packaging materials can be dangerous to children. Dispose all packaging material (plastic bags, polystyrene, etc.) out of children's reach.
- To avoid injury, cover the holes with bolt caps after removing the shipping bolts. Do not move the washing machine without the shipping bolts in place. Assemble the shipping bolts before moving the washing machine to another location. Keep the shipping bolts in a safe place for future use.

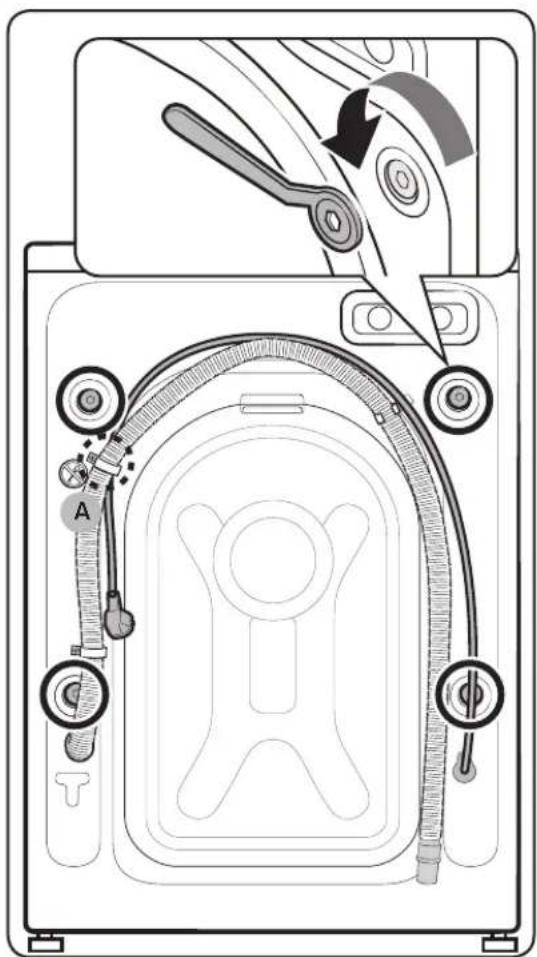
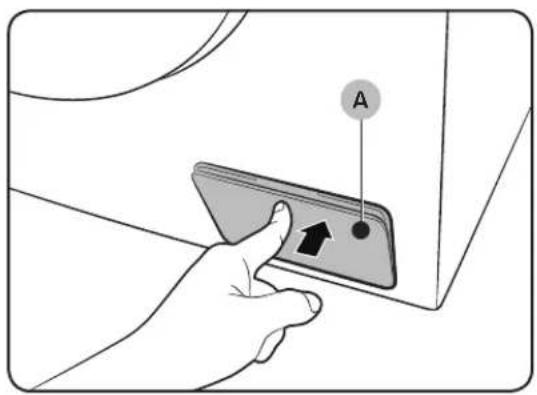
- Locate the shipping bolts (marked with circle in the figure) on the rear side of the washing machine.
CAUTION
Do not remove the screw (A) that fixes the hose clip.
- Using the supplied spanner, loosen all the shipping bolts by turning them counterclockwise.
NOTE
You must keep the shipping bolts for future use.
Installation
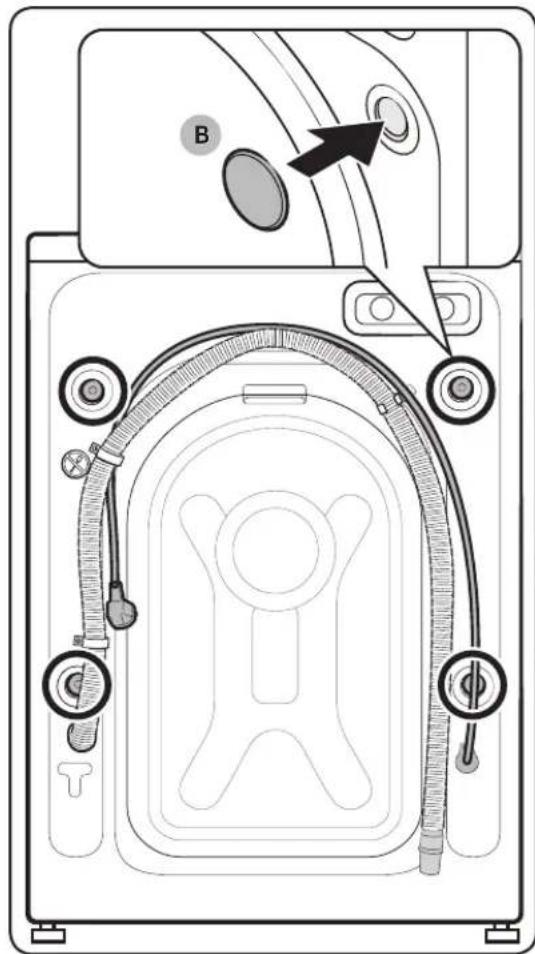
- Insert the bolt caps (B) to the holes (marked with circle in the figure).
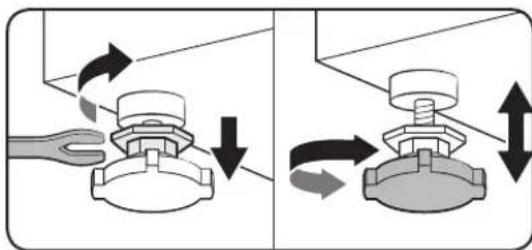
STEP 3 Adjust the levelling feet
natural_image
Diagram showing two mechanical assembly states: left with hand turning a tool, right with valve and nut assembly (no text or symbols)
- Gently slide the washing machine into position. Excessive force may damage the levelling feet.
- Level the washing machine by manually adjusting the levelling feet.
22 English
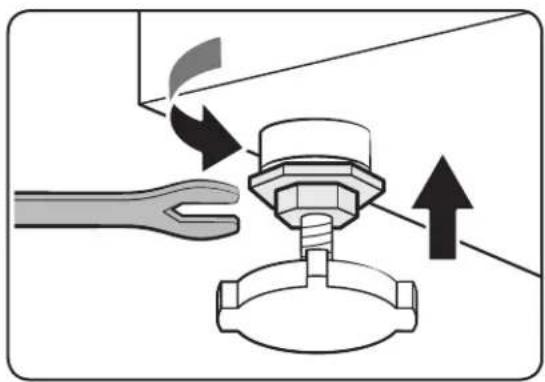
- When levelling is complete, tighten the nuts using the spanner.

natural_image
Diagram of a device with attached tubing and a magnified inset showing a no-smoking symbol (no text or labels present)
CAUTION
When installing the product make sure the levelling feet is not pressing the power cord.
CAUTION
Make sure all the levelling feet are seating on the floor surface to avoid the washing machine from moving or generating noise due to vibration. Then, check if the washing machine is not rocking. If the washing machine is not rocking, tighten the nuts.
Installation
STEP 4 Connect the water hose
The provided water hose may differ depending on the model. Please follow the instruction according to the provided water hose.
Connecting to a threaded water tap

natural_image
Diagram of a faucet assembly with rotating valve and base, showing mechanical components (no text or labels)
- Connect the water hose to the water tap, and then turn the connector clockwise as shown.

natural_image
Diagram of a car fuel plug being inserted into a door panel, showing airflow direction (no text or symbols)
- Connect the other end of the water hose to the inlet valve on the back of the washing machine. Turn the hose clockwise to tighten.
natural_image
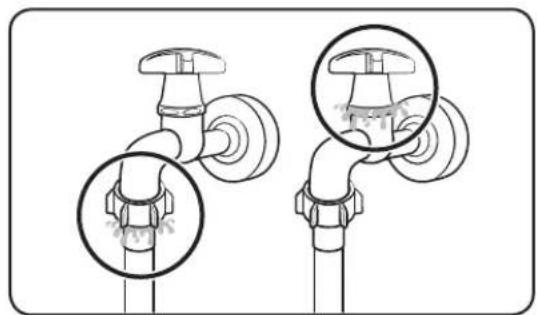
Diagram of two pipe fittings with circular annotations highlighting their features (no text or symbols present)
- Open the water tap and check if there are any leaks around the connection areas. If there are water leaks, repeat the steps above.
WARNING
If there is a water leak, stop operating the washing machine and disconnect from the electrical supply. Then, contact a local Samsung service centre in case of a leak from the water hose, or contact a plumbing technician in case of a leak from the water tap. Otherwise, this may cause electric shock.
24 English

CAUTION
Do not stretch the water hose by force. If the hose is too short, replace the hose with a longer, high-pressure hose.
Connecting to a non-threaded water tap
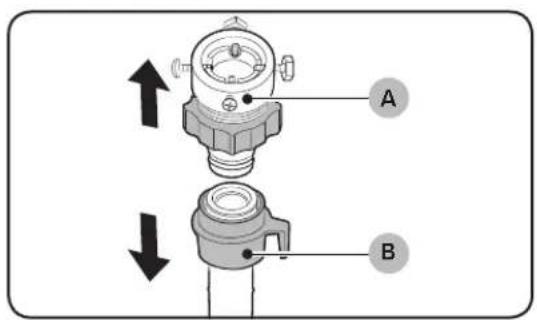
- Remove the adaptor (A) from the water hose (B).

natural_image
Hand using a screwdriver to adjust a component with a bolt, showing a curved arrow indicating rotation (no text or symbols present)
- Use a Phillips screwdriver to loosen four screws on the adaptor.
- Hold the adaptor and turn part (C) in the arrow direction to loosen it by 5 mm (*).


Installation

natural_image
Illustration of a hand using a tool to adjust a pipe fitting with a rotating valve (no text or symbols)

-
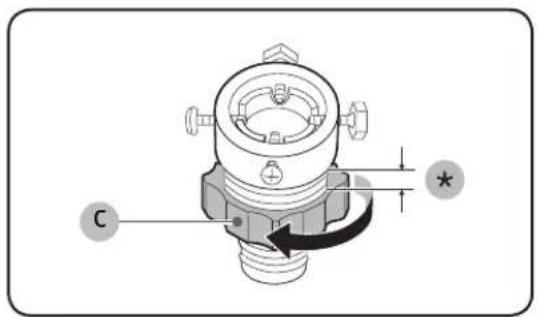
Insert the adaptor onto the water tap, and then tighten the screws while lifting the adaptor.
-
Turn part (C) in the arrow direction to tighten it.
-
While pulling down part (D) on the water hose, connect the water hose to the adaptor. Then, release part (D). The hose fits into the adaptor with a clicking sound.
-
To complete connecting the water hose, see 2 and 3 on the "Connecting to a threaded water tap" section.

NOTE
- After connecting the water hose to the adaptor, pull the water hose down to check if it is connected properly.
- Use a popular type of water taps. If the tap is square-shaped or too big, remove the spacer ring before inserting the tap into the adaptor.
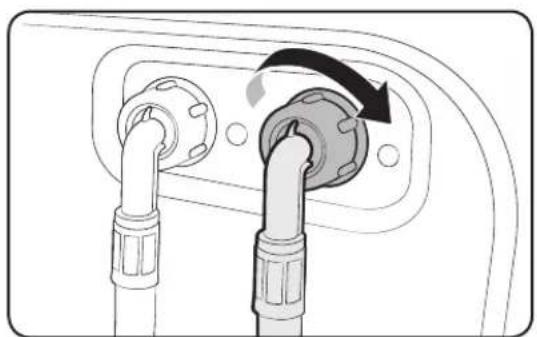
For models with an additional hot water inlet:
natural_image
Diagram of two connected electrical connectors with a directional arrow indicating rotation (no text or symbols)
Aqua stop hose (applicable models only)
- Connect the red end of the hot water hose to the hot water inlet on the back of the machine.
- Connect the other end of the hot water hose to the hot water tap.
The aqua stop hose alerts users of a risk of water leaks. It senses the water flow and turns red on the centre indicator (A) in case of a leak.

NOTE
The end of the aqua stop hose must be fitted to the water tap and not the machine.

Installation
STEP 5 Position the drain hose
The drain hose can be positioned in three ways:

natural_image
Line drawing of a washing machine with a vertical pipe and a star symbol, no text or labels present
Over the edge of a wash basin
The drain hose must be placed at a height of between 60 cm and 90 cm (*) from the floor. To keep the spout of the drain hose bent, use the supplied plastic hose guide (A). Secure the guide to the wall using a hook to ensure stable drainage.
In a drain pipe
The drain pipe should be between 60 cm and 90 cm high (*). It is advisable to use a 65 cm high vertical pipe.
- To ensure the drain hose stays in position, use the plastic hose guide provided (see the figure).
- To prevent the siphoning of water flow during drainage, make sure to insert the drain hose 15 cm in the drain pipe.
- To prevent the drain hose from moving around, secure the hose guide to the wall.
Drain standpipe requirements:
• Minimum diameter of 5 cm
• Minimum carry-away capacity of 60 litres per minute
In a sink drain pipe branch
The drain pipe branch mush be above the sink siphone so that the end of the hose is at least 60 cm above the ground.
(*) : 60 cm

CAUTION
Remove the lid on the sink drain pipe branch before connecting the drain pipe to it.
STEP 6 Turn on the washing machine
Plug the power cord into a wall socket featuring an AC 220-240 V / 50 Hz approved electrical outlet protected by a fuse or circuit breaker. Then, press Power to turn on the washing machine.

Before you start
Initial settings
Run Calibration (recommended)
Calibration ensures accurate weight detection by the washing machine. Make sure the drum is empty before running Calibration.
- Power off, and then power on the washing machine.
- Hold down 🔒 Temp. and Ⓧ Delay End simultaneously for 3 seconds to enter Calibration mode. The "CB" message appears.
- Press ▷ Start/Pause to run the Calibration cycle.
- The drum will rotate clockwise and counter-clockwise for about 3 minutes.
- When the cycle is complete, "0" appears on the display and the washing machine will turn off automatically.
- The washing machine is now ready for use.
Laundry guidelines
STEP 1 Sort
Sort the laundry according to these criteria:
• Care Label: Sort the laundry into cottons, mixed fibres, synthetics, silks, wools, and rayon.
• Colour: Separate whites from colours.
- Size: Mixing different-sized items together in the drum improves the washing performance.
- Sensitivity: Wash delicate items separately using an Easy Iron option for pure, new woollen items, curtains, and silk items. Check the labels on the items.

NOTE
Make sure to check the care label on the clothing, and sort them accordingly before starting the wash.
STEP 2 Empty pockets
Empty all the pockets of your laundry items
- Metal objects such as coins, pins, and buckles on clothing may damage other laundry items as well as the drum.
- If pants or jacket zippers are open while washing, the drum may be damaged. Zippers should be closed and fixed with a string.
- Clothing with long strings may become entangled with other clothes. Make sure to tie the strings before starting the wash.
STEP 3 Use a laundry net
- Brassieres (water washable) must be placed in a laundry net. Metal parts of the brassieres may break through and tear other laundry items.
- Small, light clothing such as socks, gloves, stockings, and handkerchiefs may become caught around the door. Place them inside a fine laundry net.
- Do not wash the laundry net by itself without other laundry. This may cause abnormal vibrations that could move the washing machine and result in injury.
STEP 4 Prewash (if necessary)
Select the Prewash option for the selected cycle if the laundry is heavily soiled. Do not use the Prewash option when detergent is manually added into the drum.
STEP 5 Determine the load capacity
Do not overload the washing machine. Overloading may cause the washing machine to not wash properly. For the load capacity for the type of clothing, see page 40.
NOTE
When washing bedding or bedding covers, the wash time may be lengthened or the spin efficiency may be reduced. For bedding or bedding covers, the recommended maximum spin cycle speed is 800 rpm, and the load capacity is 2.0 kg or less.
CAUTION
• Unbalanced laundry may reduce the spinning performance.
- Make sure the laundry is fully inserted in the drum and not caught in the door.
- Do not slam the door. Close the door gently. Otherwise, the door may not be closed properly.
STEP 6 Apply a proper detergent type
The type of detergent depends on the type of fabric (cotton, synthetic, delicate items, wool), colour, wash temperature, and degree of soiling. Always use “low suds” laundry detergent, which is designed for automatic washing machines.
English 31
Before you start

NOTE
- Follow the detergent manufacturer's recommendations based on the weight of the laundry, the degree of soiling, and the hardness of the water in your local area. If you are not sure about the water hardness, contact a local water authority.
- Do not use detergent that tends to be hardened or solidified. This detergent may remain after the rinse cycle, blocking the drain outlet.

CAUTION
When washing wool using the WOOL/DELICATES cycle, use only a neutral liquid detergent. If used with the WOOL/DELICATES cycle, powder detergent may remain on the laundry and discolour the laundry.
Laundry capsules
To get the best results from using laundry capsules, please follow these instructions.
natural_image
Line drawing of a washing machine with two circular doors and a small appliance on the side (no text or symbols)
- Put the capsule in the bottom of the empty drum towards the rear.
natural_image
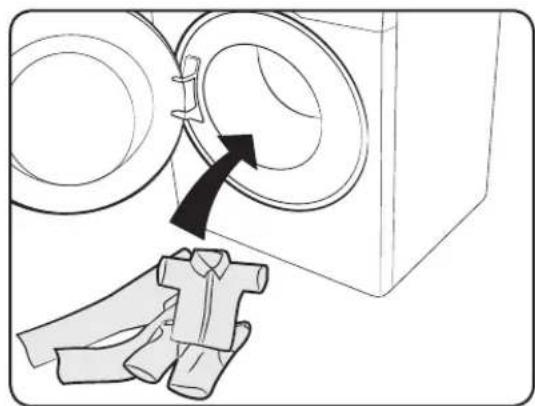
Diagram showing a door opening and lifting a shirt, with a black arrow indicating the motion (no text or symbols present)
- Put the laundry in the drum on top of the capsule.

CAUTION
For cycles using cold water or cycles that complete in less than one hour, the capsule may not dissolve completely.
Detergent recommendation
The recommendations apply to the temperature ranges given in the cycle chart.
| ● | Recommended | ▲ | Liquid detergent only |
| - | Not recommended | △ | Powder detergent only |
| Cycle | Detergent |
| Universal | Delicates and woollens | Specialist |
| ECO 40-60 | ● | - | - |
| COTTON | ● | - | - |
| SYNTHETICS | ● | - | - |
| INTENSE COLD | ● | - | - |
| HYGIENE STEAM | ● | - | - |
| DRUM CLEAN | — | | |
| 15' QUICK WASH | ● | - | - |
| MIXED LOAD | ● | - | - |
| WOOL/DELICATES | - | ▲ | ▲ |
| WASH+DRY | ● | - | - |
Before you start
Detergent drawer guidelines
The washing machine provides a three-compartment dispenser: the left compartment for the main wash, the centre compartment for fabric softeners, and the right compartment for the preliminary wash.
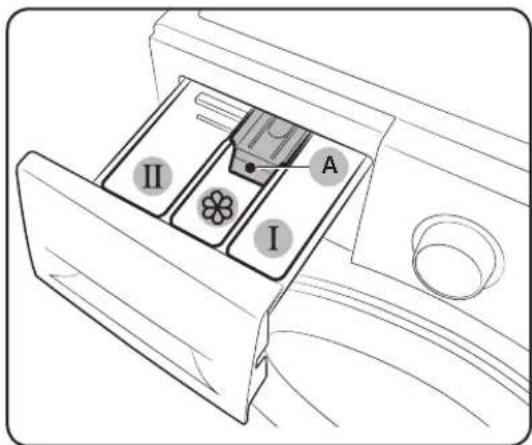
01 Prewash compartment: Apply prewash detergent.
02 Main-wash compartment: Apply main-wash detergent, water softener, soaking detergent, bleach, and/or stain removers.
03 Softener compartment: Apply additives such as fabric softener. Do not exceed the max line (A).
CAUTION
- Do not open the detergent drawer while the washing machine is operating.
• Do not use the following types of detergent:
• Tablet or capsule types
- Ball or net types
- To prevent the compartment clogging, concentrated or highly-enriched agents (fabric softener or detergent) must be diluted with water before being applied.
- When Delay End is selected, do not apply detergent directly into the drum. Otherwise, this may discolour the laundry. Use the detergent drawer when Delay End is selected.
- Do not use any cleaning agents for cleaning the drum. Chemical residue in the drum deteriorates the washing performance.
To apply washing agents to the detergent drawer

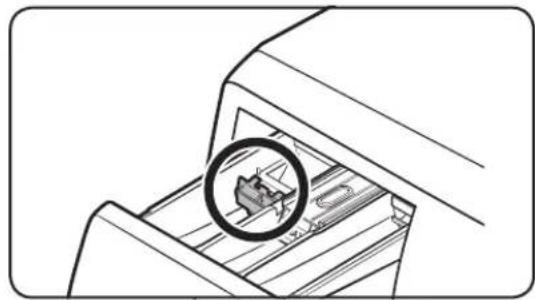
natural_image
Line drawing of a hand inserting a card into a drawer with a tray inside (no text or symbols)
- Slide open the detergent drawer.
- Apply laundry detergent to the .II main-wash compartment as instructed or recommended by the manufacturer. To use liquid detergent, see page 36.
34 English

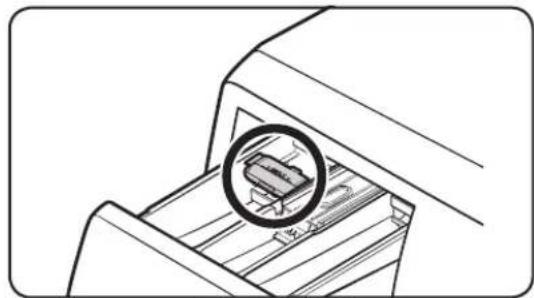
natural_image
Line drawing of a hand holding a small object over a surface, with no visible text or symbols

natural_image
Line drawing of a hand holding a smartphone with a prohibition symbol overlay (no text or symbols present)
-
Apply fabric softener to the ⚙ softener compartment. Do not exceed the max line (A).
-
If you want to prewash, apply prewash detergent to the prewash compartment as instructed or recommended by the manufacturer.
-
Close the detergent drawer.
CAUTION
- Do not apply powder detergent to the liquid container.
- Concentrated fabric softener must be diluted with water before applied.
- Do not apply main-wash detergent to the softener compartment.
Before you start
To use liquid detergent (applicable models only)
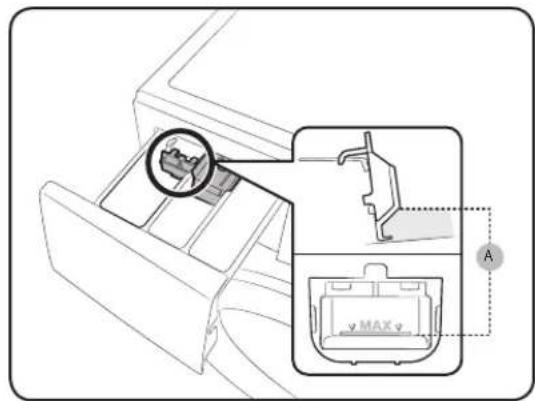
First insert the provided liquid container in the Ⅱ main-wash compartment. Then, apply liquid detergent to the container below the marked max line (A).

CAUTION
- Do not exceed the max line that is marked inside the container.
- Turn up the liquid container if using powder detergent.
When using liquid detergent When using powder detergent
natural_image
Technical line drawing of a mechanical component with a circular inset showing internal components (no text or symbols)
natural_image
Diagram of a printer with a magnified inset showing internal components (no text or symbols)
Operations
Control panel

| 01 Cycle Selector Turn the dial to select a cycle. |
| 02 Display | The display shows current cycle information and estimated time remaining, or an information code when a problem occurs. |
| 03 Temp. | Press to change the water temperature for the selected cycle. |
| 04 Rinse | Press to change the rinse count for the current cycle. You can set the rinse count to a max of 5, depending on the cycle. |
| 05 Spin | Press to change the spinning speed for the current cycle.Rinse Hold (No indicator): The final rinse cycle is suspended so that the laundry remains in the water. To unload the laundry, run a drain or spin cycle.No Spin: The drum does not spin after the final drain cycle.Spin Only: To run the Spin Only cycle, press Spin for 3 seconds. When the cycle time and spinning speed appear, press Spin repeatedly until a desired spinning speed is selected. Then, press Start/Pause to start the cycle. The spinning time depends on the selected cycle. |
| 06 Dry Option | Press this button to select proper drying option. |
| 07 Bubble Soak | Press to activate/deactivate the Bubble Soak function. This function helps remove a wide variety of stubborn stains. |
Operations
| 08 Delay End | Delay End lets you set the end time of the current cycle. Based on your settings, the start time of the cycle will be determined by the machine's internal logic. For example, this setting is useful for programming your machine to finish a wash at the time you normally return home from work.• Press to choose a preset unit of hours. |
| 09 Options | Press to select the options. Availability of the options depends on the cycle. |
| 10 ▷Start/Pause Press | Press to start or stop operation. |
| 11 Power | Press to turn on/off the washing machine. |
For more information on the options, see the Special features section.
*(3 sec): Press and hold for 3 seconds.
Simple steps to start
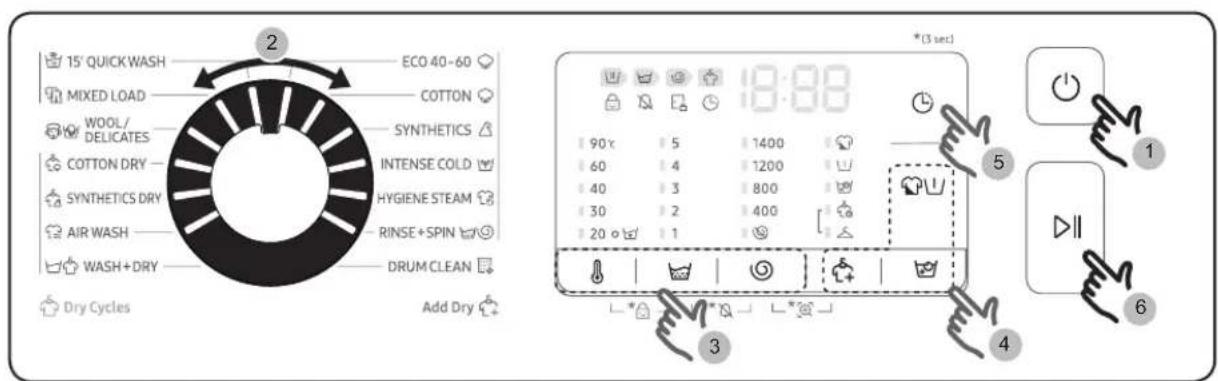
- Press ⏻ Power to turn on the washing machine.
- Turn the Cycle Selector to select a cycle.
- Change the cycle settings ( ℙ Temp., 📋 Rinse and Ⓤ Spin ) as necessary.
- Press 🎨️ 🎯 Options, 🎯 Bubble Soak or 🎯 Dry Option to add desired options. Available options differ depending on the selected cycle.
- The machine provides one easy to access buttons for ⏻ Delay End for your convenience. If you want to use the option, press the corresponding button.
- Press ▷|Start/Pause.
Drying Only
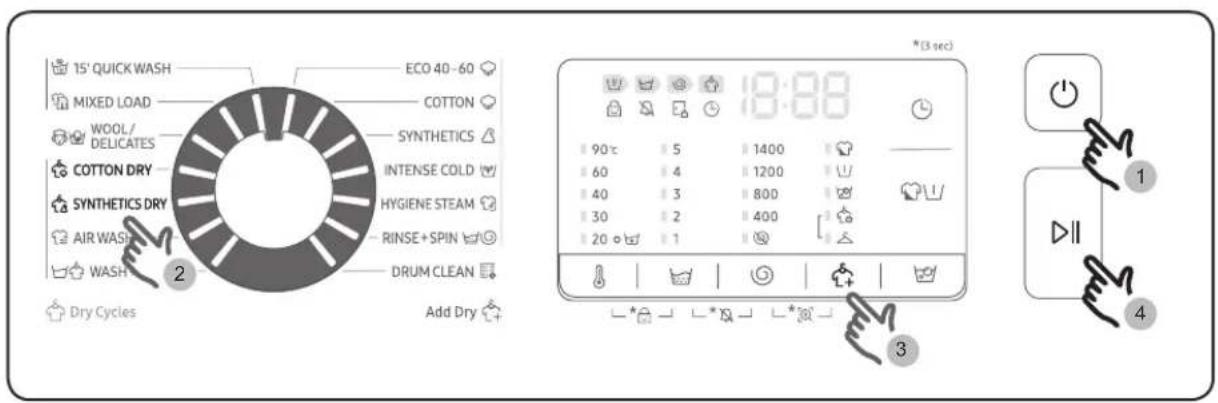
You can dry your clothes directly or dry the washed clothes according to the following procedures.
- Press ⏻ Power button to turn on the washing machine.
- Turn the Cycle Selector to select the appropriate drying cycle.
- Press 🎨 Dry Option button to select the appropriate drying mode.
- Press ▷|Start/Pause button to start dry.
To change the cycle during operation
- Press Start/Pause to stop operation.
- Select a different cycle.
- Press Start/Pause again to start the new cycle.
Operations
Cycle overview
Standard ccycles
| Cycle Description & Max load (kg) | WD9*TA**** | WD8*TA**** | WD7*TA**** |
| ECO 40-60 | For cleaning normally soiled cotton items which are declared to be washable at 40 °C or 60 °C, together in the same cycle. This cycle is used to assess the compliance with the EU Ecodesign legislation.This cycle is set as a default. | Max | Max | Max |
| COTTON | For cottons, bed linens, table linens, underwear, towels, or shirts. The washing time and the rinse count are automatically adjusted according to the load.For cleaning lightly soiled cotton items at a nominal temperature of 20 °C. | Max | Max | Max |
| SYNTHETICS | For fabrics that are made of polyester(diolen, trevira), polyamide (perlon, nylon), or the like. | 4.0 | 4.0 | 3.5 |
| INTENSE COLD | Low temperature ecobubble cycle helps reduce power consumption. | 4.0 | 4.0 | 3.5 |
| HYGIENE STEAM | Cotton and linen fabric which have been in direct contact with the skin, such as underwear.For optimum hygiene results select a temperature of 60 °C or above.Steam cycles feature allergy care and bacteria elimination (sterilize). | 4.0 | 4.0 | 3.5 |
| RINSE+SPIN | Featuring an additional rinse process after applying fabric softener to the laundry. | Max | Max | Max |
| DRUM CLEAN | Cleans the drum by removing dirt and bacteria from it.Perform once every 40 washes with no detergent or bleach applied. It notifies automatically after every 40 washes.Make sure the drum is empty.Do not use any cleaning agents for cleaning the drum. | --- | | |
| 15' QUICK WASH | For lightly soiled items in less than 2.0 kg that you want to wash quickly.Use less than 20 g of detergent. Using more than 20 g of detergent may leave detergent residue.For liquid detergent, use a max of 20 ml of liquid detergent. | 2.0 | 2.0 | 2.0 |
| MIXED LOAD | For mixed load consisting of cotton and synthetic. | 4.0 | 4.0 | 3.5 |
| WOOL/ DELICATES | Specific for machine-washable wool and delicates fabrics such as sheer fabrics, bras, lingerie (silk), and other handwash-only fabrics.The WOOL/DELICATES cycle features gentle cradling and soaking to protect fibres from shrinkage/distortion.A neutral detergent and liquid detergent is recommended. | 2.0 | 2.0 | 2.0 |

Dry cycles
| Cycle Description & Max load (kg) |
| COTTON DRY | For general drying. 6.0 5.0 4.0 | | | |
| SYNTHETICS DRY | A low temperature drying cycle for heat-sensitive garments. | 3.0 | 3.0 2.5 | |
English
Operations
| Cycle Description & Max load (kg) |
| AIR WASH 📋 | This cycle is useful for removing bad odours. 1.0 | 1.0 | 1.0 |
| WASH+DRY 📋 | For cleaning normally soiled cotton items which are declared to be washable at 40 °C or 60 °C, together in the same cycle, and to dry them in such a way that it can be immediately stored in a cupboard. This cycle is used to assess the compliance with the EU Ecodesign legislation for wash and dry. | 6.0 | 5.0 4.0 |

NOTE
- Loading the household washing machine or the household washer-dryer up to the capacity indicated by the manufacturer for the respective cycles will contribute to energy and water savings.
- The noise and remaining moisture content are influenced by the spinning speed: the higher the spinning speed in the spinning phase, the higher the noise and the lower the remaining moisture content.
- The most efficient cycle in terms of energy consumption are generally those that perform at lower temperatures and longer duration.
Options
| Option Description | |
| Intensive | For badly soiled laundry. The operation time for each cycle is longer than normal. |
| Pre Wash | This will add a preliminary washing cycle before the main wash cycle. |
| Bubble Soak | Bubble Soak helps remove a variety of stubborn stains.With Bubble Soak selected, laundry is thoroughly soaked in water bubbles for effective washing.Bubble Soak is available with and adds up to 30 minutes to 5 cycles: Cotton, Synthetics, Hygiene Steam, Mixed Load and Wash+Dry. |

Dry Option
| Option Description | |
| [TAHO] | Cupboard dry | Select to dry laundry automatically by detecting the amount and weight of the laundry. Select this to dry cotton clothing such as cotton trousers, T-shirts, and cotton underwear. |
 | Time Dry | Use to dry the laundry for a specified period of time according to the material, load, and moisture. |
Delay End
You can set the washing machine to finish your wash automatically at a later time, choosing a delay of between 1 to 24 hours (in 1 hour increments). The hour displayed indicates the time the wash will finish.
- Select a cycle. Then change the cycle settings if necessary.
- Press Delay End repeatedly until a desired end time is set.
- Press Start/Pause.
The corresponding indicator turns on with the clock running.
- To cancel the Delay End, restart the washing machine by pressing Power.
Real-life case
You want to finish a two-hour cycle 3 hours later from now. For this, you add the Delay End option to the current cycle with the 3-hour setting, and press Start/Pause at 2:00 p.m. Then, what happens? The washing machine starts operating at 3:00 p.m., and ends at 5:00 p.m.
Provided below is the time line for this example.

2:00 pm
Set the Delay End to 3 hours
3:00 pm
Start
5:00 pm
End
Operations
Settings
Child Lock
To prevent children or infants from accidentally starting or setting the washing machine, Child Lock locks all buttons except for the Power button.
- To set the Child Lock function, hold down Temp. and Rinse simultaneously for 3 seconds. To activate, press ▷ Start/ Pause.
- To release the Child Lock function, hold down ⚠ Temp. and ⏰ Rinse simultaneously for 3 seconds.
NOTE
- In the Child Lock state, you must first release the Child Lock if you want to add detergent or laundry.
- Your setting will be kept even after restarting the machine.
- You cannot open the door after a wash cycle when the Child Lock is on. Turn the function off before opening the door to take out the laundry.
Sound On/Off
You can turn on or off the sound from the washing machine. When this function is set to Off, the melody of cycle completion, and the power-off beep will not sound. However, the other sounds stay active.
- To mute the sound, hold down 📊 Rinse and 🌐 Spin simultaneously for 3 seconds.
• To unmute the sound, hold down again for 3 seconds.
- Your setting will be kept even after restarting the machine.
Maintenance
Keep the washing machine clean to prevent deteriorated performance and to preserve its life cycle.
Drum clean
Perform this cycle regularly to clean the drum by removing bacteria from it. This cycle heats the water between 60 °C and 70 °C, and it also removes accumulated dirt from the rubber door gasket.
- Press Power to turn on the washing machine.
- Turn the Cycle Selector to select DRUM CLEAN.
- Press Start/Pause.
NOTE
• The water temperature for DRUM CLEAN is set to 70 °C, which cannot be changed.
• It is recommended to run the DRUM CLEAN cycle once every 40 washes.
- To prevent limescale, add the proper amount of detergent according to your local water hardness or add a water softener additive together with the detergent.
DRUM CLEAN reminder
Depending on the model, the DRUM CLEAN reminder is either an icon or an LED. For icons, the icon lights up on the control panel.
For LEDs, the LED lights up next to DRUM CLEAN, or on the option area of the control panel.
- The DRUM CLEAN reminder blinks on the control panel once every 40 washes. It is advisable to perform DRUM CLEAN regularly.
- When you first see this reminder blinking, you can ignore the reminder for 6 consecutive washes. From the 7^th wash, the reminder no longer appears. However, it appears again on the second 40^th wash.
- Even after the last process is terminated, the "0" message may remain.
- You can record the running count of the DRUM CLEAN cycle by pressing the Power button. This does not stop or turn off the machine but marks your cycle count.
• Even if "0" does not disappear, the machine operates normally.
- It is recommended to run the cycle regularly for hygienic purposes.
Maintenance
Smart check
To enable this function, you must first download the Samsung Smart Washer app at the Play Store or the Apple Store, and install it on a mobile device featuring a camera function.
The Smart Check function has been optimized for Galaxy & iPhone series (applicable models only).
- When the washing machine detects an issue to check, an information code appears on the display. To enter Smart Check mode, press and hold Spin and Dry Option simultaneously for 3 seconds.
- The washing machine starts the self-diagnosis procedure and displays an information code if a problem is detected.
- Run the Samsung Smart Washer app on your mobile device, and tap Smart Check.
- Put the mobile device close to the washing machine's display so that the smartphone camera and the washing machine face each other. Then, the information code will be recognised automatically by the app.
- When the information code is recognised correctly, the app provides detailed information about the problem with applicable solutions.
NOTE
- The function name, Smart Check, may differ depending on the language.
- If the washing machine reflets light on the display, the app may fail to recognize the information code.
- If the app fails to recognize the Smart Check code consecutively, enter the information code manually onto the app screen.

Emergency drain
In case of a power failure, drain the water inside the drum before taking out the laundry.
- Power off and unplug the washing machine from the electrical outlet.
- Gently press the top area of the filter cover (A) to open.
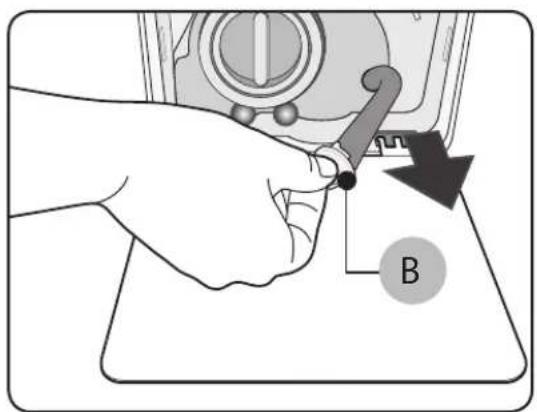
- Put an empty, spacious container around the cover, and stretch the emergency drain tube to the container while holding the tube cap (B).
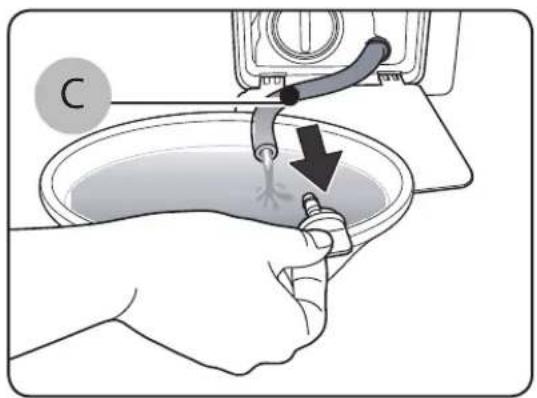
-
Open the tube cap and let water in the Emergency drain tube (C) flow into the container.
-
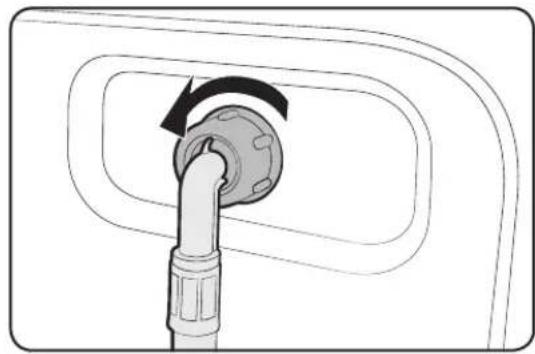
When done, close the tube cap, and reinsert the tube. Then, close the filter cover.
NOTE
Use a spacious container because the water in the drum may be more than expected.

Maintenance
Cleaning
Surface of the washing machine
Use a soft cloth with a nonabrasive household detergent. Do not spray water onto the washing machine.
Mesh filter
Clean the mesh filter of the water hose once or twice a year.
natural_image
Diagram of a plug inserted into a socket, showing airflow direction (no text or symbols)

natural_image
Illustration of a hand using scissors to cut a button into a device (no text or symbols present)
- Turn off the washing machine, and unplug the power cord.
- Close the water tap.
-
Loosen and disconnect the water hose from the back of the washing machine. Cover the hose with a cloth to prevent water from gushing out.
-
Use pliers to pull out the mesh filter from the inlet valve.
-
Submerge the mesh filter deeply in water so that the threaded connector is also submerged.
-
Dry the mesh filter completely in the shade.
-
Reinsert the mesh filter into the inlet valve, and reconnect the water hose to the inlet valve.
-
Open the water tap.

NOTE
If the mesh filter is clogged, an information code of "4C" appears on the screen.
Debris filter
Clean the debris filter bi-monthly to prevent clogging. A clogged debris filter may reduce the bubble effect.
natural_image
Illustration of a hand inserting a plug into a socket (no text or symbols visible)

natural_image
Illustration of hands using a tool to clean or repair a sink (no text or symbols visible)

natural_image
Technical line drawing of a circular mechanical component with no visible text or symbols
- Turn off the washing machine, and unplug the power cord.
- Drain the remaining water inside the drum. See the "Emergency drain" section.
- Gently press the top area of the filter cover to open.
-
Turn the debris filter knob to the left, and drain off the remaining water.
-
Clean the debris filter using soft brushes. Make sure the drain pump propeller inside the filter is unclogged.
-
Reinsert the debris filter, and turn the filter knob to the right.
NOTE
- Some debris filters feature a safety knob that is designed to prevent accidents by children. To open the safety knob of the debris filter, push in and turn it anticlockwise. The spring mechanism of the safety knob helps open the filter.
- To close the safety knob of the debris filter, turn it clockwise. The spring makes a rattling sound, which is normal.
NOTE
If the debris filter is clogged, an information code of "5C" appears on the screen.
CAUTION
- Make sure the filter cap is closed properly after cleaning the filter. Otherwise, this may cause a leak.
Maintenance
- Make sure the filter is inserted properly after cleaning it. Otherwise, this may cause an operational failure or a leak.
Detergent Drawer

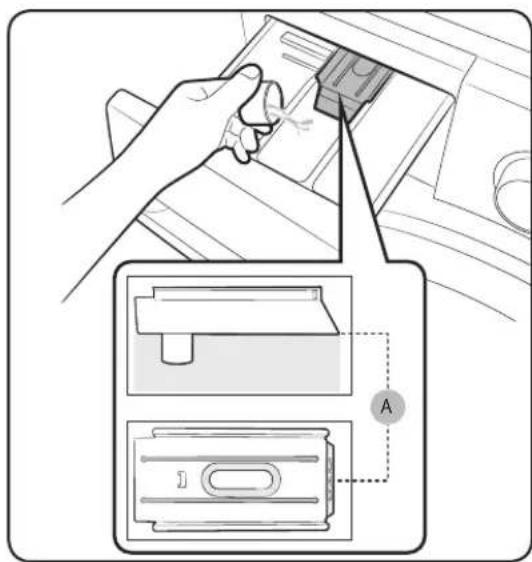
- While holding down the release lever (A) on the inner of the drawer, slide open the drawer.
natural_image
Illustration of hands cleaning a sink with a tool, no text or symbols present
- Clean the drawer components in flowing water using a soft brush.
natural_image
Illustration of a hand inserting a plastic component into a housing (no text or symbols visible)
- Clean the drawer recess using a soft brush.
- Reinsert the release lever and the liquid detergent container to the drawer.
- Slide the drawer inward to close it.
NOTE
To remove remaining detergent, perform the RINSE+SPIN cycle with the drum being empty.
50 English
Recovery from freezing
The washing machine may freeze when it drops below 0 ^ .
- Turn off the washing machine, and unplug the power cord.
- Pour warm water over the water tap to loosen the water hose.
- Disconnect the water hose, and soak it in warm water.
- Pour warm water into the drum and leave it for about 10 minutes.
- Reconnect the water hose to the water tap.
NOTE
If the washing machine still doesn't operate normally, repeat the above steps until it operates normally.
Care against an extended time of disuse
Avoid leaving the washing machine unused for an extended time.
If this is the case, drain the washing machine and unplug the power cord.
- Turn the Cycle Selector to select a RINSE+SPIN.
- Empty the drum, and press Start/Pause.
- When the cycle is complete, close the water tap and disconnect the water hose.
- Turn off the washing machine, and unplug the power cord.
- Open the door to let air circulate through the drum.
English 51


Troubleshooting
If there is any problem, check the information message on the LED screen and follow the on-screen instructions.
If the problem persists, please contact the service center.
Checkpoints
If you encounter a problem with the washing machine, first check the table below and try the suggestions.
| Problem Action | |
| Does not start. | Make sure the washing machine is plugged in.Make sure the door is properly closed.Make sure the water taps are open.Tap ▷ Start/Pause to start the washing machine.Make sure Child Lock 🔒 is not activated.Before the washing machine starts to fill, it will make a series of clicking noises to check the door lock and will do quick drain.Check the fuse or reset the circuit breaker.Check if power is supplied properly.Low voltage detected.- Check if the power cord is plugged in.Make sure laundry is not caught in the door. |
| Water supply is insufficient, or no water is supplied. | Fully open the water tap.Make sure the door is properly closed.Make sure the water supply hose is not frozen.Make sure the water supply hose is not kinked or clogged.Make sure there is sufficient water pressure.Make sure that the cold water tap and the hot water tap are properly connected.Clean the mesh filter as it may be clogged. |
| After a cycle, detergent remains in the detergent drawer. | Make sure the washing machine is running with sufficient water pressure.Make sure the detergent is added to the centre of the detergent drawer.Make sure the rinse cap is inserted properly.If using granular detergent, make sure the detergent selector is in the upper position.Remove the rinse cap and clean the detergent drawer. |
| Excessive vibrations or makes noise. | Make sure the washing machine is installed on a level, solid floor that is not slippery.If the floor is not level, use the levelling feet to adjust the height of the washing machine.Make sure the shipping bolts are removed.Make sure the washing machine is not in contact with any other object.Make sure the laundry load is balanced.The motor can cause noise during normal operation.Overalls or clothes with metallic decorations can cause noise while being washed. This is normal.Metal objects such as coins can cause noise. After washing, remove these objects from the drum or filter case.Redistribute the load. If only one item of clothing needs washing, such as a bathrobe or pair of jeans, the final spin result might be unsatisfactory, and a “Ub” check message will be shown in the display. |
| Does not drain and/or spin. | Make sure the drain hose is straightened all the way to the drain system. If you encounter a drain problem, call for service.Make sure the debris filter is not clogged.Close the door and press or tap Start/Pause.For your safety, the washing machine will not tumble or spin unless the door is closed.Make sure the drain hose is not frozen or clogged.Make sure the drain hose is connected to a drain system that is not clogged.If the washing machine is not supplied with sufficient power, the washing machine temporarily will not drain or spin. As soon as the washing machine regains sufficient power, it will operate normally.Make sure the drain hose is positioned correctly, depending on the connection type.Clean the debris filter as it may be clogged. |
Troubleshooting
| Problem Action | |
| The door does not open. | Press or tap Start/Pause to stop the washing machine.It may take a few moments for the door lock mechanism to disengage.The door will not open until 3 minutes after the washing machine has stopped or the power has been off.Make sure all the water in the drum is drained.The door may not open if water remains in the drum. Drain the drum and open the door manually.Make sure the door lock light is off. The door lock light turns off after the washing machine has drained. |
| Excessive suds. | Make sure you use the recommended types of detergent as appropriate.Use high efficiency (HE) detergent to prevent oversuding.Reduce the detergent amount for soft water, small loads, or lightly soiled loads.Non-HE detergent is not recommended. |
| Cannot apply additional detergent. | Make sure the remaining amount of detergent and fabric softener is not over the limit. |
| Stops. | Plug the power cord into a live electrical outlet.Check the fuse or reset the circuit breaker.Close the door and press or tap Start/Pause to start the washing machine.For your safety, the washing machine will not tumble or spin unless the door is closed.Before the washing machine starts to fill, it will make a series of clicking noises to check the door lock and will do quick drain.There may be a pause or soak period in the cycle. Wait briefly, and the washing machine may start.Make sure the mesh filter of the water supply hose at the water taps is not clogged. Periodically clean the mesh filter.If the washing machine is not supplied with sufficient power, the washing machine will temporarily not drain or spin. As soon as the washing machine regains sufficient power, it will operate normally. |
| Fills with the wrong water temperature. | Fully open both taps.Make sure the temperature selection is correct.Make sure the hoses are connected to the correct taps. Flush water lines.Make sure the water heater is set to supply a minimum of 49 °C hot water at the tap. Also, check the water heater capacity and recovery rate.Disconnect the hoses and clean the mesh filter. The mesh filter may be clogged.While the washing machine fills, the water temperature may change as the automatic temperature control feature checks incoming water temperature. This is normal.While the washing machine fills, you may notice just hot and/or just cold water going through the dispenser when cold or warm temperatures are selected.This is a normal function of the automatic temperature control feature as the washing machine determines the water temperature. |
| Load is wet at the end of a cycle. | Use the High or Extra High spin speed.Use high efficiency (HE) detergent to reduce oversuding.Load is too small. Small loads (one or two items) may become unbalanced and not spin completely.Make sure the drain hose is not kinked or clogged. |
| Leaks water. | Make sure the door is properly closed.Make sure all hose connections are tight.Make sure the end of the drain hose is correctly inserted and secured to the drain system.Avoid overloading.Use high efficiency (HE) detergent to prevent oversuding.Check the drain hose.- Make sure the end of the drain hose is not placed on the floor.- Make sure the drain hose is not clogged. |
| Has odours. | Excessive suds collect in recesses and can cause foul odours.Run cleansing cycles to sanitize periodically.Clean the door seal (diaphragm).Dry the washing machine interior after a cycle has finished. |
English 55
Troubleshooting
| Problem Action | |
| No bubbles are seen (Bubble models only). | You may not be able to see bubbles if there is too much items in the drum.Severely contaminated laundry may not generate bubbles. |
If a problem persists, contact a service center.
If the washing machine fails to operate, you may see an information code on the screen. Check the table below and try the suggestions.
| Code Action | |
| 4C | Water is not supplied.Make sure the water taps are open.Make sure the water hoses are not clogged.Make sure the water taps are not frozen.Make sure the washing machine is operating with sufficient water pressure.Make sure that the cold water tap and the hot water tap are properly connected.Clean the mesh filter as it may be clogged.When the “4C” message appears, the machine drains water for 3 minutes. In the meantime, the power button will be disabled. |
| 4C2 | Make sure the cold water supply hose is firmly connected to the cold water tap.If it is connected to the hot water tap, the laundry may be deformed with some cycles. |
| 5C | Water is not draining.Make sure the drain hose is not frozen or clogged.Make sure the drain hose is positioned correctly, depending on the connection type.Clean the debris filter as it may be clogged.Make sure the drain hose is straightened all the way to the drain system.If the information code remains, contact a customer service centre. |
| dC | Operating the washer with the door open.Make sure the door is properly closed.Make sure laundry is not caught in the door. |
| OC | Water has overflowed.Restart after spinning.If the information code remains on the display, contact a local Samsung service centre. |
| LC, LC1 | Check the drain hose.Make sure the end of the drain hose is not placed on the floor.Make sure the drain hose is not clogged.If the information code remains, contact a customer service centre. |
| 3C | Check the Motor for operation.Try restarting the cycle.If the information code remains, contact a customer service centre. |
| UC | Check the pulsator motor for operation.Check if power is supplied properly.If the information code remains, contact a customer service centre. |
| Low voltage detected.Check if the power cord is plugged in.If the information code remains, contact a customer service centre. |
| HC | High temperature heating check.If the information code remains, contact a customer service centre. |
| 1C | The Water Level sensor is not working properly.Try power off and restarting the cycle.If the information code remains, contact a customer service centre.When the “4C” message appears, the washer do draining for 3 minutes. During this time, the Power button is inoperative. |
Troubleshooting
| Code Action | |
| AC | Check communications between main and sub PBAs.Turn the machine off, and restart the cycle.If the information code remains, contact a customer service centre. |
| FC | The drying fan motor is not working properly.Turn the machine off, and restart the cycle.If the information code remains, contact a local Samsung service centre. |
| O | The machine does not turn off automatically after the last spinning process, and the “O” message remains.The machine operates normally without running theDRUM CLEANcycle. However, it is recommended to run the cycle for hygienic purposes. |
If any information code keeps appearing on the screen, contact a local Samsung service centre.
Specifications
Fabric care chart
The following symbols provide garment care directions. The care labels include four symbols in this order: washing, bleaching, drying and ironing (and dry cleaning when necessary). The use of symbols ensures consistency among garment manufacturers of domestic and imported items. Follow the care label directions to maximize garment life and reduce laundry problems.
 | Resistant material Do not iron |  | |
 | Delicate fabric |  | Can be dry cleaned using any solvent |
  | Item can be washed at 95 °C Dry Clean | | |
  | Item can be washed at 60 °C | P | Dry clean with perchloride, lighter fuel, pure alcohol or R113 only |
  | Item can be washed at 40 °C | F | Dry clean with aviation fuel, pure alcohol or R113 only |
  | Item can be washed at 30 °C Do not dry clean | | |
 | Hand wash only Dry flat | - | |
 | Dry clean only Can be hung to dry | III | |
 | Can be bleached in cold water Dry on clothes hanger |
 | Do not bleach Tumble dry, normal heat | | |
 | Can be ironed at 200 °C max Tumble dry reduced heat |
 | Can be ironed at 150 °C max Do not tumble dry |
 | Can be ironed at 100 °C max | | |
Specifications
Protecting the environment
- This appliance is manufactured from recyclable materials. If you decide to dispose of this appliance, please observe local waste disposal regulations. Cut off the power cord so that the appliance cannot be connected to a power source. Remove the door so that animals and small children cannot get trapped inside the appliance.
- Do not exceed the detergent quantities recommended in the detergent manufacturer's instructions.
• Use stain removal products and bleaches before the wash cycle only when strictly necessary.
- Save water and electricity by only washing full loads (the exact amount depends upon the program used).
Spare parts guarantee
We guarantee that the following spare parts will be available to professional repairers and end-users for a minimum period of 10 years after placing the last unit of the model on the market.
- Door, door hinges and seals, other seals, door locking assembly, and plastic peripherals such as detergent dispensers.
Specification sheet
“*” Asterisk(s) means variant model and can be varied (0-9) or (A-Z).
| Model name WD9*TA**** | |
| Dimensions | W600 x D663 x H850 (mm) |
| Water pressure 50 kPa ~ 800 kPa |
| NET weight 68 kg | |
| Wash and spin capacity 9.0 kg | |
| Dry capacity 6.0 kg | |
| Power consumption | Washing and heating | 220 V 1900 W |
| 240 V 2300 W |
| Drying | 220 V 1600 W |
| 240 V 1900 W |
| Spin revolutions 1400 rpm | |
| Type Front loading w | washing machine |
| Model name WD8*TA**** | WD7*TA**** | |
| Dimensions | W600 x D600 x H850 (mm) | W600 x D550 x H850 (mm) |
| Water pressure 50 kPa ~ 800 kPa |
| NET weight 68 kg 63 kg | | |
| Wash and spin capacity | 8.0 kg | 7.0 kg |
| Dry capacity | 5.0 kg | 4.0 kg |
| Power consumption | Washing and heating | 220 V | 1900 W |
| 240 V | 2300 W |
| Drying | 220 V | 1600 W |
| 240 V | 1900 W |
| Spin revolutions 1400 rpm | |
NOTE
The design and specifications are subject to change without notice for quality improvement purposes.
English 61
Specifications
natural_image
Line drawing of a washing machine with control panel and door (no text or symbols)

| MODEL A B C D E | | | | |
| WD9*TA**** 600 | mm 850 mm 66 | 3 mm 713 mm | 1170 mm | | |
| WD8*TA**** 600 | mm 850 mm 60 | 0 mm 675 mm | 1120 mm | | |
| WD7*TA**** 600 | mm 850 mm 55 | 0 mm 618 mm | 1070 mm | | |

NOTE
The design and specifications are subject to change without notice for quality improvement purposes.
62 English
Sheet of household combined washer-dries
According to Regulation (EU) No. 96/60/EC
“*” Asterisk(s) means variant model and can be varied (0-9) or (A-Z).
| Samsung |
| Model Name | WD9*TA**** | WD8*TA**** | WD7*TA**** |
| Energy Efficiency Class |
| A (most efficient) to G (least efficient) B B B | | | |
| Energy Consumption |
| Washing, spinning, and drying kWh 7.29 | 6.48 5.67 | | | |
| Washing and spinning only kWh 1.17 1.0 | 4 0.91 | | | |
| Washing Performance Class |
| A (most efficient) to G (least efficient) A A A | | | |
| Water Extraction Efficiency Class |
| A (most efficient) to G (least efficient) A A A | | | |
| Residual moisture % 44 44 44 | | | | |
| Maximum Spin Speed rpm 1400 1400 1400 | | | |
| Capacity |
| Washing | kg | 9.0 | 8.0 | 7.0 |
| Drying | kg | 6.0 | 5.0 | 4.0 |
| Water Consumption |
| Washing, spinning, and drying | l | 110 | 97 89 | |
| Washing and spinning only | l | 59 52 46 | | |
| Program time for complete operating cycle (60 °C cotton washing and 'dry cotton' drying for rated washing capacity) |
| Washing, spinning, and drying | min | 830 | 770 | 755 |
| Washing and spinning only | min | 285 | 285 | 285 |
| Programs to which the information on the label and the Sheet relate | Wash Cotton | 60 °C + Intensive |
| Dry | Cotton Dry |
| Estimated annual consumption for a 4-person household, always using the dries (200 cycles) |
| Energy Consumption | kWh/yr | 1458 1296 1134 | |
| Water Consumption | l | 22050 | 19420 | 17725 |
| Estimated annual consumption for a 4-person household, never using the drier (200 cycles) |
| Energy Consumption | kWh/yr | 234 | 208 | 182 |
| Water Consumption | l | 11700 | 10400 | 9100 |
English 63
Specifications
| Noise using standard 60°C cotton washing cycle and ‘ dry cotton’ drying cycle |
| Washing | dB (A) re 1 pW | 54 54 54 | | |
| Spinning | dB (A) re 1 pW | 73 73 73 | | |
| Drying | dB (A) re 1 pW | 59 59 59 | | |
The drying energy consumption data has been measured under the conditions specified in Standard EN50229.
Memo


QUESTIONS OR COMMENTS?
| COUNTRY CALL OR VISIT US ONLINE AT | |
| HUNGARY 06 | 80SAMSUNG (0680-726-7864) www.samsung.com/hu/support | |
| CZECH 800 | - SAMSUNG (800-726786)" www.samsung.com/cz/support | |
| SLOVAKIA 08 | 00 - SAMSUNG (0800-726 786)" www.samsung.com/sk/support | |
| CROATIA 07 | 2 726 786 www.samsung.com/hr/support | |
| BOSNIA 055 | 233 999 www.samsung.com/support | |
| North Macedonia | 023 207 777 www.samsung.com/mk/support | |
| MONTENEGRO | 020 405 888 www.samsung.com/support | |
| SLOVENIA 08 | 0 697 267 (brezplačna številka) www.samsung.com/si/support | |
| SERBIA 011 | 321 6899 www.samsung.com/rs/support | |
| Kosovo | 0800 10 10 1 | www.samsung.com/support |
| ALBANIA | 045 620 202 www.samsung.com/al/support | |
| BULGARIA | *3000 Цена на един градски разговор0800 111 31 Безплатен за всички оператори | www.samsung.com/bg/support |
| ROMANIA | *8000 (apel in retea)08008-726-78-64 (08008-SAMSUNG) Apel GRATUITAtenție: Dacă efectuați apelul din rețeaua Digi(RCS/RDS), vă rugăm să ne contactați formândnumărul Telverde fără ultimele două cifre, astfel:0800872678. | www.samsung.com/ro/support |
| LITHUANIA | 8-800-77777 | www.samsung.com/lt/support |
| LATVIA | 8000-7267 | www.samsung.com/lv/support |
| ESTONIA | 800-7267 | www.samsung.com/ee/support |

natural_image
Blurred grayscale image with no discernible text, symbols, or identifiable objects
Перална машина
natural_image
Symbol of a trash bin crossed with a diagonal line, no text or numbers present
natural_image
Diagram showing two mechanical assembly states: left with hand tool and directional arrows, right with valve and nut assembly (no text or symbols)
natural_image
Diagram showing a wrench and nut assembly with directional arrows indicating movement (no text or symbols)
natural_image
Diagram of a device with attached tubing and a magnified inset showing a no-smoking symbol (no text or labels present)
ВНИМАНИЕ
natural_image
Diagram of a faucet assembly with valve and base, showing directional arrows indicating movement (no text or labels)
natural_image
Diagram of a car fuel plug being inserted into a door panel, showing airflow direction (no text or symbols)
natural_image
Diagram of two identical pipe fittings with circular annotations highlighting their features (no text or symbols present)
natural_image
Hand using a screwdriver to adjust a component with a bolt (no text or symbols visible)
natural_image
Illustration of a hand using a tool to adjust a pipe fitting with a rotating valve (no text or symbols)
natural_image
Diagram of two connected electrical connectors with a directional arrow indicating rotation (no text or symbols)
natural_image
Line drawing of a washing machine next to a vertical pipe with a star symbol (no text or labels)
natural_image
Line drawing of a washing machine with two circular components and a small battery nearby (no text or symbols)
natural_image
Line drawing of a washing machine with a bag removed and a pair of clothes hanging nearby (no text or symbols)
natural_image
Line drawing of a hand inserting a card into a drawer with a plastic sheet inside (no text or symbols)
natural_image
Line drawing of a hand holding a small object over a surface, with no visible text or symbols
natural_image
Line drawing of a hand holding a smartphone with a prohibition symbol (no text or labels)
ВНИМАНИЕ
natural_image
Diagram of a mechanical device with a magnified circular inset showing internal components (no text or symbols)
natural_image
Diagram of a printer drawer with a magnified inset showing internal components (no text or symbols)
Командно табло

natural_image
Diagram of a plug inserted into a device, showing a circular component being inserted (no text or symbols present)
natural_image
Illustration of a hand using a power tool to adjust or install a component, with no visible text or symbols.
natural_image
Illustration of a hand inserting a plug into a socket with cable (no text or symbols)
natural_image
Illustration of hands using a tool to clean or repair a sink (no text or symbols visible)
natural_image
Technical line drawing of a circular mechanical component with concentric rings and a central shaft (no text or symbols)
natural_image
Illustration of hands using a tool to clean or store items on a sink (no text or symbols visible)
natural_image
Illustration of a hand inserting a component into a device (no text or symbols visible)
natural_image
Line drawing of a washing machine with control panel and door (no text or symbols)

natural_image
Symbol of a trash bin crossed out by a diagonal line, representing no waste or discharge (no text or labels)

natural_image
Diagram showing two mechanical assembly states: left with hand tool and directional arrows, right with valve mechanism (no text or symbols)
natural_image
Diagram of a device with attached tubing and a magnified inset showing a no-smoking symbol (no text or labels present)
! UPOZORNĚNÍ
natural_image
Diagram of a faucet assembly with rotating valve and base, showing mechanical components without any text or symbols
natural_image
Diagram of a car plug with a valve and arrow indicating rotation (no text or symbols)
natural_image
Diagram of two pipe fittings with circular annotations highlighting their features (no text or symbols present)
natural_image
Hand using a screwdriver to adjust a component with a bolt, showing a curved arrow indicating rotation (no text or symbols present)
natural_image
Illustration of a hand using a tool to adjust a pipe fitting with a rotating valve (no text or symbols)
natural_image
Diagram of two connected electrical connectors with a directional arrow indicating rotation (no text or symbols)

natural_image
Line drawing of a washing machine with a vertical pipe and a star symbol, no text or labels present
Přes okraj umyvadla
natural_image
Line drawing of a washing machine with two circular doors and a small appliance on the side (no text or symbols)
natural_image
Line drawing of a washing machine with clothes being placed inside (no text or symbols)
natural_image
Line drawing of a hand inserting a card into a drawer with a tray inside (no text or symbols)
natural_image
Line drawing of a hand holding a small object over a surface, with no visible text or symbols

natural_image
Line drawing of a hand holding a smartphone with a prohibition symbol (no text or labels)
natural_image
Diagram of a mechanical device with a magnified circular inset showing internal components (no text or symbols)
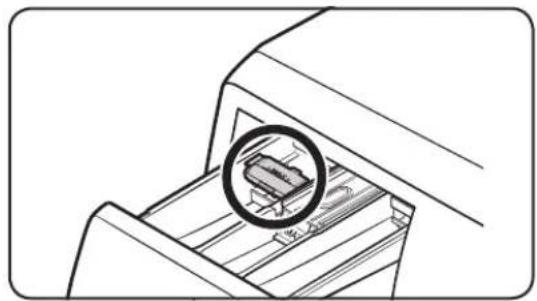
natural_image
Diagram of a printer or printer with a magnified inset showing internal components (no text or symbols)
Ovládací panel

natural_image
Diagram of a plug inserted into a socket, showing airflow direction (no text or symbols)

natural_image
Illustration of a hand using scissors to cut a button into a device (no text or symbols present)
natural_image
Illustration of a hand inserting a plug into a socket (no text or symbols visible)
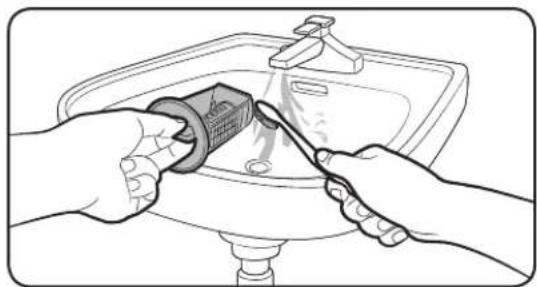
natural_image
Illustration of hands using a tool to clean or repair a sink (no text or symbols visible)
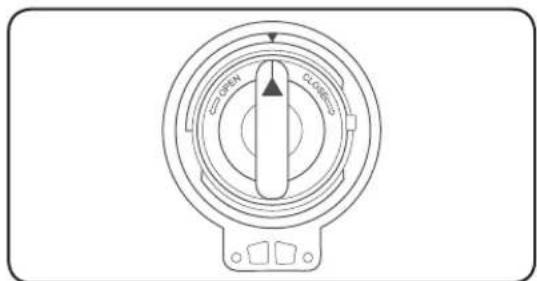
natural_image
Technical line drawing of a circular mechanical component with no visible text or symbols
natural_image
Illustration of hands using a tool to clean or wash the sink surface (no text or symbols visible)
natural_image
Illustration of a hand inserting a plastic component into a housing (no text or symbols visible)
natural_image
Line drawing of a front-loading washing machine with control panel and door (no text or symbols)

| MODEL A B C D E | | | | |
| WD9*TA**** 600 | mm 850 mm 6 | 63 mm 713 mm | 1170 mm | | |
| WD8*TA**** 600 | mm 850 mm 6 | 00 mm 675 mm | 1120 mm | | |
| WD7*TA**** 600 | mm 850 mm 5 | 50 mm 618 mm | 1070 mm | | |

POZNÁMKA
DRUM CLEAN (ΚΑΘΑΡΙΣΜΟΣ ΚΑΔΟΥ) 45
Smart check [⊕] 46
natural_image
Symbol of a trash bin crossed out by two crossed lines (no text or numbers present)

natural_image
Diagram showing two mechanical assembly states: left with hand tool and directional arrows, right with valve mechanism (no text or symbols)
natural_image
Diagram of a device with attached tubing and a magnified inset showing a prohibition symbol (no text or labels present)
! ΠΡΟΣΟΧΗ
natural_image
Diagram of a faucet assembly with valve and base, showing directional arrows indicating rotation (no text or labels)
natural_image
Diagram of a car fuel plug being inserted into a door panel, showing airflow direction (no text or symbols)
natural_image
Diagram of two pipe fittings with circular annotations highlighting their features (no text or symbols present)
natural_image
Hand using a screwdriver to adjust a component with a bolt, showing a curved arrow indicating rotation (no text or symbols present)
natural_image
Illustration of a hand using a tool to adjust a pipe fitting with a rotating valve (no text or symbols)

natural_image
Diagram of two connected electrical connectors with a directional arrow indicating rotation (no text or symbols)

natural_image
Line drawing of a washing machine next to a vertical pipe with a star symbol (no text or labels)
natural_image
Line drawing of a washing machine with two circular doors and a small appliance on the side (no text or symbols)
natural_image
Diagram showing a door opening and lifting a clothes piece, with no text or symbols present.
natural_image
Line drawing of a hand inserting a card into a drawer with a plastic sheet inside (no text or symbols)

natural_image
Line drawing of a hand holding a small object over a surface, with no visible text or symbols

natural_image
Line drawing of a hand holding a smartphone with a prohibition symbol (no text or labels)
natural_image
Diagram of a mechanical device with a magnified inset showing internal components (no text or symbols)

natural_image
Diagram of a printer with a magnified inset showing internal components (no text or symbols)
Πίνακας ελέγχου

DRUM CLEAN (ΚΑΘΑΡΙΣΜΟΣ ΚΑΔΟΥ)
natural_image
Diagram of a plug inserted into a device, showing a circular component being inserted (no text or symbols present)
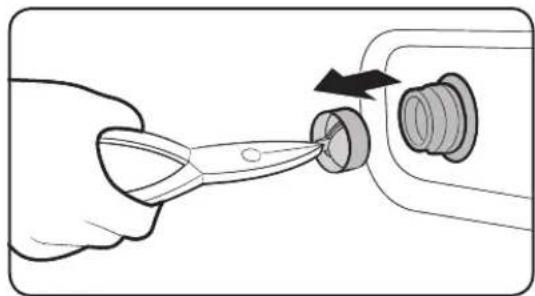
natural_image
Illustration of a hand using scissors to cut a button into a device (no text or symbols present)
natural_image
Illustration of a hand inserting a plug into a socket with cable (no text or symbols)

natural_image
Illustration of hands using a tool to clean or repair a sink (no text or symbols visible)
natural_image
Technical line drawing of a circular mechanical component with labeled center (no text or symbols beyond basic markings)
natural_image
Illustration of hands cleaning a sink with a tool, no text or symbols present
natural_image
Illustration of a hand inserting a plastic component into a housing (no text or symbols visible)
natural_image
Line drawing of a washing machine with labeled dimensions (no text or symbols on the diagram itself)

| MONTEAO A B C D E | | | | |
| WD9*TA***** 600 mm | 850 mm 663 mm | 713 mm 1170 mm | | |
| WD8*TA***** 600 mm | 850 mm 600 mm | 675 mm 1120 mm | | |
| WD7*TA***** 600 mm | 850 mm 550 mm | 618 mm 1070 mm | | |

ΣΗΜΕΙΩΣΗ
natural_image
Symbol of a trash bin crossed with no text or numbers, representing waste sorting or restriction (no text present)
01 Vabastuskang
natural_image
Diagram showing two mechanical assembly states: left with hand turning a tool, right with valve and nut assembly (no text or symbols)
natural_image
Diagram of a device with attached tubing and a magnified inset showing a no-smoking symbol (no text or labels present)
! ETTEVAATUST!
natural_image
Diagram of a faucet assembly with valve and base, showing rotational flow (no text or labels)
natural_image
Diagram of a car fuel plug being inserted into a door, showing airflow direction (no text or symbols)
natural_image
Diagram of two pipe fittings with circular annotations highlighting their features (no text or symbols present)
- Eemaldage adapter (A) veevooliku (B) küljest.

natural_image
Hand using a screwdriver to adjust a component with a bolt, showing a curved arrow indicating rotation (no text or symbols present)
- Keerake adapteril olevad neli kruvi ristpeakruvikeeraja abil lahti.

natural_image
Illustration of a hand using a tool to adjust a pipe fitting with a rotating valve (no text or symbols)

natural_image
Diagram of two connected electrical connectors with a directional arrow indicating rotation (no text or symbols)

natural_image
Line drawing of a washing machine with a vertical pipe and a star symbol, no text or labels present
Üle valamu serva
natural_image
Line drawing of a washing machine with two circular doors and a small appliance on the side (no text or symbols)
natural_image
Diagram showing a door opening and lifting a shirt, with a black arrow indicating the lifting direction (no text or symbols present)
- Pange pesu trumlisse kapsli peale.

ETTEVAATUST!
natural_image
Line drawing of a hand inserting a card into a drawer with a tray inside (no text or symbols)

natural_image
Line drawing of a hand holding a small object over a surface, with no visible text or symbols

natural_image
Line drawing of a hand holding a smartphone with a prohibition symbol (no text or labels)
natural_image
Diagram of a mechanical device with a magnified inset showing internal components (no text or symbols)
natural_image
Diagram of a printer drawer with a magnified inset showing internal components (no text or symbols)
Toimingud
Juhtpaneel

natural_image
Diagram of a plug inserted into a socket, showing airflow direction (no text or symbols)

natural_image
Illustration of a hand using scissors to cut a button into a device (no text or symbols present)
natural_image
Illustration of a hand inserting a plug into a socket (no text or symbols visible)

natural_image
Illustration of hands using a tool to clean or repair a sink (no text or symbols visible)
natural_image
Technical line drawing of a circular mechanical component with no visible text or symbols
- Hoidke sahtli sees olevat vabastushooba (A) all ja tömmake sahtel lahti.
natural_image
Illustration of hands using a tool to clean or wash the sink surface (no text or symbols visible)
natural_image
Illustration of a hand inserting a plastic component into a housing (no text or symbols visible)
natural_image
Line drawing of a washing machine with labeled dimensions (no text or symbols beyond 'A' and measurement indicators)

| MUDEL A B C D E | | | | |
| WD9*TA***** 600 | mm 850 mm 6 | 63 mm 713 mm | 1170 mm | | |
| WD8*TA***** 600 | mm 850 mm 6 | 00 mm 675 mm | 1120 mm | | |
| WD7*TA***** 600 | mm 850 mm 5 | 50 mm 618 mm | 1070 mm | | |

MÄRKUS
natural_image
Symbol of a trash bin crossed with no text or numbers, representing environmental restriction (no text present)
Ispravno odlaganje ovog proizvoda (Otpad električnih i elektronskih uredaja)
01 Ručica za otpuštanje
04 Vrata
natural_image
Diagram showing two mechanical assembly states: left with hand turning a tool, right with valve and nut assembly (no text or symbols)
natural_image
Diagram of a device with attached tubing and a magnified inset showing a no-smoking symbol (no text or labels present)

OPREZ
Pri postavljanju proizvoda, pazite da nožica za poravnavanje ne pritišće kabel napajanja.

OPREZ
Pazite da sve nožice za poravnavanje prianjaju na površinu tla kako bi se izbjeglo pomicanje perilice rublja ili stvaranje buke uslijed vibracija. Zatim provjerite poskakuje li perilica rublja. Ako perilica rublja ne poskakuje, pričvrstite matice.
Postavljanje
natural_image
Diagram of a faucet assembly with valve and base, showing rotational flow (no text or labels)
natural_image
Diagram of a car fuel plug being inserted into a door, showing airflow direction (no text or symbols)
natural_image
Diagram of two pipe fittings with circular annotations highlighting their features (no text or symbols present)
- Otvorite slavinu za vodu i provjerite curi li gdje voda na mjestu spoja. Ako voda curi, ponovite prethodne korake.
! UPOZORENJE
U slučaju istjecanja vode, zaustavite perilicu za rublje i odspojite je iz dovoda napajanja. Nakon toga, obratite se lokalnom Samsungovom servisu u slučaju da voda istječe iz crijeva ili se obratite lokalnom vodoinstalateru u slučaju istjecanja vode iz slavine. U protivnom, moglo bi doći do strujnog udara.

OPREZ
natural_image
Hand using a screwdriver to adjust a component with a bolt, showing a curved arrow indicating rotation (no text or symbols present)
- Koristite Philipsov odvijač kako biste otpustili četiri vijka na adapteru.

natural_image
Illustration of a hand using a tool to adjust a pipe fitting with a valve, showing rotational motion (no text or symbols)

natural_image
Diagram of two connected electrical connectors with a directional arrow indicating rotation (no text or symbols)
- Spojite crveni kraj crijeva za dovod tople vode na ulaz za toplu vodu sa stražnje strane perilice.
- Spojite drugi kraj crijeva za dovod tople vode na slavinu za toplu vodu.

natural_image
Line drawing of a washing machine connected to a vertical pipe with a star symbol (no text or labels)
Preko ruba umivaonika
natural_image
Line drawing of a washing machine with two circular doors and a small appliance on the side (no text or symbols)
natural_image
Diagram showing a door opening and lifting a shirt, with a black arrow indicating the motion (no text or symbols present)
- Stavite rublje u bubanj iznad kapsule.

OPREZ
natural_image
Line drawing of a hand inserting a card into a drawer with a tray inside (no text or symbols)
- Lagano otvorite ladicu za deterdžent.
- Dodajte deterdžent za rublje u Ⅱ odjeljak za glavno pranje prema uputama ili preporukama proizvođača. Za korištenje tekućeg deterdženta, pogledajte stranicu 36.
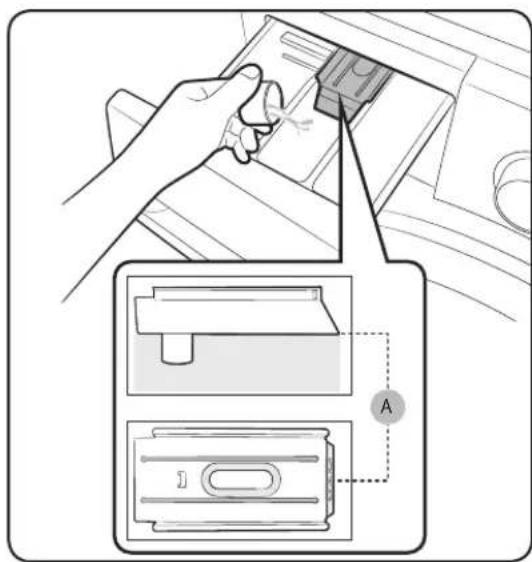

natural_image
Line drawing of a hand holding a small object over a surface, with no visible text or symbols

natural_image
Line drawing of a hand holding a smartphone with a prohibition symbol (no text or labels)
- Stavite omekšivač za tkanine u odjeljak za omekšivač. Nemojte prelaziti maksimalnu liniju (A).

- Ako želite predpranje, dodajte deterdžent za predpranje u bdjeljak za predpranje prema uputama ili preporukama proizvođača.
- Zatvorite ladicu za deterdžent.

OPREZ
- Nemojte dodavati deterdžent u prahu u odjeljak za tekući deterdžent.
- Koncentrirani omekšivač za tkanine potrebno je rastopiti u vodi prije primjene.
- Nemojte stavljati deterdžent za glavno pranje u odjeljak za omekšivač.
Prije pokretanja
Prvo umetnite odjeljak za tekući deterdžent koji je isporučen s perilicom u Iodjeljak za glavno pranje. Zatim stavite tekući deterdžent u odjeljak ispod označene maksimalne linije (A).

OPREZ
- Nemojte prelaziti maksimalnu liniju označenu na odjeljku.
- Podignite spremnik za tekući deterdžent ako koristite praškasti deterdžent.
Pri korištenju tekućeg deterdženta Pri korištenju praškastog deterdženta
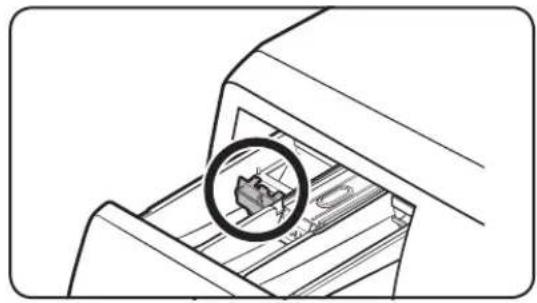
natural_image
Technical line drawing of a mechanical component with a magnified inset showing internal components (no text or symbols)

natural_image
Diagram of a printer's internal structure with a magnified inset showing internal components (no text or symbols)
Upravljačka ploča
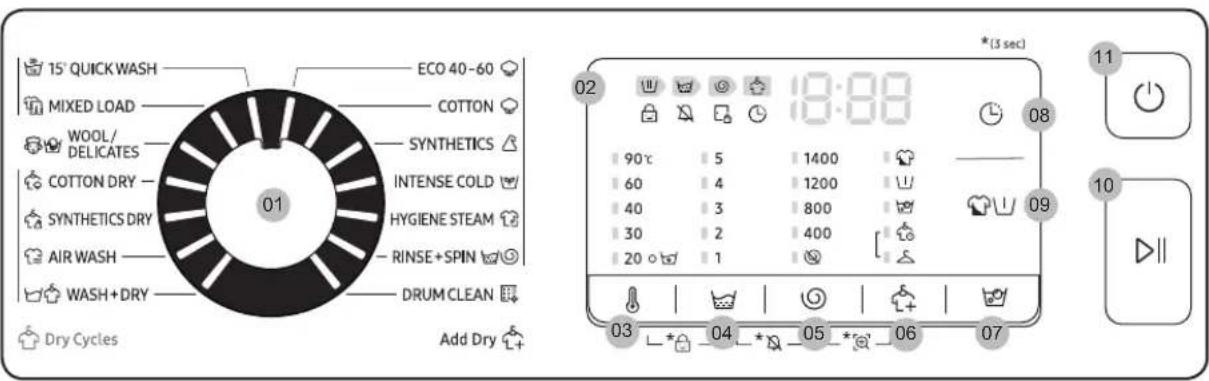
| 01 Birač Ciklusa Okrenite programator za odabir programa pranja. |
| 02 Zaslon | Na zaslonu se prikazuju informacije o tekućem programu pranja i procijenjeno preostalo vrijeme ciklusa, odnosno poruka greške ako se pojavi problem. |
| 03 [Temperatura] | Pritisnite za promjenu temperature vode za aktualni program pranja. |
| 04 [spiranje] | Pritisnite za promjenu broja ispiranja za aktualni program pranja.Ovisno o ciklusu, broj ispiranja možete postaviti na najviše 5. |
| 05 [centrifuga] | Pritisnite za promjenu brzine centrifugiranja aktualnog programa pranja.Zadržavanje ispiranja (bez indikator): Konačni ciklus ispiranja bit će obustavljen te će rublje ostati u vodi. Kako biste izvadili rublje, pokrenite ciklus ispiranja ili centrifugiranja.Bez centrifug [IMAGE]Bubanj ne vrši centrifugiranje nakon završnog ciklusa ispiranja.Samo centrifugiranje [IMAGE]za pokretanje ciklusa Samo centrifugiranje, pritišćite Centrifuga 3 sekunde. Kada se pojave vrijeme ciklusa i brzina centrifugiranja, pritišćite [Centrifuga uzastopno dok ne odaberete željenu brznu centrifugiranja.Zatim pritisnite [Pokretanje/Pauza] za pokretanje ciklusa.Vrijeme centrifugiranja ovisi o odabranom ciklusa. |
| 06 [Opcija sušenja] | Pritisnite gumb za odabir odgovarajuće opcije sušenja |
| 07 [Namakanje u mjehurićima] | Pritisnite za aktiviranje/deaktiviranje funkcije Namakanje u mjehurićima. Ova funkcija pomaže prilikom uklanjanja brojnih tvrdokornih mrlja. |
Radnje
DRUM CLEAN (ČIŠĆENJE BUBNJA)
Redovito pokrećite ovaj program za čišćenje bubnja i uklanjanje bakterija. Ovaj ciklus grije vodu između 60 °C i 70 °C, te uklanja nakupljenu nečistoću s gumene brtve na vratima.
- Za uključivanje pritisnite tipku Napajanje.
- Okrenite Birač programa za odabir opcije DRUM CLEAN (ČIŠĆENJE BUBNJA).
- Pritisnite Pokretanje/Pauza.
NAPOMENA
- Temperatura vode za DRUM CLEAN (ČIŠĆENJE BUBNJA) namještena je na 70 °C i ne može se promijeniti.
- preporučuje se pokrenuti ciklus DRUM CLEAN (ČIŠĆENJE BUBNJA) nakon svakih 40 pranja.
- Da bi se spriječio nastanak kamenca, dodajte odgovarajuću količinu deterdženta prema lokalnoj tvrdoći vode ili uz deterdžent dodajte i omekšivač vode.
Podsjetnik za DRUM CLEAN (ČIŠĆENJE BUBNJA)
natural_image
Illustration of a hand washing a basin with a water tap and a valve, no text or symbols present
-
Otvorite poklopac crijeva i pustite da voda u crijevu za ispuštanje vode u nuždi (C) teče u spremnik.
-
Kada ste završili, zatvorite poklopac crijeva te ponovno umetnite crijevo. Zatim zatvorite pokrov filtra.
NAPOMENA
natural_image
Diagram of a plug inserted into a socket, showing airflow direction (no text or symbols)

natural_image
Illustration of a hand using scissors to cut a button into a device (no text or symbols present)
natural_image
Illustration of a hand inserting a plug into an electrical socket (no text or symbols)

natural_image
Illustration of hands using a tool to clean or wash a sink (no text or symbols visible)
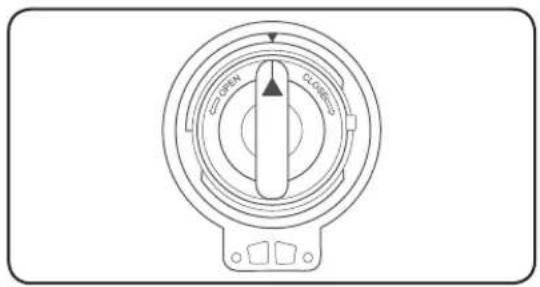
- Isključite perilicu i izvucite kabel za napajanje.
- Ispustite preostalu vodu iz bubnja.
Pogledajte odjeljak "Ispuštanje vode u nuždi".
- Lagano pritisnite gornju površinu poklopca filtra kako biste ga otvorili.
- Okrenite gumb filtra za krupnije čestice ulijevo i ispustite zaostalu vodu.
- Očistite filtar upotrebljavajući mekane četke. Pazite da propeler odvodne crpke unutar filtra nije začepljen.
- Ponovno umetnite filtar za krupnije čestice i okrenite poklopac filtra udesno.
NAPOMENA
- Neki filtri imaju sigurnosni gumb projektiran za sprječavanje nezgoda koje bi mogla uzrokovati djeca. Za otvaranje sigurnosnog gumba na filtru za krupnije čestice, pritisnite ga i okrenite u smjeru suprotnom od kazaljke na satu. Mehanizam opruge na sigurnosnom gumbu pomaže otvoriti filtar.
- Za zatvaranje sigurnosnog gumba na filtru za krupnije čestice, pritisnite ga i okrenite u smjeru kazaljke na satu. Opruga stvara zvuk klepetanja, što je normalno.
NAPOMENA
- Držeći polugu za otpuštanje (A) na unutrašnjoj strani ladice, lagano otvorite ladicu.
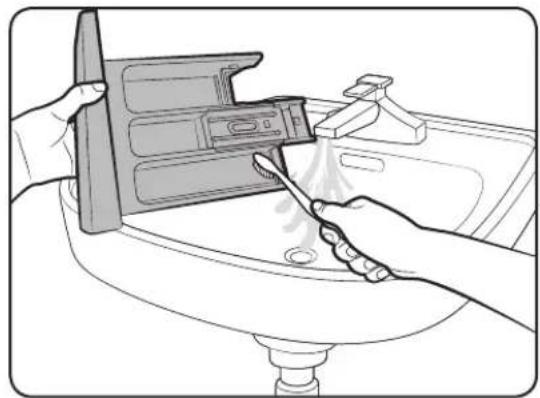
natural_image
Illustration of hands using a tool to clean or install a sink with a water filter (no text or symbols)
natural_image
Illustration of a hand inserting a plastic component into a housing (no text or symbols visible)
- Očistite udubljeni dio ladice pomoću mekane četke.
- Ponovno umetnite polugu za otpuštanje i spremnik za tekući deterdžent u ladicu.
- Lagano gurnite ladicu prema unutra kako biste je zatvorili.
NAPOMENA
Za uklanjanje zaostalog deterdženta, pokrenite program RINSE+SPIN (ISPIRANJE + CENTRIFUGA) s praznim bubnjem.
natural_image
Line drawing of a washing machine with control panel and door (no text or symbols)

| MODEL A B C D E | | | | |
| WD9*TA***** 600 | mm 850 mm 6 | 63 mm 713 mm | 1170 mm | | |
| WD8*TA***** 600 | mm 850 mm 6 | 00 mm 675 mm | 1120 mm | | |
| WD7*TA***** 600 | mm 850 mm 5 | 50 mm 618 mm | 1070 mm | | |

NAPOMENA
natural_image
Symbol of a trash bin crossed with no text or numbers, representing waste sorting or restriction (no text present)
natural_image
Diagram showing two mechanical assembly states: left with hand tool and directional arrows, right with valve mechanism (no text or symbols)
natural_image
Diagram of a device with attached tubing and a magnified inset showing a no-smoking symbol (no text or labels present)
VIGYÁZAT
natural_image
Diagram of a faucet assembly with valve and base, showing rotational flow (no text or labels)
natural_image
Diagram of a car fuel plug being inserted into a door, showing airflow direction (no text or symbols)
natural_image
Diagram of two pipe fittings with circular annotations highlighting their features (no text or symbols present)
natural_image
Illustration of a hand using a screwdriver to adjust a mechanical component (no text or symbols present)
natural_image
Illustration of a hand using a tool to adjust a pipe fitting with a valve, showing rotational motion (no text or symbols)
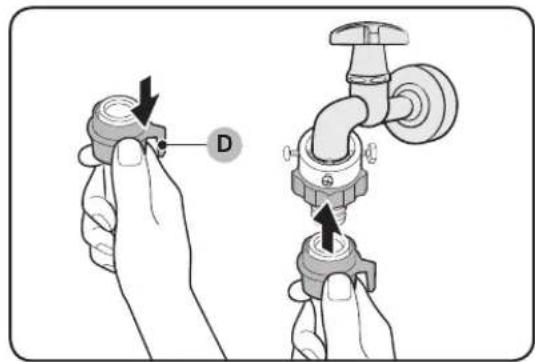
natural_image
Diagram of two connected electrical connectors with a directional arrow indicating rotation (no text or symbols)

natural_image
Line drawing of a washing machine with a vertical pipe and a star symbol, no text or labels present
natural_image
Line drawing of a washing machine with two circular doors and a small appliance on the side (no text or symbols)
natural_image
Diagram showing a washing machine opening a door with a black arrow indicating the process, and clothing items nearby (no text or symbols)
natural_image
Line drawing of a hand inserting a card into a drawer with a tray inside (no text or symbols)

natural_image
Line drawing of a hand holding a small object over a surface, with no visible text or symbols

natural_image
Line drawing of a hand holding a smartphone with a prohibition symbol overlay (no text or symbols present)
natural_image
Technical line drawing of a mechanical component with a circular inset showing a gear or cam mechanism (no text or symbols)

natural_image
Diagram of a printer with a magnified inset showing internal components (no text or symbols)
Kezelőpanel
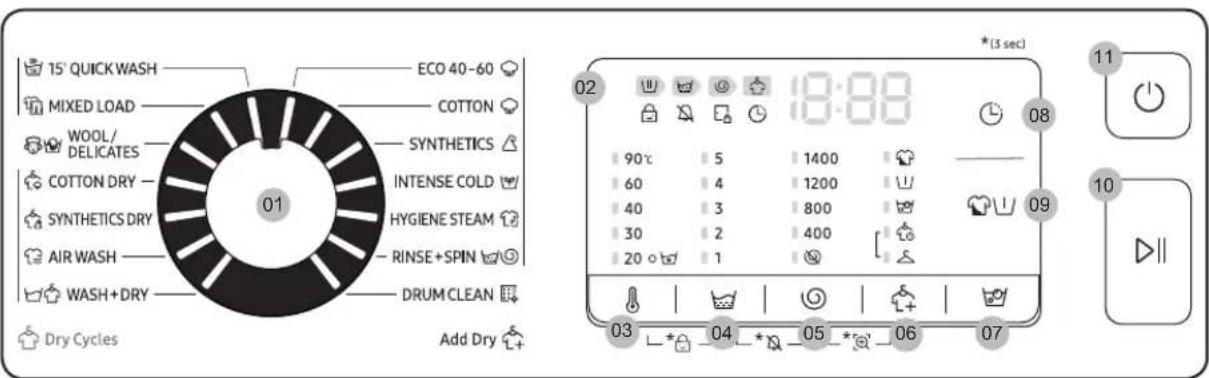
natural_image
Diagram of a plug inserted into a socket, showing airflow direction (no text or symbols)

natural_image
Illustration of a hand using scissors to cut a button into a device (no text or symbols present)
natural_image
Illustration of a hand inserting a plug into a socket (no text or symbols visible)

natural_image
Illustration of hands using a tool to clean or repair a sink (no text or symbols visible)

natural_image
Technical line drawing of a circular mechanical component with no visible text or symbols
natural_image
Illustration of hands using a tool to clean or store items on a sink (no text or symbols visible)
natural_image
Illustration of a hand inserting a component into a device (no text or symbols visible)
natural_image
Line drawing of a front-loading washing machine with control panel and door (no text or symbols)
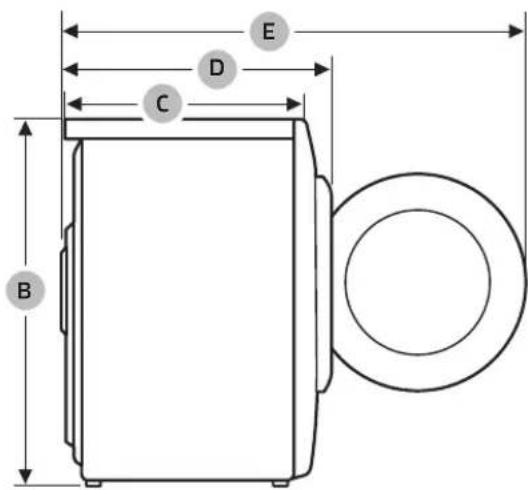
| MODELL A B C D E | | | | |
| WD9*TA**** 600 | mm 850 mm 6 | 63 mm 713 mm | 1170 mm | |
| WD8*TA**** 600 | mm 850 mm 6 | 00 mm 675 mm | 1120 mm | |
| WD7*TA**** 600 | mm 850 mm 5 | 50 mm 618 mm | 1070 mm | |

MEGJEGYZÉS
natural_image
Symbol of a trash bin crossed with no text or numbers, representing waste sorting or restriction (no text present)
natural_image
Diagram showing two mechanical assembly states: left with hand tool and directional arrows, right with valve mechanism (no text or symbols)
- Baigę reguliuoti, verzles priveržkite raktu.

natural_image
Diagram of a device with attached tubing and a magnified inset showing a no-smoking symbol (no text or labels present)
! PERSPÉJIMAS
natural_image
Diagram of a faucet assembly with valve and base, showing rotational flow (no text or labels)
natural_image
Diagram of a car plug with a valve and arrow indicating rotation (no text or symbols)
natural_image
Diagram of two pipe fittings with circular annotations highlighting their features (no text or symbols present)
natural_image
Hand using a screwdriver to adjust a component with a bolt, showing a curved arrow indicating rotation (no text or symbols present)
- Kryžminiu atsuktuvu atlaisvinkite keturis adapterio varžtus.
natural_image
Illustration of a hand using a tool to adjust a pipe fitting with a rotating valve (no text or symbols)

natural_image
Diagram of two connected electrical connectors with a directional arrow indicating rotation (no text or symbols)

natural_image
Line drawing of a washing machine with a vertical pipe and a star symbol, no text or labels present
natural_image
Line drawing of a washing machine with two circular doors and a small appliance on the side (no text or symbols)
natural_image
Diagram showing a door opening into a washing machine with clothing items nearby (no text or symbols)
natural_image
Line drawing of a hand inserting a card into a drawer with a plastic clip (no text or symbols)

natural_image
Line drawing of a hand holding a small object over a surface, with no visible text or symbols

natural_image
Line drawing of a hand holding a device with a prohibition symbol (no text or labels)
natural_image
Diagram of a printer or printer with a magnified inset showing internal components (no text or symbols)
natural_image
Diagram of a printer's internal structure with a magnified inset showing the printer's internal components (no text or symbols)
Skalbyklės valdymas
Valdymo skydelis
natural_image
Illustration of a hand washing a basin with a pipe and water droplets (no text or symbols)
natural_image
Diagram of a plug inserted into a socket, showing airflow direction (no text or symbols)

natural_image
Illustration of a hand using a power tool to cut a component, with no visible text or symbols
natural_image
Illustration of a hand inserting a plug into an electrical socket (no text or symbols)

natural_image
Illustration of hands using a tool to clean or wash a sink (no text or symbols visible)
natural_image
Illustration of hands using a tool to clean or store items on a sink (no text or symbols visible)
natural_image
Illustration of a hand inserting a component into a device (no text or symbols visible)
natural_image
Line drawing of a front-loading washing machine with control panel and door (no text or symbols)

| MODELIS A B | C D E | | | | |
| WD9*TA**** 600 | mm 850 mm 6 | 63 mm 713 mm | 1170 mm | | |
| WD8*TA**** 600 | mm 850 mm 6 | 00 mm 675 mm | 1120 mm | | |
| WD7*TA**** 600 | mm 850 mm 5 | 50 mm 618 mm | 1070 mm | | |

PASTABA
natural_image
Blurred grayscale image with no discernible text, symbols, or identifiable objects
natural_image
Symbol of a trash bin crossed with no text or numbers, representing waste sorting or restriction (no text present)
natural_image
Diagram showing two mechanical assembly states: left with hand tool and directional arrows, right with valve mechanism (no text or symbols)
natural_image
Diagram of a device with attached tubing and a magnified inset showing a no-smoking symbol (no text or labels present)
! UZMANIBU
natural_image
Diagram of a faucet assembly with rotating valve and base, showing mechanical components (no text or labels)
natural_image
Diagram of a car fuel plug being inserted into a door panel, showing airflow direction (no text or symbols)
natural_image
Diagram of two pipe fittings with circular annotations highlighting their features (no text or symbols present)
- Atvienojiet adapteri (A) no Údens caurules (B).
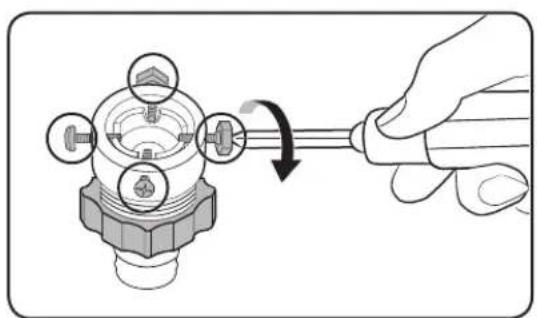
natural_image
Hand using a screwdriver to adjust a component with a bolt, showing a curved arrow indicating rotation (no text or symbols present)
- Izmantojiet Philips krustveida skrūvgriezi, lai atskrūvētu visas četras adaptera skrūves.

natural_image
Illustration of a hand using a tool to adjust a pipe fitting with a rotating valve (no text or symbols)
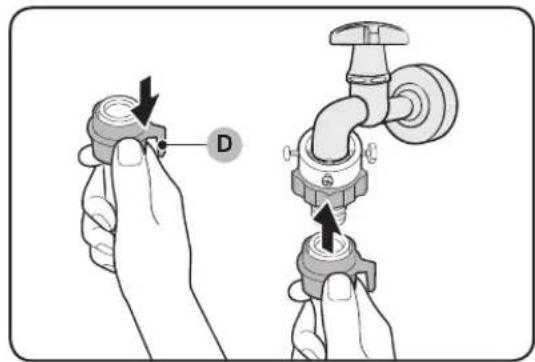
natural_image
Diagram of two connected electrical connectors with a directional arrow indicating rotation (no text or symbols)
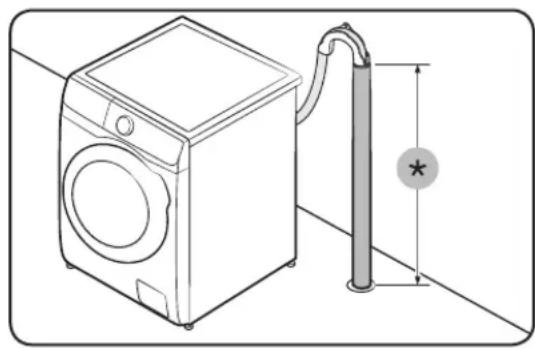
natural_image
Line drawing of a washing machine next to a vertical pipe with a star symbol (no text or labels)
natural_image
Line drawing of a washing machine with two doors and a small appliance on the side (no text or symbols)
natural_image
Diagram showing a door opening into a washing machine with a black arrow indicating the process (no text or symbols present)
natural_image
Line drawing of a hand inserting a card into a drawer with a plastic sheet inside (no text or symbols)
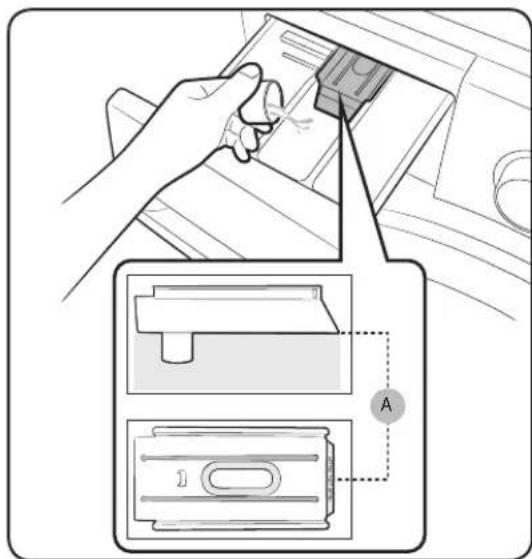
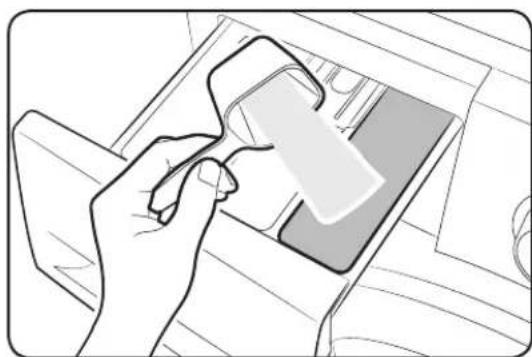
natural_image
Line drawing of a hand holding a small object over a surface, with no visible text or symbols
natural_image
Illustration of a hand holding a smartphone with a prohibition symbol (no text or symbols present)
! UZMANIBU
natural_image
Diagram of a mechanical device with a magnified inset showing internal components (no text or symbols)
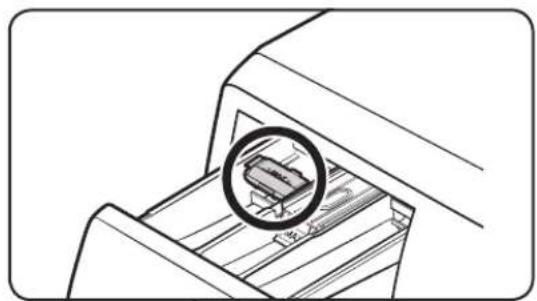
natural_image
Diagram of a printer with a magnified inset showing internal components (no text or symbols)
Vadības panelis

natural_image
Diagram of a plug inserted into a socket, showing airflow direction (no text or symbols)

natural_image
Illustration of a hand using scissors to cut a button into a device (no text or symbols present)
natural_image
Illustration of a hand inserting a plug into a socket with a cable (no text or symbols)
natural_image
Illustration of hands using a tool to clean or wash a sink (no text or symbols visible)
PIEZIME
natural_image
Illustration of hands using a tool to clean or wash the sink surface (no text or symbols visible)
natural_image
Illustration of a hand inserting a plug into a device component (no text or symbols visible)
natural_image
Line drawing of a washing machine with control panel and door (no text or symbols)

| MODELIS A B | C D E | | | | |
| WD9*TA**** 600 | mm 850 mm 6 | 63 mm 713 mm | 1170 mm | | |
| WD8*TA**** 600 | mm 850 mm 6 | 00 mm 675 mm | 1120 mm | | |
| WD7*TA**** 600 | mm 850 mm 5 | 50 mm 618 mm | 1070 mm | | |

PIEZIME
natural_image
Blurred grayscale image with no discernible text, symbols, or identifiable objects
Машина за перење
natural_image
Symbol of a trash bin crossed with no text or numbers, representing environmental restriction (no text present)
natural_image
Diagram showing two mechanical assembly states: left with hand tool and directional arrows, right with valve and nut assembly (no text or symbols)
natural_image
Diagram of a device with attached tubing and a magnified inset showing a prohibition symbol (no text or labels)
ВНИМАНИЕ
natural_image
Diagram of a faucet assembly with valve and base, showing directional arrows indicating movement (no text or labels)
natural_image
Diagram of a car fuel plug being inserted into a door panel, showing airflow direction (no text or symbols)
natural_image
Diagram of two pipe fittings with circular annotations highlighting their features (no text or symbols present)
natural_image
Hand using a screwdriver to adjust a component with a bolt, showing a curved arrow indicating rotation (no text or symbols present)
natural_image
Illustration of a hand using a tool to adjust a pipe fitting with a rotating valve (no text or symbols)

natural_image
Diagram of two connected electrical connectors with a directional arrow indicating rotation (no text or symbols)

natural_image
Line drawing of a washing machine next to a vertical pipe with a star symbol (no text or labels)
natural_image
Line drawing of a washing machine with two circular components and a small appliance on the side (no text or symbols)
natural_image
Line drawing of a washing machine with a bag removed from it, showing part of a jacket (no text or symbols)
natural_image
Line drawing of a hand inserting a card into a drawer with a plastic clip (no text or symbols)

natural_image
Line drawing of a hand holding a small object over a surface, with no visible text or symbols
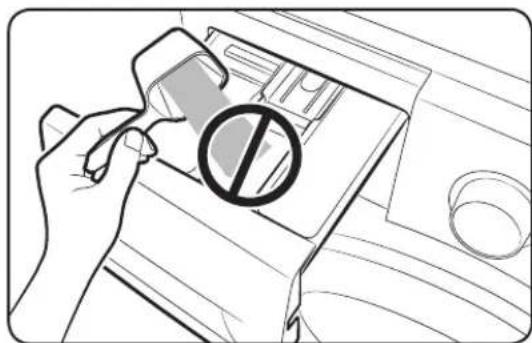
natural_image
Line drawing of a hand holding a smartphone with a prohibition symbol (no text or labels)
natural_image
Diagram of a mechanical device with a magnified inset showing internal components (no text or symbols)
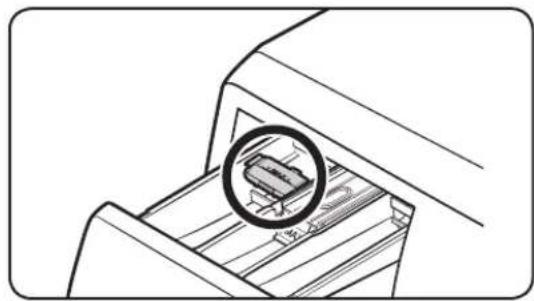
natural_image
Diagram of a printer with a magnified inset showing internal components (no text or symbols)
Контролна плоча

natural_image
Diagram of a plug inserted into a device, showing a circular component with a black arrow indicating rotation (no text or symbols present)

natural_image
Illustration of a hand using scissors to cut a button into a device (no text or symbols present)
natural_image
Illustration of a hand inserting a plug into a socket with cable (no text or symbols)

natural_image
Illustration of hands using a tool to clean or repair a sink (no text or symbols visible)

natural_image
Technical line drawing of a circular mechanical component with labeled center and outer ring (no text or symbols)
natural_image
Illustration of hands cleaning a sink with a tool, no text or symbols present
natural_image
Illustration of a hand inserting a plastic component into a housing (no text or symbols visible)
natural_image
Line drawing of a washing machine with labeled dimensions (no text or symbols on the diagram itself)

| МОДЕЛ А В С Д Е | | | | | |
| WD9*ТА****** 600 mm | 850 mm 663 mm | 713 mm 1170 mm | | | |
| WD8*ТА****** 600 mm | 850 mm 600 mm | 675 mm 1120 mm | | | |
| WD7*ТА****** 600 mm | 850 mm 550 mm | 618 mm 1070 mm | | | |

ЗАБЕЛЕШКА
natural_image
Symbol of a trash bin crossed with no text or numbers, representing environmental restriction (no text present)
natural_image
Diagram showing two mechanical assembly states: left with hand tool and directional arrows, right with valve mechanism (no text or symbols)

natural_image
Diagram of a device with attached tubing and a magnified inset showing a no-smoking symbol (no text or labels present)
natural_image
Diagram of a faucet assembly with a valve and base, showing rotational flow (no text or labels)
natural_image
Diagram of a car door handle with a valve and arrow indicating rotation (no text or symbols)
natural_image
Diagram of two pipe fittings with circular annotations highlighting their features (no text or symbols present)
natural_image
Illustration of a hand using a screwdriver to adjust a component with a tool (no text or symbols present)
natural_image
Illustration of a hand using a tool to adjust a pipe fitting with a rotating valve (no text or symbols)

natural_image
Diagram of two connected electrical connectors with a directional arrow indicating rotation (no text or symbols)

natural_image
Line drawing of a washing machine connected to a vertical pipe with a star symbol (no text or labels)
Peste marginea unei chiuvete
natural_image
Line drawing of a washing machine with two circular doors and a small appliance on the side (no text or symbols)
natural_image
Diagram showing a washing machine opening a door with a black arrow indicating the process, and clothing items nearby (no text or symbols)
natural_image
Line drawing of a hand inserting a card into a drawer with a plastic sheet inside (no text or symbols)

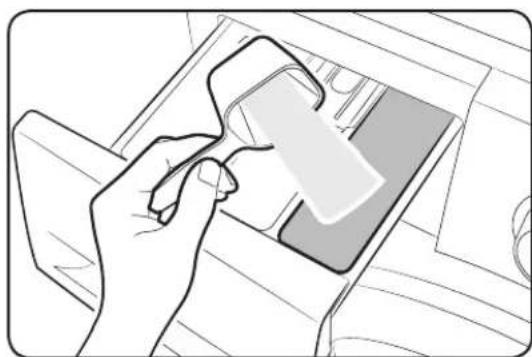
natural_image
Line drawing of a hand holding a small object over a surface, with no visible text or symbols
! ATENTIE
natural_image
Diagram of a mechanical device with a magnified inset showing internal components (no text or symbols)

natural_image
Diagram of a printer drawer with a magnified inset showing internal components (no text or symbols)
Panou de control
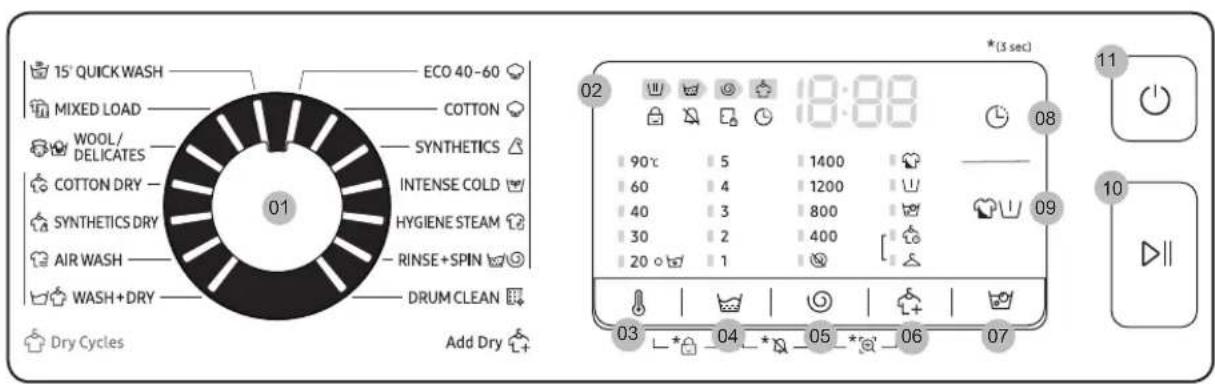
natural_image
Diagram of a plug inserted into a socket, showing airflow direction (no text or symbols)

natural_image
Illustration of a hand using scissors to cut a button into a device (no text or symbols present)
natural_image
Illustration of a hand inserting a plug into an electrical socket (no text or symbols)
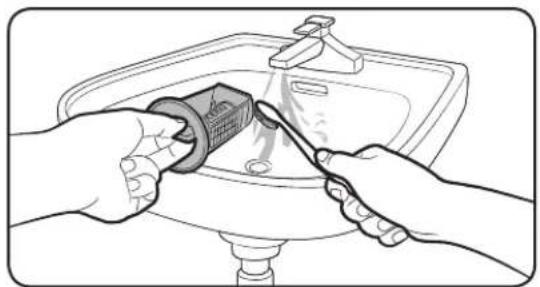
natural_image
Illustration of hands using a tool to clean or wash a sink (no text or symbols visible)

natural_image
Illustration of hands using a tool to clean or install a sink with a water filter (no text or symbols)
natural_image
Illustration of a hand inserting a component into a device (no text or symbols visible)
natural_image
Line drawing of a front-loading washing machine with control panel and door (no text or symbols)

| MODEL A B C D E | | | | |
| WD9*TA***** 600 | mm 850 mm 6 | 63 mm 713 mm | 1170 mm | | |
| WD8*TA***** 600 | mm 850 mm 6 | 00 mm 675 mm | 1120 mm | | |
| WD7*TA***** 600 | mm 850 mm 5 | 50 mm 618 mm | 1070 mm | | |

NOTĂ
natural_image
Symbol of a trash bin crossed out by a diagonal line, representing no waste or discharge (no text or numbers present)

natural_image
Diagram showing two mechanical assembly states: left with hand tool and directional arrows, right with valve mechanism (no text or symbols)
- Práčku jemne zasuňte na miesto.
Priveľkým tlakom by ste mohli poškodit
vyrovnávacie nožičky.
- Práčku vyrovnajte ručne, upravením polohy vyrovnávacích nožičiek.

natural_image
Diagram of a device with attached tubing and a magnified inset showing a no-smoking symbol (no text or labels present)
! UPOZORNENIE
natural_image
Diagram of a faucet assembly with valve and base, showing rotational flow arrows (no text or labels)
natural_image
Diagram of a car fuel plug being inserted into a door, showing airflow direction (no text or symbols)
natural_image
Diagram of two pipe fittings with circular annotations highlighting their features (no text or symbols present)
natural_image
Hand using a screwdriver to adjust a component with a bolt, showing a curved arrow indicating rotation (no text or symbols present)
- Držte adaptér a otáčajte dielom (C) v smere šípky a uvolnite ho o 5 mm (*).
Inštalácia
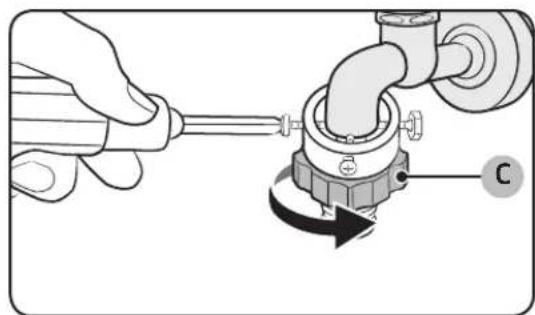
natural_image
Illustration of a hand using a tool to adjust a pipe fitting with a rotating valve (no text or symbols)

-
Adaptér nasadte na vodovodný kohútik, nadvihnite ho a dotiahnite skrutky.
-
Otáčajte dielom (C) v smere šípky, až kým ho nedotiahnete.
-
Počas pritláčania dielu (D) smerom na vodovodnú hadicu pripojte hadicu na vodu k adaptéru. Potom uvolnite diel (D). Hadica zapadne do adaptéra a budete počuť kliknutie.
-
Na dokončenie pripájania vodovodnej hadice si pozrite body 2 a 3 v časti „Pripojenie k vodovodnému kohútiku so závitom“.

POZNÁMKA
natural_image
Diagram of two connected electrical connectors with a directional arrow indicating rotation (no text or symbols)
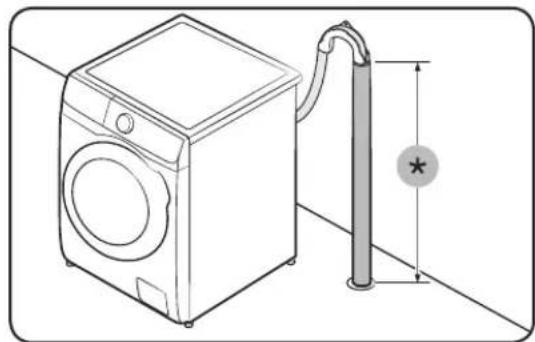
natural_image
Line drawing of a washing machine connected to a vertical pipe with a star symbol (no text or labels)
Cez okraj umývadla
natural_image
Line drawing of a washing machine with two circular doors and a small appliance on the side (no text or symbols)
natural_image
Diagram showing a washing machine opening a door with a black arrow indicating the process, and clothing items nearby (no text or symbols)
- Do bubna umiestnite bielizeň na kapsulu.

UPOZORNENIE
natural_image
Line drawing of a hand inserting a card into a drawer with a tray inside (no text or symbols)

natural_image
Line drawing of a hand holding a small object over a surface, with no visible text or symbols

natural_image
Line drawing of a hand holding a smartphone with a prohibition symbol (no text or labels)
natural_image
Diagram of a mechanical device with a magnified circular inset showing internal components (no text or symbols)

natural_image
Diagram of a printer with a magnified inset showing internal components (no text or symbols)
Ovládací panel
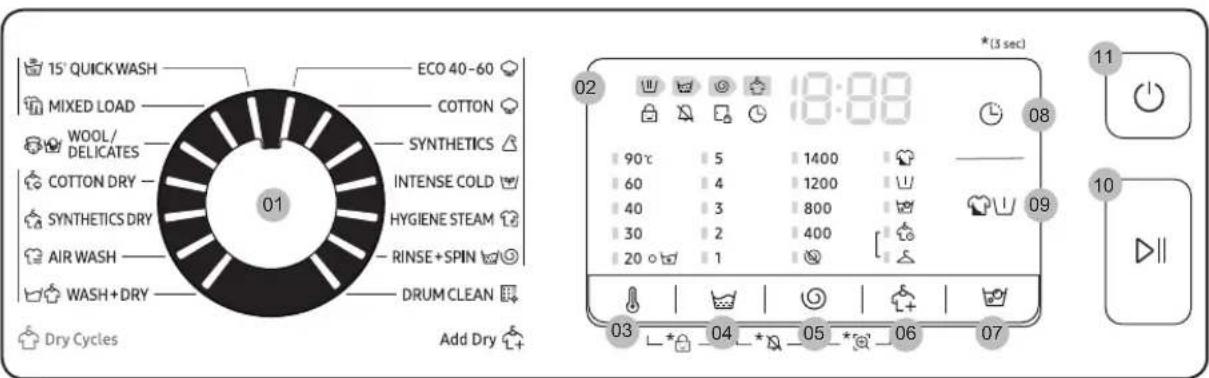
natural_image
Diagram of a plug inserted into a socket, showing airflow direction (no text or symbols)

natural_image
Illustration of a hand using scissors to cut a button into a device (no text or symbols present)
natural_image
Illustration of a hand inserting a plug into a socket (no text or symbols visible)
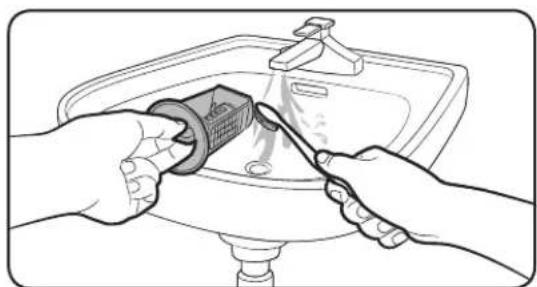
natural_image
Illustration of hands using a tool to clean or wash the sink surface (no text or symbols)

natural_image
Technical line drawing of a circular mechanical component with no visible text or symbols
natural_image
Illustration of hands using a tool to clean or store items on a sink (no text or symbols visible)
- Časti zásuvky umyte pod tečúcou vodou pomocou jemnej kefky.
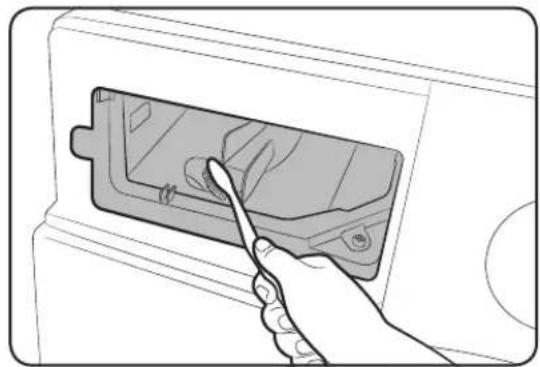
natural_image
Illustration of a hand inserting a component into a device (no text or symbols visible)
- Výklenky zásuvky umyte pod tečúcou vodou pomocou jemnej kefky.
- Opätovne vložte páčku uvolnenia a nádobu tekutého pracieho prostriedku do priečinku.
- Zásuvku zasunutím zatvorte.

POZNÁMKA
natural_image
Line drawing of a front-loading washing machine with control panel and door (no text or symbols)

| Model A B C | D E | | | | |
| WD9*TA**** 600 | mm 850 mm 6 | 63 mm 713 mm | 1170 mm | | |
| WD8*TA**** 600 | mm 850 mm 6 | 00 mm 675 mm | 1120 mm | | |
| WD7*TA**** 600 | mm 850 mm 5 | 50 mm 618 mm | 1070 mm | | |

POZNÁMKA
natural_image
Symbol of a trash bin crossed with no text or numbers, representing waste sorting or restriction (no text present)
01 Jeziček 02 Predal za pralna
sredstva
natural_image
Diagram showing two mechanical assembly states: left with hand tool and directional arrows, right with valve mechanism (no text or symbols)
- Ko dosežete ustrezno višino, s ključem zategnite matice.

natural_image
Diagram of a device with attached tubing and a magnified inset showing a no-smoking symbol (no text or labels present)
! POZOR
natural_image
Diagram of a faucet assembly with valve and base, showing rotational flow (no text or labels)
- Priključite cev za vodo na vodovodno pipo in nato zasučite priključek v smeri urnega kazalca, kot je prikazano na sliki.

natural_image
Diagram of a car fuel plug being inserted into a door, showing airflow direction (no text or symbols)
natural_image
Diagram of two pipe fittings with circular annotations highlighting their features (no text or symbols present)
- Odstranite adapter (A) iz cevi za dovod vode (B).

natural_image
Hand using a screwdriver to adjust a component with a bolt, showing a curved arrow indicating rotation (no text or symbols present)
- Z izvijačem Phillips odvijte štiri vijake na adapterju.

- Nato vzemite adapter in obrnite del (C) v smeri puščice tako, da dobite razmak 5 mm (*).
Namestitev

natural_image
Illustration of a hand using a tool to adjust a pipe fitting with a rotating valve (no text or symbols)

natural_image
Diagram of two connected electrical connectors with a directional arrow indicating rotation (no text or symbols)

natural_image
Line drawing of a washing machine connected to a vertical pipe with a star symbol (no text or labels)
Čez rob umivalnika
Na odtočno cev umivalnika
Odtočna cev mora biti nad sifonom umivalnika tako, da bo konec cevi dvignjen najmanj 60 cm od tal.
(*): 60 cm
POZOR
Odstranite pokrov na veji odtočne cevi umivalnika, preden nanjo priključite odtočno cev.
natural_image
Line drawing of a washing machine with two doors and a small appliance on the side (no text or symbols)
natural_image
Line drawing of a washing machine with a bag being opened, and clothing items nearby (no text or symbols)
- Vstavite perilo v boben na vrh kapsule.

POZOR
natural_image
Line drawing of a hand inserting a card into a drawer with a tray inside (no text or symbols)
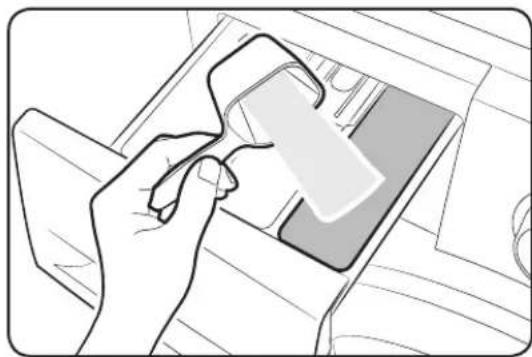
natural_image
Line drawing of a hand holding a small object over a surface, with no visible text or symbols

natural_image
Line drawing of a hand holding a smartphone with a prohibition symbol (no text or labels)
natural_image
Diagram of a mechanical device with a magnified inset showing internal components (no text or symbols)
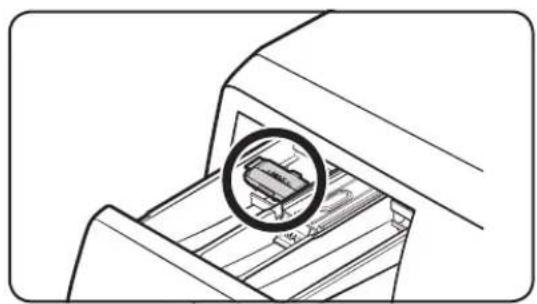
natural_image
Diagram of a printer's internal structure with a magnified inset showing the printer's internal components (no text or symbols present)
Upravljalna plošča
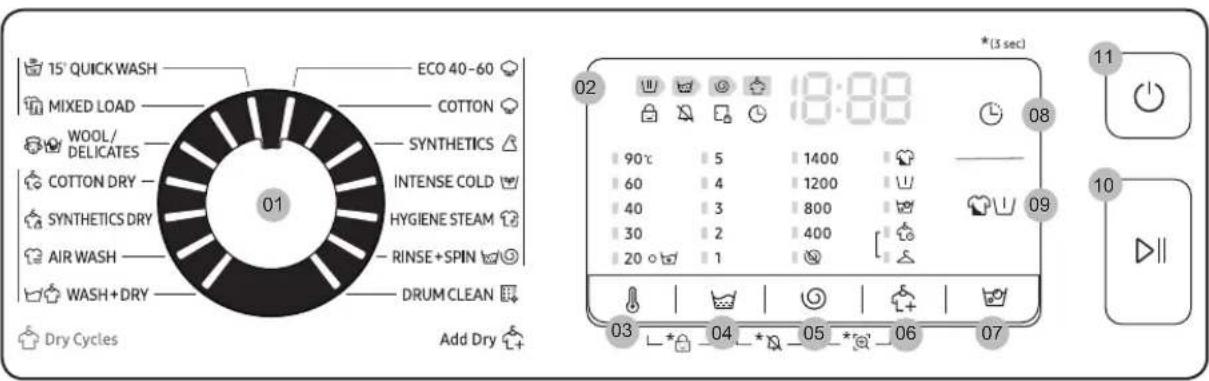
natural_image
Illustration of a hand washing a basin with a pipe and water droplets, no text or symbols present
-
Odprite pokrovček na cevi in pustite, da voda iz cevi za izčrpavanje vode v sili (C) steče v posodo.
-
Ko voda preneha teči, zaprite pokrovček na cevi in cev ponovno vstavite na njeno mesto. Nato zaprite pokrov filtra.
OPOMBA
natural_image
Diagram of a plug inserted into a device, showing a circular arrow indicating rotation (no text or symbols present)

natural_image
Illustration of a hand using scissors to cut a button into a device (no text or symbols present)
natural_image
Illustration of a hand inserting a plug into a socket with a cable (no text or symbols)

natural_image
Illustration of hands using a tool to clean or repair a sink (no text or symbols visible)

natural_image
Technical line drawing of a circular mechanical component with no visible text or symbols
- Pritisnite na jeziček (A) ki se nahaja v notranjosti predala, in izvlecite predal.
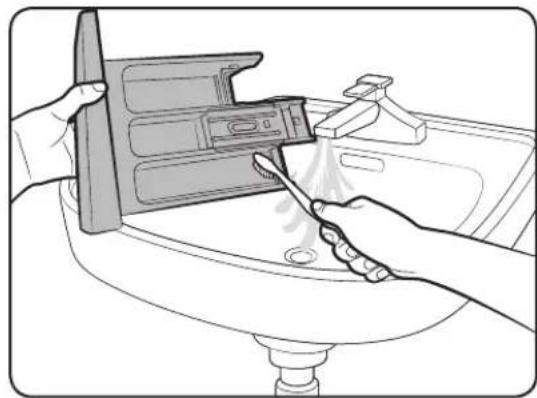
natural_image
Illustration of hands using a tool to clean or wash the sink surface (no text or symbols visible)
- Sestavne dele predala očistite pod tekočo vodo. Pri tem uporabite mehko krtačo.
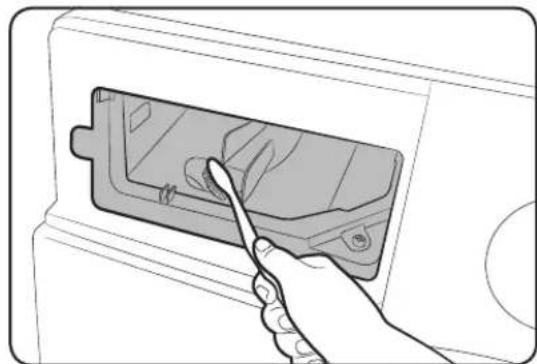
natural_image
Illustration of a hand inserting a plug into a device component (no text or symbols visible)
- Z mehko krtačo očistite prostor za predal.
- V predal ponovno vstavite jeziček in posodico za tekoče pralno sredstvo.
- Potisnite predal nazaj na svoje mesto.

OPOMBA
Ostanke pralnega sredstva odstranite tako, da pri praznem bobnu zaženete program RINSE+SPIN (IZPIRANJE IN OŽEMANJE).
Ukrepi v primeru zamrznitve
natural_image
Line drawing of a washing machine with control panel and door (no text or symbols)

| MODEL A B C D E | | | | |
| WD9*TA**** 600 | mm 850 mm 6 | 63 mm 713 mm | 1170 mm | | |
| WD8*TA**** 600 | mm 850 mm 6 | 00 mm 675 mm | 1120 mm | | |
| WD7*TA**** 600 | mm 850 mm 5 | 50 mm 618 mm | 1070 mm | | |

OPOMBA
DRUM CLEAN (PASTRIMI I KAZANIT) 45
Smart check [⊕] 46
natural_image
Symbol of a trash bin crossed with no text or numbers, representing environmental restriction (no text present)
Eliminimi i duhur i ketij produkti (Pajisje mbeturine elektrike dhe elektronike)
01 Leva e lirimit
02 Sirtari i detergjentit
03 Paneli i kontrollit
04 Dera 05 Kazani 06 Filtri i copëzave
natural_image
Diagram showing two mechanical assembly states: left with hand tool and directional arrows, right with valve mechanism (no text or symbols)
natural_image
Diagram of a device with attached tubing and a magnified inset showing a no-smoking symbol (no text or labels present)
! KUJDES
natural_image
Diagram of a faucet assembly with rotating valve and base, showing no text or symbols
natural_image
Diagram of a car door handle with a valve and arrow indicating rotation (no text or symbols)
natural_image
Diagram of two pipe fittings with circular annotations highlighting their features (no text or symbols present)
- Hiqni adaptorin (A) nga zorra (B) e ujit.
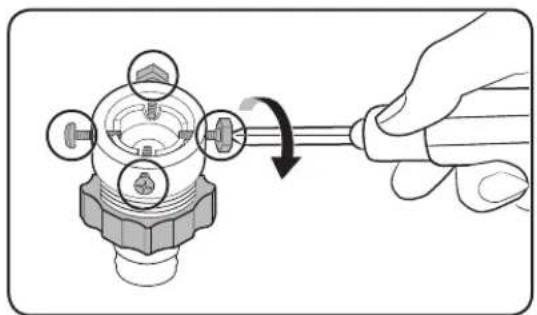
natural_image
Illustration of a hand using a screwdriver to adjust a component with a tool (no text or symbols present)
natural_image
Illustration of a hand using a tool to adjust a pipe fitting with a rotating valve (no text or symbols)

natural_image
Diagram of two connected electrical connectors with a directional arrow indicating rotation (no text or symbols)

natural_image
Line drawing of a washing machine connected to a vertical pipe with a star symbol (no text or labels)
natural_image
Line drawing of a washing machine with two circular doors and a small appliance on the side (no text or symbols)
natural_image
Diagram showing a washing machine opening a door with a black arrow indicating the process, and clothing items nearby (no text or symbols)
natural_image
Line drawing of a hand inserting a card into a drawer with a tray inside (no text or symbols)

natural_image
Line drawing of a hand holding a small object over a surface, with no visible text or symbols

natural_image
Line drawing of a hand holding a smartphone with a prohibition symbol (no text or labels)
natural_image
Diagram of a mechanical device with a magnified inset showing internal components (no text or symbols)
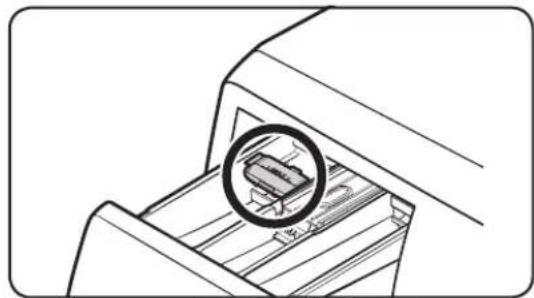
natural_image
Diagram of a printer with a magnified inset showing internal components (no text or symbols)
Paneli i kontrollit

DRUM CLEAN (PASTRIMI I KAZANIT)
natural_image
Diagram of a plug inserted into a socket, showing airflow direction (no text or symbols)

natural_image
Illustration of a hand using scissors to cut a button into a device (no text or symbols present)
natural_image
Illustration of a hand inserting a plug into a socket (no text or symbols visible)

natural_image
Illustration of hands using a tool to clean or repair a sink (no text or symbols visible)

natural_image
Technical line drawing of a circular mechanical component with no visible text or symbols
natural_image
Illustration of hands using a tool to clean or store items on a sink (no text or symbols visible)
natural_image
Illustration of a hand inserting a component into a device (no text or symbols visible)
natural_image
Line drawing of a washing machine with labeled dimensions (no text or symbols on the diagram itself)
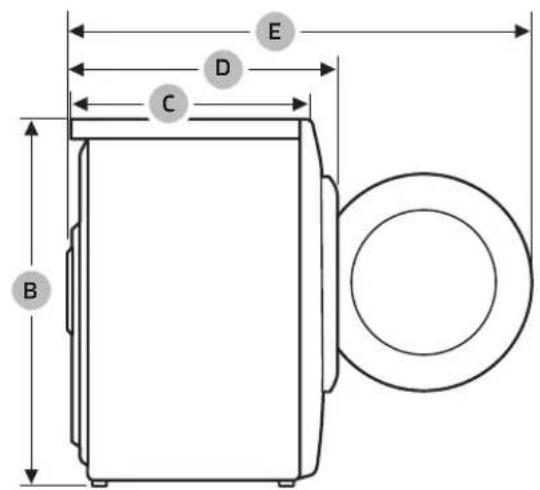
| Modeli A B C D E | | | | |
| WD9*TA***** 600 | mm 850 mm 6 | 63 mm 713 mm | 1170 mm | | |
| WD8*TA***** 600 | mm 850 mm 6 | 00 mm 675 mm | 1120 mm | | |
| WD7*TA***** 600 | mm 850 mm 5 | 50 mm 618 mm | 1070 mm | | |

SHËNIM
natural_image
Symbol of a trash bin crossed with no text or numbers, representing environmental restriction (no text present)
Pravilno odlaganje ovog proizvoda (Odlaganje električne i elektronske opreme)
01 Ručica za otpuštanje
04 Vrata
07 Odvod za hitne slučajeve
10 Utikač za struju
02 Fioka za prašak
05 Bubanj
08 Poklopac filtera 09 Radna površina
11 Odvodno crevo
03 Kontrolna tabla
06 Filter za otpatke
12 Podesive nožice
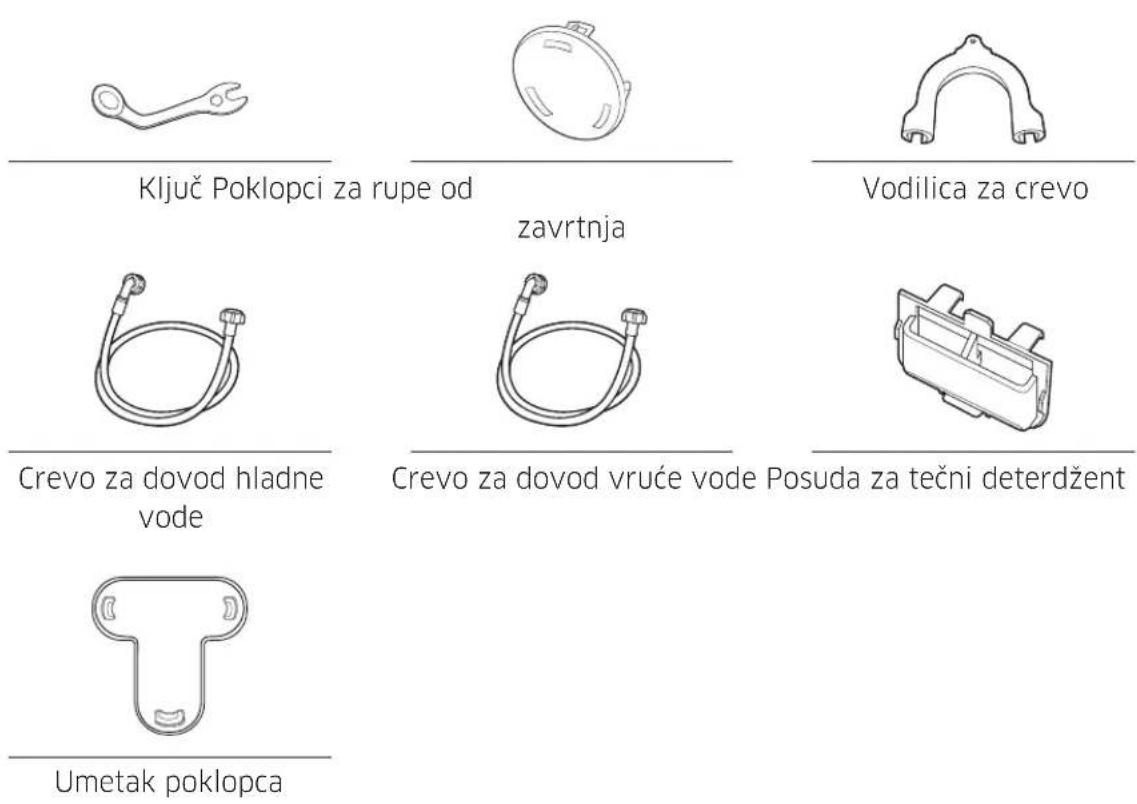

NAPOMENA
- Ključ: Služi za uklanjanje transportnih vijaka i nivelisanje mašine za pranje veša.
- Poklopci za rupe od zavrtnja : Za pokrivanje otvora nakon vadenja transportnih vijaka. Obezbeđeni broj kapica za otvore za vijke (3-6) zavisi od modela.
- Vodica za crevo: Pomoću nje možete da sprovedete crevo u odvodnu cev ili lavabo.
- Crevo za toplu/hladnu vodu: Njime se dovodi voda do mašine za pranje veša. (crevo za toplu vodu koriste samo pojedini modeli)
- Posuda za tečni deterdžent: Ako želite da koristite tečni deterdžent za pranje, umetnite je u deo za deterdžent. (samo označeni modeli)
Postavljanje
Uslovi za postavljanje
Električno napajanje i uzemljenje
- Pronadite transportne vijke (označene krugom na slici) na poledini mašine za pranje veša.

OPREZ
- Umetnite kapice za vijke (B) u otvore (označene krugom na slici).
natural_image
Diagram showing two mechanical assembly states: left with hand turning a valve, right with valve and nut assembly (no text or symbols)
-
Pažljivo postavite mašinu za pranje veša na mesto. Prevelika sila može da ošteti nožice za poravnanje.
-
Poravnajte mašinu za pranje veša ručnim podešavanjem nožica.

natural_image
Diagram of a device with attached tubing and a magnified inset showing a no-smoking symbol (no text or labels present)
! OPREZ
Kada montirate uređaj, vodite računa da stope za nivelisanje ne pritiskaju strujni kabl.
! OPREZ
Vodite računa da se sve stope za nivelisanje oslanjaju na podlogu, da biste izbegli pomeranje mašine za pranje veša i stvaranje buke usled vibracija. Proverite da li se mašina ljulja na podlozi. Ako se mašina za pranje veša ne ljulja, pričvrstite navrtke.
Postavljanje
4. KORAK - povezivanje creva za vodu
Crevo koje je isporučeno može da se razlikuje, u zavisnosti od modela. Pridržavajte se uputstava u zavisnosti od isporučenog creva za vodu.
natural_image
Diagram of a faucet assembly with rotating valve and base, showing mechanical components without any text or symbols
- Povežite crevo za vodu na slavinu, a zatim okrenite spojnicu u smeru kazaljke na satu, kao što je prikazano.
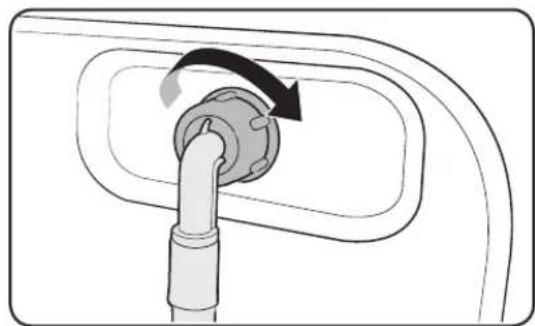
natural_image
Diagram of a car plug with a valve and arrow indicating rotation (no text or symbols)
- Drugi kraj creva za dovod vode povežite na ulazni ventil na zadnjem delu mašine za pranje veša. Zavrnite crevo do kraja u smeru kazaljki na satu.

natural_image
Diagram of two pipe fittings with circular annotations highlighting their features (no text or symbols present)
- Odvrnite slavinu i proverite da li voda curi na priključnim delovima. Ako negde curi voda, ponovite prethodne korake.
! UPOZORENJE
- Skinite adapter (A) sa creva za dovod vode (B).

natural_image
Hand using a screwdriver to adjust a component with a bolt, showing a curved arrow indicating rotation (no text or symbols present)
- Pomoću Philips odvijača odvrnite četiri zavrtnja na adapteru.

- Držite adapter i okrećite deo (C) smeru strelice dok ne napravite razmak od 5 mm (*).


Postavljanje

natural_image
Illustration of a hand using a tool to adjust a pipe fitting with a rotating valve (no text or symbols)

-
Navucite adapter na slavinu za vodu i pričvrstite zavrtnje dok ga podižete nagore.
-
Okrećite deo (C) u smeru strelice da biste ga pričvrstili.
-
Spuštajući prema dole deo (D) na crevu za vodu, povežite crevo za vodu na adapter. Zatim otpustite deo (D). Crevo će se povezati na adapter uz zvuk škljocanja.
-
Da biste završili povezivanje creva za vodu, pogledajte 2 i 3 u odeljku „Povezivanje na slavinu za vodu sa navojima“.

NAPOMENA
- Nakon što ste povezali crevo za vodu i adapter, povucite crevo nadole i tako proverite da li je dobro povezano.
- Koristite standardni tip slavine za vodu. U slučaju da je slavina u obliku kvadrata ili da je prevelika, skinite odstojni prsten pre povezivanja sa adapterom.
Za modele sa dodatnim dovodnim otvorom za vrelu vodu:

natural_image
Diagram of two connected electrical connectors with a directional arrow indicating rotation (no text or symbols)
-
Crveni kraj creva za dovod vruće vode povežite na dovodni otvor za vruću vodu na zadnjem delu mašine.
-
Povežite drugi kraj creva za dovod vruće vode na slavinu za vruću vodu.

natural_image
Line drawing of a washing machine connected to a vertical pipe with a star symbol (no text or labels)
Preko ivice umivaonika
Odvodno crevo treba da se postavi na visinu između 60 cm i 90 cm (*) od poda. Da bi grlić odvodnog creva ostao savijen, upotrebite plastičnu vodicu za crevo (A) koju ste dobili u kompletu. Pričvrstite vodicu na zid kukicom kako biste obezbedili stabilno ispuštanje vode.
U odvodnoj cevi
Odvodna cev ne sme biti kraća od 60 cm i duža od 90 cm (*). Preporučena visina uspravne cevi je 65 cm.
- Da biste bili sigurni da će crevo za odvod ostati u tom položaju, koristite priloženu plastičnu vodilicu (pogledati sliku).
- Da biste sprečili sifoniranje vode tokom odvođenja, obavezno ubacite crevo za odvod 15 cm u odvodnu cev.
- Da biste sprečili pomeranje odvodnog creva, pričvrstite vodilicu za crevo na zid.
Uspravna cev za odvod mora da ispunjava sledeće uslove:
• Minimalni prečnik 5 cm
- Minimalni odvodni kapacitet od 60 litara u minutu

natural_image
Line drawing of a washing machine with two circular doors and a small appliance on the side (no text or symbols)
natural_image
Diagram showing a door opening and lifting a shirt, with a black arrow indicating the lifting direction (no text or symbols present)
- Stavite veš u bubanj, na kapsulu.

OPREZ
natural_image
Line drawing of a hand inserting a card into a drawer with a tray inside (no text or symbols)
- Izvucite fioku za deterdžent.
- Dodajte deterdžent za pranje u II pregradu za glavno pranje na osnovu uputstva ili preporuke proizvođača. Za upotrebu tečnog deterdženta, pogledajte stranicu 36.


natural_image
Line drawing of a hand holding a small object over a surface, with no visible text or symbols

natural_image
Line drawing of a hand holding a smartphone with a prohibition symbol (no text or labels)
-
Dolijte omekšivač vlakana u pregradu za omekšivač. Ne dolivajte preko naznačene linije za maksimum (A).
-
Ako želite i pretpranje, dodajte deterdžent za pretpranje u I pregradu za pretpranje na osnovu uputstva ili preporuke proizvođača.
-
Zatvorite fioku za deterdžent.

OPREZ
- Nemojte dodavati deterdžent u prahu u posudu za tečni deterdžent.
- Koncentrovani omekšivač vlakana obavezno rastvoriti u vodi pre dodavania.
- Nemojte dodavati deterdžent za glavno pranje u spregradu za omekšivač.
Pre pokretanja
Prvo namestite priloženu posudu za tečnost u Ipregradu za glavno pranje. Zatim sipajte tečni deterdžent u posudu do linije koja označava maksimum (A).

OPREZ
- Ne sipati preko linije koja označava maksimum unutar posude.
- Okrenite naviše posudu za tečni deterdžent ako koristite deterdžent u prahu.
Pri upotrebi tečnog deterdženta Pri upotrebi deterdženta u prahu
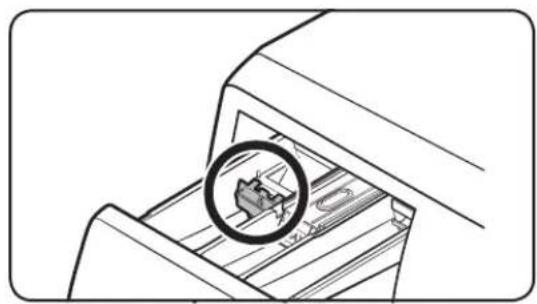
natural_image
Diagram of a mechanical device with a magnified inset showing internal components (no text or symbols)

natural_image
Diagram of a printer drawer with a magnified inset showing internal components (no text or symbols)
Kontrolna tabla
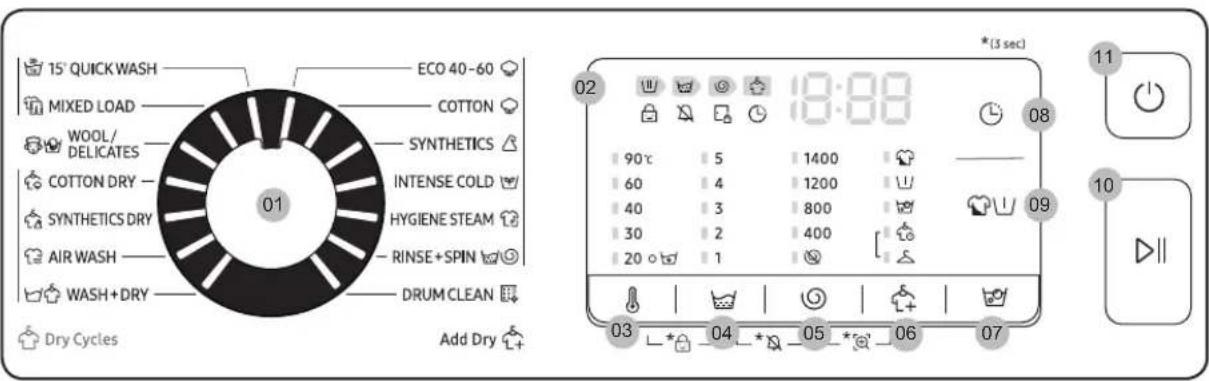
| 01 Točka programatora | Program birate okretanjem točka programatora. |
| 02 Ekran | Na ekranu su prikazane informacije o aktivnom programu i preostalom vremenu ciklusa pranja, ili informativni kod ukoliko postoji problem. |
| 03 [Temperatura] | Pritisnite da biste promenili temperaturu vode za trenutni program. |
| 04 [spiranje] | Pritisnite da biste promenili broj ispiranja za trenutni program. U zavisnosti od programa, možete da izaberete najviše 5 ispiranja. |
| 05 [centrifuga] | Pritisnite da biste promenili brzinu centrifuge za trenutni program.Rinse Hold (Ispiranje sa zadržavanjem) (Bez indikatora):Završni ciklus ispiranja se odlaje i veš ostaje u vodi. Pre vađenja veša pokrenite ciklus ispuštanja vode ili centrifuge.No Spin (Bez centrifuge) [Bubanj ne centrifugira posle završnog ciklusa ispuštanja vode.Samo centrifuga [Da biste pokrenuli ciklus Samo centrifuga, pritisnite Centrifuga 3 sekunde. Kada se pojavi vreme ciklusa i brzina okretanja, pritisnite Centrifuga nekoliko puta dok se ne odabere željena brzina okretanja. Zatim pritisnite Start/Pauza za početak ciklusa. Vreme okretanja zavisi od izabranog ciklusa. |
| 06 [Opcija sušenja] | Pritisnite ovo dugme za izbor odgovarajuće opcije sušenja. |
| 07 [Kvašenje mehurićima] | Pritiskom na taster aktivirate ili isključujete funkciju Kvašenje mehurićima. Pomaže u otklanjanju široke palete tvrdokornih mrlja. |

Funkcije
| 08 Odloženi kraj | Funkcija Odloženi kraj vam omogućava da podesite vreme završetka aktivnog ciklusa pranja. Na osnovu podešavanja koja ste postavili, unutrašnja logika veš mašine određuje početak ciklusa pranja. Na primer, ova funkcija vam omogućava da programirate mašinu da završi pranje u vreme kada se obično vraćate kući sa posla.Pritisnite taster da biste postavili vreme u satima. |
| 09 Opije | Pritisnite da izaberete opcije. Dostupnost opcija zavisi od ciklusa. |
| 10 ▷ Start/Pauza Pritisnite da biste pokrenuli ili pauzirali rad mašine. |
| 11 ⚙ Uključivanje/Isključivanje | Pritisnite da biste uključili/isključili mašinu za pranje veša. |
DRUM CLEAN (ČIŠĆENJE BUBNJA)
Redovno aktivirajte ovaj program da biste očistili bubanj i uklonili bakterije iz njega.

