
IAN 297514 - Weather Station AURIOL - Free user manual and instructions
Find the device manual for free IAN 297514 AURIOL in PDF.


| Product Type | Wireless weather station |
| Brand | Auriol |
| Model | IAN 297514 |
| Dimensions (base station) | Approximately 15 x 10 x 2 cm |
| Weight (base station) | Approximately 200 g (without batteries) |
| Power supply | 2 AAA batteries (station), 2 AAA batteries (outdoor sensor) |
| Display | Backlit LCD screen |
| Indoor temperature | Range: 0°C to +50°C, accuracy ±1°C |
| Outdoor temperature | Range: -20°C to +60°C, accuracy ±1°C (wireless sensor included) |
| Indoor humidity | Range: 20% to 95%, accuracy ±5% |
| Outdoor humidity | Range: 20% to 95%, accuracy ±5% (via sensor) |
| Weather forecast | Icons: sunny, cloudy, rainy, etc. |
| Time display | Radio-controlled clock (DCF77) or manual |
| Alarm | Ringtone with snooze |
| Value memory | Min/Max temperature and humidity |
| Outdoor sensor range | Up to 30 m in open field |
| Transmission frequency | 433 MHz |
| Care and cleaning | Wipe with a soft, dry cloth. Do not use solvents. |
| Safety | Do not expose to water or excessive humidity. Keep out of reach of children. |
| Spare parts and repairability | Batteries available commercially (AAA). Outdoor sensor can be replaced (compatible reference). |
| General information | Made in China. Year of manufacture: 2020. Compliant with EU directives. |
Frequently Asked Questions - IAN 297514 AURIOL
User questions about IAN 297514 AURIOL
0 question about this device. Answer the ones you know or ask your own.
Ask a new question about this device
Download the instructions for your Weather Station in PDF format for free! Find your manual IAN 297514 - AURIOL and take your electronic device back in hand. On this page are published all the documents necessary for the use of your device. IAN 297514 by AURIOL.
USER MANUAL IAN 297514 AURIOL
Operating instructions
NL BE RADIOGRAFISCH WEERSTATION
Gebruiksaanwijzing
ES ESTACIÓN METEOROLÓGICA INALÁMBRICA
Before reading, unfold both pages containing illustrations and familiarise yourself with all functions of the device.
FR BE
GB/IE Operating instructions Page 37
natural_image
Simple line drawing of a rectangular container with internal components and a labeled arrow pointing to the bottom-right corner (no text or symbols)Inhaltsverzeichnis
Einführung....3
Das Uhrzeitfeld ⑤
natural_image
Simple line drawing of a trash bin with crossed lines indicating no waste or discharge (no text or symbols)natural_image
Simple line drawing of a trash bin with two crossed lines indicating no waste or prohibition (no text or symbols)KOMPERNASS HANDELS GMBH
BURGSTRASSE 21
DE-44867 BOCHUM
DEUTSCHLAND
www.kompernass.com
Contents
Introduction 39
Information about these operating instructions ..... 39
Intended use 39
Warning notices. 40
Safety 41
Basic safety instructions....41
Safety information for batteries 43
Package contents 45
Description of components ..... 46
Use....47
Requirements for the set-up location 47
Operating the outdoor sensor....48
Operating the weather station....48
Displays in basic mode....51
Handling and use 53
Basic settings 53
Setting the alarm time and alarm day 55
Activate/deactivate alarm function 56
Switching off the alarm signal 56
Snooze function....57
NAP timer function....57
Display maximum/minimum temperature/humidity.....57
Background lighting....58
Battery display....58
AURIOL®
Changing the radio channel 59
Charging USB devices....60
Troubleshooting....61
Cleaning 62
Storage 62
Disposal....63
Appendix 64
Technical data 64
Notes on the EU Declaration of Conformity ..... 66
Kompernass Handels GmbH warranty ..... 66
Service....69
Importer....69
Introduction
Information about these operating instructions
Congratulations on the purchase of your new device.
You have selected a high-quality product. The operating instructions are part of this product. They contain important information about safety, usage and disposal. Before using the product, please familiarise yourself with all operating and safety instructions. Use the product only as described and for the range of applications specified. Retain these instructions for future reference. Please also pass these operating instructions on to any future owner.
Intended use
The radio weather station shows you the indoor and outdoor temperatures in Celsius (°C) or Fahrenheit (°F) in addition to the maximum and minimum values. The indoor and outdoor humidity (%) and the maximum and minimum values are also displayed. Displayed values also include the time in 12/24-hour format in addition to the date. The radio weather station is also equipped with two USB sockets which can be used to charge smartphones or other mobile devices.
The device is intended solely for private households and not for the commercial sector. The device is not intended for any other purpose, nor for use beyond the scope described. Claims of any kind for damage resulting from misuse, incompetent repairs, unauthorised modification or the use of unauthorised spare parts will not be accepted. The risk shall be borne solely by the user.
Warning notices
The following warnings are used in these operating instructions:

DANGER
A warning at this hazard level indicates a potentially hazardous situation.
Failure to avoid this hazardous situation could result in injuries or death.
▶ Follow the instructions in this warning notice to prevent injury.
CAUTION
A warning notice of this hazard level indicates a risk of property damage.
Failure to avoid this situation could result in property damage.
▶ Follow the instructions in this warning notice to prevent material damage.
NOTE
▶ A note provides additional information that makes handling the device easier for you.
Safety
This section contains important safety instructions for using the device. Improper use may result in personal injury and property damage.
Basic safety instructions
To ensure safe operation of the device, follow the safety guidelines set out below:
This device may be used by children aged 8 years and above and by persons with limited physical, sensory or mental capabilities or lack of experience and knowledge, provided that they are under supervision or have been told how to use the device safely and are aware of the potential risks. Do not allow children to use the device as a toy. Cleaning and user maintenance tasks must not be carried out by children unless they are supervised.
■ Before starting to operate the product, ensure that the product and the mains adapter and cable connections are undamaged! Never operate an device that is damaged.
■ The mains adapter and the welded connection cable may not be repaired. In the event of a defect, the entire mains adapter must be replaced with another of identical design.
Operate the weather station and the mains adapter only in dry indoor rooms.
■ Operate the weather station only with the supplied mains adapter.
■ Before operating the device, ensure that the existing mains voltage matches that required by the mains adapter.
■ The mains power socket that is used must be easily accessible at all times so that the mains adapter can be quickly removed from the mains power socket in the event of an emergency.
■ Do not expose the weather station to moisture or direct sunlight.
Safety information for batteries
DANGER
Mishandling the batteries can cause fires, explosions, leakages or other hazards!
▶ Follow the instructions in this warning notice to prevent injury.
- Keep batteries out of the hands of children. Keep the batteries out of the reach of children.
If a battery has been swallowed, seek medical assistance immediately.
▶ Batteries must never be short-circuited, taken apart, deformed or thrown into a fire.
▶ Never try to charge non-rechargeable batteries.
DANGER
▶ Chemicals from leaking or damaged batteries can cause skin irritations when touched, so please use suitable protective gloves in this case. In event of contact with your skin, rinse off with plenty of water. If the chemicals come into contact with your eyes, rinse thoroughly with plenty of water, do not rub and consult a doctor immediately.
▶ Always use batteries of the same type. Never mix old batteries with new ones!
▶ Only ever use the stated battery type.
▶ Ensure that the batteries are inserted with the correct polarity. This is indicated in the battery compartment.
▶ Clean the battery and device contacts before inserting the batteries if necessary.
Remove the batteries if you do not intend to use the device for a long time.
▶ Always remove discharged batteries from the device immediately.
Package contents
The product includes the following components:
1 weather station
1 outdoor sensor
2 batteries type AA
2 batteries type AAA
1 mains adaptor
1 wall plug (∅ 5 mm)
1 screw
1 set of operating instructions
NOTE
▶ Check the package for completeness and signs of visible damage.
If the contents are incomplete or damaged due to defective packaging or through transportation, contact the Service Hotline.
◆ Unpack all parts of the device from the packaging and remove all packaging materials.

DANGER
▶ Do not allow children to play with packaging materials. Risk of suffocation.
Description of components
For illustrations see fold-out pages
Figure A
Display
① Date panel
② Internal temperature panel
③ External temperature panel
4 USB connection panel
⑤ Time panel
Weather station
6 -/CH button
⑦ +/MEM button
⑧ ALARM button
⑨ SNOOZE/LIGHT button
⑩ MODE button
⑪ NAP button
12 Battery compartment
13 Battery compartment cover
14 Connector socket for mains adapter
15 USB socket (Type A)
16 Mains adapter
Figure B
External sensor
17 Control LED
18 Hanger
19 TX button
20 Channel selector switch
21 Battery compartment
22 Battery compartment cover
Use
Requirements for the set-up location
CAUTION
When selecting the installation location, ensure that the devices are not subjected to direct sunlight, vibration, dust, heat, cold and moisture.
▶ Do not set the devices up in the vicinity of heat sources such as radiators.
▶ Fit the outdoor sensor at a maximum distance of 100 m from the weather station. Ensure that there are no disruptive obstacles between the outdoor sensor and the weather station. Otherwise, transmission can be disrupted.
◆ Set the devices up on a horizontal, flat surface.
Alternatively, the outdoor sensor can be suspended from a screw using the hanger 18.
Operating the outdoor sensor
◆ Open the battery compartment 21 on the rear of the device by pushing the battery compartment cover 22 in the direction of the arrow.
Insert two type AA batteries into the battery compartment 21 as shown.
◆ Close the battery compartment again 21 . The control LED 17 on the front of the outdoor sensor lights up briefly.
Afterwards, the control LED ⑰ lights up once every minute to signal that transmission is taking place.
Operating the weather station
You can either operate the weather station with the mains adapter 16 supplied or using batteries.
Mains power operation:
◆ Plug the low voltage plug on the mains adapter 16 into the connector socket 14 on the weather station and connect the mains adapter 16 to an easily accessible mains plug.
Battery operation:
◆ Open the battery compartment ⑫ on the rear of the device by removing the battery compartment cover ⑬.
Insert two type AAA batteries into the battery compartment 12 as shown.
◆ Close the battery compartment 12 again.
Once the power supply has been established, the display will light up and go through a brief check of the display elements.
The weather station will now attempt to connect to the outdoor sensor. The reception symbol • flashes on the outdoor temperature panel ③.
NOTE
If no outdoor temperature is displayed within around 3 minutes, the weather station will stop the reception search. The reception symbol ) goes out and -- r and -- x are displayed on the outdoor temperature panel ③.
It is possible that no signal can be received due to the surrounding buildings or because the distance is too great.
If you are unable to establish an automatic connection to the outdoor sensor, you can do this manually:
- Press and hold the -/CH button ⑥ until the reception signal •••) flashes on the outdoor temperature panel ③.
The weather station automatically starts to receive the DCF signal after 3 minutes irrespective of whether the outdoor sensor reception search has been successful or not. The reception symbol 🌿 flashes on the time panel ⑤.
If the DCF signal is being received correctly, the current central European Time (CET) is displayed on the time panel ⑤ and the date and weekday are displayed on the date panel ①. In addition, the reception symbol ⚪ permanently displayed on the date panel ⑤.
If the device is unable to synchronise the DCF signal, you can also manually set the time (see section Basic settings) or you can attempt the reception again.
Press the -/CH button ⑥ simultaneously with the +/MEM button ⑦ to try to re-establish reception. The reception symbol 🔒 flashes on the time panel ⑤.
The DCF signal
The DCF signal (time signal transmitter) consists of time impulses which are transmitted by the most accurate clock in the world - near Frankfurt am Main, Germany.
Under ideal conditions, the radio weather station can receive the signals up to a distance of around 2000 km from Frankfurt am Main. Reception of these DCF signals normally takes between 3 and 5 minutes. If reception of the DCF signal fails, the weather station will stop trying to establish reception after around 7 minutes.
Reception can be considerably restricted by obstacles (e.g. concrete walls) or interference sources (e.g. other electronic devices). If necessary, you should change the location of the weather station (e.g. put it by a window) if reception problems continue.
Displays in basic mode
Once the weather station has received the outdoor sensor signal and the DCF signal, it is in basic mode.
In basic mode, the weather station shows the following information on its display:
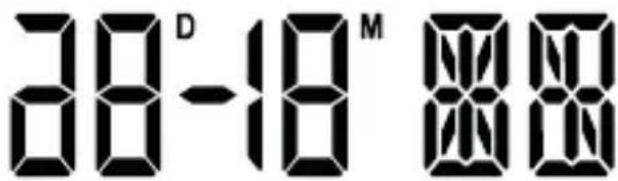
The date panel ①
The date of the current day is displayed next to the abbreviation D and the date of the current month appears next to the abbreviation M The abbreviation for the current weekday is shown on the right. The language for this abbreviation is preset to German but can be changed if required. Please refer to the section Basic settings for details.
The time panel 5
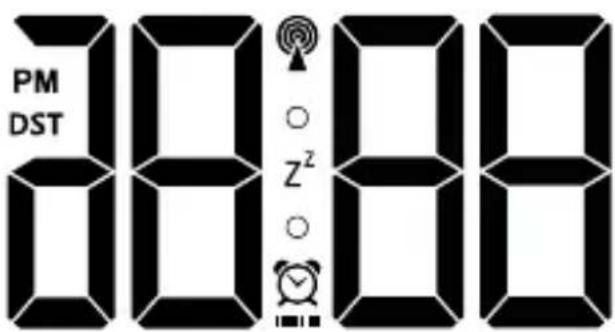
The time is shown in 24-hour format by default. If you select the 12-hour format in the basic settings, the abbreviation PM (Latin for "post Meridiem" = afternoon) is shown in front of the time between 12 noon and 11.59 at night. During the summer period, DST daylight saving time) is displayed. This display is only shown if the DCF signal is being received.
The indoor temperature panel ②
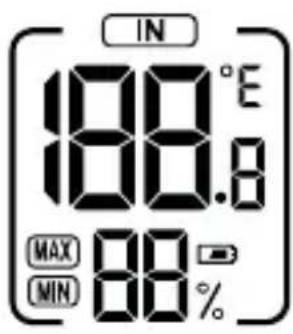
The indoor temperature measured by the weather station is displayed with one decimal place. The temperature unit °(degrees Celsius) is shown top right.
The temperature unit can also be changed to °F (degrees Fahrenheit).
If the temperature drops below the measuring range of 0irc C to 50irc C (or 32irc F to 122irc F) L is shown; His shown if the temperature rises above this range. The relative humidity (in %) around the weather station is shown below the temperature display.
The outdoor temperature panel ③
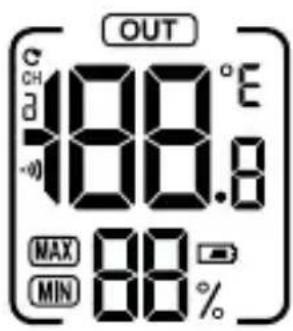
The outdoor temperature is displayed with one decimal place. The temperature unit °(degrees Celsius) is shown top right. The temperature unit can also be changed to °(degrees Fahrenheit). If the temperature drops below the measuring range of -20°C to 65°C (or -4°F to 149°F) is shown; His shown if the temperature rises above this range. The relative humidity (in %) around the outdoor sensor is shown below the temperature display.
The USB connection panel 4

If you charge mobile devices using the USB connection ⑮, the battery symbol 📄 will flash next to the appropriate USB connection symbol 1/2.
Handling and use
Basic settings
To make the basic settings, press and hold the MODE button ⑩ for around 3 seconds. The display language flashes on the date panel ①.
- Press the-/CH button ⑥ or the +/MEM button ⑦ to select the required language. You can choose between German (GE), English (EN), Italian (IT), Spanish (SP) and French (AR)German ( ) is set as the standard language by default.
- Press the MODE button ⑩ to confirm your entry. ON flashes on the time panel ⑤ (display for confirmation tone on button press).
You can press the-/CH button ⑥ or the +/MEM button ⑦ to select the setting OFF if you want to deactivate the confirmation tone.
Press the MODE button ⑩ to confirm your entry. 24H flashes on the time panel ⑤.
◆ Press the-/CH button ⑥ or the +/MEM button ⑦ to select the required hour format (24- or 12-hour format).
Press the MODE button ⑩ to confirm your entry. The hour display flashes on the time panel ⑤.
◆ Press the-/CH button ⑥ or the +/MEM button ⑦ to set the required value.
- Press the MODE button ⑩ to confirm your entry. The minute display flashes on the time panel ⑤.
◆ Press the-/CH button ⑥ or the +/MEM button ⑦ to set the required value.
- Press the MODE button ⑩ to confirm your entry. The year display flashes on the time panel ⑤.
◆ Press the-/CH button ⑥ or the +/MEM button ⑦ to set the required value.
- Press the MODE button ⑩ to confirm your entry. The month display flashes on the date panel ①.
◆ Press the-/CH button ⑥ or the +/MEM button ⑦ to set the required value.
Press the MODE button ⑩ to confirm your entry. The day display flashes on the date panel ①.
◆ Press the-/CH button ⑥ or the +/MEM button ⑦ to set the required value.
Press the MODE button ⑩ to confirm your entry. The temperature unit flashes on the time panel ⑤.
◆ Press the-/CH button ⑥ or the +/MEM button ⑦ to select the required temperature unit (°C or °F).
Press the MODE button ⑩ to confirm your entry. (time zone setting) flashes on the time panel ⑤.
◆ Press the-/CH button ⑥ or the +/MEM button ⑦ to set the required value.
Press the MODE button 10 to confirm your entry. The display will now change back to basic mode.
NOTE
If you are currently in a country in which the DCF signal is still being received but the current time zone is different, you can use the time zone settings to set the radio weather station to the current time in your country.
If you are in a country in which the local time is one hour ahead of central European Time (CET) you should set the time zone to ☐. The radio weather station is still being controlled by the DCF signal but will display the time as one hour in advance of CET.
Setting the alarm time and alarm day
- Press the ALARM button ⑧ to access alarm mode. The current alarm time set and the display for the alarm mode (A) are shown on the time panel ⑤.
◆ Press and hold the ALARM button ⑧ for around 3 seconds. The hour display blinks.
◆ Press the-/CH button ⑥ or the +/MEM button ⑦ to set the required value.
Press the ALARM button ⑧ to confirm your entry. The minute display blinks.
◆ Press the-/CH button ⑥ or the +/MEM button ⑦ to set the required value.
Press the ALARM button ⑧ to confirm your entry. The alarm symbol 📋 appears on the time panel ⑤ to indicate that the alarm function is active. In addition, the display for the alarm day (1) flashes on the date panel ①.
◆ Press the-/CH button ⑥ or the +/MEM button ⑦ to set the required alarm day (17 = Monday to Sunday, 5 = Monday to Friday, 67 = Saturday and Sunday).
NOTE
A bar display appears under the alarm symbol ☑ on the time panel ⑤ to show the set alarm days: 17 = no bars, 6= two bars, 1-5 five bars.
Press the ALARM button ⑧ to confirm your entry. The display will now change back to basic mode.
Activate/deactivate alarm function
- Press the ALARM button ⑧ to access alarm mode. The current alarm time set and the display for the alarm mode (A) are shown on the time panel ⑤.
- Press the ALARM button ⑧ briefly to activate the alarm function. The alarm symbol 📋 appears on the time panel ⑤ to indicate that the alarm function is active.
Press the ALARM button ⑧ again briefly. The alarm symbol goes out and the alarm function is deactivated.
Switching off the alarm signal
The alarm signal will sound at the set time for around 2 minutes.
◆ Press any button with the exception of the SNOOZE/LIGHT button ⑨ to switch the alarm signal off.
You do not have to reactivate the alarm function. The alarm signal will automatically sound again at the set time.
Snooze function
While the alarm is going off, press the SNOOZE/LIGHT button ⑨ to activate the snooze function. The alarm signal is interrupted for around 5 minutes. The display for the snooze function (Z) and the alarm symbol flash on the display.
NAP timer function
Press and hold the NAP button ⑪ button for around 3 seconds to set the duration of the nap timer. The currently set nap time will flash on the time panel ⑤.
- Press the-/CH button ⑥ or the +/MEM button ⑦ to set the maximum value (from 5 minutes up to a maximum of 2 hours in 5-minute stages).
- Press theNAP button ⑪ to confirm your entry and to start the nap timer. The set time starts counting down. The alarm go off for around 2 minutes once the time has been counted down.
◆ Press any button to deactivate the nap timer.
Display maximum/minimum temperature/humidity
Once the power supply and the connection to the outdoor sensor have been established, the maximum and minimum values for temperature and humidity are automatically recorded and saved by the weather station.
In basic mode, press the + / MEM button ⑦ once.
The MAX symbol is shown next to the humidity display on both temperature panels, and the highest measured value for indoors and outdoors is displayed.
In basic mode, if you press the + / MEM button ⑦ the MIN symbol is shown and the lowest measured value for indoors and outdoors is displayed.
After around 5 seconds, the current values for indoors and outdoors will automatically be displayed.
- Press and hold the + / MEM button ⑦ for around 3 seconds to delete the saved values.
Background lighting
The background lighting on the display switches off after around 10 seconds during battery operation to save the batteries.
- Press the SNOOZE/LIGHT button ⑨ to switch the display background lighting on for around 10 seconds.
The display background lighting is permanently switched on when the device is powered by the mains.
- Press the SNOOZE/LIGHT button ⑨ again to set the background lighting brightness in four stages (high, medium, low, off).
Battery display
If the battery symbol ☐ shown on the indoor temperature panel ② the batteries in the weather station should be replaced as soon as possible (see also the section Operating the weather station).
If the battery symbol 📄 is shown on the outdoor temperature panel ③ the batteries in the outdoor sensor should be replaced as soon as possible (see also section Operating the outdoor sensor).
Changing the radio channel
Changing the radio channel on outdoor sensor
You can select between 3 radio channels. Channel 1 is preset.
◆ Open the battery compartment 21 on the rear of the device by removing the battery compartment cover 22.
Select a radio channel by pushing the channel selector 20 to CH1, CH2 or CH3.
◆ Press and hold the-/CH button ⑥ until the reception signal •••) flashes on the outdoor temperature panel ③.
Press the TX button ⑲ to manually initiate the outdoor sensor radio signal. If reception is successful, the temperature and moisture on the outdoor temperature sensor ③ will now be displayed on the new radio channel.
◆ Close the battery compartment 21 again.
Changing the radio channel display on the weather station
If the weather station is receiving the outdoor sensor radio signal, it will automatically display the appropriate channel.
However, you can also manually set the display of various radio channels.
◆ Press the-/CH button ⑥ repeatedly to switch between the displays CH1 (only display channel 1), CH2 (only display channel 2), CH3 (only display channel 3) and ⬇ (display all channels alternately in a loop).
NOTE
▶ Only the values from outdoor sensors which are connected to the weather station will be displayed.
▶ If you are using several outdoor sensors you should select a different radio channel for each outdoor sensor.
Charging USB devices
CAUTION
▶ Use of the USB sockets 15 is only possible during mains operation!
▶ Ensure that the power consumption of the USB device is not higher than 2.1 A if you are using just one of the USB sockets. For more information, refer to the instruction manual of your USB device.
If you are using both USB sockets 15 simultaneously, the total power consumption of the connected USB devices may not exceed 2.1 A!
Connect your USB device to one of the USB sockets 15. The battery symbol flashes on the USB connection panel 4 and indicates that your USB device is being charged.
◆ Disconnect your USB device from the USB socket once it has completely charged.
Troubleshooting
Connected USB device does not charge
■ Weather station is not being operated on mains power.
» Connect the mains adapter 16 to the weather station.
■ No plug connection to USB device.
» Check the plug connection.
■ The charging current of the connected device is too high (> 2.1 A).
» The device cannot be charged by the weather station.
Connection cannot be made to the outdoor sensor.
■ Disruptive obstacles or other interference sources such as concrete walls or other radio transmission devices are located between the weather station and the outdoor sensor.
» Change the installation location and try again.
■ Distance between weather station and outdoor sensor is too great.
» Decrease the distance. "Visual contact" between the outdoor sensor and the weather station often improves the transmission.
■ The batteries in the weather station or the outdoor sensor are dead.
» Replace the batteries.
Synchronisation with DCF signal not possible
Disruptive obstacles or other interference sources such as concrete walls or other radio transmission devices are interfering with DCF signal reception.
» Change the installation location (e.g. near a window) and try again.
■ The batteries in the weather station are dead.
» Replace the batteries.
Cleaning

DANGER
Risk of electrocution!
Remove the mains adapter from the power socket before starting to clean the device.
CAUTION
▶ To avoid irreparable damage to the device, ensure that no moisture can penetrate the device during cleaning.
▶ Do not use caustic, abrasive or solvent-based cleaning materials. These can damage the surfaces of the device.
- Clean the surfaces of the device with a soft, dry cloth. For stubborn dirt, use a slightly damp cloth with a mild detergent.
Storage
If you do not intend to use the product for an extended period of time, disconnect it from the power supply or remove the batteries and store it in a clean, dry place without exposure to direct sunlight.
Disposal
natural_image
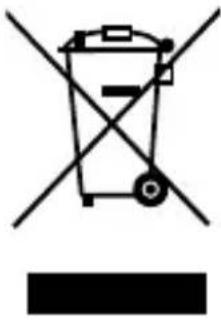
Symbol of a trash bin crossed with a diagonal line and a horizontal line, representing waste sorting or disposal (no text or labels)The symbol showing a crossed-out dustbin means that this device is subject to Directive 2012/19/EU. This directive states that this device may not be disposed of in the normal household waste at the end of its useful life, but must be handed over to specially set-up collection locations, recycling depots or disposal companies. This disposal is free of charge for the user. Protect the environment and dispose of this device properly.
natural_image
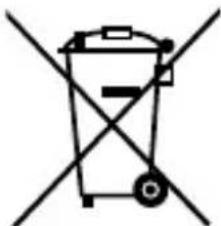
Simple line drawing of a trash bin with crossed lines indicating no waste or restriction (no text or symbols)Batteries should not be disposed of with normal household waste. Consumers are legally obliged to dispose of used batteries at a collection point in their town/district or at a retail store. They may contain poisonous heavy metals and must be disposed of in accordance with the rules for the treatment of hazardous waste. The chemical symbols for heavy metals are as follows: Cd = cadmium, Hg = mercury, Pb = lead. Dispose of batteries only when they are fully discharged.
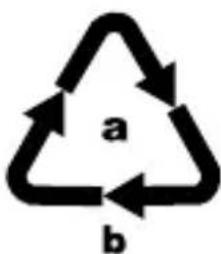
Dispose of the packaging in an environmentally friendly manner. Note the labelling on the packaging and separate the packaging material components for disposal if necessary. The packaging material is labelled with abbreviations (b) and numbers (a) with the following meanings: 1–7: plastics, 20–22: paper and cardboard, 80–98: composites

Your local community or municipal authorities can provide information on how to dispose of the worn-out product.
Appendix
Technical data
| Weather station | |
| Power supply via mains adapter: | 5 V === (direct current)/ 2500 mA |
| or batteries: 2 x 1.5 V | === (direct current) (type AAA/LR03) |
| Temperature measuring range/Measuring accuracy | 0 to +50°C (+32 to +122°F) / ±1.5 °C (±2.7 °F) |
| Temperature resolution 0.1°C (0.1 °F) | |
| Humidity measuring range/ Measuring accuracy | 20 to 99%/ ± 5 % |
| Humidity resolution 1% | |
| Radio clock signal DCF77 | |
| USB sockets 5 V | === (direct current)/ 2.1 A (total)* |
* If you are using both USB sockets 15 simultaneously, the total power consumption of the connected USB devices may not exceed 2.1 A!
| Mains adapter | |
| Model CZH024050250EUWH | |
| Input 100-240 V ~ (alternating current) | 50/60 Hz, max. 0.8 A |
Mains adapter
| Output 5.0 V | (direct current)/2500 mA |
| Polarity | ◇-●◇(positive inside, negative outside) |
| Protection class | II/□ |
| Protection type IP20 | |
| Efficiency class | 5 V |
External sensor
| Batteries 2 x 1.5 V | === (direct current)(type AA/LR06) |
| Temperature measuring range/ Measuring accuracy | -20 to +65°C (-4 to +149°F)/ ±1.5 °C (±2.7 °F) |
| Humidity measuring range/ Measuring accuracy | 20 to 99%/ ±5 % |
| Humidity resolution 1% | |
| Transmission frequency 433 MHz | |
| Transmission output >10 dBm | |
| Range max. 100 m (in open terrain) | |
| Protection type IPX4 (splashproof) |
Notes on the EU Declaration of Conformity
This device complies with the essential requirements and other relevant provisions of the RE Directive 2014/53/EU, the low voltage directive 2014/35/EU, the ERP Directive 2009/125/EC and the RoHS Directive 2011/65/EU.
You can download the complete EU conformity declaration from www.kompernass.com/support/297514_DOC.pdf.
This appliance has a 3-year warranty valid from the date of purchase. If this product has any faults, you, the buyer, have certain statutory rights. Your statutory rights are not restricted in any way by the warranty described below.
Warranty conditions
The validity period of the warranty starts from the date of purchase. Please keep your original receipt in a safe place. This document will be required as proof of purchase.
If any material or production fault occurs within three years of the date of purchase of the product, we will either repair or replace the product for you at our discretion. This warranty service is dependent on you presenting the defective appliance and the proof of purchase (receipt) and a short written description of the fault and its time of occurrence.
If the defect is covered by the warranty, your product will either be repaired or replaced by us. The repair or replacement of a product does not signify the beginning of a new warranty period.
Warranty period and statutory claims for defects
The warranty period is not prolonged by repairs effected under the warranty. This also applies to replaced and repaired components. Any damage and defects present at the time of purchase must be reported immediately after unpacking. Repairs carried out after expiry of the warranty period shall be subject to a fee.
Scope of the warranty
This appliance has been manufactured in accordance with strict quality guidelines and inspected meticulously prior to delivery.
The warranty covers material faults or production faults. The warranty does not extend to product parts subject to normal wear and tear or fragile parts such as switches, batteries, baking moulds or parts made of glass.
The warranty does not apply if the product has been damaged, improperly used or improperly maintained. The directions in the operating instructions for the product regarding proper use of the product are to be strictly followed. Uses and actions that are discouraged in the operating instructions or which are warned against must be avoided.
This product is intended solely for private use and not for commercial purposes. The warranty shall be deemed void in cases of misuse or improper handling, use of force and modifications / repairs which have not been carried out by one of our authorised Service centres.
Warranty claim procedure
To ensure quick processing of your case, please observe the following instructions:
■ Please have the till receipt and the item number (e.g. IAN 12345) available as proof of purchase.
■ You will find the item number on the type plate, an engraving on the front page of the instructions (bottom left), or as a sticker on the rear or bottom of the appliance.
If functional or other defects occur, please contact the service department listed either by telephone or by e-mail.
■ You can return a defective product to us free of charge to the service address that will be provided to you. Ensure that you enclose the proof of purchase (till receipt) and information about what the defect is and when it occurred.
You can download these instructions along with many other manuals, product videos and software on www.lidl-service.com.
Service
Service Great Britain
Tel.: 0871 5000 720 (£ 0.10/Min.)
E-Mail: kompernass@lidl.co.uk
Service Ireland
Tel.: 1890 930 034
(0,08 EUR/Min., (peak))
(0,06 EUR/Min., (off peak))
E-Mail: kompernass@lidl.ie
IAN 297514
Importer
Please note that the following address is not the service address. Please use the service address provided in the operating instructions.
KOMPERNASS HANDELS GMBH
BURGSTRASSE 21
DE-44867 BOCHUM
GERMANY
www.kompernass.com
Table des matières
Introduction 73
natural_image
Symbol of a trash bin crossed with a diagonal line and a horizontal line, representing waste sorting or disposal (no text or labels)natural_image
Simple line drawing of a trash bin with two crossed lines indicating no waste or restriction (no text or symbols)KOMPERNASS HANDELS GMBH
BURGSTRASSE 21
DE-44867 BOCHUM
ALLEMAGNE
www.kompernass.com
Inhoud
Inleiding 109
Het tijdveld 5
natural_image
Simple line drawing of a trash bin with crossed lines indicating no waste or discharge (no text or symbols)natural_image
Simple line drawing of a trash bin with crossed lines indicating no waste or restriction (no text or symbols)KOMPERNASS HANDELS GMBH
BURGSTRASSE 21
DE-44867 BOCHUM
DUITSLAND
www.kompernass.com
Obsah
Úvod....145
Časové pole ⑤
Obsluha a provoz
Základní nastavení
natural_image
Simple line drawing of a trash bin with crossed lines indicating no waste or discharge (no text or symbols)natural_image
Simple line drawing of a trash bin with crossed lines indicating no waste or restriction (no text or symbols)KOMPERNASS HANDELS GMBH
BURGSTRASSE 21
DE-44867 BOCHUM
NĚMECKO
www.kompernass.com
Índice
El campo de hora ⑤
natural_image
Simple line drawing of a trash bin with crossed lines indicating no waste or discharge (no text or symbols)natural_image
Simple line drawing of a trash bin with crossed lines indicating no waste or restriction (no text or symbols)KOMPERNASS HANDELS GMBH
BURGSTRASSE 21
DE-44867 BOCHUM
ALEMANIA
www.kompernass.com
Índice
Introdução 215
Campo das horas ⑤
natural_image
Simple line drawing of a trash bin with crossed lines indicating no waste or discharge (no text or symbols)natural_image
Simple line drawing of a trash bin with crossed lines indicating no waste or restriction (no text or symbols)KOMPERNASS HANDELS GMBH
BURGSTRASSE 21
DE-44867 BOCHUM
ALEMANHA
www.kompernass.com
KOMPERNASS HANDELS GMBH
BURGSTRASSE 21
DE-44867 BOCHUM
GERMANY
www.kompernass.com
Stand der Informationen · Last Information Update · Version des informations
Stand van de informatie · Stav informací · Estado de las informaciones


- FR BE
- Inhaltsverzeichnis
- Einführung....3
- Das Uhrzeitfeld ⑤
- Contents
- Introduction 39
- Safety 41
- Package contents 45
- Description of components ..... 46
- Use....47
- Displays in basic mode....51
- Handling and use 53
- AURIOL®
- Introduction
- Information about these operating instructions
- Intended use
- Warning notices
- DANGER
- A warning at this hazard level indicates a potentially hazardous situation.
- CAUTION
- A warning notice of this hazard level indicates a risk of property damage.
- NOTE
- Safety
- Basic safety instructions
- Safety information for batteries
- Mishandling the batteries can cause fires, explosions, leakages or other hazards!
- Package contents
- Description of components
- Figure A
- Display
- Weather station
- Figure B
- External sensor
- Use
- Requirements for the set-up location
- Operating the outdoor sensor
- Operating the weather station
- Mains power operation:
- Battery operation:
- The DCF signal
- Displays in basic mode
- The date panel ①
- The time panel 5
- The indoor temperature panel ②
- The outdoor temperature panel ③
- The USB connection panel 4
- Handling and use
- Basic settings
- Setting the alarm time and alarm day
- Activate/deactivate alarm function
- Switching off the alarm signal
- Snooze function
- NAP timer function
- Display maximum/minimum temperature/humidity
- Background lighting
- Battery display
- Changing the radio channel
- Changing the radio channel on outdoor sensor
- Changing the radio channel display on the weather station
- Charging USB devices
- Troubleshooting
- Connected USB device does not charge
- Connection cannot be made to the outdoor sensor.
- Synchronisation with DCF signal not possible
- Cleaning
- Risk of electrocution!
- Storage
- Disposal
- Appendix
- Technical data
- Notes on the EU Declaration of Conformity
- Warranty conditions
- Warranty period and statutory claims for defects
- Scope of the warranty
- Warranty claim procedure
- Service
- Service Great Britain
- Service Ireland
- Importer
- Table des matières
- Introduction 73
- Inhoud
- Inleiding 109
- Het tijdveld 5
- Obsah
- Úvod....145
- Časové pole ⑤
- Obsluha a provoz
- Základní nastavení
- Índice
- El campo de hora ⑤
- Introdução 215
- Campo das horas ⑤
- KOMPERNASS HANDELS GMBH
Brand : AURIOL
Model : IAN 297514
Category : Weather Station