
IAN 106820 - Lighting Livarno Lux - Free user manual and instructions
Find the device manual for free IAN 106820 Livarno Lux in PDF.


User questions about IAN 106820 Livarno Lux
0 question about this device. Answer the ones you know or ask your own.
Ask a new question about this device
Download the instructions for your Lighting in PDF format for free! Find your manual IAN 106820 - Livarno Lux and take your electronic device back in hand. On this page are published all the documents necessary for the use of your device. IAN 106820 by Livarno Lux.
USER MANUAL IAN 106820 Livarno Lux
text_image
PDF online www.lidl-service.comOperation and Safety Notes
IAN 106820
DE AT CH
Before reading, unfold the page containing the illustrations and familiarise yourself with all functions of the device.
GB Operation and Safety Notes Page 12
text_image
Exploded diagram of a mechanical assembly with labeled parts including a light bulb, cylindrical components, and numbered parts 1 through 5.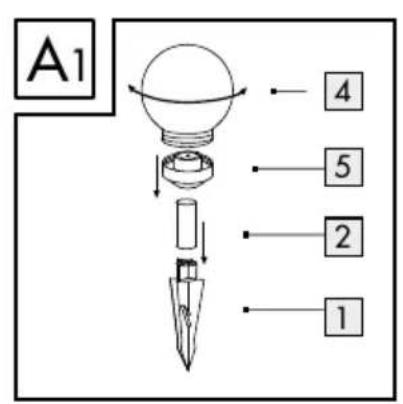
text_image
A1 4 5 2 1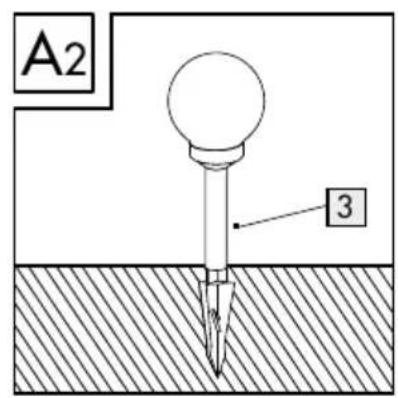
text_image
A2 3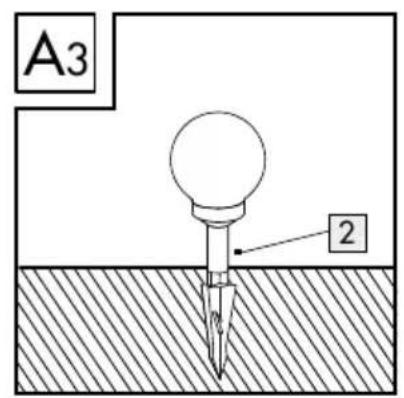
text_image
A3 2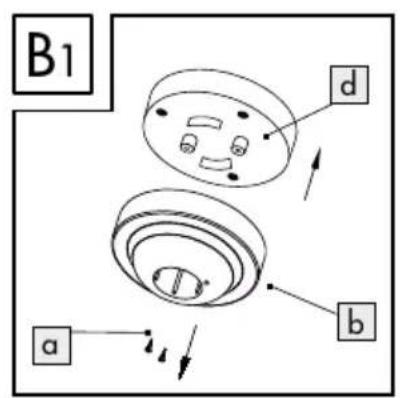
text_image
B1 a b d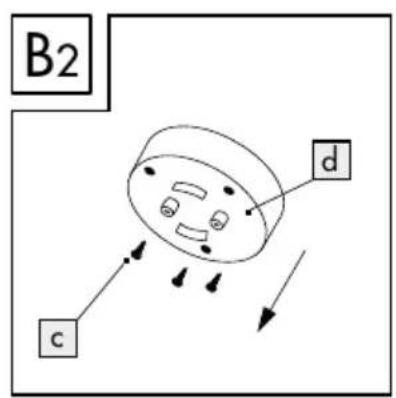
text_image
B2 c d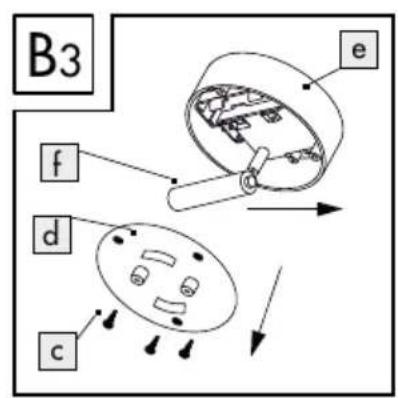
text_image
B3 f e d cEinleitung
GERAHR EXPLOSIONSGE-
EDI Light Service Center
Heiligkreuz 22
A-6136 Pill
E-Mail: info@edi-light.com
Telefon: +43 5242 6996 0
Schweiz
EGLO Schweiz AG
Seetalstraße 142
CH-6032 Emmen
E-Mail: info-switzerland@eglo.com
Telefon: +41 41 268 69 59
Deutschland
EDI Light Service Center
c/o RTS Service Solutions
Halle 17-1
Intended use....Page 13
Parts description......Page 13
Scope of delivery....Page 13
Technical Data Page 13
Safety instructions
Product-specific safety instructions....Page 14
Safety instructions for rechargeable batteries......Page 14
Functionality Page 15
Start-up
Assembling the light....Page 15
Installing the light Page 15
Prior to initial use....Page 15
Light functions....Page 15
Replacing the battery....Page 15
Troubleshooting Page 16
Maintenance / Cleaning......Page 16
Battery leaks......Page 17
Disposal Page 17
Declaration of Conformity Page 17
Warranty / Service centre Page 17
Service address......Page 18
Warranty card......Page 18
Solar-powered LED light ball
- Introduction

CONGRATULATIONS ON THE PURCHASE OF YOUR NEW LIGHT
You have selected a high quality product. The assembly instructions are part of this product. They contain important information on safety, handling and disposal. Familiarise yourself with all the functions of the appliance before operating it for the first time. To do so, read the following assembly and safety instructions. Use the product only as described and for the indicated purpose. Keep these instructions in a safe place. If you pass the product on to anyone else, please ensure that you also pass on all the documentation.
- Intended use

The solar light is not suitable as residential room lighting.
The solar light is intended as an outdoor accent light. Any other use or modification of the product constitute improper use and pose a risk of short circuits, fire, electric shocks and damage to the product. The manufacturer is not liable for damage caused by improper use. The product is not intended for commercial use.
- Parts description
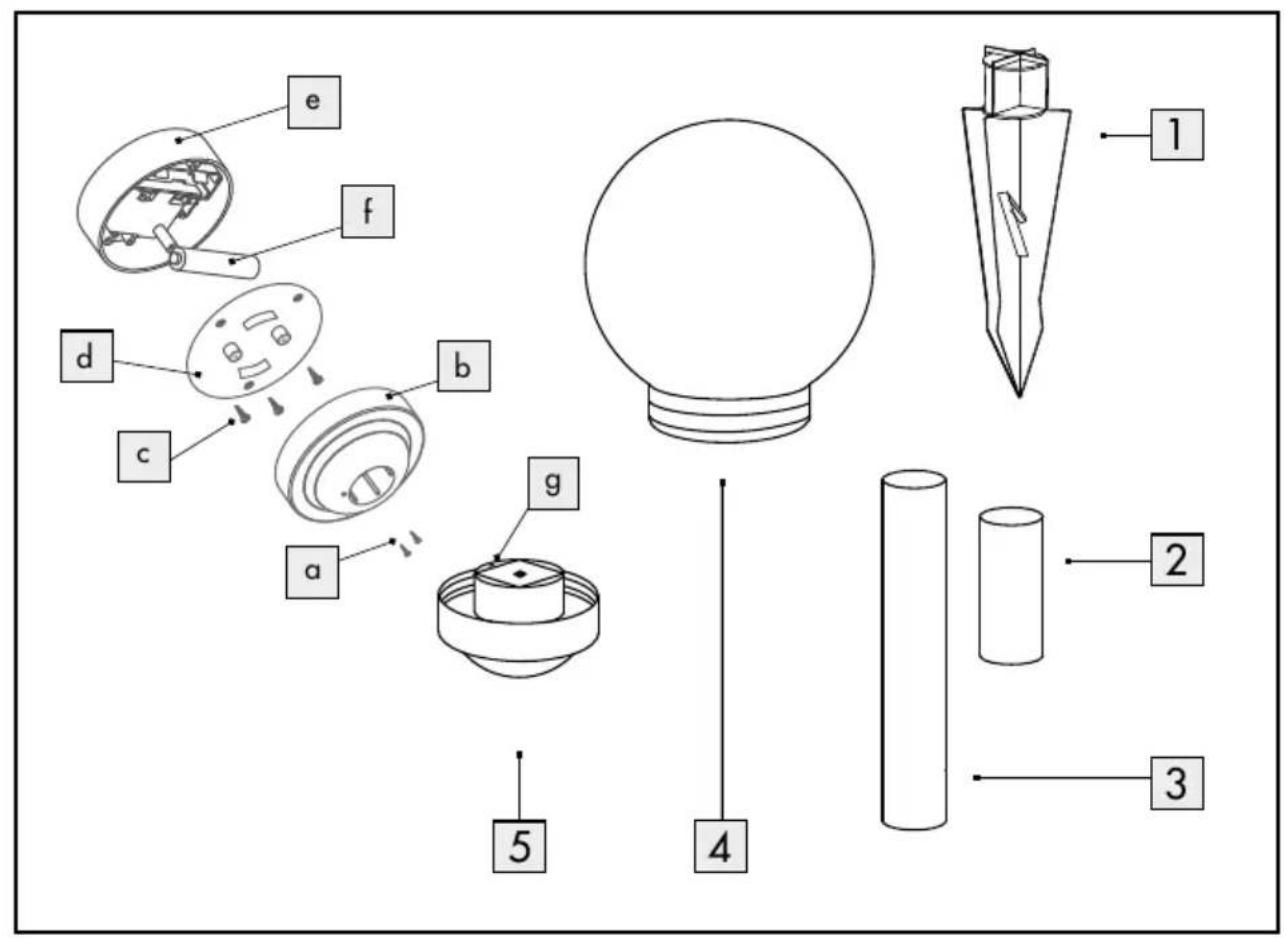
1 Ground stake
2 Spacer tube approx. 7 cm
3 Spacer tube approx. 17 cm
4 Sphere
5 Solar module, consisting of:
a Cross-head screws
b Housing
c Cross-head screws
d Cover e Solar cell
f RechargeableAAA battery
gOn/Offswitch
- Scope of delivery
Immediately after unpacking check the parts are complete and the product is in good condition.
1 x Ground stake 1
1 x Spacer tube approx. 7 cm 2
1 x Spacer tube approx. 17 cm 3
1 x Sphere 4
1 x Solar module incl. LED and rechargeable Ni-Mh battery, AAA/1.2V/300mAh 5
1 x Assembly instructions
- Technical Data
Item number: 54318
Battery: 1x Ni-Mh rechargeable
battery/AAA/1.2V/
300 mAh
Light bulb: 1x LED (not replaceable)
Rated power: 0.2 W per LED
Protection type: IPX4 (splash-proof)
Solar cell: 50 mA, multicrystalline
Dimensions:
Solar light
(without ground stake): max. 34 x 15 cm (h x ∅)
Ground stake: 10 cm (h)
Distributor:
Edi Light GmbH, Heiligkreuz 22, A-6136 Pill
● Safety instructions
WARNING! ACCIDENT HAZARD AND RISK OF FATAL INJURY FOR INFANTS AND CHILDREN!
■ Rechargeable batteries are not intended for the hands of children. Do not leave the batteries lying around. They may otherwise be swallowed by children or pets. If accidentally swallowed seek immediate medical attention.
Children or persons lacking knowledge or experience in handling the device or have limited physical, sensory or mental abilities, must not use the device without supervision or instruction by a person responsible for their safety. Children must be supervised at all times to prevent them from playing with the device.
- Never leave children unsupervised with the packaging material. The packaging material represents a danger of suffocation. Children frequently underestimate the dangers. Please keep the product out of the reach of children at all times.
This product is not a toy and should be kept out of the reach of children. Children are not aware of the dangers associated with handling electrical products.
- Do not use the article if you detect any kind of damage.
DANGER - EXPLOSION
HAZARD! Do not use the solar light in explosive environments containing flammable vapours, gasses or dusts.
●Product-specific safety instructions
- Do not expose the solar light to strong vibration or high mechanical loads.
■ Make sure the solar cell is free of dirt and free of snow and ice in winter. Otherwise the performance of the solar panel will diminish. - Cold temperatures negatively impact the battery operating time. Clean and store the solar
light in a dry, warm location during extended periods of non-use, e.g. in winter.
In the event of damage, repairs or other problems with the solar light, please contact an electrician. The LEDs cannot be replaced!
DANGER - EXPLOSION HAZARD! Use only rechargeable batteries of the recommended type.
Other rechargeable or single-use batteries could explode during charging.
DANGER - RISK OF IN- JURY! Be sure to also remove the base and ground stake when removing the solar light to prevent hazards (e.g. tripping).
DANGER - FIRE HAZARD! Never switch the solar light on inside the packaging.
● Safety instructions for rechargeable batteries
Outdated or used rechargeable batteries may leak chemicals which damage the product. Therefore remove the rechargeable batteries when not using the solar light for extended periods.
DANGER - FIRE HAZARD! Do not allow rechargeable batteries to short-circuit. Otherwise the rechargeable batteries may overheat, become a fire hazard or explode.
DANGER - EXPLOSION HAZARD! Never throw recharge- able batteries into fire or water.
WARNING - WEAR SAFETY GLOVES! If they come into contact with skin, leaked or damaged rechargeable batteries could cause chemical burns; you should therefore wear suitable protective gloves at all times if such an event occurs.
- Functionality
The solar module built into this product converts sunlight into electricity and stores it in the rechargeable NiMH battery. Switches on the light as it begins to get dark.
The in-built light-emitting diodes are a very long-life and energy-saving light source.
The light duration depends on the amount of sunlight, the angle of light on the solar panel and the temperature (the battery capacity is temperature-dependent). A vertical angle of light at temperatures above the freezing point is ideal.
The battery does not achieve maximum capacity until after several charge and discharge cycles.
- Start-up
- Assembling the light
Remove the individual parts from the packaging and assemble the solar light as shown in figures A1-A3. There are two options for doing so: the spacer tube 3 will give the solar light a height of approx. 34 cm (see Fig. A2), using the spacer tube 2 it will have a height of approx. 24 cm (see Fig. A3).
☐ Insert the selected spacer tube 2 or 3 into the designated opening on the solar module 5 (see Fig. A1).
☐ Then insert the ground stake 1 into the bottom of the spacer tube 2 or 3 (see Fig. A1).
- Installing the light
The solar light can be installed without a power source. Only use the solar light with the included ground stake 1. Push the assembled solar light far enough into the ground (lawn, flower bed) so it is stable.
Since the light relies on sunlight, consider and observe the following points prior to installation:
☐ Select a location where the solar module 5 is exposed to direct sunlight during the day.
☐ Position the solar light so the solar module 5 is not covered or in the shade (trees, roof ridge, etc.).
☐ Be sure the solar module 5 is not impacted by another light source, e.g. yard or street lighting, as this will prevent the light from switching on at twilight. Remember many light sources will only switch on due to the time or movement during the night.
- Prior to initial use
The solar light features a twilight sensor and an On/Off switch. When fully charged the light on time is approx. 6 to 8 hours.
☐ Unscrew the sphere 4 from the solar module 5 counter-clockwise. Set the On/Off switch 9 to ON before using it for the first time.
☐ Screw the sphere 4 clockwise all the way into the solar module 5 and place the solar light in the sun.
●Lightfunctions
☐Switch ☐ set to ON - the solar light will automatically switch on at twilight. At dawn the light will automatically switch off.
☐Switch ☐ set to OFF - the solar light is permanently switched off.
- Replacing the battery
The rechargeable battery is designed for prolonged operation. However, after a long time of use if may need to be replaced. Rechargeable batteries are subject to natural wear and the output may decrease. For optimal performance the batteries should be replaced every 12 months.
Replace the battery as shown in figures B1-B3.
□ Unscrew the sphere 4 counter-clockwise.
☐ Set the switch ☐ on the solar module ☐ to OFF.
☐ Remove the solar module 5 from the spacer tube 2 or 3.
☐ Unscrew the two screws ☐ on the underside counter-clockwise using a suitable cross-tip and remove the ☐ housing from the remainder of the module (see Fig. B1).
☐ Then also unscrew the three screws ☐ on the underside of the cover counter-clockwise using a suitable cross-tip screwdriver and remove the cover ☐ from the remainder of the module (see Fig. B2).
☐ Remove the battery f and replace with a new, charged rechargeable battery of the same type (see „Technical Data“). Please note the polarity (+/-) when inserting the rechargeable battery (see Fig. B3).
☐ Now reattach the cover d to the solar cell e and secure clockwise using the three screws c.
☐ Then reattach the housing b and secure clockwise using the two screws a.
☐ Reattach the solar module 5 to the spacer tube 2 or 3.
☐ Set the switch ☐ back to ON.
☐ Screw the sphere 4 all the way onto the solar module 5 turning clockwise.
- Troubleshooting

NOTE
The device contains delicate electronic components. For this reason it is possible that it can be disrupted by radio transmitting equipment in the immediate vicinity. These could be e.g. mobiles, two-way radios, CB radios, wireless remote controls/other remote controls and microwaves. If you notice that the device is malfunctioning, remove any sources of interference from the area of the device.

NOTE
Electrostatic discharges can lead to malfunctions. In the event of such malfunctions briefly remove and reinsert the rechargeable batteries.

NOTE
The power of the rechargeable battery varies according to the weather and will be higher in summer than in winter.
| Fault Cause Solution | ||
| LEDs won't light up | Surroundings are too bright or light from other light sources is hitting the solar light | Change the location (away from e.g. yard or street lighting) |
| Weak LED light | Battery not fully charged or defective | Charge the rechargeable battery with a charger or replace with a new rechargeable battery (see "Replacing the battery") |
| LEDs defective | The LEDs cannot be replaced. Dispose of the product properly (see "Disposal") | |
● Maintenance/Cleaning
The LEDs cannot be replaced. The solar light is maintenance-free.
■ Never use caustic cleaners.
☐ Regularly clean the solar light with a dry, lint-free cloth. Use a slightly moist cloth to remove any stubborn dirt.
☐ Replace the rechargeable batteries if the light on time decreases noticeably after some time despite good sun exposure (see chapter „Replacing the battery“). Only use rechargeable batteries of the right size and of the recommended type (see section „Technical data“).
●Batteryleaks
If a battery leaked, try to remove the fluid from the battery compartment using a soft cloth.

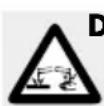
DANGER - RISK OF CHEM-
ICAL BURNS! Leaking batteries can cause in chemical burns. Be careful not to allow the battery fluid to come into contact with your skin or your eyes. If this does happen, immediately try to remove the battery fluid under cold running water. Seek medical attention to be safe.
- Disposal
The packaging is made of environmentally friendly materials, which may be disposed of through your local recycling facilities. Contact your local community or municipal administration for more details on how to dispose your worn-out product.

NOTE
To help protect the environment, please dispose of the product properly, and not in household waste, when it has reached the end of its useful life. Please contact your local authority for information on collection points and their opening hours.
In accordance with directive 2006/66/EC, defective or used rechargeable batteries must be recycled. Return rechargeable batteries and / or the appliance using the recycling facilities provided.

NOTE
Rechargeable batteries may not be disposed of with the usual domestic waste. They may contain toxic heavy metals and are subject to hazardous waste regulations. The chemical symbols of the heavy metals are: Cd = cadmium, Hg = mercury, Pb = lead. Therefore dispose of used batteries through your municipal collection site.
● Declaration of Conformity

This product fulfils the requirements of the applicable European and national directives. The relevant declarations and documents are held by the manufacturer. This product meets the requirements of the German Equipment and Product Safety Act.
We reserve the right to make technical and visual changes to the product in the interest of product improvement. Typographical and printing errors excepted.
● Warranty / Service centre
We provide a 3 year warranty from the date of purchase.
Our products are manufactured using modern production methods and are subject to precise quality control. We guarantee this product is of good quality. During the warranty period any defects in material or manufacture will be replaced free of charge In the event of an unexpected defect, please return the carefully packaged product to the service address specified.
The warranty does not extend to damage due to improper handling as well as wear items and consumables. These can be ordered from the telephone number listed for a charge.
Repairs not covered by the warranty (e.g. light bulb) may also be requested at cost from the service address listed.
The product will be repaired at the specified service location. Timely processing and return can only be ensured by sending the product directly to this address.
For additional product information, to order accessories or have a question about the service process, please contact our Customer Service Department at the telephone number specified. Please include the item number (see Technical Data) when inquiring about the product.
●Serviceaddress
Great Britain
EGLO UK Ltd.
Unit 12 Cirrus Park
Lower Farm Road
Moulton Park Industrial Estate
GB-Northampton, NN3 6UR
E-Mail: info-greatbritain@eglo.com
Phone: +44-1604-790 986
Warrantycard
Return address:
Name/First name:
Country/Postal code/City/Street address:
Phone:
Item number/Description:
Purchase date/Point of purchase:
Description of the defect:
Date/Signature:
Non-warranty cases:

Please return the unrepaired item, carriage paid.

Please provide pricing. Repair the product against charge.
Edi Light GmbH
Heiligkreuz 22
A-6136 Pill