
Elite Executive - Radio ETON - Free user manual and instructions
Find the device manual for free Elite Executive ETON in PDF.


| Product Type | Portable multi-band radio with FM, AM, LW, SW, AIR and DAB receiver |
| Brand | ETON |
| Model | Elite Executive |
| Power Supply | 4 rechargeable Ni-MH batteries (not included) or DC power adapter (polarity indicated) |
| Battery Charging | Built-in charger for Ni-MH batteries, adjustable from 1 to 36 hours |
| Frequency Range | FM: 64-108 MHz; AM (MW): 520-1710 kHz; LW: 150-285 kHz; SW: 1.711-29.999 MHz; AIR: 118-137 MHz |
| Memory | 700 memory presets (100 pages × 7) with labeling possible |
| Alarms | 4 independently programmable alarms with day selection |
| Sleep Timer | Adjustable from 1 to 99 minutes |
| RDS Functions | Display PS, PTY, RT, date/time |
| Reception Modes | AM, FM stereo/mono, SSB with USB/LSB, synchronous detector |
| Bandwidth Control | Selectable (Wide/Narrow) for AM and AIR |
| Noise Suppression | Levels 1 to 5 or off |
| Line In/Out | 3.5 mm stereo jack for Line In/Out |
| Headphones | 3.5 mm jack (cuts internal speaker) |
| Antenna | Built-in telescopic antenna + external antenna jack (coaxial 50/75 Ω) |
| Display | Backlit LCD with adjustable brightness levels |
| Key Lock | Lock function to prevent accidental presses |
| Reset | Reset button and factory reset possible |
| Maintenance and Cleaning | Clean with a dry cloth; do not use detergents or solvents |
| Safety | Do not expose to rain or moisture; do not immerse; unplug if liquid spills |
| Temperature Range | 0°C to 40°C |
| Warranty | Limited warranty; online registration recommended |
Frequently Asked Questions - Elite Executive ETON
User questions about Elite Executive ETON
0 question about this device. Answer the ones you know or ask your own.
Ask a new question about this device
Download the instructions for your Radio in PDF format for free! Find your manual Elite Executive - ETON and take your electronic device back in hand. On this page are published all the documents necessary for the use of your device. Elite Executive by ETON.
USER MANUAL Elite Executive ETON
natural_image
Line drawing of a portable electronic device with control panel and display (no text or symbols)MEET THE ELITE EXECUTIVE
Thank you for purchasing the Etón ELITE EXECUTIVE. We want you to thoroughly enjoy the use of this product. To take advantage of its many excellent and unique features, we urge you to carefully read the user's manual.
Features:
① Speaker
LCD display panel
③ Operation buttons
④ Tuning dial
⑤ Volume knob
⑥ Line in/out jack: D 3.5mm
⑦ External antenna jack
⑧ DX/Local sensitivity selection
⑨ Earphone jack: D 3.5mm
DC jack
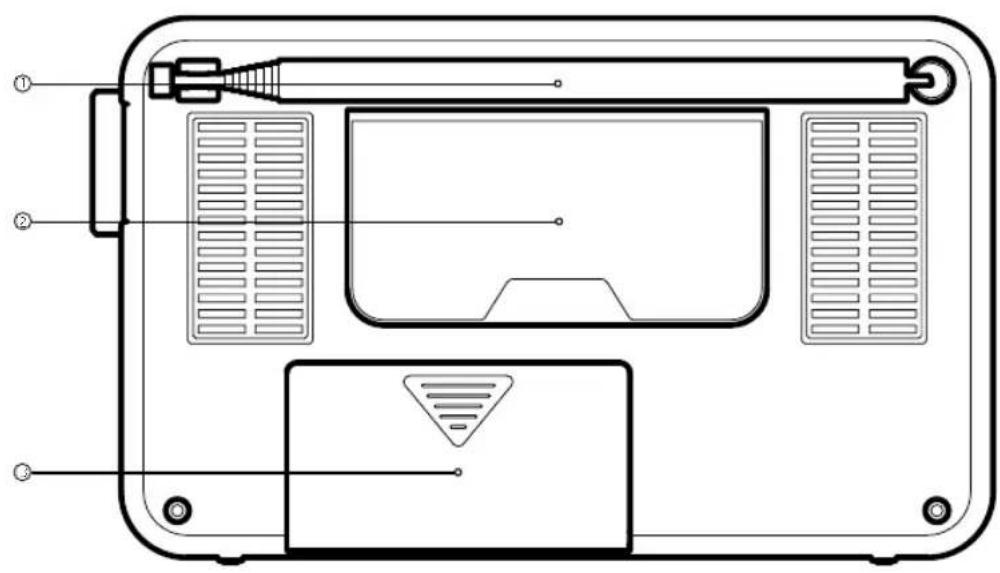
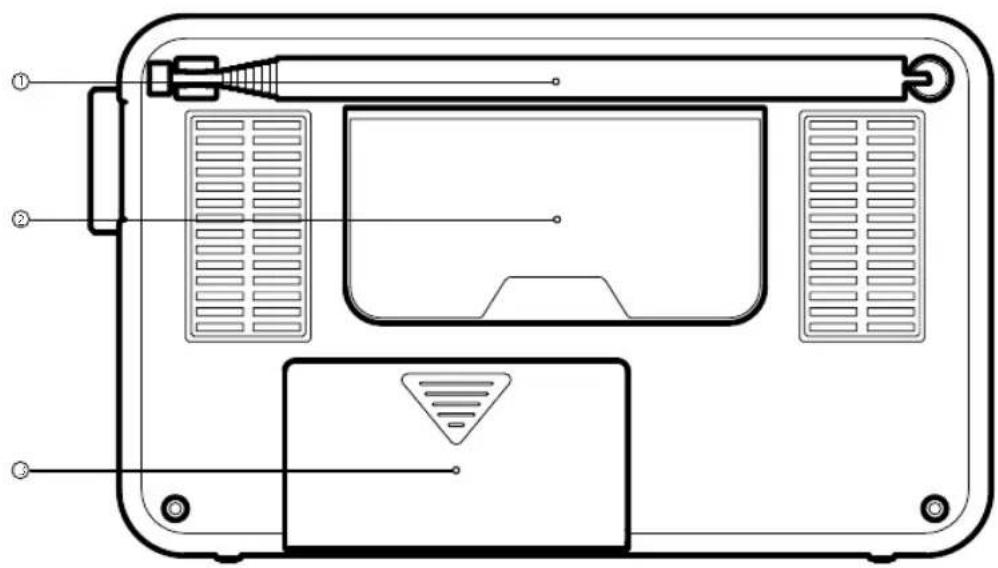
① Whip antenna
② Kick stand
Battery compartment
FRONT

BACK
BUTTON FUNCTIONALITY
Tuning Dial
Rotate the dial to select clock, frequency or air squelch level.
With the radio on:
- Quick press to select tuning speed as FAST-SLOW-STOP.
- Press and hold to select the level of squelch feature.
Note: all bands have squelch feature. The user can select squelch level with all bands.

Press and hold to set clock
With the radio on, switch between memory and weekday mode

With the radio off: press F1\~F7 to set up Mon to Sun.
With the radio on:
- in Memory mode, select page 1\~7 memory presets
- in Weekday mode: select meter band 1\~7

With the radio off, quick press F1\~F4 to activate and deactivate 4 alarm settings

With the radio off, press and hold F5 to select MW step with 9K or 10K
In North America, the FM band begins at 87.5MHz. In other parts of world, it may begin at 64MHz, 76MHz or 87MHz

With the radio off, press and hold F6 to select 3 different tuning methods as STOP/ATS/DELAY-5

With the radio off, press and hold F7 to select charging time in hours (1\~36)
timer
With the radio off: quick press to turn on the radio; press and hold to set up sleep timer (to turn off the radio automatically)
With the radio on: quick press to turn off the radio; press and hold to display the countdown of sleep

LINE IN
With the radio off, quick press to activate LINE-IN function; press and hold to select time zone and display world time

Numeric buttons

LW / MW BAND
With the radio on:
Quick press to select LW or MW

PASTE
With the radio on, in Memory mode, press and hold to copy and paste memory presets

to disable all buttons & knobs; press and hold to unlock all buttons & knobs

EDIT
With the radio on: in memory mode, press and hold to rename page; Quick press to select the backlight brightness level: high-medium-low-off

With the radio on: in memory mode, delete preset frequency

RDS MODE
In AM band, quick press to enter SSB mode
In SSB mode, quick press to select USB or LSB
In SYNC mode, quick press to select USB or LSB
In FM mode, quick press to select RT/PS/PTY/DATE

RDS
In FM band, quick press to receive and turn down RDS information In AM band, quick press to receive and switch SYNC

FM/AIR BAND
Quick press to select FM and AIR band

METER BAND
Quick press to select SW and meter band

In AM/AIR band, quick press to increase the bandwidth frequency In FM band, quick press to select STEREO mode

In AM/AIR band, quick press to reduce the bandwidth frequency In FM band, quick press to select MONO mode

In Weekday mode: quick press to turn in station; press and hold to auto-scan station and ATS station In Memory mode: select preset page

Reset hole
RESET
SETTING YOUR TIME ZONE
With the radio off, press and hold TZ/LINE IN, the time zone flashes in the display, rotate the tuning dial to switch the following world city code (see time zone abbreviation list below), the local time of world city is displayed.
To update time zone, rotate tuning dial to select your time zone code, quick press PAGE TIME button to confirm the setting or automatically confirms after 10 seconds.
Time Zone Abbreviation List:
Time Zone World City and Code
| -9 | ANC-Anchorage | |
| +8 | BEG-Beijing | |
| +7 | BKK-Bangkok | |
| +2 | CAI-Cairo | |
| -4 | CCS-Caracas | |
| -6 | CHI-Chicago | |
| +6 | DAC-Dhaka | |
| +5 | DEL - Delhi | |
| -7 | DEN - Denver | |
| +4 | DXB - Dubai | |
| 0 | GMT - GMT | |
| +8 | HKG - Hong Kong | |
| -10 | HNL - Honolulu | |
| +3 | JED - Jeddah | |
| +5 | KHI - Kashi | |
| -8 | LAX - Los Angeles | |
| 0 | LON - London | |
| +11 | N OU - Noumea |
-5 NYC - New York City
+1 PAR - Pairs
-3 RIO - De Janeiro
+10 SYD - Sydney
+9 TYO - Tokyo
+12 WLG - Wellington
SETTING THE CLOCK AND WEEKDAY
The clock is in 12 or 24 hour format. To change the format, press PAGE/TIME button. "12H" or "24H" will flash in the LCD display. Rotate the tuning knob to select "12H" or "24H" format. In 12 hour format, "AM" or "PM" icon will appear in the LCD display. Press PAGE/TIME button to confirm selection.
Starting with your radio turned OFF.
- Select your home time zone
- Press and hold PAGE TIME button until the hour digits start flashing. Quick press F1-7 to highlight today's weekday, F5 is Friday. Use the tuning knob to set the correct hour then quick press PAGE TIME button again to set the correct minute and quick press this button again to confirm. The LCD will display 'RDS Auto" or "manual" flashing, rotate the tuning knob to select "RDS auto" to update the clock automatically. With the radio off, icon will be displayed. Use the tuning knob to select MANUAL to set the clock manually, No RDS icon is displayed.
In RDS AUTO mode: the local time can be updated through local FM RDS station automatically
The procedure of update clock:
- Turn on the radio to select FM band
- Select a local FM RDS station, icon will display for 1 minute to set the current time on the clock automatically.
Note: If the signal strength of FM RDS station is weak, the clock may cause RDS to decode incorrectly, causing time to be incorrect.
In Manual mode: you can set the clock manually, which disables RDS auto-update.
SETTING ALARMS
Setting alarm 1 through 4
The ELITE EXECUTIVE has 4, independently programmable alarms (buttons F1-4 when the radio is off) to turn it on at a specific
time. Additionally, each alarm can be programmable for a specific weekday, playtime, and frequency.
- With the radio off, perform a press and hold of one of the F1-4 buttons, causing the hour to flash, 🔒 icon starts flashing. While it's still flashing, press one of the F1-7 buttons to highlight the day(s) of the week for the alarm to turn on. For example, if alarm 1 is activated, it will go off on the selected weekday(s) every week.
- Use the tuning knob to set the hour, quick press PAGE TIME button to cause the minutes to flash.
- When they're flashing, use the tuning knob to set the minutes, then continue to quick press PAGE/TIME button to set/turn-off alarm, "DELAY-XX" will appear in the LCD, rotate tuning dial to select your alarm playtime minutes from (1\~99), then press this button to cause memory page number to appear in the display. The "PAGEXX" will appear in the LCD. Rotate the tuning dial to select memory page number. Quick press F1-7 to select a memory page number, then press again to confirm, the 🔊'icon will stop flashing. If no operation in 10 seconds during setting, it will exit alarm setting mode automatically without setting the alarm.
Activating and deactivating the alarms
With the radio off, quick press F1 button, "A1:XX:XX" (e.g. A1:12:30) will appear in the LCD. The selected weekday number will be displayed in the lineup of weekday. When the 🔔 icon appears, it means Alarm 1 is activated, press F1 button again, the 🔔 icon will disappear, it means Alarm 1 is deactivated, it will exit automatically in 5 minutes with no operation.
If Alarm 1 is activated, press PAGE/TIME to confirm, quick press F1-7 to select the desired weekday (Mon\~Sun) for alarm to activate, press again to confirm exit Alarm 1 on/off setting.
If Alarm 1 is deactivated, press PAGE/TIME button to confirm exit Alarm 1 on/off setting.
The user can repeat the above-mentioned procedure to set Alarm 2\~4.
USING THE LOCK FEATURE
Quick press 📄 button once, the icon will appear in the LCD, means all buttons and knobs are locked. Press and hold ⏻ button, the → icon will appear in the LCD, means all buttons and knobs are unlocked.
RESETTING THE RADIO
If the radio has malfunction, the user should disconnect the power supply and then connect the power again to reset the radio. Or use sharp toothpick or paperclip to quick press RESET hole to reset the radio.
If the user wants to set factory default, press and hold down button, and at the same time, quick press RESET hole until "RESET..." appears in the LCD, then release button for 3 seconds and reset factory default, all memory pages are erased and the factory default settings are restored.
With the radio off, quick press LIGHT/EDIT button to select the brightness level of backlight: high-medium-low-off.
If no buttons are pressed within 10 seconds the backlight will go to sleep mode, the brightness setting of the backlight will default to off unless set to a different value by the user.
The first press of any button will activate the backlight, the second press of the same button will actuate the function for that button.
ACTIVATING THE SLEEP TIMER
To set the sleep timer, in minutes, perform the following steps in one continuous action.
- With the radio OFF press the power button
- Using the keypad, enter the number of minutes you would like the radio to play before shutting off
- Press the power button again. The word SLEEP - XX will be shown on the display and the Sleep icon will illuminate in the upper right corner of the screen.
DISPLAY CURRENT SLEEP TIMER SETTING
With the radio on, press and hold ⏻ button to display the countdown of sleep timer. If "ON" is displayed, it means there is no sleep timer setting.
TUNING
Band selection
- Quick press FM/AIR BAND button to select FM or AIR band
-
Quick press LW/MW BAND button to select LW or MW band
-
Quick press AM/METER BAND button to select SW band and switch meter band in cycle
- Quick press PAGE/TIME button to select Weekday mode, the LCD will display "WEEKDAY", quick press F1\~7 button to select 7 meter bands:
| F1: | 49M |
| F2: | 41M |
| F3: | 31M |
| F4: | 25M |
| F5: | 22M |
| F6: | 19M |
| F7: | 16M |
If select "MEMORY" mode, the LCD will display "MEMORY".
Tuning in stations
ELITE EXECUTIVE has 5 kinds of tuning methods to find your desired station:
- Quick press ▲ or ▼ button for manual tuning
- Press and hold ▲ or ▼ button for auto tuning
- ATS: Press and hold ▲ or ▼ button to finish auto-tune and storage
- Rotate the tuning dial to select frequency
- Key in numeric button (0\~9) directly to input the desired frequency
Note: Using tuning methods 1, 2, 3 above, you need to select corresponding tuning method:
Frequency Range:
| US/CAN/MEX INTL | ||
| FM: 87.5 - 108 MHz 64 - 108 MHz | ||
| AM(MW): | 520 - 1710 kHz | 522 - 1620 kHz |
| LW: | 150 - 285 kHz | 150 - 285 kHz |
| SW1: | 1.711 - 29.999 MHz | 1.711 - 29.999 MHz |
| AIR: 118 - 137 MHz 118 - 137 MHz | ||
| DAB: | 174.928 - 239.200 MHz | |
Frequency step list below:
| Tuning Method | Band | Step | Manual | STOP | DELAY-5 | ATS |
| FM 100K 100K 100K | |||
| LW 3K 3K N/A | |||
| Mw 9K/10K 9K/10K N/A | |||
| Sw 5K 5K N/A | |||
| AIR 25K 25K | N/A |
Manual Tuning
With the radio on, select one band,
Quick press PAGE/TIME button to switch to Weekday mode
Quick press ▲ or ▼ to tune in your favorite station.
Auto Tuning
With the radio off, press and hold F6 button, then rotate the tuning knob or continue to quick press F6 button to select "STOP" or "DELAY-5", press PAGE/TIME button to confirm
Note:
STOP: Auto tuning in a station then stops search
DELAY-5: Auto tuning in a station, after 5 seconds, then auto searches next station.
ATS: auto tuning in station and storage
With the radio on, select one band
Quick press PAGE/TIME button to switch to Weekday mode
Press and hold ▲ or ▼ button to enter auto search then release this button, once tuned into a station and stop search. In STOP mode, the radio tunes in a station then stops searching.
In DELAY-5 mode, auto tune in a station and continue to search next station after 5 seconds.
During auto tuning, press any button to stop auto tuning.
Auto Tuning Storage (ATS)
With the radio off, press and hold F6 button, rotate the tuning knob or continue to quick press F6 button to select ATS, then quick press PAGE/TIME button to confirm.
Turn on the radio and select FM band (ATS only works in FM mode)
Quick press PAGE/TIME button to select Weekday mode
Press and hold or button to enter ATS then release this button, store the station to page (99\~1) automatically, 7 memory locations for each page. Press any button to stop auto tuning in ATS mode.
Rotate Tuning
With the radio on, quickly press in the tuning knob to select FAST/SLOW/FINE:XX (for SSB)/STOP to select tuning step, the corresponding icon will be displayed in the LCD list below:
| Step | Band | FAST | SLOW | FINE(SSB) | STOP |
| FM 100K 10K N/A | Stop tuning | |||
| LW | 3K | 1K | SSB fine tune (-99~+99) | Stop truning |
| MW | 9K/10K | 1K | SSB fine tune (-99~+99) | Stop tuning |
| SW | 5K | 1K | SSB fine tune (-99~+99) | Stop tuning |
| AIR | 25K | 1K N/A Stop tuning | ||
Direct key in frequency
Quick press numeric button 0\~9 to enter the desired frequency. If the input frequency is FM or AIR band, quick press FM/AIR BAND button to confirm. If the frequency is LW/MW/SW band, quick press AM/METER BAND button to confirm.
For example: FM 107.5MHz, quick press 1 0 7 5 FM in that order.
If the key in is incorrect, the LCD will display "ERROR"; If the frequency is not completed then confirm, the system will confirm "O" for missing numbers. For example, quick press FM/AIR BAND button, the radio will switch to FM band at 100MHz.
STORING STATIONS INTO MEMORY
The ELITE EXECUTIVE has 700 memories (also called presets), arranged in 100 pages (0\~99), with each page holding 7 memories. Buttons F1-7 represent memory locations. Note that when storing into an already occupied memory station, its contents will be replaced with your new entry.
- Turn on the radio and tune to the desired station;
- Quick press PAGE/TIME button to select MEMORY mode;
- In memory mode, quick press ▲ or ▼ to select the desired memory page; Or press numeric buttons (0\~9) to direct key in page number and press PAGE/TIME again when finished;
- Store the frequency by pressing one of buttons F1-7 for 2 seconds. Note that when the selected location is flashing,
it means the storing is completed. Suggest manual storing frequency into memory from page 00. In FM mode, ATS will store memory from page 99, if the memories locations are available on page 99, ATS will replace already stored memories with new entries.
ACCESS STORED MEMORIES
- Turn on the radio and tune to a desired station;
- Quick press PAGE/TIME to select Memory mode;
- In memory mode, quick press ▲ or ▼ to select the desired memory page; Or press numeric button (0\~9) to direct key in page number and press PAGE/TIME again when finished;
- Select the desired memory by pressing button F1-7, if the preset location is flashing it means it is recalling memory station.
COPY/PASTE MEMORY PAGE
This feature enables copying of one memory or the entire contents of a page from one location to another.
COPYING AND PASTING ONE MEMORY LOCATION TO ANOTHER
- Turn on the radio and quick press PAGE/TIME button to select "MEMORY" mode;
- In Memory mode, quick press ▲ or ▼ to select the page that you wish to copy a memory from.
- Press and hold COPY/PASTE button until you see "COPY" and "PAGE 00" alternate flashing on the display, quick press this button again, you will see "PASTE" and "PAGE " alternate flashing.
- Quick press ▲ or ▼ to select the desired page to paste it to, quick press COPY/PASTE button again to finish paste.
- Repeat step 1\~4 to continue to paste, then quick press PAGE/TIME button to exit.
COPYING AND PASTING AN ENTIRE MEMORY PAGE
- Turn on the radio and quick press PAGE/TIME button to select "MEMORY" mode;
- In Memory mode, quick press ▲ or ▼ to select the page that you wish to copy.
-
Press and hold COPY/PASTE button until you see "COPY" and "PAGE XX" alternate flashing in the display, quick press ☐, you will see "F1 copy" and "PAGE XX" alternate flashing. Then quick press COPY/PASTE button, you will see "Paste" and "PAGE XX" alternate flashing.
-
Quick press 📄 or to select the desired page to paste to, quick press 📄, the LCD will display "F7 Paste" and "PAGE XX" alternatively. i.e. finish paste
- Repeat step 1\~4 to continue to paste, then quick press PAGE/TIME button to exit.
LABELING MEMORY PAGE
Memory page can be uniquely labeled with 8 intermixed letters, digits or symbols.
- Turn on the radio, quick press PAGE/TIME button to select Memory mode
- In Memory mode, quick press ▲ or ▼ to select the page.
- Press and hold the LIGHT/EDIT button until “_” appears in the display;
- Use the tuning knob to select the desired letter, digit or symbol, then quick press PAGE/TIME button to select the next “_”, repeat until to 8 letters/digits/numbers are selected.
Note:
- If one letter, digit or number space is not needed, just quick press PAGE/TIME to skip it.
- When labeling, the user must finish operation in 10 seconds for each selection when the “_” still is flashing;
- If the user wants to delete the labeled page and return to default "PAGE XX", just continue to pressing PAGE/TIME button 8 times at step 4, it will return to default "PAGEXX" or delete presets on the entire page and delete label at the same time.
DELETING A SELECTED MEMORY
- Turn on the ELITE EXECUTIVE and enter MEMORY mode by quick pressing the PAGE/TIME button;
- In Memory mode, quick press ▲ or ▼ toto select the page you want to delete;
- Press and hold ERASE button for 2 seconds or until "DEL" and "PAGE XX" alternate flashing in the LCD. Quick press F1-7 button to select the memory location you want to erase. The LCD displays "FX(1-7) DEL" and "PAGE XX", which means the memory is erased. For example, delete the first memory on the PAGE 00, quick press 📄 button, LCD displays "F1 DEL" & "PAGE 00" alternatively.
- Quick press PAGE/TIME button again to exit mode.
-
If you want to delete the contents of full one page, when "DEL" and "PAGE XX" alternate flashing in the in the LCD, release ERASE button then hold down ERASE button for 2 seconds, all digits in the line of MEMORY disappear, which means all memories were erased including the labels.
-
To continue to erase other memory pages, just repeat the process.
- Press PAGE/TIME to exit delete mode.
- If you want to delete the contents of all memory pages, you must RESET the radio. Resetting the radio deletes all memories and resets the radio to factory default.
9K/10K AM(MW) STEP SELECTION/FM FREQUENCY RANGE.
LCD displays:
MW-9K indicates MW step at 9kHz MW-10k indicates MW step at 10kHz
FM-64.0M indicates FM frequency range is 64.0-108MHz FM-76.0M indicates FM frequency range is 76.0-108MHz FM-87.0M indicates FM frequency range is 87.0-108MHz FM-87.5M indicates FM frequency range is 87.5-108MHz
With the radio off, press and hold Ⓗ5 button, the LCD displays "MW-9K" or "MW-10K", then quick press Ⓗ5 button or use the tuning knob to switch between 9K or 10k, then quick press PAGE/TIME button to confirm 9k/10k mode. The LCD displays "FM-87.5M" or "FM-76.0M" or "87.0 -108M" or "64-108MHz", quick press Ⓗ5 button or use the tuning knob to switch the selection of FM frequency. Quick press PAGE/TIME button to exit.
FM STEREO/MONO SELECTION
- Turn on the radio and select FM band
- Quick press WIDE/STEREO button, LCD displays "AUTO", which means FM station in STEREO mode, if the ELITE EXECUTIVE detects stereo station, "STEREO" will display in the LCD, versus displaying "MONO".
- Quick press NAR/MONO button, LCD displays "MONO", the station will be listening in MONO mode only.
AM/VHF AIRCRAFT BANDWIDTH SELECTION
- Turn on the radio and select MW or VHF aircraft band
- Quick press WIDE/STEREO button or NAR/MONO button to switch different bandwidth, the LCD displays "BW XK", e.g. "BW 3K" indicates the bandwidth is 3kHz.
Squelch Selection
- Turn on the radio
- Press and hold down tuning dial, the display shows "SQL-X" (X means 1\~5 or OFF", use the tuning knob to select the desired squelch level (SQL-1, SQL-2, SQL-5" or "SQL-OFF" which means to turn off squelch function;
- Quick press PAGE/TIME to exit Squelch level selection.
- When the signal strength is lower than selected squelch level, the ELITE EXECUTIVE will mute squelch, "Squelch" appears in the display; if higher, the ELITE EXECUTIVE will not mute squelch.
FM/RDS
- Turn on the radio and selected FM band;
- If the station is transmitting any RDS information, icon appears in the LCD,
- Quick press SYNC/SSB/RDS button to review RDS information; Continue to quick press U/LSB/RDS MODE button to select different RDS information (PS/PTY/RT/DATA).
PS: station name, no station information, display "NO PS"; PTY: program category, no program information, display "NO PTY"; RT: program text, no program text, display "NO RT"
DATA: time, date, weekday, call-sign information, if none of this information available, displays "NO DATA", if this information is available, the display format is:
"call-sign, weekday, MM-DD-YY, hour:minute"
Weekday display format:
| “MON” Monday | |
| “TUE” | Tuesday |
| “WED” | Wednesday |
| “THU” | Thursday |
| “FRI” | Friday |
| “SAT” | Saturday |
| “SUN” | Sunday |
If the station call-sign is WGSS, TUE, 03-25-14 02:15
The LCD data will roll in display:
"WGSS TUE 03-25-2014 02:15" (RBDS format, for North America)
"TUE 03-25-2014 02:15" (RDS format, for outside North America)
NOTE: if no station call-sign, will display PI CODE of current station
SSB enables listening to shortwave two way communications using the SSB mode such as amateur radio, Morse Code, weatherfax transmissions and other signals often referred to as 'utility' signals. The internet and your local library are great resources to learn more.
To experience with SSB, turn on the ELITE EXECUTIVE and position near a window if you are in a building with stories above you.
- Turn on 20-meter Amateur band, by pressing 14150kHz with the keypad and then pressing the AM button to enter it;
- Quick press SYNC/SSB/RDS button twice to turn on SSB circuit, i.e. don't select SYNC. Note SSB appears in the display, then displays "SSB-USB" or "SSB-LSB";
- Repeat quick press U/LSB/RDS MODE button to switch between USB and LSB.
SSB-USB: upper sideband
SSB-LSB: lower sideband
-
SSB fine tuning: quick press down tuning knob to select tuning speed as FAST/SLOW/FINE-XX(-99\~+99)/STOP, then select FINE -XX, which appears in the display to enter SSB fine tuning mode. Rotate the tuning knob to set to it's the best position. Put the sensitivity switch, on the left side of the radio, to the DX position. Fully extend the antenna and with the tuning knob tune slowly from 14150 to 14350kHz, listening for anything that sounds like a human voice.
-
Quick press SYNC/SSB/RDS button when finished to turn off SSB to return to normal receiving status.
USING THE SYNCHRONOUS DETECTOR
The synchronous detector can be used when listening to AM and shortwave broadcast stations. It may help to minimize interference and to improve the signal qualitywhile listening to a station, turn on the ELITE EXECUTIVE, select a AM or SW station, quick press SYNC/SSB/RDS button to enter SYNC mode, "SYNC >>>" appears in the display. Then displays "SYNC_LSB" or "SYNC_USB", the sync detector function is on, repeat quick press U/LSB/RDS MODE button to switch between USB and LSB. Quick press this button again to turn off SYNC function and return to normal receiving.
Turn the synchronous detector off while tuning stations or when it's not needed. Using the Wide/Narrow button may also help. Using the synchronous detector does not always minimize interference or improve the signal.
Turn the synchronous detector off while tuning stations or when it's not needed. Using the Wide/Narrow button may also help. Using the synchronous detector does not always minimize interference or improve the signal.
USING DX/LOCAL SWITCH
The DX/local switch (left side panel) adjusts sensitivity. Use DX (down) as the default setting for maximum sensitivity to signals. If strong stations or SSB signals seem distorted, then use Local (up). If tune in the weak signal station, use DX.
DC IN JACK
Plug the input jack into DC in jack to connect external AC adapter to power supply the ELITE EXECUTIVE according to polarity on labeling, "💡" icon appears in the display.
Note: AC power may have interference with the reception for AM(MW), so it may be better to listen to the ELITE EXECUTIVE using batteries and disconnect to external AC adapter to get the best reception.
CHARGING NI-MH BATTERY IN THE ELITE EXECUTIVE
With its included AC adapter/charger connected, the ELITE EXECUTIVE internally recharges 4 Ni-MH rechargeable batteries (not included).
To Charge batteries:
1.) Connect the AC adapter/charger, ion appears in the LCD;
2.) With the ELITE EXECUTIVE turned off, install 4 Ni-MH batteries and connect the AC adapter;
3.) Press and hold the F7 button until CHARGE XX appears in the display;
4.) Use the tuning knob to select the charging time in hours (1\~36) based on the mAh rating of your batteries, CHARGE 00 indicates not charging. Normally 11 hours for 1100mAh rating; 23 hours for 2300mAh rating etc.
5.) Quick press PAGE/TIME button when finished, the charging begins, the charging icon 📄 is rolling, which means on-charging. If the battery is fully charged or the charging time set is over, the charging is completed.
Caution: Do not attempt to charge non-charging batteries to avoid explosion.
LINE-IN/OUT SOCKET
This socket provides an industry standard, fixed level audio input/output source to safely route the ELITE EXECUTIVE's audio to the line-in socket of a stereo system or recording device, or to play an audio device, such as MP3, through the ELITE EXECUTIVE.
- To route a line-in source into the ELITE EXECUTIVE, turn it off, attach a double 1/8 inch(3.5mm) stereo cord to the ELITE EXECUTIVE's LINE in/out socket and to the output of the other system. Press TZ/LINE IN button and "LINE IN" appears in the LCD, which indicates LINE IN is on. Press this button again to turn it off LINE IN function
- To route the audio output of your ELITE EXECUTIVE to another device, turn it on, plug a 1/8 inch (3.5mm) stereo cord into the ELITE EXECUTIVE's Line in/out socket and into the other device's Line IN socket. Follow your external device's line-in/out instructions.
Note: When a cable is plugged into the Line in/out socket it will have no effect on the internal speaker operation. The internal speaker will still play back audio. Also note that the Line Input is a fixed amplitude output that cannot be controlled using the volume knob.
The ELITE EXECUTIVE's headphone jack use is mutually exclusive with the internal speaker. When headphones are plugged into the headphone jack the internal speaker will be muted. The volume of the signal from the headphone jack can be adjusted using the volume knob.
VOLUME CONTROL
Rotate the volume knob upwards or downwards to get your desired volume.
EXTERNAL ANTENNA SOCKET
The external antenna socket is used to connect the ELITE EXECUTIVE to advanced performance shortwave antennas using a 50 or 75 ohm coaxial cable feed-line when the user listens to FM/SW/AIR band.
Caution: Do not use external antenna in lightning storms to avoid lightning strike.
NEED HELP? CONTACT US.
Etón Corporation
1015 Corporation Way, Palo Alto, CA 94303, USA 1-800-872-2228 (U.S.)
1-800-637-1648 (Canada)
650-903-3866 (worldwide)
M-F, 8:00AM-4:30PM, Pacific Standard Time
https://etoncorp.com/pages/contact-us.
WARNING
- Do not expose this appliance to rain or moisture.
- Do not submerge or expose for extended period to water.
- Protect from high humidity and rain.
- Only operate within specified temperature range (0 °C to 40 °C).
- Unplug or remove batteries immediately if liquid has been spilled or any object has fallen into the apparatus.
- Clean only with a dry cloth. Do not use detergents or chemical solvents as this might damage the finish.
- Do not remove cover [or back].
• Refer servicing to qualified service personnel.
ENVIRONMENT
FC CE
Disposal
According to the European Directive 2002/96/EC all electrical and electronic products must be collected separately by a local collection system.
Please act according to your local rules and do not dispose of your old products with your normal household waste.
Please dispose of all types of batteries per your Government, State or Local rules and/or regulations. If you are unsure, please call the appropriate local authority to find out how to dispose of them safely and help protect the environment.
WARRANTY REGISTRATION
To ensure full warranty coverage or product updates, registration of your product should be completed as soon as possible after purchase or receipt.
Please go to
https://etoncorp.com/pages/contact-us to register your product.
LIMITED WARRANTY
Retain your proof of purchase or the receipt. Limited Warranty information can be viewed at www.etoncorp.com in the Support section.
SERVICE FOR YOUR PRODUCT
To obtain service for your product, we recommend first contacting an Etón service representative at 800-872-2228 US, 800-637-1648 Canada or (650) 903-3866 for problem determination and trouble-shooting. If further service is required, the technical staff will instruct how to proceed based on whether the radio is still under warranty or needs non-warranty service.
WARRANTY
If your product is still in warranty and the Etón service representative determines that warranty service is needed, a return authorization will be issued and instructions for shipment to an authorized warranty repair facility. Do not ship your radio back without obtaining the return authorization number.
NON-WARRANTY
If your product is no longer under warranty and requires service our technical staff will refer you to the nearest repair facility that will be able to best handle the repair.
For service outside of North America, please refer to the distributor information included at time of purchase/receipt.
FAITES CONNAISSANCE AVEC LE ELITE EXECUTIVE
CÔTÉ DROIT CÔTÉ GAUCHE

ARRIÈRE

FONCTIONS DES BOUTONS
Cadran d'accord
https://etoncorp.com/pages/contact-us.
AVERTISSEMENT
SERVICE POUR VOTRE PRODUIT
PARTE TRASERA
https://etoncorp.com/pages/contact-us.
ADVERTENCIA
Corporate Headquarters
1015 Corporation Way
Palo Alto, California 94303 USA
tel +1 650-903-3866
tel +1 800-872-2228
fax +1 650-903-3867
www.etoncorp.com
Designed by E. O. Corporation are assembled in China © Copyright, 2019 Elor Corporation. All rights reserved. ©0320-9


- MEET THE ELITE EXECUTIVE
- Features:
- FRONT
- BUTTON FUNCTIONALITY
- Tuning Dial
- RESET
- SETTING YOUR TIME ZONE
- Time Zone Abbreviation List:
- SETTING THE CLOCK AND WEEKDAY
- SETTING ALARMS
- Setting alarm 1 through 4
- Activating and deactivating the alarms
- USING THE LOCK FEATURE
- RESETTING THE RADIO
- ACTIVATING THE SLEEP TIMER
- DISPLAY CURRENT SLEEP TIMER SETTING
- TUNING
- Band selection
- Tuning in stations
- Manual Tuning
- Auto Tuning
- Note:
- Auto Tuning Storage (ATS)
- Rotate Tuning
- Direct key in frequency
- STORING STATIONS INTO MEMORY
- ACCESS STORED MEMORIES
- COPY/PASTE MEMORY PAGE
- COPYING AND PASTING ONE MEMORY LOCATION TO ANOTHER
- COPYING AND PASTING AN ENTIRE MEMORY PAGE
- LABELING MEMORY PAGE
- DELETING A SELECTED MEMORY
- 9K/10K AM(MW) STEP SELECTION/FM FREQUENCY RANGE.
- LCD displays:
- FM STEREO/MONO SELECTION
- AM/VHF AIRCRAFT BANDWIDTH SELECTION
- Squelch Selection
- FM/RDS
- USING THE SYNCHRONOUS DETECTOR
- USING DX/LOCAL SWITCH
- DC IN JACK
- CHARGING NI-MH BATTERY IN THE ELITE EXECUTIVE
- To Charge batteries:
- LINE-IN/OUT SOCKET
- VOLUME CONTROL
- EXTERNAL ANTENNA SOCKET
- NEED HELP? CONTACT US.
- WARNING
- ENVIRONMENT
- FC CE
- Disposal
- WARRANTY REGISTRATION
- Please go to
- LIMITED WARRANTY
- SERVICE FOR YOUR PRODUCT
- WARRANTY
- NON-WARRANTY
- FAITES CONNAISSANCE AVEC LE ELITE EXECUTIVE
- FONCTIONS DES BOUTONS
- Cadran d'accord
- AVERTISSEMENT
- SERVICE POUR VOTRE PRODUIT
- ADVERTENCIA
Brand : ETON
Model : Elite Executive
Category : Radio