
CombiWave 10034025 - Microwaves Klarstein - Free user manual and instructions
Find the device manual for free CombiWave 10034025 Klarstein in PDF.


| Product type | Combination microwave (grill and convection) |
| Brand | Klarstein |
| Model | CombiWave 10034025 |
| Capacity | 25 liters |
| Microwave power | 900 W |
| Grill power | 1000 W |
| Convection power | 1500 W |
| External dimensions (W x H x D) | 49.5 x 29.0 x 40.0 cm |
| Internal dimensions (W x H x D) | 33.0 x 22.0 x 33.0 cm |
| Weight | 15.5 kg |
| Power supply | 230 V / 50 Hz |
| Power consumption | 1450 W |
| Display type | Digital LED |
| Main functions | Microwave, grill, convection, combination, automatic defrost, 8 automatic programs |
| Cavity material | Enameled stainless steel |
| Door opening type | Handle, left hinge |
| Cleaning | Easy-to-clean non-stick coating, removable back wall |
| Safety | Child lock, automatic shut-off when door open |
| Spare parts | Turntable, plastic support, metal grid (accessories included) |
| Repairability | Repairability score: 7.2/10 (parts available on request) |
| General information | Timer function, clock, LED interior light, adjustable audible signal |
Frequently Asked Questions - CombiWave 10034025 Klarstein
User questions about CombiWave 10034025 Klarstein
0 question about this device. Answer the ones you know or ask your own.
Ask a new question about this device
Download the instructions for your Microwaves in PDF format for free! Find your manual CombiWave 10034025 - Klarstein and take your electronic device back in hand. On this page are published all the documents necessary for the use of your device. CombiWave 10034025 by Klarstein.
USER MANUAL CombiWave 10034025 Klarstein
INHALTSVERZEICHNIS
Technische Daten 3
natural_image
Symbol of a trash bin crossed with a diagonal line, no text or labels presentCongratulations on purchasing this equipment. Please read this manual carefully and take care of the following hints to avoid damages. Any failure caused by ignoring the items and cautions mentioned in the instruction manual is not covered by our warranty and any liability. Scan the QR code to get access to the latest user manual and other information about the product.

CONTENT
Safety Instructions 20
Notes on the Cooking Utensils 22
Cooking Tips 23
Product Overview 24
Control Panel and Key Functions 25
Operation 26
Cleaning and Care 31
Troubleshooting 32
Hints on Disposal 33
Declaration of Conformity 33
TECHNICAL DATA
| Item number | 10034025 |
| Power supply | 220-240 V ~ 50/60 Hz |
| Microwave power | 1500 W |
| Grill power | 1300 W |
| Capacity | 43 L |
| Weight | 18.3 kg |
| Dimensions (oven cavity) H x W x D | 250 mm × 400 mm × 432 mm |
SAFETY INSTRUCTIONS
Read all the safety and operating instructions carefully and retain them for future reference. Make sure the voltage in your living area corresponding to the one shown on the rating label of the appliance. And the wall socket is properly grounded.
To reduce the risk of fire in the oven cavity:
- Do not overcook the food.
- Remove wire twist ties from paper or plastic bags before placing bags in the oven.
- Do not heat oil or fat for deep drying as the temperature of oil cannot be controlled.
- After use wipe the waveguide cover with a damp cloth, followed by dry cloth to remove any food splashes and grease.
• Built up grease may overheat and begin to cause smoke or catch fire. - If materials inside the oven should smoke or ignite, keep oven door closed, turn oven off and disconnect the power supply.
- When heating food in plastic or paper containers, keep an eye on the oven due to the possibility of ignition.
To reduce the risk of explosion and sudden boiling:
- Liquids and other foods must not be heated in sealed container since they are liable to explode; Baby bottles fitted with a screw cap or teat are considered to be sealed containers.
- Use the wide mouthed container to cook liquid, and the cooked liquid should not be removed out immediately. Several moments should be waited before removing. In order to avoid possible hazards caused by delayed eruptive boiling of liquids.
- Potatoes, sausage and chestnut should be peeled or pierced before cooking. Eggs in their shell, whole hard boiled eggs should not be heated in microwave ovens since they may explode, even after microwave heating has ended.
- The contents of feeding bottles and baby food jars are to be stirred or shaken and the temperature is to be checked before consumption, in order to avoid burns.
- If the supply cord is damaged, it must be replaced by the manufacturer or its service agent or a qualified technician in order to avoid a shock hazard.
- After cooking, the container is very hot. Using gloves to take out the food and avoid steam burns by directing steam away from the face and hands.
- Slowly lift the furthest edge of dishes cover and microwave plastic wrap and carefully open popcorn and oven cooking bags away from the face.
To prevent the turntable from breaking:
- Let the turntable cool down before cleaning.
- Do not place hot foods or utensils on the cold turntable.
- Do not place frozen foods or utensils on the hot turntable.
General Instructions
• Make sure that the cookware does not touch the walls of the microwave.
- Only use containers that are suitable for microwave ovens.
- Do not store food or other items in the microwave.
- Do not use the microwave without contents, otherwise it may be damaged.
- If you use the microwave, do not leave it unattended in the presence of children.
- Only use accessories specified by the manufacturer.
- Only use the microwave indoors.
- If the door or seals are damaged, do not continue to use the microwave, have it repaired by a specialist company.
- Do not attempt to repair the appliance yourself. Repairs may only be carried out by trained specialists.
- If smoke is generated, pull the plug and keep the microwave door closed to prevent possible flames.
- Heating liquids may result in sudden boiling. Be careful when removing the container.
- Do not use abrasives or metal scrapers to clean the door to avoid scratching or shattering the glass.
- Do not use the unit with an external timer or remote-controlled power outlet.
- The unit is not intended for commercial use, but only for household and similar environments.
- The appliance is designed to heat food and beverages. Heating clothes, slippers, heat pads, and sponges may cause injury, fire, or fire.
- This device may be only used by children 8 years old or older and persons with limited physical, sensory and mental capabilities and / or lack of experience and knowledge, provided that they have been instructed in use of the device by a responsible person who understands the associated risks.
- Do not use a steam jet for cleaning. - Do not touch any parts of the appliance, door or heating elements inside during operation, they can become very hot.
NOTES ON THE COOKING UTENSILS
It is strongly recommended to use the containers which are suitable and safe for microwave cooking. Generally speaking, the containers which are made of heat-resistant ceramic, glass or plastic are suitable for microwave cooking. Never use the metal containers for microwave cooking and combination cooking as spark is likely to occur. You can take the reference of below table.
| Material Micro Grill Combi Notes | ||||
| Heat-resistant ceramic | Yes Yes | Yes Never use | the ceramics | which are decorated with metal rim or glazed |
| Heat-resistant plastic | Yes No | No Can not be used for long time microwave cooking | ||
| Heat-resistant glass | Yes Yes Yes | |||
| Plastic film Yes No | No It should | not be used when | cooking meat or chops as the over-temperature may do damage to the film | |
| Grill rack No Yes Yes | ||||
| Metal container No | No No It should not be used | in microwave oven.Microwave can not penetrate through metal. | ||
| Iacquer No No No | Poor heat-resistant. Can | not be used for High-temperature cooking | ||
| Bamboo wood and paper | No No | No Poor heat-resistant. Can | not be used for High-temperature cooking | |
COOKING TIPS
The following factors may affect the cooking result:
Food arrangement
Place thicker areas towards outside of dish, the thinner part towards the centre and spread it evenly. Do not overlap if possible.
Cooking time length
Start cooking with a short time setting, evaluate it after it times out and extend it according to the actual need. Over cooking may result in smoke and burns.
Cooking food evenly
Food such as chicken, hamburger or steak should be turned once during cooking. Depending on the type of food, if applicable, stir it from outside to centre of dish once or twice during cooking
Allow standing time
After cooking times out, leave the food in the oven for an adequate length of time, this allows it to complete its cooking cycle and cooling it down in a gradual manner.
Whether the food is done
Color and hardness of food help to determine if it is done, these include: Steam coming out from all parts of food, not just the edge, Joints of poultry can be moved easily, Pork or poultry shows no signs of blood and Fish is opaque and can be sliced easily with a fork.
Microwave safe plastic wrap
When cooking food with high fat content, do not allow the plastic wrap come into contact with food as it may melt
Microwave safe plastic cookware
Some microwave safe plastic cookware might not be suitable for cooking foods with high fat and sugar content. Also, the preheating time specified in the dish instruction manual must not be exceeded.
PRODUCT OVERVIEW
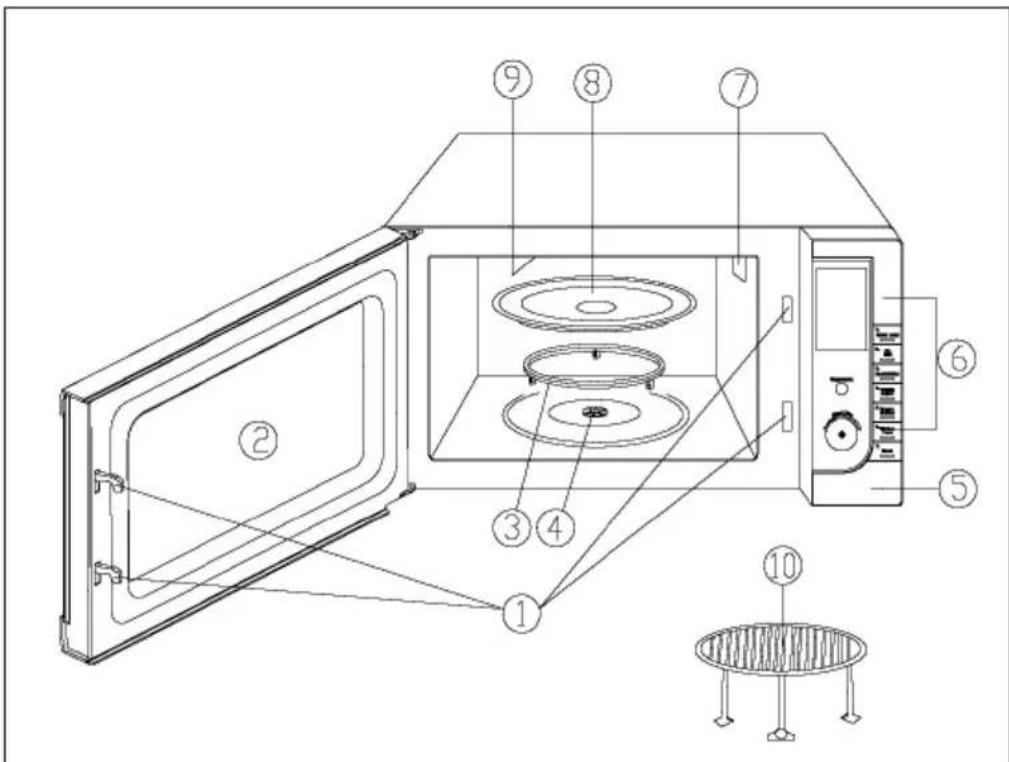
| 1 | Door lock | 6 | Control panel |
| 2 | Inspection windows | 7 | Wave guide |
| 3 | Roll ring | 8 | Glass tray |
| 4 | Wave | 9 | Grill heater |
| 5 | Door opener | 10 | Metal rack |
CONTROL PANEL AND KEY FUNCTIONS
| Menu action screen Cooking | g time, power, action indicators, and clock time are displayed. |
| POWER LEVEL Touch this button to set microwave cooking power level. | |
| GRILL Press this button to set a grill-cooking program up to 60 minutes. | |
| COMBINATION Cooking with combined microwave and grill power. | |
| WEIGHT ADJUST After choosing an auto-cooking menu, use it to specify food weights or number of servings. | |
| WEIGHT DEFROST Touch to defrost food based on the weight you entered. | |
| KITCHEN TIMER Touch to set the timer feature. | |
| CLOCK Touch this button to start setting the oven clock and ending by touching it again. | |
| STOP/CANCEL Press to cancel setting or reset the oven before setting a cooking program. Press once to temporarily stop cooking, or twice to cancel cooking altogether. It is also used for setting child lock. | |
| MENU/TIME Turn the dial to set the oven clock time and input cooking time. Turn the TIME/MENU dial to select an auto-cooking menu including auto defrost. | |
| START/ QUICKSTART Touch to start a cooking program. Simply touch it a number of times to set cooking time and cook immediately at full power level. |
OPERATION
Note: Each time a button is touched, a beep will sound to acknowledge the touch.
Time setting
When the unit is first plugged in, the screen displays "01:00" in 12-hour or 24-hour format, depending on the setting. During microwave operation, press the CLOCK button to display the current time.
Example: Setting the time to 08:30
- Press the STOP/CANCEL button.
- Press and hold the CLOCK button for three seconds. "Hr 24" is displayed on the screen. If you press the button again, you can select "Hr 12".
- Turn the MENU/TIME knob to set 8 o'clock.
- Press the CLOCK button.
- Turn the MENU/TIME knob to set 30 minutes.
- Press the CLOCK button to confirm your setting.
Microwave function
With the microwave function, the maximum preparation time is 60 minutes. You can adjust the power by pressing the POWER LEVEL button.
| Display Cooking Power | |
| once | P-HI 100 % |
| twice | P-90 90 % |
| 3 times | P-80 80 % |
| 4 times | P-70 70 % |
| 5 times | P-600 60 % |
| 6 times | P-50 50 % |
| 7 times | P-40 40 % |
| 8 times | P-30 30 % |
| 9 times | P-20 20 % |
| 10 times | P-10 10 % |
| 11 times | P-00 0 |
Example: You want to prepare food for 5 minutes with a capacity of 60%.
- Press the STOP/CANCEL button.
- Press the POWER LEVEL button five times to adjust the power 60 %.
- Turn the TIMER/MENU button to "05:00".
- Press the START/QUICK START button.
Note: You can display the currently set power by pressing the POWER LEVEL button during microwave operation.
Grill function
The maximum preparation time when using the grill function is 60 minutes. The grill function is particularly suitable for thin pieces of meat, steaks, chops, kebab meat, sausages and chicken pieces. The function is also suitable for warming up sandwiches or gratins.
Example: The grill function should be used for 12 minutes:
- Press the STOP/CANCEL button.
- Press the GRILL button.
- Turn the TIME/MENU knob to "12:00".
- Press the START/QUICK START button.
COMBINATION 1
The maximum preparation time is 60 minutes.
30 % of the time with microwave function and 70 % of the time with grill function. Use "Combination 1" to heat fish or gratin.
Example: You want to use "Combination 1" for 25 minutes.
- Press the STOP/CANCEL button.
- Press the COMBINATION button once.
- Turn the TIME/MENU knob clockwise to "25:00".
- Press the START/QUICKSTART button.
COMBINATION 2
The maximum preparation time is 60 minutes.
55 % of the time with microwave function and 45 % of the time with grill function. Use "Combination 1" to heat omelettes, baked potatoes and poultry.
Example: You want to use Combination "2" for 12 minutes.
- Press the STOP/CANCEL button.
- Press the COMBINATION button twice.
3 Turn the TIME/MENU knob clockwise to "12:00". - Press the START/QUICKSTART button.
WEIGHT DEFROST
The microwave can be used to defrost meat, poultry and seafood. Defrost time and power level can be set for each food category by weight. Frozen foods range from 100 g to 1800 g. The oven pauses during defrosting and beeps to remind the user that the food should be turned to achieve a better defrosting effect. After turning the food, press the START/QUICKSTART button to continue the defrosting process.
Example: You want to defrost 600 g shrimps.
- Press the STOP/CANCEL button.
- Press the WEIGHT DEFROST button.
- Press the WEIGHT ADJUST button and set 600 g.
- Press the START/QUICK START button.
QUICK START
- In the Quick Start programs, the device runs at 100 % power. The maximum preparation time is 10 minutes.
- In standby mode, press the START/ QUICK START button to set the preparation time. The appliance starts automatically at full power.
- You can extend the preparation time during operation of the appliance by pressing the START/QUICK START button.
KITCHEN TIMER
If you want to use the timer function to set the end of preparation or something else, proceed as follows:
- Press the KITCHEN TIMER button in the Preparation or Standby mode.
- Set the desired time by turning the TIME/MENU knob.
- Press the START/ QUICK START button.
Notes:
- The longest countdown time is 60 minutes. Once the time has elapsed, the unit will beep.
- The countdown is displayed before the display changes to the time or preparation time. To display the countdown time, press the KITCHEN TIMER button.
- Press the KITCHEN TIMER button and press the STOP/CANCEL button to cancel the timer function.
Multi-stage cooking
The microwave can be set for up to 3 automatic cooking sequences.
Example: You want to set the following sequence: Microwave function > Grill function
- Set a microwave function program.
- Set a grill function program.
- Press the START/QUICK START button.
Note: The Quick Start, Weight Defrost and Auto Cook functions cannot be set for multi-stage cooking. The corresponding indicator lights (1S, 2S, 3S) will illuminate to indicate the level the microwave is currently in. After the first level is completed, the unit beeps to indicate that the next level is about to begin.
Automatic cooking menu
For the following foods or preparation methods, you do not need to set the performance and preparation time separately. It is sufficient to select the food you wish to prepare and its weight.
Example: Preparation of 400 g fresh vegetables
- Press the STOP/CANCEL button.
- Turn the TIME/MENU knob counterclockwise to the symbol of the corresponding foodstuff.
- Press the WEIGHT ADJUST button to adjust the weight or number of portions.
- Press the START/ QUICK START button.
Notes:
- The result of automatic cooking depends on factors such as the shape and size of the food, your personal preferences for frying and how the food has been placed in the microwave. If you are not satisfied with the result, adjust the preparation time slightly.
• For popcorn, only one level can be selected. - For coffee and potatoes only the portion size and not the weight can be selected.
- For grilled chicken and steaks, the microwave stops during preparation and beeps. This is to remind you to turn the food over. After turning, press the START/QUICK START button to continue the preparation.
Parental lock
Using the child safety lock prevents small children from operating the microwave. When the parental control is active, the icon will light up on the screen. The unit cannot be operated while the Parental Lock is active.
Activating the Parental Lock
In standby mode, press and hold the STOP/CANCEL button for three seconds. A beep sounds and the parental control is displayed on the screen.
Deactivating the Parental Lock
Press and hold the STOP/CANCEL button for three seconds. The on-screen display disappears.
CLEANING AND CARE
- The oven should be cleaned regularly and any food deposits removed.
- Remove the power cord from the wall outlet before cleaning. Don't immerse the appliance in water or other fluids when cleaning.
- Failure to maintain the oven in a clean condition could lead to deterioration of the surface that could adversely affect the life of the appliance and possibly result in a hazardous situation
- Never use hard detergent, gasoline, abrasive powder or metal brush to clean any part of the appliance
- Do not remove the waveguide cover
How get rid of strange odors
When the microwave oven has been used for a long time, there may be some strange odors exist in oven. Following 3 methods can get rid of them:
1 Place several lemon slices in a cup, then heat with high Micro Power for 2-3 min.
2 Place a cup of red tea in oven, then heat with high micro power.
3 Put some orange peel into oven, and then heat them with high Micro Power for 1 minute.
Tips for Cleaning
| Exterior | Wipe the enclosure with a dampened soft cloth |
| Door | Using a dampened soft cloth, wipe clean the door and window Wipe the door seals and adjacent parts to remove any spill or spatter. |
| Control panel | Wipe the control panel with a slightly dampened soft cloth. |
| Interior walls | Wipe clean the cavity with a dampened soft cloth. Wipe clean the waveguide cover to remove any food splashed |
| Turntable, rotation ring and rotation axis | Wash with mild soap water. Rinse with clean water and allow drying thoroughly. |
TROUBLESHOOTING
Please check the following before contacting our customer service:
Place a cup of water (150 ml) in the microwave and close the door. Once the door is securely closed, the interior lights will go out. Turn on the microwave and let it run for one minute.
- Is the oven light on?
- Is the cooling fan running? To check, hold your hand to the ventilation slots on the back.
- Is the glass plate turning? The plate can rotate both clockwise and counterclockwise.
• Is the water hot after one minute?
If you answer any of these questions NO, check the socket and fuse in the fuse box. If the socket and fuse are OK, contact our customer service or a specialist company.
HINTS ON DISPOSAL
natural_image
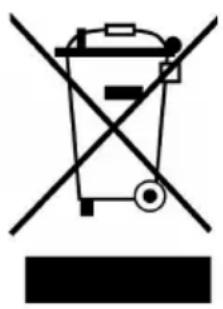
Symbol of a trash bin crossed with a diagonal line, no text or labels presentAccording to the European waste regulation 2012/19/EU this symbol on the product or on its packaging indicates that this product may not be treated as household waste. Instead it should be taken to the appropriate collection point for the recycling of electrical and electronic equipment. By ensuring this product is disposed of correctly, you will help prevent potential negative consequences for the environment and human health, which could otherwise be caused by inappropriate waste handling of this product. For more detailed information about recycling of this product, please contact your local council or your household waste disposal service.
DECLARATION OF CONFORMITY
CE
Producer:
Chal-Tec GmbH, Wallstraße 16, 10179 Berlin, Germany.
This product is conform to the following European Directives:
2014/30/EU (EMC)
2014/35/EU (LVD)
2011/65/EU (RoHS)
2009/125/EC (ErP)
Chère cliente, cher client,
SOMMAIRE
Fiche technique 35
natural_image
Symbol of a trash bin crossed with a diagonal line, no text or labels presentDÉCLARATION DE CONFORMITÉ
CE
Fabricant :
Chal-Tec GmbH, Wallstraße 16, 10179 Berlin, Allemagne.
ÍNDICE
Datos técnicos 51
natural_image
Symbol of a trash bin crossed with a diagonal line, no text or labels presentINDICE
Dati tecnici 67
natural_image
Symbol of a trash bin crossed with a diagonal line, no text or labels present- INHALTSVERZEICHNIS
- CONTENT
- SAFETY INSTRUCTIONS
- To reduce the risk of fire in the oven cavity:
- To reduce the risk of explosion and sudden boiling:
- To prevent the turntable from breaking:
- General Instructions
- NOTES ON THE COOKING UTENSILS
- COOKING TIPS
- Food arrangement
- Cooking time length
- Cooking food evenly
- Allow standing time
- Whether the food is done
- Microwave safe plastic wrap
- Microwave safe plastic cookware
- PRODUCT OVERVIEW
- CONTROL PANEL AND KEY FUNCTIONS
- OPERATION
- Time setting
- Microwave function
- Grill function
- COMBINATION 1
- COMBINATION 2
- WEIGHT DEFROST
- QUICK START
- KITCHEN TIMER
- Notes:
- Multi-stage cooking
- Automatic cooking menu
- Parental lock
- Activating the Parental Lock
- Deactivating the Parental Lock
- CLEANING AND CARE
- How get rid of strange odors
- TROUBLESHOOTING
- Please check the following before contacting our customer service:
- HINTS ON DISPOSAL
- DECLARATION OF CONFORMITY
- Producer:
- SOMMAIRE
- DÉCLARATION DE CONFORMITÉ
- CE
- Fabricant :
- ÍNDICE
- INDICE
Brand : Klarstein
Model : CombiWave 10034025
Category : Microwaves