
MaxiWave 10034015 - Microwaves Klarstein - Free user manual and instructions
Find the device manual for free MaxiWave 10034015 Klarstein in PDF.


| Product type | Microwave |
| Brand | Klarstein |
| Model | MaxiWave 10034015 |
| External dimensions (W×H×D) | 628 × 359 × 491 mm |
| Internal dimensions (W×H×D) | 468 × 294 × 474 mm |
| Capacity | 60 liters |
| Net weight | 16.8 kg |
| Power supply | 230-240 V~ 50/60 Hz |
| Power | 1500 W |
| Microwave frequency | 2450 MHz |
| Cooking type | Glass turntable |
| Defrost function | Yes, by weight (max 2.2 kg) and by time |
| Auto cooking | Yes (butter, cheese, pizza, ice cream, popcorn, vegetables, etc.) |
| Keep warm | Yes |
| Timer | Yes, up to 95 minutes |
| Quick cook | Yes (+30 sec button) |
| Child lock | Yes |
| Control panel | Touch buttons and knob |
| Display | LED |
| Cleaning | Removable glass turntable, dishwasher safe; interior with damp cloth |
| Safety | Door lock, automatic shut-off, overheat protection |
| Spare parts | Available via customer service |
| General information | Household use, compliant with EU directives |
Frequently Asked Questions - MaxiWave 10034015 Klarstein
User questions about MaxiWave 10034015 Klarstein
0 question about this device. Answer the ones you know or ask your own.
Ask a new question about this device
Download the instructions for your Microwaves in PDF format for free! Find your manual MaxiWave 10034015 - Klarstein and take your electronic device back in hand. On this page are published all the documents necessary for the use of your device. MaxiWave 10034015 by Klarstein.
USER MANUAL MaxiWave 10034015 Klarstein
INHALT
Technische Daten 3
natural_image
Symbol of a trash bin with no text or labels, featuring a crossed-out wheel and a solid rectangle below (no readable text or symbols)Congratulations on purchasing this equipment. Please read this manual carefully and take care of the following hints to avoid damages. Any failure caused by ignoring the items and cautions mentioned in the instruction manual are not covered by our warranty and any liability. Scan the QR code to get access to the latest user manual and other information about the product.
CONTENTS
Technical Data 19
Safety Instructions 20
Installation 23
Product Description 24
Control Panel 25
Getting started and operation 26
Multiple cooking 29
Auto Cook 31
Utensils Guide 32
Cleaning and Care 33
Disposal Considerations 34
TECHNICAL DATA
| Item number 10034015 | |
| Power supply 230-240 V~ 50/60 Hz | |
| Power rating 1500 W | |
| Operation frequency 2450MHz | |
| Outside dimensions (HxWxD) 359 mm | x 628 mm x 491mm |
| Oven cavity dimensions (HxWxD) 294 | mm x 468 mm x 474 mm |
| Oven capacity 60 litres | |
| Cooking uniformity Turntable system | |
| Weight 16.8 kg |
SAFETY INSTRUCTIONS
Read all the safety and operating instructions carefully and retain them for future reference. Make sure the voltage in your living area corresponding to the one shown on the rating label of the appliance. And the wall socket is properly grounded.
To reduce the risk of fire in the oven cavity:
- Do not overcook the food.
- Remove wire twist ties from paper or plastic bags before placing bags in the oven.
- Do not heat oil or fat for deep drying as the temperature of oil cannot be controlled.
- After use wipe the waveguide cover with a damp cloth, followed by dry cloth to remove any food splashes and grease.
• Built up grease may overheat and begin to cause smoke or catch fire. - If materials inside the oven should smoke or ignite, keep oven door closed, turn oven off and disconnect the power supply.
- When heating food in plastic or paper containers, keep an eye on the oven due to the possibility of ignition.
To reduce the risk of explosion and sudden boiling:
- Liquids and other foods must not be heated in sealed container since they are liable to explode; Baby bottles fitted with a screw cap or teat are considered to be sealed containers.
- Use the wide mouthed container to cook liquid, and the cooked liquid should not be removed out immediately. Several moments should be waited before removing. In order to avoid possible hazards caused by delayed eruptive boiling of liquids.
- Potatoes, sausage and chestnut should be peeled or pierced before cooking. Eggs in their shell, whole hard boiled eggs should not be heated in microwave ovens since they may explode, even after microwave heating has ended.
- The contents of feeding bottles and baby food jars are to be stirred or shaken and the temperature is to be checked before consumption, in order to avoid burns.
- If the supply cord is damaged, it must be replaced by the manufacturer or its service agent or a qualified technician in order to avoid a shock hazard.
- After cooking, the container is very hot. Using gloves to take out the food and avoid steam burns by directing steam away from the face and hands.
- Slowly lift the furthest edge of dishes cover and microwave plastic wrap and carefully open popcorn and oven cooking bags away from the face.
To prevent the turntable from breaking:
- Let the turntable cool down before cleaning.
- Do not place hot foods or utensils on the cold turntable.
- Do not place frozen foods or utensils on the hot turntable.
General Instructions
• Make sure that the cookware does not touch the walls of the microwave.
- Only use containers that are suitable for microwave ovens.
- Do not store food or other items in the microwave.
- Do not use the microwave without contents, otherwise it may be damaged.
- If you use the microwave, do not leave it unattended in the presence of children.
- Only use accessories specified by the manufacturer.
- Only use the microwave indoors.
- If the door or seals are damaged, do not continue to use the microwave, have it repaired by a specialist company.
- Do not attempt to repair the appliance yourself. Repairs may only be carried out by trained specialists.
- If smoke is generated, pull the plug and keep the microwave door closed to prevent possible flames.
- Heating liquids may result in sudden boiling. Be careful when removing the container.
- Do not use abrasives or metal scrapers to clean the door to avoid scratching or shattering the glass.
- Do not use the unit with an external timer or remote-controlled power outlet.
- The unit is not intended for commercial use, but only for household and similar environments.
- The appliance is designed to heat food and beverages. Heating clothes, slippers, heat pads, and sponges may cause injury, fire, or fire.
- This device may be only used by children 8 years old or older and persons with limited physical, sensory and mental capabilities and / or lack of experience and knowledge, provided that they have been instructed in use of the device by a responsible person who understands the associated risks.
- Do not use a steam jet for cleaning. - Do not touch any parts of the appliance, door or heating elements inside during operation, they can become very hot.
PRECAUTIONS TO AVOID POSSIBLE EXPOSURE TO EXCESSIVE MICROWAVE ENERGY
-
Do not attempt to operate this oven with the door open since open door operation can result in harmful exposure to microwave energy. It is important not to defeat or tamper with the safety interlocks.
-
Do not place any object between the oven front face and the door or allow soil or cleaner residue to accumulate on sealing surfaces.
-
Do not operate the oven if it is damaged. It is particularly important that the oven door close properly and that there is no damage to the a. Door (bent),
b. Hinges and latches (broken or loosened),
c. Door seals and sealing surfaces.
- The oven should not be adjusted or repaired by anyone except properly qualified service personnel.
INSTALLATION
• Make sure that all the packing materials are removed from the inside of the door.
- WARNING: Check the oven for any damage, such as misaligned or bent door, damaged door seals and sealing surface, broken or loose door hinges and latches and dents inside the cavity or on the door. If there is any damage, do not operate the oven and contact qualified service personnel.
- This microwave oven must be placed on a flat, stable surface to hold its weight and the heaviest food likely to be cooked in the oven.
- Do not place the oven where heat, moisture, or high humidity are generated, or near combustible materials.
- For correct operation, the oven must have sufficient airflow. Allow 20cm of space above the oven, 10cm at back and 5cm at both sides. Do not cover or block any openings on the appliance. Do not remove feet.
- Do not operate the oven without glass tray, roller support, and shaft in their proper positions.
- Make sure that the power supply cord is undamaged and does not run under the oven or over any hot or sharp surface.
- The socket must be readily accessible so that it can be easily unplugged in an emergency.
• Do not use the oven outdoors.
Radio interference
Operation of the microwave oven can cause interference to your radio, TV, or similar equipment. When there is interference, it may be reduced or eliminated by taking the following measures:
- Clean door and sealing surface of the oven.
- Reorient the receiving antenna of radio or television.
- Relocate the microwave oven with respect to the receiver.
- Move the microwave oven away from the receiver.
- Plug the microwave oven into a different outlet so that microwave oven and receiver are on different branch circuits.
PRODUCT DESCRIPTION
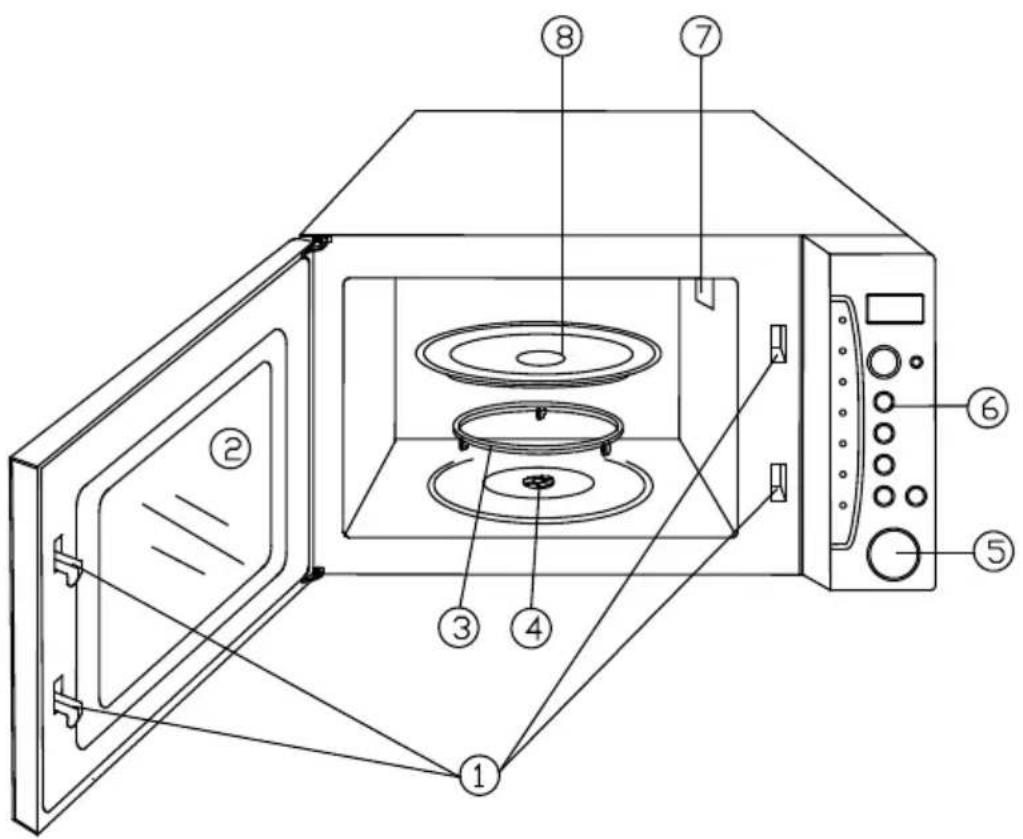
1 Door Safety Lock System
2 Oven Window
3 Roller Ring
4 Shaft
5 Door Release Button
6 Control Panel
7 Wave Guide
8 Glass Tray
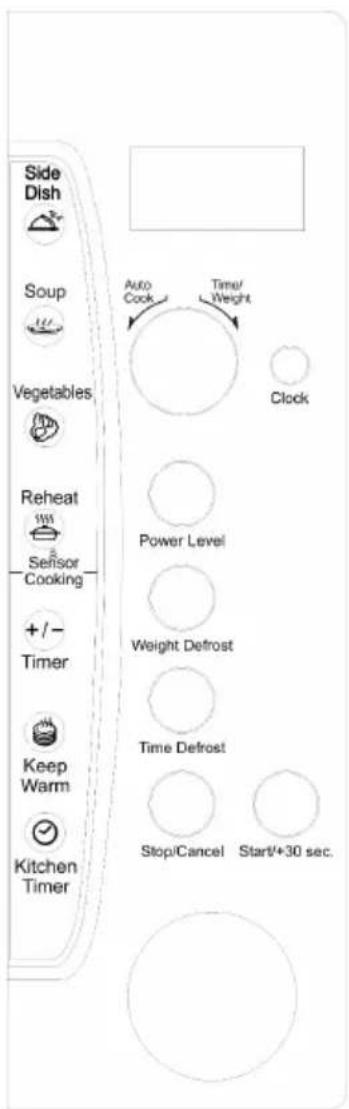
| DISPLAY | Cooking time, power, indicators and clock time are displayed. |
| POWER LEVEL Use to set microwave power levels. | |
| CLOCK Touch to set CLOCK function. | |
| KITCHEM TIMER Touch to set timer function. | |
| KEEP WARM | Touch to set keep warm program.Touch to stop the oven or reset the oven before setting a program. Touch to set the child lock. |
| STOP/CANCEL | Touch to stop the oven or reset the oven before setting a program.Touch to set the child lock. |
| WEIGHT DEFROST Use to set weight defrost program. | |
| TIME DEFROST | Touch to set defrost program base on the time |
| START/+30SEC | Touch to start the oven; also use to add cooking time during cooking process and use to set the express cooking. |
| TIMER +/- | Use to change cooking time during cooking process |
| AUTO COOK/TIME/WEIGHT DIAL | Use to choose auto menu code; also use to select time or weight. |
GETTING STARTED AND OPERATION
Microwave cooking principles
- Arrange food carefully. Place thickest areas towards outside of dish.
- Watch cooking time. Cook for the shortest amount of time indicated and add more as needed. Food severely overcooked can smoke or ignite.
- Cover foods while cooking. Covers prevent spattering and help foods to cook evenly.
- Turn foods over once during microwave cooking to speed cooking of such foods as chicken and hamburgers. Large items like roasts must be turned over at least once.
- Rearrange foods such as meatballs halfway through cooking both from top to bottom and from the center of the dish to the outside.
Operation
- When the display first plugged in, beep will sound and the display will show "1:01".
- During the setting mode, the system will return to waiting mode if there is not any operation within 25 seconds.
- During cooking, if press STOP/CANCEL pad once or open the door, the program will be paused, then press START/+30SEC pad to resume, but if press STOP/CANCEL pad twice, the program will be canceled.
- After ending cooking, the system will sound beeps to remind user every two minutes until user press STOP/CANCEL pad or open the door.
- The controlling system of the microwave oven has the feature of cooling. As for any cooking mode which cooking time above 2 minutes, the oven door is opened or the cooking program is paused, the oven fan will work about 30 seconds automatically to cool the oven for prolonging the life of the oven.
Setting the clock
This is a clock in 12 or 24 hour cycle. You can choose it by touching CLOCK pad.
Suppose you want to enter 8:08.
- In standby mode, touch CLOCK pad once, "Hr12" is displayed. If you want to set the clock in 24-hour cycle, touch CLOCK again, "Hr24" will be displayed.
- Turn AUTO COOK/TIME/WEIGHT dial to indicate the hour digit.
- Press CLOCK button once.
- Turn AUTO COOK/TIME/WEIGHT dial to indicate the minute digits.
- Press START/+30SEC to confirm the setting.
NOTE: During cooking, you can press CLOCK pad to check the current clock time.
Microwave cooking
For microwave cooking, just press POWER LEVEL pad a number of times to choose a cooking power level and then turn the AUTO COOK/TIME/WEIGHT dial to enter cooking time. The longest cooking time is 95 minutes. The oven will start cooking after user press START/+30SEC pad.
Select power level by pressing the POWER LEVEL button.
| PressPOWER LEVEL button | Cooking power Display | |
| 1x 100% P100 | ||
| 2x 90% P-90 | ||
| 3x 80% P-80 | ||
| ... ... ... | ||
| 9x 20% P-20 | ||
| 10x 10% P-10 |
Suppose you want to cook for 5 minutes at 60%:
- Touch POWER LEVEL pad a number of times to select the power level.
- Turn AUTO COOK/TIME/WEIGHT dial to enter 5 minutes
- Press START/+30SEC pad to start.
NOTE: During cooking you can check the cooking power level by touching POWER LEVEL pad. If you want to cook at full power level, omit the first step. You can add cooking time by touching START/+30SEC pad during cooking process,
Express cook
In standby mode, press START/+30SEC pads to enter cooking time, and the oven will start automatically at 100% high power level. During cooking, you can add the cooking time by pressing START/+30SEC pad. The longest cooking time is 95 minutes.
Adjust the cooking time
During cooking process (except the auto cook), you may press TIMER +/- pad once and then turn the AUTO COOK/TIME/WEIGHT dial to extend or shorten the cooking time while the sign COOK is twinkling
KEEP WARM
- In standby mode, press KEEP WARM pads once
- Turn AUTO COOK/TIME/WEIGHT dial to enter desired time.
- Press START/+30SEC pad to confirm.
Setting the timer
- Press KITCHEM TIMER pad.
- Turn AUTO COOK/TIME/WEIGHT dial to enter time. The longest time you can set is 95 minutes.
- Press START/+30SEC pad to confirm.
NOTES
- If you want to cancel the timer, press KITCHEM TIMER pad, during the display showing the time, press STOP/CANCEL pad.
- When the countdown ends, the buzzer will beep to remind you.
- During sensor cooking, the timer program cannot be set and check.
- Once you set the timer in standby mode but do not set the cook program, oven will always display the timer interface.
Time defrost
The longest defrosting time is 95 minutes
- Touch TIME DEFROST pad once.
- Enter desired defrosting time by turning AUTO COOK/TIME/WEIGHT dial.
- Touch START/+30SEC pad.
NOTE: During defrost, the oven will pause and sound beep to remind user to turn the food over and then press START/+30SEC pad to resume.
Weight defrost
The oven could be used to defrost food on the weight you entered. The defrosting time and power level are automatically set once the weight is programmed.
FOR EXAMPLE: Suppose you want to defrost food.
- Press WEIGHT DEFROST pad once.
- Enter weight by turning AUTO COOK/TIME/WEIGHT dial. The maximum weight is 5 lb 16 oz.
- Press START/+30SEC pad.
NOTE: During defrosting process, the system will pause to remind user to turn food over, after that, press START/+30SEC to resume.
MULTIPLE COOKING
The microwave oven can set 3 period of microwave cooking program
Suppose you want set the following cooking program:
Paragraph 1: Microwave and power level cooking (2 minutes at 100% power level);
Paragraph 2: Microwave and power level cooking (5 minutes at 60% power level);
- Press STOP/CANCEL pad to reset the oven.
Paragraph 1:
- Touch POWER LEVEL pad to select "P100" power level.
- Turn AUTO COOK/TIME/WEIGHT dial to enter cooking time "2:00".
Paragraph 2:
- Touch POWER LEVEL pad a number of times to select "P-60" power level.
- Turn AUTO COOK/TIME/WEIGHT dial to enter cooking time "5:00".
- Press START/+30SEC pad to start.
NOTE: Sensor cooks, Weight defrost, Time defrost and Auto cook cannot be set in multiple cooking program.
Child lock
Use to prevent unsupervised operation of the oven by little children. The Child Lock indicator will show on display screen, and the oven cannot be operated while the Child Lock is set.
To set: In standby mode, press and hold the STOP/CANCEL button for 3 seconds, a beep sounds and lock indicator lights.
To cancel: Press and hold the STOP/CANCEL button for 3 seconds until lock indicator light on display turns off.
Failure warning
In the microwave mode, if undetectable feedback signals for five seconds, the system will stop working, and buzzer constantly issued "DE" hint sound and display "E-1". After troubleshooting, press the STOP/CANCEL button, the system back to normal standby mode
Sensor cook
The sensor features detect the increasing humidity released during cooking. The oven automatically adjusts the cooking time to various types and amounts of food.
Suppose you want to cook potatoes:
-
Place the food in the oven and close the door, press desired sensor menu pads once to enter menu code, the oven will start automatically one second later and the display will show "AUTO", "[ ]" and COOK.
-
After cooking for a period of time, the system will detect whether there is error, if there is error, for example, the sensor short circuit or open circuit, the system will stop automatically with the display showing E-0, beeps sound until touch STOP/
CANCEL pad.
-
If there is not error, the system will judge the cooking time according the steam which generated by the food in the oven, the cooking time appears on display and begins counting down. You can adjust the cooking time by touching the TIMER +/- pad once and then turn the AUTO COOK /TIME /WEIGHT dial to change the cook time while the sign COOK is twinkling
-
END will display and beep sound when cook is finished. During cooking, once you open the door or press STOP/CANCEL pad once, oven return to standby. Sensor cooking chart
| Food Category Food | Code Food | |
| Reheat | Sr-1 Beverage | |
| Sr-2 Casserole | ||
| Sr-3 Plate of Food | ||
| Sr-4 Steak | ||
| Vegetables | SE-1 Fresh | |
| SE-2 Frozen | ||
| SE-3 Canned | ||
| Side Dishes | SS-1 Potato | |
| SS-2 Rice | ||
| SS-3 Pasta | ||
| Soup | SOUP Soup |
For example, you want to reheat a plate of food:
Place food into the oven and close the door. Press REHEAT pad 3 times to choose Sr-3, and the oven will auto start cooking.
NOTE: For beverage, there are three numbers of servings you can to choose; the default amount is two cups.
For example, you want to reheat three cups coffee.
-
Press REHEAT pad once, the display shows "Sr-1".
-
Turn the AUTO COOK/TIME/WEIGHT dial to choose three cups. The oven will auto start after you choose.
AUTO COOK
For food or the following cooking mode, it is not necessary to program the duration and the cooking power. It is sufficient to indicate the type of food that you wish to cook as well as the weight of this food.
For example: to cook 1/2 Stick of Butter.
- In waiting mode, place food into oven, and close the door.
- Turn AUTO COOK/TIME/WEIGHT dial anti-clockwise once and then rotate it clockwise until code b1 displays.
- Press START/+30SEC to start.
Auto cook menu
| Food Food Code Weight | ||
| Butter | b1 1/2 stick | |
| b2 1 stick | ||
| b3 2 sticks | ||
| Cheese | C1 3 ounces | |
| C2 6 ounces | ||
| Frozen pizza (4 ounce each) | F1 1 slice | |
| F2 2 slices | ||
| F3 3 slices | ||
| Ice cream | E1 1 pint | |
| E2 1 quart | ||
| Popcorn | P1 1.75 ounces | |
| P2 3.0 ounces | ||
| 3.5 ounces | ||
Note: The result of auto cooking depends on factors such as voltage fluctuation, the shape and size of food, your personal preference as to the doneness of certain foods and even how well you happen to place food in the oven. If you find the result at any rate not quite satisfactory, please adjust the cooking time a little bit accordingly.
UTENSILS GUIDE
-
Microwave cannot penetrate metal. Only use utensils that are suitable for use in microwave ovens. Metallic containers for food and beverages are not allowed during microwave cooking. This requirement is not applicable if the manufacturer specifies size and shape of metallic containers suitable for microwave cooking.
-
Microwave cannot penetrate metal, so metal utensils or dishes with metallic trim should not be used.
-
Do not use recycled paper products when microwave cooking, as they may contain small metal fragments which may cause sparks and/or fires.
-
Round /oval dishes rather than square/oblong ones are recommend, as food in corners tends to overcook.
-
Narrow strips of aluminum foil may be used to prevent overcooking of exposed areas. But be careful don't use too much and keep a distance of 1 inch (2.54cm) between foil and cavity.
The list below is a general guide to help you select the correct utensils
| COOKWARE MICROWAVE | |
| Heat-Resistant Glass Yes | |
| Non Heat-Resistant Glass No | |
| Heat-Resistant Ceramics Yes | |
| Microwave-Safe Plastic Dish Yes | |
| Kitchen Paper Yes | |
| Metal Tray No | |
| Metal Rack No | |
| Aluminum Foil & Foil Containers No |
CLEANING AND CARE
- Turn off the oven and remove the power plug from the wall socket before cleaning.
- Keep the inside of the oven clean. When food splatters or spilled liquids adhere to oven walls, wipe with a damp cloth. Mild detergent may be used if the oven gets very dirty. Avoid the use of spray and other harsh cleaners as they may stain, streak or dull the door surface.
- The outside surfaces should be cleaned with a damp cloth. To prevent damage to the operating parts inside the oven, water should not be allowed to seep into the ventilation openings.
- Wipe the door and window on both sides, the door seals and adjacent parts frequently with a damp cloth to remove any spills or spatters. Do not use abrasive cleaner.
- Do not allow the control panel to become wet. Clean with a soft, damp cloth. When cleaning the control panel, leave oven door open to prevent oven from accidentally turning on.
• A steam cleaner is not be used. - If steam accumulates inside or around the outside of the oven door, wipe with a soft cloth. This may occur when the microwave oven is operated under high humidity condition. And it is normal.
- It is occasionally necessary to remove the glass tray for cleaning. Wash the tray in warm sudsy water or in a dishwasher.
- The roller ring and oven floor should be cleaned regularly to avoid excessive noise. Simply wipe the bottom surface of the oven with mild detergent. The roller ring may be washed in mild sudsy water or dishwasher. When removing the roller ring from cavity floor for cleaning, be sure to replace in the proper position.
- Remove odors from your oven by combining a cup of water with the juice and skin of one lemon in a deep microwaveable bowl, microwave for 5 minutes. Wipe thoroughly and dry with a soft cloth.
- When it becomes necessary to replace the oven light, please consult a dealer to have it replaced.
- The oven should be cleaned regularly and any food deposits removed. Failure to maintain the oven in a clean condition could lead to deterioration of the surface that could adversely affect the life of the appliance and possibly result in a hazardous.
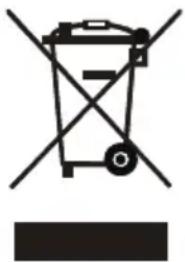
- Please do not dispose this appliance into the domestic rubbish bin; it should be disposed to the particular disposal center provided by the municipalities.
DISPOSAL CONSIDERATIONS
natural_image
Symbol of a trash bin with crossed lines indicating no waste or restriction, and a solid black rectangle below (no text or labels)According to the European waste regulation 2012/19/EU this symbol on the product or on its packaging indicates that this product may not be treated as household waste. Instead it should be taken to the appropriate collection point for the recycling of electrical and electronic equipment. By ensuring this product is disposed of correctly, you will help prevent potential negative consequences for the environment and human health, which could otherwise be caused by inappropriate waste handling of this product. For more detailed information about recycling of this product, please contact your local council or your household waste disposal service.

Declaration of Conformity
Producer: Chal-Tec GmbH, Wallstraße 16, 10179 Berlin, Germany
This product is conform to the following European Directives
2011/65/EU (RoHS)
2014/30/EU (EMC)
2014/35/EU (LVD)
Chère cliente, cher client,
SOMMAIRE
Fiche technique 35
MESURES DESÉCURITÉ POUR NE PAS VOUS EXPOSER À UNE DOSE D'ÉNERGIE EXCESSIVE DE MICRO-ONDES
natural_image
Symbol of a trash bin with crossed lines indicating no waste, and a solid rectangle below (no text or labels)ÍNDICE
Datos técnicos 51
natural_image
Symbol of a trash bin with no text or labels, featuring a crossed-out wheel and a solid rectangle below (no readable text or symbols)INDICE
Dati tecnici 67
MISURE DI SICUREZZA PER EVITARE UNA POSSIBILE ESPOSIZIONE A ECCESSIVA ENERGIA A MICROONDE
natural_image
Symbol of a trash bin with no text or labels, featuring a crossed-out wheel and a rectangular block below (no readable text or symbols)- INHALT
- CONTENTS
- SAFETY INSTRUCTIONS
- To reduce the risk of fire in the oven cavity:
- To reduce the risk of explosion and sudden boiling:
- To prevent the turntable from breaking:
- General Instructions
- PRECAUTIONS TO AVOID POSSIBLE EXPOSURE TO EXCESSIVE MICROWAVE ENERGY
- INSTALLATION
- Radio interference
- PRODUCT DESCRIPTION
- GETTING STARTED AND OPERATION
- Microwave cooking principles
- Operation
- Setting the clock
- Microwave cooking
- Express cook
- Adjust the cooking time
- KEEP WARM
- Setting the timer
- NOTES
- Time defrost
- Weight defrost
- MULTIPLE COOKING
- Paragraph 1:
- Paragraph 2:
- Child lock
- Failure warning
- Sensor cook
- For example, you want to reheat three cups coffee.
- AUTO COOK
- UTENSILS GUIDE
- CLEANING AND CARE
- DISPOSAL CONSIDERATIONS
- Declaration of Conformity
- SOMMAIRE
- MESURES DESÉCURITÉ POUR NE PAS VOUS EXPOSER À UNE DOSE D'ÉNERGIE EXCESSIVE DE MICRO-ONDES
- ÍNDICE
- INDICE
- MISURE DI SICUREZZA PER EVITARE UNA POSSIBILE ESPOSIZIONE A ECCESSIVA ENERGIA A MICROONDE
Brand : Klarstein
Model : MaxiWave 10034015
Category : Microwaves