
246 BIO - Brush cutter HUSQVARNA - Free user manual and instructions
Find the device manual for free 246 BIO HUSQVARNA in PDF.
Download the instructions for your Brush cutter in PDF format for free! Find your manual 246 BIO - HUSQVARNA and take your electronic device back in hand. On this page are published all the documents necessary for the use of your device. 246 BIO by HUSQVARNA.
USER MANUAL 246 BIO HUSQVARNA
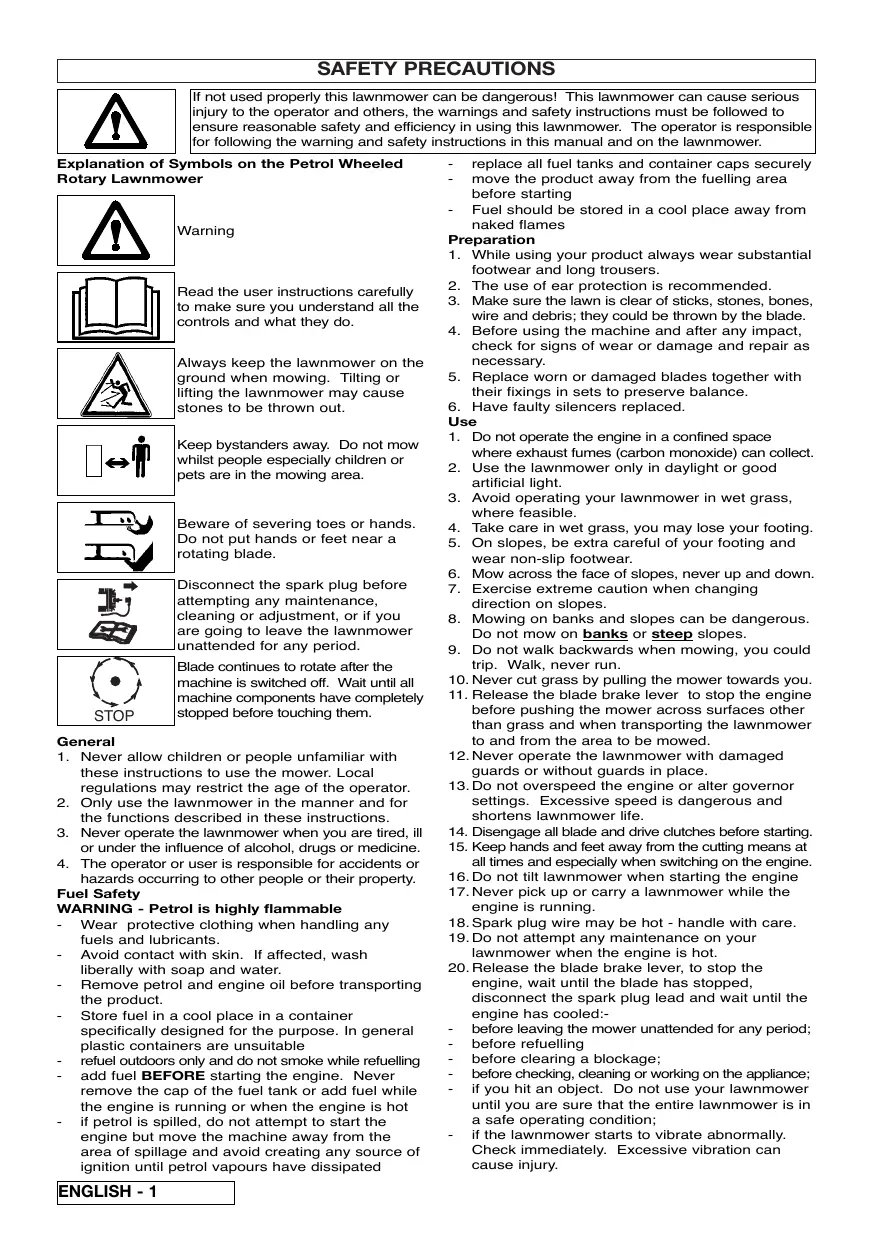
- Sommario Leva del freno motore Manubrio superiore Manubrio inferiore Leva avviamento Instruziono per l’uso Etichetta con dati prodotto Etichetta di pericolo SAFETY PRECAUTIONS If not used properly this lawnmower can be dangerous! This lawnmower can cause serious injury to the operator and others, the warnings and safety instructions must be followed to ensure reasonable safety and efficiency in using this lawnmower. The operator is responsible for following the warning and safety instructions in this manual and on the lawnmower. Explanation of Symbols on the Petrol Wheeled Rotary Lawnmower Warning Read the user instructions carefully to make sure you understand all the controls and what they do. Always keep the lawnmower on the ground when mowing. Tilting or lifting the lawnmower may cause stones to be thrown out. Keep bystanders away. Do not mow whilst people especially children or pets are in the mowing area. Beware of severing toes or hands. Do not put hands or feet near a rotating blade. Disconnect the spark plug before attempting any maintenance, cleaning or adjustment, or if you are going to leave the lawnmower unattended for any period. STOP Blade continues to rotate after the machine is switched off. Wait until all machine components have completely stopped before touching them. General
1. Never allow children or people unfamiliar with
these instructions to use the mower. Local regulations may restrict the age of the operator.
2. Only use the lawnmower in the manner and for
the functions described in these instructions.
3. Never operate the lawnmower when you are tired, ill
or under the influence of alcohol, drugs or medicine.
4. The operator or user is responsible for accidents or
hazards occurring to other people or their property. Fuel Safety WARNING - Petrol is highly flammable - Wear protective clothing when handling any fuels and lubricants. - Avoid contact with skin. If affected, wash liberally with soap and water. - Remove petrol and engine oil before transporting the product. - Store fuel in a cool place in a container specifically designed for the purpose. In general plastic containers are unsuitable - refuel outdoors only and do not smoke while refuelling - add fuel BEFORE starting the engine. Never remove the cap of the fuel tank or add fuel while the engine is running or when the engine is hot - if petrol is spilled, do not attempt to start the engine but move the machine away from the area of spillage and avoid creating any source of ignition until petrol vapours have dissipated ENGLISH - 1
replace all fuel tanks and container caps securely move the product away from the fuelling area before starting - Fuel should be stored in a cool place away from naked flames Preparation
1. While using your product always wear substantial
footwear and long trousers.
2. The use of ear protection is recommended.
3. Make sure the lawn is clear of sticks, stones, bones,
wire and debris; they could be thrown by the blade.
4. Before using the machine and after any impact,
check for signs of wear or damage and repair as necessary.
5. Replace worn or damaged blades together with
their fixings in sets to preserve balance.
6. Have faulty silencers replaced.
1. Do not operate the engine in a confined space
where exhaust fumes (carbon monoxide) can collect.
2. Use the lawnmower only in daylight or good
3. Avoid operating your lawnmower in wet grass,
4. Take care in wet grass, you may lose your footing.
5. On slopes, be extra careful of your footing and
wear non-slip footwear.
6. Mow across the face of slopes, never up and down.
7. Exercise extreme caution when changing
direction on slopes.
8. Mowing on banks and slopes can be dangerous.
Do not mow on banks or steep slopes.
9. Do not walk backwards when mowing, you could
trip. Walk, never run.
10. Never cut grass by pulling the mower towards you.
11. Release the blade brake lever to stop the engine
before pushing the mower across surfaces other than grass and when transporting the lawnmower to and from the area to be mowed.
12. Never operate the lawnmower with damaged
guards or without guards in place.
13. Do not overspeed the engine or alter governor
settings. Excessive speed is dangerous and shortens lawnmower life.
14. Disengage all blade and drive clutches before starting.
15. Keep hands and feet away from the cutting means at
all times and especially when switching on the engine.
16. Do not tilt lawnmower when starting the engine
17. Never pick up or carry a lawnmower while the
18. Spark plug wire may be hot - handle with care.
19. Do not attempt any maintenance on your
lawnmower when the engine is hot.
20. Release the blade brake lever, to stop the
engine, wait until the blade has stopped, disconnect the spark plug lead and wait until the engine has cooled:- before leaving the mower unattended for any period; - before refuelling - before clearing a blockage; - before checking, cleaning or working on the appliance; - if you hit an object. Do not use your lawnmower until you are sure that the entire lawnmower is in a safe operating condition; - if the lawnmower starts to vibrate abnormally. Check immediately. Excessive vibration can cause injury. SAFETY PRECAUTIONS Maintenance and storage
1. Keep all nuts, bolts and screws tight to be sure
the lawnmower is in safe working condition.
2. Replace worn or damaged parts for safety.
3. Only use the replacement blade and blade bolt
specified for this product.
4. Never store the lawnmower with fuel in the tank
inside a building where fumes can reach an open flame or spark.
5. Allow the engine to cool before storing in any
6. To reduce fire hazard, keep the engine, silencer,
battery compartment and fuel storage area free of grass, leaves or excessive grease.
7. If the fuel tank has to be drained, this should be
8. Be careful during adjustment of the machine to
prevent entrapment of the fingers between the blade and fixed parts of the machine. ASSEMBLY INSTRUCTIONS
1. Set the lower handlebar in place. (A)
2. Fit the lower handle ensuring that the formed
ends are located properley in corresponding slots either side of the lawnmower (B).
3. Insert the plastic plugs on both sides. (C)
4. Assemble the upper handle.
Note: washer between wing nut and handle. (D) RECOIL STARTER You must release the brake by pulling the blade brake lever to the handle before pulling out the cord.
1. Disconnect the spark plug lead. (H)
2. Pull the blade brake lever to release the brake on
3. Extend the pull cord fully. (E2)
4. Locate the cord in the pull cord guide positioned
on handle. (E3). Handlebar Stop
- THE 2 HANDLEBAR STOPS MUST BE FITTED BEFORE USE
1. In the packaging you will find 2 stops one marked
-H- and one marked -V-.
2. To lock the handlebar in a fixed position, attach
the stops as shown in the illustration (F).
3. Place -H- on the right side and -V- on the left
1. Fill the engine with oil. A bottle of the correct amount of oil is included with the mower, SAE 30. (G)
ADJUSTING THE CUTTING HEIGHT
1. Remove the spark plug lead before adjusting.
2. Move the axles between the notches to achieve
the desired cutting height. (J1) & (J2) OIL & PETROL Oil
1. Check oil level periodically and after every five
2. Add oil as necessary to keep the level to the
FULL mark on the dipstick.
3. Use a good quality SAE 30 four stroke oil.
4. To fill with oil:a) Remove oil filler cap.
b) Fill to the FULL mark on the dipstick.
5. Change the oil after the first five hours operation
and thereafter every 25 working hours.
6. Always change the oil while the engine is warm but not hot - never attempt any maintenance on
a hot engine. Petrol
1. Use fresh regular grade lead free petrol.
2. Do not fill the fuel tank when the engine is hot.
3. Do not fill the fuel tank while smoking.
4. Do not fill the fuel tank while the engine is
5. To avoid introducing dirt into the fuel system,
wipe all grass and dirt from the petrol filler cap before unscrewing it.
6. It is recommended that you fill the tank through a
funnel with a filter.
7. Wipe away spillages before starting.
1. Place the mower on a flat surface free from grit,
gravel, etc. Fill the tank with unleaded petrol, not mixed with oil. (K)
2. Do not fill with petrol while the engine is running.
Any petrol spillage should be hosed away with water. Take care that water does not enter the engine.
3. Connect the spark plug lead.
1. Starting the cold engine
Push primer bulb firmly 3 times before starting cold engine. (Also, if engine stopped because it ran out of fuel, refuel engine and push primer 3 times).(L)
2. Starting the warm engine
NOTE: Priming is usually unnecessary when restarting a warm engine. However, cool weather may require priming to be repeated.
3. Pull the blade brake lever all the way to the upper
handle before you start the engine. The lever must be held in position to keep the engine running. (M)
4. Releasing the blade brake lever will stop the
engine within 3 seconds.
5. Start the engine by pulling the starting handle
6. Stopping the engine
Release the blade brake lever. (M) ENGLISH - 2 USE Due to engine lubrication limitations, the mower should not be used on slopes in excess of 300.. (P) Before mowing objects such as twigs, toys and stones should be removed from the lawn. (Q) Avoid running the blade over foreign objects such as stones, roots, etc., as it may cause engine damage. Mow the lawn twice weekly during the most active periods of growth. Never cut more than 1/3 of the length of the grass, especially during dry periods. (R) Mow with a high cutting height setting the first time. Examine the result and lower the mower to the desired setting. Mow slowly or mow the grass twice if it is very long. MAINTENANCE Always remove the spark plug lead before repair, cleaning or maintenance work. All nuts, bolts and screws should be checked for tightness after 5 hours use. Check the oil. Push the handle down to ground level when tilting the mower for cleaning purposes. This will avoid oil and fuel spillage. REGULARLY
1. Hose down or brush off all grass, leaves, etc.,
2. Check the oil level.
ANNUALLY Always handle the blade with care - sharp edges could cause injury. USE GLOVES. Renew your metal blade after 50 hours mowing or 2 years whichever is the sooner - regardless of condition. If the blade is cracked or damaged replace it with a new one.
1. Sharpening and balancing the cutter blade.
Remove the spark plug lead. Remove the cutter blade and take it to a service workshop for sharpening and balancing. When reassembling the blade ensure that the retaining washer is flat and not dished, tighten the bolt to a torque of 35-40 Nm. (T)
2. Change the oil after each season or after 25
hours. Run the engine until warm. Remove the spark plug lead. Remove the blade to gain access to the oil drain plug, open the drain plug underneath the mower and let the oil run out. Refit the plug and fill with new oil, SAE 30. (V)
3. The engine brake cable should always be
adjusted to stop the engine within 3 sec. CAUTION! For adjustment contact your authorized service dealer. (W)
4. Loosen screw, remove cover and take out the air
5. Clean the filter with kerosene. Add 2-3 spoons
of oil, distributing evenly throughout the filter. TRANSPORT Remove the spark plug lead Loosen the wire/cable from the handle before carefully folding it. Avoid damaging the wire/cable. Empty the petrol tank. The machine must be drained of oil and fuel when moving it by public transport. CARING At the End of the Mowing Season
1. Replace blade, bolts, nuts or screws, if
2. Clean your lawnmower thoroughly. Do not clean
with chemicals, including petrol or solvents some can destroy critical plastic parts.
3. Ask your local Service Centre to clean the air
filter thoroughly and carry out any service or repairs required.
4. Drain engine of oil and petrol.
ENGLISH - 3 Storing your Lawnmower
1. Do not store your lawnmower immediately after use.
2. Wait until the engine has cooled to avoid a
potential fire hazard.
3. Clean your lawnmower
4. Store in a cool, dry place where your lawnmower
is protected from damage. Engine Maintenance Schedule Follow the hourly or calendar intervals, whichever occur first. More frequent service is required when operating in adverse conditions First 5 hours - Change oil. Every 5 hours or daily - Check oil level. Clean finger guard. Clean around silencer. Every 25 hours or every season - Change oil if operating under heavy load or high ambient temperature. Service air cleaner. Every 50 hours or every season - Change oil. Inspect spark arrester, if equipped. Every 100 hours or every season - Clean cooling system*. Replace spark plug.
- Clean more often under dusty conditions, or when airborne debris is present or after prolonged operation cutting tall, dry grass. ENVIRONMENTAL INFORMATION Husqvarna Outdoor Products are manufactured under an Environmental Management System (ISO 14001) using, where practical, components manufactured in the most environmentally responsible manner, according to company procedures, and with the potential for recycling at the end of the products’ life.
- Packaging is recyclable and plastic components have been labelled (where practical) for categorised recycling.
- Awareness of the environment must be considered when disposing of ‘end-of-life’ product.
- If necessary, contact your local authority for disposal information.
DISPOSAL OF FUELS AND LUBRICATING OILS
- Wear protective clothing when handling any fuels and lubricants.
- Avoid contact with skin.
- Remove petrol and engine oil before transporting the product.
- Contact your local authority for information of your nearest Recycling/Disposal Station.
- Do NOT dispose of used fuels/oils with household waste.
- Waste fuels/oils are harmful, but can be recycled and should be disposed of through the recognised facilities.
- Do NOT dispose of used fuels/oils to water.
- Do not incinerate. MAINTENANCE FAULT FINDING Engine Will Not Start
1. Ensure blade brake lever is in the start
2. Check that there is sufficient fuel in the tank and
the cap air vent is clear.
3. Remove and dry the spark plug.
4. Petrol may be stale, replace. Once petrol has
been replaced, it may take a little time for fresh petrol to filter through.
5. Check that the blade bolt is tight. A loose bolt
could cause difficult starting.
6. If the engine will still not start, immediately
disconnect the spark plug lead.
7. CONSULT YOUR LOCAL APPROVED
SERVICE CENTRE. Lack of Engine Power and/or Overheating
1. Disconnect the spark plug lead and allow the
engine to cool down.
2. Clean grass clippings and debris from around
the engine and air inlets and the underside of the deck.
3. Clean the engine air filter (Ask your local
Approved Service Centre to clean the engine air filter thoroughly).
4. Petrol may be stale, replace. Once petrol has
been replaced, it may take a little time for fresh petrol to filter through.
5. If the engine still lacks power and/or is
overheating, immediately disconnect the spark plug lead.
6. CONSULT YOUR LOCAL APPROVED
SERVICE CENTRE. Excessive Vibration
1. Disconnect the spark plug lead.
2. Check that the blade is correctly fitted.
3. If the blade is damaged or worn replace it with a
4. If vibration persists, immediately disconnect
the spark plug lead.
5. CONSULT YOUR LOCAL APPROVED
ENGINE SERVICING & GUARANTEE
The engine fitted to your lawnmower is guaranteed by the Engine Manufacturer. To obtain further information contact your dealer as detailed below. SERVICE RECOMMENDATIONS
1. We strongly recommend that your product is
serviced at least every twelve months, more often in a professional application.
2. Always use genuine Spare Parts.
3. Prepacked spares are available from most
authorised stockists.
4. Your product is identified by a silver and black
product rating label
5. If you have a problem with your machine contact
your local Approved Service Centre ensuring you have full details of your product as described on the product rating label.
6. Should it be necessary for work to be carried
out by your Service Centre, it is important to take your complete petrol wheeled rotary lawnmower. To obtain service on your product simply telephone or visit your local Service Centre. Should you require service under the terms of our guarantee the Service Centre will require proof of purchase. All of the centres stock genuine Spare Parts. NOTE: Our Service Repairers act on their own behalf and are not empowered to commit or legally bind Husqvarna Outdoor Products in any manner whatsoever.
GUARANTEE AND GUARANTEE POLICY
If any part is found to be defective due to faulty manufacture within the guarantee period, Husqvarna Outdoor Products, through its Authorised Service Repairers will effect the repair or replacement to the customer free of charge providing: (a) The fault is reported directly to the Authorised Repairer. (b) Proof of purchase is provided. (c) The fault is not caused by misuse, neglect or faulty adjustment by the user. (d) The failure has not occurred through fair wear and tear. (e) The machine has not been serviced or repaired, taken apart or tampered with by any person not authorised by Husqvarna Outdoor Products. (f) The machine has not been used for hire. (g) The machine is owned by the original purchaser. (h) The product has not been used outside of the country in which it was purchased. (i) The machine has not been used commercially.
- This guarantee is additional to, and in no way diminishes the customers statutory rights. Failures due to the following are not covered, therefore it is important that you read the instructions contained in this Operator's Manual and understand how to operate and maintain your machine: Failures not covered by guarantee
- Replacing worn or damaged blades
- Failures as a result of not reporting an initial fault.
- Failures as a result of sudden impact.
- Failures as a result of not using the product in accordance with the instructions and recommendations contained in this Operator's Manual.
- Machines used for hire are not covered by this guarantee.
- The following items listed are considered as wearing parts and their life is dependent on regular maintenance and are, therefore not normally subject to a valid warranty claim: Blades, drive belts.
- Caution! Husqvarna Outdoor Products does not accept liability under the warranty for defects caused in whole or part, directly or indirectly by the fitting of replacement parts or additional parts that are not either manufactured or approved by Husqvarna Outdoor Products, or by the machine having been modified in any way. ENGLISH - 4 SICHERHEITSMAßNAHMEN Bei nicht ordnungsgemäßer Verwendung kann dieser Rasenmäher gefährlich sein! Dieser Rasenmäher kann den Bediener und andere schwer verletzen; die Warnhinweise und Sicherheitsvorschriften müssen unbedingt beachtet werden, damit eine angemessene Sicherheit und Leistung beim Gebrauch dieses Rasenmähers gewährleistet werden kann. Der Bediener ist dafür verantwortlich, die in dieser Betriebsanleitung und am Rasenmäher gegebenen Warn- und Sicherheitshinweise zu beachten. Erklärung der verschiedenen, am Sichelmäher befindlichen Symbole
Vibrations excessives