
Coffeexx Plus TKM6003 - Coffee maker BOSCH - Free user manual and instructions
Find the device manual for free Coffeexx Plus TKM6003 BOSCH in PDF.

| Product Type | Turkish Coffee Maker |
| Brand | Bosch |
| Model | Coffeexx Plus TKM6003 |
| Dimensions (H x W x D) | 223 mm x 290 mm x 260 mm |
| Power Supply | 220-240 V~, 50/60 Hz |
| Power Consumption | 1,220 - 1,450 W |
| Water Tank Capacity | 1.20 L |
| Cord Length | 88 cm |
| Number of Cooking Stations | 2 (left and right) |
| Maximum Cups per Brew | 6 (3 per side) |
| Cup Size Options | Small, Medium, Large |
| Control Type | Touch panel with icons |
| Child Lock | Yes |
| Auto Standby | After 20 minutes of inactivity |
| Safety Features | Overheat protection, automatic shut-off |
| Cleaning | Hand wash only; not dishwasher safe |
| Included Accessories | 2 coffee pots, 1 measuring spoon |
| Descaling Frequency | Monthly recommended |
| Warranty | Varies by country; contact dealer |
Frequently Asked Questions - Coffeexx Plus TKM6003 BOSCH
User questions about Coffeexx Plus TKM6003 BOSCH
0 question about this device. Answer the ones you know or ask your own.
Ask a new question about this device
Download the instructions for your Coffee maker in PDF format for free! Find your manual Coffeexx Plus TKM6003 - BOSCH and take your electronic device back in hand. On this page are published all the documents necessary for the use of your device. Coffeexx Plus TKM6003 by BOSCH.
USER MANUAL Coffeexx Plus TKM6003 BOSCH
new device on MyBosch now and get free benefits:
bosch-home.com/ welcome
Coffeexx plus Turkish coffee maker
TKM6...
[en] Instruction manual Turkish coffee maker 16
natural_image
Illustration of two metallic mugs with handles and a pair of handles, labeled with numbers 12 and 12 (no text or symbols on the mugs themselves)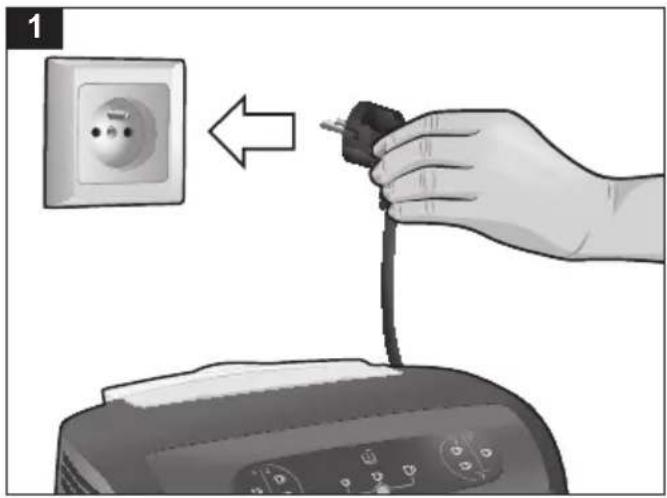
natural_image
Close-up of a computer mouse with a finger pointing to the button, showing a simple diagram of connected devices (no text or symbols present)
natural_image
Illustration of a hand inserting a plastic container into a device, showing internal structure and upward arrow (no text or symbols)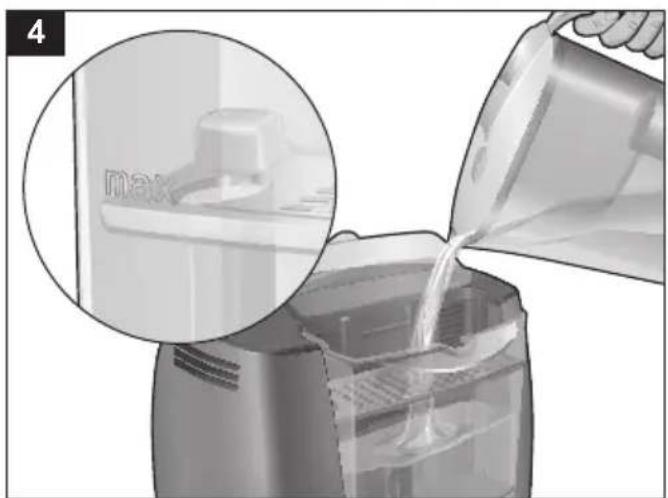
natural_image
Illustration of a hand pouring liquid into a vacuum cleaner (no text or symbols visible)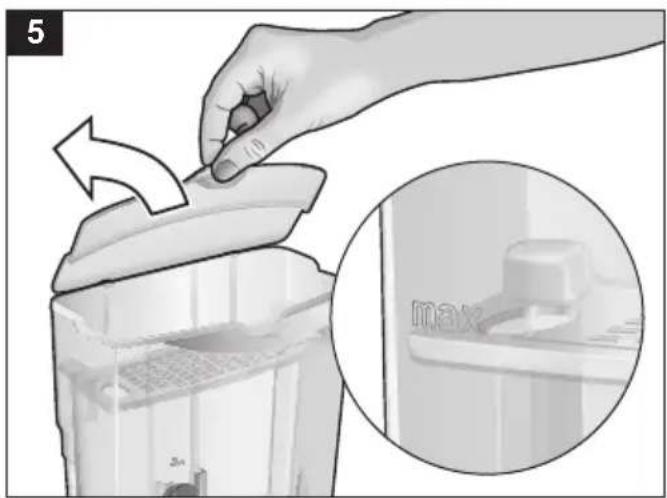

natural_image
Illustration of hands operating a kitchen appliance with a magnified view showing the process (no text or symbols)

natural_image
Close-up of a finger pressing a button on a device (no visible text or symbols)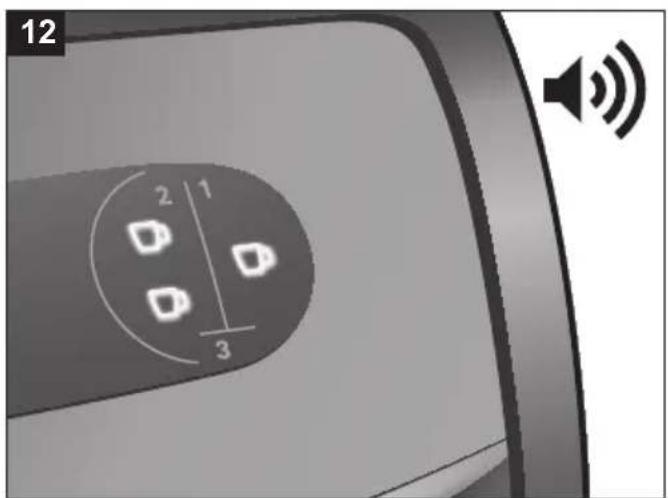
natural_image
Illustration of a toaster oven pouring coffee into a cup, with hands adding a section to the cup (no text or symbols present)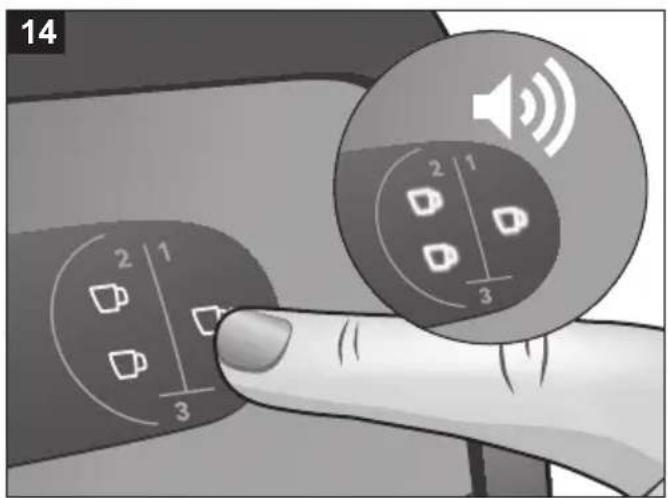
natural_image
Illustration of a finger interacting with devices, showing icons for devices like laptops and water pumps (no text or symbols)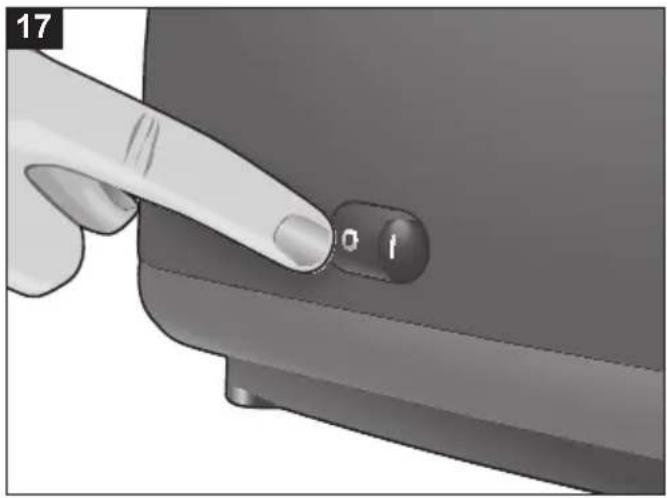
natural_image
Illustration of a hand using a cleaning or cleaning tool to clean a product (no text or symbols visible)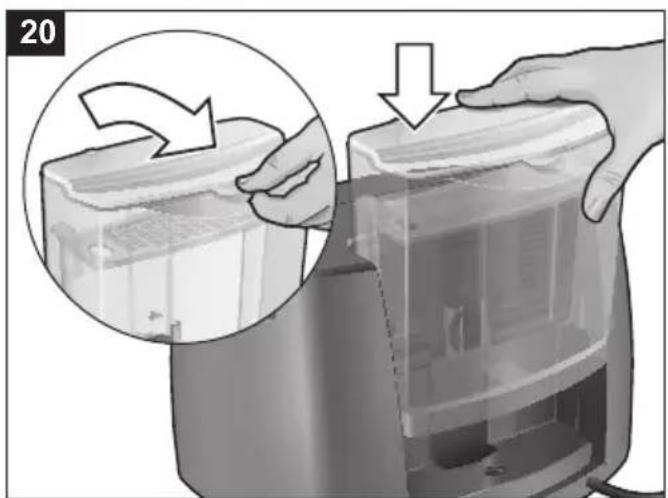
natural_image
Illustration of hands operating a refrigerator with a magnified inset showing the lid and handle (no text or symbols)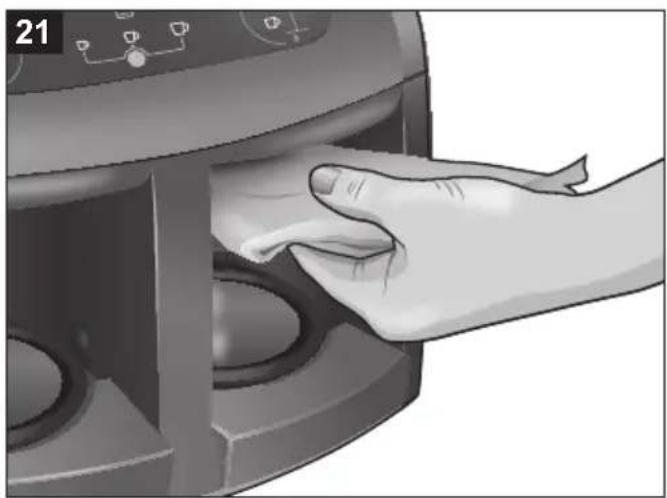
natural_image
Hand placing a cloth into a portable air conditioner unit (no text or symbols visible)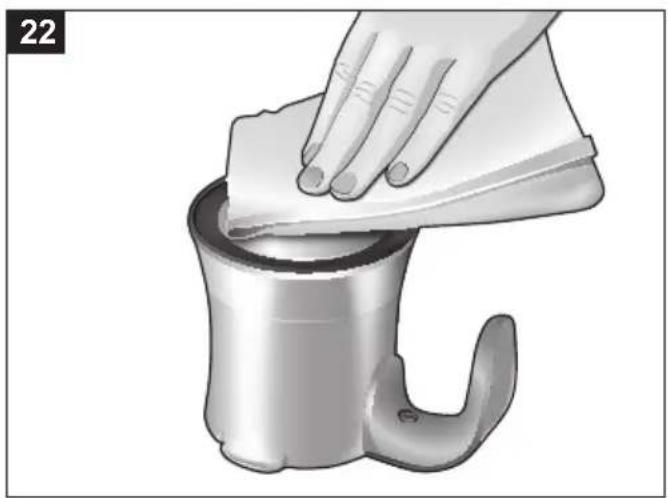
natural_image
Illustration of a hand cleaning a metal object with a cloth (no text or symbols)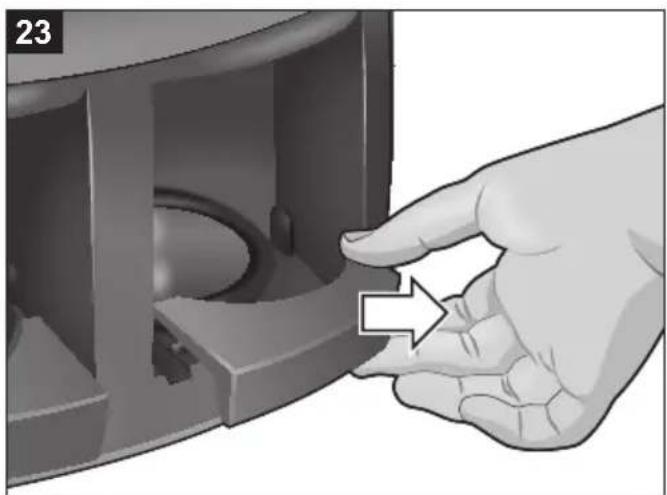
natural_image
Hand inserting a component into a cylindrical housing (no text or symbols visible)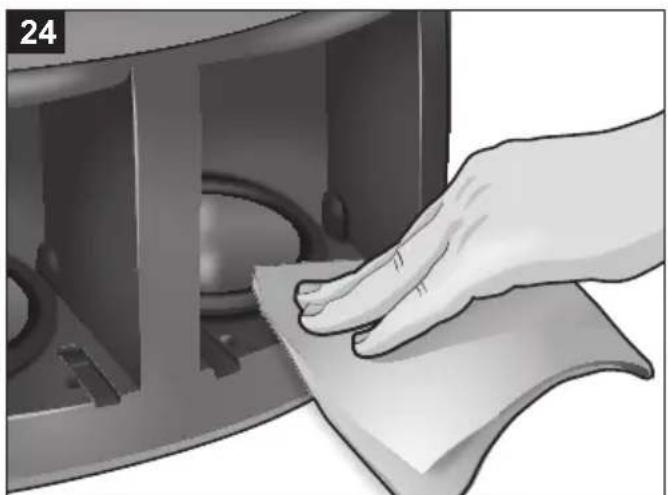
natural_image
Hand cleaning a clean document inside a microwave oven (no text or symbols visible)Güvenlik uyarıları
Please read this user manual carefully. Pay special attention to important safety instructions. Keep this user manual for future reference.
⚠️Danger! / Warning!
This appliance can be used by children aged from 8 years and above if they have been given supervision or instruction concerning use of the appliance in a safe way and if they understand the hazards involved. Cleaning and user maintenance shall not be made by children unless they are older than 8 and supervised. Keep the appliance and its cord out of reach of children aged less than 8 years. Appliances can be used by persons with reduced physical, sensory or mental capabilities or lack of experience and knowledge if they have been given supervision or instruction concerning use of the appliance in a safe way and understand the hazards involved.
Children shall not play with the appliance.
Risk of suff ocation! Do not allow children to play with packaging material.
Be careful when using the appliance around children.
Do not operate the appliance if its power cord, housing or the handle are damaged.
If the power cord is damaged, in order to avoid a hazard it should be replaced by the manufacturer or by a specialised service centre or by a qualified person.
The appliance can only be repaired by qualified service personnel. Improper servicing may cause a serious hazard to the user. In case of defects please contact a qualified service center.
Before cleaning the appliance, and in case of any problems during coffee making, always turn off the appliance and pull the plug out of the socket first.
Leave it to cool down before putting it away or removing pieces and before cleaning the appliance.
en
Do not place your hands underneath steam, hot water or poured coffee, as it may lead to scalds and burns.
Do not wet or immerse the power cord plug in water.
Do not operate the appliance with the cable still coiled.
Do not connect the plug into the outlet with wet hands.
Do not let the cable hang over the edge of the table or work-top, nor let it come into contact with hot surfaces.
Do not drink the coffee directly from the coffee pots.
Always hold the coffee pots from their handles. Do not touch to any surfaces of coffee pots when it is hot.
Do not touch the metal parts of the coffee pots and the surface of the heater when it is hot.
Do not immerse the appliance in water or any other liquid.
Only use the appliance indoors at room temperature and up to 2000 m above sea level.
The appliance gets hot.
Never operate the appliance in a cupboard.
Avoid spillage on the connector.
A misuse of the appliance can potentially lead to injury.
After the use the heating element surfaces and warming plate can be subjected to residual heat.
Cleaning surfaces which come into contact with foodstuffs! Please note the special information on cleaning in the instructions.

Caution!
Always place the appliance on a stable, flat surface.
The water tank should be filled with clean and cold water only. Do not go over the maximum capacity of the water tank.
Do not put hot water into the water tank.
Do not allow the power cord to touch any hot parts of the appliance.
Always turn off the appliance (by means of the ON/OFF switch)
before plugging it in or out. You should not unplug the appliance by pulling the power cable – grab only the plug instead.
If the appliance is not used for a longer time or is going to be cleaned, always remember to turn it off and unplug it.
en
Do not use an extension cord with the appliance, unless it is checked by a qualified technician or service staff member.
The appliance should be plugged into a power socket with alternating current equipped with a safety pin, and voltage compatible with the one given on the rating plate of the appliance.
The appliance is not designed to work with exterior time switches or separate remote control systems.
Do not place the appliance on hot surfaces or near hot objects.
Do not use different coffee pots than original one.
Never scratch heating surface and bottom (metallic part) of the coffee pots with wire wool.
Do not wash the water tank and coffee pots in dishwasher.
Keep your appliance away from steam sources and try not to use it in steamy environments.
Never put any other liquid than the water in the water tank (no milk). Do not use the coffee pots on any other heating surfaces (stove etc.).
Do not put anything into the coffee pots other than coffee and sugar; water fills into the coffee pots automatically.
i Suggestion
This appliance is designed for the preparation of normal household quantities in the home, or in household-like, non-commercial environments. Different warranty conditions apply when appliance is used for catering.
The appliance is designed to work in 4-37°C 80% relative humidity. Due the production technology applied, your appliance might emit steam and odor at the first use. This is normal for your appliance. It will recover after the first few uses.
Congratulations on purchasing this Bosch appliance. You have acquired a high-quality product that will bring you a lot of enjoyment.
This instruction manual describes the following models: TKM600... series
Appliance parts
→ Fig. A
1 ON/OFF switch (on the side)
2 Supply cord
3 Water tank
4 Water tank insert
5 Water tank lid
6 Control panel
7 Cooking detection sensor
8 Nozzle
9 Left cover of heating surface
10 Right cover of heating surface
11 Heating surfaces
12 Coffee pots
13 Measuring spoon
14 Left 1cup coffee option
15 Left 2cups coffee option
14+15 Left 3 cups coffee option (touching at the same time)
16 Cup size controller
17 Small cup indicator
18 Medium cup indicator
19 Large cup indicator
20 Water (level) indicator
21 Right 1cup coffee option
22 Right 2 cups coffee option
21+22 Right 3cups coffee option (touching at the same time)
Before first use
Before using your appliance for the first time, wash all accessories in warm water with a mild detergent. Please do not use cleaning tools that may cause scratches. During first use it is recommended to wash coffee pots, water tank and spoon hand wash is recommended. Afterwards, the washed accessories should be rinsed in clean water.
Fill water tank up to MAX and wait 10 min.
For the first usage touch 3 cups cooking option on both sides and wait until the end boiling. Pour boiled water. Place the empty coffee pots. Repeat it three times.
Preparing the appliance for operation
In order to prepare your appliance for operation, follow the instructions below.
■ Connect the appliance to a suitable power source (data on the nameplate). (Pic. 1)
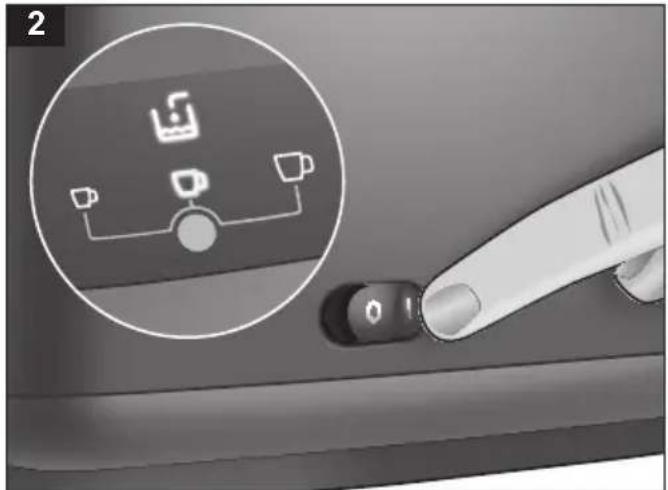
■ Press the ON/OFF switch (1) and wait a few seconds until the appliance is ready to operate. Icons on the display will turn on. (Pic. 2)
■ Take out the water tank (3) from the appliance or leave it in the appliance and pour with water. (Pic. 3-4)
■ Open the lid (5) and fill the water tank (3) with appropriate amount of fresh, cold water between min and max levels. (Pic. 5)
Info: You can check the water level by looking on the tank (3) (min max level).
Info: When the water level is above min. level, water indicator 📋 (20) lights up blue.
Info: When the water level is under min. level the appliance will not operate and will not brew coffee, water indicator (20) lights up blinking red. In this case, you must add water to the water tank (3).
Caution: Max level should not be passed when water is filled. Exceeding the max level will cause water leakage under the device.
Caution: While pouring water directly into the water tank (3) mounted on the device (without removing the water tank) be careful not to spill water on the appliance.
■ Close the lid (5) and place the filled water tank (3) on the appliance. After placing the water tank correctly please push the tank down to be sure it fitted properly. (Pic. 6)
Caution: Water tank (3) should be inserted correctly if not, pump will not work properly. If water tank is not fitted well, water flow cannot occur. This situation causes coffee mixture to have less water than expected. The coffee's taste will be too bitter.
Brewing coffee
To brew coffee, follow the instructions below.
■ You can select cup size (small (17) / medium (18) / large (19)) by pressing cup size controller (16). For each press, there will be one bip. Cup size will be memorized for next usage until changed, even though the appliance is turned off and on. (Pic. 7)
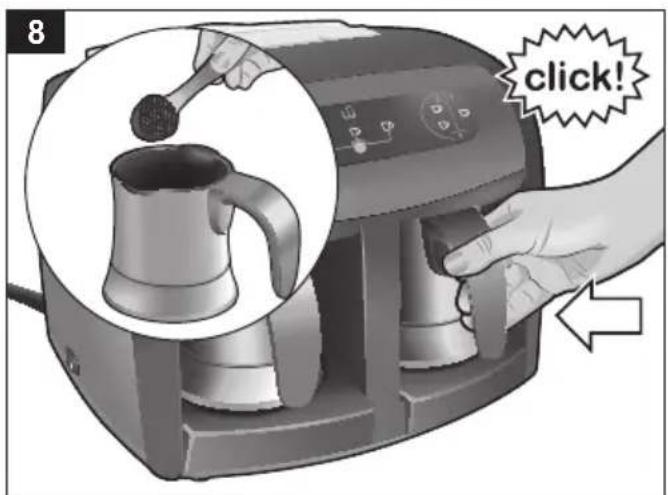
- Put coffee and sugar into the coffee pots (12) for one/two/three cups according to the amounts recommended in below table. Place the coffee pots (12) into the appliance. Make sure to insert the coffee pots (12) correctly (Straight and till they hit the wall of the cooking station. You will hear click sound when coffee pots hits the wall of the cooking station.). (Pic. 8)
Info: The appliance will not start operating until the coffee pots (12) are correctly placed. If the coffee pots are correctly placed you will hear a “click” sound.
Caution: Please do not use your appliance without adding coffee in the coffee pots. Cooking just water (without coffee) reduces your appliance life.
Info: The cooking functions start after releasing your finger from cooking function icons.
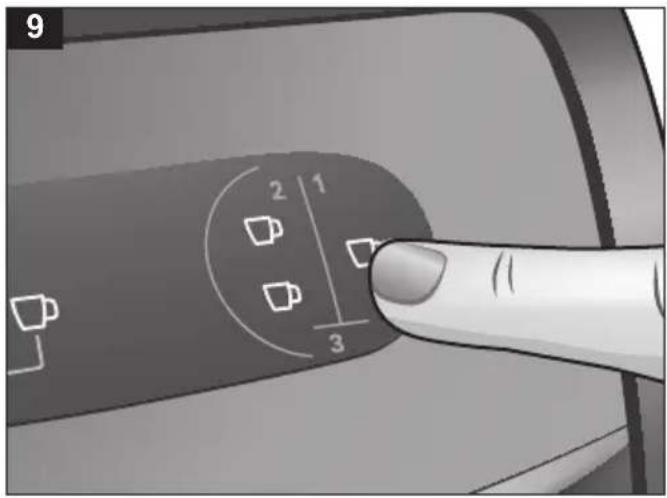
■ Touch 1 cup or 2 cups or 3 cups on the front panel according to the quantity of coffee cups you wish to make.
For 1 cup of coffee, touch 1 cup coffee option on left (14) or/and right (21) side of the control panel. (Pic. 9)
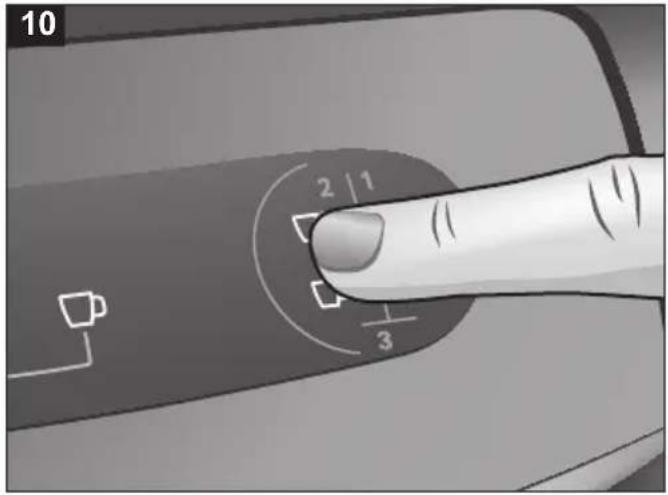
For 2 cups of coffee, touch 2cup coffee option on left (15) or/and right (22) side of the control panel. (Pic. 10)
For 3 cups of coffee, touch 1cup and 2cups coffee options (1+2 together) at the same time on left (14)+(15) or/and right (21)+(22) side of the control panel. (Pic. 11)
Info: The appliance can brew up to 6 cups in one operation (3 cups on the left, 3 cups on the right).
Info: Upon choosing the number of cups, and touching the cooking options, the appliance will give a blue light before starting.
Info: Once the cooking is done, the appliance will emit an audio signal and cup icons will start blinking based on your cup selection.
■ After cooking is done, if you do not pick up the coffee pots (12), the light will continue to blink at intervals and will give audio signal every 5 seconds (until you take the coffee pots (12) out). (Pic. 12)
Info: You can brew coffee at the same time on both sides of the appliance (left and right).
Info: It is possible to prepare coffee for different cup sizes. For example, cooking at the same time “small cup size 1cup coffee” in right cooking station and “big cup size 3cups coffee” in left cooking station.
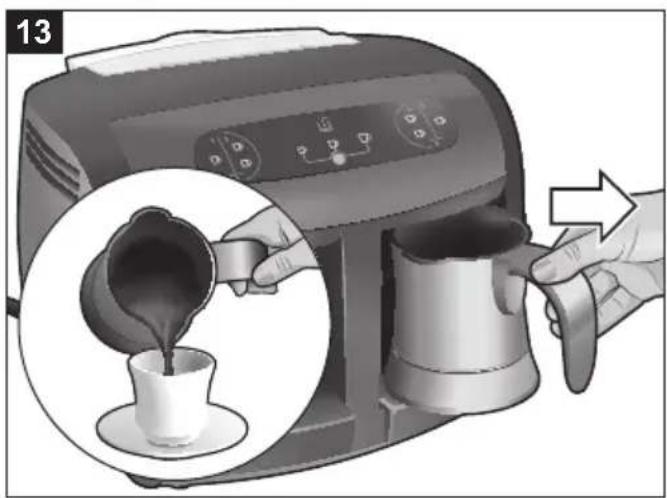
■ Take out the coffee pots (12) from the appliance and serve the coffee into the cup. (Pic. 13)
■ You can cancel cooking by touching for 3 seconds to the chosen option on the display. It is possible to cancel cooking at right (14) (15) and left cooking stations (21) (22) at the same time. You will hear three beeps and icons will start blinking pink. (Pic. 14)
Caution: Do not operate the appliance before emptying the coffee pots (12). It might cause overflow and your coffee might be diluted.
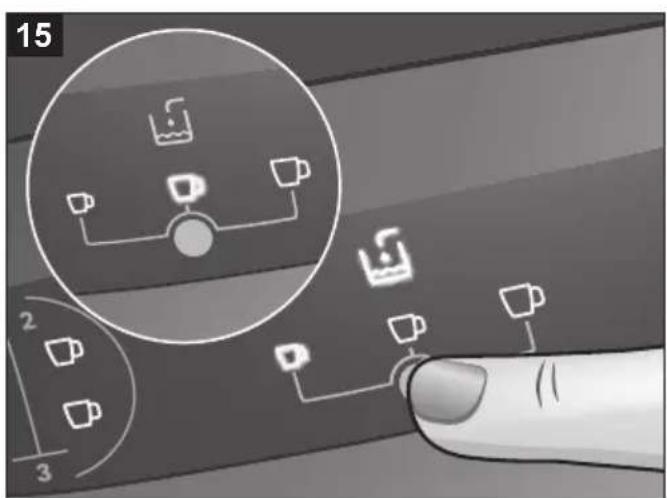
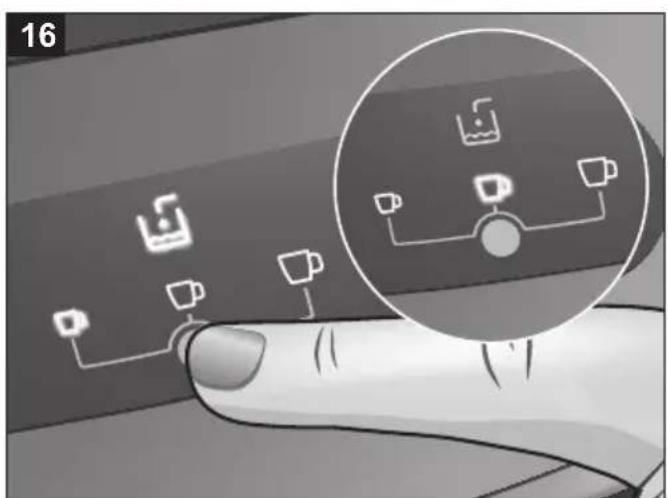
If you don't use the appliance for 20 minutes, the appliance will automatically switch to standby mode and medium cup indicator (18) will start to blink. To start brewing, touch the cup size controller (16) for 3 seconds and the appliance will be on. (Pic. 15-16)
Info: The appliance is equipped with a child lock feature. To activate it, touch the cup size controller (16) for 3 seconds, and the appliance will switch to standby mode.
Info: Make sure to clean and dry bottom metallic part of the coffee pots (12). If the bottom part of the coffee pot is not dry, it might cause some undesired noise during the heating process.
Info: There might be some dripping from the nozzle (8) towards the heating surfaces (11). That's normal and it is caused by the drops left in the water pump. Try to always keep the heating surfaces (11) clean for a better performance.
Danger: Do not touch the heating surfaces (11) nor try to clean it before the heating surfaces are completely cooled down. The heating surfaces (11) are very hot, you might burn your skin.
Info: If the coffee pots (12) are put in the appliance with hot liquid inside, 3 cups cooking option icons might blink pink.
Recommended ingredient measurings for preparation of Turkish Coffee
This product is an automated appliance, designed to cook Turkish Coffee. Using the sizes and measurements indicated on below table, you can brew your ideal, Turkish Coffee for your taste.
The below instructions are reference values and only provided as guidance. You can make your own adjustments based on your personal preference.
| Coffee Sugar | ||
| No sugar (plain) | 1 measuring spoon(7 g of coffee) | - |
| Little sugar 1 | measuring spoon(7 g of coffee) | 1 sugar cube / 1 teaspoon sugar(2-3 g of sugar) |
| Coffee Sugar | ||
| Medium sugar | 1 measuring spoon (7 g of coffee) | 1.5 sugar cubes / 1.5 teaspoon sugar (3-4,5 g of sugar) |
| Very sugary | 1 measuring spoon (7 g of coffee) | 2 sugar cubes / 2 teaspoon sugar (4,5-6 g of sugar) |
The above measurings are the recommended dosages for medium sized cups and for one person (1cup cooking option) only.
The appliance is equipped with a measuring spoon (13) placed in the water tank.
The above measurings are only valid with the provided measuring spoon.
Use fresh coffee and cold water in order to make delicious and foamy Turkish Coffee.
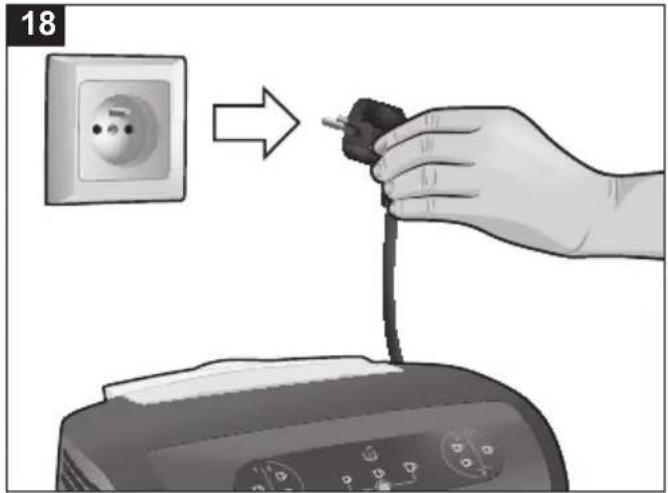
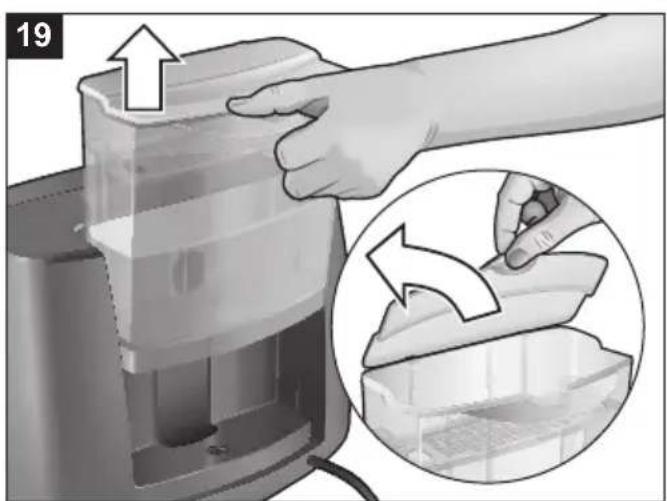
Turning off the appliance
■ Presss the ON/OFF switch button (1) and wait for a few seconds until the appliance turns off. The lights on the control panel will go off. (Pic. 17)
■ Disconnect the appliance from the power source. (Pic. 18)
■ Take out the water tank (3) from the appliance, open the lid (5) and remove the remaining water from the tank (3). (Pic. 19)
■ Close the lid (5) and place the water tank (3) on the appliance. (Pic. 20)
Cleaning and maintenance
■ Before starting to clean, unplug the appliance.
■ Clean the coffee pots after every use to have the best taste for your coffee.
■ Do not wash the appliance or any of its parts in the dishwasher, including the coffee pots. Wiping the surfaces with a moist cloth is recommended.
■ Wipe the cooking detection sensor with moist cloth every 15-20 services. (Pic. 21)
■ For cleaning, use only delicate cloths with a mild detergent or warm water. Carefully wipe the heating plates and coffee pots with a soft clothe to avoid scratching and damaging the surfaces. (Pic. 22)
For better cleaning take out left and right cover of heating surface. (Pic. 23-24)
Caution: Sharp cloths or sponges may scratch the metal parts of the appliance.
■ Never use harsh, abrasive or alcohol-based cleaners.
■ When coffee drips on the heating surfaces, first wait for the heating surfaces to cool down. Then wipe the coffee stains before they get dry.
■ When transporting your appliance, always make sure that there is no water left in the water tank and coffee pots. Do not move the product without removing the coffee pots from the brewing chambers. They might get damaged if they fall.
Descaling
We recommend that you use purified water or natural spring water in your appliance. The lime formed on your appliance should be cleaned once a month. To clean the resulting lime:
Preparation of lime solvent mixture
- Option: Fill the water tank of your appliance with 3 glasses of vinegar. Fill the remaining part with water to the maximum level.
- Option: Fill the water tank of your appliance with water to the maximum level. Then dissolve in water the 2 decalcifying tablets of code 311821 which you can provide from your authorized service center. You can mix it with a spoon to facilitate melting.
Application of descaling
Without adding coffee or sugar, run the appliance in 3-cup small-size option with only the mixture in the tank. After the
appliance has finished heating the water, pour out the water in the pot.
Repeat the above operation 3 times in the right and 3 times in the left compartment. Then pour the descaling mixture remaining in the water tank, rinse the tank and fill it with clean water only and place it on your appliance. Operate the appliance once more in 3-cup small size option in both compartments (without adding coffee) and wait until the heating process is complete. Finally pour out the water in the coffee pots and rinse the pots.
Technical data
| Electrical connection | 220-240 V~ 50/60 Hz |
| Output 1.220-1.450 W | |
| Appliance height 223 mm | |
| Appliance width 290 mm | |
| Appliance depth 260 mm | |
| Water capacity 1.20 l | |
| Lenght of the supply cord | 88 cm |
Disposal
Dispose of packaging in an environmentally-friendly manner. This appliance is labelled in accordance with European Directive 2012/19/EU concerning used electrical and electronic appliances (waste electrical and electronic equipment – WEEE). The guideline determines the framework for the return and recycling of used appliances as applicable throughout the EU. Please ask your specialist retailer about current disposal facilities.
Guarantee
The guarantee conditions for this appliance are as defined by our representative in the country in which it is sold. Details regarding these conditions can be obtained from the dealer from whom the appliance was purchased. The bill of sale or receipt must be produced when making any claim under the terms of this guarantee.
Changes reserved.
Do it before calling technical service
| PROBLEM POSSIBLE CAUSE | SOLUTION | |
| Decrease in the amount of coffee prepared. | Calcification formed in the appliance. | Apply descaling as described in the user manual. |
| Less coffee in the cup after cleaning water tank or taking out the water tank for filing it. | No enough water in water channels. | Without adding any coffee and sugar in the pots select large cup size and press 1cup coffee button on both sides. Stop before it starts to boil. Remove the water from the coffee pots and place them in the appliance.Advice: please take out the tank only for cleaning purposes. |
| 3 beeps when touching the cup icons. | No water in the water tank, or the water level is below the minimum level. | Fill the water tank with cold water between minimum and maximum level. |
| During brewing, cup icons are blinking red and you hear 3 beeps. | The appliance is overheated. | Turn off the appliance and wait until it gets cool down. After it is cooled down: Clean the heating surface. Clean inside and outside bottom of the coffee pot (metal parts). |
| During brewing, cup icons are blinking pink and you hear 3 beeps. | Cooking detection sensor is dirty or amount of coffee is too low in the mixture. | Clean the cooking detection sensor with wet cloth or add more coffee. If it is continuous call technical service. |
| Coffee overflowed. Dirt on co | cooking detection sensor and heating surfaces. | Clean detection sensor and heating surfaces with moist cloth. If continuous call the technical service. |
en
| PROBLEM POSSIBLE CAUSE | SOLUTION | |
| Water leakage under device. | Max water level exceeded. | Wipe the water that has leaked. Remember that Max level should not be passed when is filled. |
| No water in cup. No water in | the system. Fill the water tank to the Maximum level and remove and insert it 3 times and wait for 5 minutes. Select the large-cup and 3-cup option and run the device without adding coee and sugar (Press and hold at 3-cup option for 3 seconds after pump noise stops, and cancel before boiling). | |
Info: Heating surfaces (11) and the cooking detection sensor (7) window must be cleaned periodically with the moist cloth.
(waste electrical and electronic equipment – WEEE).
Gate 1, 1555 Centre Road
Clayton, Victoria 3168
Tel.: 1300 369 744*
mailto:customersupport.au@bshg.com
www.bosch-home.com.au
* Mo-Fr: 24 hours
BA Bosna i Hercegovina, Bosnia-Herzegovina
"HIGH" d.o.o.
Gradačačka 29b
71000 Sarajevo
Tel./Fax: 033 21 35 13
mailto:centralniservis@yahoo.com
Business center FPI, floor 5,
Cherni vrah Blvd. 51B
1407 Sofia
Tel.: 0700 208 17
mailto:informacia.servis-bg@bshg.com
www.bosch-home.bg
(exclude public holidays)
To arrange an engineer visit, to order
spare parts and accessories or for
product advice please visit
www.bosch-home.co.uk
or call Tel.: 0344 892 8979*
* Calls are charged at the basic rate, please
check with your telephone service provider
for exact charges.
GR Greece, Ελλάς
BSH Ikiakes Siskeves A.B.E.
Central Branch Service
17 km E.O. Athinon-Lamias & Potamou 20
14564 Kifisia
Unit 1 & 2, 3rd Floor, North Block,
Skyway House, 3 Sham Mong Road
Tai Kok Tsui, Kowloon
Hong Kong
Tel.: 2626 9655 (HK)
Toll free 0800 863 (Macao)
Fax: 2565 6681
mailto:bosch.hk.service@bshg.com
www.bosch-home.com/hr
www.bosch-home.com/hu
IE Republic of Ireland
BSH Home Appliances Ltd.
M50 Business Park
Ballymount Road Upper
Walkinstown
Dublin 12
To arrange an engineer visit, to order
spare parts and accessories or for
product advice please call
Tel.: 01450 2655*
www.bosch-home.ie
* Calls are charged at the basic rate, please
check with your telephone service provider
for exact charges
IL Israel
C/S/B/ Home Appliance Ltd.
1, Hamasger St.
North Industrial Park
Lod, 7129801
Tel.: 08 9777 222
Fax: 08 9777 245
mailto:csb-serv@csb-ltd.co.il
www.bosch-home.co.il
IN India, Bhārat, भारत
BSH Household Appliances Mfg. Pvt. Ltd.
Arena House, Main Bldg, 2nd Floor,
Plot No. 103, Road No. 12,
MIDC, Andheri East
Mumbai 400 093
Toll Free 1800 266 1880*
www.bosch-home.com/in
* Mo-Sa: 8.00am to 8.00pm
(exclude public holidays)
IS Iceland
Smith & Norland hf.
Noatuni 4
105 Reykjavik
Tel.: 0520 3000
Fax: 0520 3011
www.sminor.is
IT Italia, Italy
www.bosch-home.com/it
KR Republic Korea,
Daehan Minguk,대한민국
Dong Suh Foods Corporation
Dongsuh Bldg., 324,
Dongmak-ro, Mapo-gu
Seoul 121-730
Tel.: 080 025 9114
Business Center "Khan Tengri"
Almaty
Hotline: 5454*
mailto:ALA-Service@bshg.com
* Toll free from mobile only
LB Lebanon
Teheni, Hana & Co.
Boulevard Dora 4043 Beyrouth
P.O. Box 90449
Jdeideh, 1202 2040
Tel.: 01 255 211
mailto:Info@Teheni-Hana.com
LT Lietuva, Lithuania
Senuku prekybos centras UAB
Jonavos g. 62
44192 Kaunas
Tel.: 037 212 146
Fax: 037 212 165
www.senukai.lt
UAB "AG Service"
R. Kalantos g. 32
52494 Kaunas
Tel.: 0700 556 55
Fax: 037 331 363
mailto:servisas@agservice.lt
www.agservice.lt
Baltic Continent Ltd.
Lukšio g. 23
09132 Vilnius
Tel.: 870 055 595
Fax: 052 741 722
mailto:info@balticcontinent.lt
www.balticcontinent.lt
UAB Emtoservis
S.R.L. "Rialto-Studio"
ул. Щусева 98
2012 Кишинев
Lintel Investments and
Management Services Pvt. Ltd.
Ma. Maadheli, Majeedhee Magu
Malé
Tel.: 03 010 200
mailto:mohamed.zuhuree@lintel.com.mv
www.lintel.com.mv
NL Nederlande, Netherlands
Level 3, Air NZ Building, Smales Farm
74 Taharoto Road, Takapuna
Auckland 0622
Tel.: 0800 245 700*
mailto:aftersales.nz@bshg.com
www.bosch-home.co.nz
* Mo-Fr: 8.30 am to 5.00 pm
(exclude public holidays)
PL Polska, Poland
SA Kingdom Saudi Arabia,
and Airconditioning Co. Ltd.
BOSCH Service centre,
Kilo 5 Old Makkah Road
(Next to Toyota), Jamiah Dist.,
P.O. Box 7997
Jeddah 21472
Tel.: 800 127 9999*
mailto:Khadeermj@ALJ.COM
www.aljelectronics.com.sa
Sat-Thu: 8.00 am to 11.00 pm
(exclude public holidays)
SE Sverige, Sweden
BSH Home Appliances AB
Landsvägen 32
169 29 Solna
Tel.: 0771 19 70 00 local rate
Tel.: 0771 11 22 77 local rate
mailto:Bosch-Service-SE@bshg.com
www.bosch-home.se
SG Singapore新加坡
BSH Home Appliances Pte. Ltd.
Block 4012, Ang Mo Kio Avenue 10
01-01 Techplace 1
Singapore 569628
Tel.: 6751 5000*
Fax: 6751 5005
mailto:bshsgp.service@bshg.com
www.bosch-home.com.sg
* Mo-Fr: 8.30am to 7.00pm, Sa: 8.30am to 5.30pm
(exclude public holidays)
SI Slovenija, Slovenia
BSH Hišni aparati d.o.o.
Litostrojska 48
1000 Ljubljana
Tel.: 01 5830 700
Fax: 01 5830 889
mailto:informacije.servis-slo@bshg.com
www.bosch-home.com/si
SK Slovensko, Slovakia
Ital Thai Tower, 2034/31-39, 1st floor,
New Petchburi Road
Bangkapi, Huay Kwang
Bangkok, 10310
Tel.: 02 975 5353*
www.bosch-home.com/th
* Mo-Sa: 8.00am to 6.00pm
(exclude public holidays)
TR Türkiye, Turkey
www.bosch-home.com/tr
BSH Home Appliances Private Limited
台北市內湖區洲子街80號11樓
11F., No.80, Zhouzi St., Neihu Dist.
Taipei City 11493
Tel.: 0800 368 888
Fax: 02 2627 9788
mailto:bshtzn-service@bshg.com
Service-General SH.P.K.
rr.Magjistralja Ferizaj Prishtine
70000 Ferizaj
Tel.: 00381 (0) 290 330 723
Tel.: 00377 44 172 309
mailto:servicegeneral527@gmail.com
XS Srbija, Serbia
BSH Kućni aparati d.o.o.
15th Road Randjespark
Private Bag X36, Randjespark
1685 Midrand – Johannesburg
Tel.: 086 002 6724
Fax: 086 617 1780
mailto:applianceserviceza@bshg.com
www.bosch-home.com/za

www.bosch-home.com/tr
www.bosch-yetkiliservisi.com
Bandrol ve Seri No. :
bosch-infoteam@bshg.com
natural_image
Blue square icon with a white user silhouette and plus sign, labeled 'MyBosch' (no additional text or symbols)Thank you for buying a Bosch Home Appliance!
Register your new device on MyBosch now and profit directly from:
- Expert tips & tricks for your appliance
• Warranty extension options
• Discounts for accessories & spare-parts
• Digital manual and all appliance data at hand - Easy access to Bosch Home Appliances Service
Free and easy registration – also on mobile phones:
www.bosch-home.com/welcome
BOSCH HOME APPLIANCES SERVICE
Looking for help? You'll find it here.
Expert advice for your Bosch home appliances, need help with problems or a repair from Bosch experts.
Find out everything about the many ways Bosch can support you:
www.bosch-home.com/service
Contact data of all countries are listed in the attached service directory.
- Coffeexx plus Turkish coffee maker
- Güvenlik uyarıları
- ⚠️Danger! / Warning!
- Caution!
- i Suggestion
- Appliance parts
- → Fig. A
- Before first use
- Preparing the appliance for operation
- Brewing coffee
- Recommended ingredient measurings for preparation of Turkish Coffee
- Turning off the appliance
- Cleaning and maintenance
- Descaling
- Preparation of lime solvent mixture
- Application of descaling
- Disposal
- Guarantee
- BA Bosna i Hercegovina, Bosnia-Herzegovina
- GR Greece, Ελλάς
- IE Republic of Ireland
- IL Israel
- IN India, Bhārat, भारत
- IS Iceland
- IT Italia, Italy
- KR Republic Korea,
- Daehan Minguk,대한민국
- LB Lebanon
- LT Lietuva, Lithuania
- NL Nederlande, Netherlands
- PL Polska, Poland
- SA Kingdom Saudi Arabia,
- SE Sverige, Sweden
- SG Singapore新加坡
- 01-01 Techplace 1
- SI Slovenija, Slovenia
- SK Slovensko, Slovakia
- TR Türkiye, Turkey
- XS Srbija, Serbia
- Thank you for buying a Bosch Home Appliance!
- Looking for help? You'll find it here.
Brand : BOSCH
Model : Coffeexx Plus TKM6003
Category : Coffee maker