
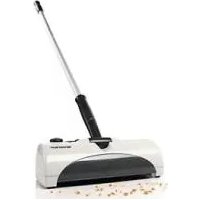
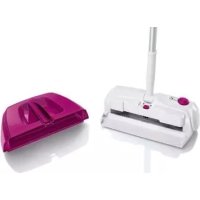
SABD 3.6 Li B1 - Broom SILVERCREST - Free user manual and instructions
Find the device manual for free SABD 3.6 Li B1 SILVERCREST in PDF.

| Product Type | Cordless Sweeper (Broom) |
| Brand | SilverCrest |
| Model | SABD 3.6 Li B1 |
| Intended Use | Sweeping dry dirt in dry closed rooms, domestic use only |
| Battery Type | Li-ion, 3.7 V, 1800 mAh |
| Charging Time | Approx. 5 hours for full charge |
| Operating Time | Approx. 50 minutes (depending on floor type) |
| Charger Input | 100-240 V~, 50/60 Hz, 0.3 A max |
| Charger Output | 5 V, 500 mA |
| Protection Class (Appliance) | III |
| Protection Class (Charger) | II |
| Handle | 3-part handle with grip, detachable |
| Controls | On/off switch, charge indicator (red/green) |
| Dirt Container | Removable, release knob, empty after each use |
| Rotary Brush | Removable for cleaning, drive shaft |
| Safety Features | Do not use on wet surfaces, deep-pile carpets, or exposed concrete; keep away from children; use only included charger |
| Cleaning Instructions | Wipe housing with damp cloth; do not immerse; remove and clean rotary brush if clogged |
| Storage | Switch off, store in clean dry place |
| Warranty | 3 years from date of purchase |
| Disposal | Dispose of appliance and battery separately according to local regulations |
Frequently Asked Questions - SABD 3.6 Li B1 SILVERCREST
User questions about SABD 3.6 Li B1 SILVERCREST
0 question about this device. Answer the ones you know or ask your own.
Ask a new question about this device
Download the instructions for your Broom in PDF format for free! Find your manual SABD 3.6 Li B1 - SILVERCREST and take your electronic device back in hand. On this page are published all the documents necessary for the use of your device. SABD 3.6 Li B1 by SILVERCREST.
USER MANUAL SABD 3.6 Li B1 SILVERCREST
Operating instructions
PT
VASSOURA ELÉTRICA
Before reading, unfold the page containing the illustrations and familiarise yourself with all functions of the device.
DE AT CH
GB / MT Operating instructions Page 17
Indice
Introduzione 2
Uso conforme....2
natural_image
Technical line drawing of a mechanical assembly with a monitor and gear (no text or symbols)KOMPERNASS HANDELS GMBH
BURGSTRASSE 21
44867 BOCHUM
GERMANY
www.kompernass.com
Índice
Introdução....10
natural_image
Technical line drawing of a mechanical assembly with a monitor and gear (no text or symbols)KOMPERNASS HANDELS GMBH
BURGSTRASSE 21
44867 BOCHUM
GERMANY
www.kompernass.com
Contents
Introduction....18
Intended use 18
Package contents....18
Appliance description ....18
Technical data 18
Safety guidelines 19
Before initial use ....20
Assembly of the cordless sweeper 20
Charging the battery 20
Working with the cordless sweeper ....21
Cleaning and care 21
Housing....21
Dirt container 21
Rotary brush 22
Storage....22
Troubleshooting 22
Warranty and service 22
Disposal 23
Disposal of the appliance ....23
Disposal of batteries 23
Disposal of packaging 24
Importer 24.
Introduction
Congratulations on the purchase of your new appliance.
You have selected a high-quality product.
The operating instructions are part of this product. They contain important information on safety, usage and disposal. Before using the product, familiarise yourself with all handling and safety guidelines.
Use the product only as described and for the range of applications specified. Please also pass these operating instructions on to any future owner(s).
Intended use
This appliance is intended only for sweeping dry dirt in dry closed rooms.
The appliance is intended exclusively for domestic use.
Not for commercial use! Use the appliance only as described in this manual.
Package contents
■ Rechargeable Floor Sweeper
Charger
■ Handle (3 elements and grip)
■ Operating instructions
Appliance description
Figure A:
① Grip
② Handle (3 elements)
3 Holder
Figure B:
4 Switch
⑤ Charging socket (with dust cover)
6 Charge indicator
⑦ Release knob
8 Dirt container
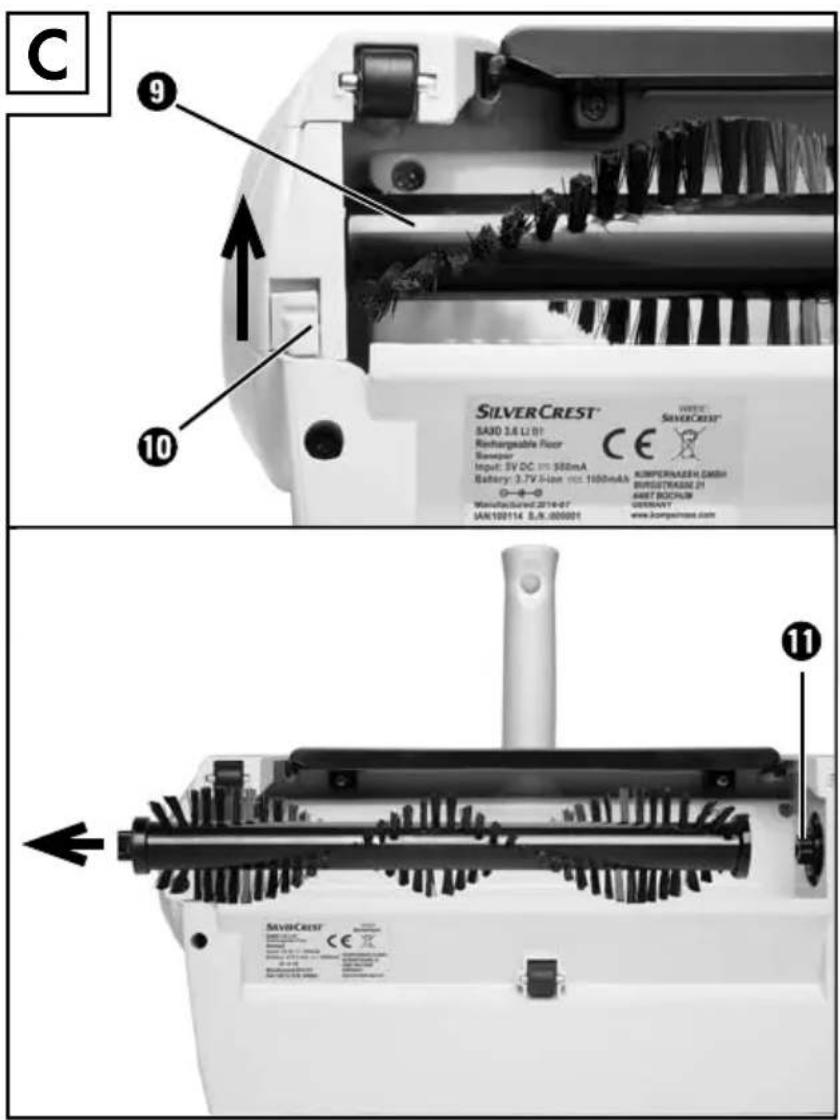
Figure C:
9 Rotary brush
10 Catch
11 Drive shaft
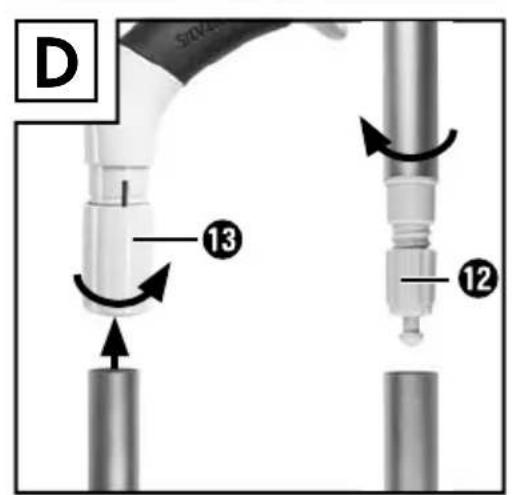
Figure D:
⑫ Screw catch
13 Catch
Technical data
Charger
Input: 100 - 240 V \~, 50/60 Hz, 0.3 A max.
Output: 5 = 500 mA
Type designation: SABD 3.6 Li A1-1
Protection class: II /
Input voltage/current: 5 V 500 mA
Battery working voltage: 3.7 V
Battery: High-capac Li-ion battery 1 x 3.7 V, 1800 mAh
Charging time with empty battery: 5 hrs.
Operating time with full battery charge (depending
on floor covering): approx. 50 min.
Protection class: III /
Safety guidelines

DANGER - ELECTRIC SHOCK!
▶ Never charge the appliance with a damaged power adapter! To avoid risks, replace a damaged power adapter immediately. To do this, contact Customer Services.
▶ To avoid risks, arrange to have damaged power cables and/or plugs replaced as soon as possible by a qualified specialist.
▶ Ensure that the power cable does not become wet or moist during use. Route the cable in such a way that it cannot be crushed or damaged.

WARNING! RISK OF INJURY!
▶ Operate the appliance only with the supplied accessories.
- Do not use the appliance to sweep exposed concrete, gravel or similar surfaces.
▶ Do not use the appliance to clean deep-pile carpets or wet floor coverings.
This appliance may be used by children aged 8 years and above and by persons with limited physical, sensory or mental capabilities or lack of experience and knowledge, provided that they are under supervision or have been told how to use the appliance safely and are aware of the potential risks.
▶ Children must not use the appliance as a plaything.
- Cleaning and user maintenance tasks may not be carried out by children unless they are supervised.
▶ Only use this appliance for its intended purpose as described in this operating instructions.
This product contains rechargeable batteries. Do not throw the batteries into a fire and do not subject them to high temperatures. There is a risk of explosion!
▶ Do not use the appliance as a toy.
▶ Never leave children unsupervised in the vicinity of the appliance!
ATTENTION! PROPERTY DAMAGE!
▶ Charge the appliance only with the supplied mains adapter/charger (type SABD 3.6 Li A1-1)!
▶ Only this cordless sweeper may be charged with the supplied battery charger; the charger is not suitable for other batteries.
▶ Never try to recharge non-rechargeable batteries.
Before initial use
■ Remove all packaging materials from the appliance. Including the plastic safety catch that secures the switch ④ from accidental activation during transportation.
Assembly of the cordless sweeper
■ Attach the handle ②:
- If necessary, turn the screw catch ⑫ a down a little so that you can insert them into the handle elements.
Push the 3 handle elements ② together and turn them so that the screw catches ⑫ open up and the handle elements are firmly connected. - Push the grip ① onto the shaft and turn the catch ⑬ so that the grip ⑪ is firmly seated.
- Push the assembled handle ② with the screw catch ⑫ into the holder ③ on the appliance.
■ Push the dirt container ⑧ back onto the appliance.
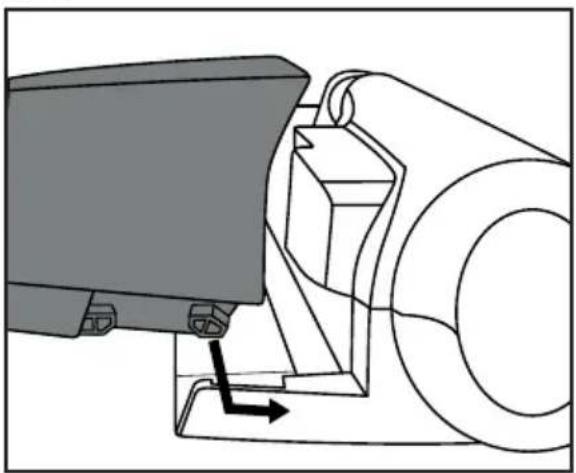
natural_image
Technical line drawing of a mechanical assembly with a monitor and gear (no text or symbols)- The two guide pins on the side of dirt container ⑧ must grip into the angled guide rails on the appliance.
- Push the dirt container ⑧ onto the appliance until the release knob ⑦ clicks into place.
Charging the battery
To ensure that the battery reaches its full performance potential, it is necessary to charge the battery for around 5 hours before the first use. Further charges will take up to 5 hours depending on the discharge level of the battery.
With a fully charged battery, the appliance provides an operating time of 50 minutes before recharging will be again required.
ATTENTION! MATERIAL DAMAGE!
▶ Use only the supplied charger.
▶ Operate the appliance only with the built-in battery.
▶ Never attempt to remove the battery to recharge it.
▶ Do not attempt to open the battery housing or dismantle the battery. This will destroy it.
1) To charge the battery, ensure that the cordless sweeper is switched off.
Switch it off using the switch ④ if required.
NOTE
Do not use the cordless sweeper when it is connected to the charger.
2) Open the dust cover that closes the charging socket ⑤.
3) Insert the plug of the battery charger into the charging socket ⑤ of the appliance and then attach the mains plug to a mains power outlet.
4) While the battery is charging, the charge indicator ⑥ lights up red. If this is not the case, check the connectors and whether the cordless sweeper is switched off.
5) Once the battery is fully charged, the charge indicator ⑥ lights up green. You can now use the appliance with full power again.
6) First unplug the charger from the mains power socket and then the charger plug from the charging socket ⑤ on the appliance.
7) Close the charging socket ⑤ with the dust cover.
Working with the cordless sweeper
WARNING! RISK OF INJURY!
Hold the end of the rotary brush ⑨, the rod and the appliance openings away from your face and body.
NOTE
Never use the appliance without the dirt container ⑧ attached. The dirt will simply be swirled up!
■ Press the switch ④ to switch the cordless sweeper on.
■ Move the cordless sweeper across the floor.
By pressing the switch ④ again, you will turn the appliance off.
You can leave the handle ② engaged in the vertical position during breaks.
NOTE
On some kinds of carpets, the cordless sweeper may clatter or jump. If this is the case, work slowly and in the opposite direction.
Cleaning and care
DANGER - ELECTRIC SHOCK!
Do not clean the appliance while charging it. Always disconnect the battery charger from the mains power socket before cleaning the appliance!
NEVER immerse the appliance in water or any other liquid!
WARNING! RISK OF INJURY!
Ensure that the appliance is not accidentally switched on without the dirt container ⑧ attached or while cleaning the rotary brush ⑨. Risk of injury!
ATTENTION! MATERIAL DAMAGE!
▶ Do not use abrasive or aggressive cleaning materials. These may damage the surfaces of your appliance.
Housing
■ Wipe off the housing of the appliance with a damp cloth. If required, use a mild detergent on the cloth.
■ Ensure that the appliance is completely dry before reconnecting it with the battery charger.
Dirt container
To ensure that the performance of the cordless sweeper does not deteriorate, empty the dirt container ⑧ after every use.
■ Press the release knob ⑦ of the dirt container ⑧ to detach it from the appliance.
Pull the dirt container ⑧ off the appliance while keeping the release knob ⑦ pressed.
■ Empty the dirt container ⑧ and push it back onto the appliance so that it sits firmly on the appliance and clicks into place on the release knob ⑦.
Rotary brush
If the rotary brush ⑨ stops turning because of a severe dirt accumulation or because threads have caught around it, proceed as follows:
Remove the rotary brush ⑨:
1) Turn the cordless sweeper around and hold it so that the flat side with the rotary brush ⑨ is facing you.
2) Push the small catch ⑩ back so that the cover can be removed at the side.
3) Remove the cover.
4) Pull the rotary brush ⑨ out of the appliance.
5) Remove any dirt (on both sides of the brush bristles) and clean the rotary brush ⑨. To do this, take a damp cloth and wipe the individual bristle bundles from the inside to the outside.
Replace the rotary brush ⑨.
1) Push one side of the rotary brush ⑨ onto the drive shaft ⑪.
2) Push the square end of the rotary brush ⑨ into the housing so that the rotary brush ⑨ sits straight in the housing again.
3) Replace the cover on the housing and push the catch 10 back so that the cover sits firmly in place.
Storage
ATTENTION! MATERIAL DAMAGE!
▶ Ensure that the appliance is switched off before putting it away. Otherwise the battery could be damaged by excessive discharging.
■ Store the cleaned appliance in a clean, dust-free and dry place.
Troubleshooting
The appliance will not start.
■ The battery is discharged. Recharge the appliance.
■ The appliance is defective. Contact Customer Service.
The rotary brush ⑨ generates loud noises when revolving.
■ The rotary brush ⑨ is soiled. Clean the rotary brush ⑨.
■ The rotary brush ⑨ is not inserted properly. Check whether the rotary brush ⑨ is correctly fitted and correct the fitting if required.
Warranty and service
You are provided a 3-year warranty on this appliance, valid from the date of purchase. This appliance has been manufactured with care and inspected meticulously prior to delivery. Please retain your receipt as proof of purchase. In the event of a warranty claim, please contact your Customer Service unit by telephone. This is the only way to guarantee free return of your goods.
The warranty only covers claims for material and manufacturing defects, not for damage sustained during carriage, components subject to wear and tear or damage to fragile components such as switches or batteries. This appliance is intended solely for private use and not for commercial purposes.
The warranty shall be deemed void in the case of misuse or improper handling, use of force and interventions which have not been carried out by one of our authorised Service centres.
Your statutory rights are not restricted by this warranty.
The warranty period is not prolonged by repairs effected under the warranty. This also applies to replaced and repaired components. Any damage and defects present at the time of purchase must be reported immediately after unpacking, but no later than two days after the date of purchase. Repairs effected after expiry of the warranty period shall be subject to charge.
GB Service Great Britain
Tel.: 0871 5000 720 (£ 0.10/Min.)
E-Mail: kompernass@lidl.co.uk
IAN 114179
MT Service Malta
Tel.: 80062230
E-Mail: kompernass@lidl.com.mt
IAN 114179
Hotline availability:
Monday to Friday 08:00 - 20:00 (CET)
Disposal
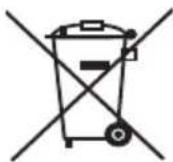
The appliance and the batteries must be disposed of separately.
Disposal of the appliance
Under no circumsto the appliance be disposed of in standard household waste. This product is subject to the provisions of European Directive 2012/19/EU.
Dispose of the appliance via an approved waste disposal company or your municipal waste disposal facility. Please observe applicable regulations. Please contact your waste disposal centre if you are in any doubt.
Disposal of batteries
Used batteries may not be dispo
of in the household waste. Consumers are required by law to dispose of batteries at a collection point provided by their local community or at a retail store.
The purpose of this obligation is to ensure that batteries are disposed of in an environmentally sound manner. Only dispose of batteries when they are fully discharged.
To dispose of the appliance in an environmentally friendly way, you must remove the battery from the appliance:

DANGER - ELECTRIC SHOCK!
▶ Disconnect the appliance from the mains power supply when you remove the battery!!
ATTENTION! MATERIAL DAMAGE!
▶ Remove the battery from the appliance only if you want to scrap/dispose of the appliance! The appliance is permanently defective after you have removed the battery!
1) Remove the dirt collector ⑧.
2) Turn the cordless sweeper around and hold it so that the flat side with the rotary brush ⑨ is facing you.
3) Remove the rotary brush ⑨ as described in Chapter "Cleaning and Care".
4) Use a flat object such as a screwdriver to lever out the two small external rollers. Unscrew the screws beneath.
5) Unscrew the 2 Phillips screws from the black plastic cover and then remove it.
6) Unscrew the remaining 3 Phillips screws from the plastic part beneath and then remove it. You can now see the drive belt.
7) Remove the drive belt at the side and pull the drive gear upwards out of the rail.
8) Unscrew the 4 Phillips screws on the motor block and remove the cover of the motor block.
9) Snip the cables to the battery and remove the battery for environmentally friendly disposal.
Disposal of packaging
GB MT
The packaging for this product is made from environmentally friendly material and can be disposed of at your local recycling plant.
Importer
KOMPERNASS HANDELS GMBH
BURGSTRASSE 21
44867 BOCHUM
GERMANY
www.kompernass.com
Inhaltsverzeichnis
Einleitung 26
natural_image
Technical line drawing of a mechanical assembly with a monitor and gear (no text or symbols)KOMPERNASS HANDELS GMBH
BURGSTRASSE 21
44867 BOCHUM
GERMANY
www.kompernass.com
KOMPERNASS HANDELS GMBH
BURGSTRASSE 21
44867 BOCHUM
DEUTSCHLAND / GERMANY
www.kompernass.com
- DE AT CH
- Indice
- Índice
- Contents
- Introduction
- Intended use
- Package contents
- Appliance description
- Technical data
- Charger
- Safety guidelines
- DANGER - ELECTRIC SHOCK!
- WARNING! RISK OF INJURY!
- ATTENTION! PROPERTY DAMAGE!
- Before initial use
- Assembly of the cordless sweeper
- Charging the battery
- ATTENTION! MATERIAL DAMAGE!
- NOTE
- Working with the cordless sweeper
- Cleaning and care
- Housing
- Dirt container
- Rotary brush
- Storage
- Troubleshooting
- Warranty and service
- GB Service Great Britain
- MT Service Malta
- Hotline availability:
- Disposal
- Disposal of the appliance
- Disposal of batteries
- Disposal of packaging
- Importer
- Inhaltsverzeichnis
Brand : SILVERCREST
Model : SABD 3.6 Li B1
Category : Broom